New and Changed Information
The following table provides an overview of the significant changes up to this current release. The table does not provide an exhaustive list of all changes or of the new features up to this release.
|
Cisco ACI CNI plug-in Release Version |
Feature |
|---|---|
|
5.2(3) |
Support for Calico 3.23.2 for Tigera operator on Cisco APIC. |
Overview
This document has details about the Cisco ACI integration with Calico 3.23.2 using the Tigera operator. The integration is based on the Autonomous System (AS) per cluster design for BGP peering. This document has details about how to provision the Cisco APIC, and install the Calico CNI. For more information, you can also see the Cisco Application Centric Infrastructure Calico Design White Paper.
Prerequisites
The required prerequisites are:
-
Minimum supported Kubernetes version is 1.21.
-
SSH access to the nodes in the Kubernetes cluster.
-
Minimum Cisco ACI version is 5.0, to support floating switch virtual interfaces (SVI).

Note
The recommended Cisco ACI version for the Calico integration is Release 5.2(x).
BGP Peering Topology
For the BGP design options, see the Calico over IP fabrics section in the Calico documentation.
In the context of this documentation, the AS per Cluster design has been chosen. Each Kubernetes node in a cluster will have the same AS number and will peer via eBGP with a pair of ACI Top-of-Rack (ToR) switches configured in a vPC pair. For more information about the design, see the AS Per Cluster design overview section in the Cisco Application Centric Infrastructure Calico Design White Paper document.
Configuring Cisco APIC External L3Out
You must manually pre-configure the APIC before running the acc-provision command.
Before you begin
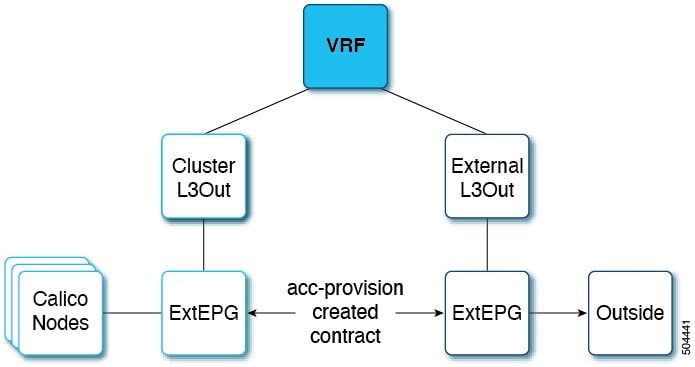
Configure the external L3Out which is used to provide connectivity outside of the ACI fabric to, for example, reach the corporate network or the internet. The Cluster L3Out is automatically created by acc-provision and is used to provide connectivity to the Kubernetes Nodes. This dual L3Out approach is the preferred approach as it allows to:
-
Decouple the cluster eBGP peering from external router peering
-
Support deploying multiple clusters in dedicated L3Outs without having to modify the external connectivity L3Out
-
Support a shared L3Out design where different VRFs are used for the kubernetes clusters and the External L3Out
The figure below shows the external L3Out and the cluster L3Out.
Procedure
| Step 1 |
Create a tenant, VRF, AEP and Layer 3 domain using the standard procedures. |
| Step 2 |
Create an external L3Out. It should have the VRF and L3 domain mapped, and have an external EPG attached to it. The procedure for creating an external L3Out is provided here:
|
Configuring Cisco APIC and Generating Calico Manifests
Use this procedure to configure the Cisco APIC and generate manifests to install the Calico CNI.
Procedure
| Step 1 |
Install the acc-provision deb package. Verify the installation by running the acc-provision –version command. |
||
| Step 2 |
Create an input yaml file. Sample input file is described below: |
||
| Step 3 |
Run the acc-provision -f calico-3.23.2 -c input.yaml -z output.tar.gz -a -u admin -p password command. Example:
|
Verifying ACI Provisioning
Before starting the Kubernetes cluster installation, follow the procedures indicated below to verify that the ACI fabric is configured correctly to support networking for the cluster. The tasks listed below are optional, but recommended.
-
Verifying Cisco APIC Configuration
-
Verifying the Node Network
Verifying Cisco APIC Configuration
Use this procedure to verify the provisioning of the Cisco APIC.
Procedure
| Step 1 |
Log in to the Cisco APIC GUI. On the menu bar, choose Tenant > Networking> L3Outs > Logical Node Profiles. Confirm that the configured nodes section has all the anchor nodes provided in the input file. |
| Step 2 |
Go to Logical Node Profiles > Logical Interface Profile. On the right hand side, select Floating SVI and verify whether all the anchor nodes are added along with the VLAN and MTU from the input file. Select the anchor node and verify that the secondary IP is correct. Under Path Attributes, ensure the Domain and Floating IP are correct. |
| Step 3 |
Go to the configured interface profile and select a BGP Peer. The remote AS should be the remote_as_number from the input file and the Local-AS Number should be the aci_as_number from the input file. |
Verifying the Node Network
Use this procedure to verify that the node network and the external network are working properly.
Procedure
| Step 1 |
Check the node to external connectivity. Verify that you have external connectivity from every node. Use: returns 200. |
||
| Step 2 |
Check the node-to-node connectivity. From every node, check that you can ping all other nodes. |
||
| Step 3 |
Use the BIRD docker image to deploy a BGP speaker inside a docker container. This will ensure successful BGP peering. To run this docker image, you need to write a |
||
| Step 4 |
Use the $ docker run --rm --net=host --uts=host --cap-add=NET_ADMIN --cap-add=NET_BROADCAST --cap-add=NET_RAW -v /path/to/config:/etc/bird:ro
ibhde/bird4 command to deploy a BGP speaker inside the docker container using the
|
||
| Step 5 |
Run |
||
| Step 6 |
Run |
||
| Step 7 |
Use the show protocols all command. The displayed output should show the BGP established status for all the peers. |
Applying Generated Manifests
This section describes how to apply the generated manifests by running the acc-provision command. The generated tar file has 3 separate files. Unpack the tar file by running the tar -xvzf tar_file command, and run the commans in the following order:
-
tigera_operator.yaml: This file consists of all the CRDs; run the kubectl apply -f tigera_operator.yaml command. -
custom_resources_aci_calico.yaml: This file has all the custom resources; run the kubectl apply -f custom_resources_aci_calico.yaml command. -
custom_resources_calicoctl.yaml: This file contains all the calicoctl custom resources; run the calicoctl apply -f custom_resources_calicoctl.yaml command.
Verifying the Calico CNI Installation
Use this procedure to verify if the calico CNI is up and running, and if the BGP neighborship is established.
Procedure
| Step 1 |
Use the Kubectl get pods -A command to check if the tigera-operator pod is running in the tigera-operator namespace. |
| Step 2 |
Use the Kubectl get pods -A command to check if the pods in the calico-apiserver and calico-system namespaces are running. |
| Step 3 |
Verify that the core DNS pods transition from pending to running status. |
| Step 4 |
Use the ip route command on the node to verify the route configuration. You should see a pod subnet on a remote node that is advertised with that node address as the next hop. An example of this route configuration is shown below. The highlighted is the route added as a result of the configuration. You should be able to see one such route for each node that is part of the cluster. |
Troubleshooting
Use this procedure for troubleshooting common issues.
Procedure
| Step 1 |
Use the ping command to check node-to-node connectivity inside the cluster, and node-to-external connectivity. |
| Step 2 |
Ensure there are no faults on cluster L3Out. In Cisco APIC GUI, navigate to Tenants > Tenant_name > Networking > L3Out, and check the faults for cluster L3Out on the right-hand corner. If there are any faults, the affected object and a description of the fault are displayed. |
| Step 3 |
Check if the external L3Out is functional on the APIC. Ensure the following:
|
| Step 4 |
Check the routes for all pod subnets on each node. If a route is missing for a particular node, check whether calico-node pod is up for that node. If the calico-node pod is crashing, check the logs of the pod and fix them by following the upstream instructions and/or restart the node. For upstream troubleshooting, see the Calico Tiger.io Troubleshooting documentation. |
| Step 5 |
Check if the BGP neighborship is successful. To verify this, enter the calico-node pod and activate the bird client. See example, below: |
| Step 6 |
Check if the BGP neighborship is successful on APIC. In the Cisco APIC GUI, navigate to L3Out > Logical Node Profiles > Configured Nodes. Under each configured node, a BGP for VRF section is available, and under that, are the neighbors. Ensure all the node IPs are present. |
| Step 7 |
Check for proxy issue. If the Calico apiserver pods are crashing, or the describing apiservice shows Context deadline exceeded (Client.Timeout exceeded while awaiting headers), it is a proxy issue. To resolve this, add |
Cisco APIC and Cluster Cleanup
To unprovision Cisco APIC and uninstall the CNI, run the acc-provision -f calico-3.23.2 -c input.yaml -z output.tar.gz -d -u admin -p password command.
Example:
acc-provision -f calico-3.23.2 -c calico_input.yaml -z calico_output.tar.gz -d -u admin -p pw1To clean up the cluster by deleting the CNI and its resources, use the following commands:
-
kubectl delete installation default
-
kubectl delete –f tigera_operator.yaml
-
kubectl delete -f custom_resources_aci_calico.yaml
Restart the coredns pods after running the above commands.
 Feedback