Solution Overview
This guide serves as a validated reference for a Cisco Prime Infrastructure customer to migrate to Catalyst Center. This guide provides an end-to-end requirement checklist, readiness assessment, migration tool details, and postmigration day-n operations guidance.
The audience for this guide includes the technical staff responsible for migrating the enterprise network from Cisco Prime Infrastructure to Catalyst Center.
 Note |
If you are viewing this guide on cisco.com, click any of its figures to view a full-sized version. |
Migrate from Cisco Prime Infrastructure to Catalyst Center
Cisco Prime Infrastructure has served as a vital management platform for customers, enabling them to oversee their campus networks effectively. However, the advantages presented by Catalyst Center and its approach of orchestrating campuses and branches with intent, security and assurance, and third-party device integration surpass the capabilities of Cisco Prime Infrastructure.
Cisco has created a solution called the Prime Data Migration Tool (PDMT) to streamline the process of migrating sites, devices, maps, configuration, CLI templates, Cisco ISE, and Cisco Connected Mobile Experiences (CMX) from Cisco Prime Infrastructure to Catalyst Center. The PDMT enables seamless coexistence between Cisco Prime Infrastructure and Catalyst Center, granting the flexibility to transition gradually to Catalyst Center.
This guide focuses on coexistence model between Cisco Prime Infrastructure and Catalyst Center. In the coexistence model, network devices are managed by both Cisco Prime Infrastructure and Catalyst Center. Cisco Prime infrastructure is used for device automation, and Catalyst Center is used primarily for assurance and other nonintent-based automation. Wireless controller automation is done from Cisco Prime Infrastructure, which is a temporary solution until Catalyst Center brownfield learning of wireless controllers is available.
The following sections describe the end-to-end flow to complete the Cisco Prime Infrastructure to Catalyst Center migration.
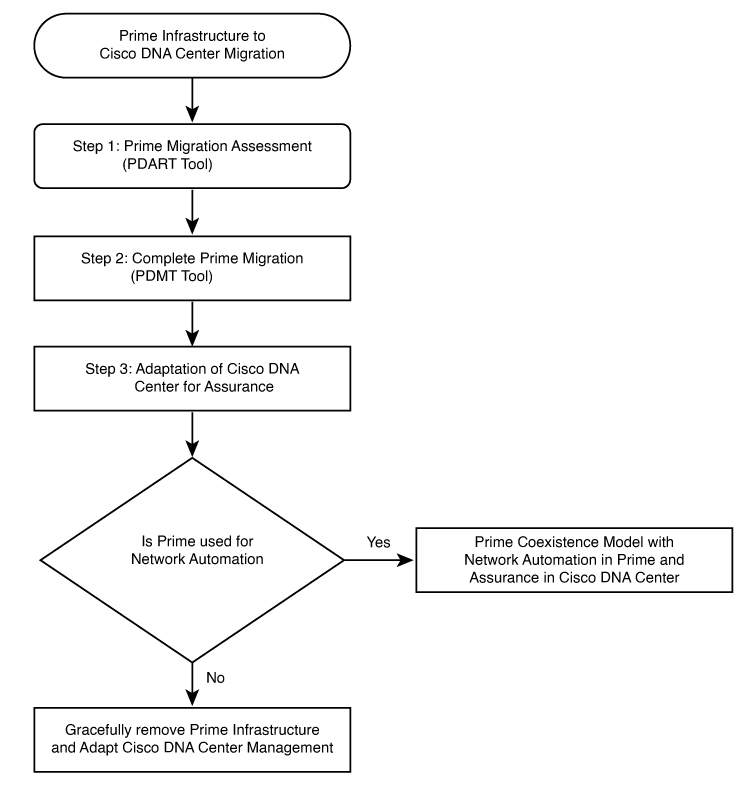
Procedure
|
Step 1 |
Assess Cisco Prime Infrastructure deployment usage and Catalyst Center capability. The Cisco Prime Infrastructure Catalyst Center Assessment & Readiness Tool (PDART) analyzes Cisco Prime Infrastructure and provides details such as:
|
|
Step 2 |
Prepare for data migration. Follow recommendations from the Cisco PDART report. If required, upgrade Cisco Prime Infrastructure to the latest version, optimize network hierarchy, onboard Catalyst Center appliance, and so on. |
|
Step 3 |
Initiate and complete data migration. Use the data migration tool (coexistence tool) within Cisco Prime Infrastructure to port your network easily and securely Catalyst Center. |
|
Step 4 |
Adopt Catalyst Center. Catalyst Center offers superior automation, greater visibility, artificial intelligence (AI)-driven analytics to help keep the network healthy and reduce operation expenditures. Catalyst Center is a powerful management system that leverages AI to connect, secure, and automate network operations. Catalyst Center simplifies the management of the Cisco Catalyst network infrastructure, ensuring a consistent user experience across wired and wireless networks. It delivers enterprise-scale, secure, seamless, and reliable connectivity among users and applications. |
Comparison of Cisco Prime Infrastructure and Catalyst Center Use Cases
The following table shows the use case summary comparison of Cisco Prime Infrastructure and Catalyst Center.
| Feature | Cisco Prime Infrastructure | Catalyst Center | ||
|---|---|---|---|---|
|
Cisco Prime Infrastructure monitoring of alarms and incidents; Cisco Catalyst Assurance for monitoring and troubleshooting |
Supported |
Supported |
||
|
Device 360, Client 360, App 360 |
Supported |
Supported |
||
|
Maps |
Supported |
Supported |
||
|
User CLI Templates |
Supported |
Supported
|
||
|
Compliance |
Supported |
Supported |
||
|
Reports |
Supported |
Supported |
||
|
SWIM |
Supported |
Supported |
||
|
Cisco Prime Lightweight Access Points/Catalyst Center AP Configuration workflow |
Supported |
Supported |
||
|
Rogue AP |
Supported |
Supported |
||
|
aWIPS |
Supported |
Supported |
||
|
Configuration Archive |
Supported |
Supported |
||
|
Cisco ISE and CMX integration |
Supported |
Supported |
||
|
Configure HA |
Supported |
Supported |
||
|
Configure Mobility Tunnel |
Supported |
Supported |
||
|
Intelligent Capture |
Not Supported |
Supported |
||
|
Machine Reasoning Engine |
Not Supported |
Supported |
||
|
Cisco AI Endpoint Analytics |
Not Supported |
Supported |
||
|
Cisco AI Network Analytics |
Not Supported |
Supported |
||
|
AP refresh for Assurance use case |
Supported |
Supported |
Hardware and Software Specifications
The solution is validated with the hardware and software listed in this table.
| Role | Model Name | Hardware Platform | Software Version | |
|---|---|---|---|---|
|
Catalyst Center |
DN2-HW-APL |
Second-generation Catalyst Center appliance |
Catalyst Center 2.3.7.7 |
Cisco Catalyst Center 2.3.7.9 |
|
Identity Management, RADIUS Server |
ISE-VM-K9 |
Cisco Identity Services Engine virtual appliance |
Cisco Identity Services Engine 3.3 Patch 4 |
Cisco Identity Services Engine 3.3 Patch 4 |
|
Cisco Prime Infrastructure |
Prime Infrastructure |
Cisco Prime Infrastructure virtual appliance |
3.10.5 |
Cisco Identity Services Engine 3.3 Patch 4 |
|
PDMT |
Prime Data Migration Tool |
Cisco Prime Infrastructure virtual appliance |
PI 3.10.5 Prime Data Migration Tool Update 6 |
PI 3.10.5 Prime Data Migration Tool Update 6 |
|
Cisco collapsed core node |
C9500-32C C9500-24Q |
Cisco Catalyst 9500 Series Switches |
17.9.5, 17.12.4 |
17.9.6a, 17.12.5, 17.15.3 |
|
Cisco access node |
C9300-48P C9300-24P C9407R C9200-48P 3850-48U |
Cisco Catalyst 9300/3850 Series Switches |
17.9.6, 17.12.4 |
17.9.6a, 17.12.5, 17.15.3 |
|
Cisco Wireless Controller |
C9800-40-K9 C9800-L-K9 |
Cisco Catalyst 9800 Wireless Controller |
17.9.6, 17.12.4 |
17.9.6, 17.12.5 |
|
Cisco AireOS Wireless Controller |
AIR-CT5520-K9 |
Cisco 5520 Wireless Controller |
AireOS 8.10.190.0 |
AireOS 8.10.190.0 |
|
Cisco access points |
9120-AXI 9130-AXI 2800 3800 |
Cisco Catalyst/Cisco Aironet access points |
17.9.6, 17.12.4 |
17.9.6, 17.12.5 |
|
Cisco Connected Mobile Experiences (CMX) |
— |
— |
10.6.3 |
10.6.3 |
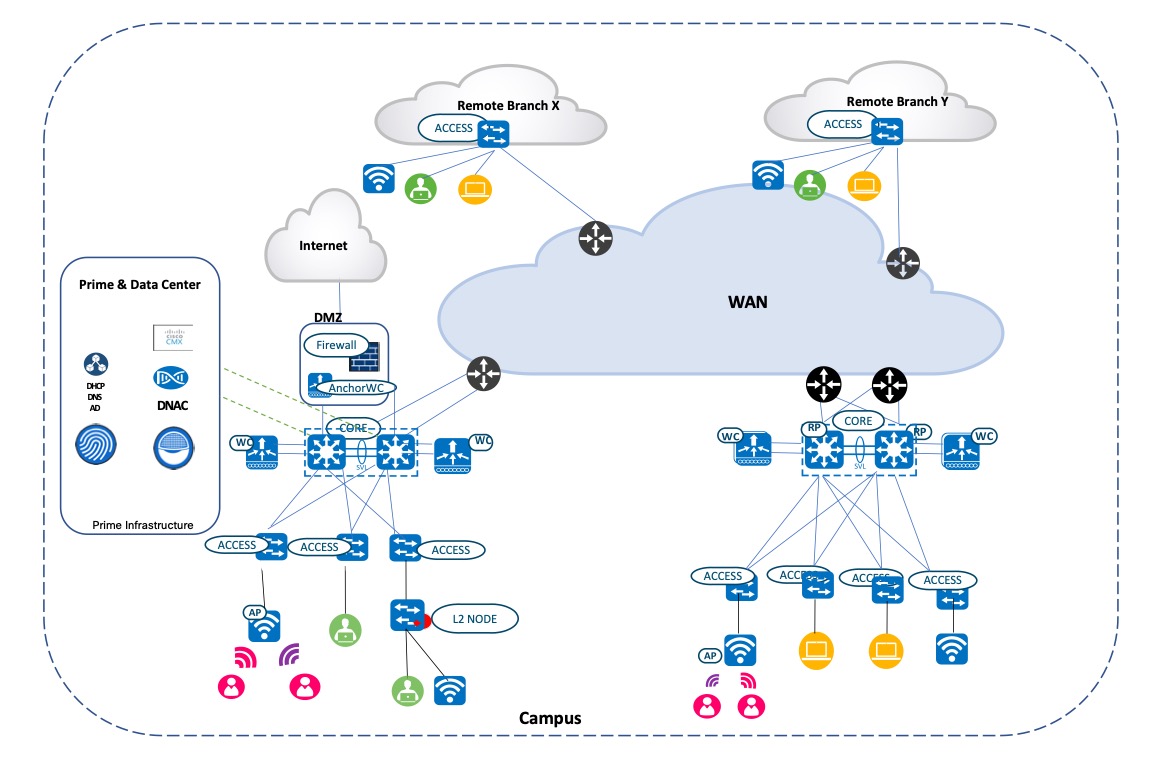
Solution Topology
The following figure shows the solution topology.
Solution Use Cases
The following table lists the solution use cases.
| Category | Functions | Use Case |
|---|---|---|
|
PDART |
Migration Tool |
Install, run, verify use case, scale, reports, device compatibility |
|
PDMT |
Migration Tool |
Install, verify location group, maps, inventory, device credential, CLI template, CMX and Cisco ISE are migrated to Catalyst Center |
|
Assurance |
Assurance |
Device 360 |
|
Client 360 |
||
|
App 360 |
||
|
Network services like AAA, DHCP |
||
|
Cisco AI Endpoint Analytics |
||
|
Cisco AI Network Analytics |
||
|
Maps |
Floor map view with APs overlaid |
|
|
Heatmap wireless coverage |
||
|
Interferers using maps |
||
|
MRE |
MRE for wired network events |
|
|
MRE for wireless client like AAA events |
||
|
Rogue and aWIPS |
Threat detection and mitigation on WLAN |
|
|
Template |
User CLI template |
User CLI template for configuration push |
|
Compliance |
Compliance |
Compliance startup versus running configuration for any configuration change |
|
Reports |
Reports |
AP summary and AP utilization Client session and count Client traffic and traffic stream metrics Radio performance and AP RF quality Inventory Wireless uptime |
|
SWIM |
SWIM |
Image upgrade or downgrade of network switch, wireless controller |
|
AP Configuration Workflow |
AP workflow |
Perform AP workflow to configure AP name, radio parameter change, schedule radio task, and so on |
|
Cisco ISE and CMX Migration |
Cisco ISE migration |
Configure and integrate with Cisco ISE and CMX |
|
CMX migration |
||
|
Wireless Controller HA and Mobility |
Wireless Controller HA and mobility |
Configure C9800 HA and mobility from Catalyst Center automation |
|
Intelligent Capture |
ICAP |
Perform AP, client capture for AP and client troubleshooting |
|
Configuration Archive |
Configuration Archive |
View, schedule network device archive configuration |
|
Remove the Device from Cisco Prime |
Cisco Prime Infrastructure migration |
Remove the device from Cisco Prime Infrastructure after migration |
|
AP refresh for Assurance use case |
AP refresh |
Replace unprovisioned older AP models with newer AP models |
Scale Matrix
Solution testing has verified the scale numbers that are listed in the following table. To view the scale numbers for the Catalyst Center appliance, see the Cisco Catalyst Center Data Sheet.
| Category | Value |
|---|---|
|
Device inventory |
2000 |
|
Number of sites with maps |
2000 |
|
Catalyst Center appliances |
1 |
|
Number of buildings and floors |
400 buildings and 5 floors |
|
Number of wireless controllers |
8 |
|
Number of APs in inventory |
10,000 |
|
Number of endpoints |
24,000 wireless + 1000 wired |
|
Number of SSIDs |
10 |
|
Number of user CLI templates |
500 |
Solution Keynotes
Cisco Prime Infrastructure Catalyst Center Assessment and Readiness Tool
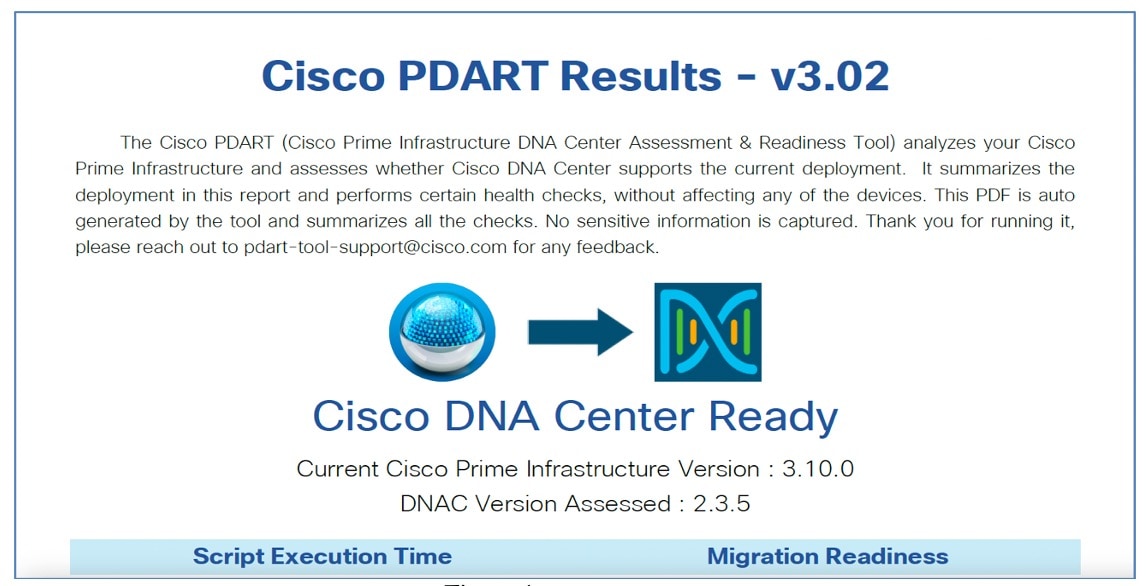
The Cisco PDART analyzes a Cisco Prime Infrastructure deployment and assesses whether Catalyst Center supports the current deployment.
For more information on Cisco PDART, see Use PDART.
-
Copy the Cisco PDART file to Cisco Prime Infrastructure:
(base) USER-M-32NQ:Downloads USER$ scp pdart_3_10_4 root@209.165.201.0:/ root@209.165.201.0's password: pdart_3_10_4 100% 14MB 945.3KB/s 00:15 (base) USER-M-32NQ:Downloads USER$ -
Change the file to an executable:
[root@USER-prime /]# chmod 755 pdart_3_10_4 -
Run the following command:
[root@USER-prime /]# ./pdart_3_10_4


              ####################################################
###                                              ###
###       Welcome to Cisco PDART                 ###
###             version: 3.02                    ###
###                                              ###
####################################################
###

##
##  Script Start Time: 2023-07-07_02:47:04
##


##
##  Script End Time: 2023-07-07_02:51:30
##


******
Cisco PDART Tool has successfully completed.
After you run the PDART in CLI, the outputs-PDF report, run logs, and a JSON file are found at:
PDART tarfile - /localdisk/defaultRepo/pdart.d/PDART_2023-07-07_02-47-04.tar.gz
[root@USER-prime /]#
-
To go through the PDF report, copy it to a file server or to the desktop:
[root@USER-prime ~]# scp /localdisk/defaultRepo/pdart.d/PDART_2023-07-07_02-47-04.tar.gz admin@209.165.201.0.247:/home/admin/
admin@209.165.201.0.247's password:
PDART_2023-07-07_02-47-04.tar.gz                                                                                                                                            100%  704KB  11.0MB/s   00:00
[root@USER-prime ~]#
Before initiating any migration, we recommend that you carefully evaluate the migration readiness and supported devices, use cases, and reports. A careful evaluation will help ensure that you have a holistic view of supported and unsupported features before migrating.
The following figure shows the Cisco PDART-generated PDF report.
Cisco Prime Data Migration Tool
Use either the Cisco Prime Data Migration Tool (PDMT) or a coexistence tool within Cisco Prime Infrastructure to port your network from Cisco Prime Infrastructure to Catalyst Center easily and securely. When using the PDMT, data is sent from Cisco Prime Infrastructure to Catalyst Center, but not from Catalyst Center to Cisco Prime Infrastructure. This means that the network hierarchy, maps, and devices remain unchanged in Cisco Prime Infrastructure, even if changes are made within Catalyst Center.
You can migrate devices, location groups, associated site maps, user-defined CLI templates, and CMX data from Cisco Prime Infrastructure to Catalyst Center and manage your enterprise network over a centralized dashboard.
For more information on the PDMT, see Cisco Prime Infrastructure to Cisco Catalyst Center Prime Data Migration Guide.
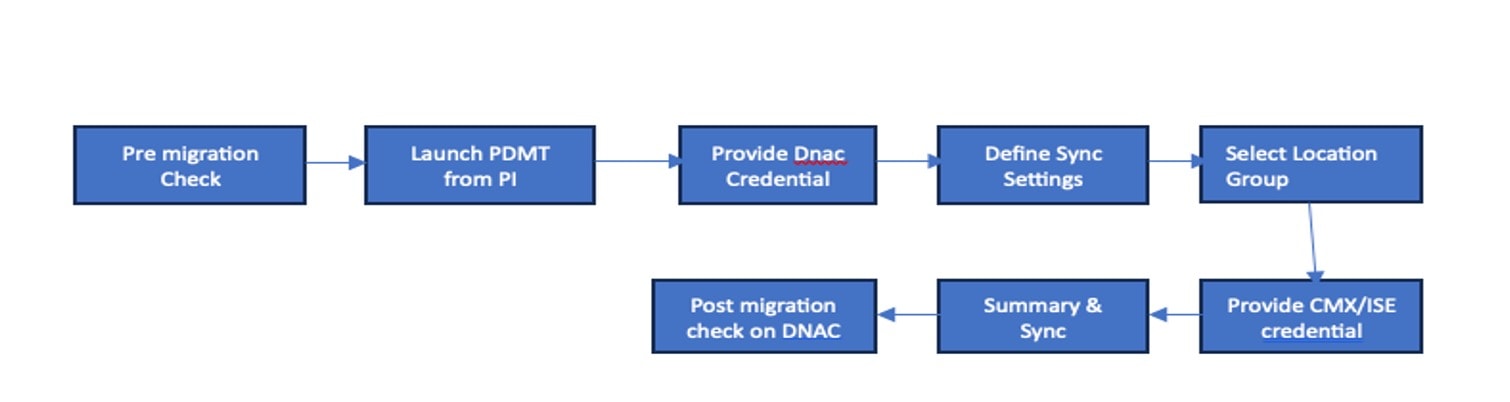
Install the PDMT
Install the PDMT from Cisco Prime Infrastructure's Software Update window.
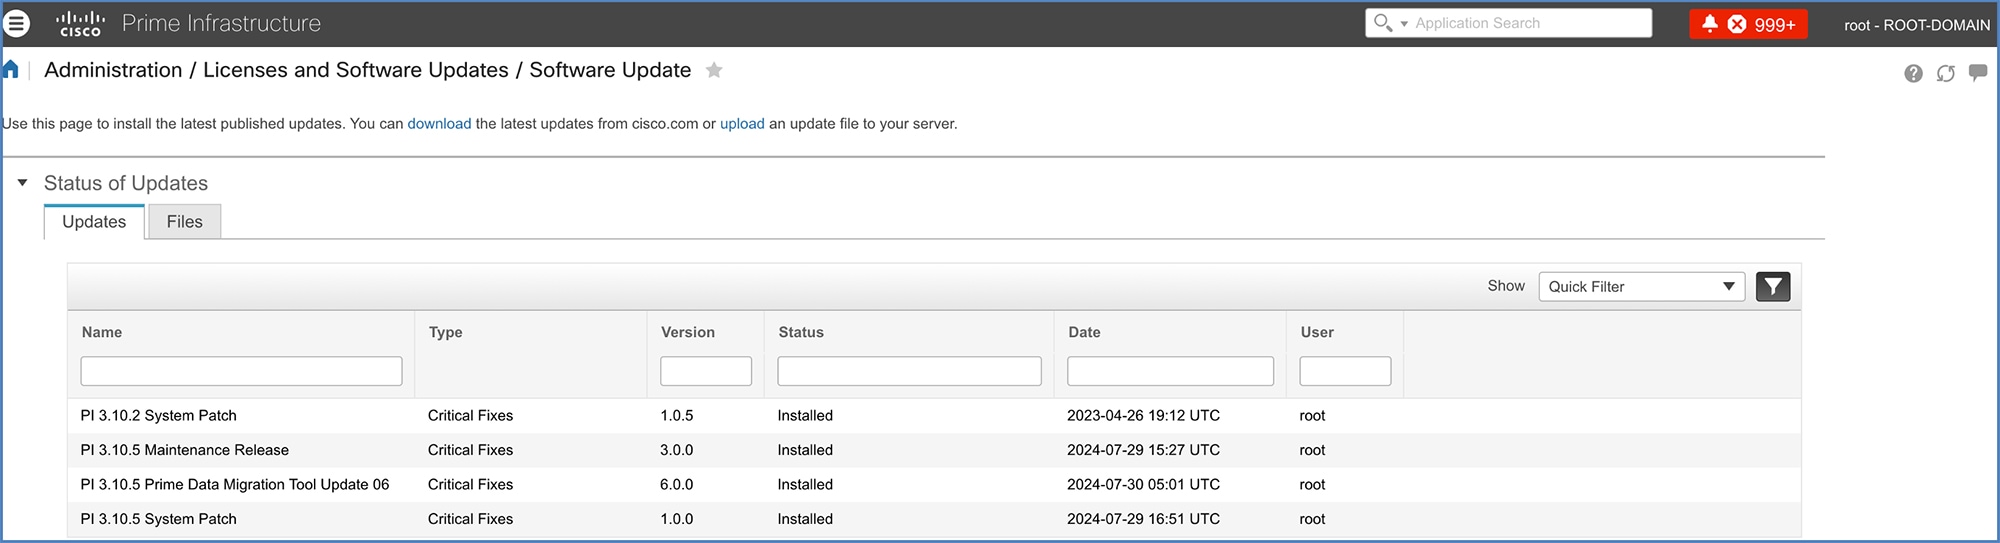
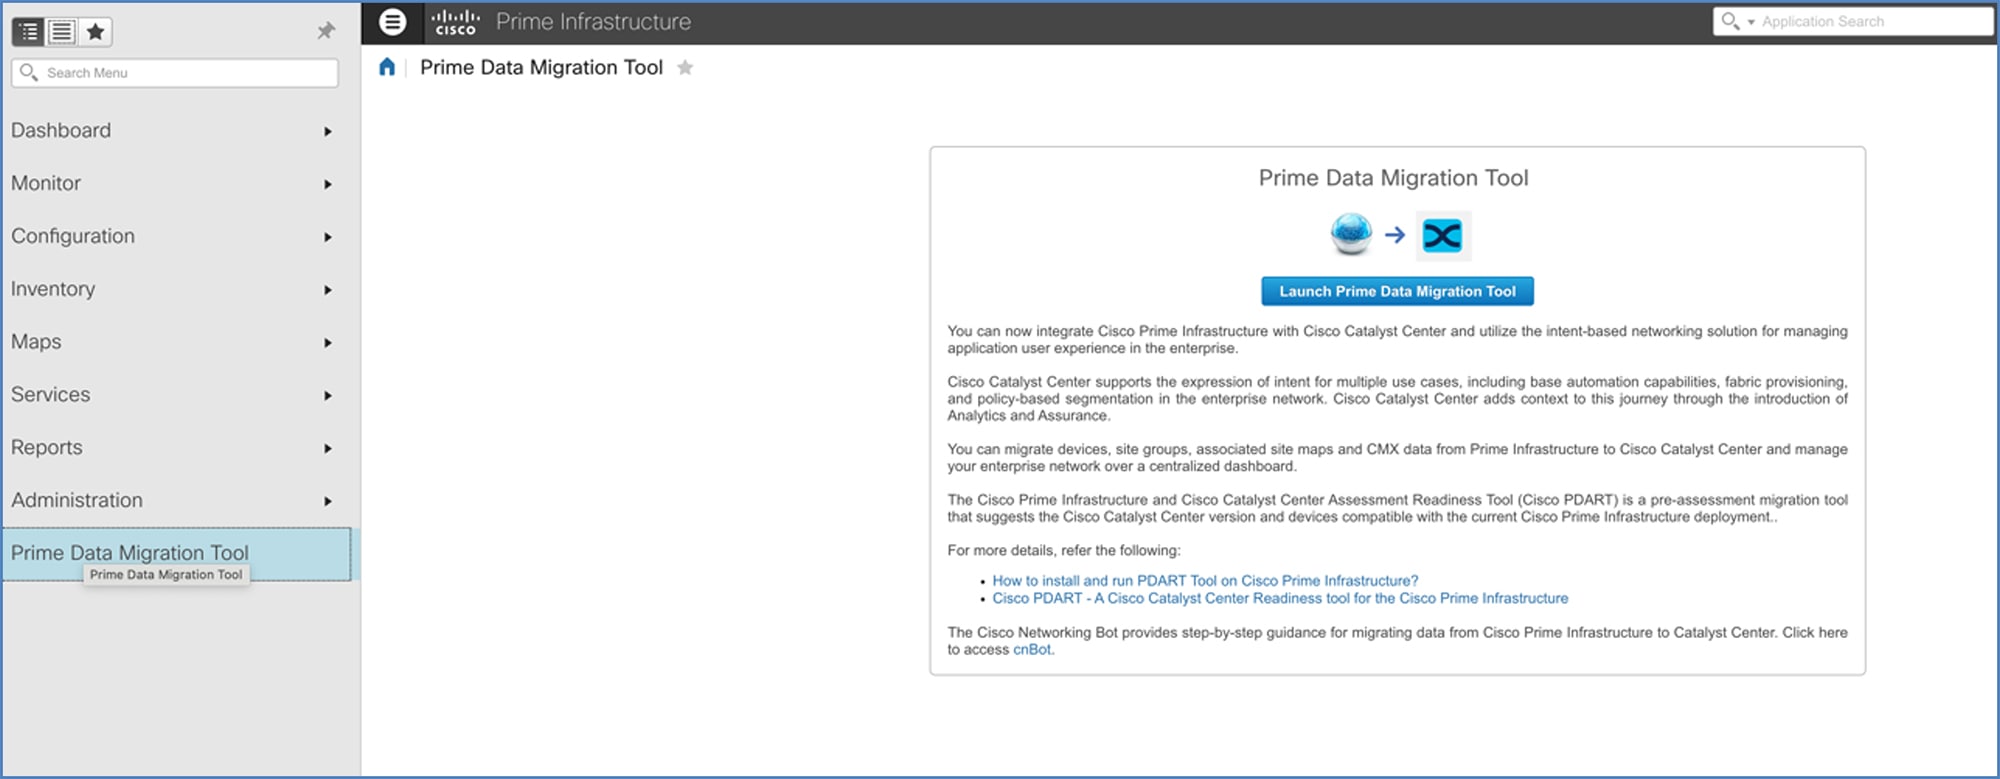
The following figure shows PDMT's launch point.
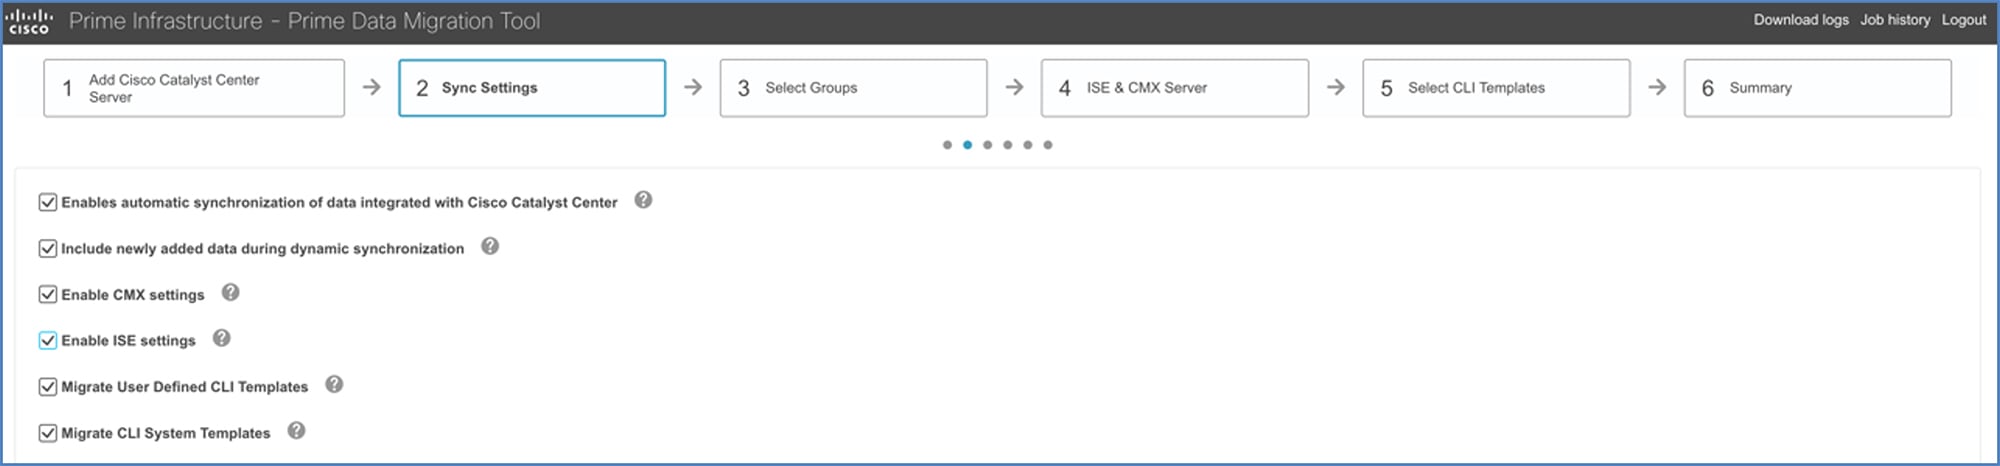
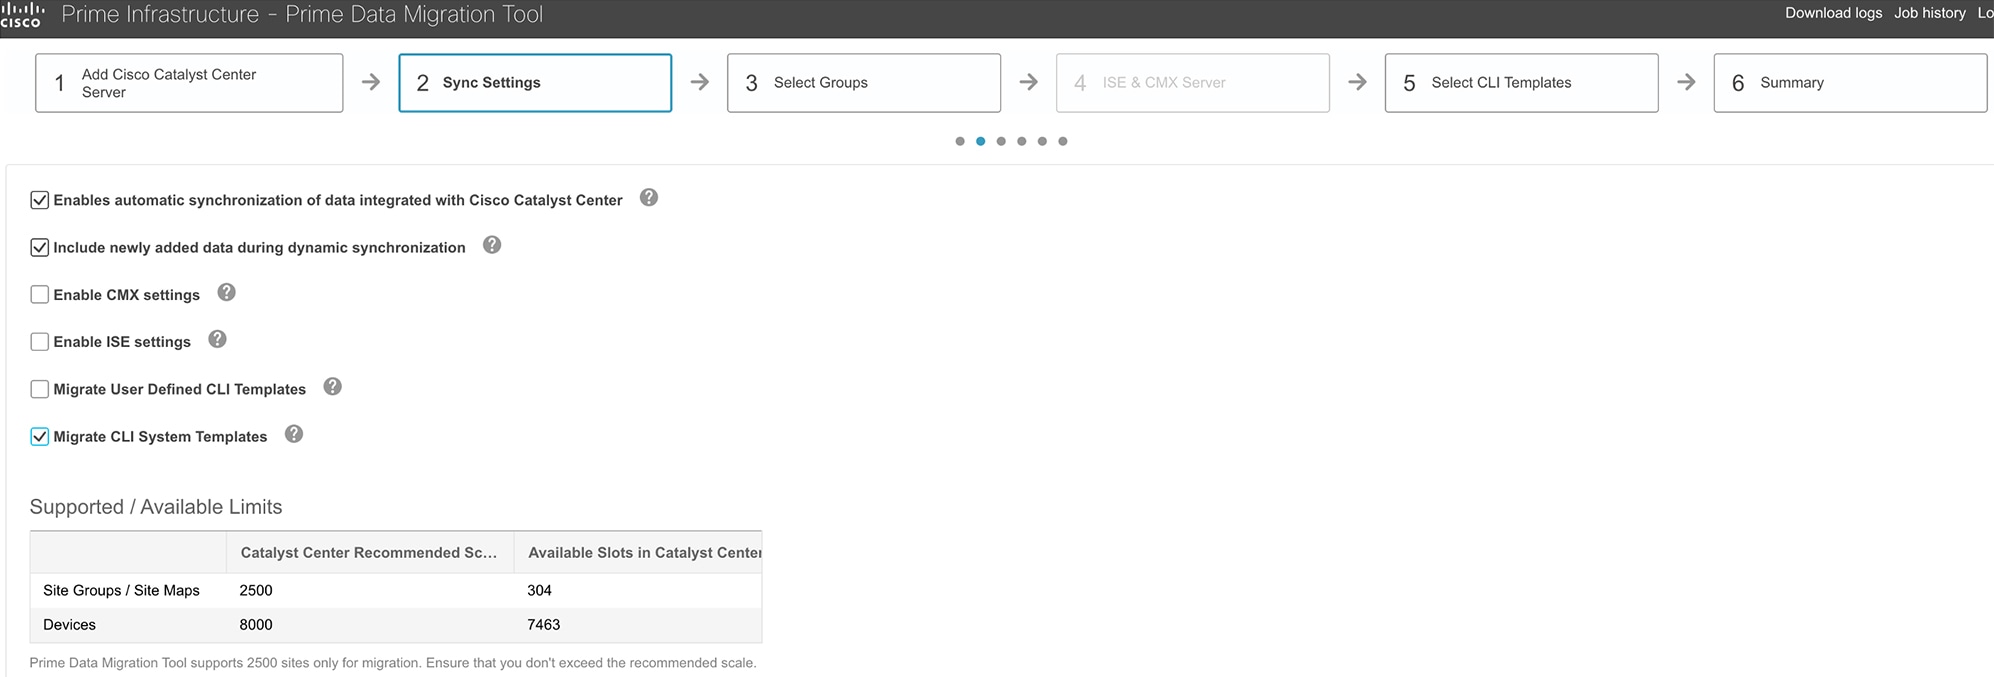
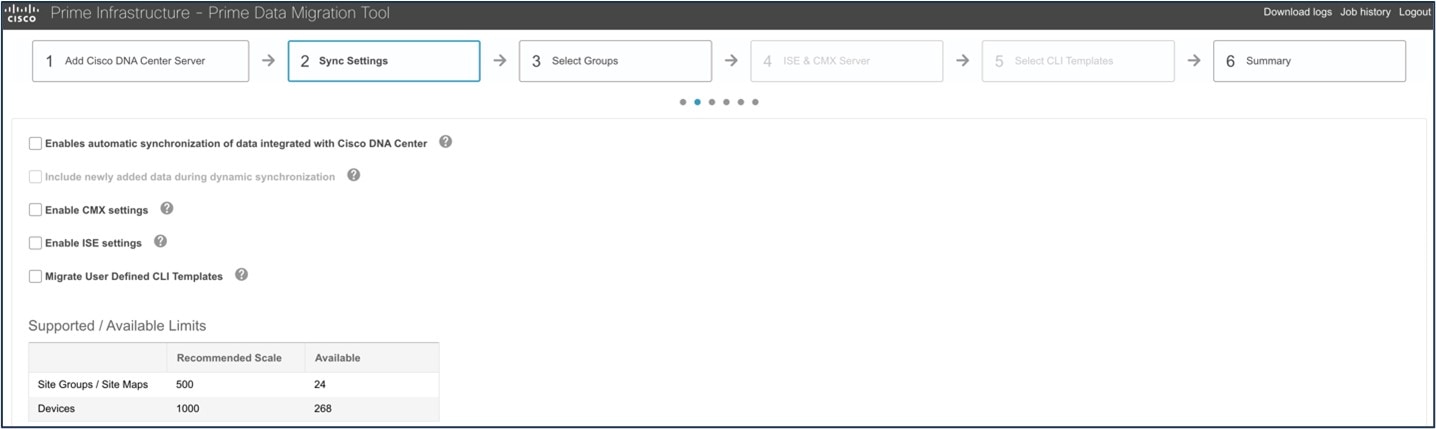
And this figure displays PDMT's Sync Settings window.
Key Points
Keep the following points in mind when migrating data from Cisco Prime Infrastructure to Catalyst Center:
-
Check the Enables automatic synchronization of data integrated with the Cisco Catalyst Center check box to synchronize the already migrated data set for the groups and devices from Cisco Prime Infrastructure to Catalyst Center automatically after modification.
-
Check the Include newly added data during dynamic synchronization check box to move the newly created groups and the newly added devices during dynamic synchronization, if any, from Cisco Prime Infrastructure to Catalyst Center automatically after addition.
Dynamic synchronization does not support the add, update, or delete operations for the already migrated data and won’t synchronize the data automatically for the following components:
-
Maps
-
CLI templates
-
Cisco ISE server
-
-
Check the Enable CMX settings check box to push the CMX with floor groups. If the Enable CMX settings check box is not checked, CMX data will not be pushed to the Catalyst Center server.
Note |
|
Cisco Catalyst Assurance
Cisco Catalyst Assurance uses unique network graph technology developed by Cisco. This technology draws from a combination of data sources, such as NetFlow, Application Visibility and Control (AVC), DDI (DNS, DHCP, and IP address management), Cisco ISE, RADIUS information, topology data, CMX, and other device metrics to construct a real-time and historical capture of interrelationships among users, devices, applications, and network services across time and location.
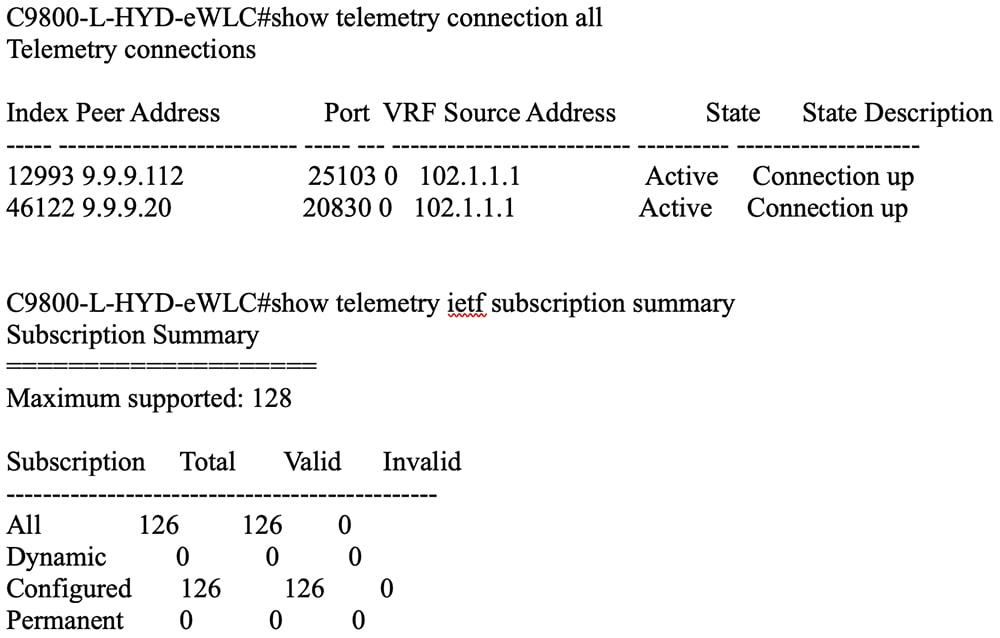
Cisco Catalyst 9800 wireless controllers are managed by Cisco Prime Infrastructure for read/write and configuration push using Cisco Prime Infrastructure templates and monitoring. Catalyst Center is used for assurance purposes only. Currently, wireless controllers are monitored by both Cisco Prime Infrastructure and Catalyst Center in a coexistence model. The subscription channels established for C9800 wireless controllers to publish streaming telemetry data have peer addresses to both Cisco Prime Infrastructure and Catalyst Center.
NETCONF discovery in Catalyst Center inventory is mandatory for wired switches (access, core, and so on) for the telemetry subscription to be pushed to wired switches.
To enable wired telemetry, you must:
-
Postmigration: Discover the device with NETCONF, and edit the device with NETCONF port 830.
-
Repush/force telemetry pushes after NETCONF discovery.
Note |
After migration, for Assurance to work correctly, ensure that:
|
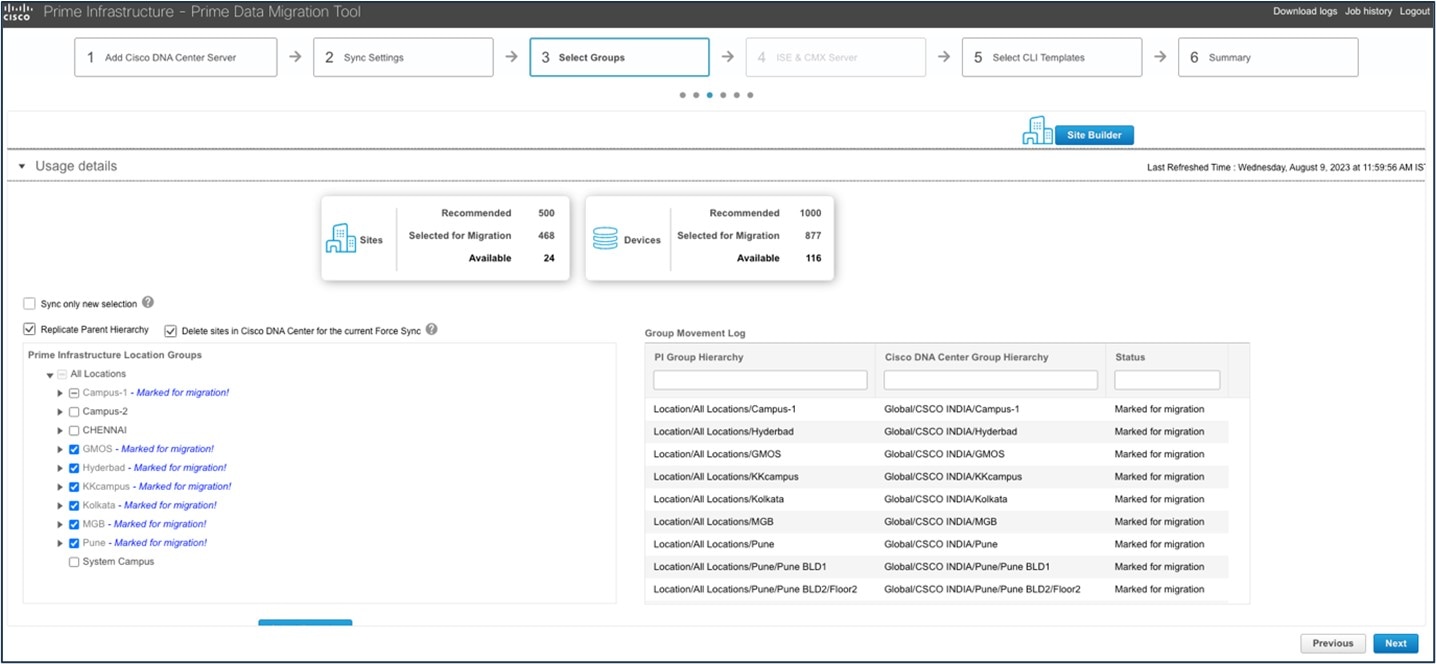
Before migration to Catalyst Center:
After migration to Catalyst Center, 116 total subscriptions are migrated:
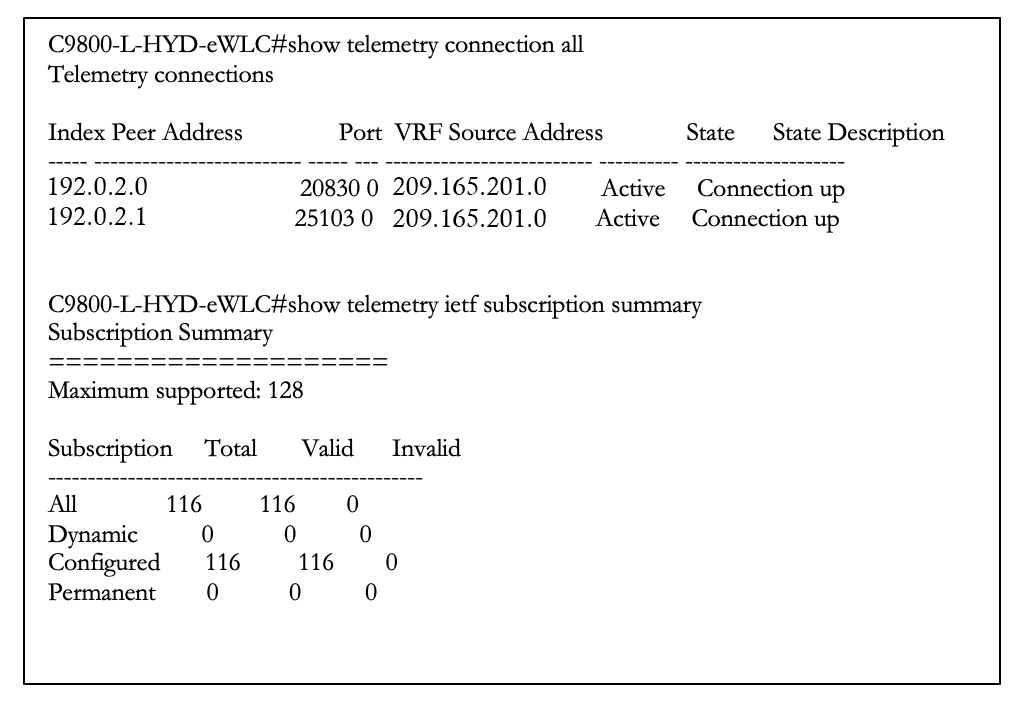
After migration to Catalyst Center 2.3.7.7, the total subscription count is 126.
The following table compares the assurance use cases of Cisco Prime Infrastructure and Catalyst Center.
| Feature | Cisco Prime Infrastructure | Catalyst Center |
|---|---|---|
|
Health Dashboard |
Supported |
Supported |
|
Historical Troubleshooting |
Supported |
Supported |
|
Alarms and Events |
Supported |
Supported (Issue and Events) |
|
Device 360 |
Supported |
Supported |
|
Client 360 |
Supported |
Supported |
|
Network Services |
Not Supported |
Supported (AAA, DHCP, and DNS) |
|
Application Visibility |
Not Supported |
Supported |
|
Maps |
Supported |
Supported |
|
Rogue and aWIPS |
Supported |
Supported |
|
MRE |
Not Supported |
Supported |
|
Reports |
Supported |
Supported |
|
CMX Integration |
Supported |
Supported |
|
Intelligent Capture |
Not Supported |
Supported |
Cisco Catalyst Assurance offers the following benefits:
-
Automatically detects and prioritizes issues.
-
Provides instant guided remediation for quick resolution.
-
Offers increased performance and shortens the time spent on troubleshooting issues.
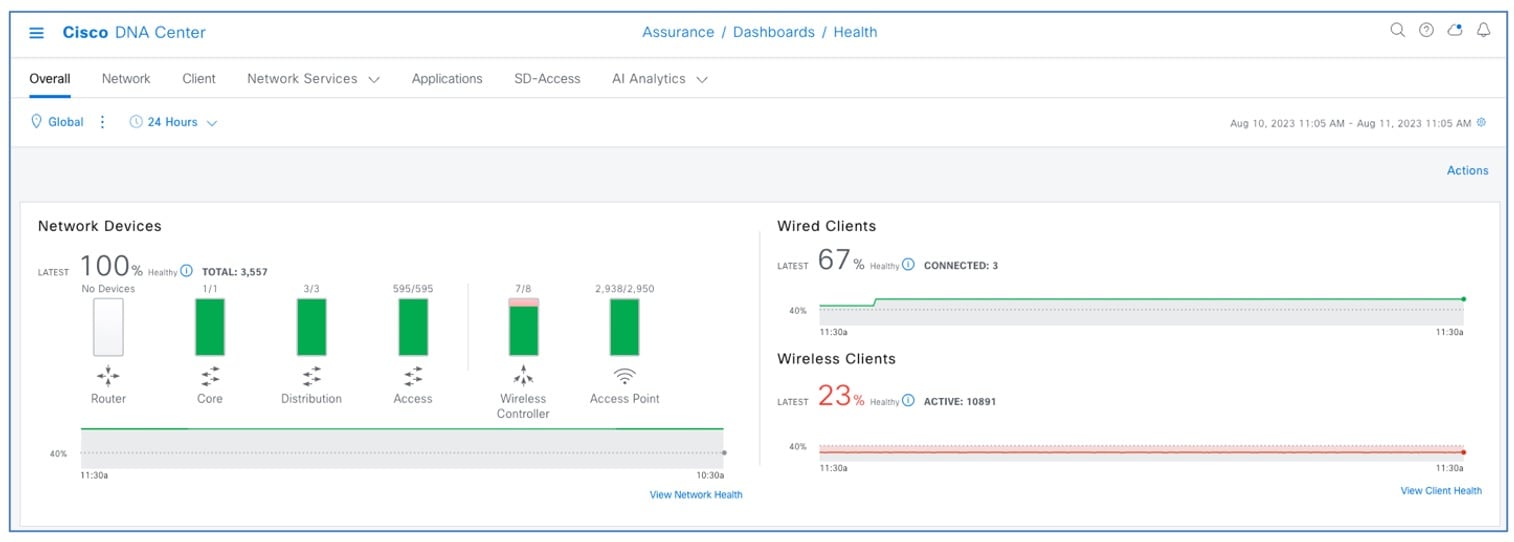
Assurance Health Dashboards in Catalyst Center
Assurance dashboards give a high-level overview of the health of every network device and wired or wireless client in the network. Assurance dashboards provide the top 10 global issues and allow administrators to expand views by:
-
geographical site
-
device list
-
client list
-
topology
Any poorly connected devices or communication issues are highlighted, with suggested remediation. You can customize how the health score is computed.
To view the Assurance health dashboard, choose .
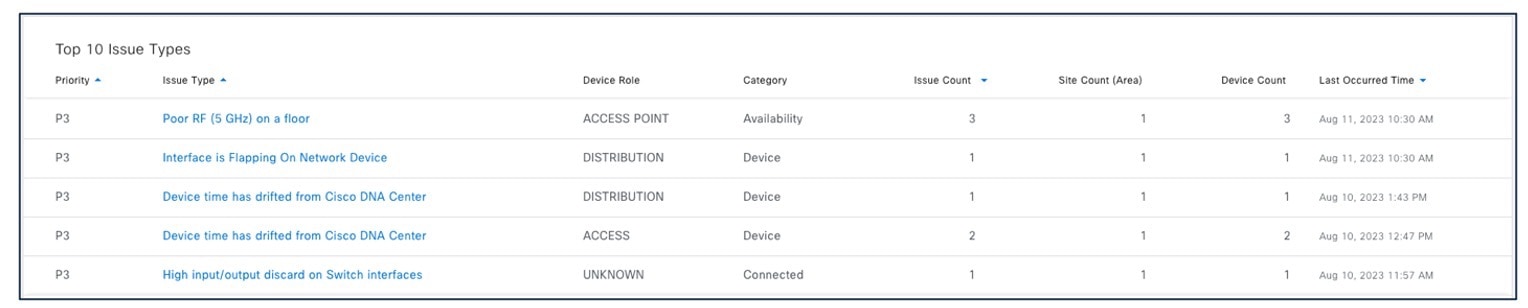
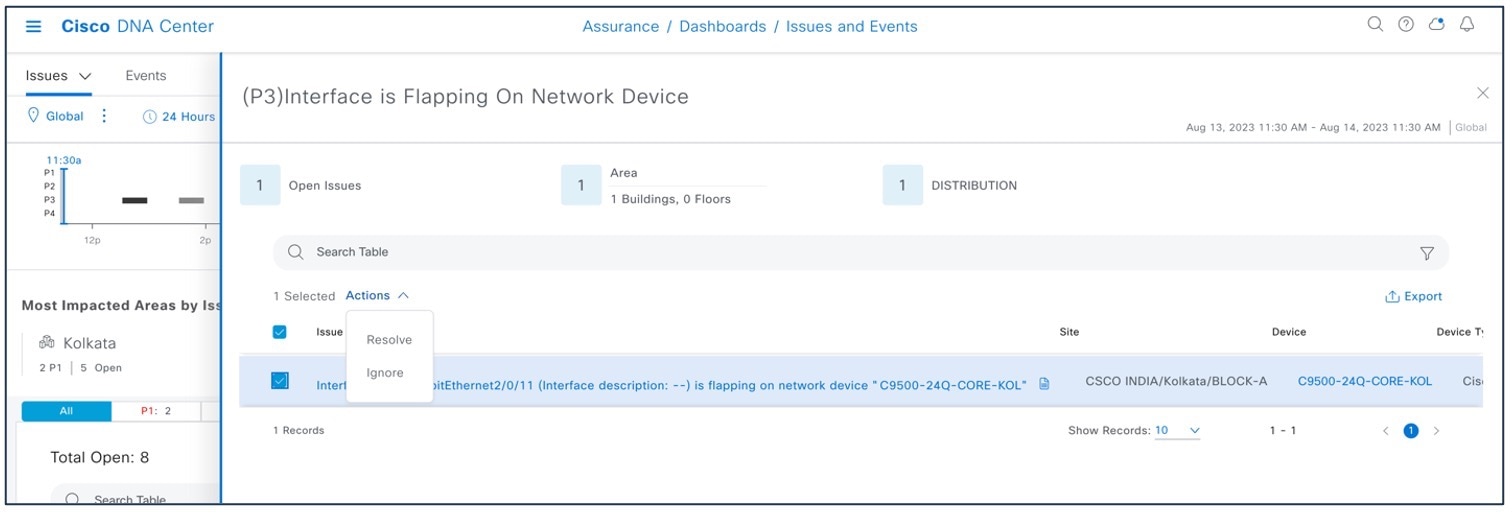
To view the Catalyst Center Top 10 Global issues, choose .
To change the status of issues in Catalyst Center, choose .
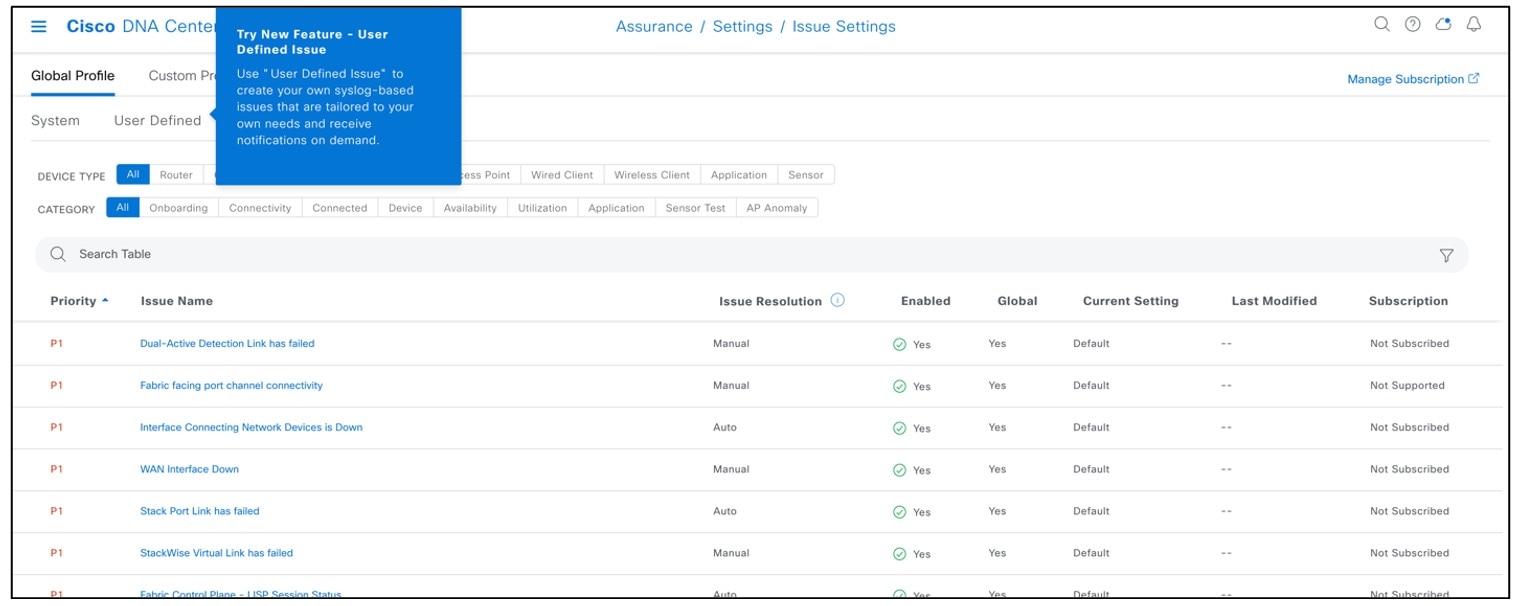
To create user-defined issues based on syslog, choose .
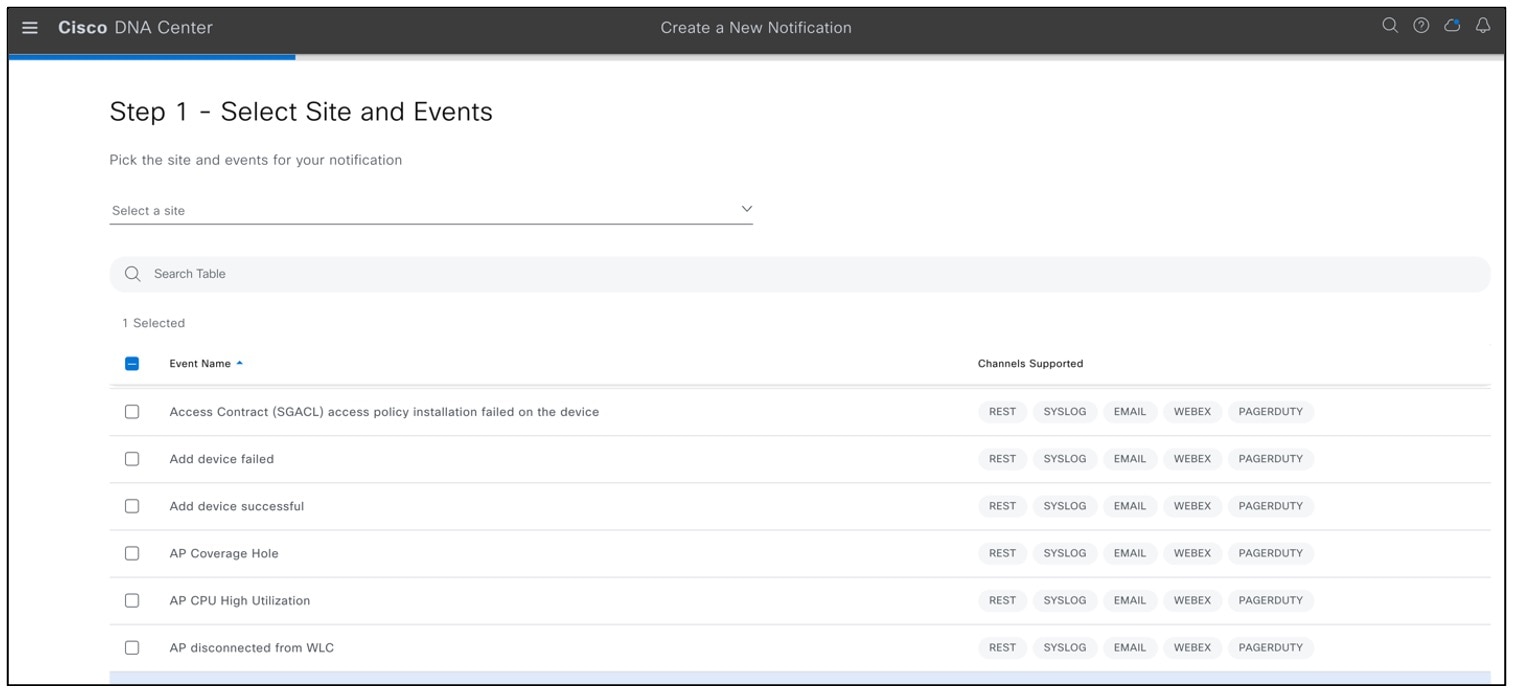
Catalyst Center event notification allows you to associate multiple channels inside one notification that delivers the details of selected events that occur at multiple points.
To view the event notification channels, choose .
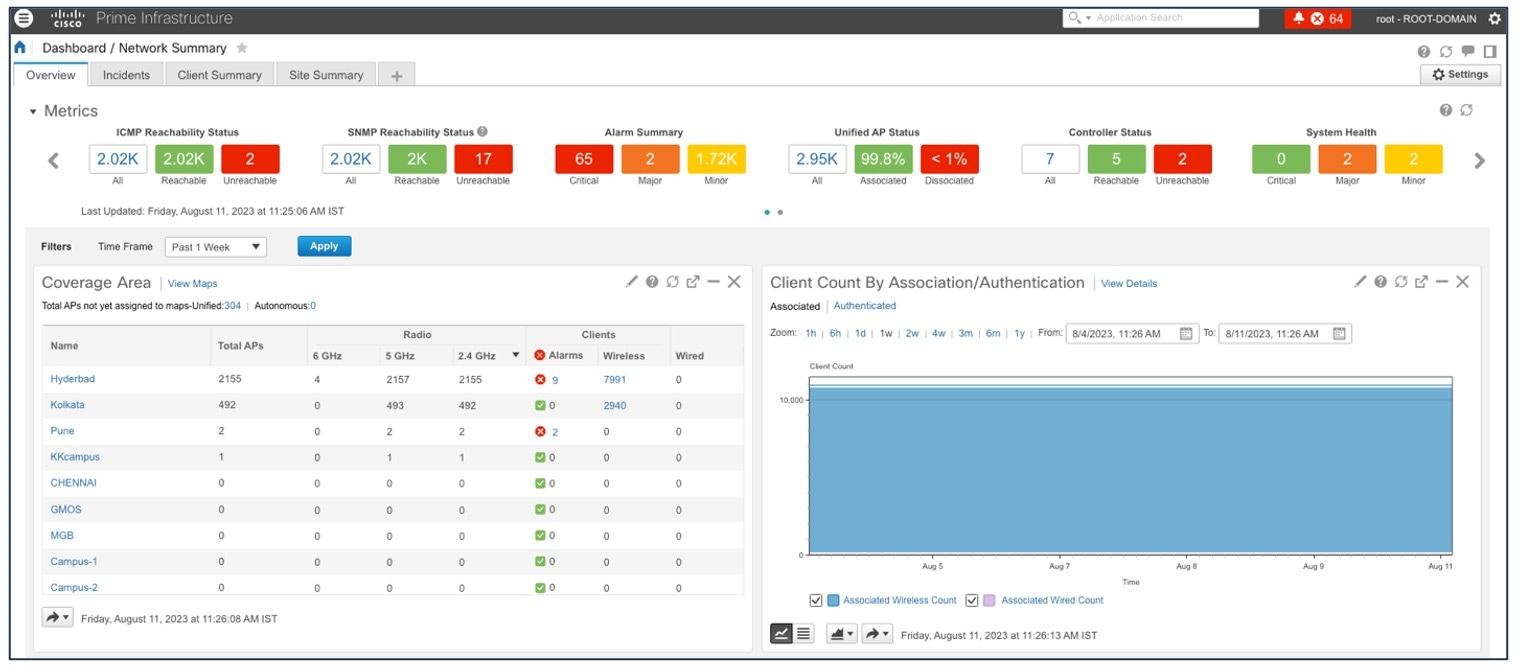
To view the Cisco Prime Infrastructure Health Dashboard, choose .
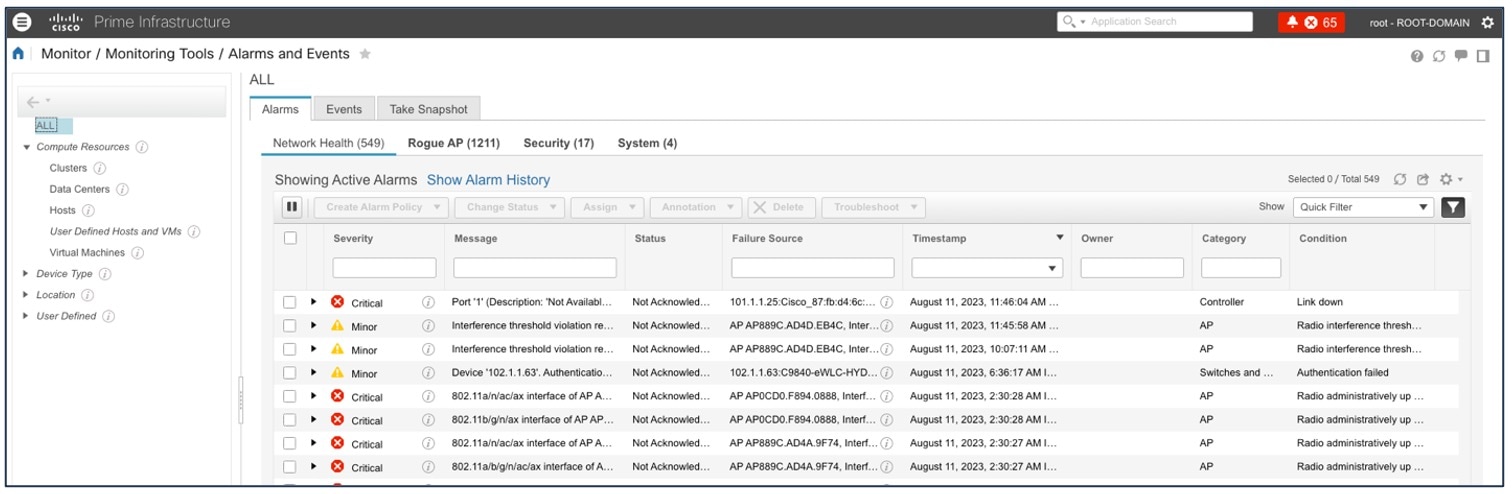
To view the Cisco Prime Infrastructure Alarms & Events, choose .
Historical Troubleshooting
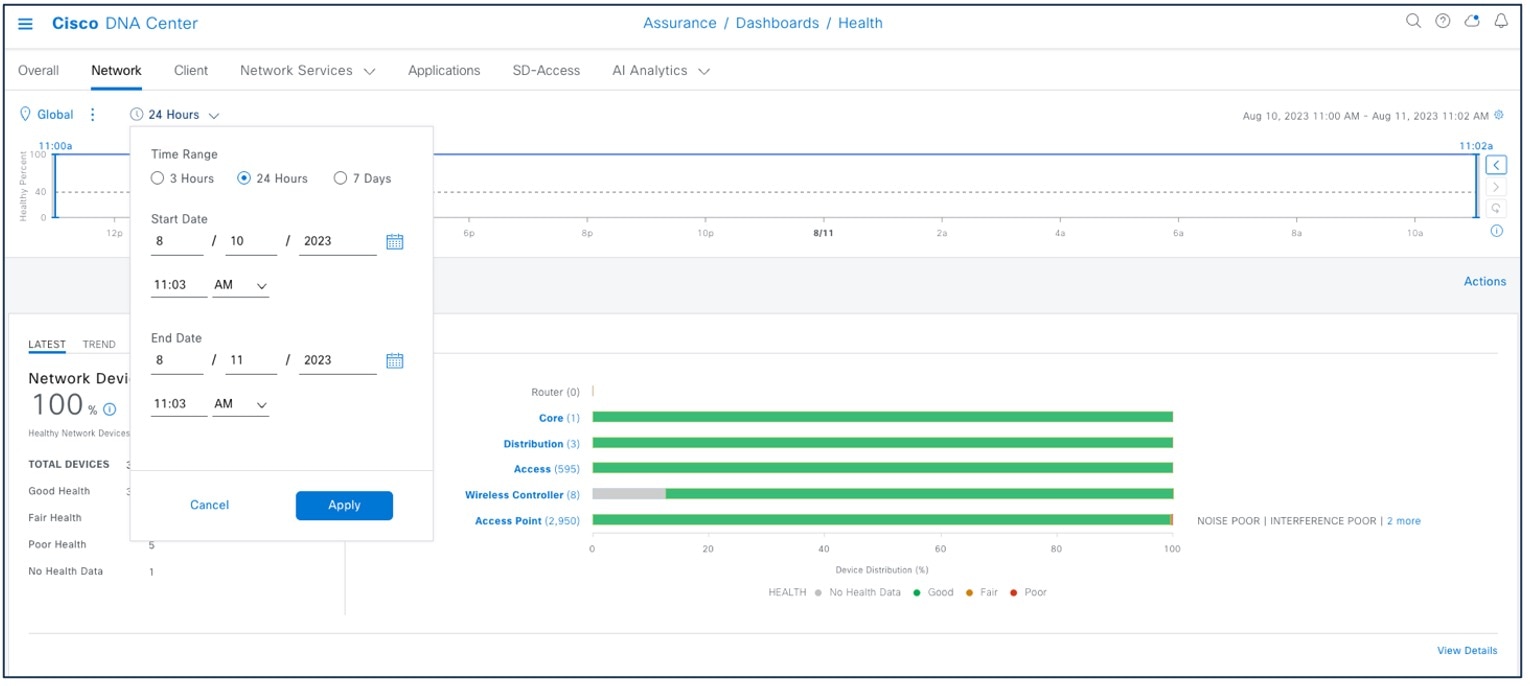
Time-based filters are used to zoom in to a specific period of low health score to understand the cause of the reduced health. Information on the network health page is divided into the device roles, such as core, access, distribution, router, or wireless. Time ranges of 3 hours, 24 hours, and 7 days are supported to get an idea of the current and past health of the network.
For time-based filters, choose .
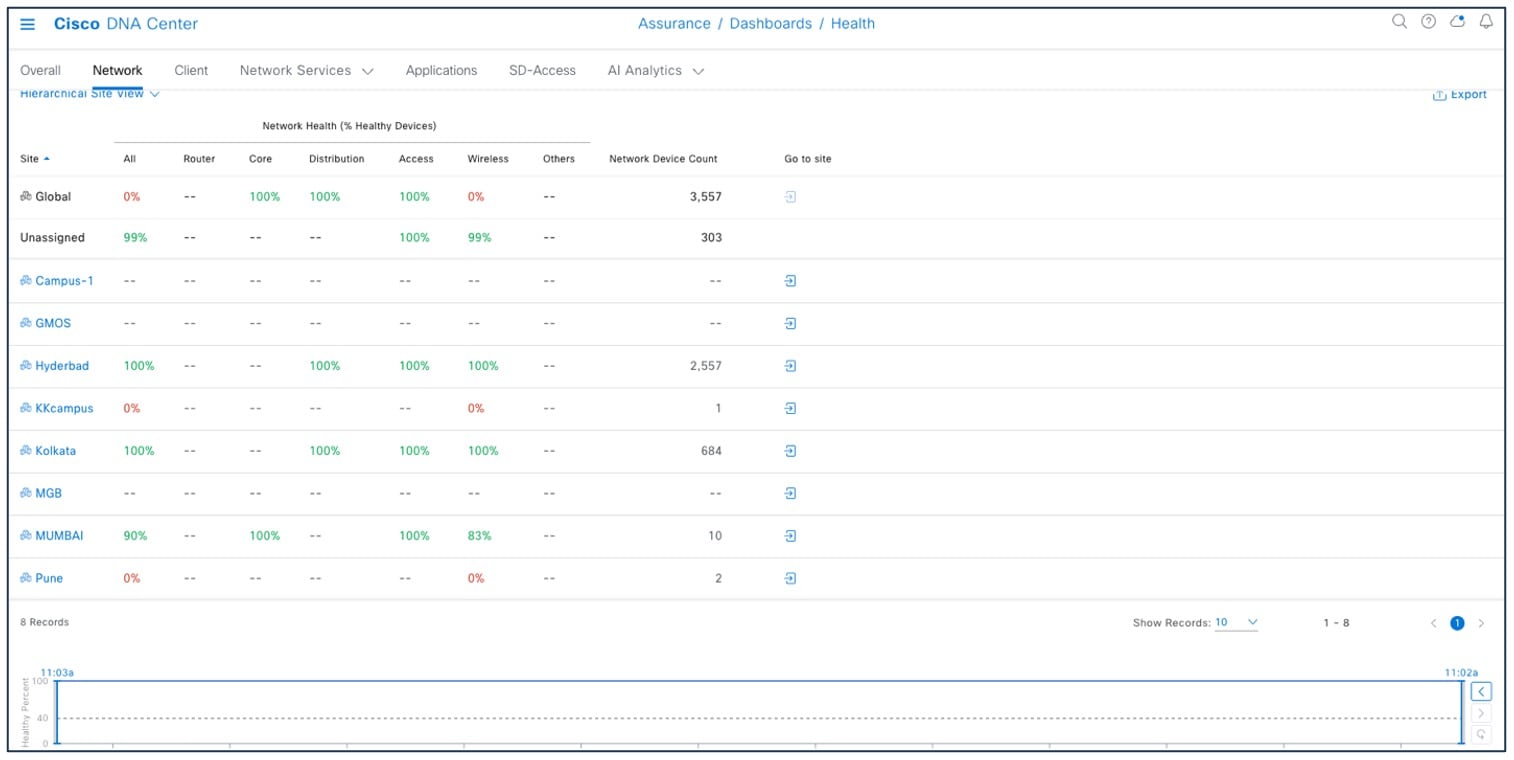
This window shows the site-specific health scores for network devices and clients and provides an indication of the health of devices by their role (access, core, distribution) with healthy percent.
To view the site-specific health scores, choose .
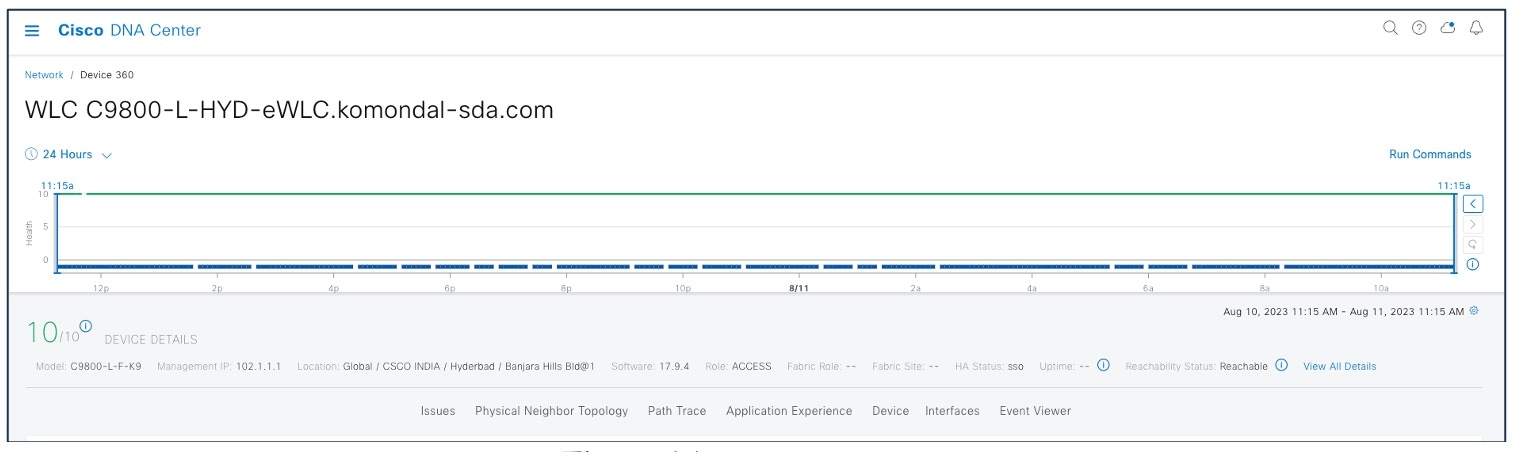
Device 360
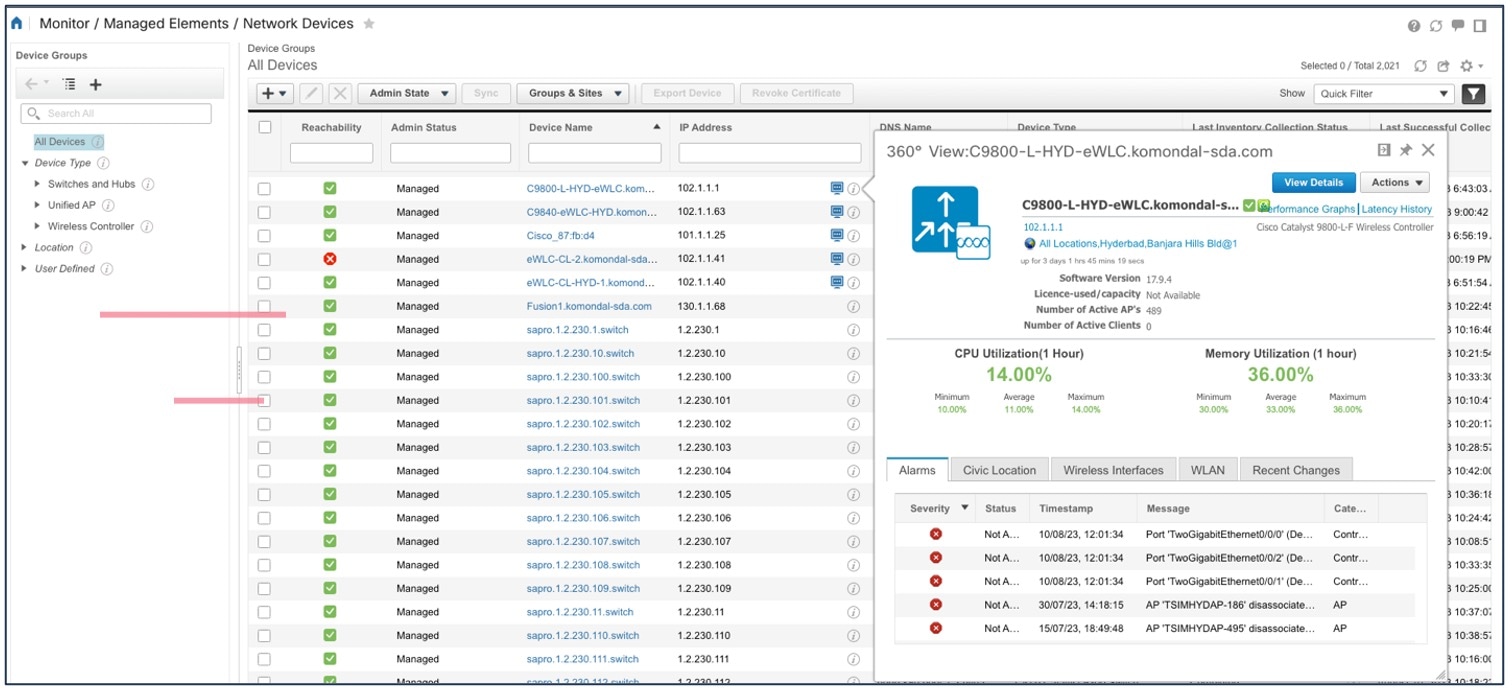
The Network Health by Device Roles/Type dashlet contains health scores for the device category by role. For a 360-degree view of a specific network element, click the device name in the Network Devices table.
The Device 360 view provides the following information:
-
Device-critical KPIs such as CPU, memory, and so on
-
List of top issues
-
Physical neighbor topology of the device
-
Event Viewer
-
Path Trace
-
Application Experience
-
Connectivities and interface utilization information
For the Catalyst Center Device 360 view, choose .
The Cisco Prime Infrastructure Device 360 view provides the following information:
-
Device-critical KPIs such as CPU, memory, and so on
-
List of top alarms
For the Cisco Prime Infrastructure Device 360 view, choose > Click information (i) icon adjacent to the IP Address for additional information.
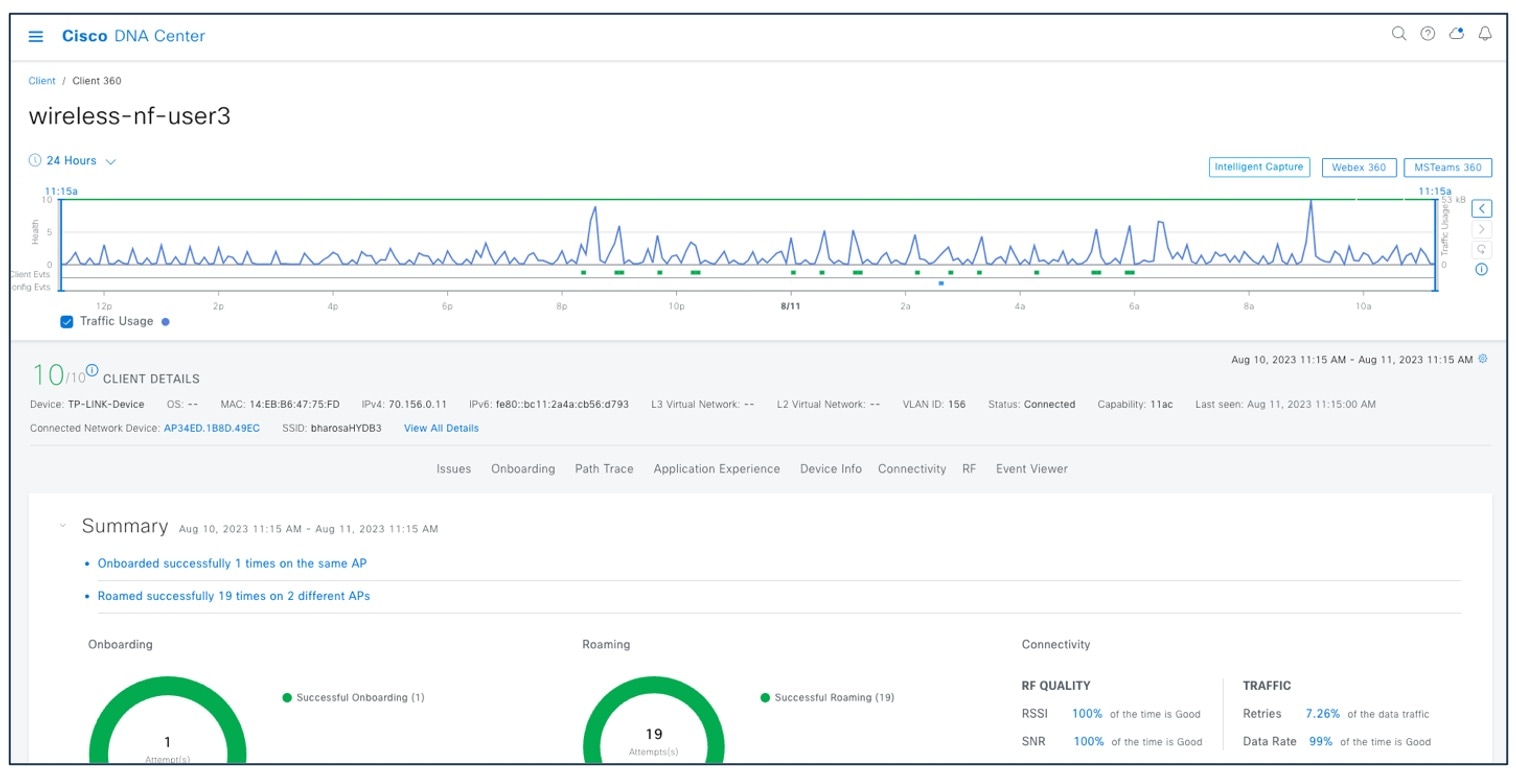
Client 360
The Client Health Dashboard shows the client health score and has multiple filters to effectively drill down to specific clients of interest.
To view 360 views of client health in Catalyst Center, click .
The Details 360 view of the client helps to troubleshoot the client's issues.
The Client 360 view provides the following information:
-
Historical view of client traffic usage
-
Client details like MAC, IP, VLAN, SSID, AP, and controller
-
List of top issues
-
Client joining summary like onboarding, roaming, RF quality, and traffic
-
Path Trace
-
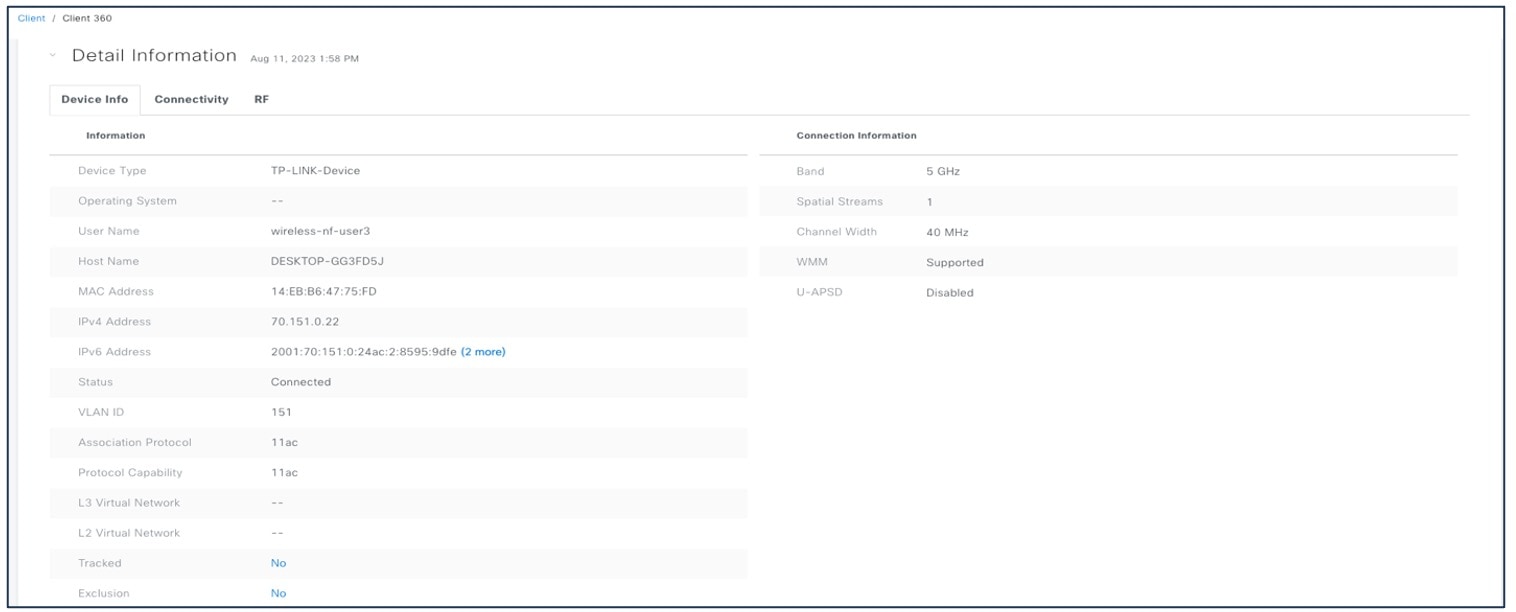
Device information
-
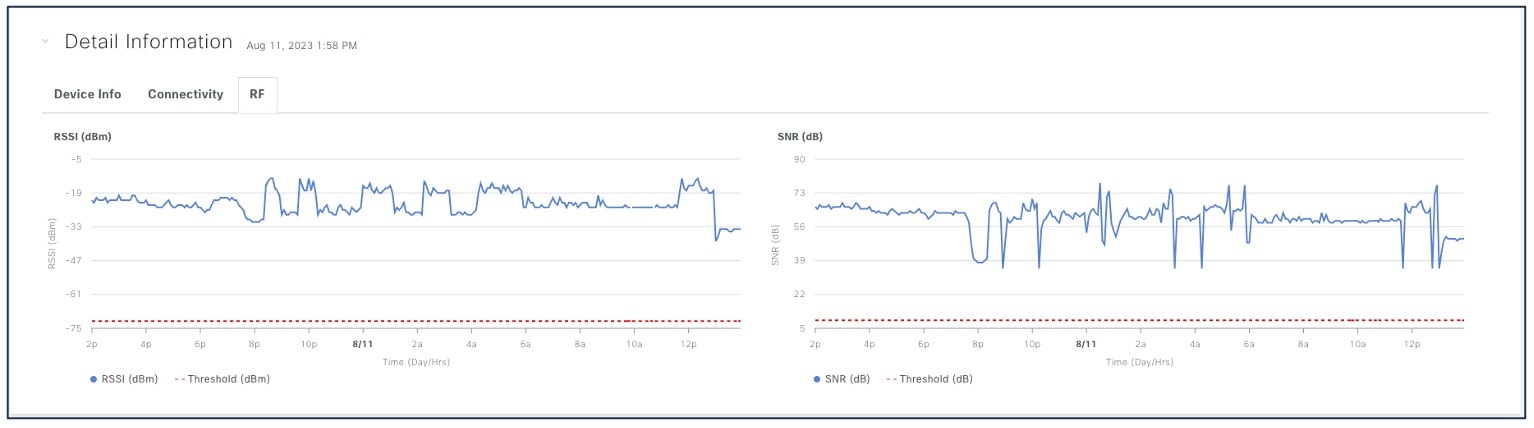
Connectivity and RF information
For the Catalyst Center Client 360 view, choose .
For client device information, choose .
For better client troubleshooting, client connectivity provides details of Tx (bytes), RX (bytes), data rate, retries, and Catalyst Center request and response.
For client connectivity information, choose .

Client RF information provides details of RSSI and SNR.
For client RF information, choose .
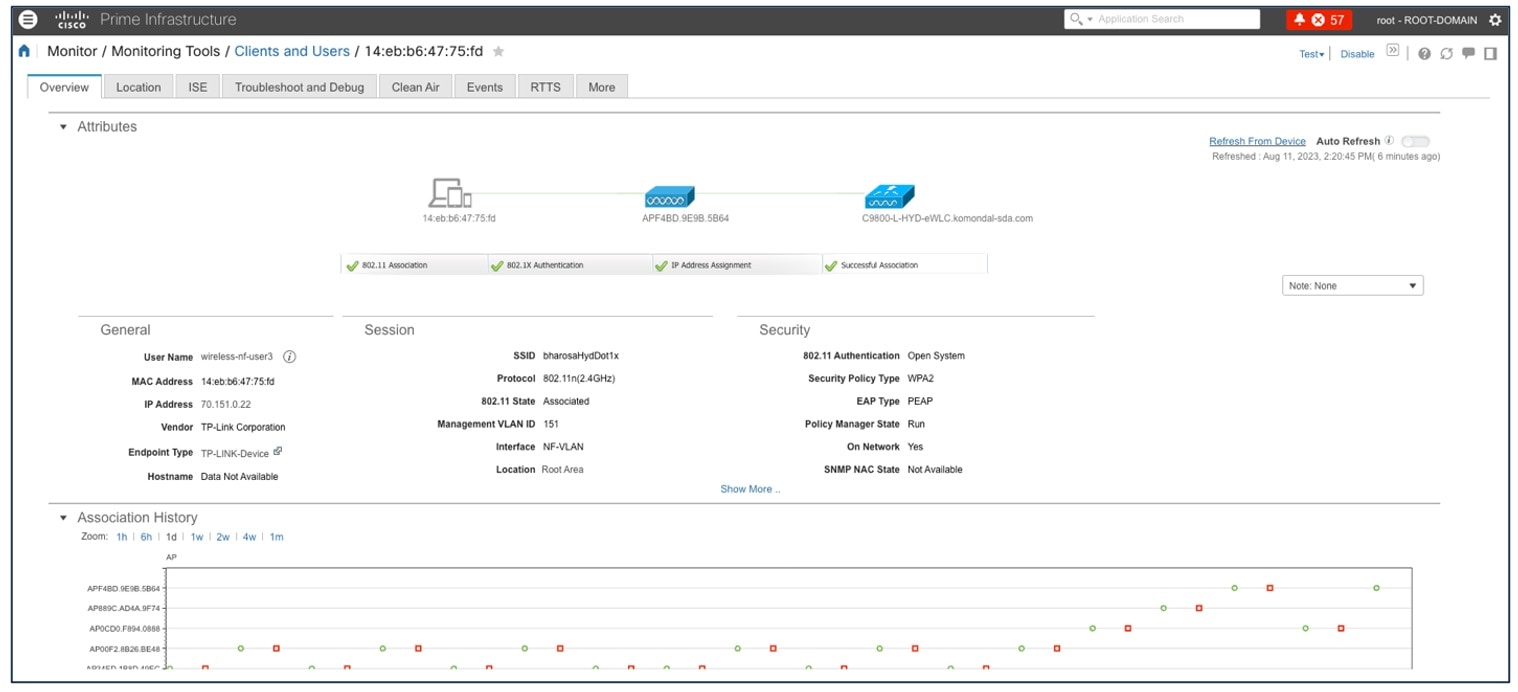
View the Cisco Prime Infrastructure client overview to:
-
Monitor clients
-
View alerts and events
-
Configure controllers and client location
Attributes like ISE, endpoint type, posture, and authorization profile name are populated with Cisco ISE added to Cisco Prime Infrastructure.
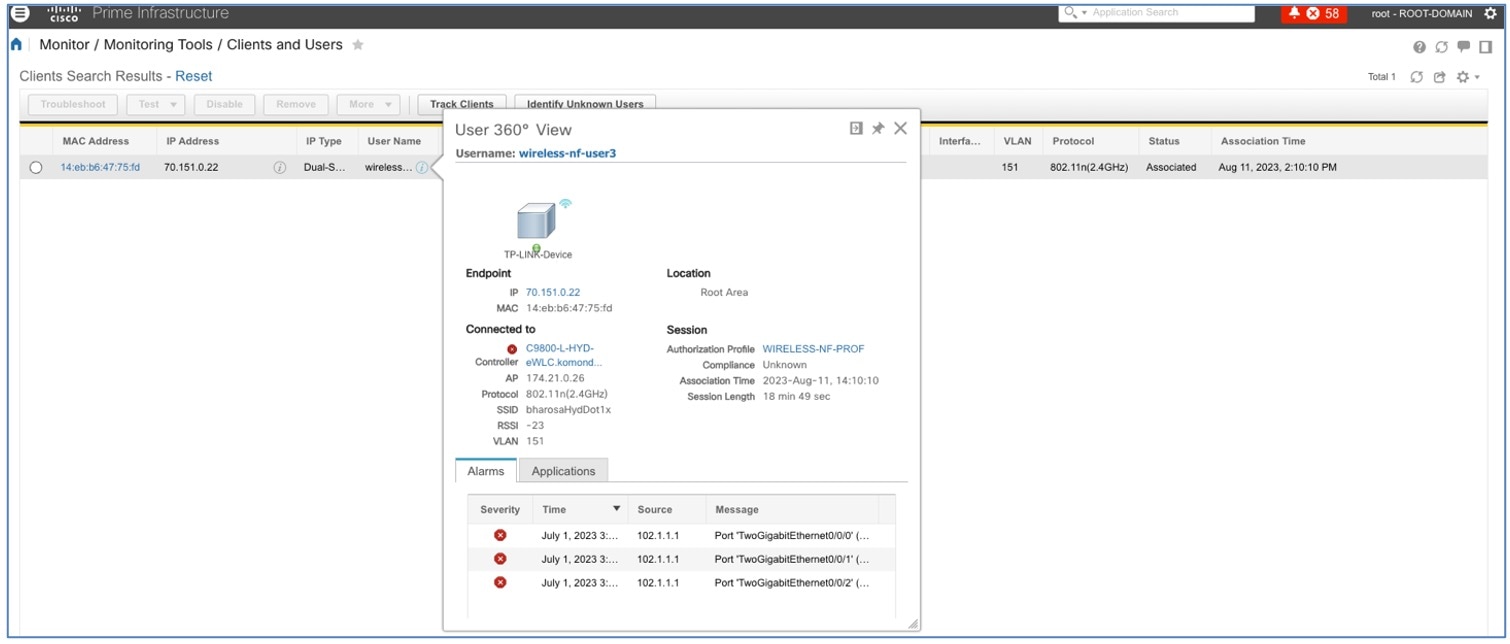
The Cisco Prime Infrastructure User 360 view provides details about user IP, controller, alarm, session details, and so on.
For the Cisco Prime Infrastructure User 360 view, choose . Click the information (i) icon on the username for additional information.
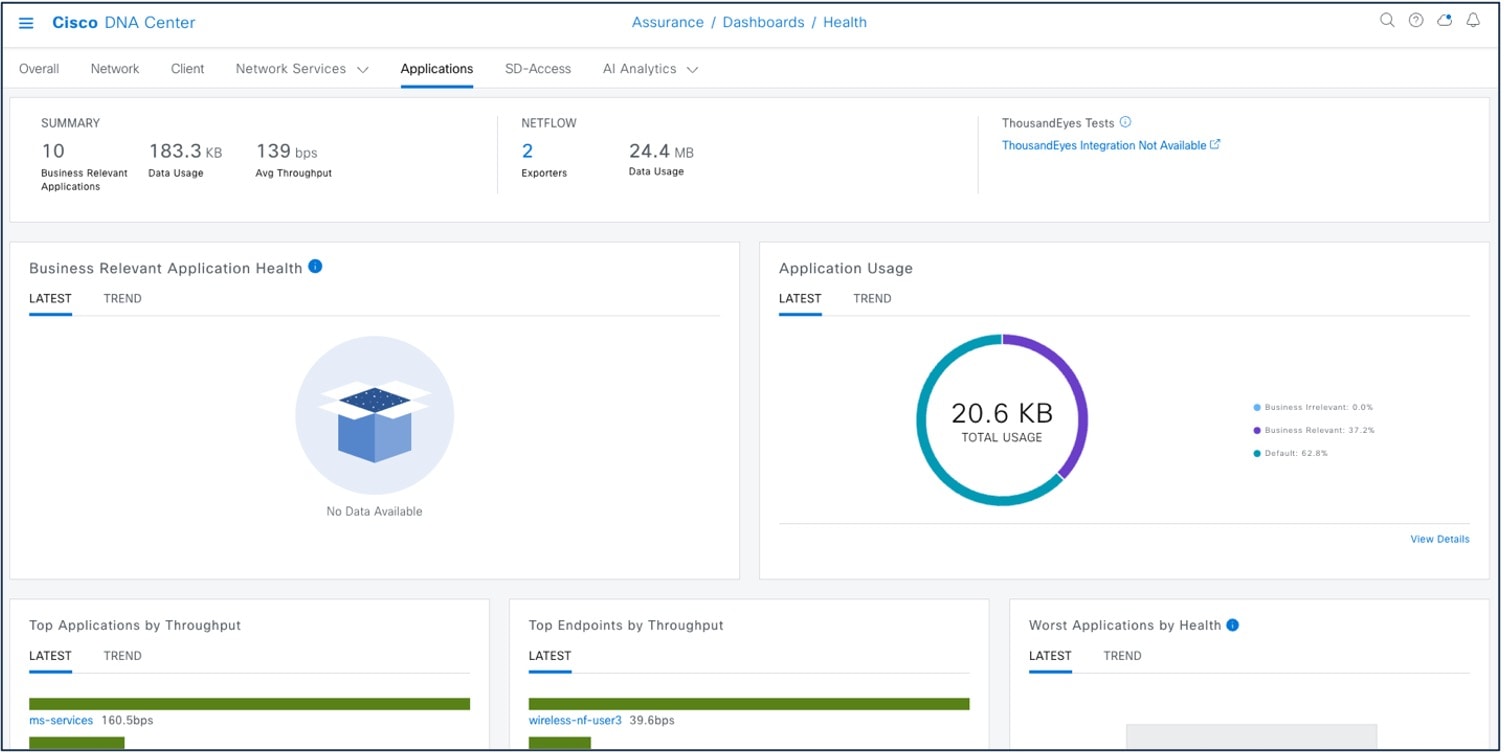
Application 360
Application 360 provides a general overview of the health of all applications on the network, including a special section on applications that have been tagged as business relevant. Business-relevant application issues are highlighted, with suggested remediation for any anomalies.
Application telemetry is enabled from Catalyst Center for the wireless controllers after migration. There might be a chance that the controllers already have NetFlow exporter, monitor, and records before migration. In that case, the NetFlow-related configuration is removed before enabling application telemetry from Catalyst Center.
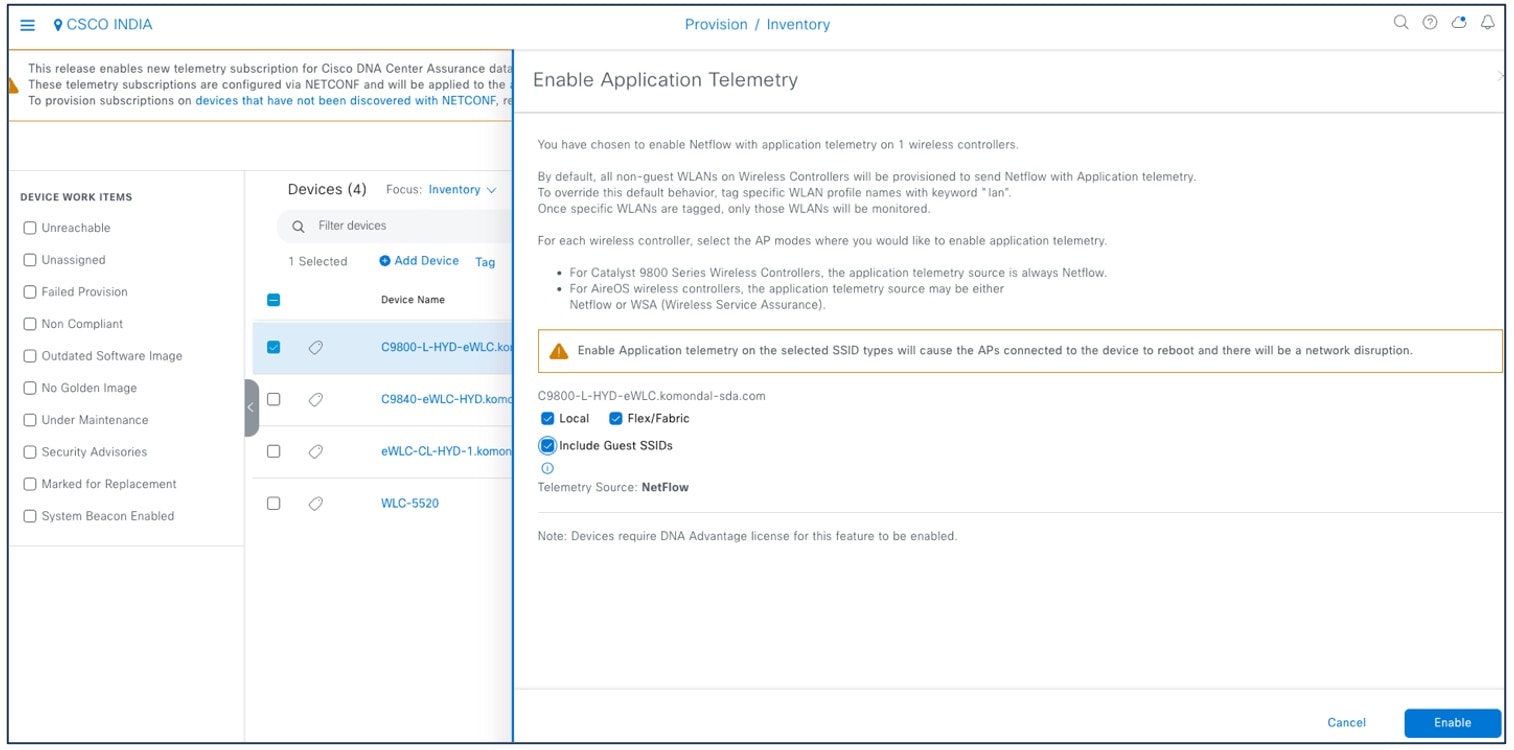
Enable application telemetry to configure application telemetry for the selected devices.
To enable application telemetry, choose .
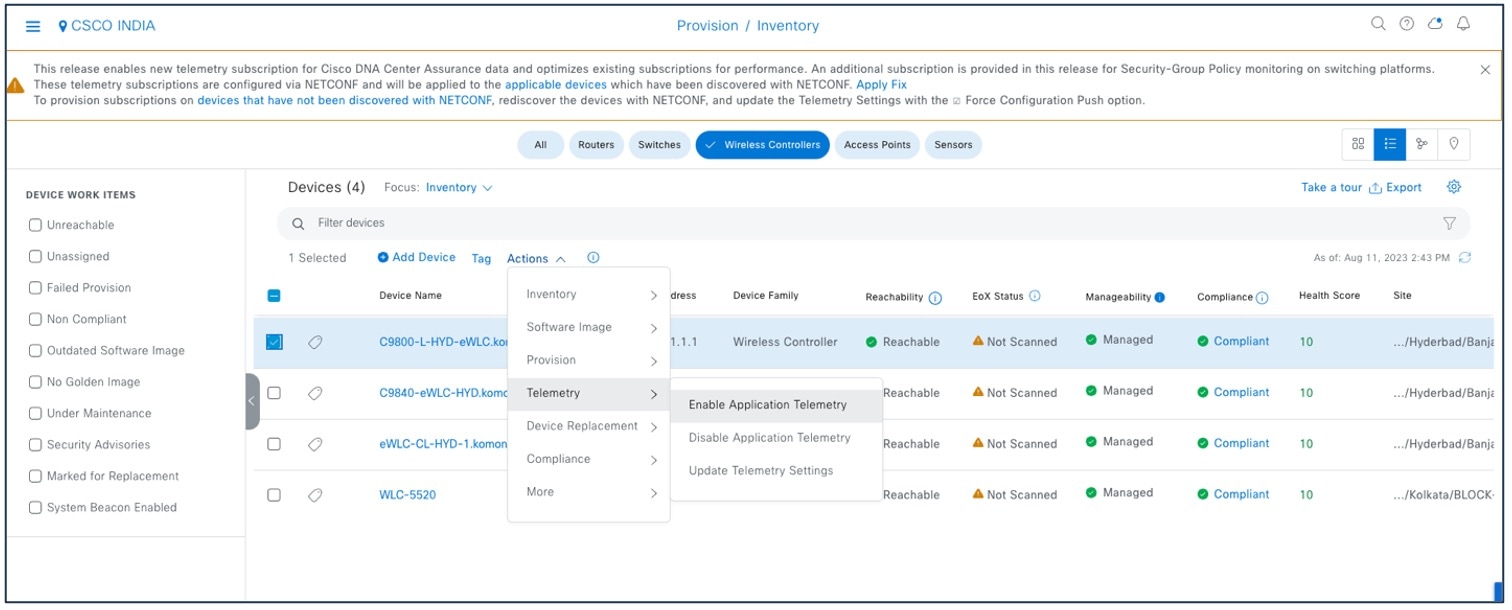
Enable the SSID type before enabling application telemetry, as shown in the following figure.
The Application Telemetry column shows the telemetry configuration status. If you do not see the Application Telemetry column in the default column setting, click the ellipsis icon at the right end of the column headings and check the Application Telemetry check box.
To view the application dashboard, choose .
For more information, see Criteria for Enabling Application Telemetry on Devices.
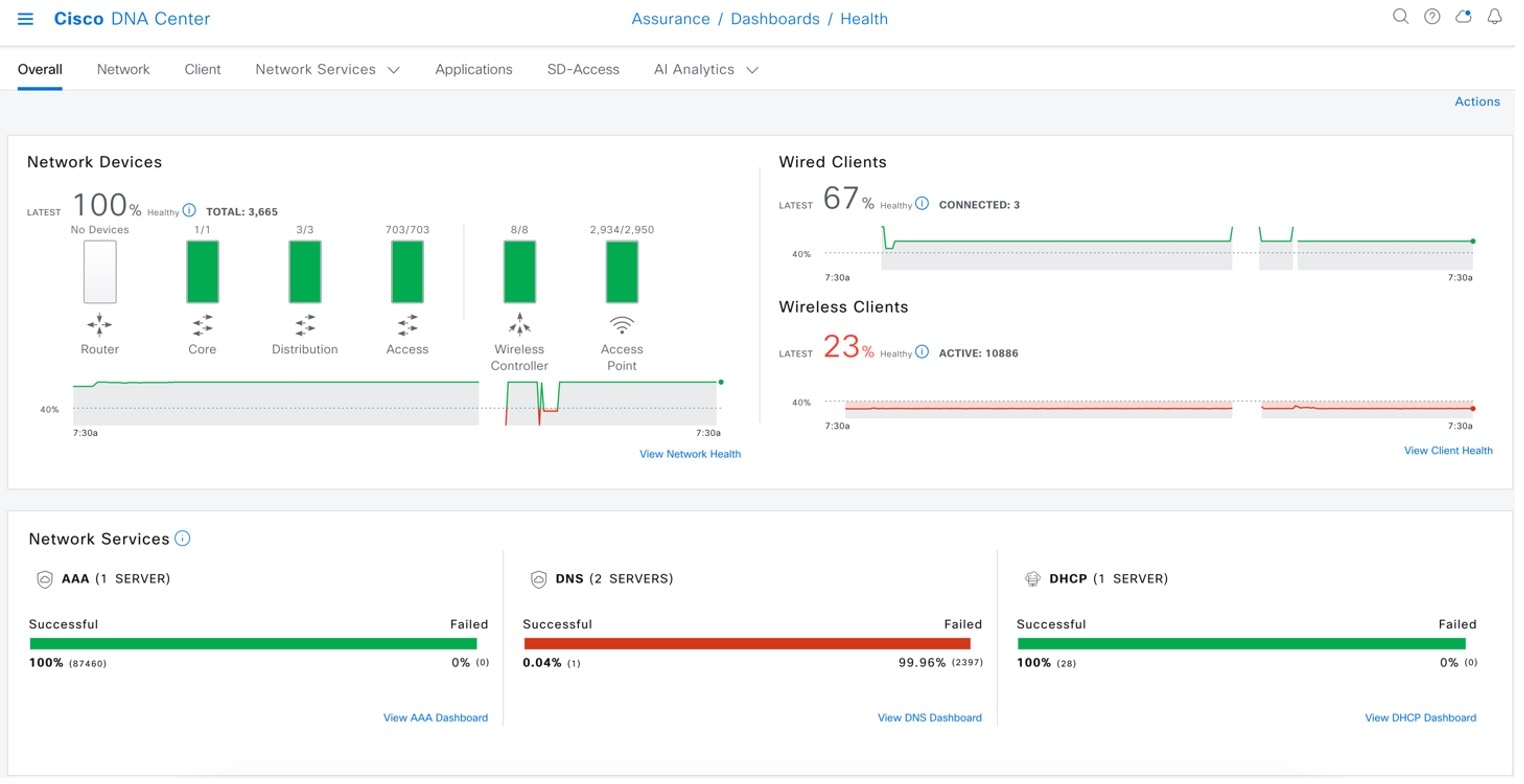
Network Service 360
The following capabilities include the overall health of the critical services all in one place:
-
View Authentication, Authorization, and Accounting (AAA)
-
Dynamic Host Configuration Protocol (DHCP) services for wireless devices across Cisco and all third-party servers in a global comprehensive view
These capabilities help network operators reduce overall issue-ticket resolution time and lead to lower ticket volume.
To view network services, choose .
For more information, see Monitor Network Services.
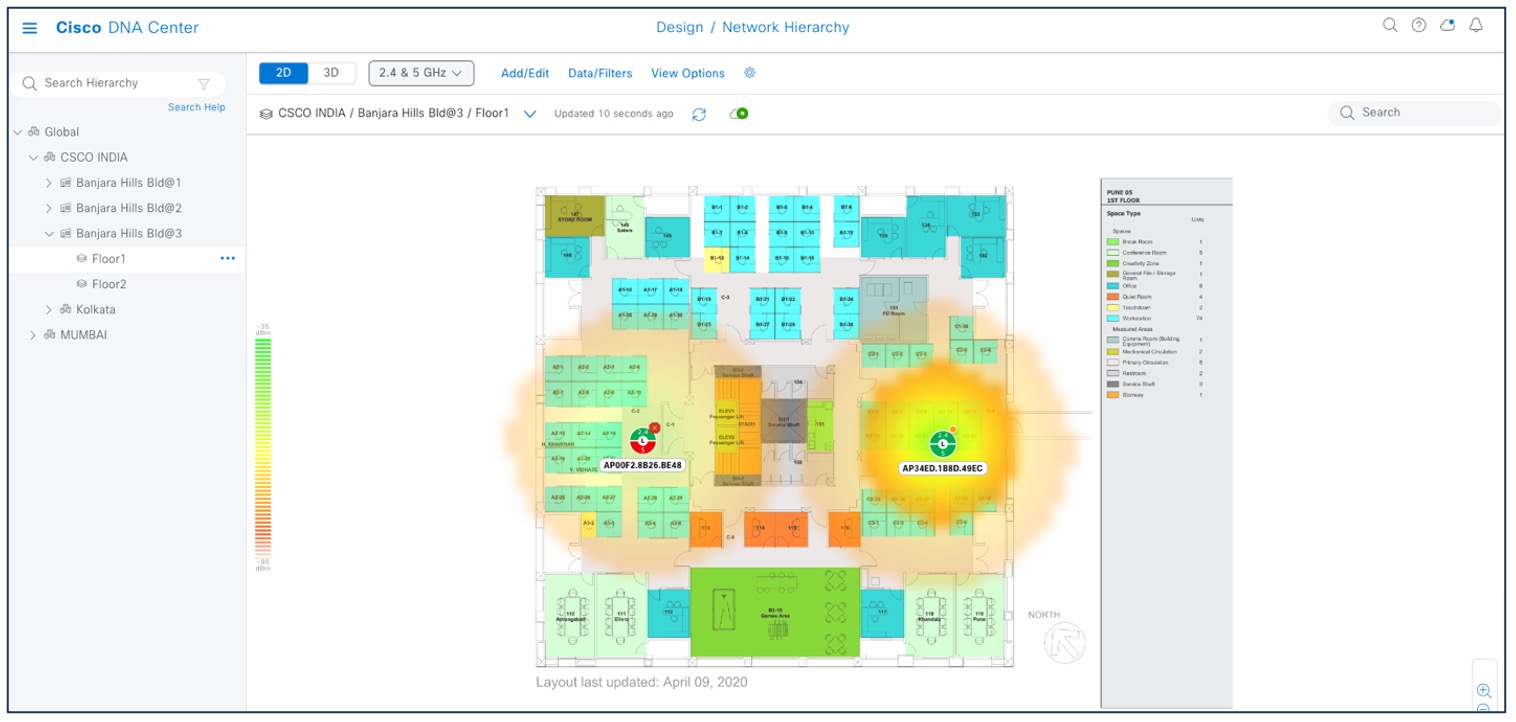
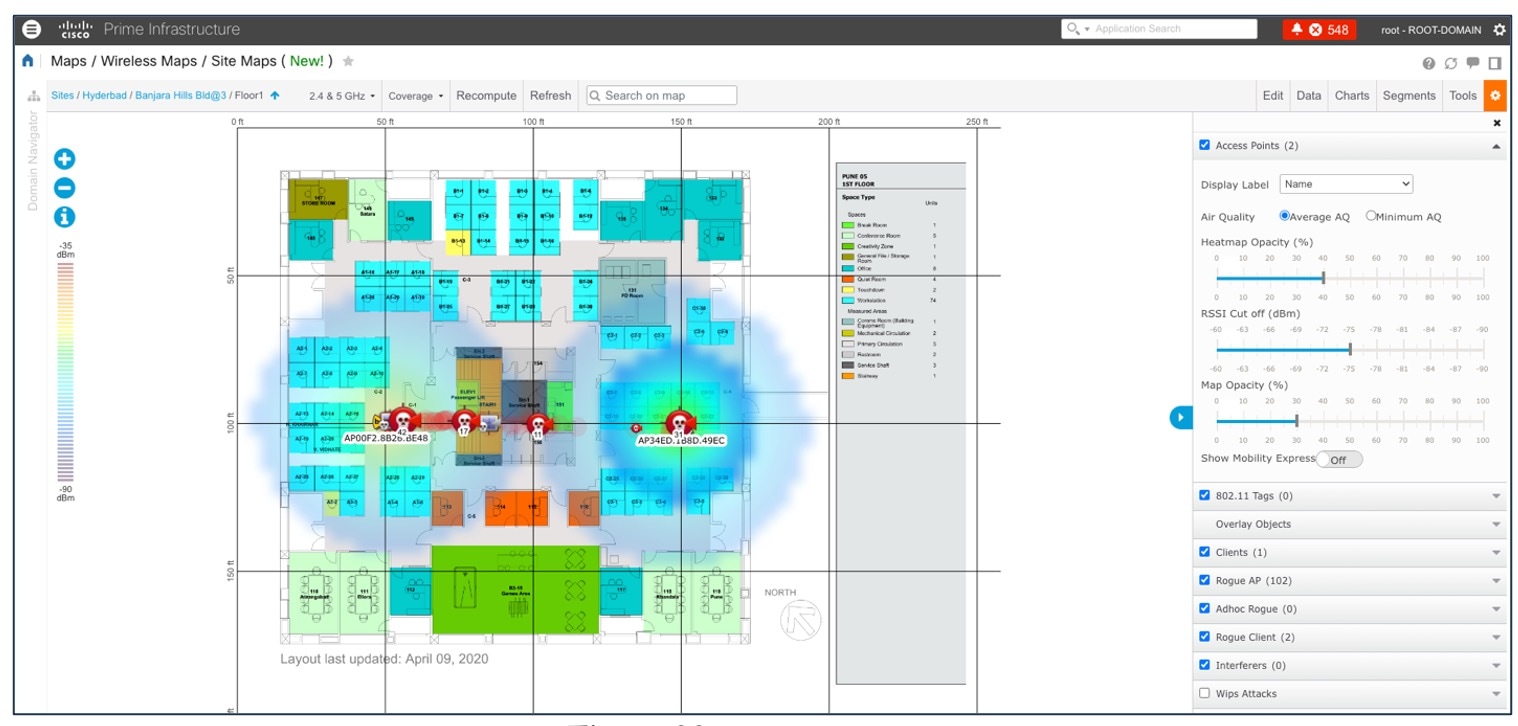
Maps
There are several reasons to add floors with floor maps. One reason is to see your wireless network the way it exists today. Another reason is to help you plan and visualize future changes.
You can visualize your wireless network by creating or importing a floor map that contains various building components, like walls and windows, and then positioning your wireless devices on it. Using the floorplan, Catalyst Center computes 2D and 3D heatmaps that show the relative intensity of the RF signals in the coverage area. For 2D wireless maps, the heatmap is only an approximation of the actual RF signal intensity because it does not consider the attenuation of various building materials, such as drywall or metal objects, nor does it display the effects of RF signals bouncing off obstructions. 3D maps are primarily used to plan and analyze a wireless network on a floor. As such, there are minimal configurations and edit functions that you can perform in 3D maps. With 3D wireless maps, you can view a 3D representation of your wireless network. A near real-time predictive model dynamically updates the 3D map to show changes in RF coverage.
The data migration tool (PDMT) is used to migrate the maps along with groups, devices, and associated floor maps.
The following figure shows a Catalyst Center 2D floor map view with AP overlaid and heatmap coverage.
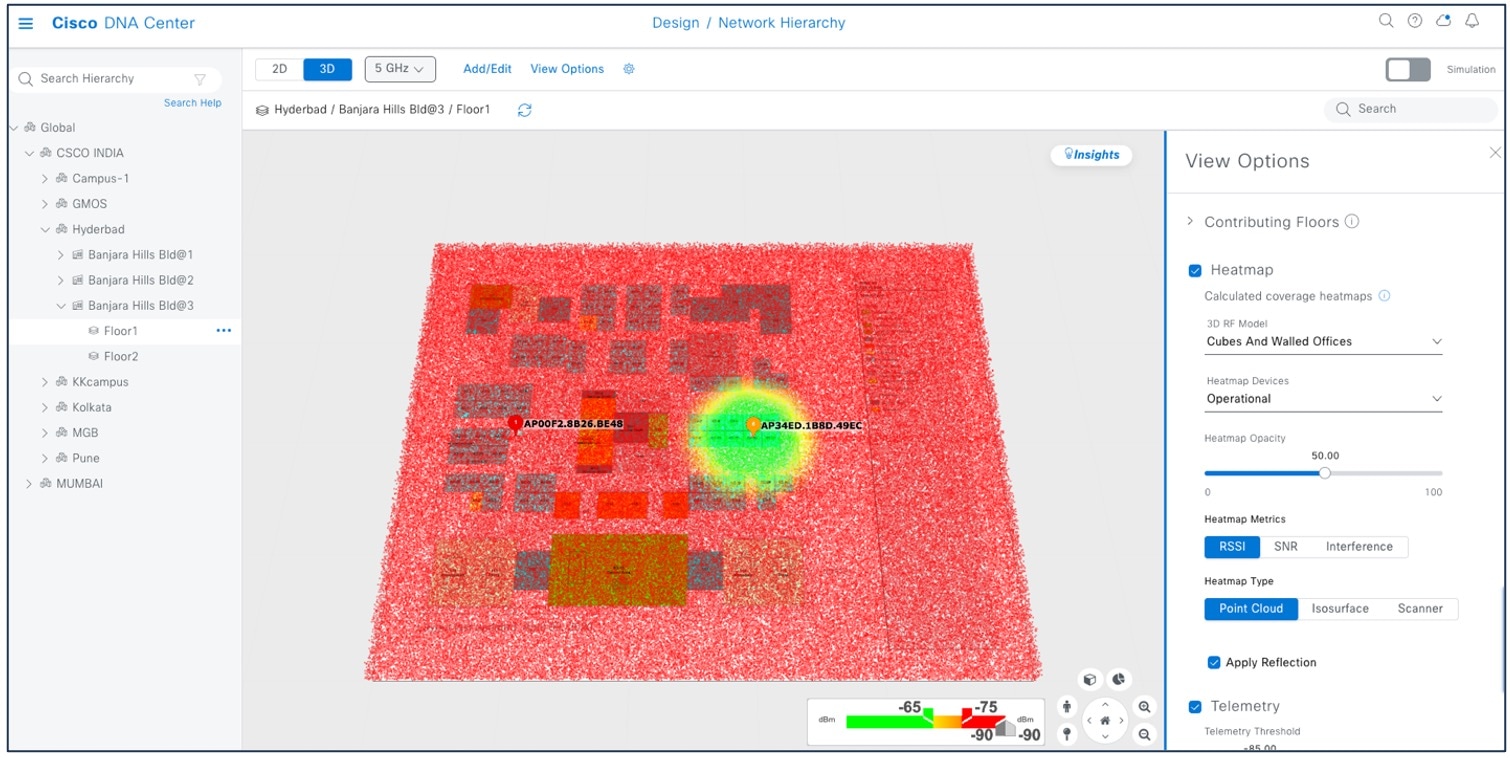
3D wireless maps offer the following features and functionalities:
-
Navigate through your wireless network in a 3D environment with a first-person view or third-person view.
-
Gain insights into the areas in your wireless network where service-level agreements (SLAs) are not being met.
-
Run an optimizer tool to compute the best AP layout to meet your SLAs.
-
View the RF coverage for different elevations and use the Scanner tool to view the RF coverage for specific elevations.
-
Crop the KPI heatmap with the clipping tools.
The following figure shows a Catalyst Center 3D map view.
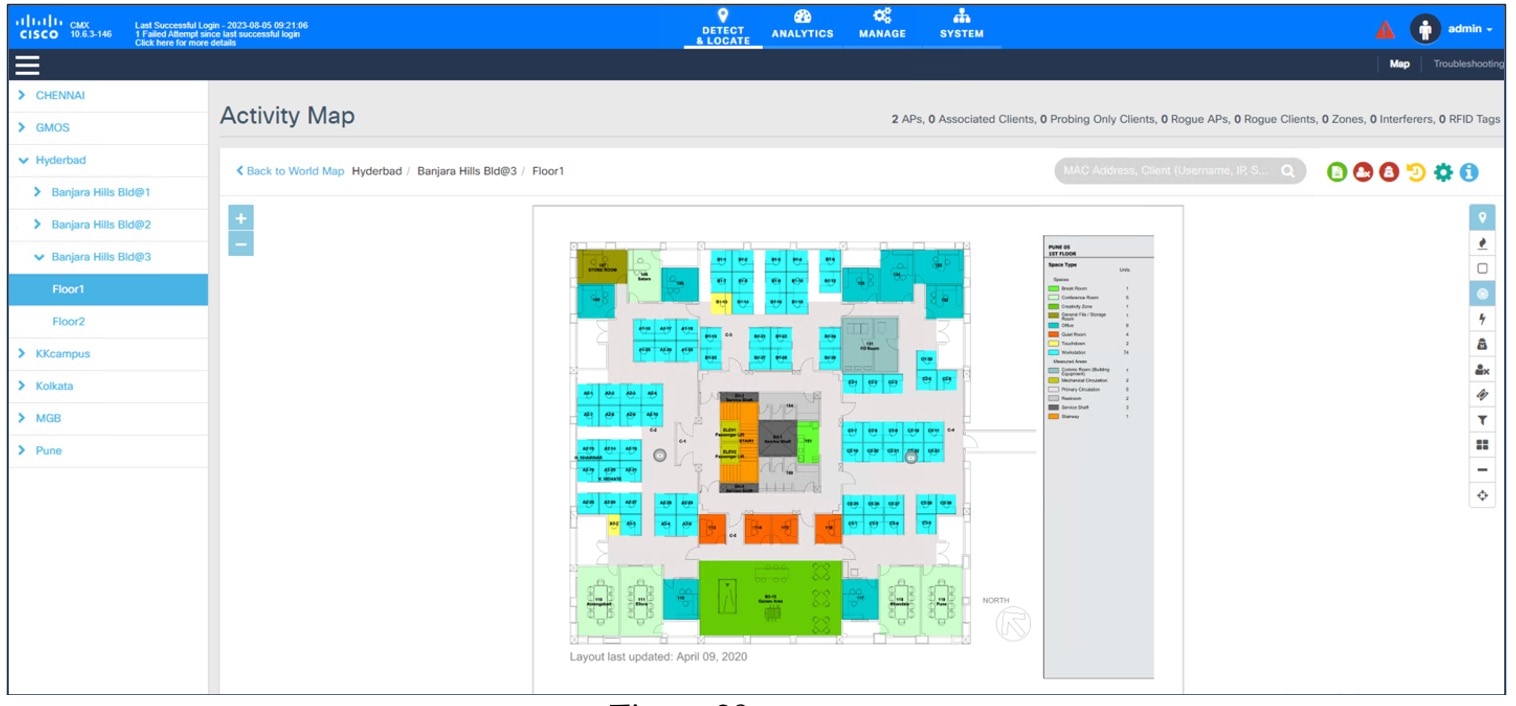
The following figure shows the Cisco Prime Infrastructure floor with heatmap coverage after migration.
The following figure shows Cisco CMX for a wireless map (migrated from Cisco Prime Infrastructure using the PDMT).
Note |
Dynamic synchronization of PDMT does not support add, update, or delete operations for the already migrated data and does not synchronize the data automation for maps. Maps migration is achieved only by force sync. For more information, see Work with Wireless 2D and 3D Floor Maps. |
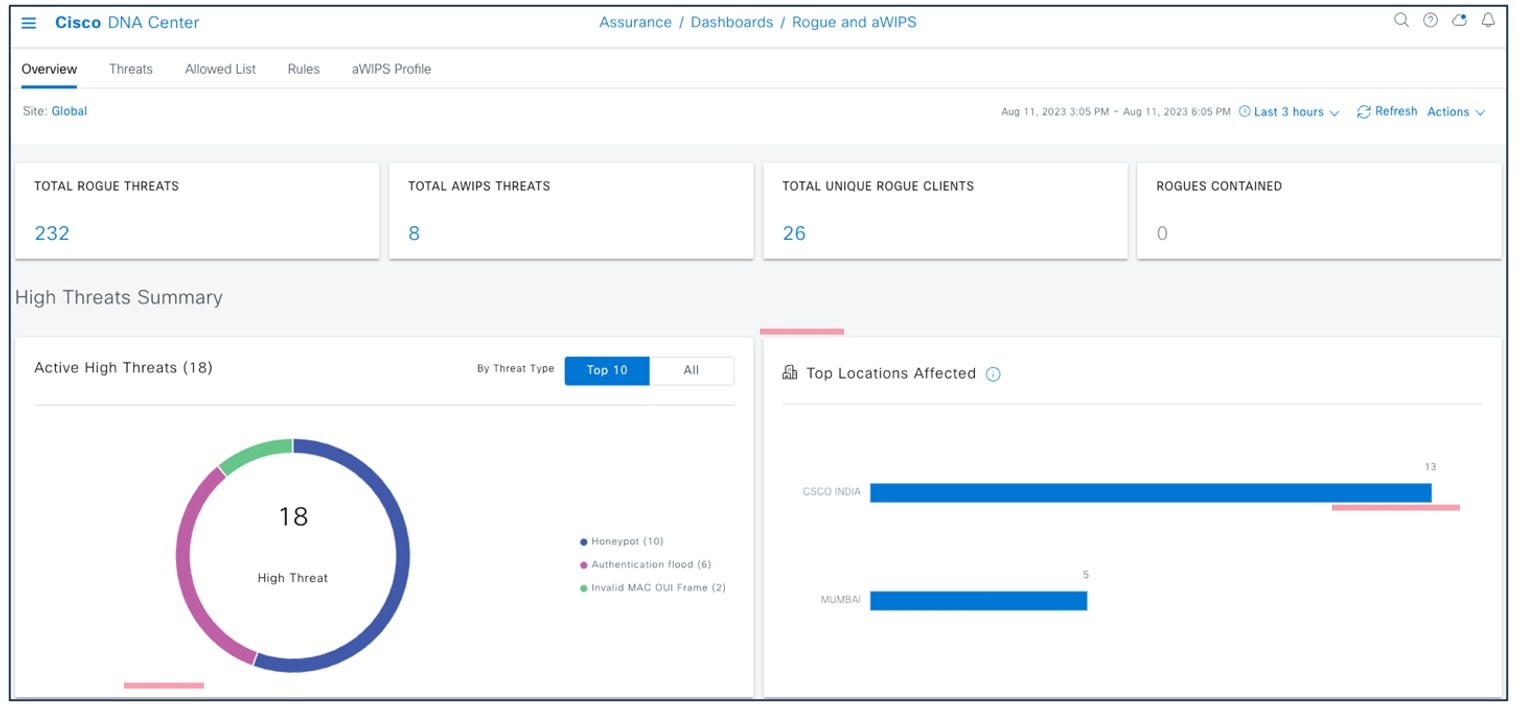
Rogue and aWIPS
The Rogue Management application in Catalyst Center detects and classifies threats in the WLAN and enables the network administrator and operator to monitor these detected threats. The Rogue unauthorized access point (AP) is used to hack sensitive information in the WLAN.
The Cisco Adaptive Wireless Intrusion Prevention System (aWIPS) is a wireless intrusion threat detection and mitigation mechanism. With a fully infrastructure-integrated solution, you can continually monitor wireless traffic on both wired and wireless networks and use that network intelligence to analyze attacks from many sources to pinpoint accurately, and proactively prevent attacks, rather than wait until damage or exposure has occurred.
For more information on turning on Rogue and aWIPS, see the Cisco Catalyst Center Rogue Management and aWIPS Application Quick Start Guide.
The Catalyst Center Rogue and aWIPS dashboard offers the following benefits:
-
Built on wireless telemetry that communicates based on more reliable transport protocol like HTTPS/TCP
-
Better classification engine
-
Reduce false positives when managed APs are reported as rogue due to different RF group name, compared with Cisco Prime Infrastructure
-
Reduce complexity by aggregating rogue AP with multiple SSIDs into a single threat
-
Contextual data on rogue AP (time and location) for users to consume
-
Better correlation algorithms to trace rogue APs on wire (multi-vendor algorithms with BSSID to Ethernet MAC address mapping)
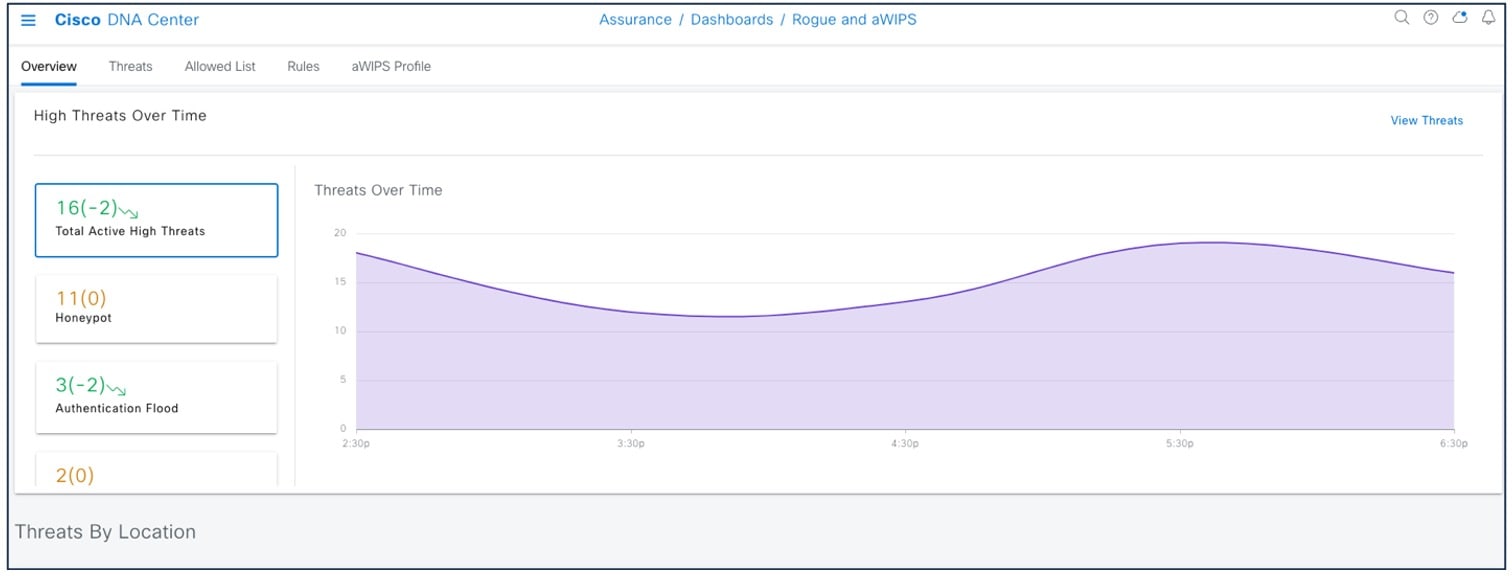
To view the Catalyst Center Rogue and aWIPS dashboard, choose .
To view the Cisco Prime Infrastructure Rogue and aWIPS dashboard, choose .
This page displays all the rogue APs detected in the past hour and the past 24 hours. Click the rogue AP number to view the rogue AP alarms.
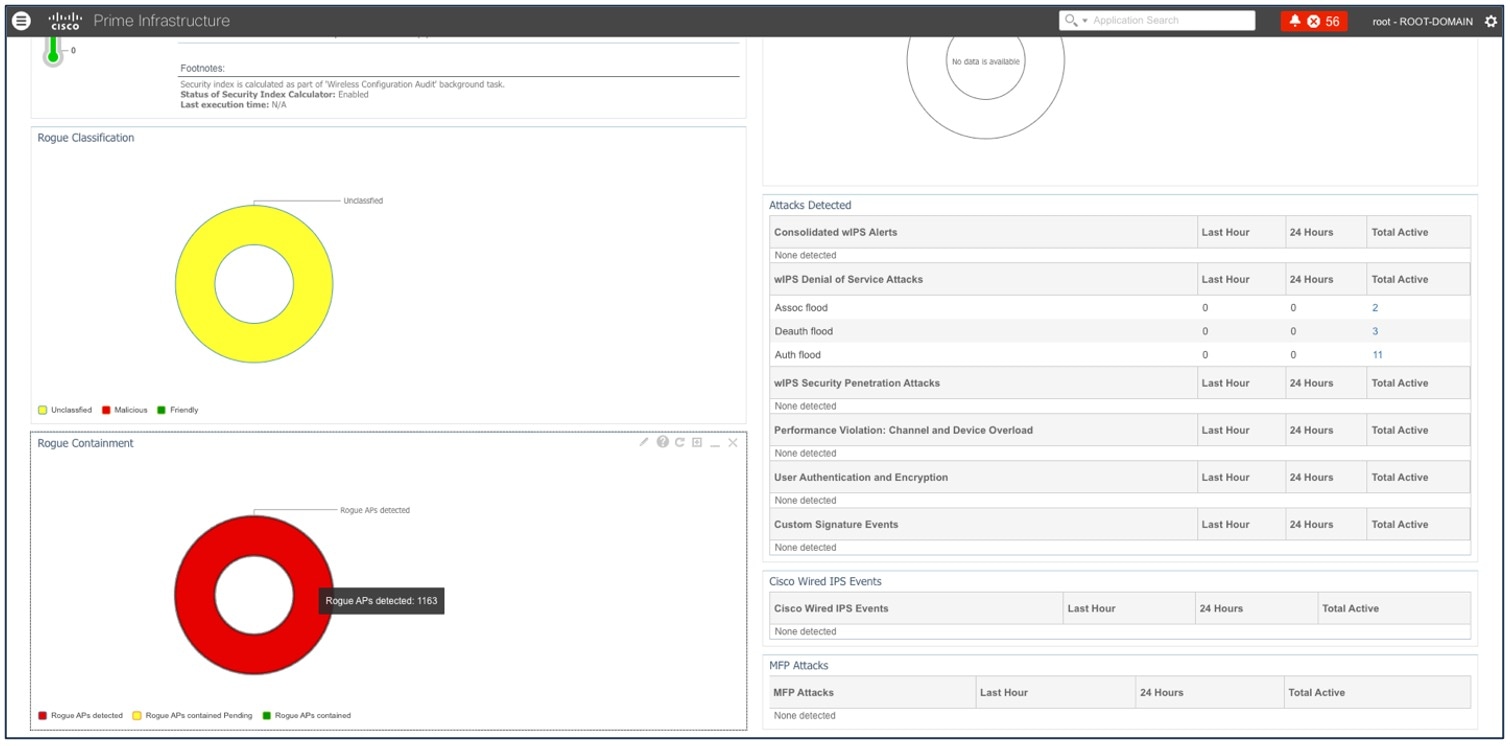
To view general information for the rogue AP, issue severity, and recent events for the rogue AP alarm, choose .

For more information, see the Cisco DNA Assurance User Guide.
Templates
User-defined CLI templates provide out-of-the-box configuration templates that you can use to make changes on your network devices. If you have sufficient privileges, you can also create new templates that meet the exact needs of your environment, and then make those templates available for others to use. You can make the templates as simple or as complex as needed, including grouping multiple templates together into a composite template. Finally, you can associate templates with particular devices by creating configuration groups.
Catalyst Center templates offer the following benefits:
-
Validate errors in the template
-
Simulate the template
-
Version control the template for tracking purposes
-
Day-0 onboarding and day-n templates
| Template Features | Cisco Prime Infrastructure | Catalyst Center |
|---|---|---|
|
Feature and technologies templates |
Supported |
Brownfield learning1 |
|
Create regular CLI template |
Supported |
Supported |
|
Composite template |
Supported |
Supported |
|
Import/export template |
Supported |
Supported |
|
Tagging template |
Supported |
Not supported |
User-Defined CLI Templates
User-defined CLI templates provide customized configurations using CLI commands that you can use in your templates. You can use a blank CLI template to create new CLI commands.
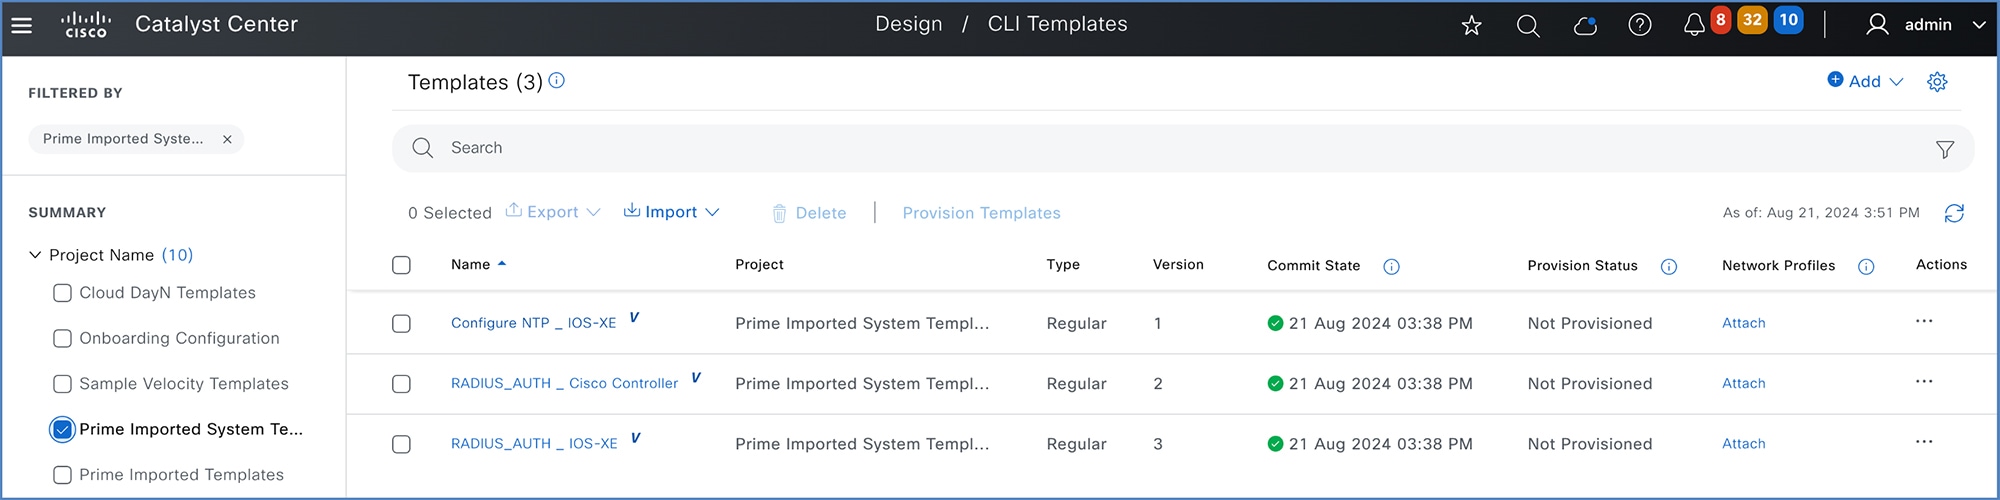
User-defined CLI template created in Cisco Prime Infrastructure can be migrated using the PDMT. Migrated CLI templates are shown in the Catalyst Center Template Hub. Only user-defined templates are migrated by default.
To view the user-defined templates in Cisco Prime Infrastructure, choose .
To view the migrated templates in the Catalyst Center Template Hub, choose .
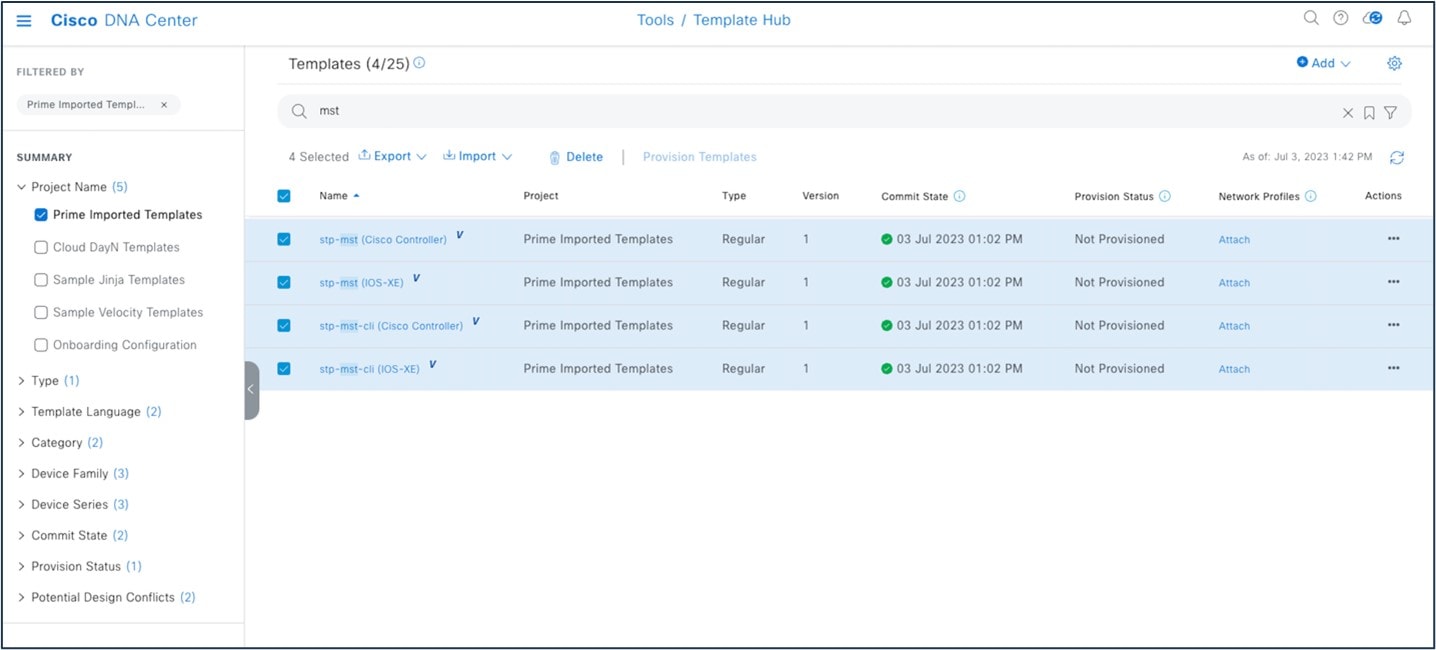
You must associate the template to a network profile before provisioning the template to network devices. To attach the template to a network profile, choose .

System-Defined CLI Templates
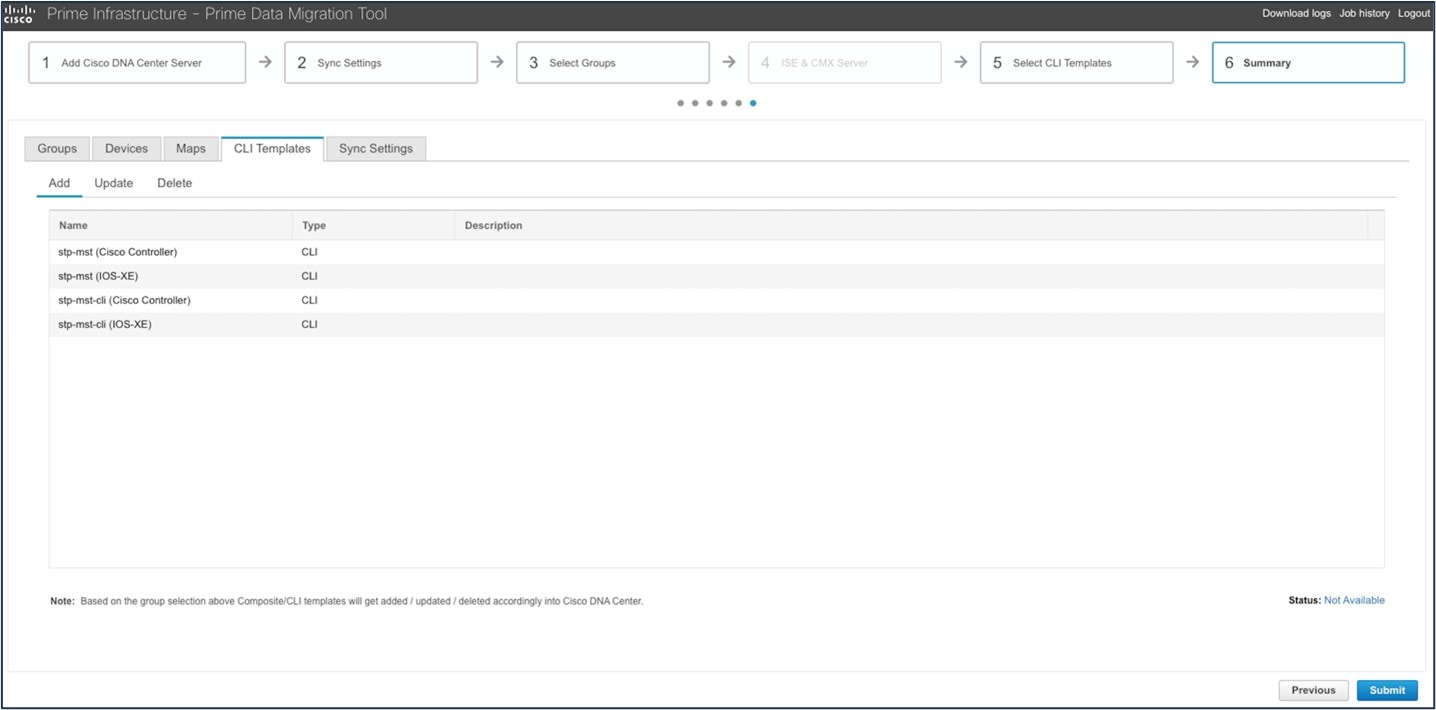
Use the Cisco Prime Infrastructure wireless Feature & Technologies templates and System CLI templates to push configurations to wireless controllers. System CLI templates can be migrated to Catalyst Center by checking the Migrate CLI System Templates check box.
Next, check the check box for the templates you want to migrate.
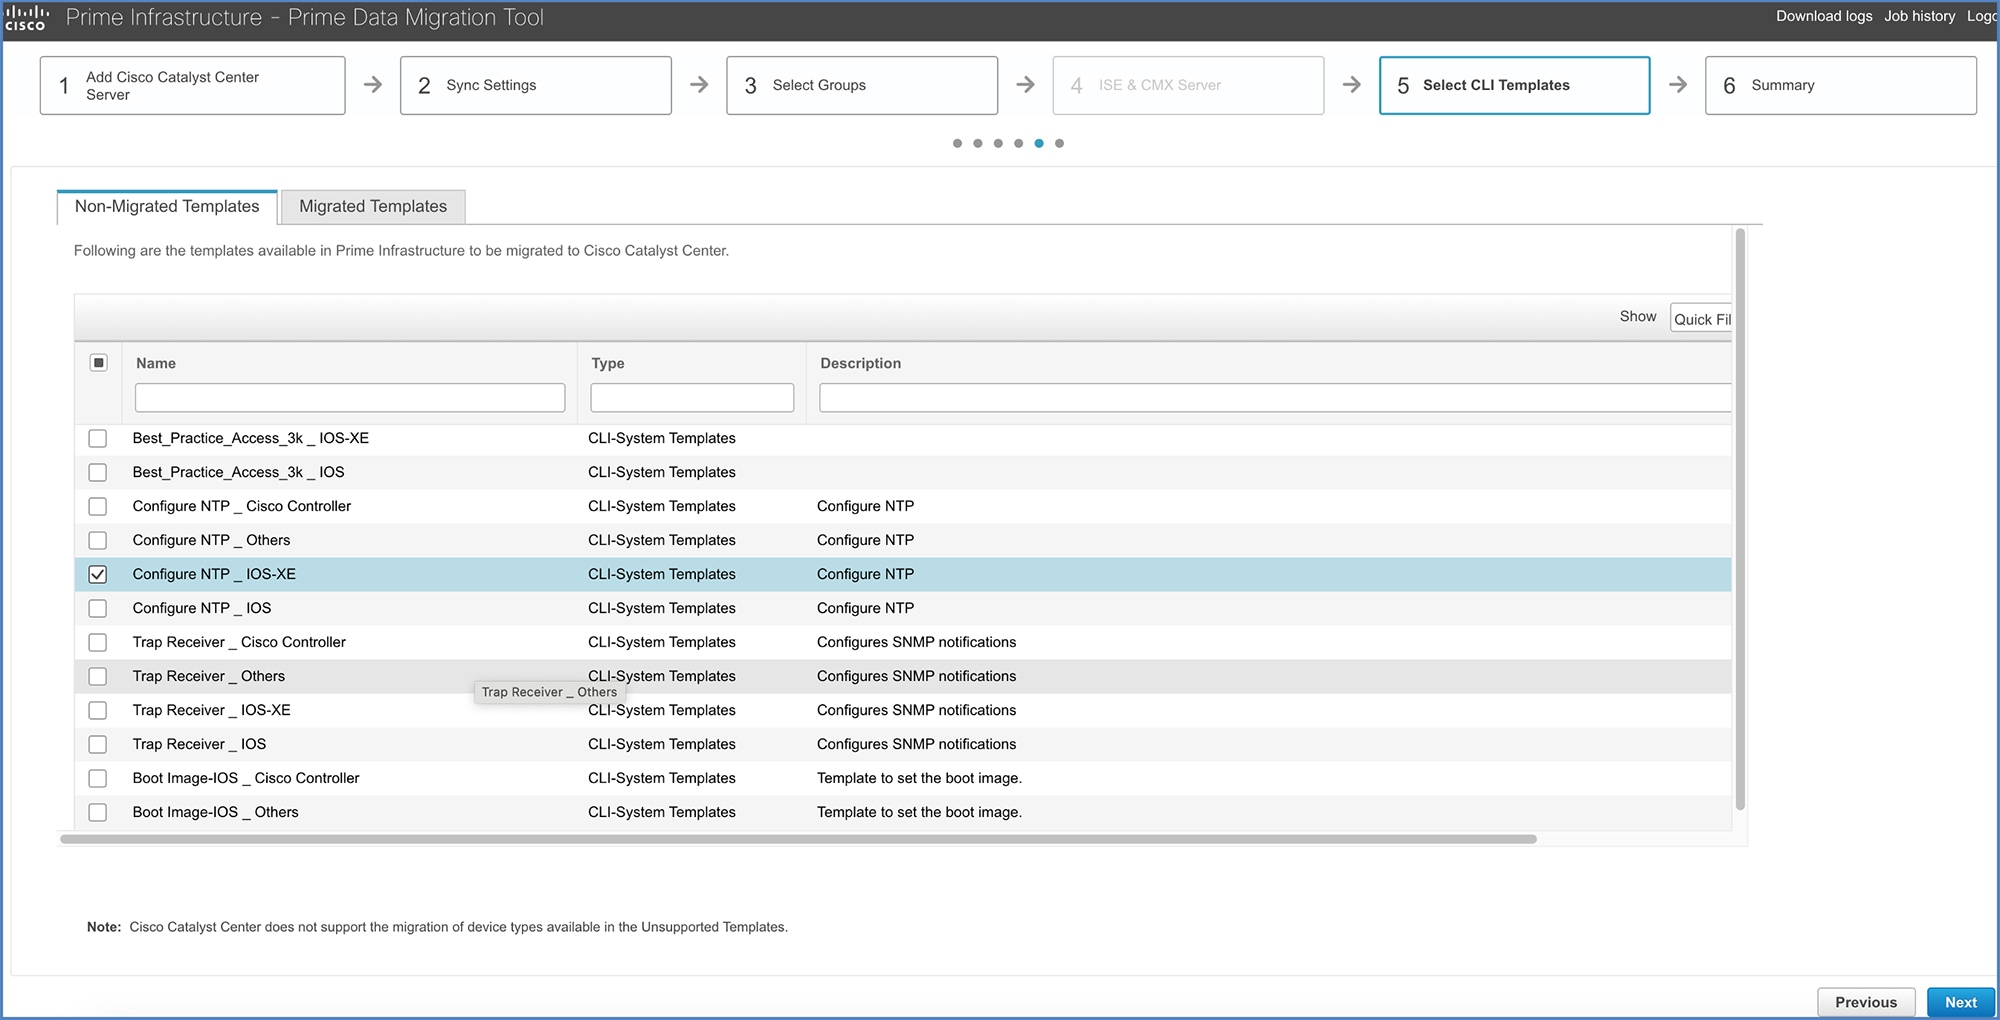
Then use the PDMT to migrate the System CLI templates.
After migration, the templates are listed in the Catalyst Center CLI Templates window.
To view Cisco Prime Infrastructure built-in wireless templates, choose .
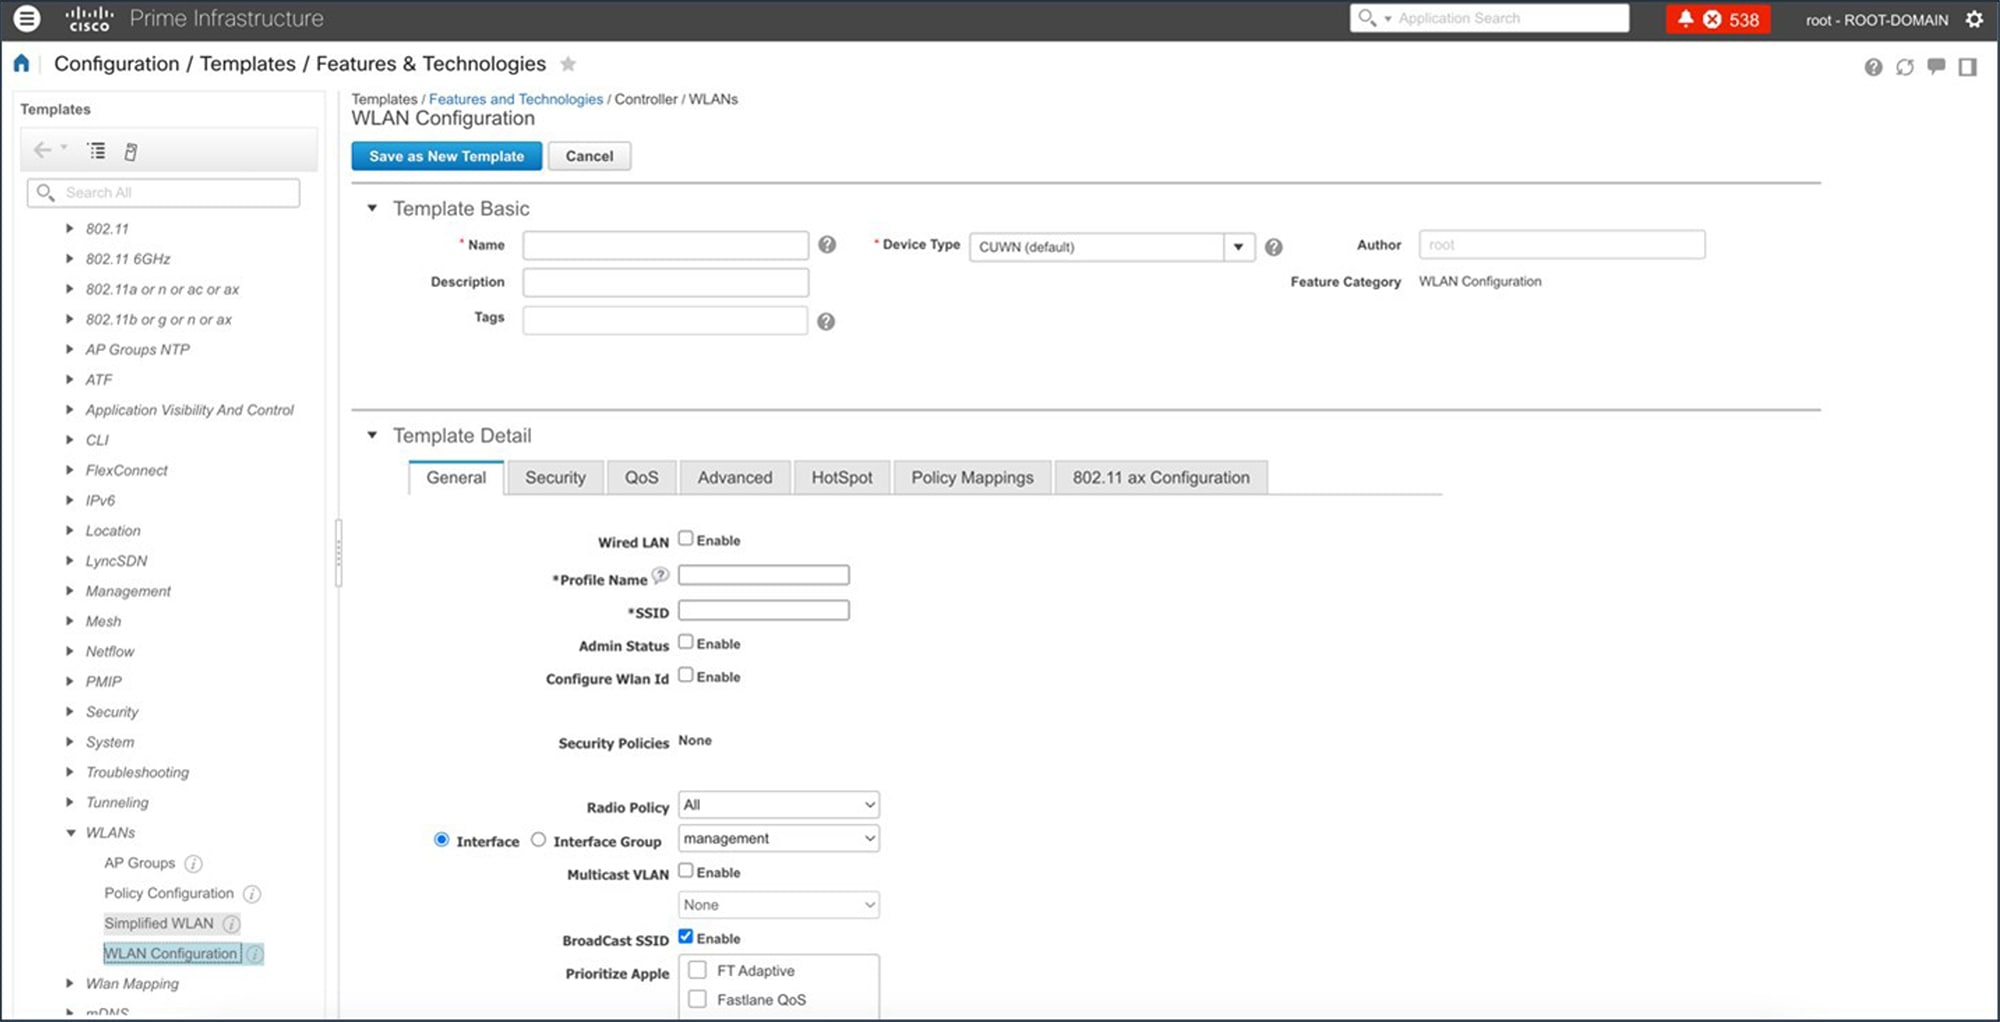
Note |
Port-based templates of Cisco Prime Infrastructure require extra CLI modification on Catalyst Center before provisioning the template. Provisioned templates listed in the CLI Templates window can be used to provision templates. For more information about this window, see the "Create Templates to Automate Device Configuration Changes" chapter in the Cisco Catalyst Center User Guide. |
Compliance
Cisco Prime Infrastructure provides compliance features that you can use to audit whether device configurations comply with network requirements. Compliance policy defines how the system evaluates device configurations for compliance with network standards and expectations.
A compliance profile is a method of organizing custom and system compliance policies that the system uses to perform configuration audits.
Catalyst Center built-in compliance ensures that devices comply with business intent.
Compliance helps to identify any intent deviation or out-of-band changes in the network that can be injected or reconfigured without affecting the original content.
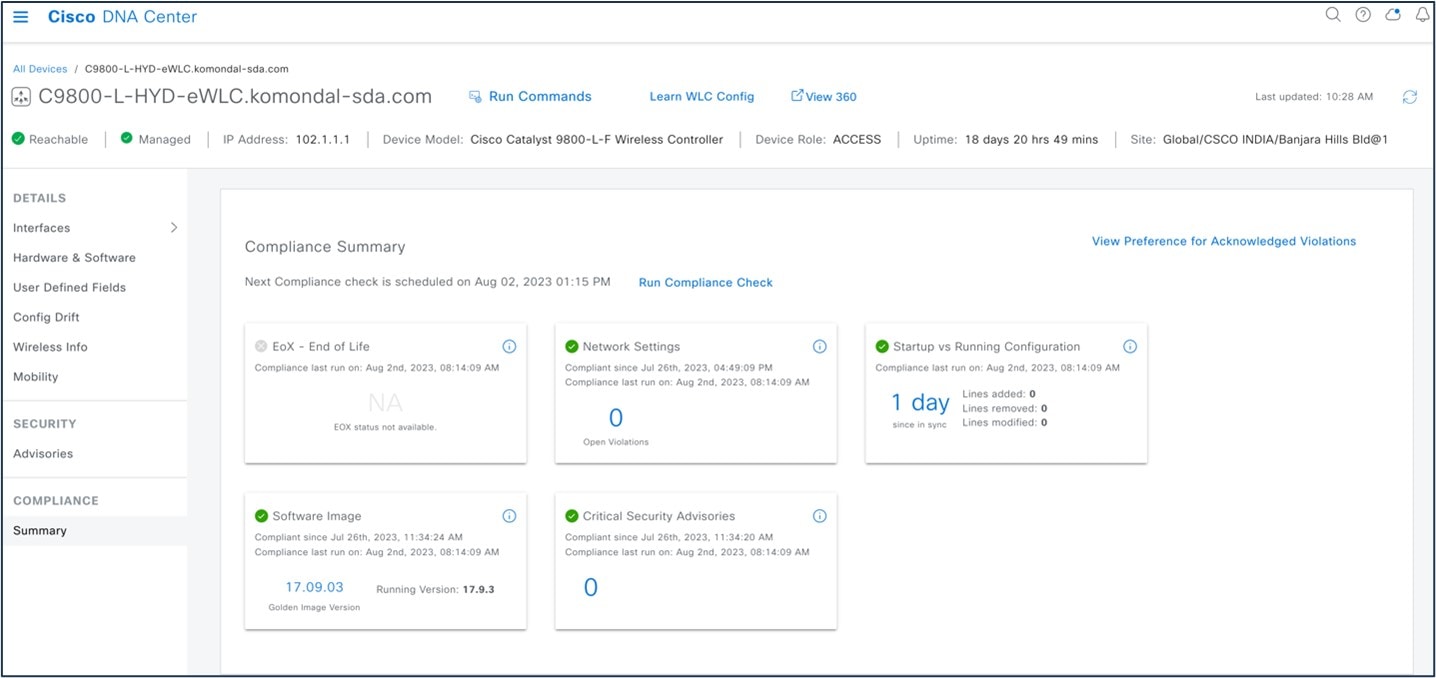
Catalyst Center compliance summary:
-
Network settings: Indicates that the device configuration complies with what was designed and provisioned from Catalyst Center.
-
End of life: Indicates that are no end-of-life alerts on the device.
-
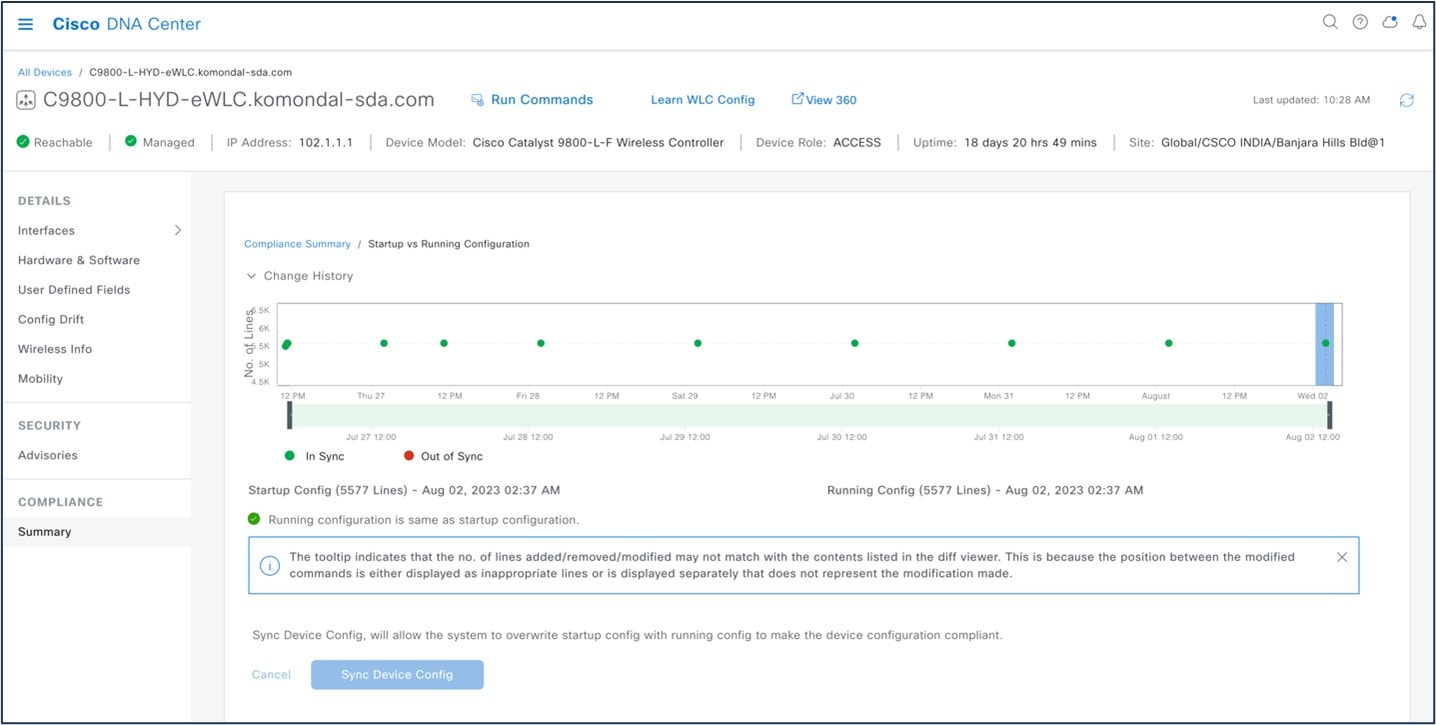
Startup vs running configuration: Indicates that both the startup and running configuration are in sync.
-
Software image: Indicates that the device is running the golden image.
-
Critical security advisories: Indicates that there are no critical advisories for the device.
A network administrator can conveniently identify devices that do not meet compliance requirements in Catalyst Center. Compliance checks can be automated or performed on demand:
-
Automated compliance check: By default, a compliance check is triggered for any out-of-band change.
-
Manual compliance: Can be triggered from the Inventory window or a device-specific window.
-
Scheduled compliance check: Weekly trigger for all devices.
To view a compliance summary in Catalyst Center, choose .
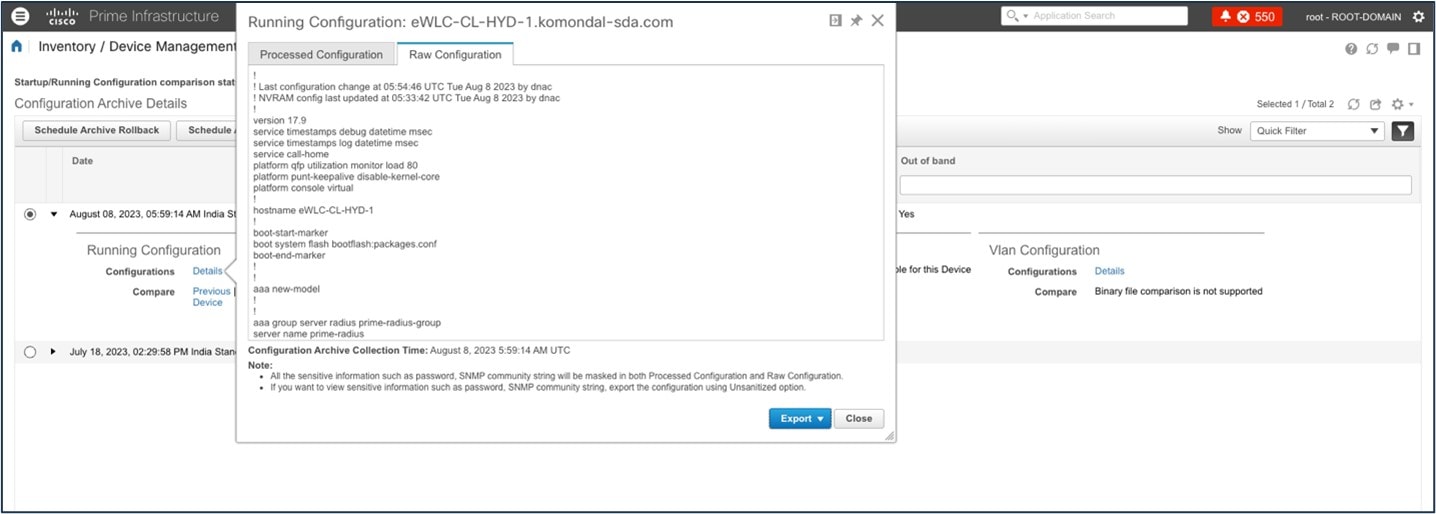
In Catalyst Center, the Startup vs. Running Configuration compliance check identifies whether the startup and running configurations of a device are in sync. If the configurations are out of sync, a compliance check is triggered and a detailed report of the out-of-band changes is displayed. The check is triggered within 5 minutes of any out-of-band changes. To view the Startup vs. Running Configuration compliance check in Catalyst Center, choose .
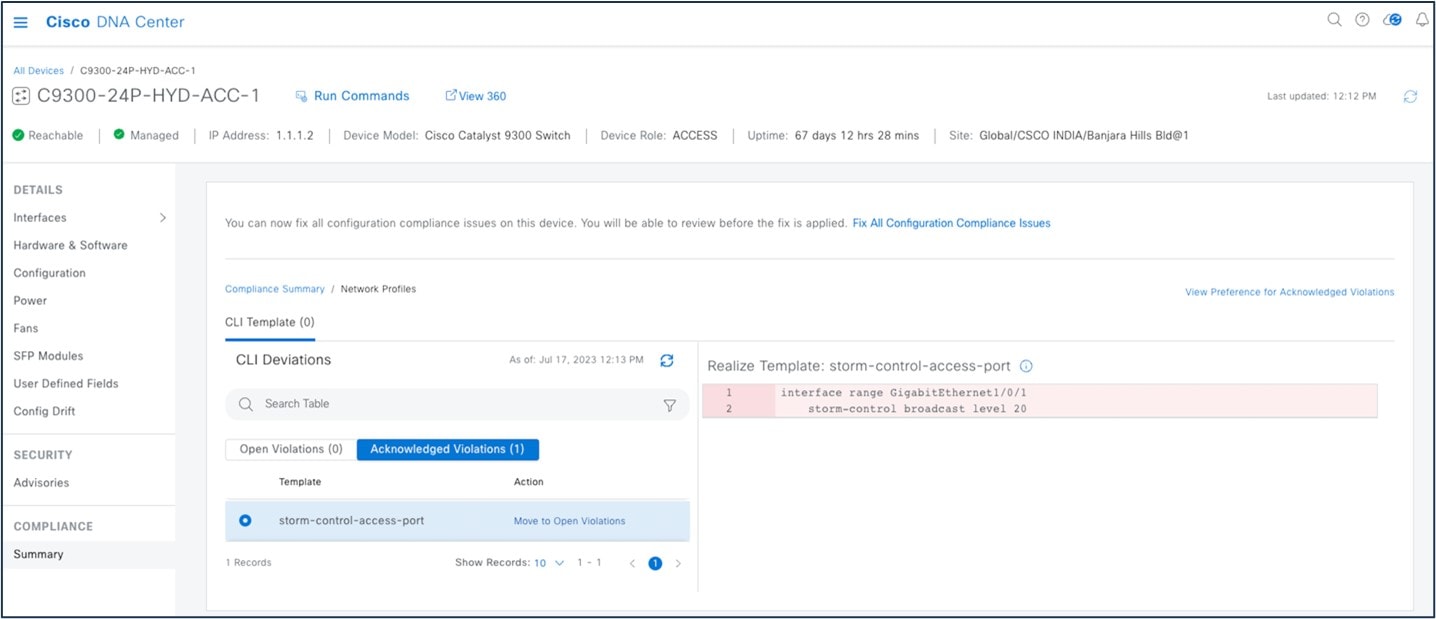
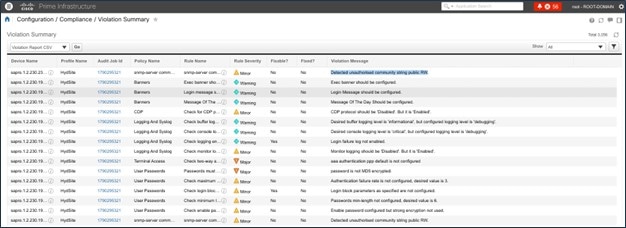
In Catalyst Center, you can view open violations after a template CLI push. You can acknowledge less-important device compliance violations. You can opt the violations in or out of the compliance status calculation.
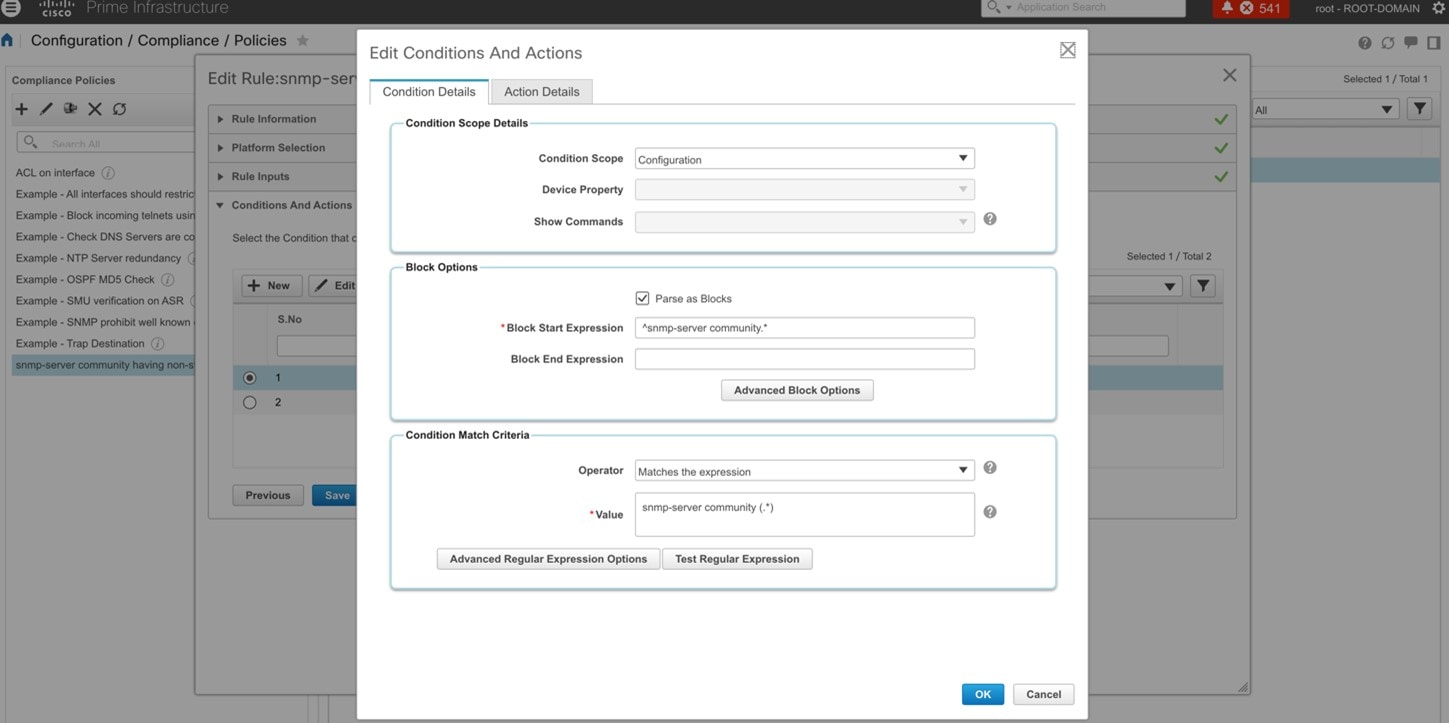
To view rule-based compliance in Cisco Prime Infrastructure, choose .
To view a compliance violation summary in Cisco Prime Infrastructure, choose .
For more information, see Compliance Audit for Network Devices.
Reports
Cisco Prime Infrastructure reports provide information about system and network health and fault information. You can customize and schedule reports to run on a regular basis. Reports can present data in a table, in a graph, or in a mixture of both formats. You can save reports in CSV or PDF format on the Cisco Prime Infrastructure server for download, or send reports to an email address.
Cisco Prime Infrastructure provide the following types of report data:
-
Current: Provides a snapshot of data that is not time dependent.
-
Historical: Periodically retrieves data from the device and stores it in the Cisco Prime Infrastructure database.
-
Trend: Generates a report using aggregated data, which is collected and summarized as minimums, maximums, and averages.
With Cisco Prime Infrastructure, you can filter reports based on specific criteria. You can export reports, sort reports into logical groups, and archive reports for long-term storage.
Catalyst Center uses data from the reports feature to derive insights from the network and its operation. Catalyst Center reports data in several formats, such as CSV and PDF. Catalyst Center provides flexible scheduling and configuration options to meet operational needs. For more information, see Reports.
Note |
Not all Catalyst Center reports are supported in PDF file format. |
The following table compares Cisco Prime Infrastructure and Catalyst Center reports.
| Features | Cisco Prime Infrastructure | Catalyst Center |
|---|---|---|
|
AP summary |
Supported |
Supported |
|
AP utilization |
Supported |
Supported |
|
Client session |
Supported |
Supported |
|
Client count, client detail |
Supported |
Supported |
|
Radio performance and AP RF quality/AP radio report in Catalyst Center |
Supported |
Supported |
|
Inventory |
Supported |
Supported |
|
Wireless uptime, AP summary |
Supported |
Supported |
|
Composite report, flexible report |
Supported |
Supported |
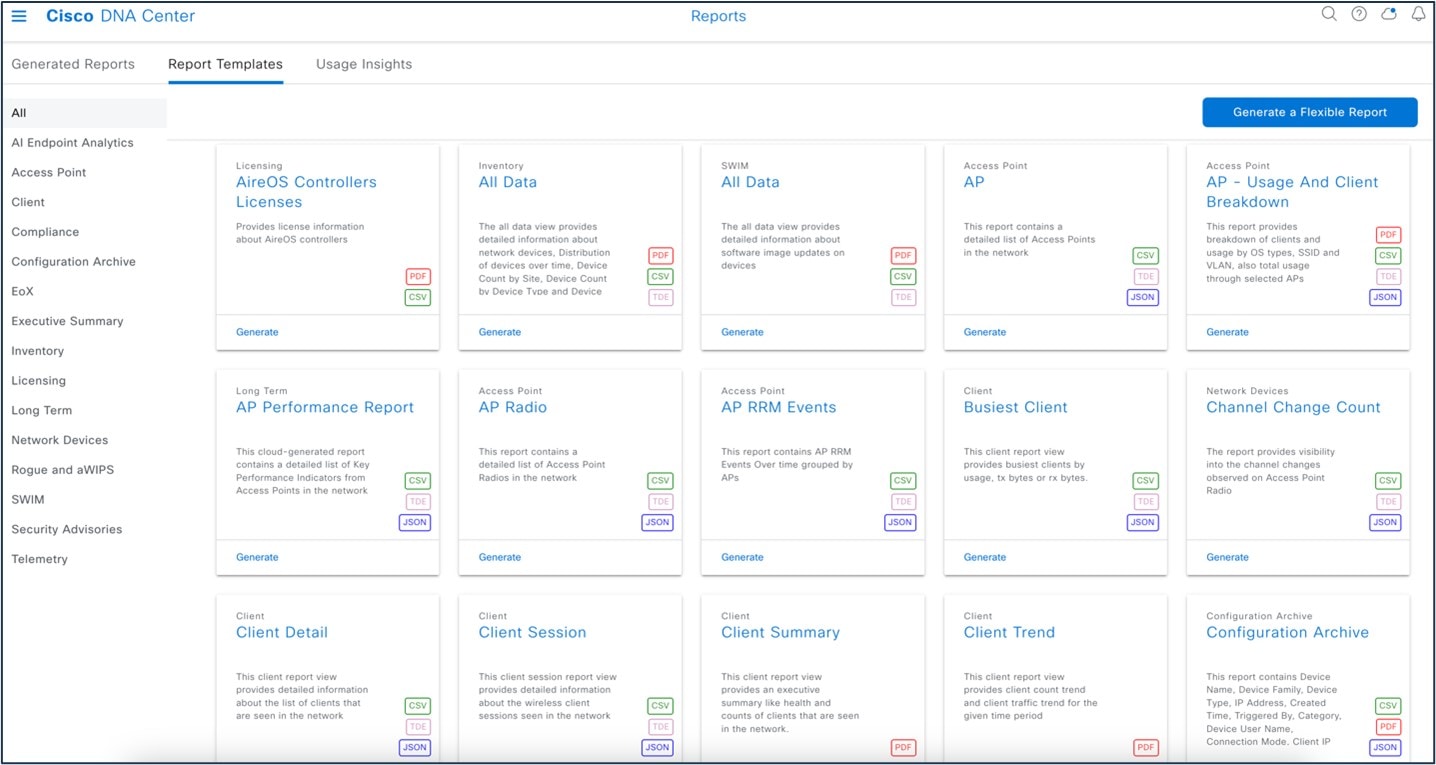
The following figure shows the Catalyst Center Reports window:
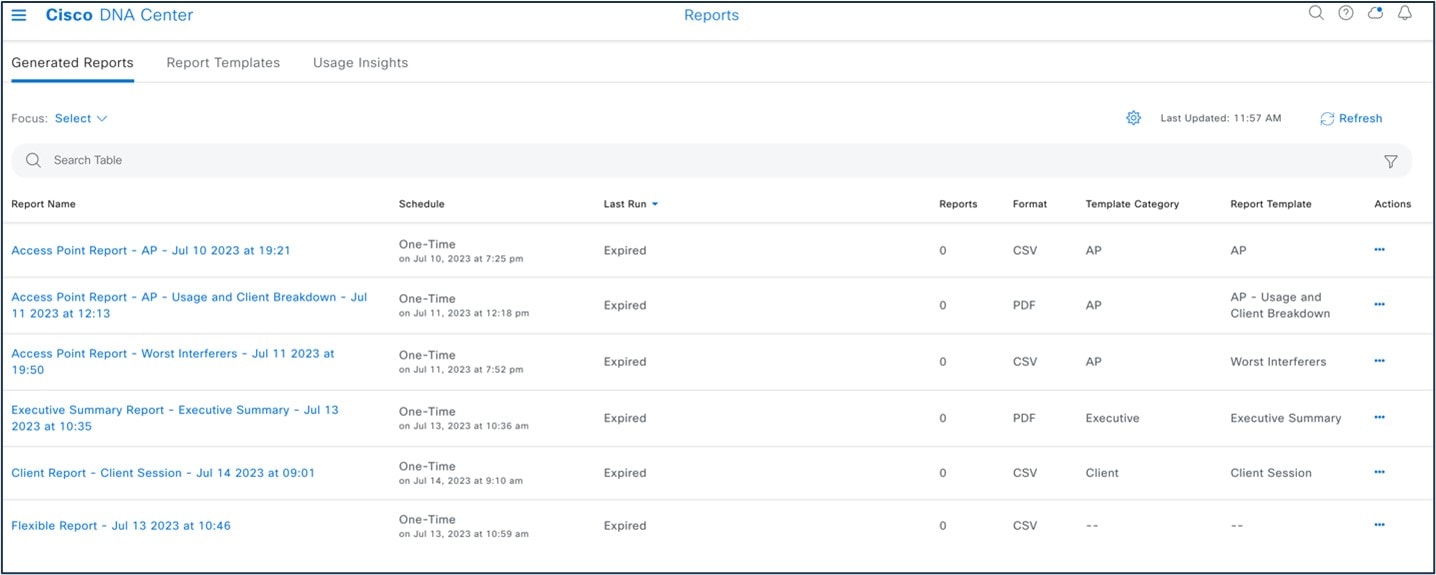
The following figure shows a Catalyst Center-generated report:
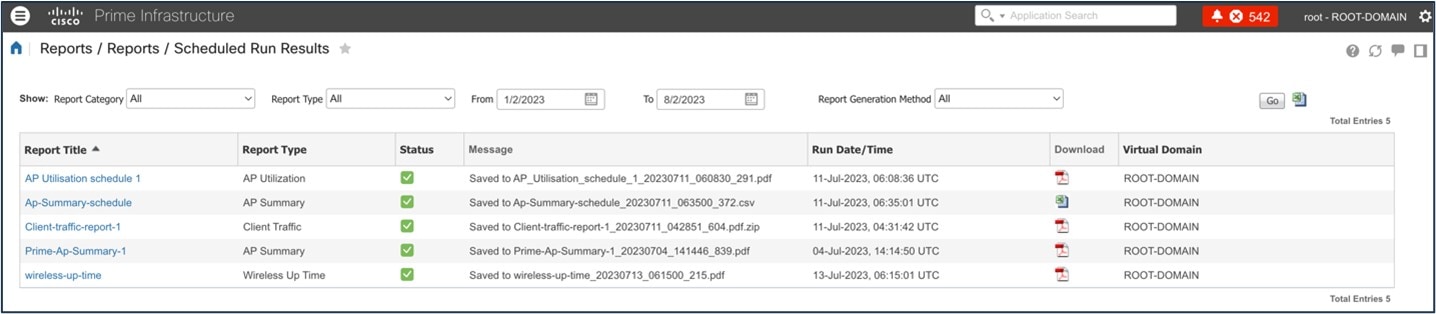
The following figure shows a Cisco Prime Infrastructure-generated report ():
Software Image Management
The Catalyst Center software image management (SWIM) process manages software upgrades and controls the consistency of image versions and configurations across your network. SWIM speeds and simplifies the deployment of new software images and patches. Prechecks and postchecks help ensure that an upgrade has no adverse effects. SWIM provides an easy way to build a central repository of software images and apply them to devices. Administrators can mark software images as golden for a device family, and then upgrade devices to the software image and patch versions that follow the golden versions defined in the repository. Catalyst Center supports patches from intent to prechecks and postchecks in the same way that it manages regular images. SWIM tracks when software maintenance updates, subpackages, ROMMON, AP service pack, and AP device pack upgrades are applied to the base image.
| Feature | Cisco Prime Infrastructure | Catalyst Center |
|---|---|---|
|
SWIM preinstall check |
Not Supported |
Supported |
|
Software image summary |
Supported |
Supported |
|
Add/import image |
Supported |
Supported |
|
Golden image |
Not Supported |
Supported |
|
Distribute image |
Supported |
Supported |
|
Activate image |
Supported |
Supported |
|
Commit changes |
Supported |
Supported |
|
Last n SWIM jobs |
Supported |
Supported |
|
SMU support |
Not Supported |
Supported |
|
ROMMON upgrade |
Not Supported |
Supported |
|
SWIM postinstall check |
Not Supported |
Supported |
Catalyst Center SWIM provides the following benefits:
-
Provides prechecks and postchecks as part of the SWIM workflow, comparing the difference before and after an upgrade.
-
Provides complete flexibility and simplicity to choose show commands based on your network requirement.
With the Catalyst Center software image upgrade, you import the image from cisco.com and then mark the image as golden. You can specify a golden software image for a device family or for a particular device role. The device role is used to identify and group devices according to their responsibilities and placement in the network.

To start the image upgrade, Catalyst Center compares each device software image with the image that you designate as golden for that specific device type. If the software image and the golden image differ, Catalyst Center specifies that the software image of the device is outdated. You can then update the outdated software image.
Before pushing a software image to a device, Catalyst Center performs upgrade readiness prechecks on the devices, such as checking the device management status, disk space, and so on. If any prechecks fail, you cannot perform the software image upgrade. You must correct any issues before you can upgrade the software image on the devices.
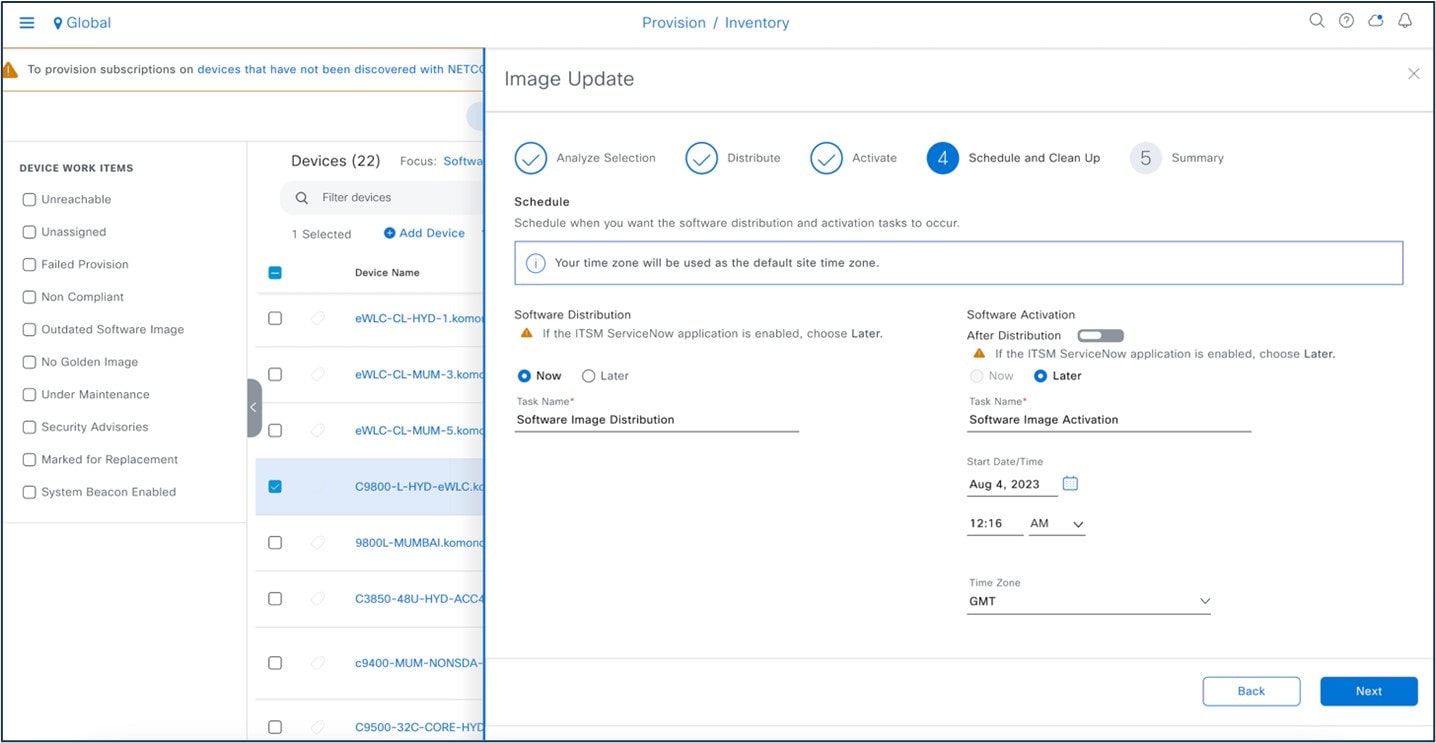
If all prechecks succeed, you can distribute (copy) the new image to the device and activate it (that is, make the new image the running image). The activation of the new image requires a reboot of the device. Because a reboot might interrupt the current network activity, you can schedule the process for a later time.
After the software image is successfully upgraded, Catalyst Center performs upgrade postchecks, such as checking the CPU usage, route summary, and so on, to ensure that the state of the network remains unchanged.
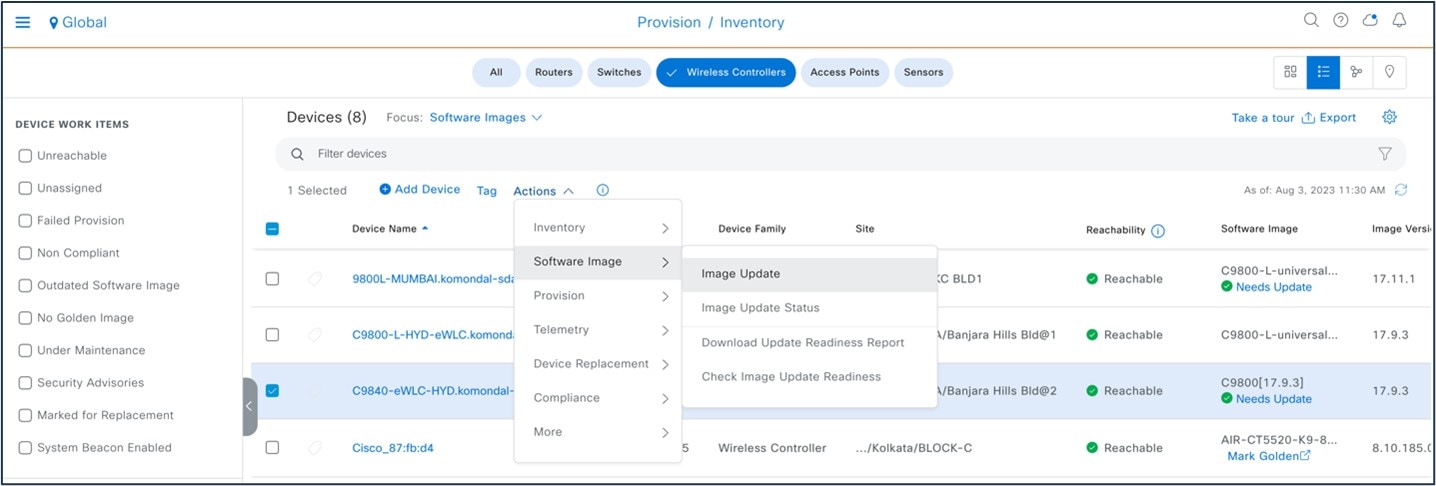
To start the image upgrade, choose .
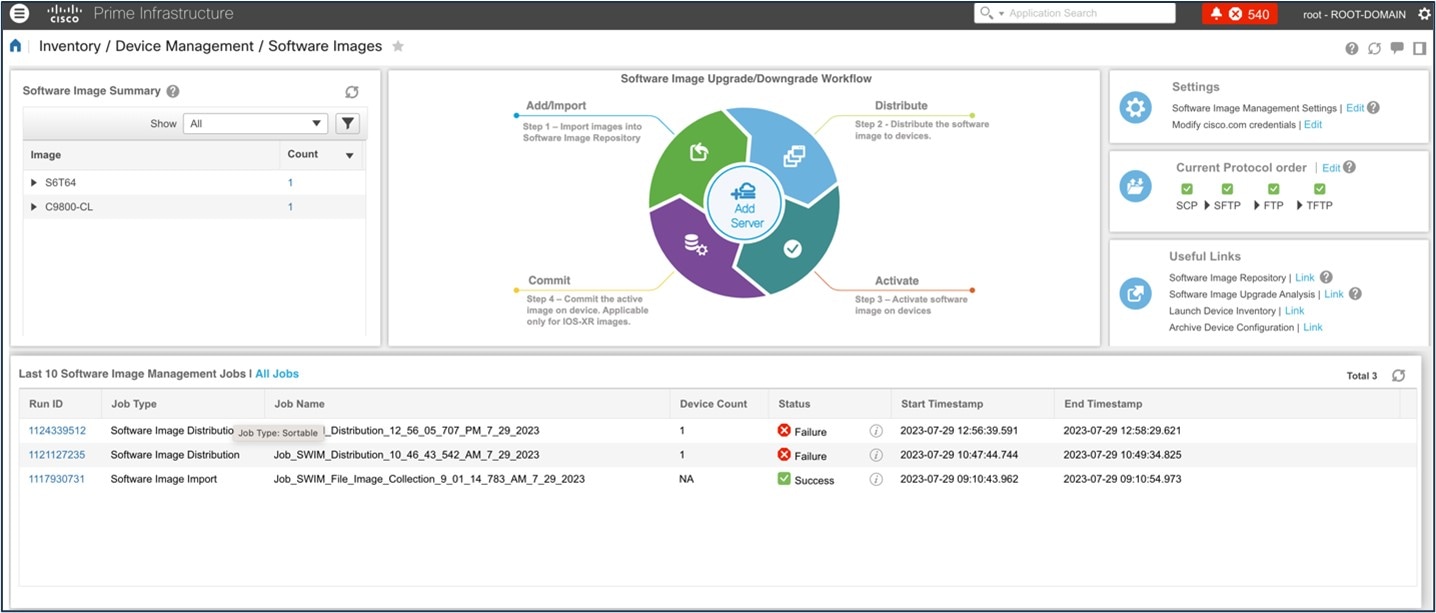
The following figure shows the Cisco Prime Infrastructure SWIM landing page:
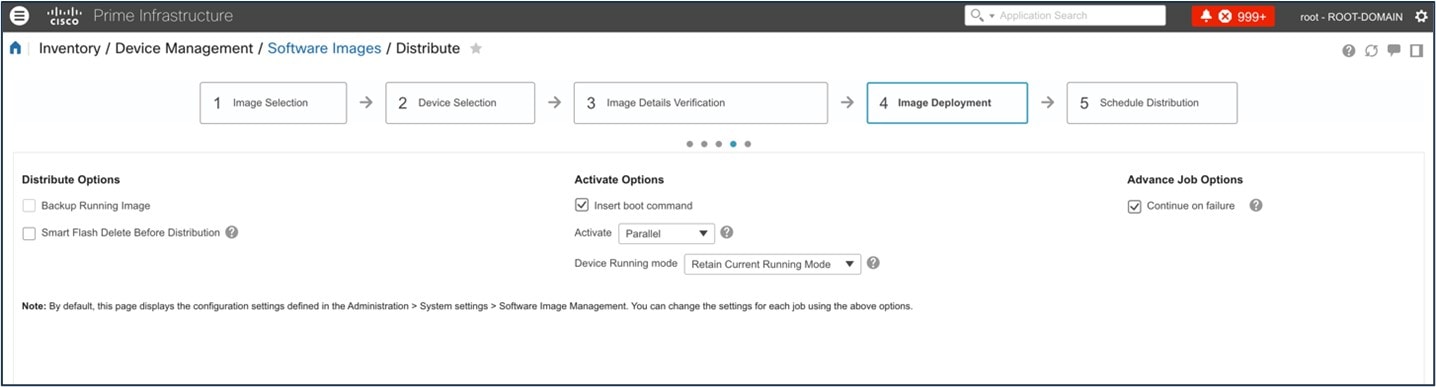
The following figure shows the Cisco Prime Infrastructure image upgrade:
For more information about Catalyst Center SWIM, see Manage Software Images.
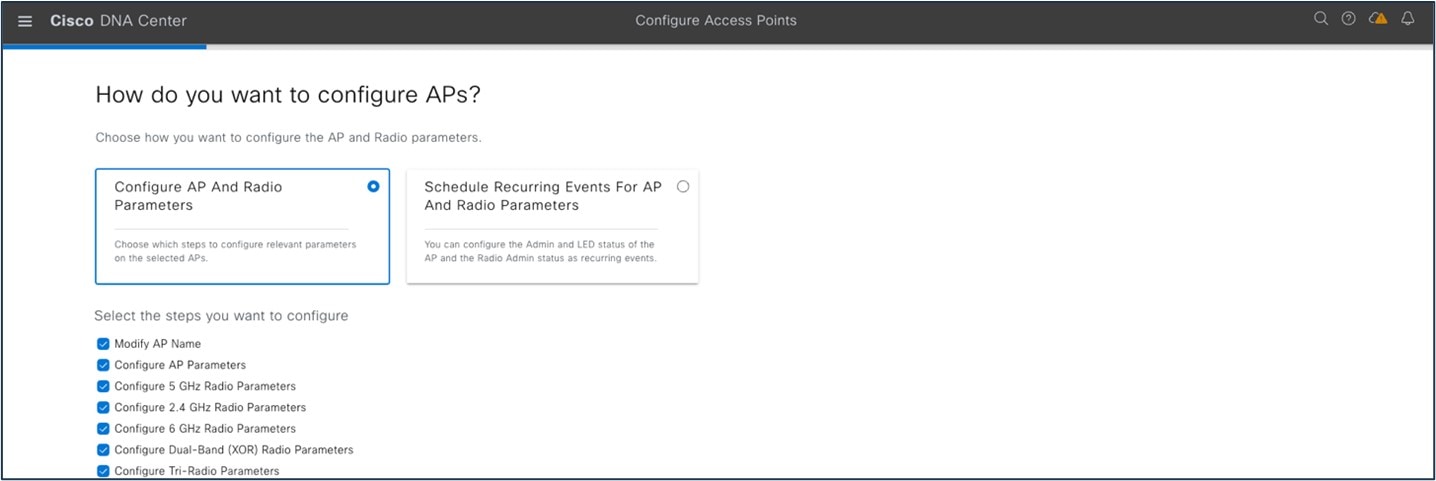
AP Configuration Workflow
The Configure Access Points workflow lets you configure and deploy AP-level parameters, such as the AP location, admin status, mode, and so on. You can also configure radio-level parameters, such as the radio power level, channel settings, and so on.
The Configure Access Points workflow in Catalyst Center is similar to the Lightweight Access Point feature in Cisco Prime Infrastructure.
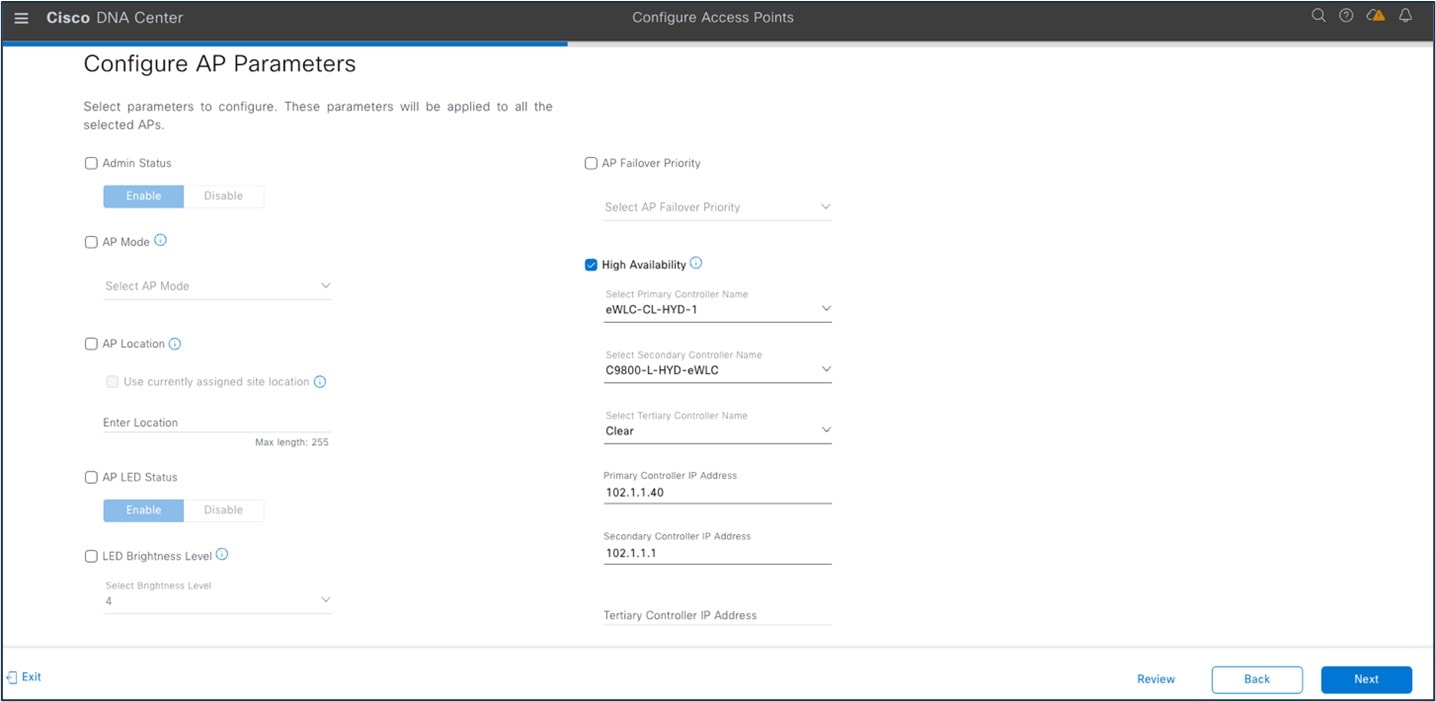
The following settings configured using the Configure Access Points workflow aren't overwritten when the wireless controllers or APs are reprovisioned:
-
Admin status for radios (only applicable for Cisco AireOS wireless controllers)
-
AP primary controller
-
AP secondary controller
To launch the Configure Access Points workflow in Catalyst Center, choose :

The following figure shows the AP-level parameters to configure:
The following figure shows an AP primary controller name change for HA:
To launch the Cisco Prime Infrastructure Lightweight Access Point feature, choose :
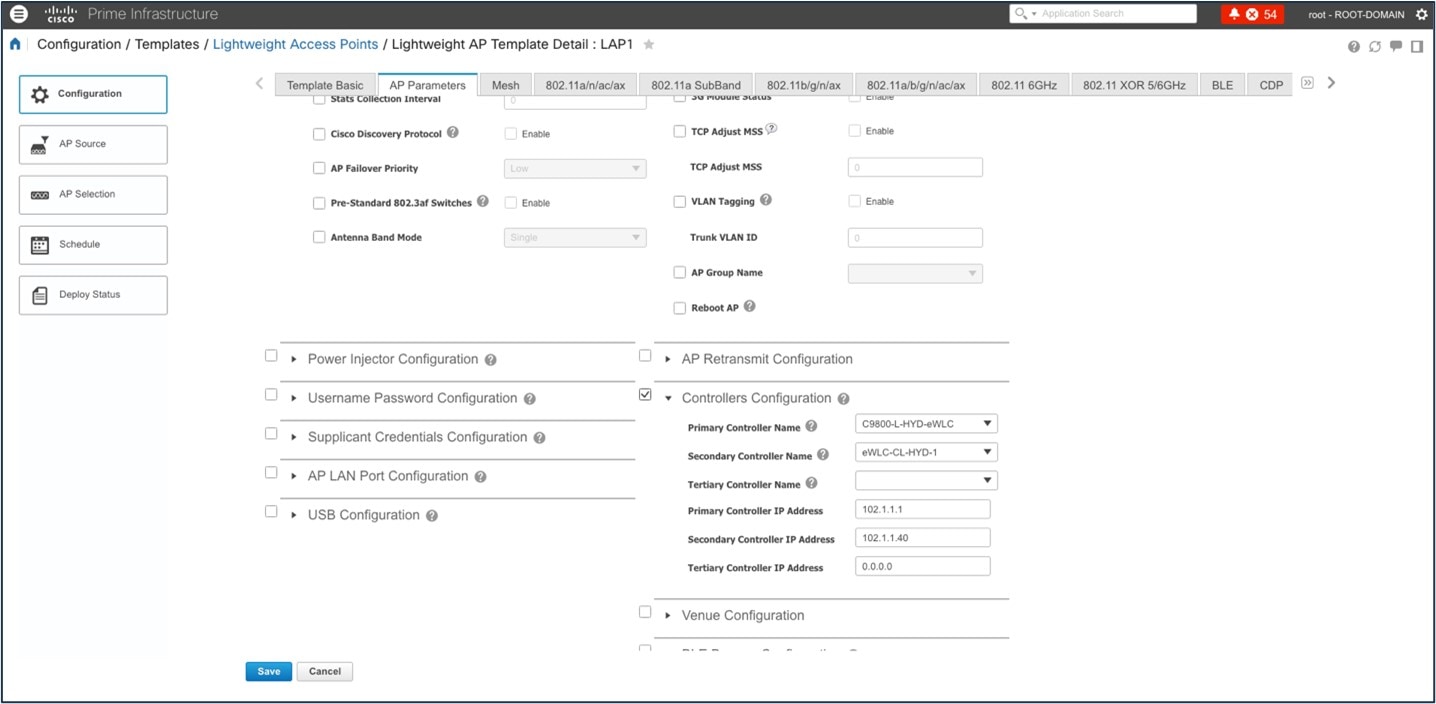
For more information, see AP Configuration in Catalyst Center.
Cisco ISE and CMX Migration
If you check the Enable ISE settings check box, the Cisco ISE server details are pushed. If you don't check the Enable ISE settings check box, Cisco ISE data isn't pushed to the Catalyst Center server.
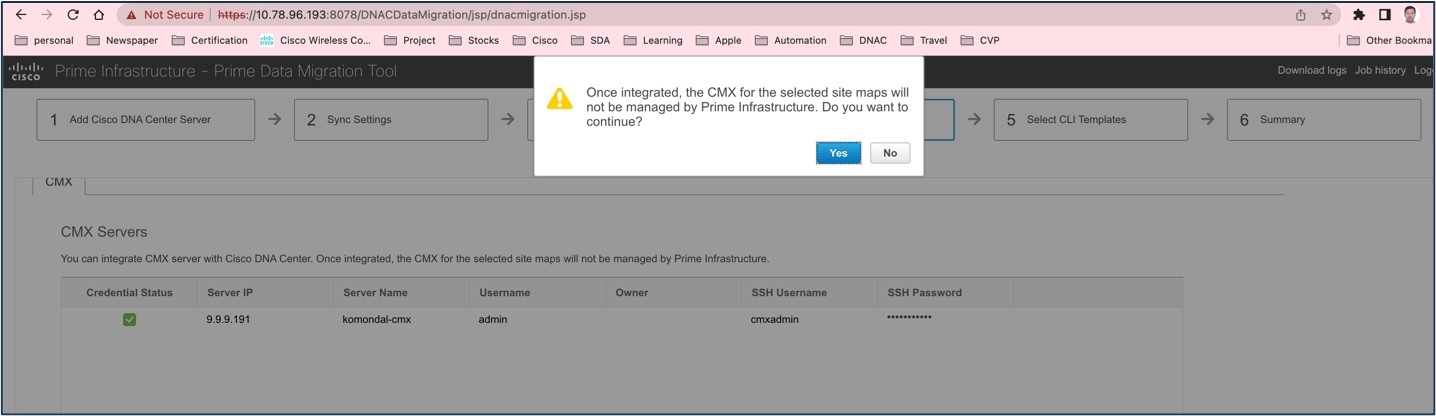
If you check the Enable CMX settings check box, CMX is pushed with floor groups. If you don't check the Enable CMX settings check box, CMX data isn't pushed to the Catalyst Center server.
When the Cisco Prime Infrastructure – Catalyst Center migration tool is active and auto sync is enabled, CMX is pushed dynamically to Catalyst Center floor groups, and Catalyst Center tracks the location data for assigned groups.
After CMX is migrated to Catalyst Center, it is not managed by Cisco Prime Infrastructure.
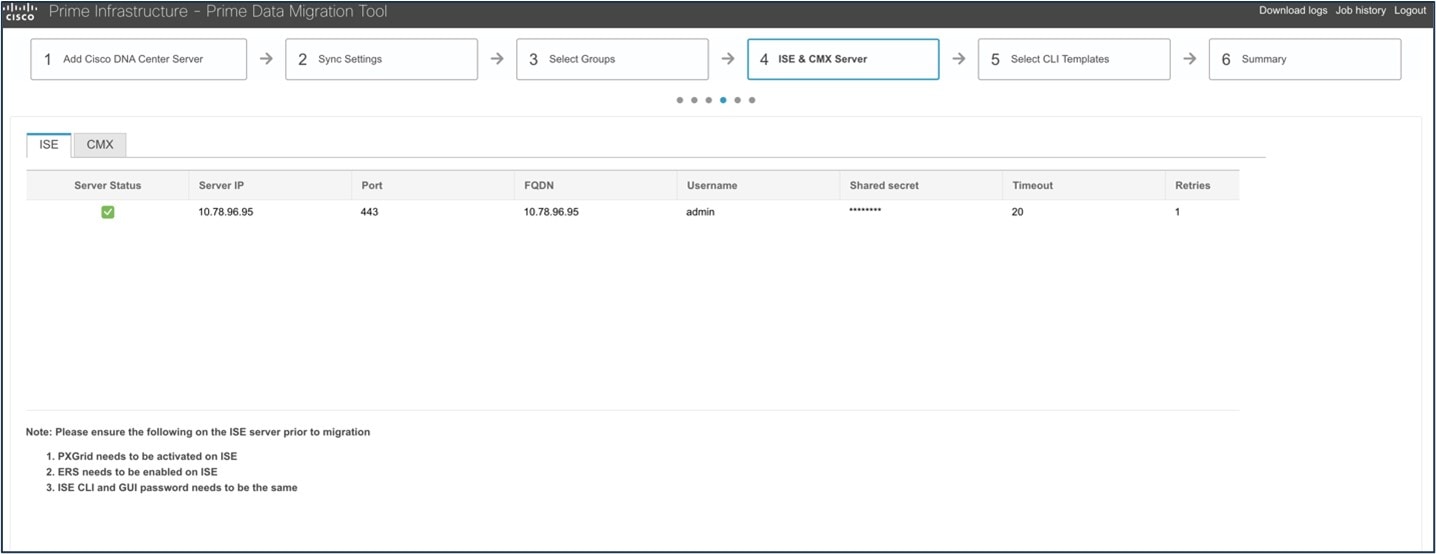
The following figure shows how to enable the Cisco ISE setting in the PDMT for migration:
The following figure shows how to enable CMX settings in the PDMT for migration:
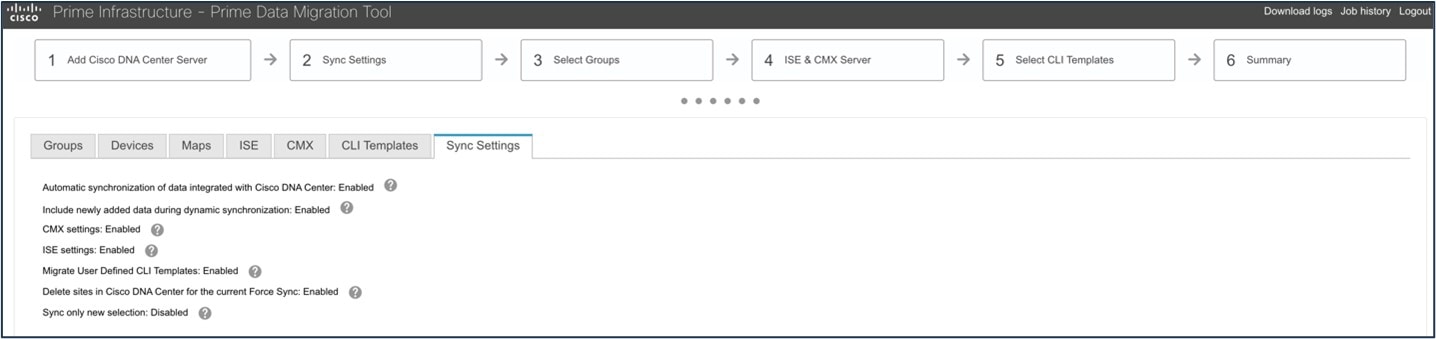
The following figure shows the dynamic synchronization and CMX settings enabled:
The following figure shows CMX on Cisco Prime Infrastructure before migration:

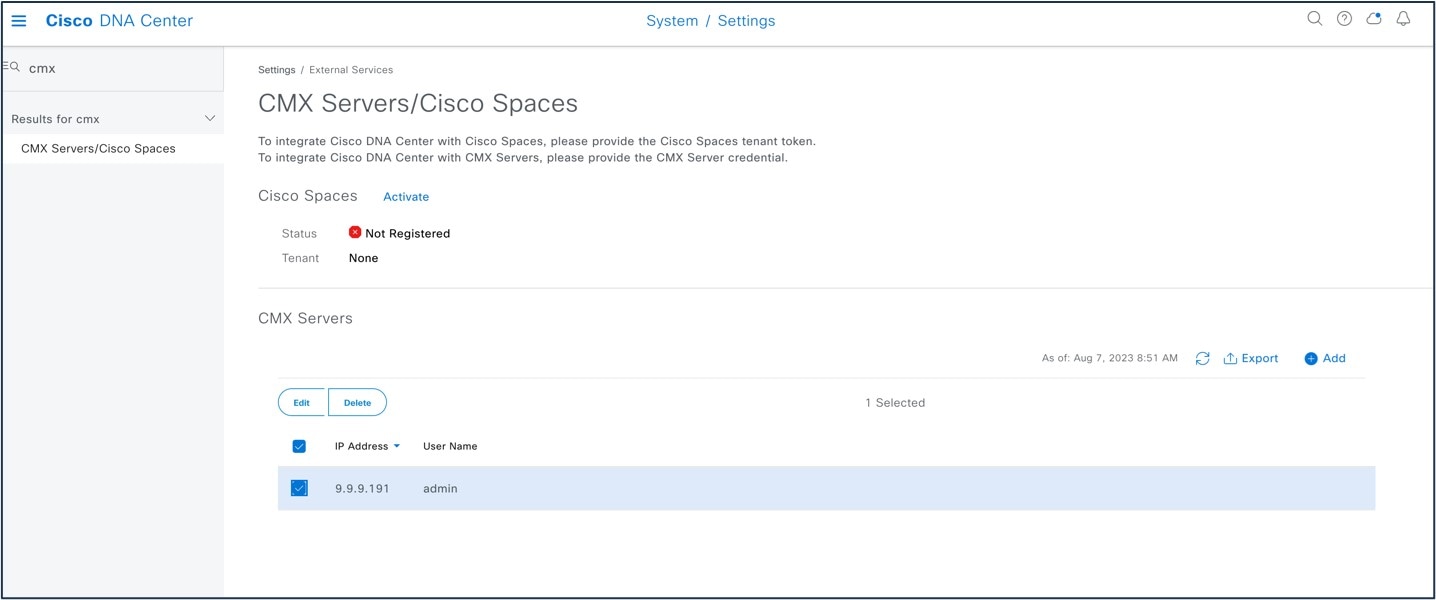
The following figure shows CMX settings after migration to Catalyst Center:
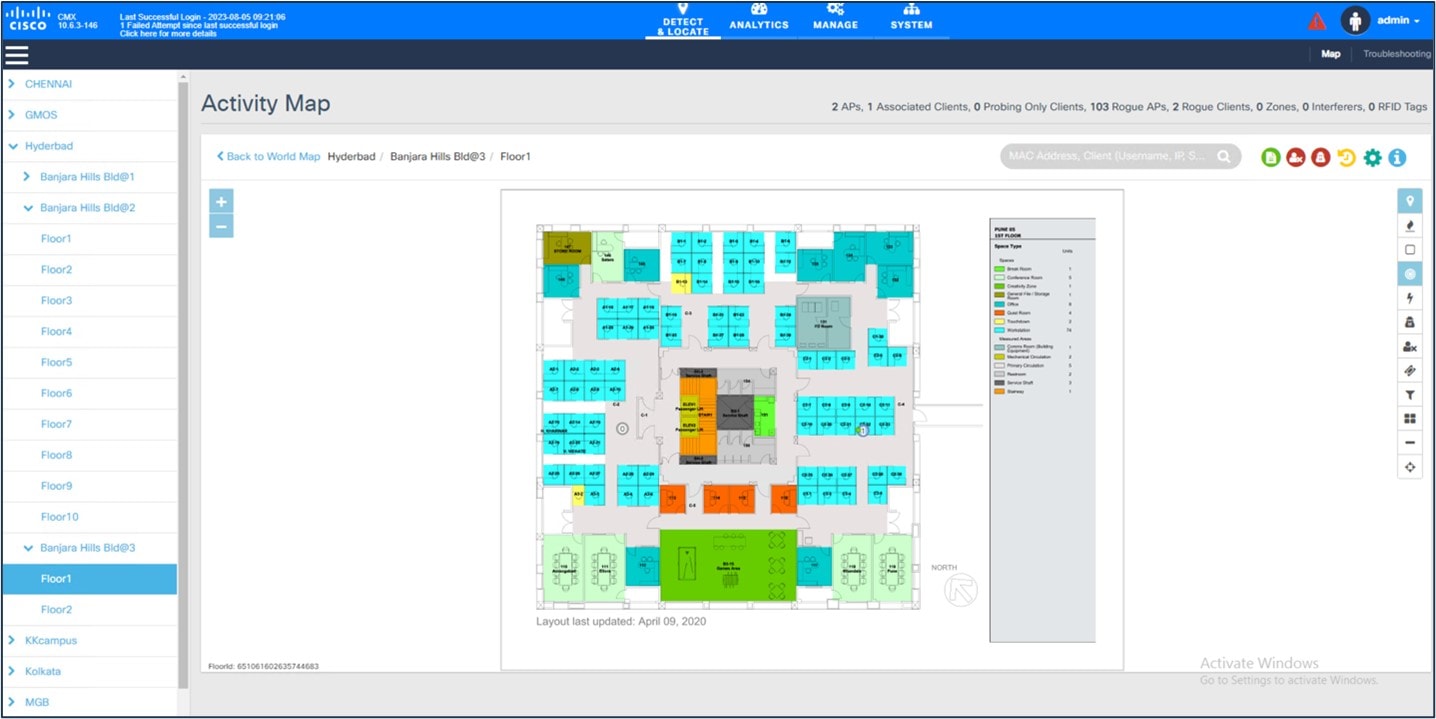
The following figure shows a floor map on CMX:
When you migrate Cisco ISE from Cisco Prime Infrastructure to Catalyst Center, Cisco ISE is added to Catalyst Center in the failed state. To avoid this, you must:
-
Activate pxGrid on Cisco ISE.
-
Enable ERS on Cisco ISE.
-
Make sure that the Cisco ISE CLI and GUI passwords are the same.
Wireless Controller HA and Mobility
Cisco Catalyst 9800 Series wireless controllers support the ability to be configured in an active/standby high availability (HA) stateful switch-over (SSO) pair. Catalyst Center supports the ability to take two controllers of the same model, running the same OS version, and configure them into an HA SSO pair.
For Catalyst 9800 Series wireless controllers, the redundancy management IP and peer redundancy management IP addresses that need to be configured in Catalyst Center are actually the redundancy port and peer redundancy port IP addresses. These are referred to as the local IP and remote IP addresses in the web UI of the Catalyst 9800 Series wireless controllers. The IP subnet for the redundancy port must be a separate IP subnet from any other interface on the Catalyst 9800 Series wireless controller. Also, the primary and standby Catalyst 9800 Series wireless controllers must use the same IP subnet for the redundancy port, meaning the redundancy port connection must be a Layer 2 connection or back-to-back.
Using Catalyst Center base automation for wireless controller HA and mobility offers the following benefits:
-
Automated workflow to enable or disable wireless controller HA
-
Automated workflow to enable or disable mobility tunnels
Procedure
|
Step 1 |
To configure wireless controller HA or mobility tunnels in Catalyst Center, choose . 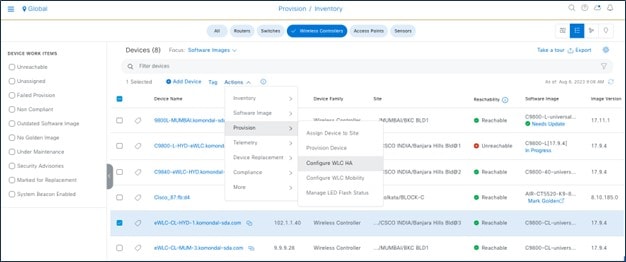
|
|
Step 2 |
To disable HA on the wireless controller (if HA is already provisioned), click Disable HA. 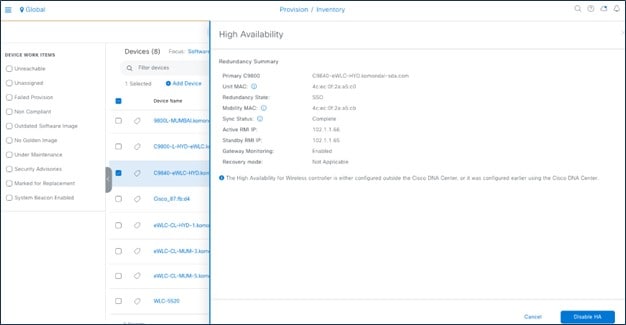
|
|
Step 3 |
To configure or reset the mobility group, choose . 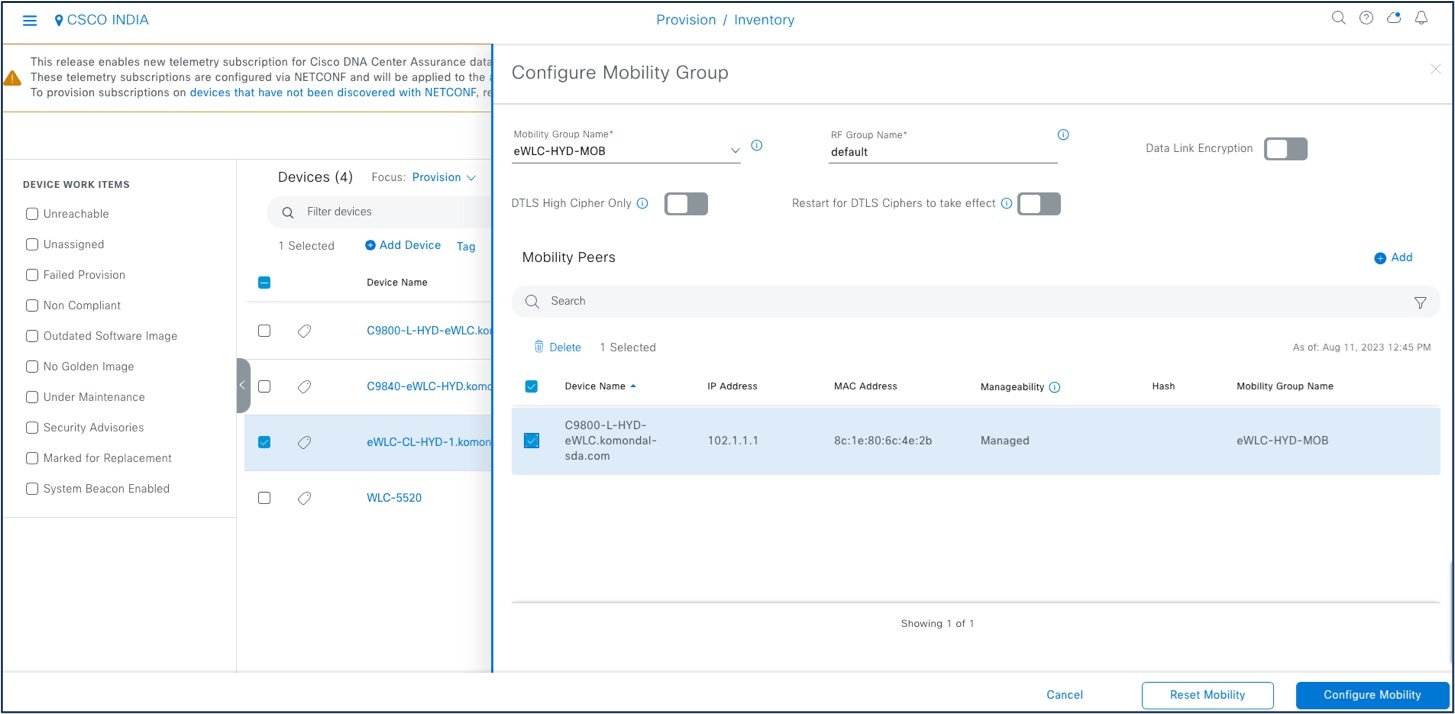
For more information, see Catalyst 9800 Non-Fabric Deployment Using Cisco DNA Center. |
Intelligent Capture
Intelligent Capture (ICAP) is Cisco’s state-of-the-art, intent-based networking solution. ICAP provides live technical insight into various wireless metrics from both the client and AP perspective, allowing you to easily resolve the most difficult wireless issues.
ICAP provides support for a direct communication link between Catalyst Center and APs. Using this channel, Catalyst Center can receive packet capture (PCAP) data, AP and client statistics, and spectrum data. With the direct link from the AP to Catalyst Center via gRPC, ICAP allows you to access data from APs that is not available from wireless controllers.
Catalyst Center ICAP supports the features listed in the following table.
| Catalyst Center Feature Name | Wireless Controller and AP Feature Name |
|---|---|
|
Data Packet Capture |
Full Packet Capture |
|
Live Capture |
Partial Packet Capture Client Filtered |
|
AP Stats Capture |
AP WLAN Statistics AP RF Statistic Client RF Statistics |
|
Anomaly Stats Capture |
Anomaly Detection Anomaly Packet Capture Anomaly Individual Reports Anomaly Summary Reports |
|
Spectrum Analysis |
Spectrum Analysis |
For more information, see the Cisco Intelligent Capture Deployment Guide.
Procedure
|
Step 1 |
To enable AP stats capture using ICAP, choose . 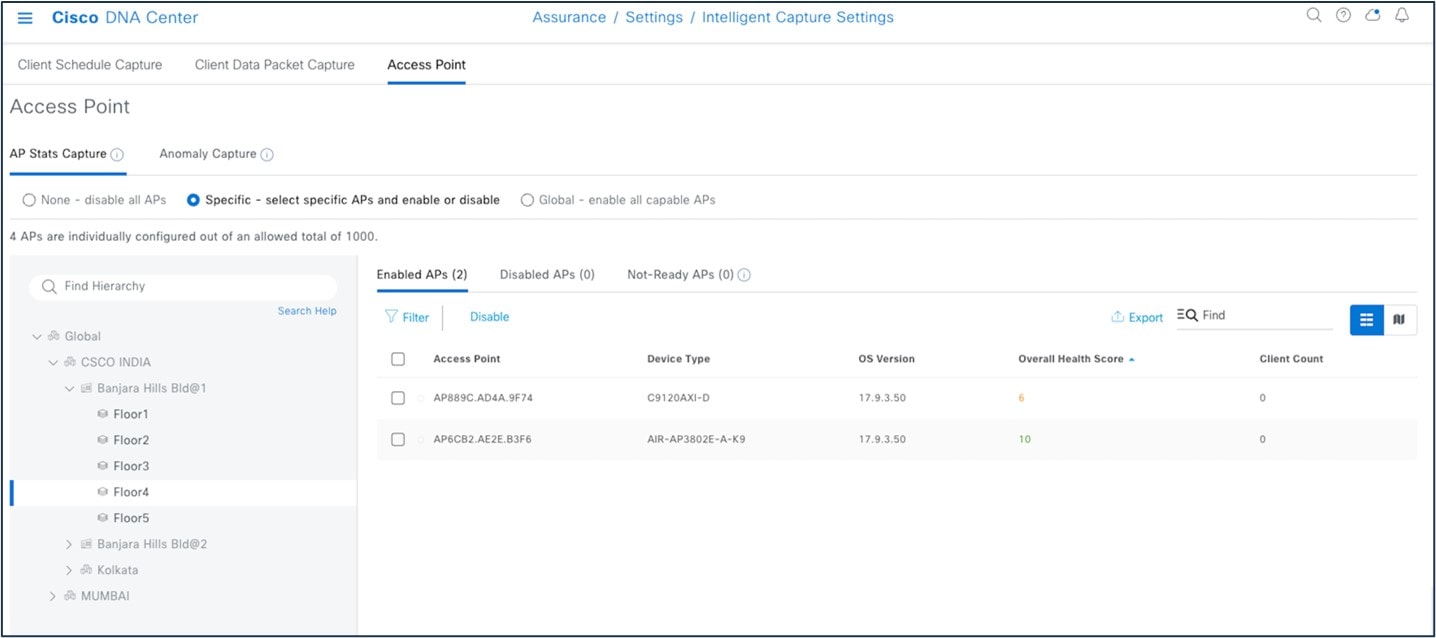
|
|
Step 2 |
Start the AP capture. 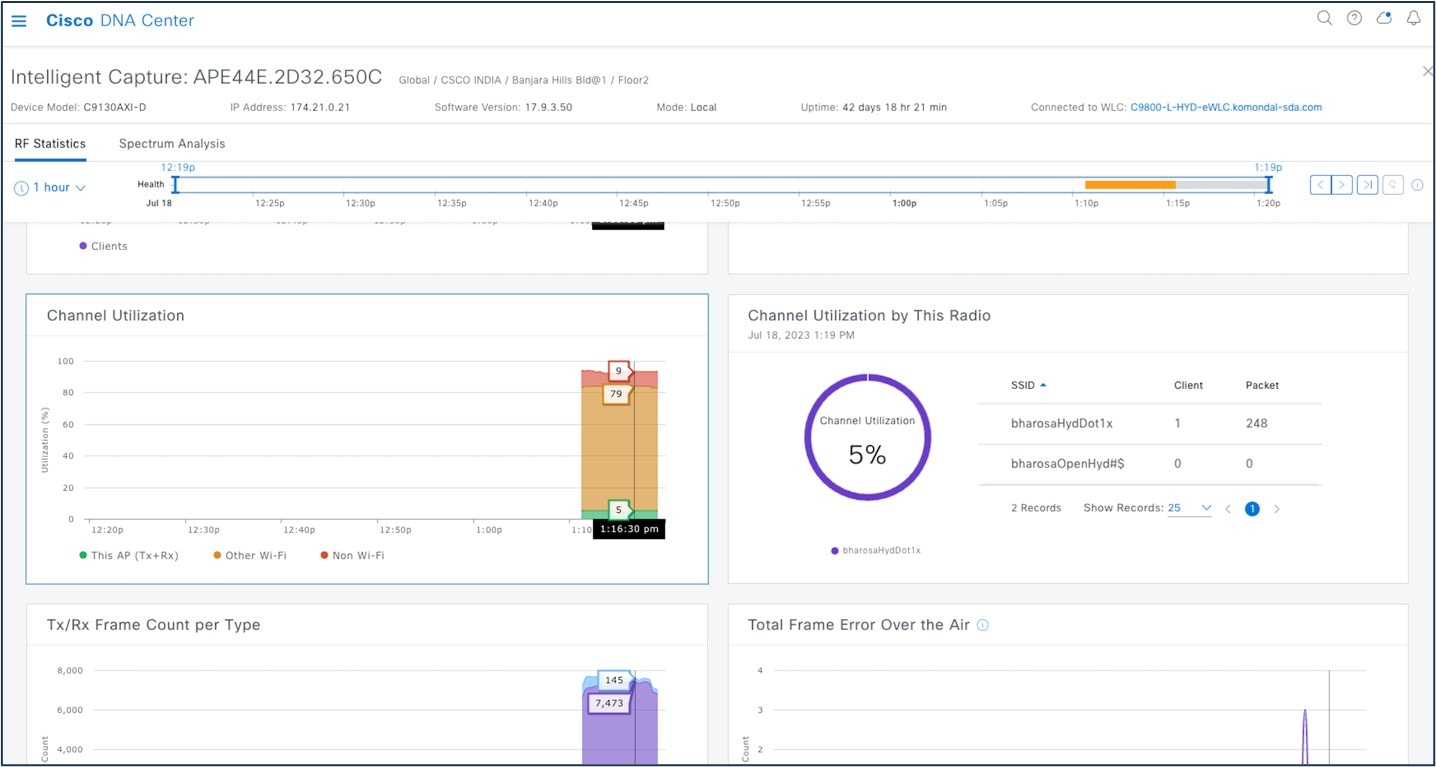
|
|
Step 3 |
Start the client ICAP capture. 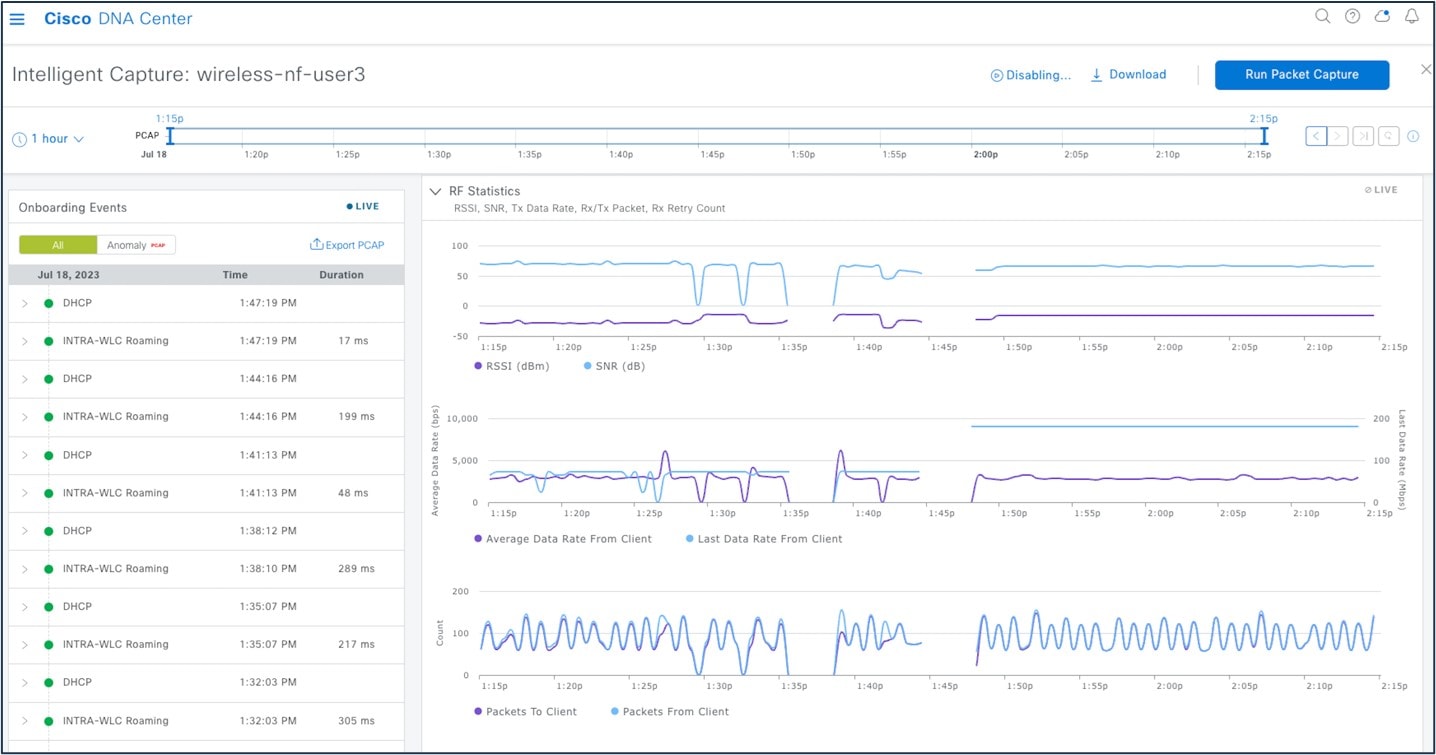
|
Configuration Archive
Catalyst Center uses configuration archive functionality to save the latest device configuration in its internal databases. The configuration of a device is archived when a new device is added to Cisco Prime Infrastructure and updated by periodic triggers or event-based triggers. Event-based triggers occur when there is a change in the configuration.
Catalyst Center exports the device configuration of the switch from the inventory and exports the CLI output.
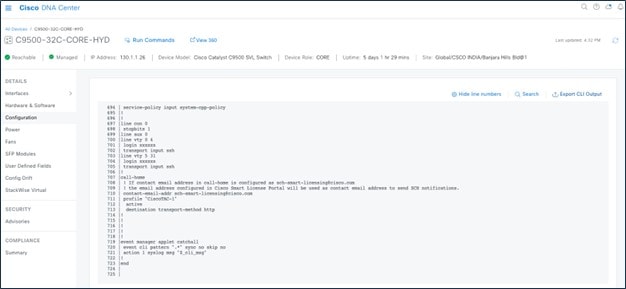
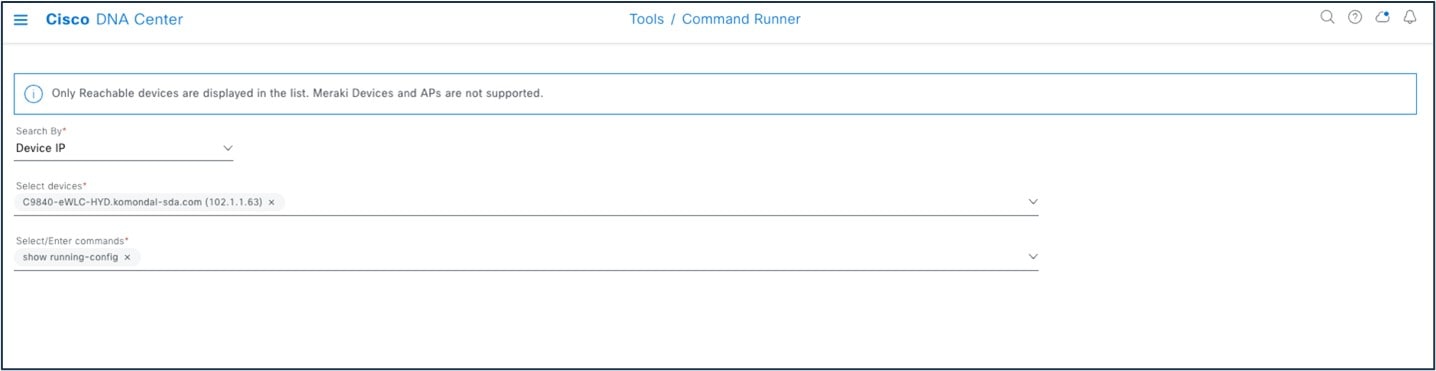
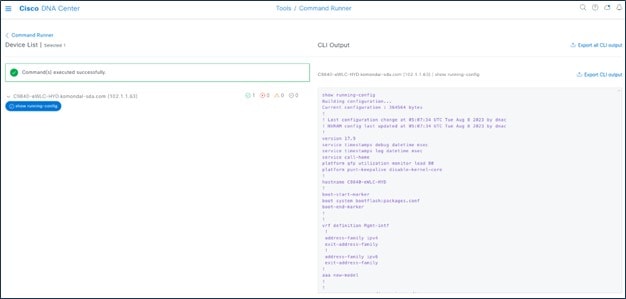
Catalyst Center uses Command Runner to export the running configuration for Catalyst 9800 wireless controllers.
Catalyst Center exports the wireless configuration.
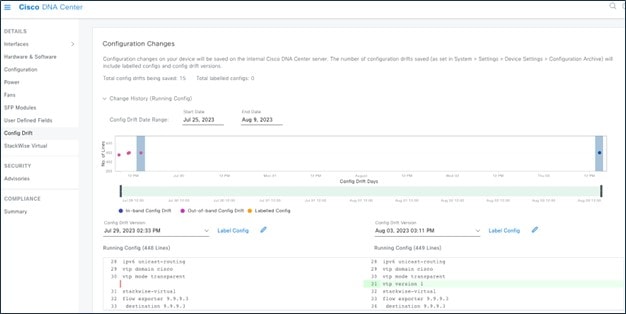
Use config drift to check the configuration difference between drift versions.
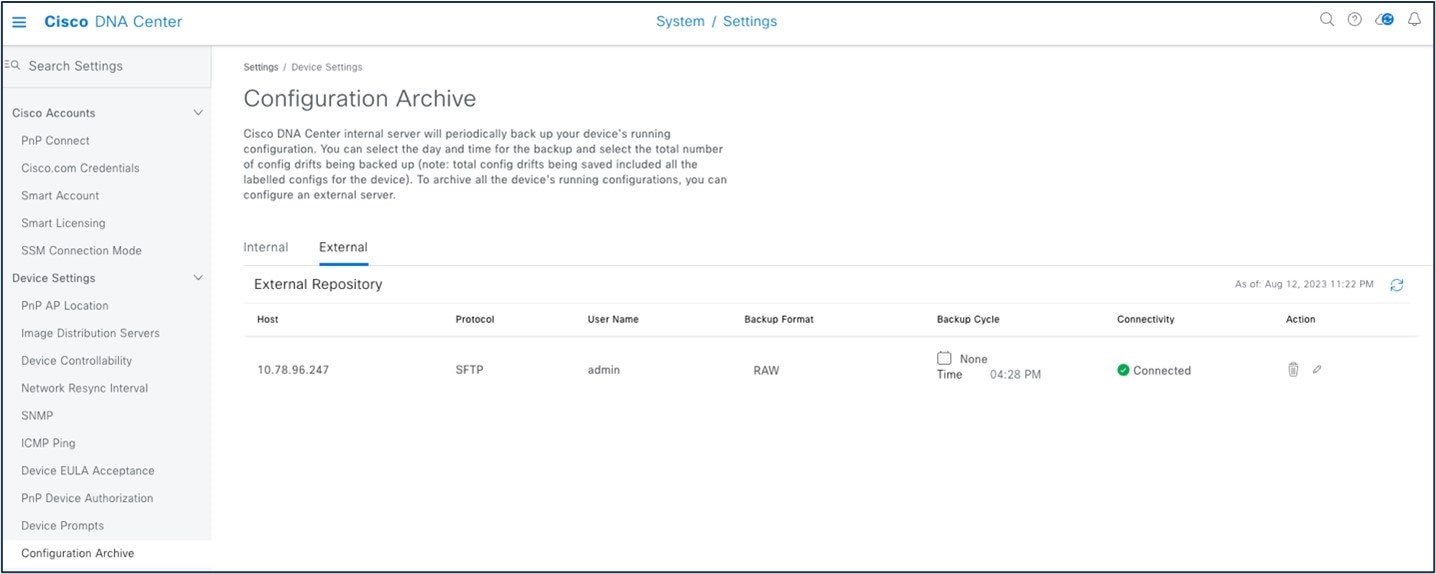
Archive the configuration to internal and external servers.
Cisco Prime Infrastructure maintains an archive summary.
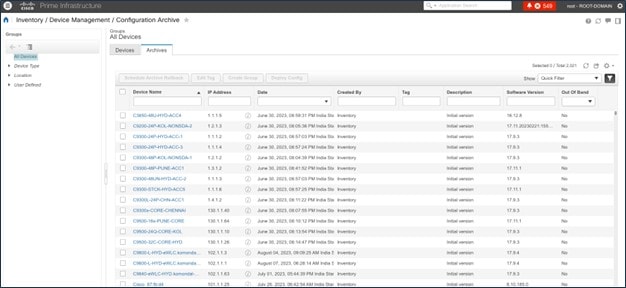
Cisco Prime Infrastructure exports the device configuration.
Machine Reasoning Workflows
Catalyst Center delivers some incredible machine reasoning workflows with the addition of a powerful cloud-connected Machine Reasoning Engine (MRE). The solution offers two ways to experience the usefulness of this new MRE. The first way is something many of you are already aware of, because it’s been part of our AI/ML insights in Cisco Catalyst Center for a while now: proactive insights. When Catalyst Center's Assurance engine flags an issue, it may the issue to the MRE for automated troubleshooting. If there is an MRE workflow to resolve this issue, you will be presented with a run button to execute that workflow and resolve the issue.
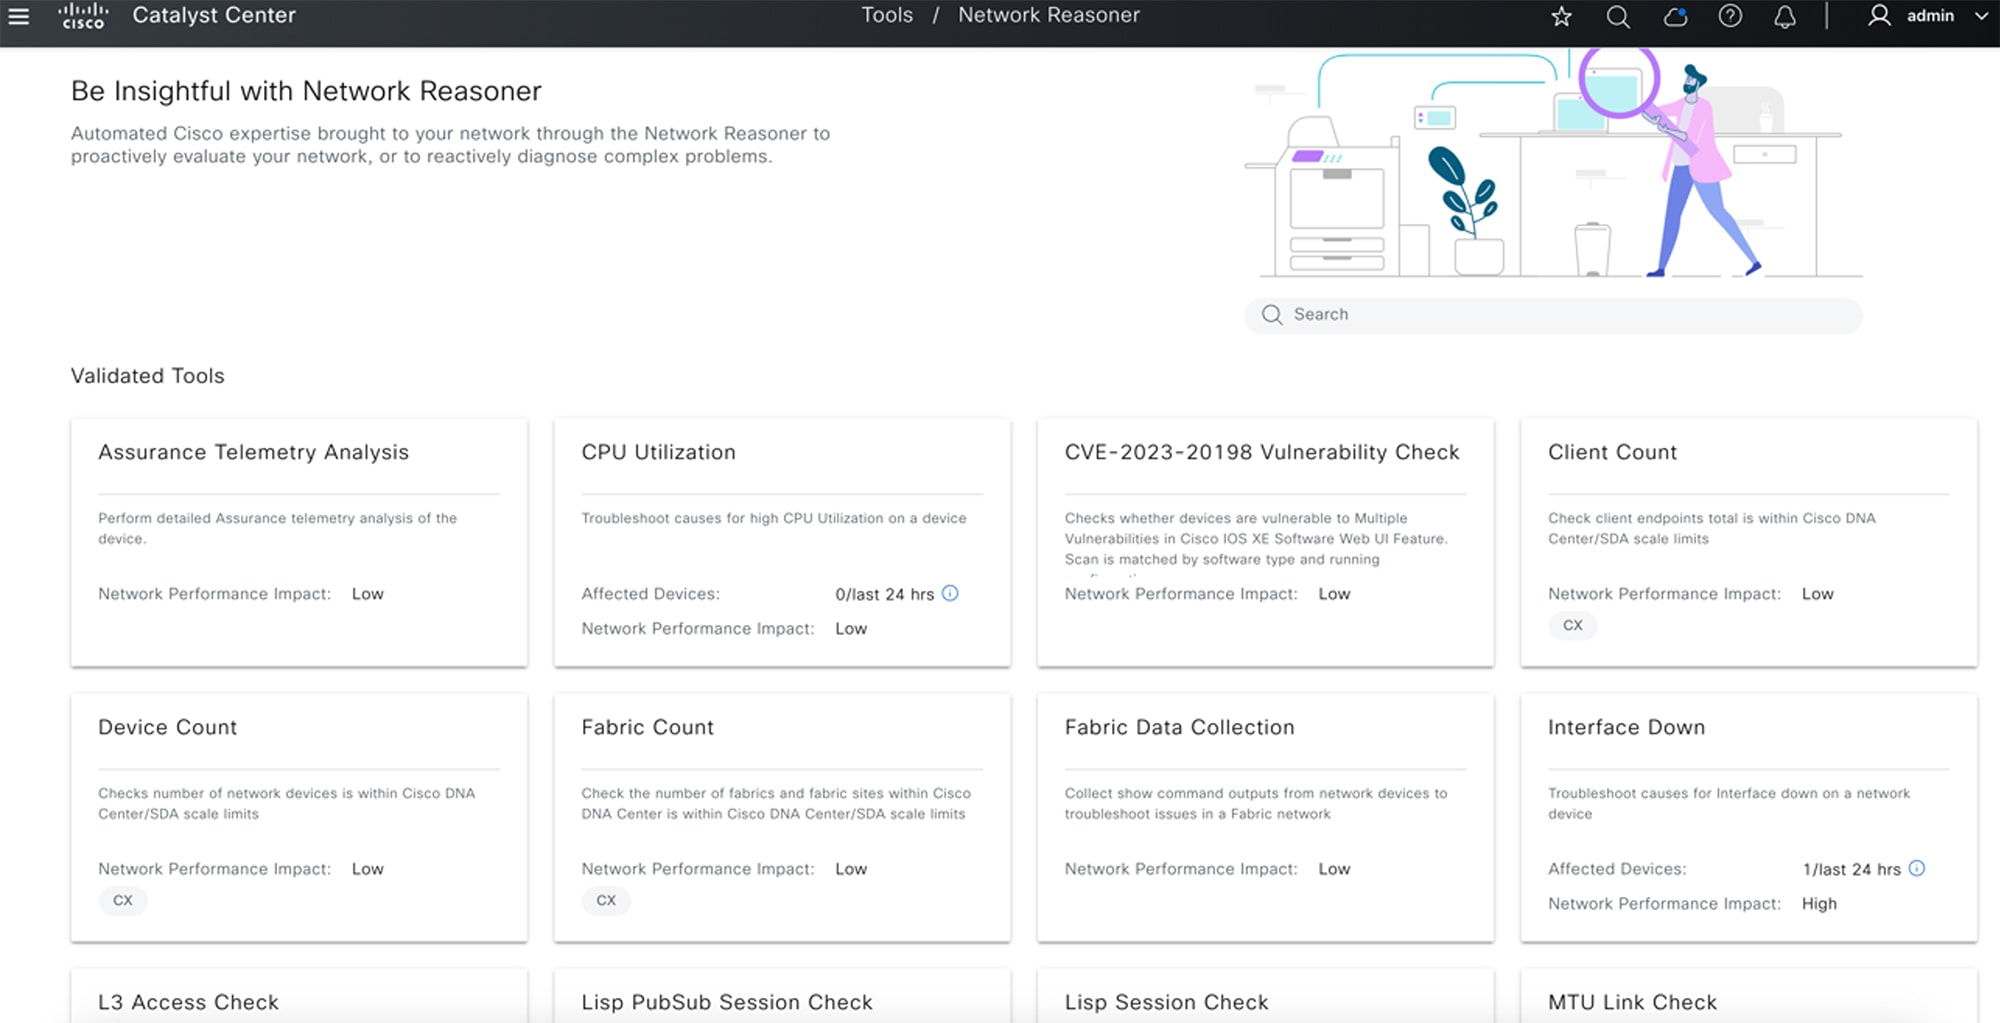
The Network Reasoner tool allows you to troubleshoot issues on your network quickly. From the main menu, choose to open the Network Reasoner dashboard. This dashboard provides workflows you can use to proactively troubleshoot network issues. It also provides a brief description of these workflows, the number of affected devices in the last 24 hours, and the impact of running a workflow on a network.
Troubleshoot Wireless APs Using the MRE Workflow
Complete these steps to troubleshoot issues with your network's wireless APs using the MRE workflow.
Procedure
|
Step 1 |
From the main menu, choose . |
|
Step 2 |
Click the Wireless AP Data Collection tile. The Devices window shows the filtered wireless controller devices. |
|
Step 3 |
Choose the wireless controller device that you want to troubleshoot for the AP, then click the Troubleshoot link. |
|
Step 4 |
In the Reasoner Inputs window, complete these fields:
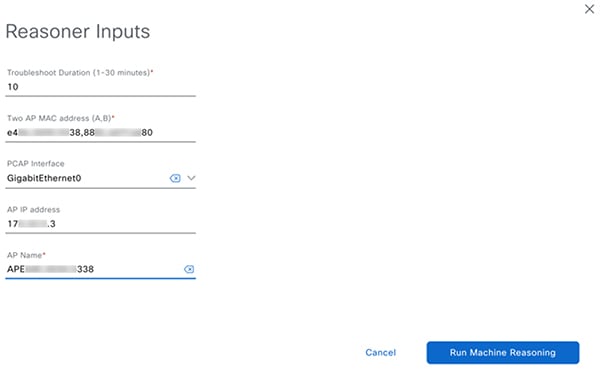 If packet capture is required, also complete these fields:
In the Root Cause Analysis area, the Reasoning Activity tab shows the various parameters that are checked as part of the troubleshooting process. 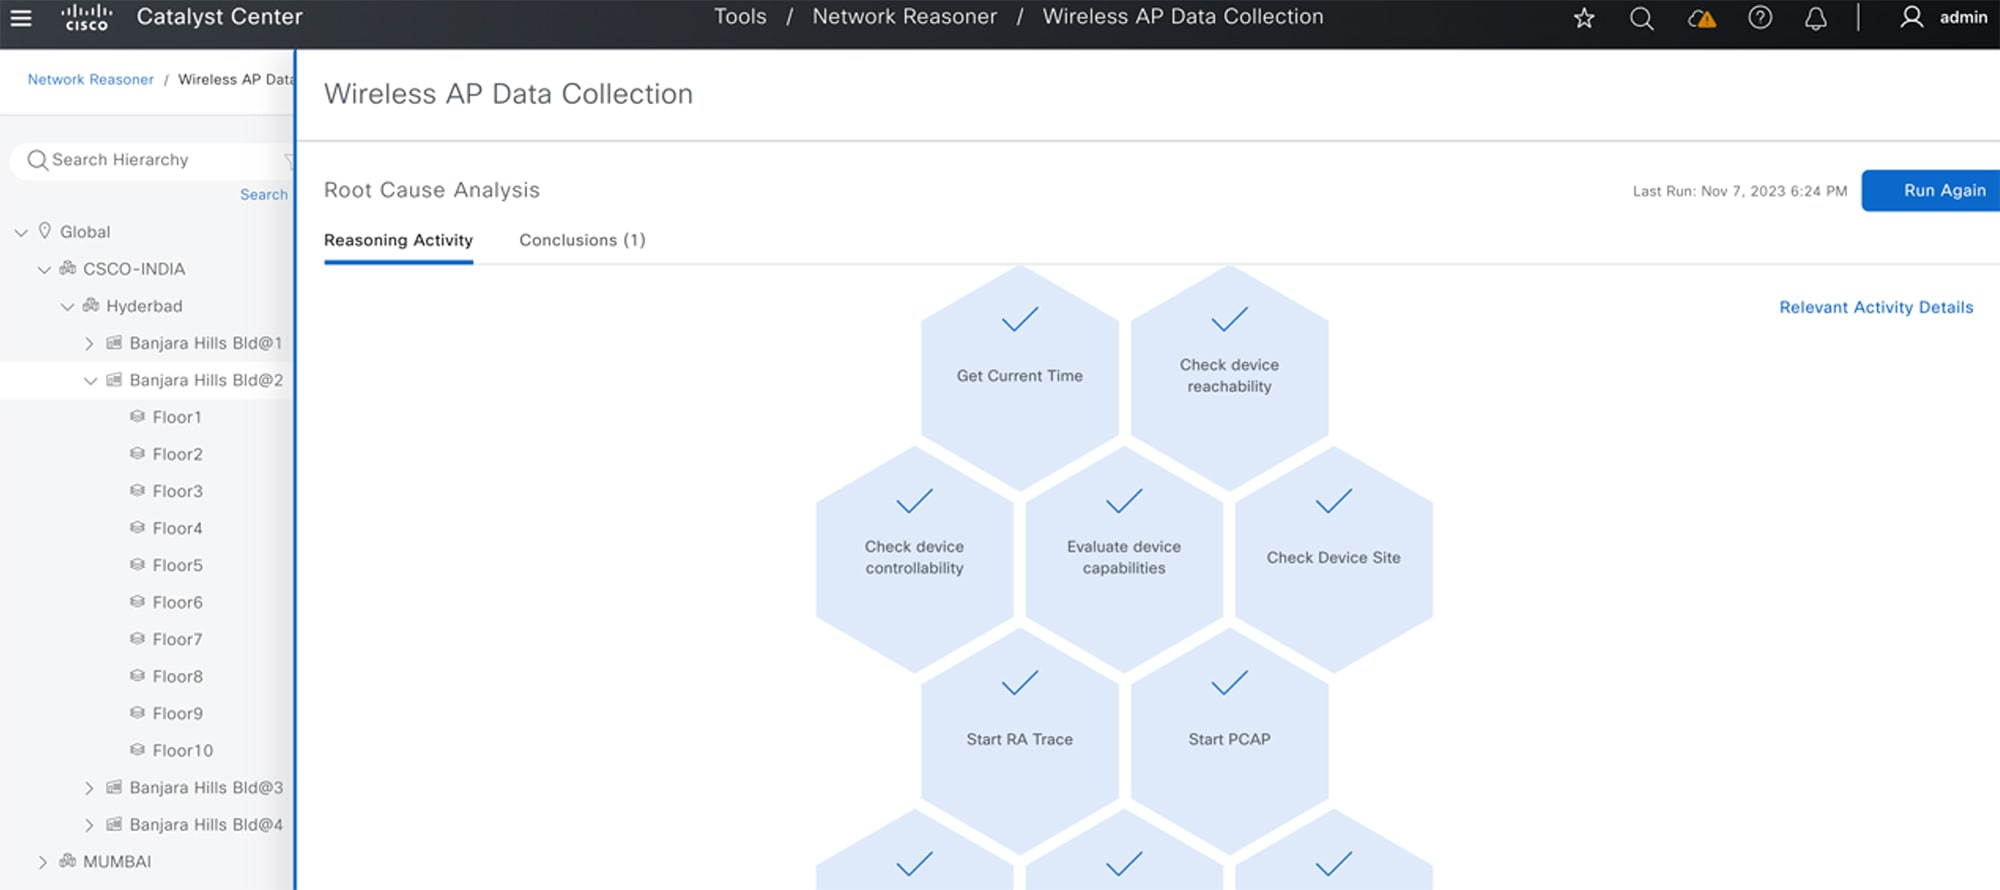 Note that you can click Stop to stop the ongoing reasoning activity and wait for the troubleshooting process to complete. When it does, click the Conclusions tab to view the troubleshooting files. 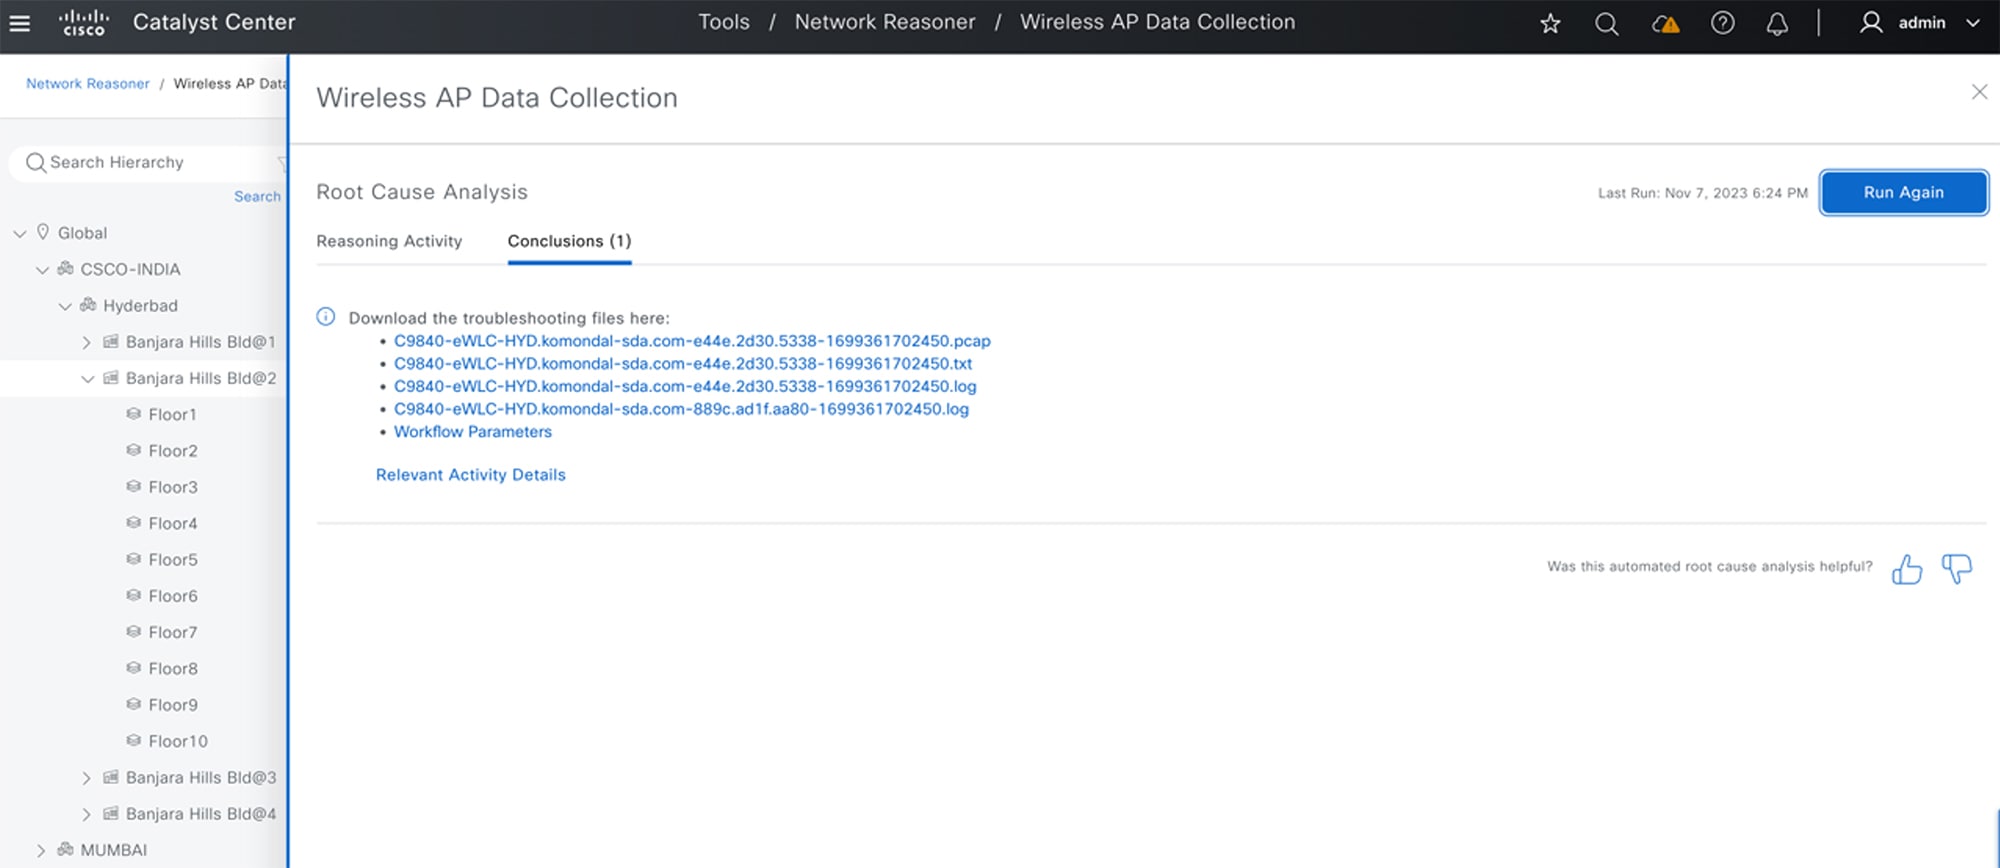 For more information, see the "Troubleshoot Network Devices Using Network Reasoner" chapter in the Cisco Catalyst Center User Guide. |
Cisco AI Endpoint Analytics
Cisco AI Endpoint Analytics provides information about the endpoints that are connected to your network, including profiled endpoints, trust score alerts, and AI rules.
Note |
If Cisco AI Endpoint Analytics isn’t currently installed, click Set Up Cisco AI Endpoint Analytics. |
From the main menu, choose to open the Overview tab.
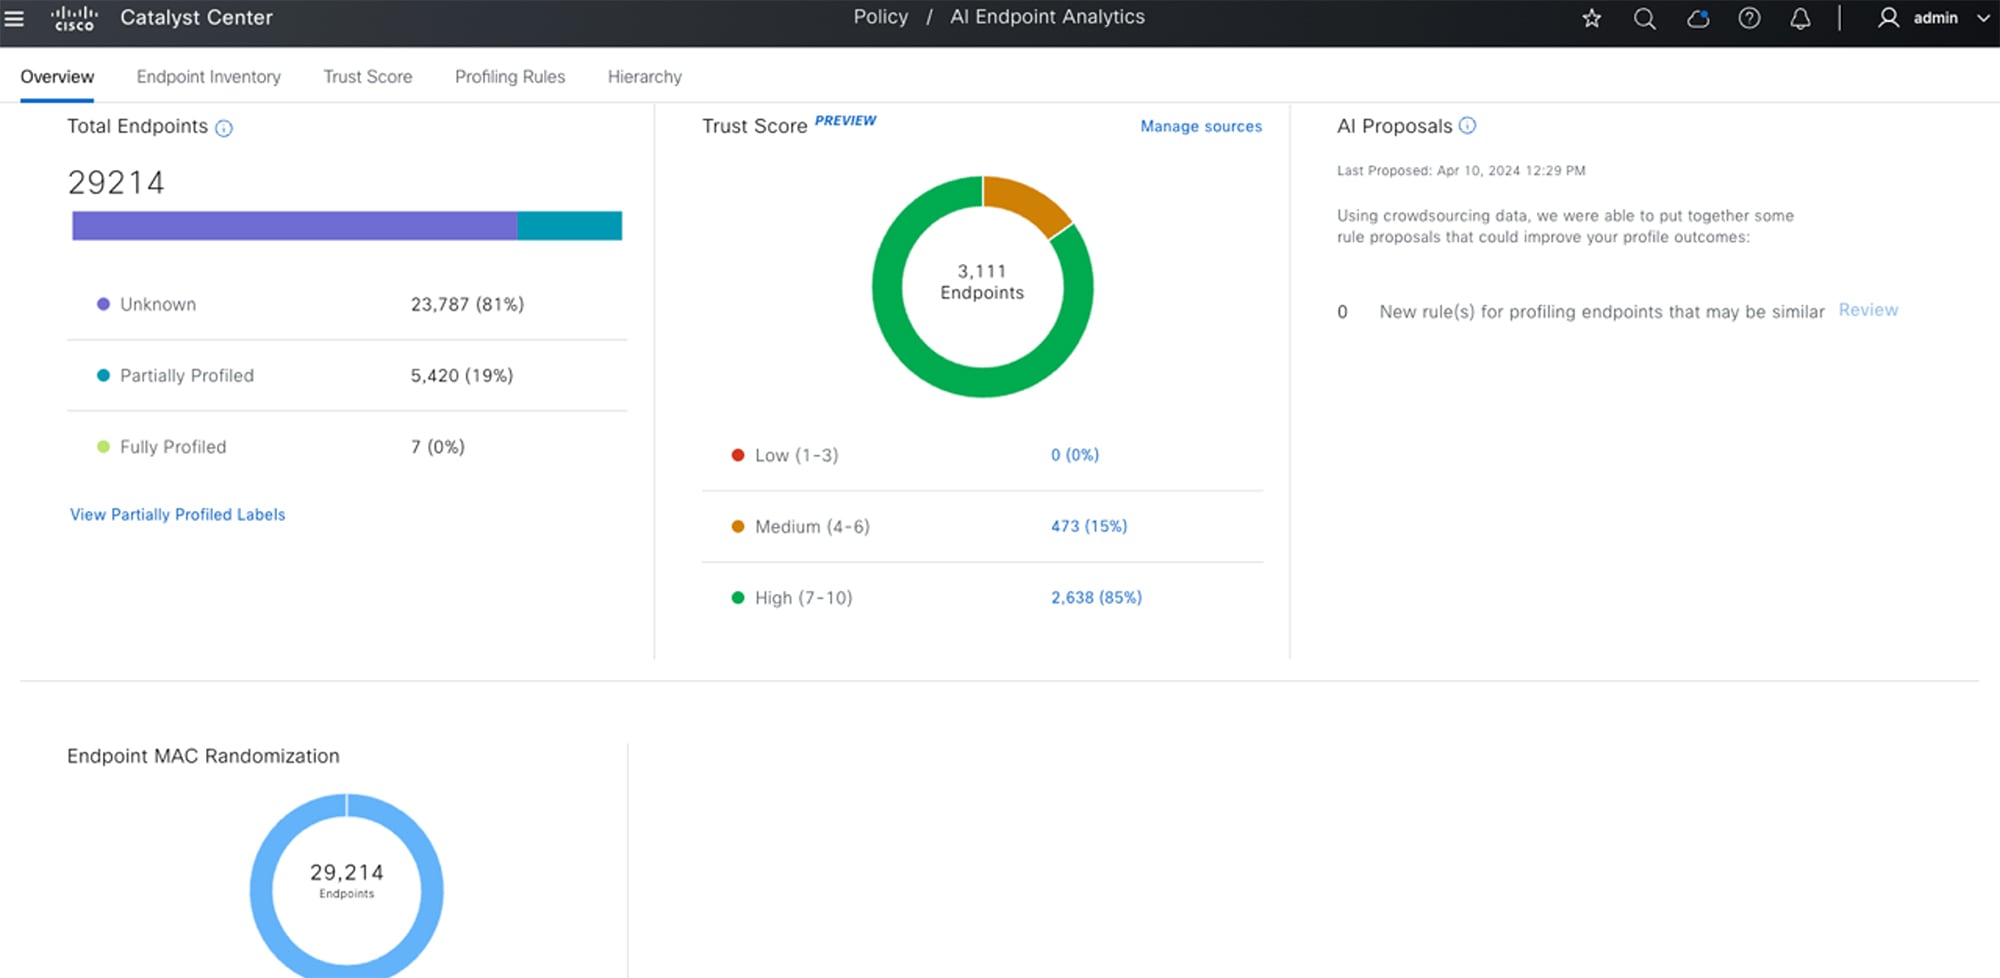
Here, the Total Endpoints dashlet displays the total number of endpoints in your network in three groups: Fully Profiled, Partially Profiled, and Unknown. Cisco AI Endpoint Analytics profiles endpoints based on four factors:
-
Endpoint Type
-
OS Type
-
Hardware Model
-
Hardware Manufacturer
If one or more of these factors are missing for an endpoint, it's included in the Partially Profiled group. And if it's missing all of these factors, it's included in the Unknown group.
The Endpoint Inventory tab displays details of the endpoints that are connected to Cisco AI Endpoint Analytics through the configured data sources. This view displays the profiling information of all the connected endpoints.
To see the complete profiling details of an endpoint, click the endpoint's MAC address. A slide-in pane opens, displaying the endpoint's user, endpoint, and attribute details.
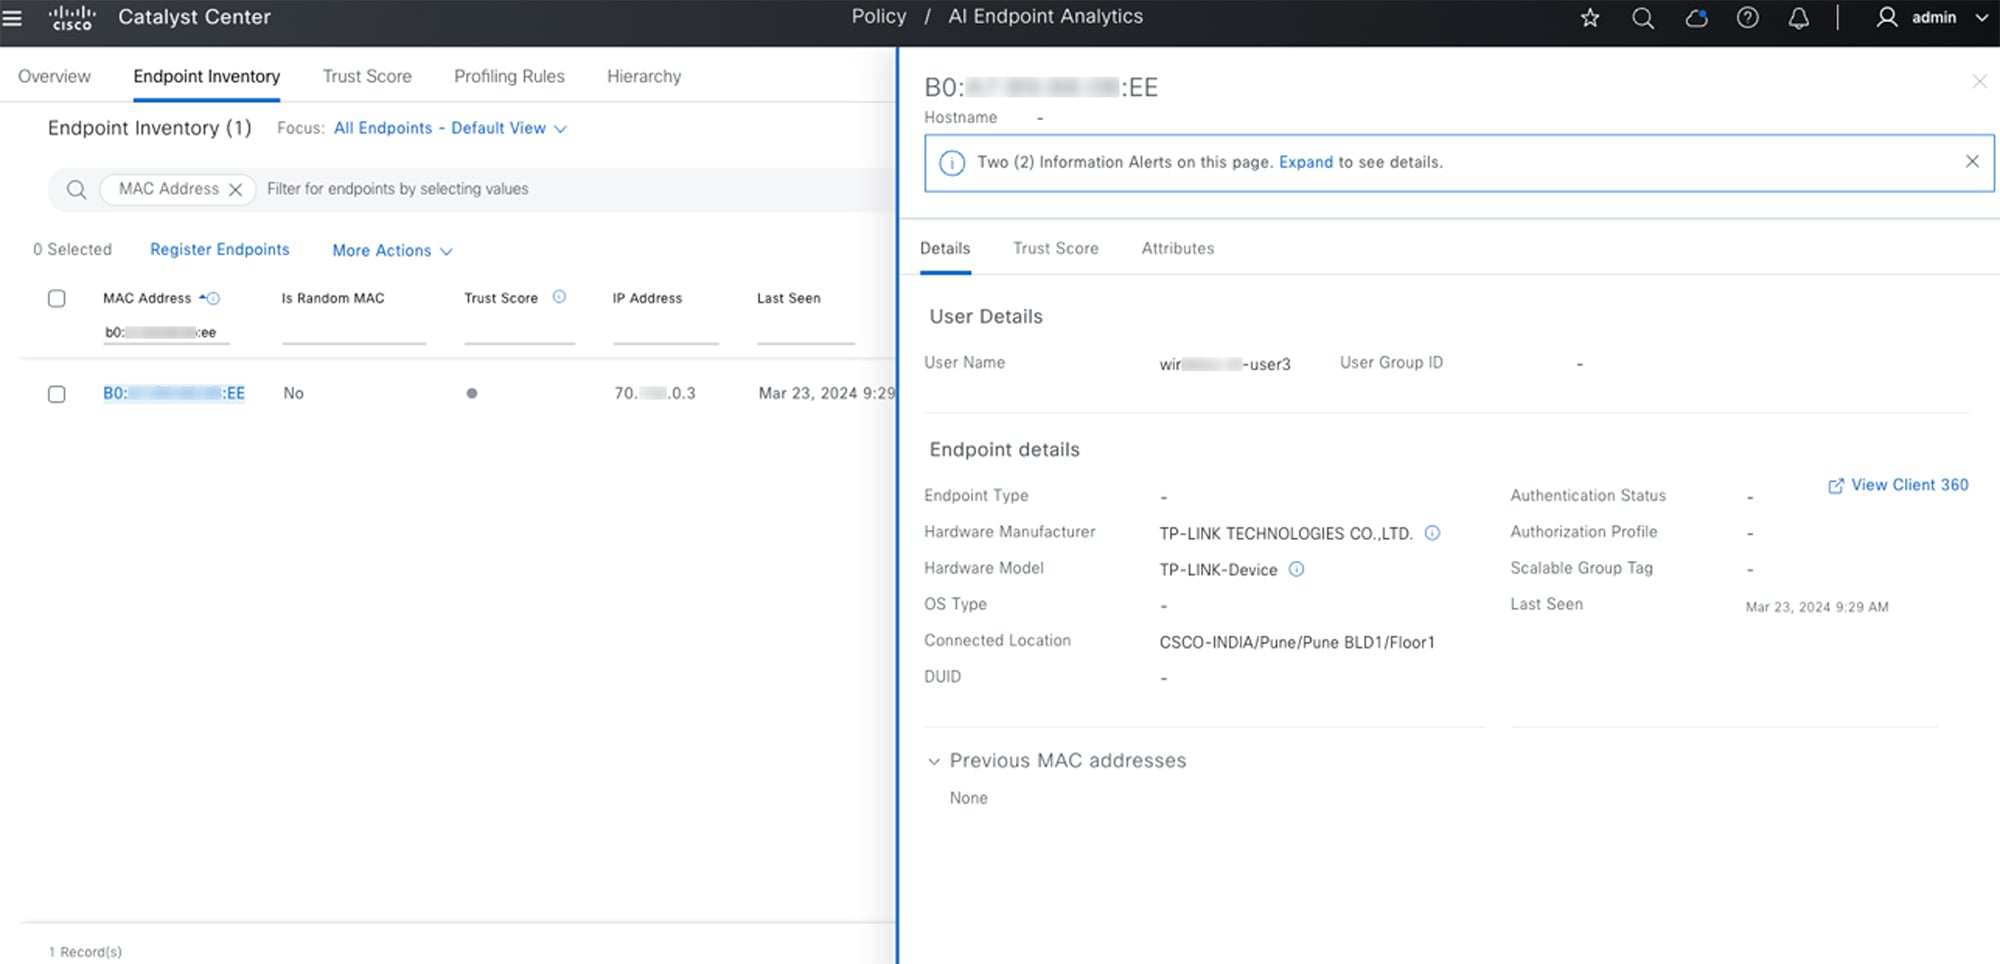
For more information, see the "Cisco AI Endpoint Analytics" chapter in the Cisco Catalyst Center User Guide.
Cisco AI Network Analytics
Cisco AI Network Analytics is an application within Catalyst Center that leverages the power of machine learning and machine reasoning to provide accurate insights that are specific to your network deployment, which allows you to quickly troubleshoot issues.
Cisco AI Network Analytics provides the following:
-
Cloud-Based Infrastructure: Network events information is deidentified in Catalyst Center and sent through a secure encrypted channel to the Cisco AI Network Analytics cloud-based infrastructure. The Cisco AI Network Analytics cloud runs the machine learning model with such deidentified network event data and brings the issues and overall insights back to Catalyst Center.
-
Intelligent Issue Detection and Analysis, which includes:
-
AI-Driven Baselining: Baselining is a method used to analyze network dynamics to extract behavioral patterns that help define what is the normal (baseline) behavior for that specific network. The actual network performance is then compared with that baseline.
Cisco AI Network Analytics uses the most advanced machine learning techniques to define the baseline that is relevant to your specific network and sites with the current conditions. With this information, Cisco AI Network Analytics is able to define what is normal for each network and site at a specific moment, and identify the most important issues.
-
AI-Driven Anomaly Detection: Detect anomalies to determine their root causes and ease troubleshooting.
Cisco AI Network Analytics can detect the following types of AI-driven issues
-
Connection Issues (onboarding issues): Excessive Time, Excessive Failures, Excessive DHCP Time, Excessive DHCP Failures, Excessive AAA Time, Excessive AAA Failures, Excessive Association Time, and Excessive Association Failures.
-
Application Experience Issues: Total Radio Throughput, Media Application Throughput, Cloud Application Throughput, Collab Application Throughput, and Social Application Throughput.
-
-
-
Trends and Insights, which includes:
-
Trend Deviations: Determine global patterns (trends) and deviations to provide system-generated insights.
-
AP Performance Advisories: Detect APs that have a consistently poor client experience, and provide a root cause and suggested actions.
-
-
Comparative Benchmarking, which includes:
-
AI-Driven AP Comparisons in Network Heatmaps: Compare all of the APs in your network for a given month in a heatmap to spot trends and gain insights.
-
AI-Driven Peer Comparisons: Determine how your network is performing in comparison to your peer networks for a selected Key Performance Indicator (KPI).
-
AI-Driven Network Comparisons: Determine how a network (such as sites, buildings, AP models, client types) is performing compared to another network for a selected KPI.
-
For more information, see the "Cisco AI Network Analytics" chapter in the Cisco Catalyst Assurance User Guide.
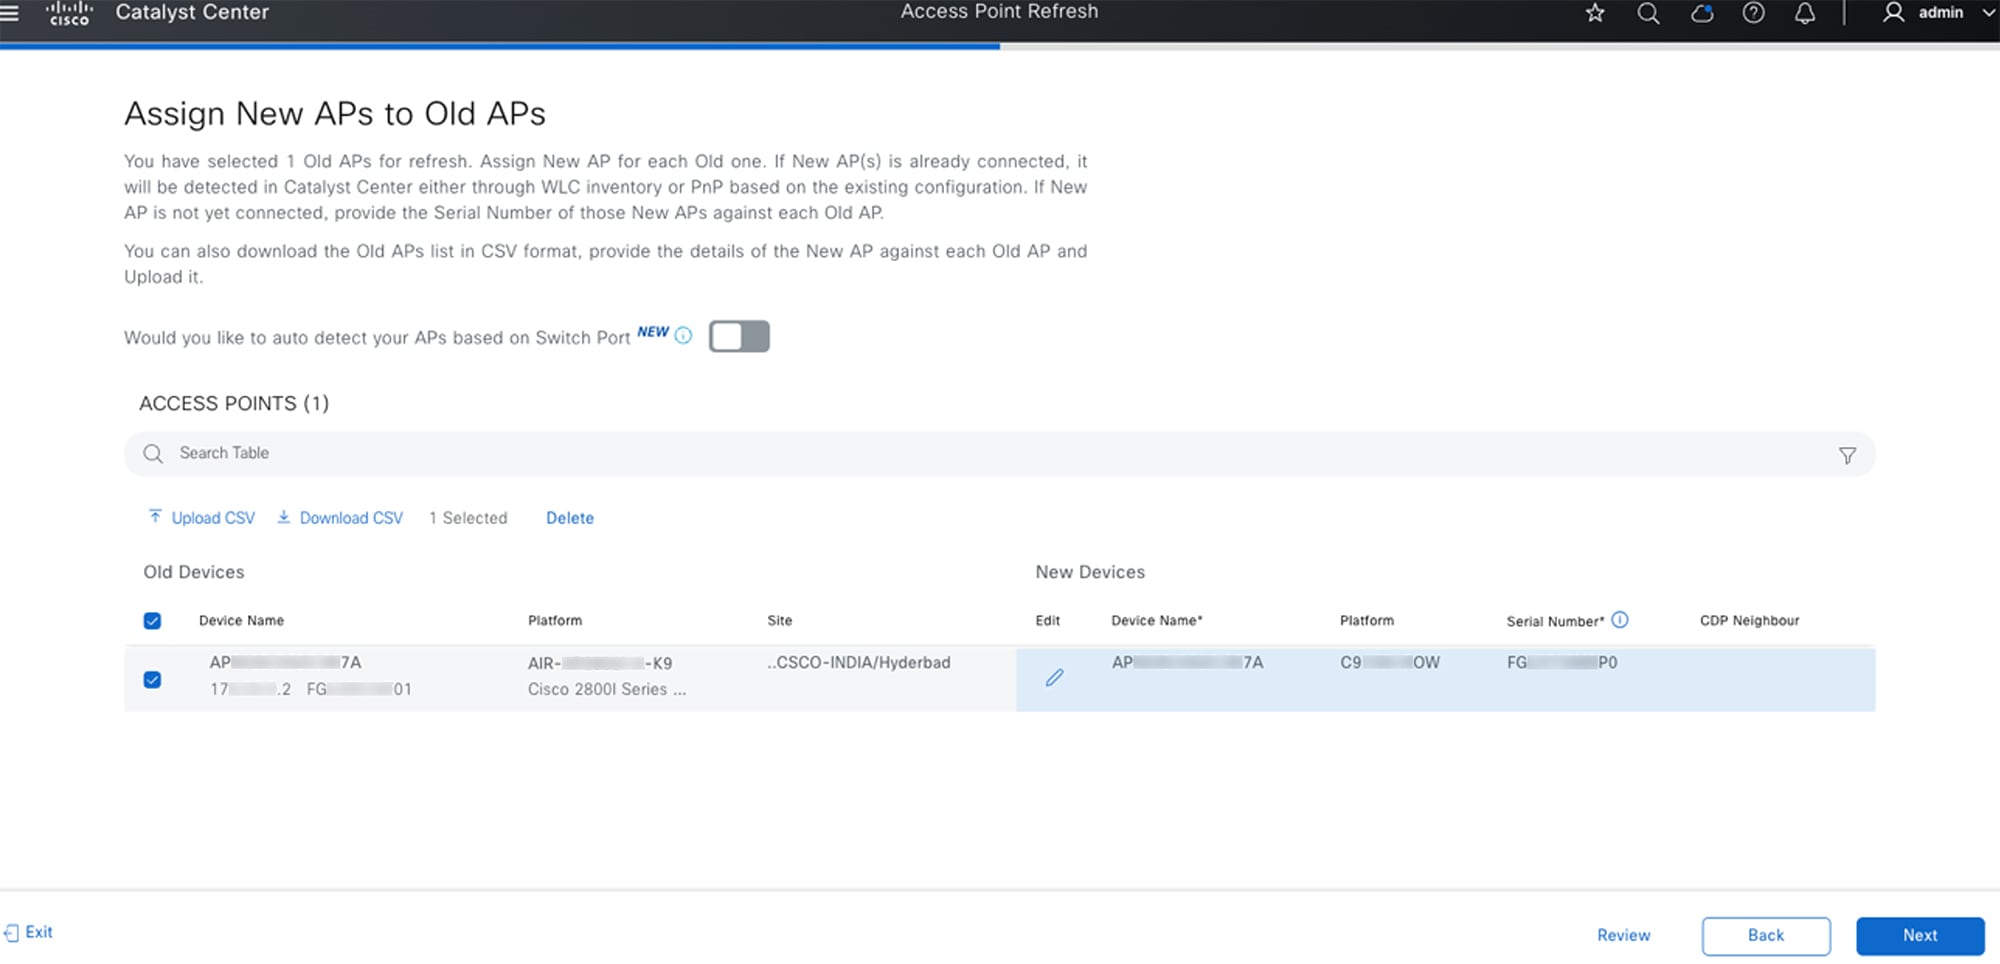
AP Refresh for Assurance Use Case
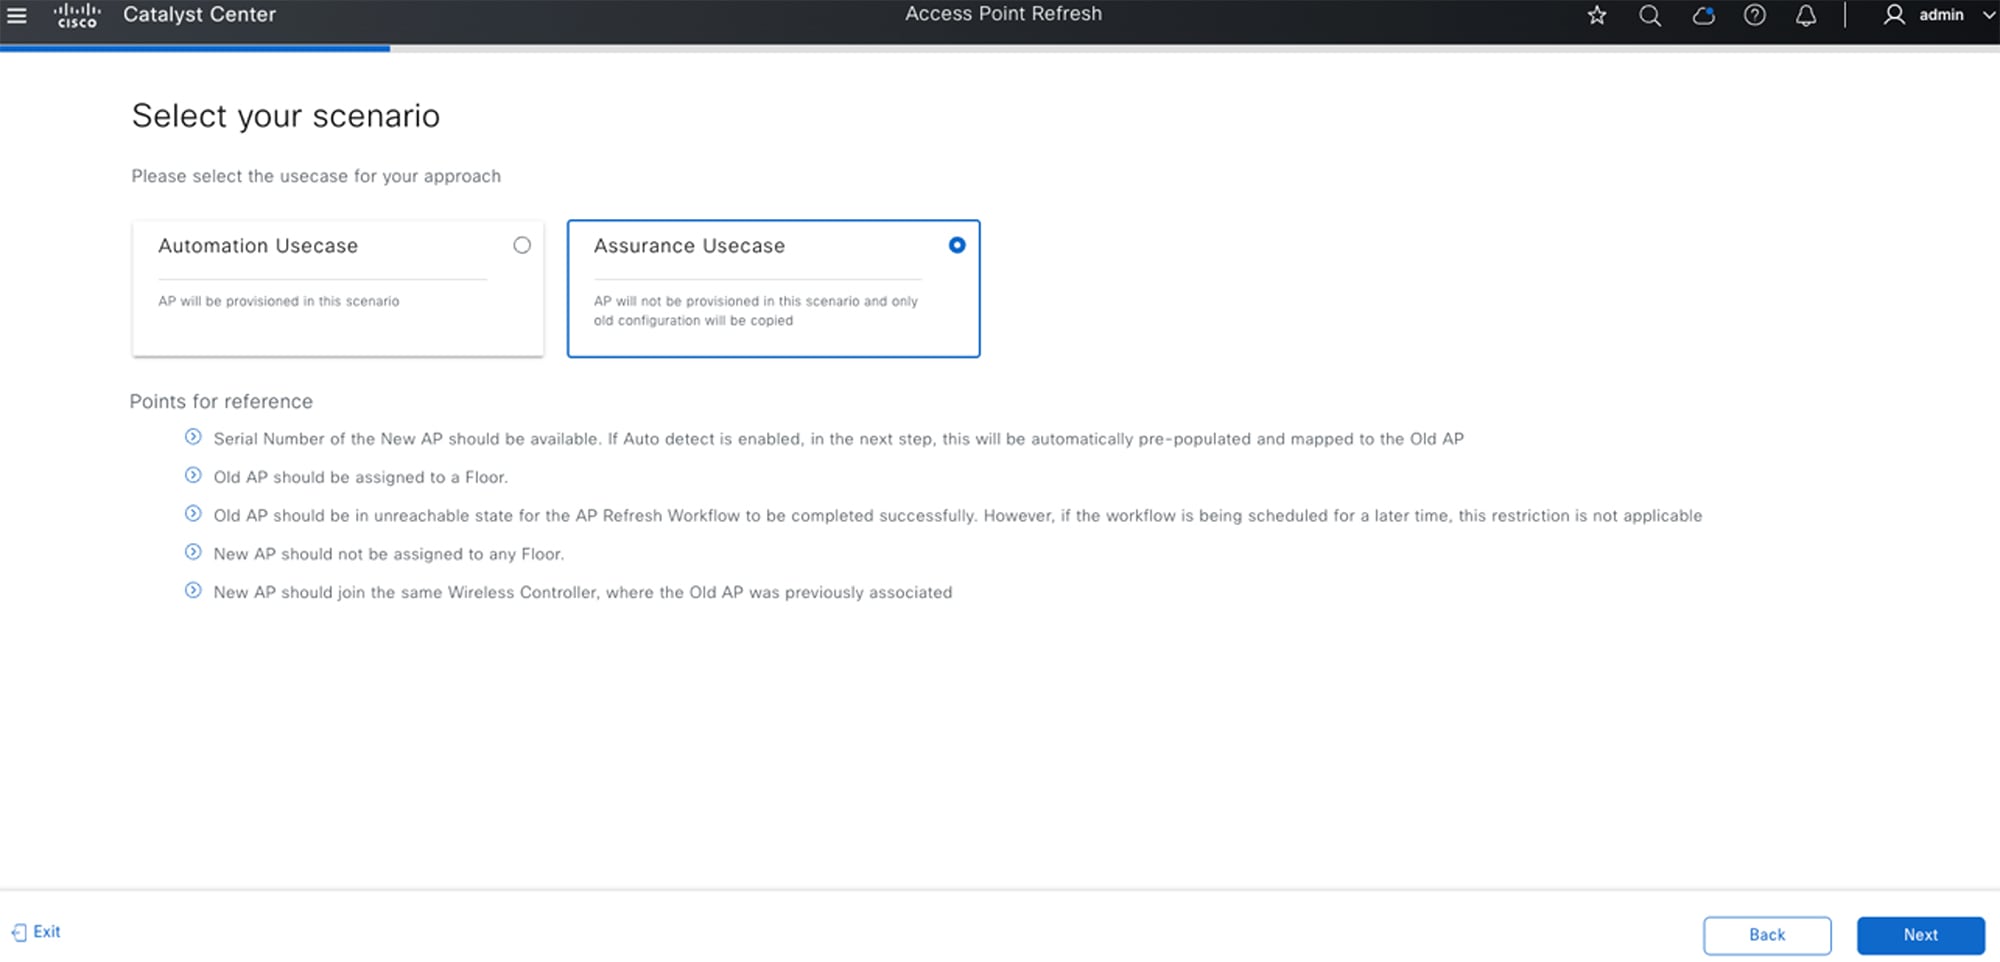
The AP Refresh workflow allows you to replace older AP models (both provisioned and unprovisioned) with newer AP models. You can complete this procedure for the following use cases:
-
Automation use case: Deployments where a wireless controller, provisioned via Catalyst Center, is used to provision your network. After an AP refresh, the new AP is provisioned with the network intent configuration.
-
Assurance use case: Deployments where Catalyst Center is used primarily for Assurance purposes, and the provisioning and administration of wireless controllers and APs is done outside of Catalyst Center. The new AP isn’t provisioned after an AP refresh, and only the old configuration is copied to the new AP.
Points to keep in mind:
-
The serial number of the new AP should be available. When Auto detect is enabled, this serial number is automatically prepopulated and mapped to the old AP.
-
The old AP should be assigned to a floor.
-
To complete the AP Refresh workflow successfully, the old AP should be in the unreachable state. Note that this restriction is not applicable if the workflow is scheduled for a later time.
-
The new AP should not be assigned to any floor.
-
The new AP should join the same wireless controller that the old AP was previously associated with.
-
An older unprovisioned AP can be replaced with a new AP that's available in the Catalyst Center inventory and joined to the same wireless controller.
For more information, see the "AP Refresh Workflow" topic in the Cisco Catalyst Center User Guide, Release 2.3.7.x.
Remove a Device from Cisco Prime Infrastructure After Migration
If you aren't using Cisco Prime Infrastructure for wireless automation and Catalyst Center Assurance and you want to remove Cisco Prime Infrastructure permanently, review the following two workflows.
When Force Sync Is Enabled
When force sync is enabled and you initiate device deletion from the Cisco Prime Infrastructure, the device is removed from the Cisco Prime Infrastructure but not from the Catalyst Center inventory and Catalyst Center is used for Assurance.
Note |
Make sure that dynamic sync is disabled in the PDMT before removing the device from Cisco Prime Infrastructure. |
The device deletion initiates from Cisco Prime Infrastructure.
The device is intact in the Catalyst Center inventory.
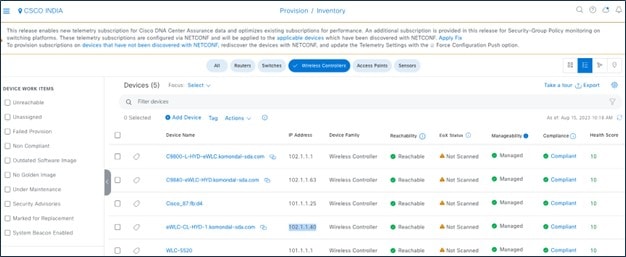
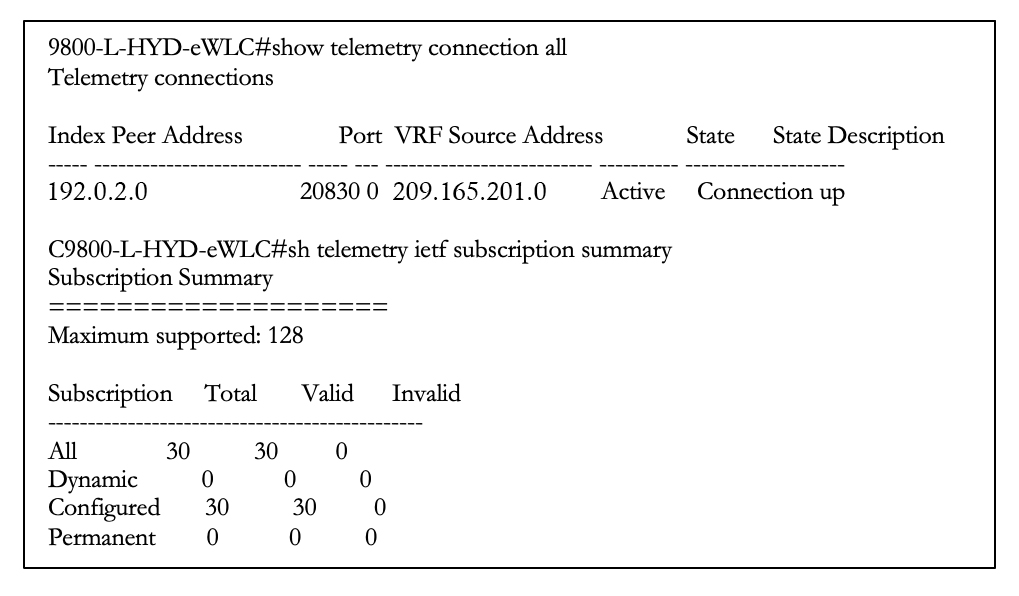
When the device is removed from Cisco Prime Infrastructure after migration, the telemetry subscription for Cisco Prime Infrastructure is removed and the telemetry connection is up.
When Dynamic Sync Is Enabled
When dynamic sync is enabled and you initiate device deletion from Cisco Prime Infrastructure, the device is deleted from the Cisco Prime Infrastructure inventory and dynamic sync triggers removal of the device from the Catalyst Center inventory.
Note |
Make sure all the telemetry subscriptions for Cisco Prime Infrastructure and Catalyst Center are cleared. |
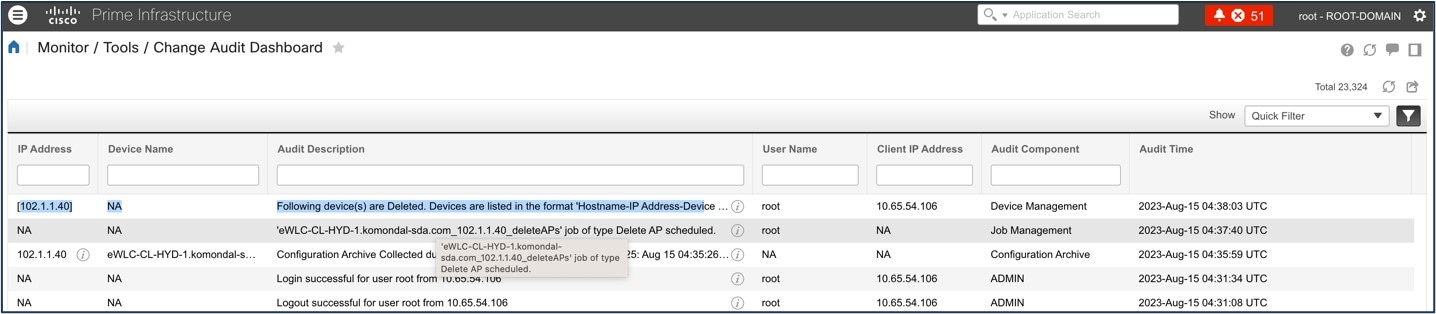
Removing the device from the Cisco Prime Infrastructure inventory initiates device deletion from Catalyst Center.
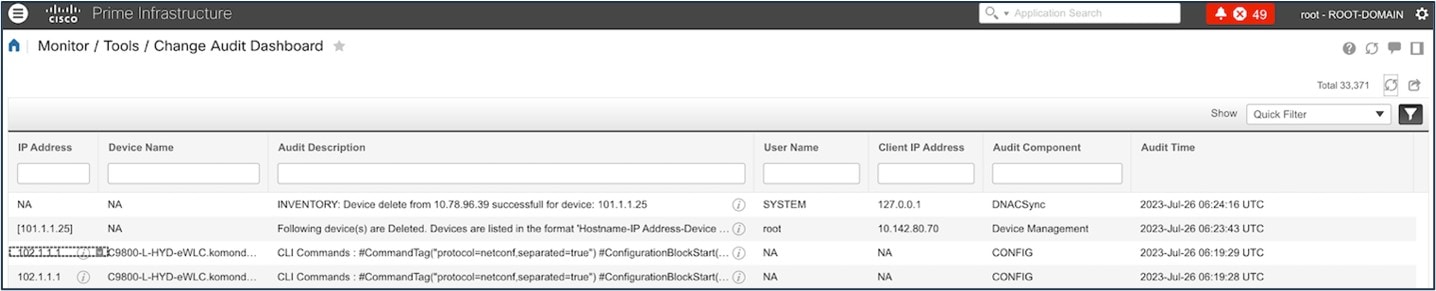
The following figure shows the deletion of the device from Catalyst Center.
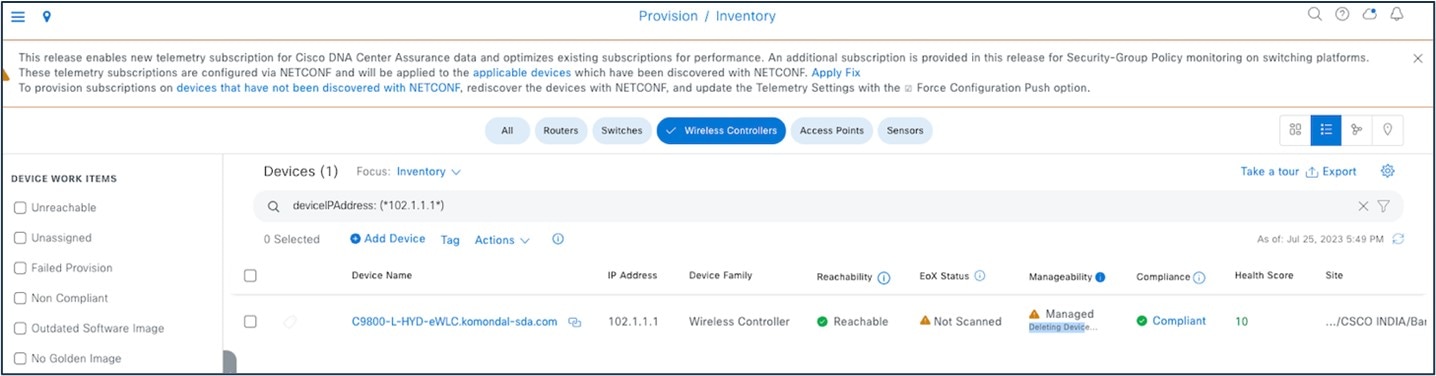
Currently, device deletion from Catalyst Center doesn’t remove the telemetry subscription for Catalyst Center.
To delete all the telemetry subscriptions from the wireless controller configuration, enter the following commands:
WLC#term shell
            WLC#function removeall() {
            for id in `sh run | grep telemetry | cut -f4 -d' '`
            do
            conf t
            no telemetry ietf subscription $id
            exit
            done
            }
           WLC#removeall
For more information, see Delete All Telemetry Subscriptions from the WLC Configuration.
Scale and Performance
The following tables show the scale used in the PDMT migration.
| Entity | Amount |
|---|---|
|
Sites with buildings and floor maps |
2000 |
|
Wired devices |
2000 |
|
Templates |
500 |
|
APs |
10,000 |
|
Wireless controllers |
10 |
|
Wireless clients |
20,000 |
| Cisco Prime Infrastructure VM Footprint | Catalyst Center | Length of Time |
|---|---|---|
|
16 vCPU 24 GB RAM 1.2 TB HDD |
112-core appliance (DN2-HW-APL-XL) |
6 hours |
Cisco Prime Infrastructure usage summary for migration:
Migration time taken:

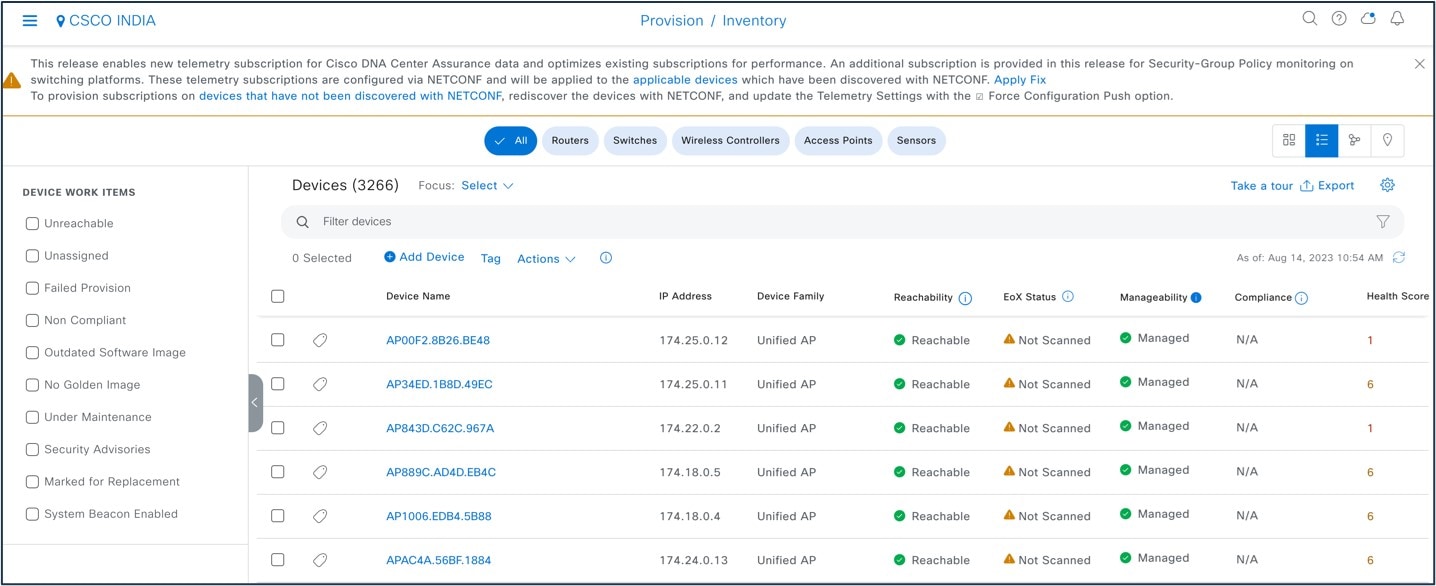
Catalyst Center inventory after migration:
Catalyst Center dashboard after migration:

Assurance dashboard after migration:
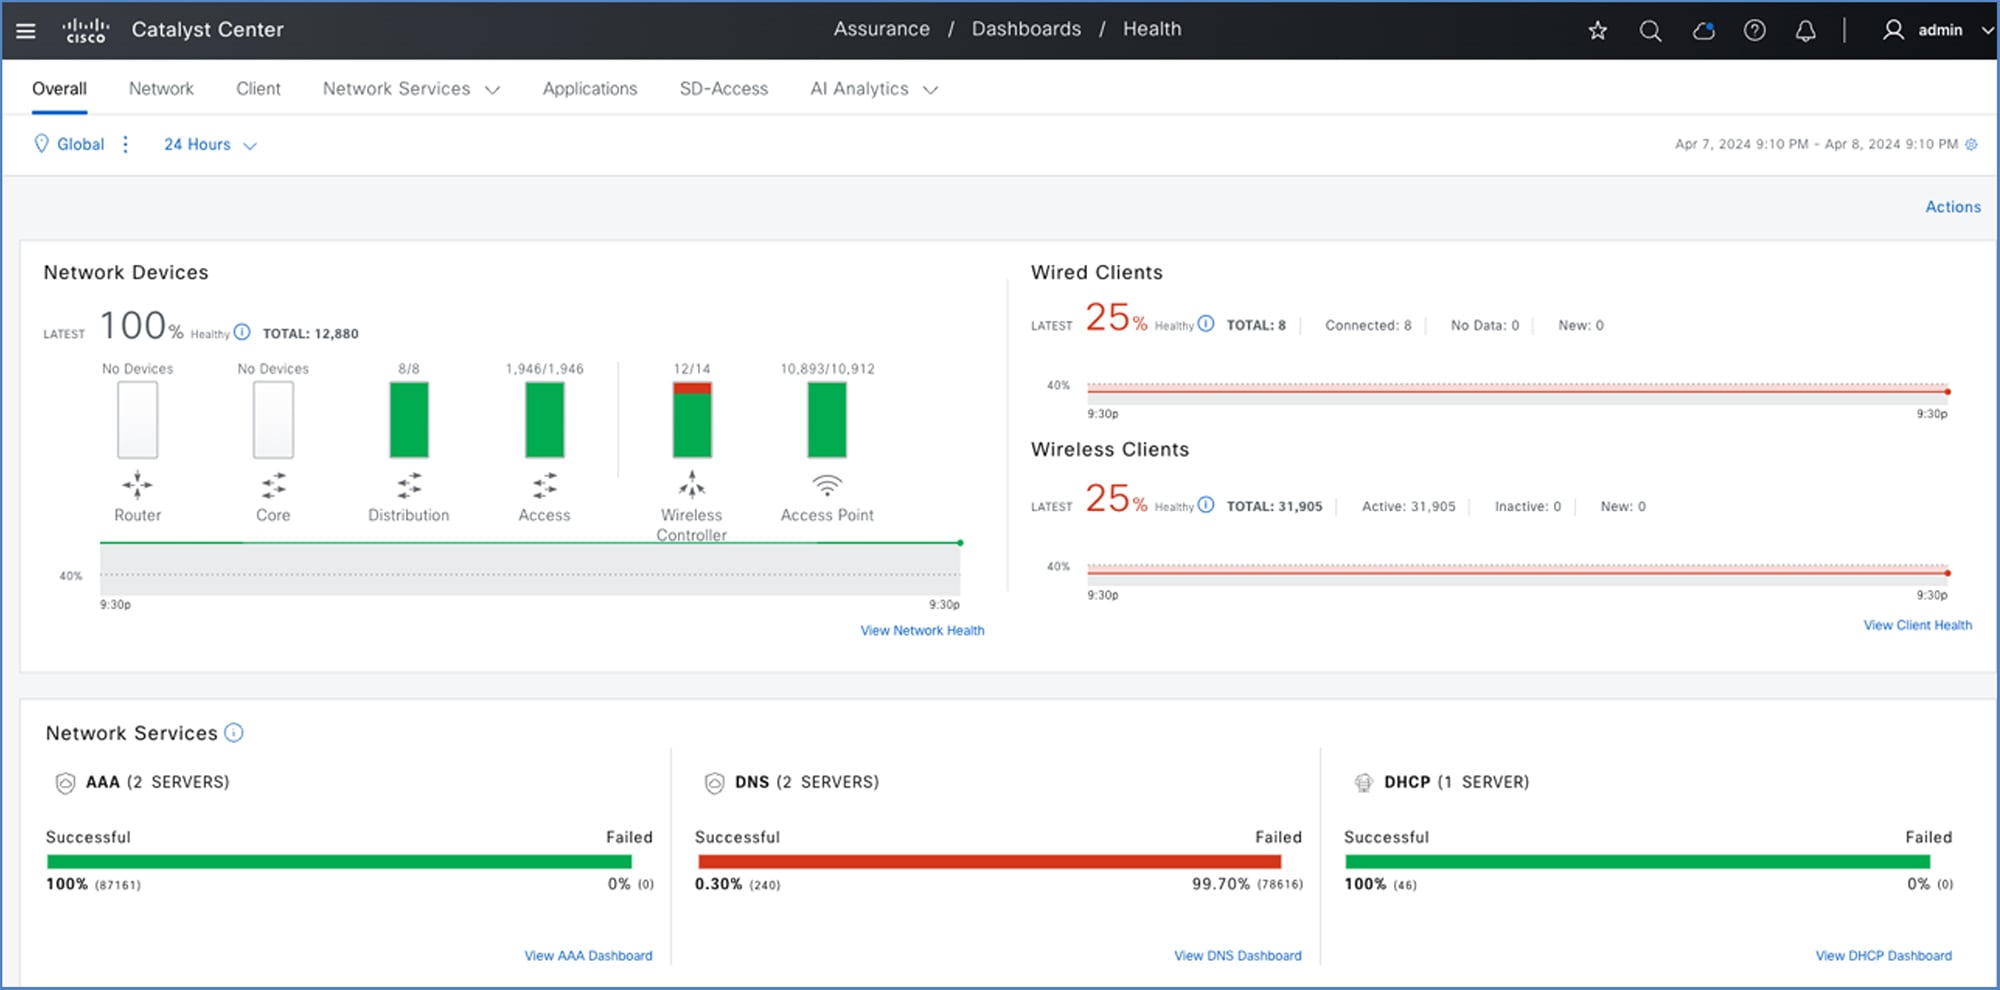
Roadmap and References
The current version of this guide focuses on the Cisco Prime coexistence model, where Cisco Prime Infrastructure is used for network automation and provisioning and Catalyst Center is used for assurance and monitoring. Future revisions of this guide will cover the use cases of learning device configurations in Catalyst Center and adapting the network automation functionality in Catalyst Center. These use cases will enable the complete migration from Cisco Prime Infrastructure to Catalyst Center, and eventually replace Cisco Prime Infrastructure with Catalyst Center for full management of the enterprise network.
To learn more about the Cisco Prime Infrastructure-to-Catalyst Center migration, consult the following references:
 Feedback