Configure SDG Agents and Service Peers Through the Cisco DNA Center Template Hub Tool

About SDG Agent and Service Peer Configuration Through the Cisco DNA Center Template Hub Tool

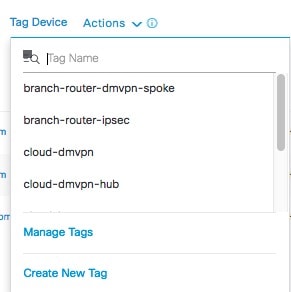
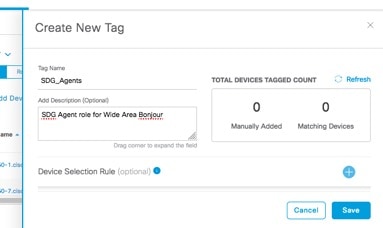
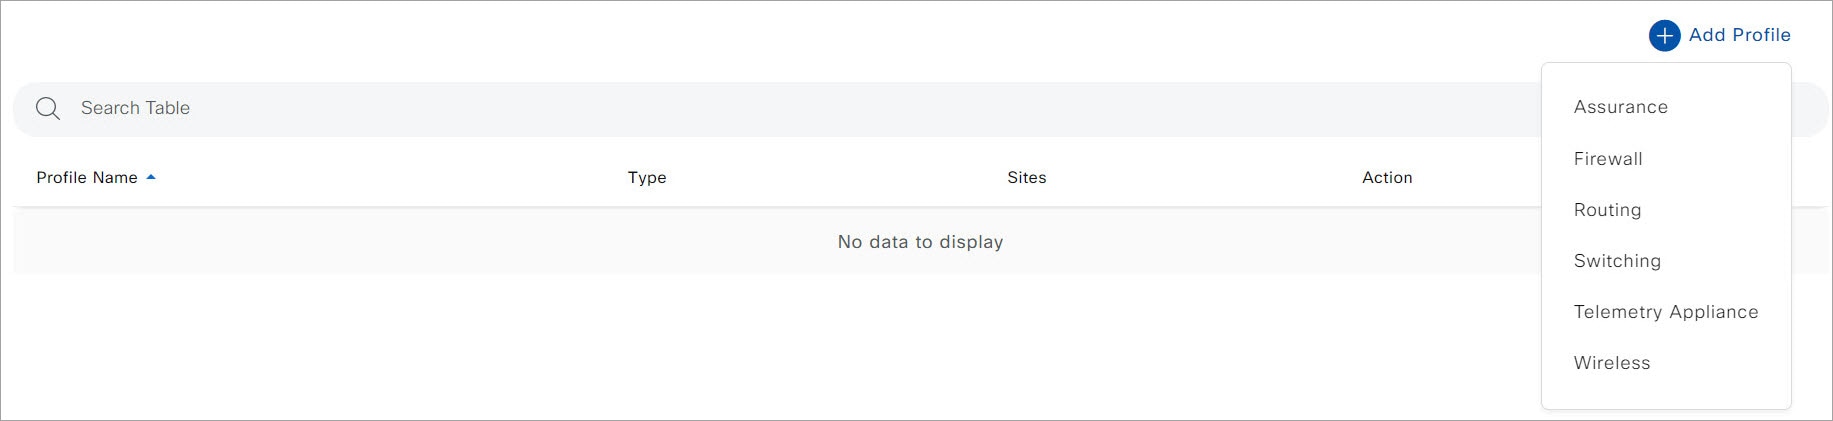
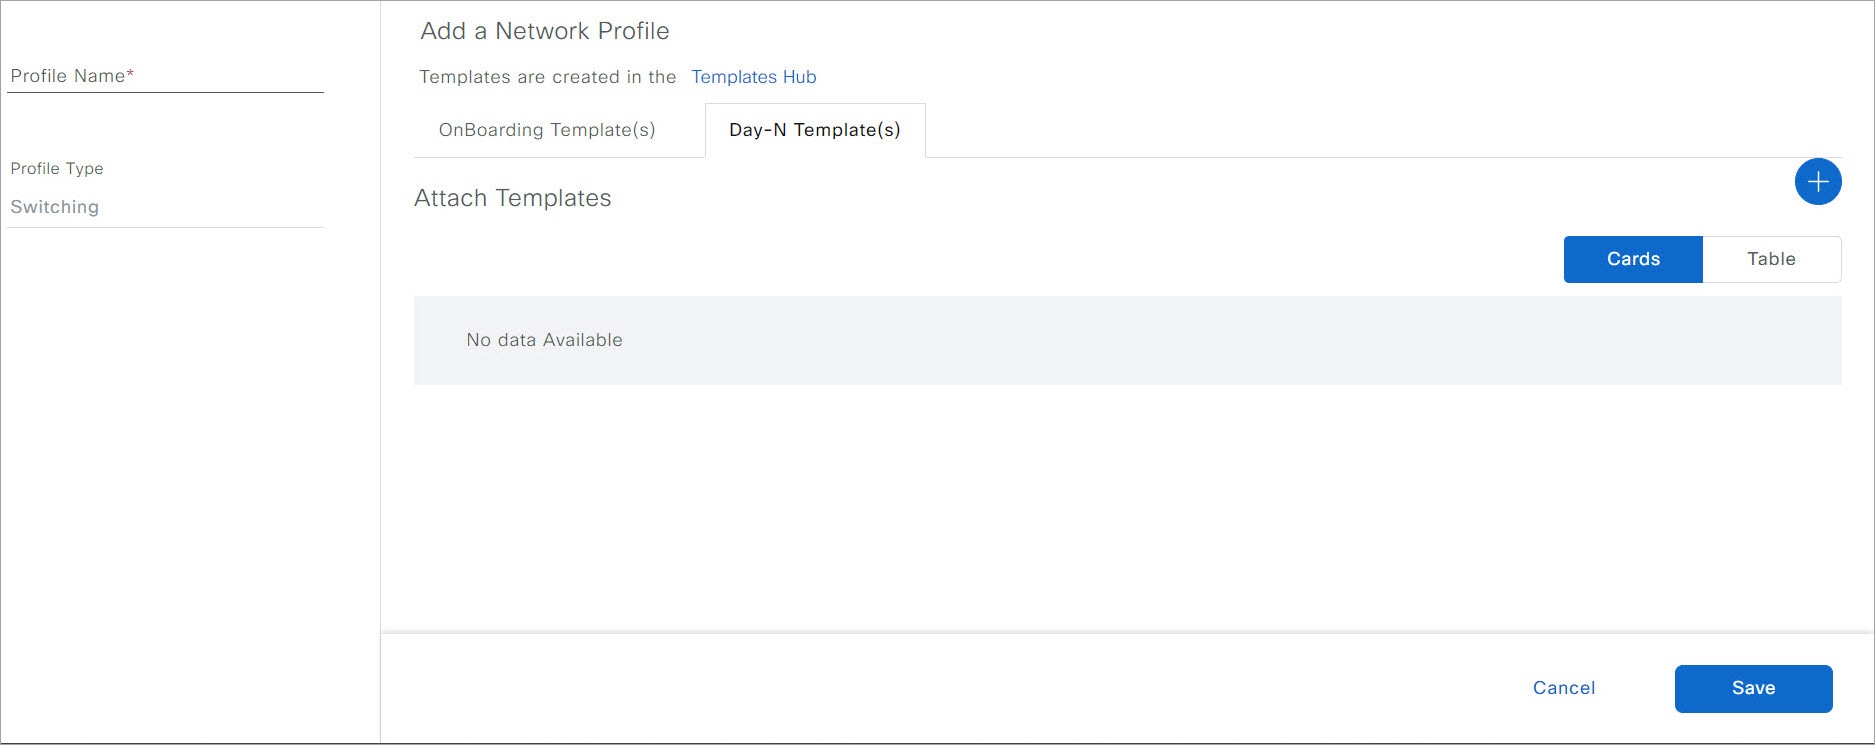
The Cisco Wide Area Bonjour application on Cisco DNA Center does not push configurations to the SDG agent switches or service peer devices automatically. The SDG agents and service peers need to be configured either manually or through templates created by the Template Hub tool in Cisco DNA Center.

This section explains how to create templates for deploying SDG agents and service peers. The exact IP addresses, VLANs, and service types used in the template vary based on the deployment. You can add or remove service types as necessary.

Tag Cisco Catalyst and Cisco Nexus SDG Agent Switches

You can create a tag and apply it to your SDG agents to make it easy to identify the switches when selecting templates to apply to them.

Procedure


Step 1

Click the menu icon () and choose Provision > Inventory.

Step 2

Check the associated check box to choose the SDG agents that you want to tag.

Step 3

Click Tag Device.

The following image shows the Tag Device drop-down list.

Step 4

From the drop-down list, choose the tag with which you want to tag the selected SDG agent.

If you need to create a tag, complete the following steps:

  1. Click Create New Tag.

  2. Enter the name of the tag and an optional description.

    The following image shows the filled-in Create New Tag screen.

  3. (Optional) To set device selection rules, expand the Device Selection Rules section.

  4. Click Save.

    The tag is created.

Step 5

Click Apply.

The tag is applied to the selected SDG agents.


Build Bonjour Policy CLI Templates

The following sections provide information about the various tasks to build Bonjour policy CLI templates.

Configure SDG Agents and Service Peers for Traditional Routed Access Networks

Procedure


Step 1

Click the menu icon () and choose Tools > Template Hub.

Step 2

In the left pane of the Cisco DNA Center Template Hub tool, hover your cursor over Add and click New Template.

Step 3

In the Template Details area of the Add New Template slide-in pane, do the following:

  1. In the Template Name field, enter a unique name for the template.

  2. From the Project Name drop-down list, choose Cloud DayN Templates.

  3. Under Template Type, click Regular Template.

  4. Under Template Language, choose Velocity or Jinja language to use for the template content.

  5. From the Software Type drop-down list, choose a software type.

Step 4

In the Device Type Details area, do the following:

  1. Click the Add Device Details link.

  2. In the Add Device Details slide-in pane, from the Device Family drop-down list, choose a device type for which the template is applicable.

  3. Click the Device Series tab and check the check box next to the required device series.

  4. Click the Device Models tab and check the check box next to the required device model.

  5. Click Add.

  6. In the Add New Template slide-in pane, from the Device Tags drop-down list, choose the tags for the switches to which the template needs to be added.

  7. In the Software Version field, enter the software version.

  8. In the Template Description field, enter a description for the template.

Step 5

Click Continue.

The created template is displayed in the Templates table.

Step 6

In the left pane of the Template Hub window, choose the project under which the newly created template exists.

Step 7

Click the template name.

Step 8

In the Templates tab, enter the CLI commands that the template needs to push to the SDG agent switches and service peer devices.

The following is a sample set of CLI commands:

mdns-sd gateway
 rate-limit 100
!

service-export mdns-sd controller DNAC
 controller-address <DNAC IP>
 controller-source-interface Loopback0
!

vlan configuration 101-103
mdns-sd gateway
!

Note


Replace the VLAN with one or more VLANs that are specific to your deployment.

Step 9

Click Save.

Step 10

Click Commit to commit the template.

The Template Hub tool provides the additional flexibility of customizing templates in multiple ways. You can use template variables and simulation. For more information about working with the Template Hub tool, see the Cisco DNA Center User Guide.


Configure SDG Agents on Traditional Multilayer Networks

Procedure


Step 1

Click the menu icon () and choose Tools > Template Hub.

Step 2

In the left pane of the Cisco DNA Center Template Hub tool, hover your cursor over Add and click New Template.

Step 3

In the Template Details area of the Add New Template slide-in pane, do the following:

  1. In the Template Name field, enter a unique name for the template.

  2. From the Project Name drop-down list, choose Cloud DayN Templates.

  3. Under Template Type, click Regular Template.

  4. Under Template Language, choose Velocity or Jinja language to use for the template content.

  5. From the Software Type drop-down list, choose a software type.

Step 4

In the Device Type Details area, do the following:

  1. Click the Add Device Details link.

  2. In the Add Device Details slide-in pane, from the Device Family drop-down list, choose a device type for which the template is applicable.

  3. Click the Device Series tab and check the check box next to the required device series.

  4. Click the Device Models tab and check the check box next to the required device model.

  5. Click Add.

  6. In the Add New Template slide-in pane, from the Device Tags drop-down list, choose the tags for the switches to which the template needs to be added.

  7. In the Software Version field, enter the software version.

  8. In the Template Description field, enter a description for the template.

Step 5

Click Continue.

The created template is displayed in the Templates table.

Step 6

In the left pane of the Template Hub window, choose the project under which the newly created template exists.

Step 7

Click the template name.

Step 8

In the Templates tab, enter the CLI commands that the template needs to push to the SDG agent switches.

The following is a sample set of CLI commands.

mdns-sd gateway
 rate-limit 100
!

service-export mdns-sd controller DNAC
 controller-address <DNAC IP>
 controller-source-interface Loopback()
!

vlan configuration 101-103
mdns-sd gateway
!

Note


Replace the VLAN with one or more VLANs that are specific to your deployment.

Step 9

Click Save.

Step 10

Click Commit to commit the template.

The Template Hub tool provides the additional flexibility of customizing templates in multiple ways. You can use template variables and simulation. For more information about working with the Template Hub tool, see the Cisco DNA Center User Guide.


Configure Service Peers on Traditional Multilayer Networks

Procedure


Step 1

Click the menu icon () and choose Tools > Template Hub.

Step 2

In the left pane of the Cisco DNA Center Template Hub tool, hover your cursor over Add and click New Template.

Step 3

In the Template Details area of the Add New Template slide-in pane, do the following:

  1. In the Template Name field, enter a unique name for the template.

  2. From the Project Name drop-down list, choose Cloud DayN Templates.

  3. Under Template Type, click Regular Template.

  4. Under Template Language, choose Velocity or Jinja language to use for the template content.

  5. From the Software Type drop-down list, choose a software type.

Step 4

In the Device Type Details area, do the following:

  1. Click the Add Device Details link.

  2. In the Add Device Details slide-in pane, from the Device Family drop-down list, choose a device type for which the template is applicable.

  3. Click the Device Series tab and check the check box next to the required device series.

  4. Click the Device Models tab and check the check box next to the required device model.

  5. Click Add.

  6. In the Add New Template slide-in pane, from the Device Tags drop-down list, choose the tags for the switches to which the template needs to be added.

  7. In the Software Version field, enter the software version.

  8. In the Template Description field, enter a description for the template.

Step 5

Click Continue.

The created template is displayed in the Templates table.

Step 6

In the left pane of the Template Hub window, choose the project under which the newly created template exists.

Step 7

Click the template name.

Step 8

In the Templates tab, enter the CLI commands that the template needs to push to the service peer devices.

The following is a sample set of CLI commands.

mdns-sd gateway
 mode service-peer
 rate-limit 100
 sdg-agent 40.1.1.1
!

vlan configuration 101-103
mdns-sd gateway 
!

Note


Replace the VLAN with one or more VLANs that are specific to your deployment.

Step 9

Click Save.

Step 10

Click Commit to commit the template.

The Template Hub tool provides the additional flexibility of customizing templates in multiple ways. You can use template variables and simulation. For more information about working with the Template Hub tool, see the Cisco DNA Center User Guide.


Configure SDG Agents on Distributed Anycast Gateway Without Service Peers

Procedure


Step 1

Click the menu icon () and choose Tools > Template Hub.

Step 2

In the left pane of the Cisco DNA Center Template Hub tool, hover your cursor over Add and click New Template.

Step 3

In the Template Details area of the Add New Template slide-in pane, do the following:

  1. In the Template Name field, enter a unique name for the template.

  2. From the Project Name drop-down list, choose Cloud DayN Templates.

  3. Under Template Type, click Regular Template.

  4. Under Template Language, choose Velocity or Jinja language to use for the template content.

  5. From the Software Type drop-down list, choose a software type.

Step 4

In the Device Type Details area, do the following:

  1. Click the Add Device Details link.

  2. In the Add Device Details slide-in pane, from the Device Family drop-down list, choose a device type for which the template is applicable.

  3. Click the Device Series tab and check the check box next to the required device series.

  4. Click the Device Models tab and check the check box next to the required device model.

  5. Click Add.

  6. In the Add New Template slide-in pane, from the Device Tags drop-down list, choose the tags for the switches to which the template needs to be added.

  7. In the Software Version field, enter the software version.

  8. In the Template Description field, enter a description for the template.

Step 5

Click Continue.

The created template is displayed in the Templates table.

Step 6

In the left pane of the Template Hub window, choose the project under which the newly created template exists.

Step 7

Click the template name.

Step 8

In the Templates tab, enter the CLI commands that the template needs to push to the SDG agent switches and service peer networks.

The following is a set of sample CLI commands.

mdns-sd gateway
 rate-limit 100
!

service-export mdns-sd controller DNAC
 controller-address <DNAC IP>
 controller-source-interface Loopback0
!

vlan configuration 101-103
member evpn-instance 1 vni 10001
mdns-sd gateway
!

Note


Replace the VLAN with one or more VLANs that are specific to your deployment.

Step 9

Click Save.

Step 10

Click Commit to commit the template.

The Template Hub tool provides the additional flexibility of customizing templates in multiple ways. You can use template variables and simulation. For more information about working with the Template Hub tool, see the Cisco DNA Center User Guide.


Configure SDG Agents on a Distributed Anycast Gateway with a Service Peer

Procedure


Step 1

Click the menu icon () and choose Tools > Template Hub.

Step 2

In the left pane of the Cisco DNA Center Template Hub tool, hover your cursor over Add and click New Template.

Step 3

In the Template Details area of the Add New Template slide-in pane, do the following:

  1. In the Template Name field, enter a unique name for the template.

  2. From the Project Name drop-down list, choose Cloud DayN Templates.

  3. Under Template Type, click Regular Template.

  4. Under Template Language, choose Velocity or Jinja language to use for the template content.

  5. From the Software Type drop-down list, choose a software type.

Step 4

In the Device Type Details area, do the following:

  1. Click the Add Device Details link.

  2. In the Add Device Details slide-in pane, from the Device Family drop-down list, choose a device type for which the template is applicable.

  3. Click the Device Series tab and check the check box next to the required device series.

  4. Click the Device Models tab and check the check box next to the required device model.

  5. Click Add.

  6. In the Add New Template slide-in pane, from the Device Tags drop-down list, choose the tags for the switches to which the template needs to be added.

  7. In the Software Version field, enter the software version.

  8. In the Template Description field, enter a description for the template.

Step 5

Click Continue.

The created template is displayed in the Templates table.

Step 6

In the left pane of the Template Hub window, choose the project under which the newly created template exists.

Step 7

Click the template name.

Step 8

In the Templates tab, enter the CLI commands that the template needs to push to the SDG agent switches.

The following is a sample set of CLI commands.

mdns-sd gateway
 rate-limit 100
!

service-export mdns-sd controller DNAC
 controller-address <DNAC IP>
 controller-source-interface Loopback0
!

vlan configuration 101-103
 member evpn-instance 1 vni 10001
 mdns-sd gateway
!

Note


Replace the VLAN with one or more VLANs that are specific to your deployment.

Step 9

Click Save.

Step 10

Click Commit to commit the template.

The Template Hub tool provides the additional flexibility of customizing templates in multiple ways. You can use template variables and simulation. For more information about working with the Template Hub tool, see the Cisco DNA Center User Guide.


Configure Service Peers on a Distributed Anycast Gateway Multilayer Network

Procedure


Step 1

Click the menu icon () and choose Tools > Template Hub.

Step 2

In the left pane of the Cisco DNA Center Template Hub tool, hover your cursor over Add and click New Template.

Step 3

In the Template Details area of the Add New Template slide-in pane, do the following:

  1. In the Template Name field, enter a unique name for the template.

  2. From the Project Name drop-down list, choose Cloud DayN Templates.

  3. Under Template Type, click Regular Template.

  4. Under Template Language, choose Velocity or Jinja language to use for the template content.

  5. From the Software Type drop-down list, choose a software type.

Step 4

In the Device Type Details area, do the following:

  1. Click the Add Device Details link.

  2. In the Add Device Details slide-in pane, from the Device Family drop-down list, choose a device type for which the template is applicable.

  3. Click the Device Series tab and check the check box next to the required device series.

  4. Click the Device Models tab and check the check box next to the required device model.

  5. Click Add.

  6. In the Add New Template slide-in pane, from the Device Tags drop-down list, choose the tags for the switches to which the template needs to be added.

  7. In the Software Version field, enter the software version.

  8. In the Template Description field, enter a description for the template.

Step 5

Click Continue.

The created template is displayed in the Templates table.

Step 6

In the left pane of the Template Hub window, choose the project under which the newly created template exists.

Step 7

Click the template name.

Step 8

In the Templates tab, enter the CLI commands that the template needs to push to the service peer devices.

The following is a sample set of CLI commands:

mdns-sd gateway
 mode service-peer
 rate-limit 100
 sdg-agent 40.1.1.1
!

vlan configuration 101-103
mdns-sd gateway
!

Note


Replace the VLAN with one or more VLANs that are specific to your deployment.

Step 9

Click Save.

Step 10

Click Commit to commit the template.

The Template Hub tool provides the additional flexibility of customizing templates in multiple ways. You can use template variables and simulation. For more information about working with the Template Hub tool, see the Cisco DNA Center User Guide.


Configure SDG Agents on a Centralized Gateway Network

Procedure


Step 1

Click the menu icon () and choose Tools > Template Hub.

Step 2

In the left pane of the Cisco DNA Center Template Hub tool, hover your cursor over Add and click New Template.

Step 3

In the Template Details area of the Add New Template slide-in pane, do the following:

  1. In the Template Name field, enter a unique name for the template.

  2. From the Project Name drop-down list, choose Cloud DayN Templates.

  3. Under Template Type, click Regular Template.

  4. Under Template Language, choose Velocity or Jinja language to use for the template content.

  5. From the Software Type drop-down list, choose a software type.

Step 4

In the Device Type Details area, do the following:

  1. Click the Add Device Details link.

  2. In the Add Device Details slide-in pane, from the Device Family drop-down list, choose a device type for which the template is applicable.

  3. Click the Device Series tab and check the check box next to the required device series.

  4. Click the Device Models tab and check the check box next to the required device model.

  5. Click Add.

  6. In the Add New Template slide-in pane, from the Device Tags drop-down list, choose the tags for the switches to which the template needs to be added.

  7. In the Software Version field, enter the software version.

  8. In the Template Description field, enter a description for the template.

Step 5

Click Continue.

The created template is displayed in the Templates table.

Step 6

In the left pane of the Template Hub window, choose the project under which the newly created template exists.

Step 7

Click the template name.

Step 8

In the Templates tab, enter the CLI commands that the template needs to push to the SDG agent switches.

mdns-sd gateway
 ingress-client query-supression enable
 rate-limit 100
!
mdns-sd service-list INGRESS-SERVICE-LIST IN
 match apple-tv
 match printer-ipp
 match printer-ipps
 match apple-airprint
 match web-server
 match apple-screen-share
 match apple-rdp
 match printer-lpd
 match apple-windows-fileshare
 match apple-continuity
!
mdns-sd service-list EGRESS-SERVICE-LIST OUT
 match apple-tv
 match printer-ipp
 match printer-ipps
 match apple-airprint
 match web-server
 match apple-screen-share
 match apple-rdp
 match printer-lpd
 match apple-windows-fileshare
 match apple-continuity
!
mdns-sd service-list WIDE-AREA-SERVICE-LIST OUT
 match apple-tv
 match printer-ipp
 match printer-ipps
 match apple-airprint
 match web-server
 match apple-screen-share
 match apple-rdp
 match printer-lpd
 match apple-windows-fileshare
 match apple-continuity
!

mdns-sd aervice-policy LOCAL_AREA_POLICY
 service-list INGRESS-SERVICE-LIST IN
 service-list EGRESS-SERVICE-LIST OUT
!
mdns-sd service-policy WIDE_AREA_POLICY
 service-list WIDE-AREA-SERICE-LIST OUT
!
service-export mdns-sd controller DNAC
 controller-address <DNAC IP>
 controller-service-policy WIDE_AREA_POLICY OUT
 controller-source-interface Loopback0
!

vlan configuration 101
member evpn-instance 1 vni 10001
!
interface vlan 101
mdns-sd gateway
 service-policy LOCAL_AREA_POLICY
 active_query timer 60
 transport both
!

You can add or delete match <service-type> statements in the service-lists according to your deployment requirements.

Note


Replace the VLAN with one or more VLANs that are specific to your deployment.

Step 9

Click Save.

Step 10

Click Commit to commit the template.

The Template Hub tool provides the additional flexibility of customizing templates in multiple ways. You can use template variables and simulation. For more information about working with the Template Hub tool, see the Cisco DNA Center User Guide.


Create a Cisco Catalyst and Cisco Nexus Switch Network Profile

With Cisco DNA Center, you can create a network profile for SDG agents and assign templates to them. This step creates a network profile for the SDG agents, and assigns both the templates created in the previous steps to the template. The network profile will be used to provision the SDG agents later.

Procedure


Step 1

Click the menu icon () and choose Design > Network Profiles.

Step 2

Hover your cursor over Add Profile and click Switching.

The following window is displayed.

Step 3

Click the Day-N Template(s) tab.

Step 4

In the left pane of the Add a Network Profile window, in the Profile Name field, enter a profile name.

Step 5

Click the plus icon ().

Step 6

In the Add Template slide-in pane, do the following:

  1. Under Device Type(s), from the drop-down list, choose Switches and Hubs.

  2. Under Templates, choose a template for the network profile.

  3. Under Applicable Device Tag, from the drop-down list, choose the device tags.

Step 7

Click Add.

Step 8

In the Add a Network Profile window, click Save.


Provision Cisco Service Discovery Gateway Bonjour Policies

Provisioning the Cisco SDG Bonjour policies pushes the CLI configurations of the two templates assigned to the network profile, enabling the switch to process Bonjour announcements and queries, and to forward them to the Wide Area Bonjour Controller.

Procedure


Step 1

Click the menu icon () and choose Provision > Inventory.

Step 2

Check the check box of the device to provision.

Step 3

From the Actions drop-down list, choose Provision > Provision Device.

Step 4

Enter the details of the site and click Next.

Step 5

Choose the devices for which to fill out the provisioning parameters and click Next.

Step 6

Review the details and ensure that both the required templates are listed under Template Name, then click Deploy.

Step 7

Choose Now to provision the template immediately, or choose Later to schedule the provisioning for a later date.

Step 8

Click Apply.

You can monitor the provisioning status from the Inventory page with the Focus set to Provision.