Deploy Wide Area Bonjour on Cisco SD-Access Networks

About Wide Area Bonjour on Cisco SD-Access Networks

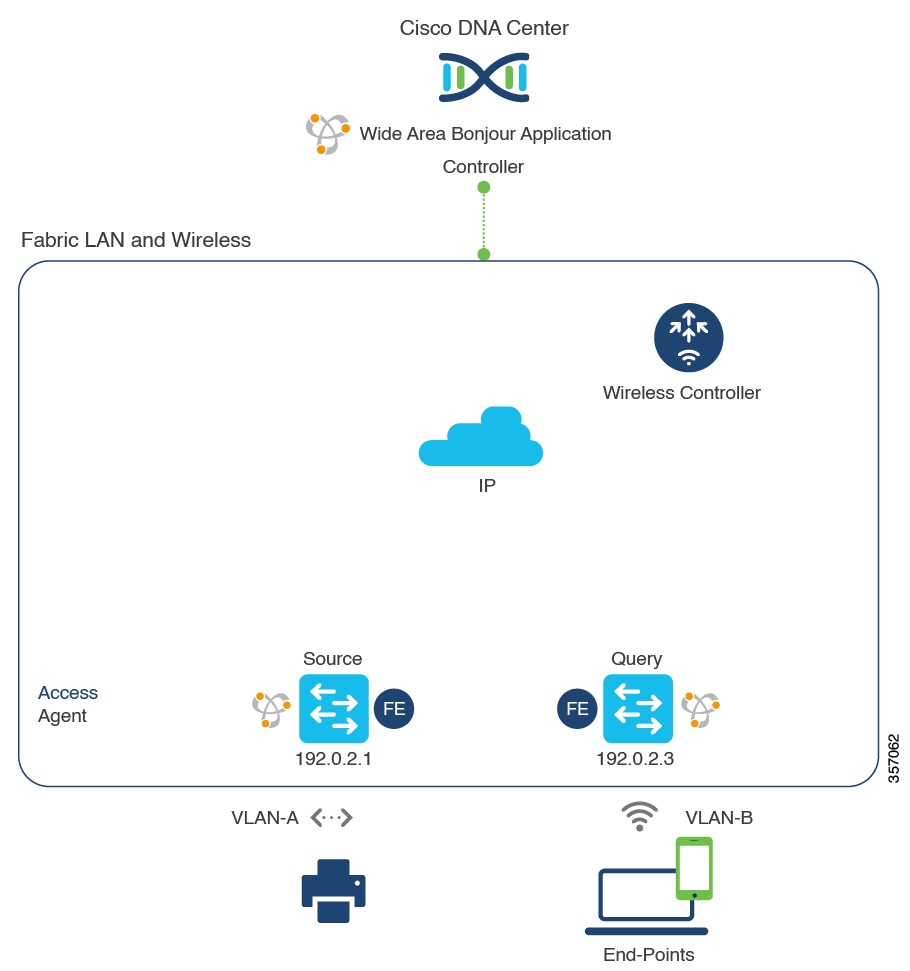
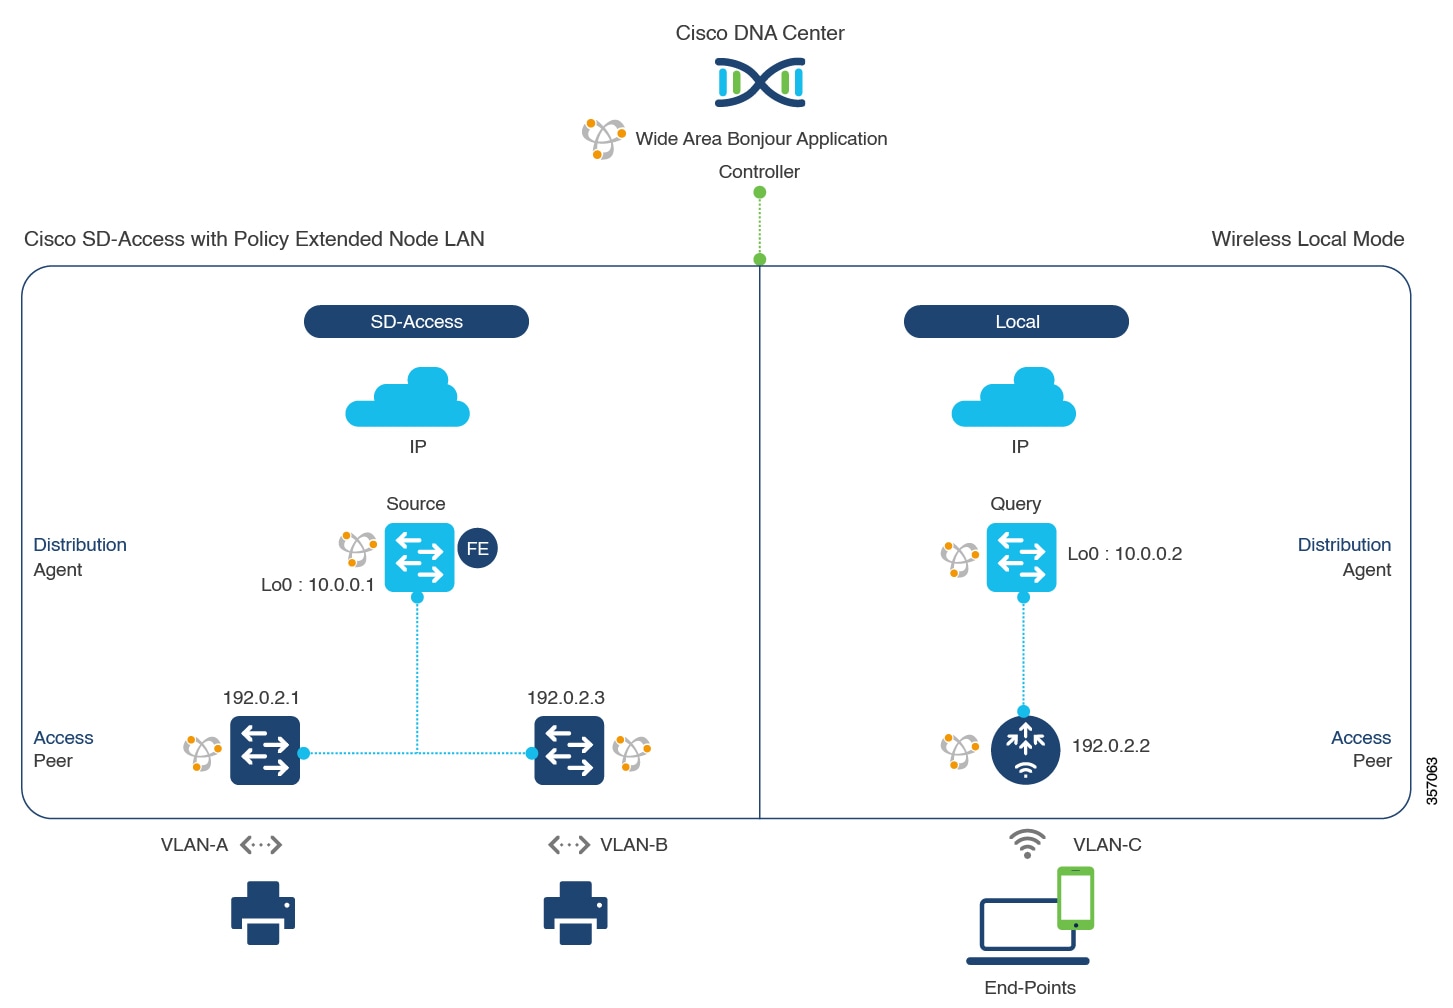
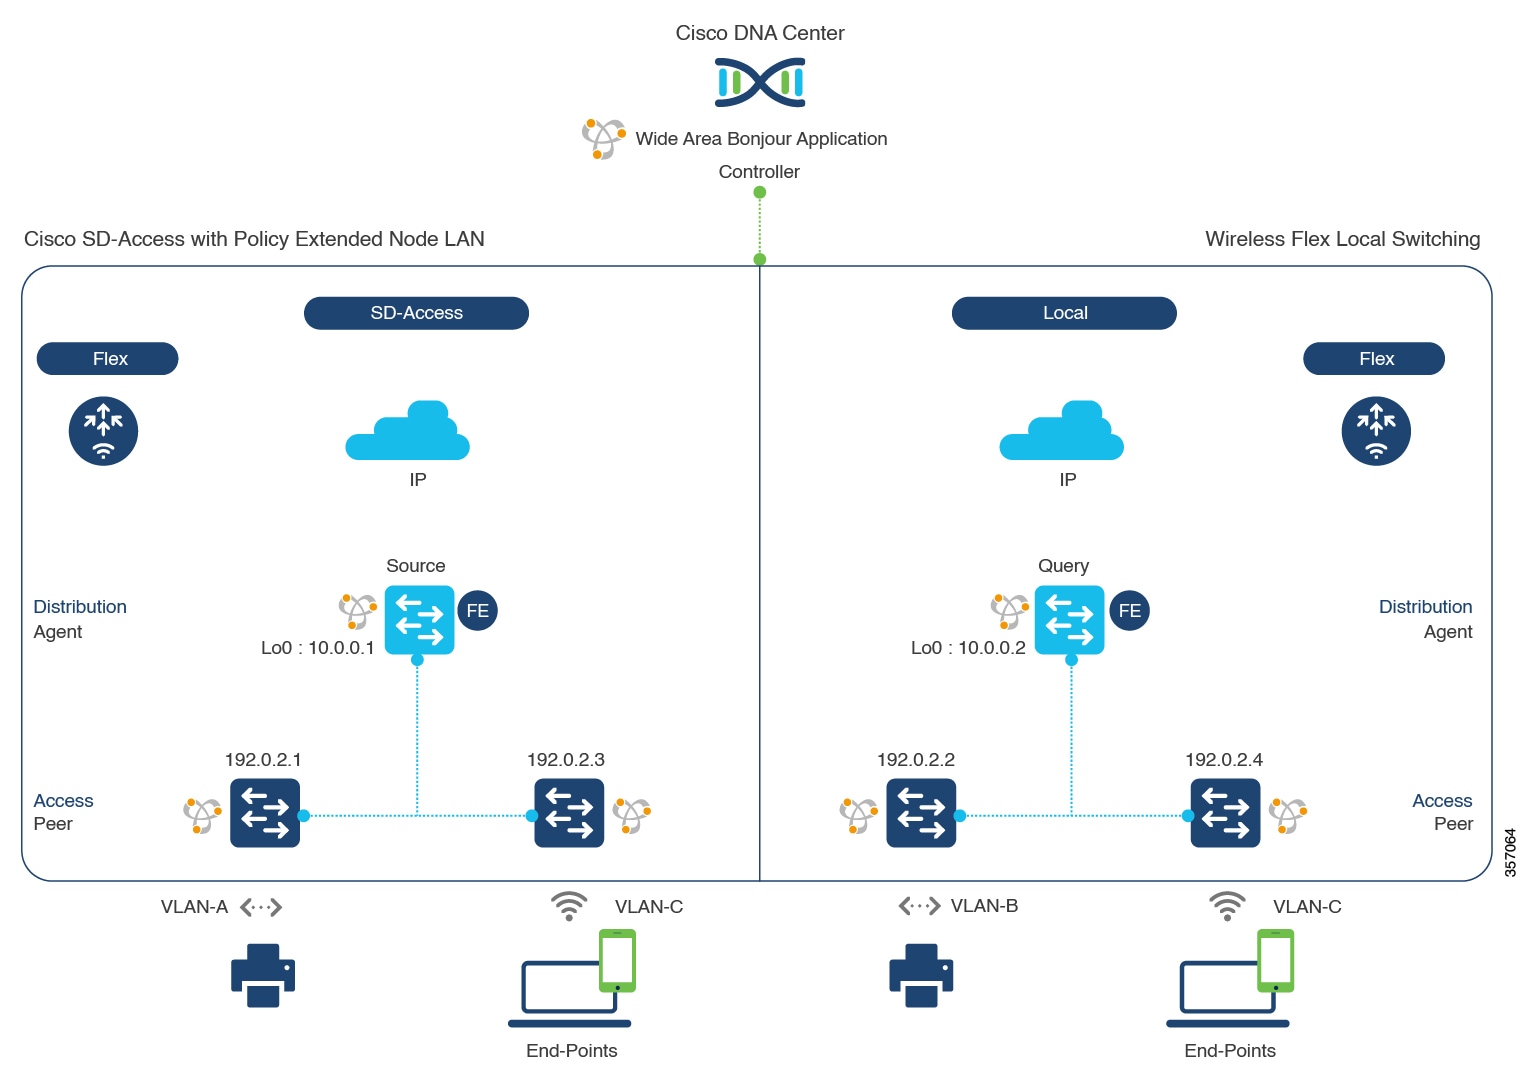
The Cisco Wide Area Bonjour application supports various types of Cisco SD-Access wired and wireless LAN network deployment models. This chapter provides step-by-step instructions to implement global service filter policies in the Cisco Wide Area Bonjour application, enabling network-wide service routing functions for virtual network environments, without extending the Layer 2 flood boundary.

Cisco SD-Access LAN and Wireless Fabric Mode

This section provides step-by-step global configuration policy guidelines to enable Wide Area Bonjour between Fabric-Edge LAN switches providing Bonjour services, such as wired printers to remotely connected wireless users connected over Fabric-enabled wireless networks.

The following figure shows a reference network topology for Cisco SD-Access LAN and Fabric mode wireless networks with Bonjour source and receiver in virtual network environments.

Figure 1. Cisco SD-Access LAN and Fabric-Enabled Wireless Virtual Network Service Routing

For more information about the Cisco Catalyst 9800 Series Wireless Controller, see the Cisco Catalyst 9800 Series Wireless Controller Software Configuration Guide, Cisco IOS XE Amsterdam 17.3.x.

Create Service Filters for Cisco SD-Access LAN and Wireless Fabric Mode

This section lists the general steps to implement global service filters, which permit the Cisco Wide Area Bonjour application to dynamically discover and distribute service information between trusted Cisco Catalyst SDG agent switches across IP networks.

Procedure


Step 1

Navigate to the Configuration tab in the Cisco Wide Area Bonjour application.

Step 2

From the sidebar, select the subdomain for which you want to create the service filter.

Step 3

Ensure that the Service Filter box is checked.

Step 4

Click the service filter icon from the topology to view a list of the service filters for the selected domain.

You can also manually edit existing service filters from this list.

Step 5

Click Create Service Filter.

Step 6

From the Network Mode drop-down list, choose Traditional (the default mode).

Step 7

Enter a unique name for the service filter.

Step 8

(Optional) Enter a description for the service filter.

Step 9

Select one or more service types to permit announcements and queries.

Step 10

Enable or disable service filters after creating them. By default, the service filters are enabled.


Configure Source SDG Agents in Cisco SD-Access LAN and Wireless Fabric Mode

This section lists the additional configuration steps to enable discovering wired printer sources from the LAN Fabric-Edge Switch-1 in an SDG agent role. The wired printer can be discovered by remotely connected wireless users from the Fabric-Edge LAN Switch-2 in an SDG agent role.

A unidirectional service filter allows network-wide service discovery for operation and management purposes. However, the services can't be distributed across an IP network unless you configure a query SDG agent. For steps to configure a query SDG agent, see Configure Query SDG Agents for Cisco SD-Access LAN and Wireless Fabric Mode.

Before you begin

Ensure that you've completed the steps in Create Service Filters for Cisco SD-Access LAN and Wireless Fabric Mode.

Procedure


Step 1

Click Add in the upper-right corner of the window.

Step 2

Click the radio button to select a source SDG agent. By default, the source radio button is selected.

Step 3

From the SDG Agent/IP drop-down list, choose an SDG agent (192.0.2.1) that announces the services (printer).

Step 4

If you're using a policy extended node, choose Peer from the Service Layer drop-down list. If you're not using a policy extended node, choose Local.

Step 5

Uncheck the Any check box. By default, this check box is unchecked.

Step 6

Select the source VLAN (Vlan-A) to discover services (printer) from a specific network.

Step 7

Enable or disable a service from a selected IPv4 subnet. By default, this is enabled.

Step 8

Enable or disable a service from a selected IPv6 subnet. By default, this is enabled.

Step 9

For Location Group, do one of the following:

  • To accept services from any location group, check the check box.
  • To accept services from location group 0, choose Default from the drop-down list.
  • To use a custom location group ID, choose Custom from the drop-down list and enter the location group ID. The valid range is from 1 to 4096.

Step 10

(Optional) Click Add Next to add more source SDG agents. (Repeat the preceding steps.)

Step 11

Click DONE.

Step 12

Click CREATE.


Configure Query SDG Agents for Cisco SD-Access LAN and Wireless Fabric Mode

This section lists the additional configuration steps to distribute services to query SDG agents, based on a policy.

For instructions to configure a source SDG agent, see Configure Source SDG Agents in Cisco SD-Access LAN and Wireless Fabric Mode.

Before you begin

Ensure that you've completed the steps in Create Service Filters for Cisco SD-Access LAN and Wireless Fabric Mode.

Procedure


Step 1

Click Add in the upper-right corner of the window.

Step 2

Click the radio button to select a query SDG agent. By default, the source radio button is selected.

Step 3

From the SDG Agent/IP drop-down list, choose an SDG agent (192.0.2.3) that receives queries for the services (Printer).

Step 4

From the Service Layer drop-down list, choose Local.

Step 5

Ensure that the Any check box is unchecked. By default, this is enabled.

Step 6

Select the query VLAN (Vlan-B) to distribute services (printer) to a specific network.

Step 7

Enable or disable services from the selected query IPv4 subnet. By default, this is enabled.

Step 8

Enable or disable services from the selected query IPv6 subnet. By default, this is enabled.

Step 9

For Location Group, do one of the following:

  • To accept services from any location group, check the check box.
  • To accept services from location group 0, choose Default from the drop-down list.
  • To use a custom location group ID, choose Custom from the drop-down list and enter the location group ID. The valid range is from 1 to 4096.

Step 10

(Optional) Click Add Next to add more query agents. (Repeat the preceding steps.)

Step 11

Click DONE.

Step 12

Click CREATE.


Cisco SD-Access with Policy Extended Node LAN and Wireless Local Mode

This section provides step-by-step global configuration policy guidelines to enable Wide Area Bonjour between the Cisco SD-Access LAN with a policy extended node in Layer 2 access providing Bonjour services (such as wired printers) to users connected over wireless networks with Cisco wireless access points in local mode.

The following figure illustrates reference network topologies for Cisco SD-Access with Policy Extended Node LAN and wireless Local mode networks with Bonjour source and receiver devices across the fabric and external IP networks.

Figure 2. Cisco SD-Access with Policy Extended Node LAN and Wireless Local Mode Network Service Routing

For more information about the Cisco Catalyst 9800 Series Wireless Controller configuration guidelines, see the Cisco Catalyst 9800 Series Wireless Controller Software Configuration Guide, Cisco IOS XE Amsterdam 17.3.x.

Configure Service Filters for Cisco SD-Access with Policy Extended Node LAN and Wireless Local Mode

This section lists the general steps to implement global service filters, which permit the Cisco Wide Area Bonjour application to dynamically discover and distribute service information between trusted Cisco Catalyst SDG agent switches across IP networks.

Procedure


Step 1

Navigate to the Configuration tab in the Cisco Wide Area Bonjour application.

Step 2

From the sidebar, select the subdomain for which you want to create the service filter.

Step 3

Ensure that the Service Filter box is checked.

Step 4

Click the service filter icon from the topology to view a list of the service filters for the selected domain.

You can also manually edit existing service filters from this list.

Step 5

Click Create Service Filter.

Step 6

From the Network Mode drop-down list, choose Traditional (the default mode).

Step 7

Enter a unique name for the service filter.

Step 8

(Optional) Enter a description for the service filter.

Step 9

Select one or more service types to permit announcements and queries.

Step 10

Enable or disable service filters after creating them. By default, the service filters are enabled.


Configure Source SDG Agents for Cisco SD-Access with Policy Extended Node LAN and Wireless Local Mode

This section lists the additional configuration steps to enable discovering wired printer sources from the LAN Fabric-Edge Switch-1 in an SDG agent role. The wired printer can be discovered by remotely connected wireless users from the Fabric-Edge LAN Switch-2 in an SDG agent role.

A unidirectional service filter allows network-wide service discovery for operation and management purposes. However, the services can't be distributed across the IP network unless you configure a query SDG agent. For steps to configure a query SDG agent, see Configure Query SDG Agents for Cisco SD-Access with Policy Extended Node LAN and Wireless Local Mode.

Before you begin

Ensure that you've completed the steps in Configure Service Filters for Cisco SD-Access with Policy Extended Node LAN and Wireless Local Mode.

Procedure


Step 1

Click Add in the upper-right corner of the window.

Step 2

Click the radio button to select a source SDG agent. By default, the source radio button is selected.

Step 3

From the SDG Agent/IP drop-down list, choose an SDG agent (192.0.2.1) that announces the services (printer).

Step 4

From the Service Layer drop-down list, choose Peer.

Step 5

Uncheck the Any check box. By default, this check box is unchecked.

Step 6

Select the source VLAN (Vlan-A) to discover services (printer) from a specific network.

Step 7

Enable or disable a service from a selected IPv4 subnet. By default, this is enabled.

Step 8

Enable or disable a service from a selected IPv6 subnet. By default, this is enabled.

Step 9

For Location Group, do one of the following:

  • To accept services from any location group, check the check box.
  • To accept services from location group 0, choose Default from the drop-down list.
  • To use a custom location group ID, choose Custom from the drop-down list and enter the location group ID. The valid range is from 1 to 4096.

Step 10

(Optional) Click the Add Next button to add more source SDG agents. (Repeat the preceding steps.)

Step 11

Click DONE.

Step 12

Click CREATE.


Configure Query SDG Agents for Cisco SD-Access with Policy Extended Node LAN and Wireless Local Mode

This section lists the additional configuration steps to distribute services to query SDG agents, based on a policy.

For instructions to configure a source SDG agent, see Configure Source SDG Agents for Cisco SD-Access with Policy Extended Node LAN and Wireless Local Mode.

Before you begin

Ensure that you've completed the steps in Configure Service Filters for Cisco SD-Access with Policy Extended Node LAN and Wireless Local Mode.

Procedure


Step 1

Click Add in the upper-right corner of the window.

Step 2

Click the radio button to select a source SDG agent. By default, the source radio button is selected.

Step 3

From the SDG Agent/IP drop-down list, choose an SDG agent (10.0.0.2) that announces the services (printer).

Step 4

From the Service Layer drop-down list, choose Peer.

Step 5

Uncheck the Any check box. By default, this check box is unchecked.

Step 6

Select the source VLAN (Vlan-C) to discover services (printer) from a specific network.

Step 7

Enable or disable a service from a selected IPv4 subnet. By default, this is enabled.

Step 8

Enable or disable a service from a selected IPv6 subnet. By default, this is enabled.

Step 9

Enter the service peer IPv4 address (192.0.2.2).

Step 10

Click the plus icon to add more service peers (192.0.2.4). Check the Any check box to accept services from any peer on the selected VLAN.

Step 11

For Location Group, do one of the following:

  • To accept services from any location group, check the check box.
  • To accept services from location group 0, choose Default from the drop-down list.
  • To use a custom location group ID, choose Custom from the drop-down list and enter the location group ID. The valid range is from 1 to 4096.

Step 12

(Optional) Click Add Next to add more source SDG agents. (Repeat the preceding steps.)

Step 13

Click DONE.

Step 14

Click CREATE.


What to do next

Create a new reverse service filter to permit Printer service discovery from source Fabric-Edge 10.0.0.2 and peer 192.0.2.2, and distribute the service to remote querying Fabric-Edge SDG agent 10.0.0.1 and wireless users connected to peer 192.0.2.3.

Cisco SD-Access with Policy Extended Node LAN and Wireless FlexConnect Local Switching Mode

This section provides step-by-step global configuration policy guidelines to enable Wide Area Bonjour on Cisco SD-Access with Policy Extended Node LAN providing Bonjour services (such as wired printers) to local or remote wireless users connected over wireless networks with Cisco wireless access points in FlexConnect Local Switching mode.

The following figure illustrates reference network topologies for Cisco SD-Access with Policy Extended Node LAN and wireless FlexConnect Local Switching mode networks with Bonjour source and receiver in virtual network environment.

Figure 3. Cisco SD-Access with Policy Extended Node LAN and Wireless FlexConnect Local Switching Network Service Routing

Configure Service Filters for Cisco SD-Access with Policy Extended Node LAN and Wireless FlexConnect Local Switching Mode

This section lists the general steps to implement global service filters, which permit the Cisco Wide Area Bonjour application to dynamically discover and distribute service information between trusted Cisco Catalyst SDG agent switches across IP networks.

Procedure


Step 1

Navigate to the Configuration tab in the Cisco Wide Area Bonjour application.

Step 2

From the sidebar, select the subdomain for which you want to create the service filter.

Step 3

Ensure that the Service Filter box is checked.

Step 4

Click the service filter icon from the topology to view a list of the service filters for the selected domain.

You can also manually edit existing service filters from this list.

Step 5

Click Create Service Filter.

Step 6

From the Network Mode drop-down list, choose Traditional (the default mode).

Step 7

Enter a unique name for the service filter.

Step 8

(Optional) Enter a description for the service filter.

Step 9

Select one or more service types to permit announcements and queries.

Step 10

Enable or disable service filters after creating them. By default, the service filters are enabled.


Configure Source SDG Agents for Cisco SD-Access with Policy Extended Node LAN and Wireless FlexConnect Local Switching Mode

This section lists the additional configuration steps to enable discovering wired printer sources from the Fabric-Edge SDG agent LAN Distribution Block-1 switches paired with Layer 2 Catalyst switches in a service-peer role.

A unidirectional service filter allows network-wide service discovery for operation and management purposes. However, the services can't be distributed across an IP network unless you configure the query SDG agents. For steps to configure a query SDG agent, see Create Query SDG Agents for Cisco SD-Access with Policy Extended Node LAN and Wireless FlexConnect Local Switching Mode.

Before you begin

Ensure that you've completed the steps in Configure Service Filters for Cisco SD-Access with Policy Extended Node LAN and Wireless FlexConnect Local Switching Mode.

Procedure


Step 1

Click Add in the upper-right corner of the window.

Step 2

Click the radio button to select a source SDG agent. By default, the source radio button is selected.

Step 3

From the SDG Agent/IP drop-down list, choose an SDG agent (10.0.0.1) that announces the services (printer).

Step 4

From the Service Layer drop-down list, choose Peer.

Step 5

Uncheck the Any check box. By default, this check box is unchecked.

Step 6

Select the source VLAN (Vlan-A and Vlan-B) to discover services (printer) from a specific network.

Step 7

Enable or disable a service from a selected IPv4 subnet. By default, this is enabled.

Step 8

Enable or disable a service from a selected IPv6 subnet. By default, this is enabled.

Step 9

Enter the service peer IPv4 address (192.0.2.1). Click the plus icon to add more peers (192.0.2.3). Select Any to accept services from any peer on the selected VLAN.

Step 10

For Location Group, do one of the following:

  • To accept services from any location group, check the check box.
  • To accept services from location group 0, choose Default from the drop-down list.
  • To use a custom location group ID, choose Custom from the drop-down list and enter the location group ID. The valid range is from 1 to 4096.

Step 11

(Optional) Click Add Next to add more source SDG agents. (Repeat the preceding steps.)

Step 12

Click DONE.

Step 13

Click CREATE.


Create Query SDG Agents for Cisco SD-Access with Policy Extended Node LAN and Wireless FlexConnect Local Switching Mode

This section lists the next configuration steps to distribute services to query SDG agents, based on a policy.

Before you begin

Ensure that you've completed the steps in Configure Service Filters for Cisco SD-Access with Policy Extended Node LAN and Wireless FlexConnect Local Switching Mode.

Procedure


Step 1

Click Add in the upper-right corner of the window.

Step 2

Click the radio button to select a source SDG agent. By default, the source radio button is selected.

Step 3

From the SDG Agent/IP drop-down list, choose an SDG agent (10.0.0.2) that announces the services (printer).

Step 4

From the Service Layer drop-down list, choose Peer.

Step 5

Uncheck the Any check box. By default, this check box is unchecked.

Step 6

Select the source VLAN (Vlan-C) to discover services (printer) from a specific network.

Step 7

Enable or disable a service from a selected IPv4 subnet. By default, this is enabled.

Step 8

Enable or disable a service from a selected IPv6 subnet. By default, this is enabled.

Step 9

Enter the service peer IPv4 address (192.0.2.2).

Step 10

Click the plus icon to add more service peers (192.0.2.4). Check the Any check box to accept services from any peer on the selected VLAN.

Step 11

For Location Group, do one of the following:

  • To accept services from any location group, check the check box.
  • To accept services from location group 0, choose Default from the drop-down list.
  • To use a custom location group ID, choose Custom from the drop-down list and enter the location group ID. The valid range is from 1 to 4096.

Step 12

(Optional) Click Add Next to add more source SDG agents. (Repeat the preceding steps.)

Step 13

Click DONE.

Step 14

Click CREATE.


What to do next

Create a new reverse service filter configuration to permit service discovery from the source Fabric-Edge 10.0.0.2 and peer 192.0.2.2, and distribute the service to a remote querying Fabric-Edge SDG agent 10.0.0.1 and wireless users connected to the peer 192.0.2.3.


Note


The Cisco Catalyst 9800 Series Wireless Controller with FlexConnect Access-Point in Local Switching mode doesn't require any mDNS configuration settings.