Deploy Wide Area Bonjour on BGP EVPN Networks

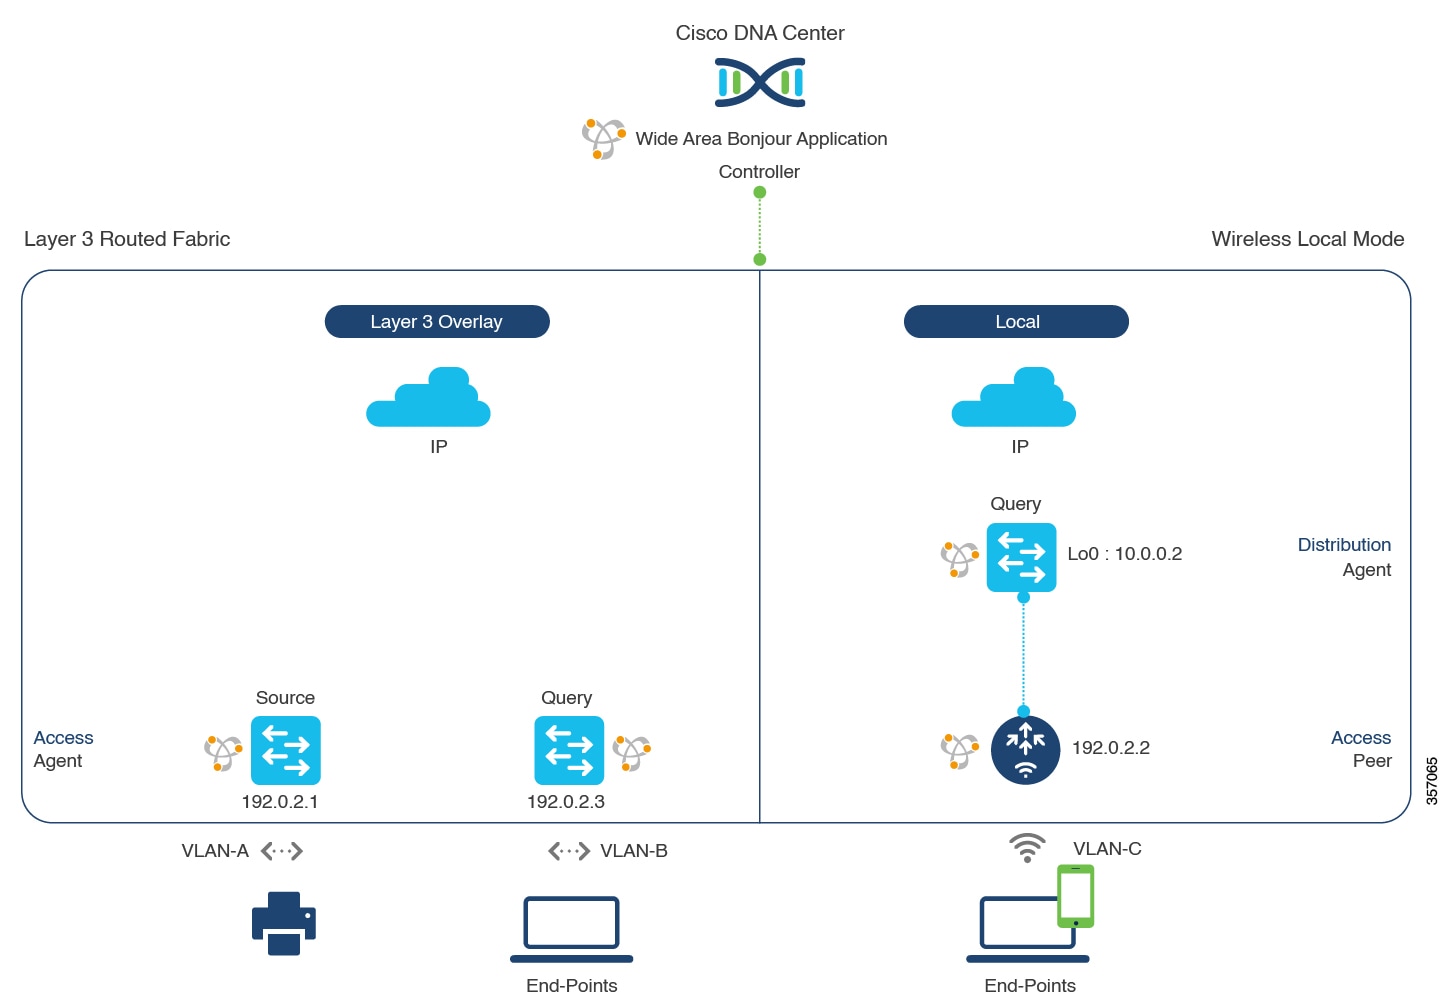
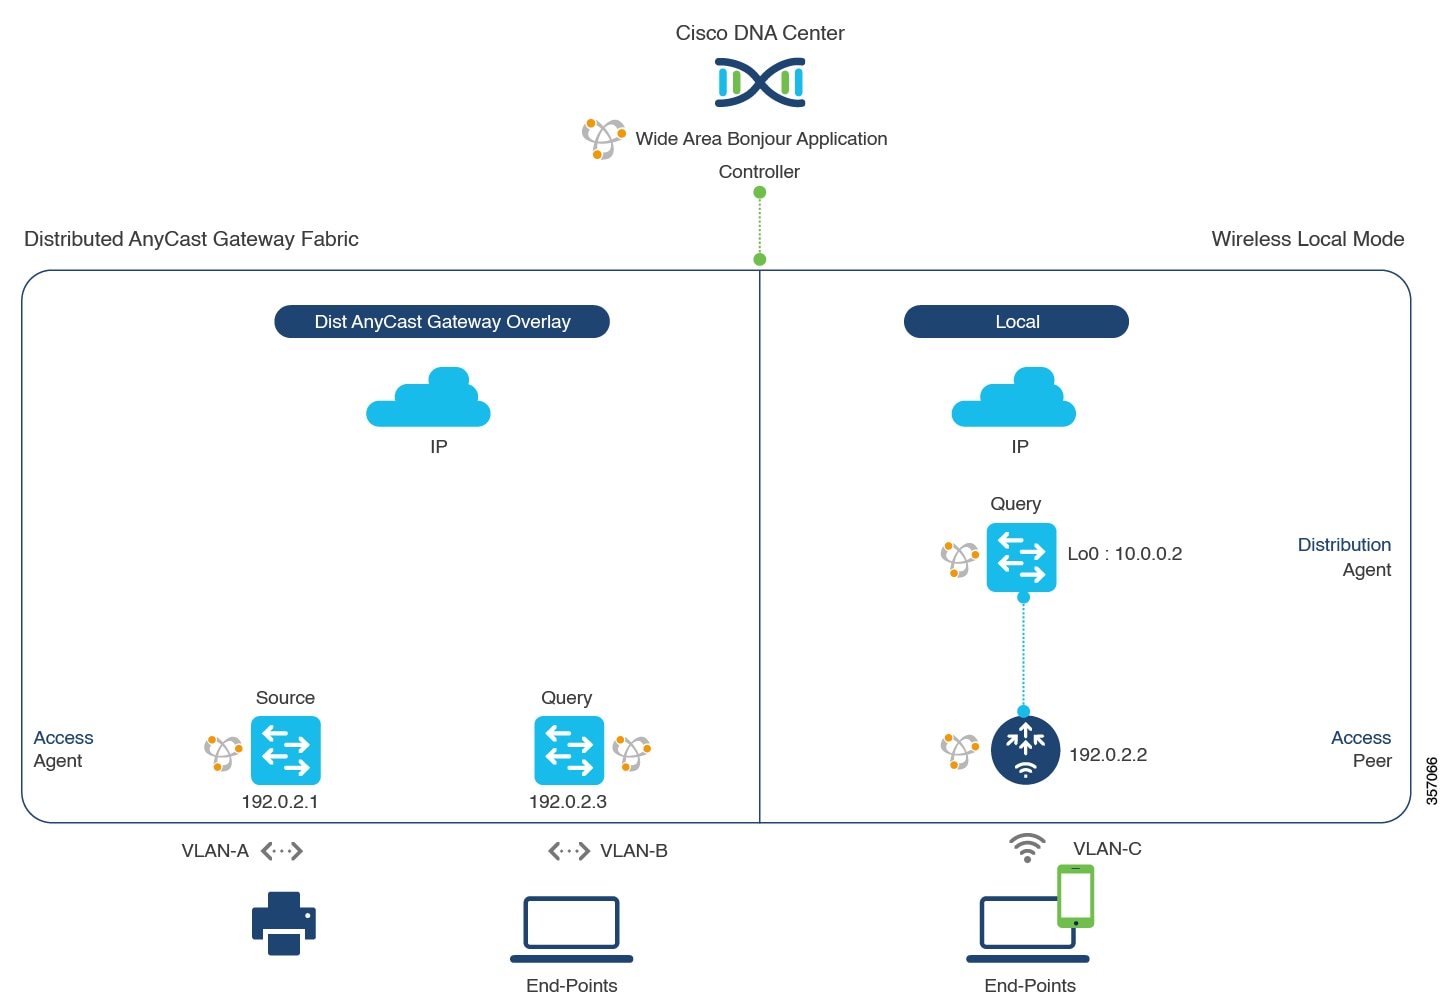
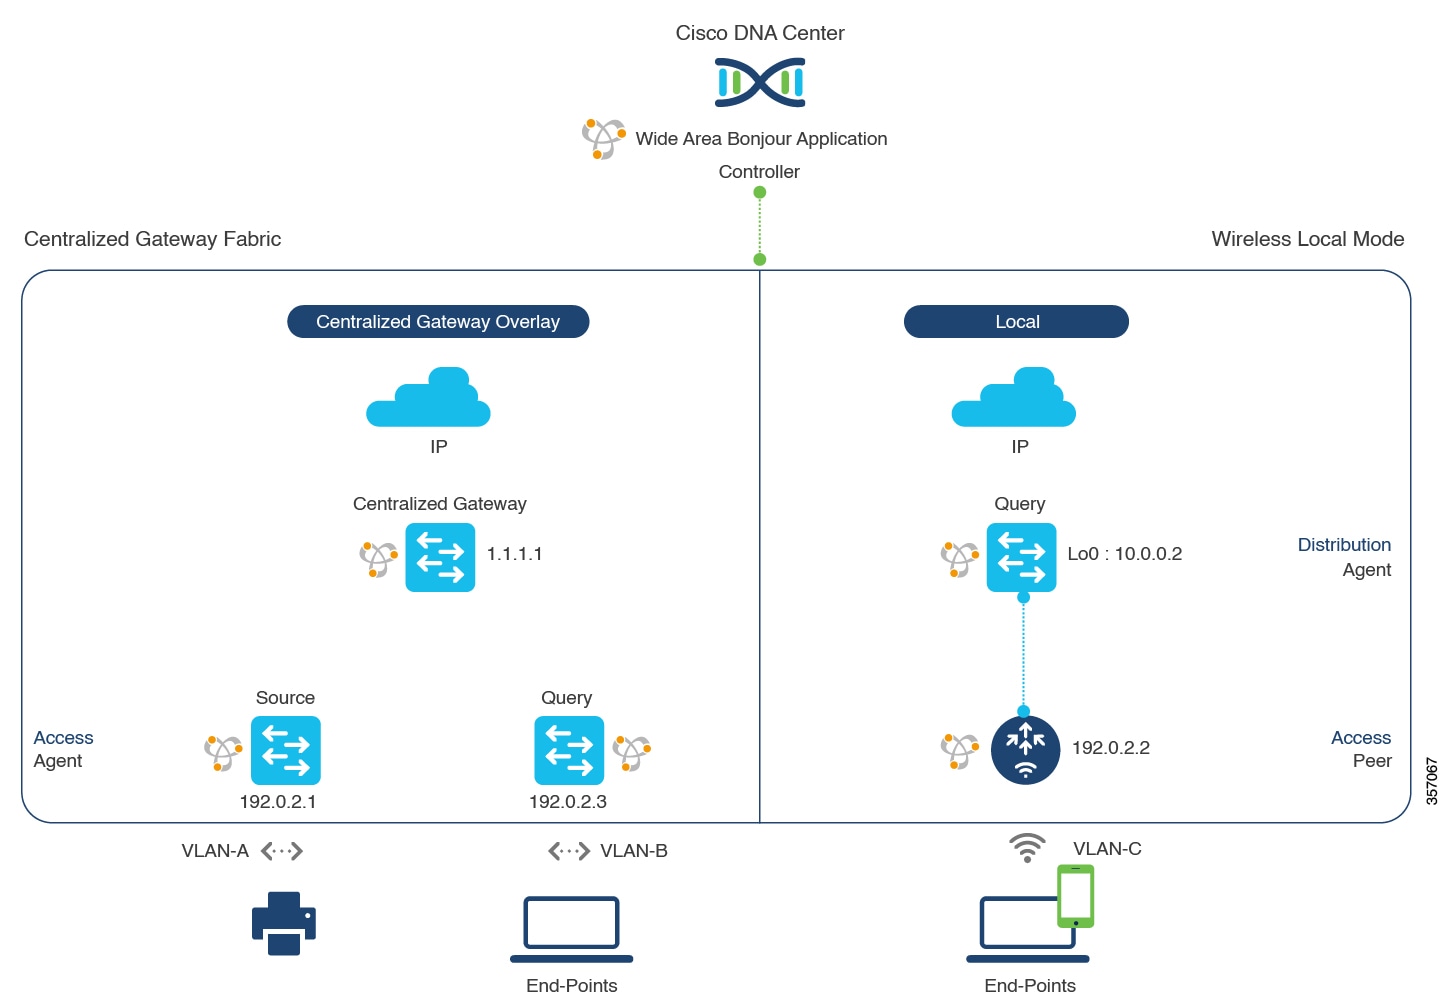
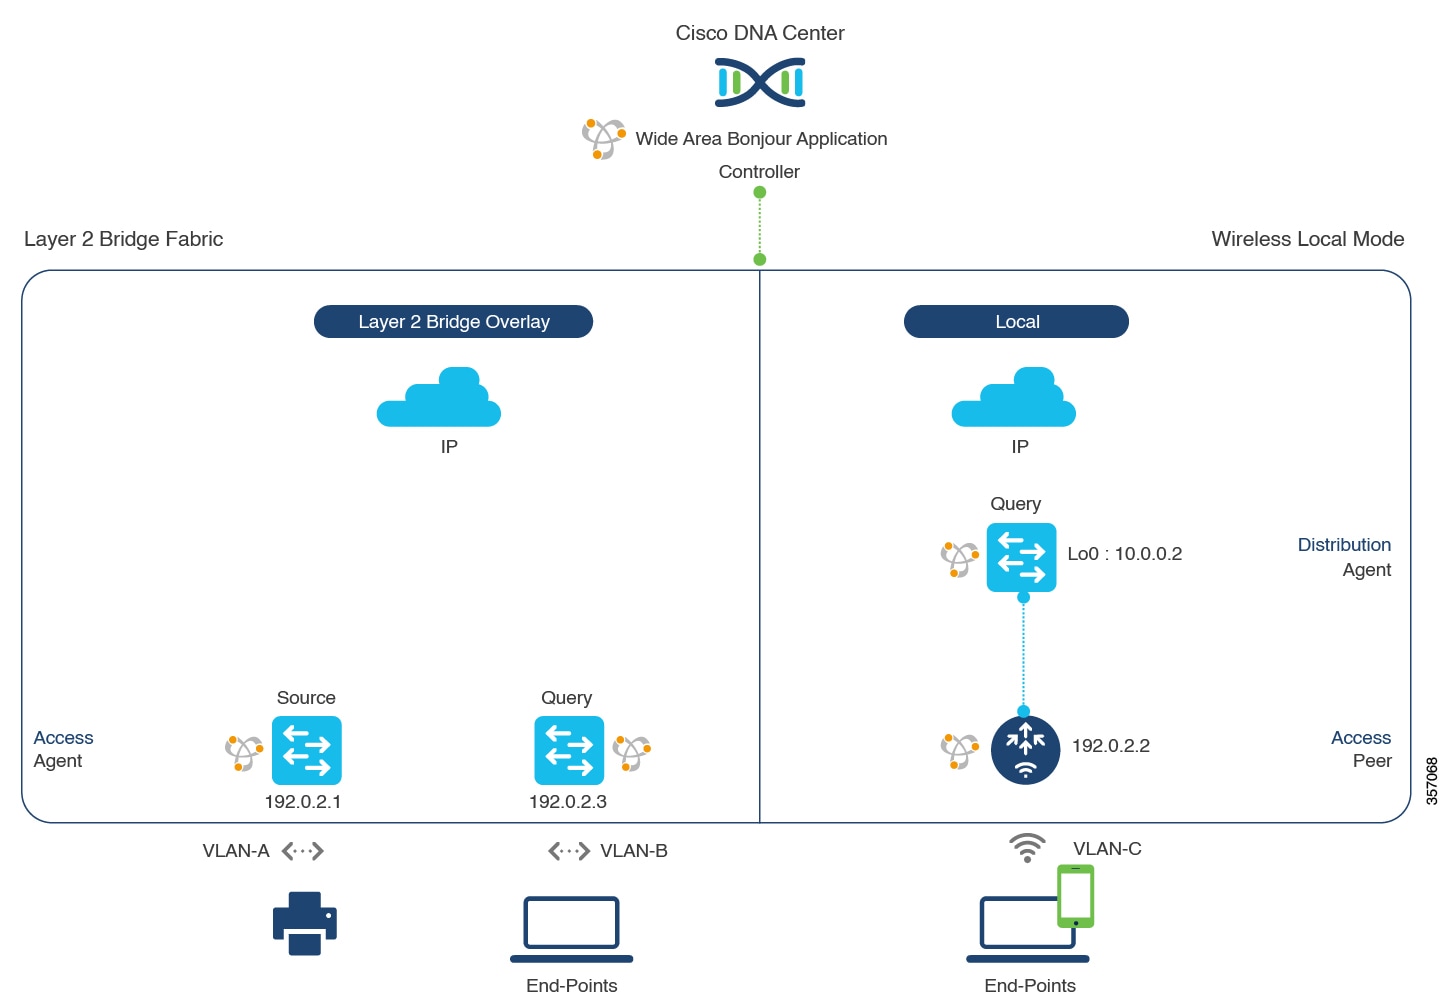
About Wide Area Bonjour on BGP EVPN Networks

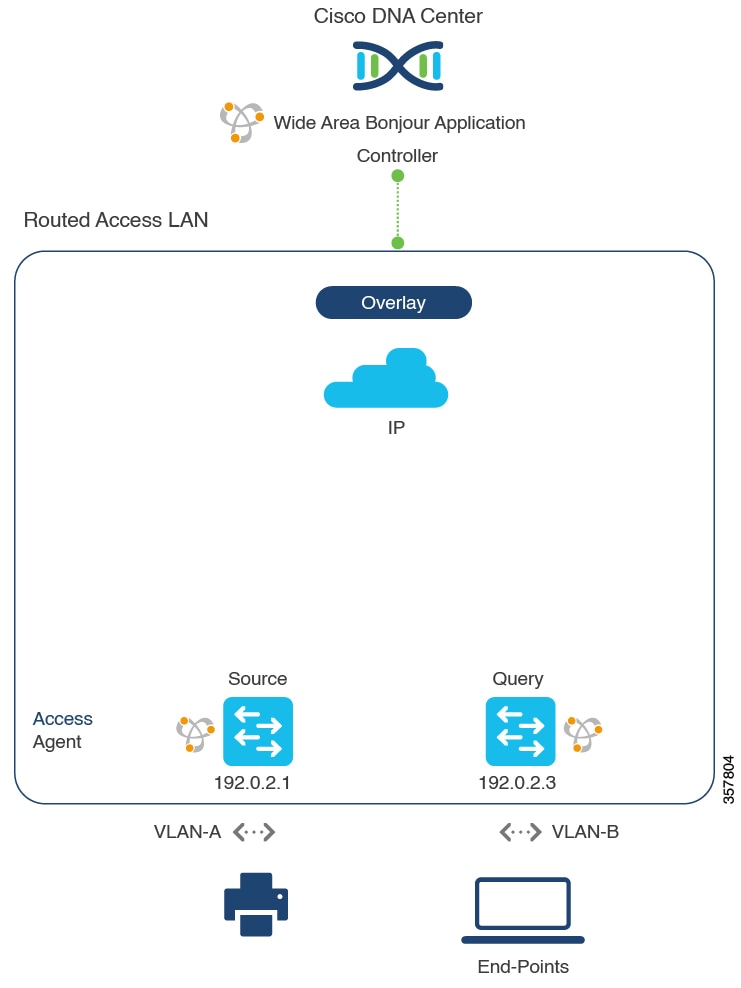
Cisco Wide Area Bonjour supports various types of BGP EVPN overlay networks for wired and traditional wireless LAN in Local mode network deployment models. This chapter provides step-by-step configuration to implement global service filter policies in the Cisco Wide Area Bonjour application, which enables network-wide service routing functions for Layer 3 or Layer 2 overlay virtual network environments, without extending the Layer 2 flood boundary.

BGP EVPN Layer 3 Routed Fabric and Wireless Local Mode

This section provides step-by-step global configuration policy guidelines to enable Wide Area Bonjour between the BGP EVPN VTEP LAN switch, which provides different Bonjour services such as wired printers, and remotely connected wired users on different IP subnets and wireless users connected over Local mode wireless networks.

The following figure illustrates reference network topologies for BGP EVPN Layer 3 routed LAN and Local mode wireless networks with Bonjour source and receiver devices in virtual network devices.

Figure 1. BGP EVPN Layer 3 Routed LAN and Local Mode Wireless Virtual Network Service Routing

For more information about the Cisco Catalyst 9800 Series Wireless Controller configuration guidelines, see the Cisco Catalyst 9800 Series Wireless Controller Software Configuration Guide, Cisco IOS XE Amsterdam 17.3.x.

Configure Service Filters for a BGP EVPN Layer 3 Routed Fabric and Wireless Local Mode

This section lists the general steps to implement global service filters, which permit the Cisco Wide Area Bonjour application to dynamically discover and distribute service information between trusted Cisco Catalyst SDG agent switches across your IP network.

Procedure


Step 1

Navigate to the Configuration tab in the Cisco Wide Area Bonjour application.

Step 2

From the sidebar, select the subdomain for which you want to create the service filter.

Step 3

Ensure that the Service Filter box is checked.

Step 4

Click the service filter icon from the topology to view a list of the service filters for the selected domain.

You can also manually edit existing service filters from this list.

Step 5

Click Create Service Filter.

Step 6

From the Network Mode drop-down list, choose Overlay.

Step 7

Enter a unique name for the service filter.

Step 8

(Optional) Enter a description for the service filter.

Step 9

Choose one or more service types to permit announcements and queries.

Step 10

Enable or disable service filters after creating them. By default, they are enabled.


Configure Source SDG Agents for BGP EVPN Layer 3 Routed Fabric and Wireless Local Mode

This section provides additional configuration steps to enable discovering wired printer sources from the EVPN LAN VTEP Switch-1 in an SDG agent role. The wired printer can be discovered by remotely connected wired users in the EVPN LAN VTEP switch-2 in SDG agent role. The wireless distribution switches in a BGP EVPN VTEP role paired with a Cisco Catalyst 9800 Series Wireless Controller in a service-peer role receive query responses for wired printers when browsed over wireless Local mode networks.

A unidirectional service filter allows network-wide service discovery for operation and management purposes. However, the service can't be distributed across the IP network unless you configure the query SDG agent. For steps to configure a query SDG agent, see Configure Query SDG Agents for BGP EVPN Layer 3 Routed Fabric and Wireless Local Mode.

Before you begin

Ensure you've completed the steps outlined in Configure Service Filters for a BGP EVPN Layer 3 Routed Fabric and Wireless Local Mode.

Procedure


Step 1

Click Add in the upper-right corner of the window.

Step 2

Click the radio button to select a source SDG agent. By default, the source radio button is selected.

Step 3

From the SDG Agent/IP drop-down list, choose an SDG agent (192.0.2.1) that announces the services (printer).

Step 4

From the Service Layer drop-down list, choose Local.

Step 5

Use the toggle switch to enable Symmetric IRB.

Step 6

Uncheck the Any check box. By default, this check box is unchecked.

Step 7

Select the source VLAN (Vlan-A) to discover services (printer) from a specific network.

Step 8

Enable or disable a service from a selected IPv4 subnet. By default, this is enabled.

Step 9

Enable or disable a service from a selected IPv6 subnet. By default, this is enabled.

Step 10

For Location Group, do one of the following:

  • To accept services from any location group, check the check box.
  • To accept services from location group 0, choose Default from the drop-down list.
  • To use a custom location group ID, choose Custom from the drop-down list and enter the location group ID. The valid range is from 1 to 4096.

Step 11

Enter the L3 VNI ID mapped to the IP VRF. Select Any to accept services from any L3 VNI ID.

Step 12

(Optional) Click Add Next to add more source SDG agents. (Repeat the preceding steps.)

Step 13

Click DONE.

Step 14

Click CREATE.


Configure Query SDG Agents for BGP EVPN Layer 3 Routed Fabric and Wireless Local Mode

This section lists the additional configuration steps to distribute service to query SDG agents, based on a policy.

For instructions to configure a source SDG agent, see Configure Source SDG Agents for BGP EVPN Layer 3 Routed Fabric and Wireless Local Mode.

Before you begin

Ensure that you've completed the steps in Configure Service Filters for a BGP EVPN Layer 3 Routed Fabric and Wireless Local Mode.

Procedure


Step 1

Click Add in the upper-right corner of the window.

Step 2

Click the radio button to select a query SDG agent. By default, the source radio button is selected.

Step 3

From the SDG Agent/IP drop-down list, choose an SDG agent (192.0.2.3) that receives queries for the services (printer).

Step 4

From the Service Layer drop-down list, choose Local.

Step 5

Use the toggle switch to enable Symmetric IRB.

Step 6

Ensure that the Any check box is unchecked. By default, this check box is unchecked.

Step 7

Select the query VLAN (Vlan-B) to distribute services (printer) to a specific network.

Step 8

Enable or disable services from the selected query IPv4 subnet. By default, this is enabled.

Step 9

Enable or disable services from the selected query IPv6 subnet. By default, this is enabled.

Step 10

For Location Group, do one of the following:

  • To accept services from any location group, check the check box.
  • To accept services from location group 0, choose Default from the drop-down list.
  • To use a custom location group ID, choose Custom from the drop-down list and enter the location group ID. The valid range is from 1 to 4096.

Step 11

Enter the L3 VNI ID mapped to the IP VRF. Choose Any to match any L3 VNI ID.

Step 12

From the Service Layer drop-down list, choose Peer.

Step 13

Ensure that the Any check box is unchecked. By default, this check box is unchecked.

Step 14

Select the query VLAN (Vlan-C) to distribute services (printer) to a specific network.

Step 15

Enable or disable services from the selected query IPv4 subnet. By default, this is enabled.

Step 16

Enable or disable services from the selected query IPv6 subnet. By default, this is enabled.

Step 17

Enter the service peer IPv4 address (192.0.2.2). Click the plus icon to add more peers. Choose Any to accept services from any peer on a selected VLAN.

Step 18

For Location Group, do one of the following:

  • To accept services from any location group, check the check box.
  • To accept services from location group 0, choose Default from the drop-down list.
  • To use a custom location group ID, choose Custom from the drop-down list and enter the location group ID. The valid range is from 1 to 4096.

Step 19

(Optional) Click Add Next to add more query agents. (Repeat the preceding steps.)

Step 20

Click DONE.

Step 21

Click CREATE.


BGP EVPN Distributed AnyCast Gateway Fabric and Wireless Local Mode

This section provides step-by-step global configuration policy guidelines to enable Wide Area Bonjour between the BGP EVPN VTEP LAN switch, which provides Bonjour services (such as wired printers) to remotely connected wired users on the same IP subnet, and wireless users connected over Local mode wireless networks.

The following figure illustrates reference network topologies for BGP EVPN Distributed AnyCast Gateway LAN and Local mode wireless networks with Bonjour source and receiver devices in the virtual network environment.

Figure 2. BGP EVPN Distributed AnyCast Gateway LAN and Local Mode Wireless Virtual Network Service Routing

For more information about the Cisco Catalyst 9800 Series Wireless Controller configuration guidelines, see the Cisco Catalyst 9800 Series Wireless Controller Software Configuration Guide, Cisco IOS XE Amsterdam 17.3.x.

Configure Service Filters for BGP EVPN Distributed AnyCast Gateway Fabric and Wireless Local Mode

This section lists the general steps to implement global service filters, which permit the Cisco Wide Area Bonjour application to dynamically discover and distribute service information between trusted Cisco Catalyst SDG agent switches across your IP network.

Procedure


Step 1

Navigate to the Configuration tab in the Cisco Wide Area Bonjour application.

Step 2

From the sidebar, select the subdomain for which you want to create the service filter.

Step 3

Ensure that the Service Filter box is checked.

Step 4

Click the service filter icon from the topology to view a list of the service filters for the selected domain.

You can also manually edit existing service filters from this list.

Step 5

Click Create Service Filter.

Step 6

From the Network Mode drop-down list, choose Overlay.

Step 7

Enter a unique name for the service filter.

Step 8

(Optional) Enter a description for the service filter.

Step 9

Choose one or more service types to permit announcements and queries.

Step 10

Enable or disable service filters after creating them. By default, they are enabled.


Configure Source SDG Agents for BGP EVPN Distributed Anycast Gateway Fabric and Wireless Local Mode

This section provides additional configuration steps to enable discovering wired printer sources from the BGP EVPN LAN VTEP switch-1 in an SDG agent role. The wired printer can be discovered by remotely connected wired users in EVPN LAN VTEP switch-2 in an SDG agent role. The wireless distribution switches in a BGP EVPN VTEP role, paired with a Cisco Catalyst 9800 Series Wireless Controller in a service peer role, receive query responses for wired printers when browsed over wireless Local mode networks.

A unidirectional service filter allows network-wide service discovery for operation and management purposes. However, the services can't be distributed across the IP network unless you configure query SDG agents. For steps to configure a query SDG agent, see Configure Query SDG Agents for BGP EVPN Distributed Anycast Gateway Fabric and Wireless Local Mode.

Before you begin

Ensure you've completed the steps outlined in Configure Service Filters for BGP EVPN Distributed AnyCast Gateway Fabric and Wireless Local Mode.

Procedure


Step 1

Click Add in the upper-right corner of the window.

Step 2

Click the radio button to select a source SDG agent. By default, the source radio button is selected.

Step 3

From the SDG Agent/IP drop-down list, choose an SDG agent (192.0.2.1) that announces the services (printer).

Step 4

From the Service Layer drop-down list, choose Local.

Step 5

Use the toggle switch to enable Symmetric IRB.

Step 6

Uncheck the Any check box. By default, this check box is unchecked.

Step 7

Choose the source VLAN (Vlan-A) to discover services (printer) from a specific network.

Step 8

Enable or disable a service from a selected IPv4 subnet. By default, this is enabled.

Step 9

Enable or disable a service from a selected IPv6 subnet. By default, this is enabled.

Step 10

For Location Group, do one of the following:

  • To accept services from any location group, check the check box.
  • To accept services from location group 0, choose Default from the drop-down list.
  • To use a custom location group ID, choose Custom from the drop-down list and enter the location group ID. The valid range is from 1 to 4096.

Step 11

Enter the L3 VNI ID mapped to the IP VRF. Choose Any to accept services from any L3 VNI ID.

Step 12

(Optional) Click Add Next to add more source SDG agents. (Repeat the preceding steps.)

Step 13

Click DONE.

Step 14

Click CREATE.


Configure Query SDG Agents for BGP EVPN Distributed Anycast Gateway Fabric and Wireless Local Mode

This section lists the additional configuration steps to distribute services to query agents, based on a policy.

For instructions to configure a source SDG agent, see Configure Source SDG Agents for BGP EVPN Distributed Anycast Gateway Fabric and Wireless Local Mode.

Before you begin

Ensure that you've completed the steps in Configure Service Filters for BGP EVPN Distributed AnyCast Gateway Fabric and Wireless Local Mode.

Procedure


Step 1

Click Add in the upper-right corner of the window.

Step 2

Click the radio button to select a query SDG agent. By default, the source radio button is selected.

Step 3

From the SDG Agent/IP drop-down list, choose an SDG agent (192.0.2.3) that receives queries for the services (printer).

Step 4

From the Service Layer drop-down list, choose Local.

Step 5

Use the toggle switch to enable Symmetric IRB.

Step 6

Ensure that the Any check box is unchecked. By default, this check box is unchecked.

Step 7

Select the query VLAN (Vlan-B) to distribute services (printer) to a specific network.

Step 8

Enable or disable services from the selected query IPv4 subnet. By default, this is enabled.

Step 9

Enable or disable services from the selected query IPv6 subnet. By default, this is enabled.

Step 10

For Location Group, do one of the following:

  • To accept services from any location group, check the check box.
  • To accept services from location group 0, choose Default from the drop-down list.
  • To use a custom location group ID, choose Custom from the drop-down list and enter the location group ID. The valid range is from 1 to 4096.

Step 11

Enter the Layer 3 VNI ID mapped to the IP VRF. Choose Any to match any Layer 3 VNI ID.

Step 12

From the Service Layer drop-down list, choose Peer.

Step 13

Ensure that the Any check box is unchecked. By default, this check box is unchecked.

Step 14

Select the query VLAN (Vlan-C) to distribute services (printer) to a specific network.

Step 15

Enable or disable services from the selected query IPv4 subnet. By default, this is enabled.

Step 16

Enable or disable services from the selected query IPv6 subnet. By default, this is enabled.

Step 17

Enter the service peer IPv4 address (192.0.2.2). Click the plus icon to add more peers. Choose Any to accept services from any peer on a selected VLAN.

Step 18

For Location Group, do one of the following:

  • To accept services from any location group, check the check box.
  • To accept services from location group 0, choose Default from the drop-down list.
  • To use a custom location group ID, choose Custom from the drop-down list and enter the location group ID. The valid range is from 1 to 4096.

Step 19

(Optional) Click Add Next to add more query agents. (Repeat the preceding steps.)

Step 20

Click DONE.

Step 21

Click CREATE.


BGP EVPN Centralized Gateway Fabric and Wireless Local Mode

This section provides step-by-step global configuration policy guidelines to enable Wide Area Bonjour between the BGP EVPN VTEP LAN switch which provides different Bonjour services (such as wired printers) and remotely connected wired users on the same Layer 2 overlay VLAN, and wireless users connected over Local mode wireless networks.

The following figure illustrates reference network topologies for BGP EVPN Centralized Gateway LAN and Local mode wireless networks with Bonjour source and receiver devices in a virtual network environment.

Figure 3. BGP EVPN Centralized Gateway LAN and Local Mode Wireless Virtual Network Service Routing

For more information about Cisco Catalyst 9800 Series Wireless Controller configuration guidelines, see Cisco Catalyst 9800 Series Wireless Controller Software Configuration Guide, Cisco IOS XE Amsterdam 17.3.x.

Configure Service Filters for BGP EVPN Centralized Gateway Fabric and Wireless Local Mode

This section lists the general steps to implement global service filters, which permit the Cisco Wide Area Bonjour application to dynamically discover and distribute service information between trusted Cisco Catalyst SDG agent switches across your IP network.

Procedure


Step 1

Navigate to the Configuration tab in the Cisco Wide Area Bonjour application.

Step 2

From the sidebar, select the subdomain for which you want to create the service filter.

Step 3

Ensure that the Service Filter box is checked.

Step 4

Click the service filter icon from the topology to view a list of the service filters for the selected domain.

You can also manually edit existing service filters from this list.

Step 5

Click Create Service Filter.

Step 6

From the Network Mode drop-down list, choose Overlay.

Step 7

Enter a unique name for the service filter.

Step 8

(Optional) Enter a description for the service filter.

Step 9

Select one or more service types to permit announcements and queries.

Step 10

Enable or disable service filters after creating them. By default, they are enabled.


Configure Source SDG Agents in BGP EVPN Centralized Gateway Fabric and Wireless Local Mode

This section provides additional configuration steps to enable discovering wired printer sources from the EVPN Layer 2 Leaf LAN VTEP switch-1 in an SDG agent role. The wired printer can be discovered by remotely connected wired users in the EVPN Layer 2 Leaf LAN VTEP switch-2 in an SDG agent role. The wireless distribution switches in a BGP EVPN VTEP role, paired with a Cisco Catalyst 9800 Series Wireless Controller in a service peer role, receive query responses for wired printers when browsed over wireless Local mode networks.

A unidirectional service filter allows network-wide service discovery for operation and management purposes. However, the services can't be distributed across the IP network unless you configure query SDG agents. For steps to configure a query SDG agent, see Configure Query SDG Agents for BGP EVPN Centralized Gateway Fabric and Wireless Local Mode.

Before you begin

Ensure you've completed the steps outlined in Configure Service Filters for BGP EVPN Centralized Gateway Fabric and Wireless Local Mode.

Procedure


Step 1

Click Add in the upper-right corner of the window.

Step 2

Click the radio button to select a source SDG agent. By default, the source radio button is selected.

Step 3

From the SDG Agent/IP drop-down list, choose an SDG agent (192.0.2.1) that announces the services (printer).

Step 4

From the Service Layer drop-down list, choose Local.

Step 5

Use the toggle switch to enable Symmetric IRB.

Step 6

Uncheck the Any check box. By default, this check box is unchecked.

Step 7

For Location Group, do one of the following:

  • To accept services from any location group, check the check box.
  • To accept services from location group 0, choose Default from the drop-down list.
  • To use a custom location group ID, choose Custom from the drop-down list and enter the location group ID. The valid range is from 1 to 4096.

Step 8

Enter the Layer 2 VNI ID mapped to the IP VRF. Choose Any to accept services from any Layer 2 VNI ID.

Step 9

Click DONE.

Step 10

Click CREATE.


Configure Query SDG Agents for BGP EVPN Centralized Gateway Fabric and Wireless Local Mode

This section lists the additional configuration steps to distribute service to query SDG agents, based on a policy.

For instructions to configure a source SDG agent, see Configure Source SDG Agents in BGP EVPN Centralized Gateway Fabric and Wireless Local Mode.

Before you begin

Ensure that you've completed the steps in Configure Service Filters for BGP EVPN Centralized Gateway Fabric and Wireless Local Mode.

Procedure


Step 1

Click Add in the upper-right corner of the window.

Step 2

Click the radio button to select a query SDG agent. By default, the source radio button is selected.

Step 3

From the SDG Agent/IP drop-down list, choose an SDG agent (192.0.2.3) that receives queries for the services (printer).

Step 4

From the Service Layer drop-down list, choose Local.

Step 5

Use the toggle switch to enable Symmetric IRB.

Step 6

Ensure that the Any check box is unchecked. By default, this check box is unchecked.

Step 7

For Location Group, do one of the following:

  • To accept services from any location group, check the check box.
  • To accept services from location group 0, choose Default from the drop-down list.
  • To use a custom location group ID, choose Custom from the drop-down list and enter the location group ID. The valid range is from 1 to 4096.

Step 8

Enter the Layer 2 VNI ID mapped to the MAC VRF. Choose Any to match any Layer 2 VNI ID.

Step 9

Click DONE.

Step 10

Click the radio button to select a query SDG agent. By default, the source radio button is selected.

Step 11

From the SDG Agent/IP drop-down list, choose an SDG agent (10.0.0.2) that receives queries for the services (printer).

Step 12

From the Service Layer drop-down list, choose Peer.

Step 13

Ensure that the Any check box is unchecked. By default, this check box is unchecked.

Step 14

Select the query VLAN (Vlan-C) to distribute services (printer) to a specific network.

Step 15

Enable or disable services from the selected query IPv4 subnet. By default, this is enabled.

Step 16

Enable or disable services from the selected query IPv6 subnet. By default, this is enabled.

Step 17

Enter the service peer IPv4 address (192.0.2.2). Choose Any to accept services from any peer on a selected VLAN.

Step 18

For Location Group, do one of the following:

  • To accept services from any location group, check the check box.
  • To accept services from location group 0, choose Default from the drop-down list.
  • To use a custom location group ID, choose Custom from the drop-down list and enter the location group ID. The valid range is from 1 to 4096.

Step 19

(Optional) Click Add Next to add more query agents. (Repeat the preceding steps.)

Step 20

Click DONE.

Step 21

Click CREATE.


BGP EVPN Layer 2 Bridge Fabric and Wireless Local Mode

This section provides step-by-step global configuration policy guidelines to enable Wide Area Bonjour between the BGP EVPN VTEP LAN switch providing Bonjour services, such as wired printers, and remotely connected wired users on the same Layer 2 overlay VLAN and wireless users connected over Local mode wireless networks.

The following figure illustrates reference network topologies for BGP EVPN Layer 2 LAN and Local mode wireless networks with Bonjour source and receiver devices in virtual network environments.

Figure 4. BGP EVPN Layer 2 Leaf LAN and Local Mode Wireless Virtual Network Service Routing

For more information about the Cisco Catalyst 9800 Series Wireless Controller configuration guidelines, see the Cisco Catalyst 9800 Series Wireless Controller Software Configuration Guide, Cisco IOS XE Amsterdam 17.3.x.

Configure Service Filters for BGP EVPN Layer 2 Bridge Fabric and Wireless Local Mode

This section lists the general steps to implement global service filters, which permit the Cisco Wide Area Bonjour application to dynamically discover and distribute service information between trusted Cisco Catalyst SDG agent switches across your IP network.

Procedure


Step 1

Navigate to the Configuration tab in the Cisco Wide Area Bonjour application.

Step 2

From the sidebar, select the subdomain for which you want to create the service filter.

Step 3

Ensure that the Service Filter box is checked.

Step 4

Click the service filter icon from the topology to view a list of the service filters for the selected domain.

You can also manually edit existing service filters from this list.

Step 5

Click Create Service Filter.

Step 6

From the Network Mode drop-down list, choose Overlay.

Step 7

Enter a unique name for the service filter.

Step 8

(Optional) Enter a description for the service filter.

Step 9

Select one or more service types to permit announcements and queries.

Step 10

Enable or disable service filters after creating them. By default, they are enabled.


Configure Source SDG Agents for BGP EVPN Layer 2 Bridge Fabric and Wireless Local Mode

This section provides additional configuration steps for global policies to enable discovering wired printer sources from the EVPN Layer 2 Leaf LAN VTEP switch-1 in an SDG agent role. The wireless distribution switches in a BGP EVPN VTEP role, paired with a Cisco Catalyst 9800 Series Wireless Controller in a service-peer role, receive query responses for wired printers when browsed over the wireless Local mode network.

A unidirectional service filter allows network-wide service discovery for operation and management purposes. However, the services can't be distributed across the IP network unless you configure query SDG agents. For steps to configure a query SDG agent, see Configure Query SDG Agents for BGP EVPN Layer 2 Bridge Fabric and Wireless Local Mode.

Before you begin

Ensure you've completed the steps outlined in Configure Service Filters for BGP EVPN Layer 2 Bridge Fabric and Wireless Local Mode.

Procedure


Step 1

Click Add in the upper-right corner of the window.

Step 2

Click the radio button to select a source SDG agent. By default, the source radio button is selected.

Step 3

From the SDG Agent/IP drop-down list, choose an SDG agent (192.0.2.1) that announces the services (printer).

Step 4

From the Service Layer drop-down list, choose Local.

Step 5

Use the toggle switch to enable Symmetric IRB.

Step 6

Uncheck the Any check box. By default, this check box is unchecked.

Step 7

For Location Group, do one of the following:

  • To accept services from any location group, check the check box.
  • To accept services from location group 0, choose Default from the drop-down list.
  • To use a custom location group ID, choose Custom from the drop-down list and enter the location group ID. The valid range is from 1 to 4096.

Step 8

Enter the Layer 2 VNI ID mapped to the IP VRF. Choose Any to accept services from any Layer 2 VNI ID.

Step 9

(Optional) Click Add Next to add more source SDG agents. (Repeat the preceding steps.)

Step 10

Click DONE.

Step 11

Click CREATE.


Configure Query SDG Agents for BGP EVPN Layer 2 Bridge Fabric and Wireless Local Mode

This section lists the additional configuration steps to distribute service to query SDG agents, based on a policy.

For instructions to configure a source SDG agent, see Configure Source SDG Agents for BGP EVPN Layer 2 Bridge Fabric and Wireless Local Mode.

Before you begin

Ensure that you've completed the steps in Configure Service Filters for BGP EVPN Layer 2 Bridge Fabric and Wireless Local Mode.

Procedure


Step 1

Click Add in the upper-right corner of the window.

Step 2

Click the radio button to select a query SDG agent. By default, the source radio button is selected.

Step 3

From the SDG Agent/IP drop-down list, choose an SDG agent (192.0.2.3) that receives queries for the services (printer, for example).

Step 4

From the Service Layer drop-down list, choose Local.

Step 5

Use the toggle switch to enable Symmetric IRB.

Step 6

Ensure that the Any check box is unchecked. By default, this check box is unchecked.

Step 7

For Location Group, do one of the following:

  • To accept services from any location group, check the check box.
  • To accept services from location group 0, choose Default from the drop-down list.
  • To use a custom location group ID, choose Custom from the drop-down list and enter the location group ID. The valid range is from 1 to 4096.

Step 8

Enter the Layer 2 VNI ID mapped to the MAC VRF. Choose Any to match any Layer 2 VNI ID.

Step 9

Click Done.

Step 10

From the SDG Agent/IP drop-down list, choose an SDG agent (10.0.0.2) that receives queries for the service type (printer).

Step 11

From the Service Layer drop-down list, choose Peer.

Step 12

Ensure that the Any check box is unchecked. By default, this check box is unchecked.

Step 13

Select the query VLAN (Vlan-C) to distribute services (printer) to a specific network.

Step 14

Enable or disable services from the selected query IPv4 subnet. By default, this is enabled.

Step 15

Enable or disable services from the selected query IPv6 subnet. By default, this is enabled.

Step 16

Enter the service peer IPv4 address (192.0.2.2). Click the plus icon to add more peers. Choose Any to accept services from any peer on a selected VLAN.

Step 17

For Location Group, do one of the following:

  • To accept services from any location group, check the check box.
  • To accept services from location group 0, choose Default from the drop-down list.
  • To use a custom location group ID, choose Custom from the drop-down list and enter the location group ID. The valid range is from 1 to 4096.

Step 18

(Optional) Click Add Next to add more query agents. (Repeat the preceding steps.)

Step 19

Click DONE.

Step 20

Click CREATE.


BGP EVPN Routed Access LAN

This section provides step-by-step global configuration policy guidelines to enable Wide Area Bonjour between the BGP EVPN VTEP LAN switch, which provides different Bonjour services such as wired printers, and remotely connected wired users and wireless users on different IP subnets.

The following figure illustrates reference network topology for BGP EVPN routed access LAN with Bonjour source and receiver devices in virtual network devices.

Figure 5. BGP EVPN Routed Access LAN Service Routing
BGP EVPN Routed Access LAN Service Routing

For more information about the Cisco Nexus switches configuration guidelines, see the Cisco DNA Service For Bonjour Configuration Guide, Cisco Nexus 9000 Series NX-OS, Release 10.2(3)F.

Configure Service Filters for BGP EVPN Routed Access LAN

This section lists the general steps to implement global service filters, which permit the Cisco Wide Area Bonjour application to dynamically discover and distribute service information between trusted SDG agent switches across your IP network.

Procedure


Step 1

Navigate to the Configuration tab in the Cisco Wide Area Bonjour application.

Step 2

From the sidebar, select the subdomain for which you want to create the service filter.

Step 3

Ensure that the Service Filter box is checked.

Step 4

Click the service filter icon from the topology to view a list of the service filters for the selected domain.

You can also manually edit existing service filters from this list.

Step 5

Click Create Service Filter.

Step 6

From the Network Mode drop-down list, choose Overlay.

Step 7

Enter a unique name for the service filter.

Step 8

(Optional) Enter a description for the service filter.

Step 9

Choose one or more service types to permit announcements and queries.

Step 10

Enable or disable service filters after creating them. By default, they are enabled.


Configure Source SDG Agents for BGP EVPN Routed Access LAN

This section provides additional configuration steps to enable discovering wired printer sources from the EVPN LAN VTEP Switch-1 in an SDG agent role. The wired printer can be discovered by remotely connected wired users in the EVPN LAN VTEP switch-2 in SDG agent role.

A unidirectional service filter allows network-wide service discovery for operation and management purposes. However, the service can't be distributed across the IP network unless you configure the query SDG agent. For steps to configure a query SDG agent, see Configure Query SDG Agents in Traditional Routed Access LAN.

Before you begin

Ensure you've completed the steps outlined in Configure Service Filters for BGP EVPN Routed Access LAN.

Procedure


Step 1

Click Add in the upper-right corner of the window.

Step 2

Click the radio button to select a source SDG agent. By default, the source radio button is selected.

Step 3

From the SDG Agent/IP drop-down list, choose an SDG agent (192.0.2.1) that announces the services (printer).

Step 4

From the Service Layer drop-down list, choose Local.

Step 5

Use the toggle switch to enable Symmetric IRB.

Step 6

Uncheck the Any check box. By default, this check box is unchecked.

Step 7

Select the source VLAN (Vlan-A) to discover services (printer) from a specific network.

Step 8

Enable or disable a service from a selected IPv4 subnet. By default, this is enabled.

Step 9

Enable or disable a service from a selected IPv6 subnet. By default, this is enabled.

Step 10

For Location Group, do one of the following:

  • To accept services from any location group, check the check box.
  • To accept services from location group 0, choose Default from the drop-down list.
  • To use a custom location group ID, choose Custom from the drop-down list and enter the location group ID. The valid range is from 1 to 4096.

Step 11

Enter the VNI ID mapped to the IP VRF. Select Any to accept services from any VNI ID.

Step 12

(Optional) Click Add Next to add more source SDG agents. (Repeat the preceding steps.)

Step 13

Click DONE.

Step 14

Click CREATE.


Configure Query SDG Agents for BGP EVPN Routed Access LAN

This section lists the additional configuration steps to distribute service to query SDG agents, based on a policy.

For instructions to configure a source SDG agent, see Configure Source SDG Agents for BGP EVPN Routed Access LAN.

Before you begin

Ensure that you've completed the steps in Configure Service Filters for BGP EVPN Routed Access LAN.

Procedure


Step 1

Click Add in the upper-right corner of the window.

Step 2

Click the radio button to select a query SDG agent. By default, the source radio button is selected.

Step 3

From the SDG Agent/IP drop-down list, choose an SDG agent (192.0.2.3) that receives queries for the services (printer).

Step 4

From the Service Layer drop-down list, choose Local.

Step 5

Use the toggle switch to enable Symmetric IRB.

Step 6

Ensure that the Any check box is unchecked. By default, this check box is unchecked.

Step 7

Select the query VLAN (Vlan-B) to distribute services (printer) to a specific network.

Step 8

Enable or disable services from the selected query IPv4 subnet. By default, this is enabled.

Step 9

Enable or disable services from the selected query IPv6 subnet. By default, this is enabled.

Step 10

For Location Group, do one of the following:

  • To accept services from any location group, check the check box.
  • To accept services from location group 0, choose Default from the drop-down list.
  • To use a custom location group ID, choose Custom from the drop-down list and enter the location group ID. The valid range is from 1 to 4096.

Step 11

Enter the VNI ID mapped to the IP VRF. Choose Any to match any VNI ID.

Step 12

(Optional) Click Add Next to add more query agents. (Repeat the preceding steps.)

Step 13

Click DONE.

Step 14

Click CREATE.