Get Started with Catalyst Center on AWS

Catalyst Center on AWS


Note


Cisco DNA Center has been rebranded as Cisco Catalyst Center, and Cisco DNA Center VA Launchpad has been rebranded as Cisco Global Launchpad. During the rebranding process, you will see the former and rebranded names used in different collaterals. However, Cisco DNA Center and Catalyst Center refer to the same product, and Cisco DNA Center VA Launchpad and Cisco Global Launchpad refer to the same product.


Catalyst Center on AWS

Catalyst Center on Amazon Web Services (AWS) is a deployment model that

  • provides the full functionality of a Catalyst Center appliance deployment

  • runs in your AWS cloud environment, and

  • manages your network from the cloud.

Catalyst Center offers centralized, intuitive management that makes it fast and easy to design, provision, and apply policies across your network environment. The Catalyst Center user interface provides end-to-end network visibility and uses network insights to optimize network performance and deliver the best user and application experience.

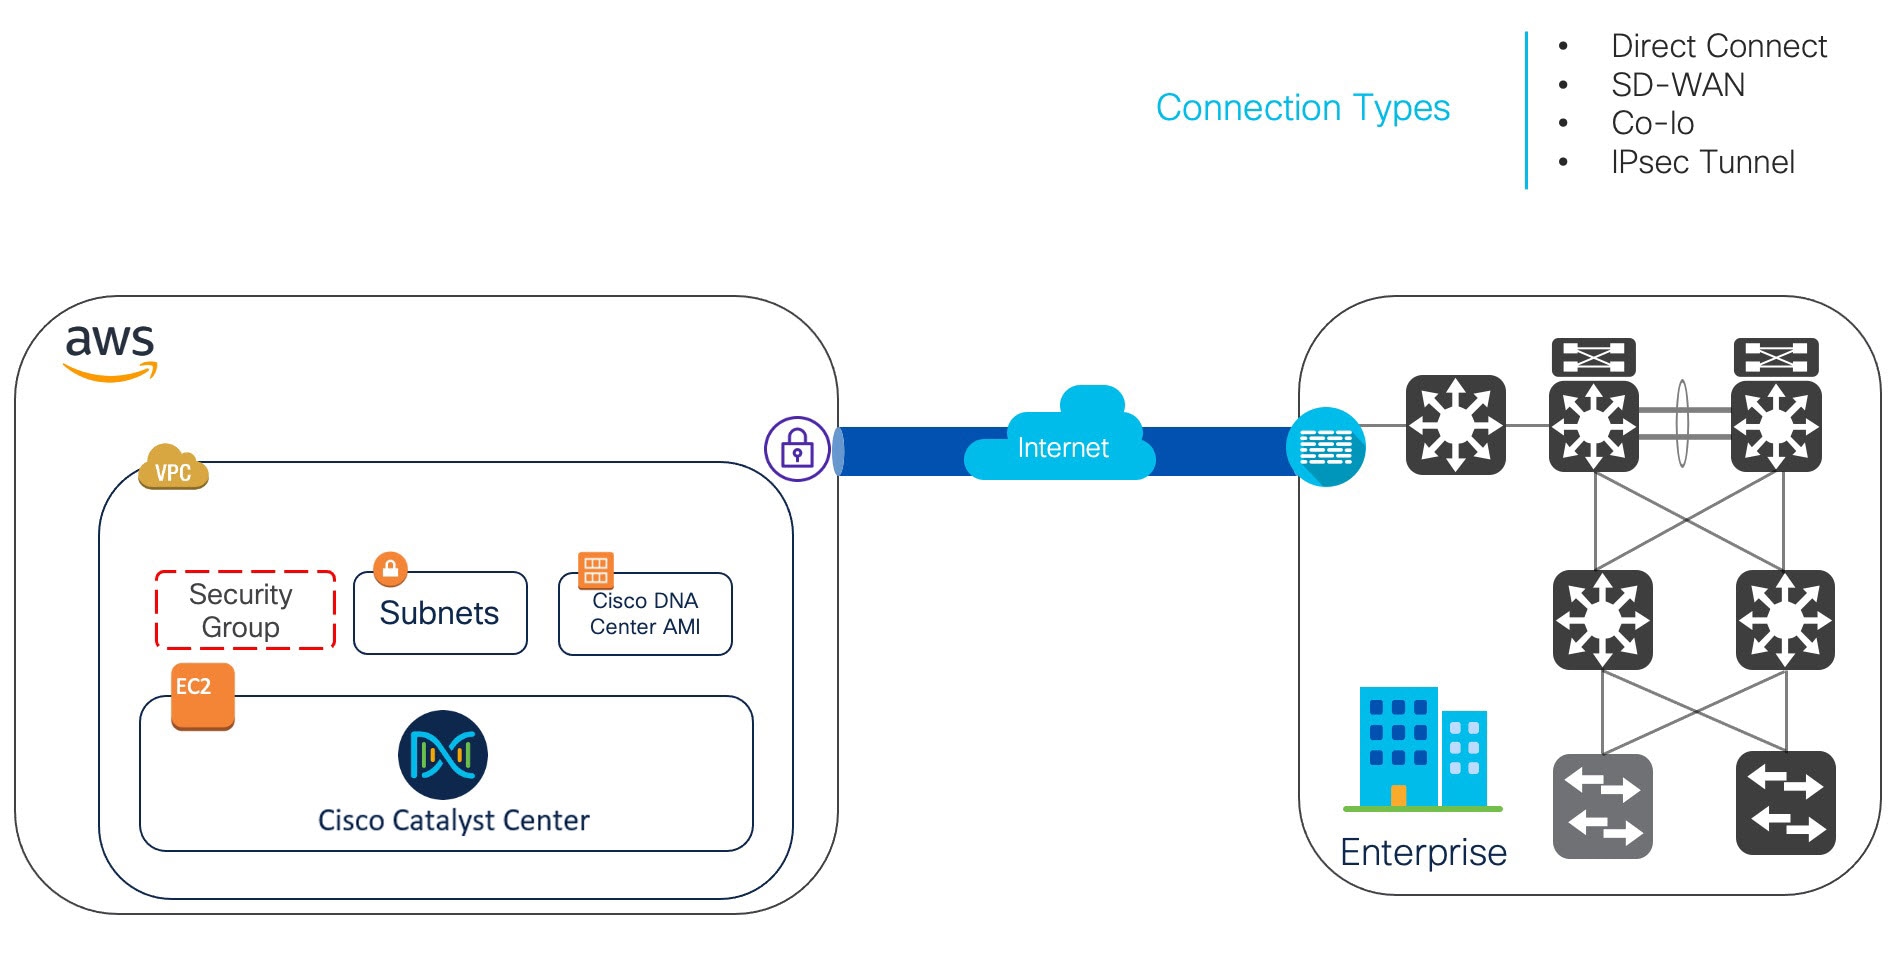
Catalyst Center on AWS topology

Deployment methods

You can deploy Catalyst Center on AWS using one of these three methods:

  • Automated deployment using Cisco Global Launchpad

  • Manual deployment using AWS CloudFormation

  • Manual deployment using AWS Marketplace

Automated deployment using Cisco Global Launchpad

In the automated deployment method, Cisco Global Launchpad configures Catalyst Center on AWS. It helps you create the services and components that are required for the cloud infrastructure. For example, it helps create Virtual Private Clouds (VPCs), subnets, security groups, IPsec VPN tunnels, and gateways. Then the Catalyst Center Amazon Machine Image (AMI) deploys as an Amazon Elastic Compute Cloud (EC2) instance with the prescribed configuration in a new VPC along with subnets, transit gateways, and other essential resources like Amazon CloudWatch for monitoring, Amazon DynamoDB for state storage, and security groups.

Cisco provides two methods for you to use Cisco Global Launchpad. You can either download and install it on a local machine or access it from a server hosted by Cisco. Regardless of the method, Cisco Global Launchpad provides the tools that you need to install and manage your Catalyst Center Virtual Appliance (VA).

Manual deployment using AWS CloudFormation

In this manual deployment method, you manually deploy the Catalyst Center AMI on AWS. Instead of using the Cisco Global Launchpad deployment tool, you use AWS CloudFormation, which is a deployment tool within AWS. Then you manually configure Catalyst Center by creating the AWS infrastructure, establishing a VPN tunnel, and deploying your Catalyst Center VA.

Manual deployment using AWS Marketplace

In this manual deployment method, you manually deploy the Catalyst Center AMI on AWS. Instead of using the Cisco Global Launchpad deployment tool, you use AWS Marketplace, which is an online software store within AWS. You launch the software through the Amazon EC2 console, and then you manually deploy Catalyst Center by creating the AWS infrastructure, establishing a VPN tunnel, and configuring your Catalyst Center VA. Only Launch through EC2 is supported for this method. The other two launch options—Launch from Website and Copy to Service Catalog—are not supported.

Choose a deployment method

If you have minimal experience with the AWS administration, the automated deployment method offers the most streamlined, supportive installation process. If you are familiar with the AWS administration and have existing VPCs, the manual deployment methods offer an alternative installation process.

Consider the benefits and drawbacks of each method using this table.

Automated deployment using Cisco Global Launchpad Manual deployment using AWS CloudFormation Manual deployment using AWS Marketplace
  • It helps create the AWS infrastructure, such as VPCs, subnets, security groups, IPsec VPN tunnels, and gateways, in your AWS account.

  • It automatically completes the installation of Catalyst Center.

  • It provides access to your VAs.

  • It provides manageability of your VAs.

  • Deployment time is approximately 1 to 1.5 hours.

  • Automated alerts are sent to your Amazon CloudWatch dashboard.

  • You can choose between an automated cloud or enterprise Network File System (NFS) backup.

  • Any manual alterations made to the automated configuration workflow of Catalyst Center on AWS can cause conflict with the automated deployment.

  • The AWS CloudFormation file is required to create Catalyst Center on AWS.

  • You create the AWS infrastructure, such as VPCs, subnets, and security groups, in your AWS account.

  • You establish a VPN tunnel.

  • You deploy Catalyst Center.

  • Deployment time may take from a couple of hours to a couple of days.

  • You need to manually configure monitoring through the AWS console.

  • You can only configure an on-premises NFS for backups.

  • The AWS CloudFormation file is not required to create Catalyst Center on AWS.

  • You create the AWS infrastructure, such as VPCs, subnets, and security groups, in your AWS account.

  • You establish a VPN tunnel.

  • You deploy Catalyst Center.

  • Deployment time may take from a couple of hours to a couple of days.

  • You need to manually configure monitoring through the AWS console.

  • You can only configure an on-premises NFS for backups.

Deployment preparation

Network requirements and access considerations

Before you deploy Catalyst Center on AWS, consider

  • your network requirements

  • whether you need to implement supported Catalyst Center on AWS integrations, and

  • how you will access Catalyst Center on AWS.

Preparation resources

Use these resources to prepare for the deployment:

High availability and Catalyst Center on AWS

The Catalyst Center on AWS high availability (HA) implementation features:

  • A single-node EC2 HA within an Availability Zone (AZ) is enabled by default.

  • If a Catalyst Center EC2 instance crashes, AWS automatically brings up another instance with the same IP address. This process ensures uninterrupted connectivity and minimizes disruptions during critical network operations.

  • The experience and Recovery Time Objective (RTO) are similar to a power outage sequence in a bare-metal Catalyst Center appliance.

Guidelines for integrating Cisco ISE on AWS with Catalyst Center on AWS

Cisco ISE on AWS can be integrated with Catalyst Center on AWS. To integrate them in the cloud, consider these guidelines:

  • Cisco ISE on AWS should be deployed in a separate VPC from the one reserved for Catalyst Center on AWS.

  • The VPC for Cisco ISE on AWS can be in the same region as or a different region from the VPC for Catalyst Center on AWS.

  • Use VPC or Transit Gateway (TGW) peering depending on your environment.

  • To connect the Catalyst Center on AWS with Cisco ISE on AWS using a VPC or TGW peering, add the required routing entries to the VPC or TGW peering route tables and to the route table that is attached to the subnet associated with Catalyst Center on AWS or Cisco ISE on AWS.

  • Cisco Global Launchpad cannot detect any out-of-band changes to entities that were created using Cisco Global Launchpad. These entities include: VPCs, VPNs, TGWs, TGW attachments, subnets, routing, and so on.

    For example, it's possible to delete or change a VA pod that was created by Cisco Global Launchpad from another application, and Cisco Global Launchpad would not know about this change.

Inbound ports for Cisco ISE integration

In addition to basic accessibility rules, you need to allow these inbound ports for attaching a security group to the Cisco ISE instance in the cloud:

  • Allow TCP ports 9060 and 8910 for Catalyst Center on AWS and Cisco ISE on AWS integration.

  • Allow UDP ports 1812, 1813, and any other enabled ports for radius authentication.

  • Allow TCP port 49 for device administration via TACACS.

  • For additional settings, such as Datagram Transport Layer Security (DTLS) or RADIUS Change of Authorization (CoA) made on Cisco ISE on AWS, allow the corresponding ports.

Guidelines for accessing Catalyst Center on AWS

After you create a virtual instance of Catalyst Center, you can access it through the Catalyst Center GUI and CLI.


Important


The Catalyst Center GUI and CLI are accessible only through the enterprise network, not from the public network. With the automated deployment method, Cisco Global Launchpad ensures that Catalyst Center is accessible only from the enterprise intranet. With the manual deployment method, you need to ensure Catalyst Center is not accessible on the public internet for security reasons.


Guidelines for accessing the Catalyst Center on AWS GUI

Use these guidelines to access the Catalyst Center GUI:

  • Use a compatible browser.

    For information about compatible browsers, see the Release Notes for Cisco Global Launchpad.

  • In a browser, enter the IP address of your Catalyst Center instance in this format:

    http://ip-address/dna/home

    For example:

    http://192.0.2.27/dna/home
  • Use these credentials for the initial login:

    • Username: admin

    • Password: P@ssword9


    Note


    You must change this password when you log in for the first time.

    The password must:

    • Omit any tab or line breaks.

    • Have at least nine characters.

    • Contain characters from at least three of these categories:

      • Lowercase letters (a to z)

      • Uppercase letters (A to Z)

      • Numbers (0 to 9)

      • Special characters (for example, ! or #)


Guidelines for accessing the Catalyst Center CLI

Use these guidelines to access the Catalyst Center CLI:

  • Use the IP address and keys that correspond to how you deployed Catalyst Center:

    • If you used Cisco Global Launchpad, use the IP address and keys provided by Cisco Global Launchpad.

    • If you used AWS CloudFormation or AWS Marketplace, use the IP address and keys provided by AWS.


      Note


      The key must be a .pem file. If the key file is downloaded as a key.cer file, you need to rename the file to key.pem.


  • Manually change the access permissions on the key.pem file to 400 by using the Linux chmod command.

    For example:

    chmod 400 key.pem

  • Use this Linux command to access the Catalyst Center CLI:

    ssh -i key.pem maglev@ip-address -p 2222

    For example:

    ssh -i key.pem maglev@192.0.2.27 -p 2222