Provision RSVP-TE Tunnels


Note


When using the Crosswork Network Controller solution, the navigation is Traffic Engineering & Services > Traffic Engineering.


For a list of known limitations, important notes, and what networking technologies are supported, see the Cisco Crosswork Optimization Engine Release Notes.

This section contains the following topics:

RSVP-TE Tunnel Configuration Sources

RSVP-TE tunnels discovered and reported by Crosswork Optimization Engine may have been configured from the following sources:

Create Explicit RSVP-TE Tunnels

This task creates RSVP-TE tunnels using an explicit (fixed) path consisting of a list of prefix consisting of a list of prefix or adjacency Segment IDs (SID list), each representing a node or link along on the path.

Procedure


Step 1

From the main menu, choose Traffic Engineering > Traffic Engineering.

Step 2

From the right window, click RSVP-TE .

Step 3

Under RSVP-TE Tunnels, click + Create.

Step 4

If you are using Crosswork Optimization Engine within Crosswork Network Controller, select either PCE Initor PCC Init.

Step 5

Enter the required RSVP-TE Tunnel values. Hover the mouse pointer over Field Help icon to view a description of each field.

Tip


If you have set up device groups, you can select the device group from the Device Groups drop-down menu. Then navigate and zoom in on the topology map to click the device for headend or endpoint selection.

Step 6

Under Policy Path, click Explicit Path and enter a path name.

Step 7

Add segments that will be part of the RSVP-TE path.

Step 8

Click Preview. The path is highlighted on the map.

Step 9

If you want to commit the tunnel path, click Provision.

Step 10

Validate the RSVP-TE tunnel creation:

  1. Confirm that the new RSVP-TE tunnel appears in the RSVP-TE Tunnels table. You can also click the check box next to the policy to see it highlighted in the map.

    Note

     
    The newly provisioned RSVP-TE tunnel may take some time, depending on the network size and performance, to appear in the RSVP-TE Tunnels table. The RSVP-TE Tunnels table is refreshed every 30 seconds.
  2. View and confirm the new RSVP-TE tunnel details. From the RSVP-TE table, click More icon (in the same row as the RSVP-TE tunnel), and select View.
Note


On a scaled setup with high node, policy, or interface counts, a timeout may occur during policy deployment. Please contact a Cisco representative to fine tune the timers involved.


Configure Link Affinities

Affinity names defined on devices are not collected by Crosswork Optimization Engine. The affinity mapping is only used for visualization in Crosswork Optimization Engine. For this reason, you should collect affinities on the device, then define affinity mapping in Crosswork Optimization Engine with the same name and bits that are used on the device. Crosswork Optimization Engine will only send bit information to SR-PCE during provisioning. If an affinity mapping is not defined in the UI, then the affinity name is displayed as "UNKNOWN".

Affinity of an SR-TE policy or RSVP-TE tunnel is used to specify the link attributes for which the SR-TE policy or RSVP-TE tunnel has affinity for. It determines which links are suitable to form a path for the SR-TE policy or RSVP-TE tunnel. It is a 32-bit value, with each bit position (0 - 31) representing a link attribute. Affinity mapping is used to map each bit position or attribute to a color. This makes it easier to refer to link attributes.

See SR configuration documentation for your specific device to view descriptions and supported configuration commands (for example: Segment Routing Configuration Guide for Cisco ASR 9000 Series Router)

The following example shows the affinity configuration (affinity-map) on a device:

RP/0/RP0/CPU0:c12#sh running-config segment-routing traffic-eng affinity-map
Wed Jul 27 12:14:50.027 PDT
segment-routing
 traffic-eng
  affinity-map
   name red bit-position 1
   name blue bit-position 5
   name green bit-position 4
  !
 !
! 

Procedure


Step 1

From the main menu choose Administration > Settings > System Settings > Traffic Engineering > Affinity > TE Link Affinities. You can also define affinities while creating an SR-TE policy or RSVP-TE tunnel by clicking Manage Mapping.

Step 2

To add a new affinity mapping, click + Create.

Step 3

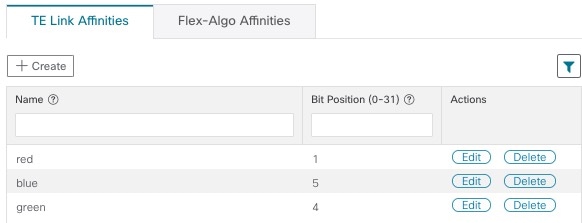
Enter the name and the bit it will be assigned. For example (using the above configuration):

Example:

TE Affinity Example

Step 4

Click Save to save the mapping.

Note


You should remove the TE tunnel before removing the affinity to avoid orphan TE tunnels. If you have removed an affinity associated to a TE tunnel, the affinity is shown as "UNKNOWN" in the SR Policy / RSVP-TE Tunnel Details window.


Create Dynamic RSVP-TE Tunnels Based on Optimization Intent

This task creates an RSVP-TE tunnel with a dynamic path. SR-PCE computes a path for the tunnel that is based on metrics and path constraints (affinity or disjointness) defined by you. You can select from three available metrics to minimize in path computation: IGP, TE, or delay. SR-PCE will also automatically re-optimize the path as necessary based on topology changes.


Tip


If you plan to use affinities, collect affinity information from your devices and then map them in Cisco Crosswork before creating a dynamic RSVP-TE tunnel. For more information, see Configure Link Affinities.

Procedure


Step 1

From the main menu, choose Traffic Engineering > Traffic Engineering.

Step 2

From the right window, click RSVP-TE .

Step 3

Under RSVP-TE Tunnels, click + Create.

Step 4

Enter the required RSVP-TE Tunnel values. Hover the mouse pointer over Field Help icon to view a description of each field.

Tip


If you have set up device groups, you can select the device group from the Device Groups drop-down menu. Then navigate and zoom in on the topology map to click the device for headend or endpoint selection.

Step 5

Under Tunnel Path, click Dynamic Path and enter the Path Name.

Step 6

Under Optimization Objective, select the metric you want to minimize.

Step 7

Define any applicable constraints and disjointness.

Note


Affinity constraints and disjointness cannot be configured on the same RSVP-TE tunnel. Also, there cannot be more than two RSVP-TE tunnels in the same disjoint group or subgroup. If there are existing RSVP-TE tunnels belonging to a disjoint group that you define here, all RSVP-TE tunnels that belong to that same disjoint group are shown during Preview.

Step 8

Click Preview. The path is highlighted on the map.

Step 9

If you want to commit the tunnel path, click Provision.

Step 10

Validate the RSVP-TE tunnel creation:

  1. Confirm that the new RSVP-TE tunnel appears in the RSVP-TE Tunnels table. You can also click the check box next to the policy to see it highlighted in the map.

    Note

     
    The newly provisioned RSVP-TE tunnel may take some time, depending on the network size and performance, to appear in the RSVP-TE Tunnels table. The RSVP-TE Tunnels table is refreshed every 30 seconds.
  2. View and confirm the new RSVP-TE tunnel details. From the RSVP-TE table, click Edit icon and select View.

Note


On a scaled setup with high node, policy, or interface counts, a timeout may occur during policy deployment. Please contact a Cisco representative to fine tune the timers involved.


Modify RSVP-TE Tunnels

To view, modify, or delete an RSVP-TE tunnel, do the following:

Procedure


Step 1

From the main menu, choose Traffic Engineering > Traffic Engineering.

Step 2

From the Traffic Engineering window select the RSVP-TE tab.

Step 3

Locate the RSVP-TE tunnel you are interested in and click Edit icon.

Step 4

Choose View or Edit/Delete.

Note

 
  • You can only modify or delete RSVP-TE tunnels that have been created with the UI or API.

  • After updating the RSVP-TE tunnel details, you can preview the changes on the map before saving it.