Embedded Collectors support SNMP-based data collection based on the OIDs supported on the devices. The SNMP OID-based collection
jobs can be created from the Cisco Crosswork UI or using the API, and SNMP-traps using the API.
The SNMP collector makes a poll request to Crosswork Network Controller to get its configuration profile (a list of MIB objects to collect and a list of devices to fetch from). It determines the
corresponding OIDs by looking up the prepackaged list of MIB modules or the custom list of MIB modules.

Note
|
Embedded Collectors enable SNMP polling on third-party devices for standard MIBs already included in the system. Proprietary
MIBs are required only if the collection request references MIB TABLE names or SCALAR names from a proprietary MIB. However,
if the requests are OID-based, then MIBs are not required.
|
After the OIDs are resolved, they are provided as input to the SNMP collectors.
The device packages can be imported into the Embedded Collectors instance as described in Section Upload Custom Packages.
Supported SNMP versions for data polling and traps are:
-
Polling Data
-
SNMP V2
-
SNMP V3 (no auth nopriv, auth no priv, authpriv)
-
Supported auth protocols – SHA-1, MD5
-
Supported priv protocols – AES-128, AES-192, AES-256, CiscoAES192, CiscoAES256, DES, and 3-DES.
-
Traps
Sample Configurations on Device:
The following table lists sample commands to enable various SNMP functions. For more information, refer to the platform-specific
documentation.
Table 2. Sample configuration to enable SNMP on device
|
Version
|
Command
|
To...
|
|
V2c
|
snmp-server group <group_name> v2c
snmp-server user <user_name>
                                                <group_name> v2c
|
Define the SNMP version, user/user group details.
|
|
snmp-server host <host_ip> traps SNMP version
                                                <community_string> udp-port 31062
snmp-server host a.b.c.d traps version 2c v2test udp-port 31062
|
Define the destination to which trap data must be forwarded.
|
Note
|
The IP address mentioned here must be the virtual IP address of Embedded Collectors.
|
|
|
snmp-server traps snmp linkup
snmp-server traps snmp linkdown
|
Enable traps to notify link status.
|
|
V3
|
Note
|
Password for a SNMPv3 user must be at least 8 bytes.
|
|
snmp-server host <host_IP> traps version 3 priv <user_name> udp-port 31062
|
Define the destination to which trap data must be forwarded.
|
Note
|
The IP address mentioned here must be the virtual IP address of Embedded Collectors.
|
|
|
snmp-server user <user_name>
                                                <group_name> v3 auth md5 <password> priv aes 128 <password>
|
Configures the SNMP server group to enable authentication for members of a specified named access list.
|
|
snmp-server view <user_name>
                                                < MIB > included
|
Define what must be reported.
|
|
snmp-server group <group_name> v3 auth notify <user_name> read <user_name> write <user_name>
|
Define the SNMP version, user/user group details.
|
|
snmp-server enable traps snmp [authentication ] [linkup ] [linkdown ] [warmstart ] [coldstart ]
|
-
When used without any of the optional keywords, enables authenticationFailure, linkUp, linkDown, warmStart, and coldStart
traps.
-
When used with keywords, enables only the trap types specified. For example, to globally enable only linkUp and linkDown SNMP
traps for all interfaces, use the snmp-server
enable
traps
snmp
linkup
linkdown form of this command.
|
The SNMP Collector supports the following operations:
-
SCALAR
Note
|
If a single collection requests for multiple scalar OIDs, you can pack multiple SNMP GET requests in a single getbulkrequestquery to the device.
|
-
TABLE
-
WALK
-
COLUMN
These operations are defined in the sensor config (see payload sample below).
Note
|
There is an optional deviceParams attribute
snmpRequestTimeoutMillis (not shown in the sample payloads) that should be used if the device response time is more than 1500 milliseconds. It’s not
recommended to use snmpRequestTimeoutMillis unless you are certain that your device response time is high.
The value for snmpRequestTimeoutMillis should be specified in milliseconds:
The default and minimum value is 1500 milliseconds. However, there is no limitation on the maximum value of this attribute.
|
The following is an SNMP collection job sample:
{
  "collection_job": {
    "application_context": {
      "context_id": "collection-job1",
      "application_id": "APP1"
    },
    "collection_mode": {
      "lifetime_type": "APPLICATION_MANAGED",
      "collector_type": "SNMP_COLLECTOR"
    },
    "job_device_set": {
      "device_set": {
        "devices": {
          "device_ids": [
            "c70fc034-0cbd-443f-ad3d-a30d4319f937",
            "8627c130-9127-4ed7-ace5-93d3b4321d5e",
            "c0067069-c8f6-4183-9e67-1f2e9bf56f58"
          ]
        }
      }
    },
    "sensor_input_configs": [
      {
        "sensor_data": {
          "snmp_sensor": {
            "snmp_mib": {
              "oid": "1.3.6.1.2.1.1.3.0",
              "snmp_operation": "SCALAR"
            }
          }
        },
        "cadence_in_millisec": "60000"
      },
      {
        "sensor_data": {
          "snmp_sensor": {
            "snmp_mib": {
              "oid": "1.3.6.1.2.1.31.1.1",
              "snmp_operation": "TABLE"
            }
          }
        },
        "cadence_in_millisec": "60000"
      }
    ],
    "sensor_output_configs": [
      {
        "sensor_data": {
          "snmp_sensor": {
            "snmp_mib": {
              "oid": "1.3.6.1.2.1.1.3.0",
              "snmp_operation": "SCALAR"
            }
          }
        },
        "destination": {
          "destination_id": "4c2ab662-2670-4b3c-b7d3-b94acba98c56",
          "context_id": "topic1_461cb8aa-a16a-44b8-b79f-c3daf3ea925f"
        }
      },
      {
        "sensor_data": {
          "snmp_sensor": {
            "snmp_mib": {
              "oid": "1.3.6.1.2.1.31.1.1",
              "snmp_operation": "TABLE"
            }
          }
        },
        "destination": {
          "destination_id": "4c2ab662-2670-4b3c-b7d3-b94acba98c56",
          "context_id": "topic2_e7ed6300-fc8c-47ee-8445-70e543057f8a"
        }
      }
    ]
  }
}
SNMP Traps Collection Job
SNMP Traps Collection jobs can be created only via API. Trap listeners listen on a port and dispatch data to recipients (based
on their topic of interest).
Important
|
Before starting the SNMP trap collection, install the Common EMS Services application and configure the host information for
SNMP.
|
Embedded Collectors listen on UDP port 31062 for Traps.
Note
|
Before submitting SNMP Trap collection jobs, SNMP TRAPS must be properly configured on the device to be sent to the virtual
IP address of Embedded Collectors.
|
SNMP Trap Collection Job Workflow
On receiving an SNMP trap, :
-
Checks if any collection job is created for the device.
-
Checks the trap version and community string.
Note
|
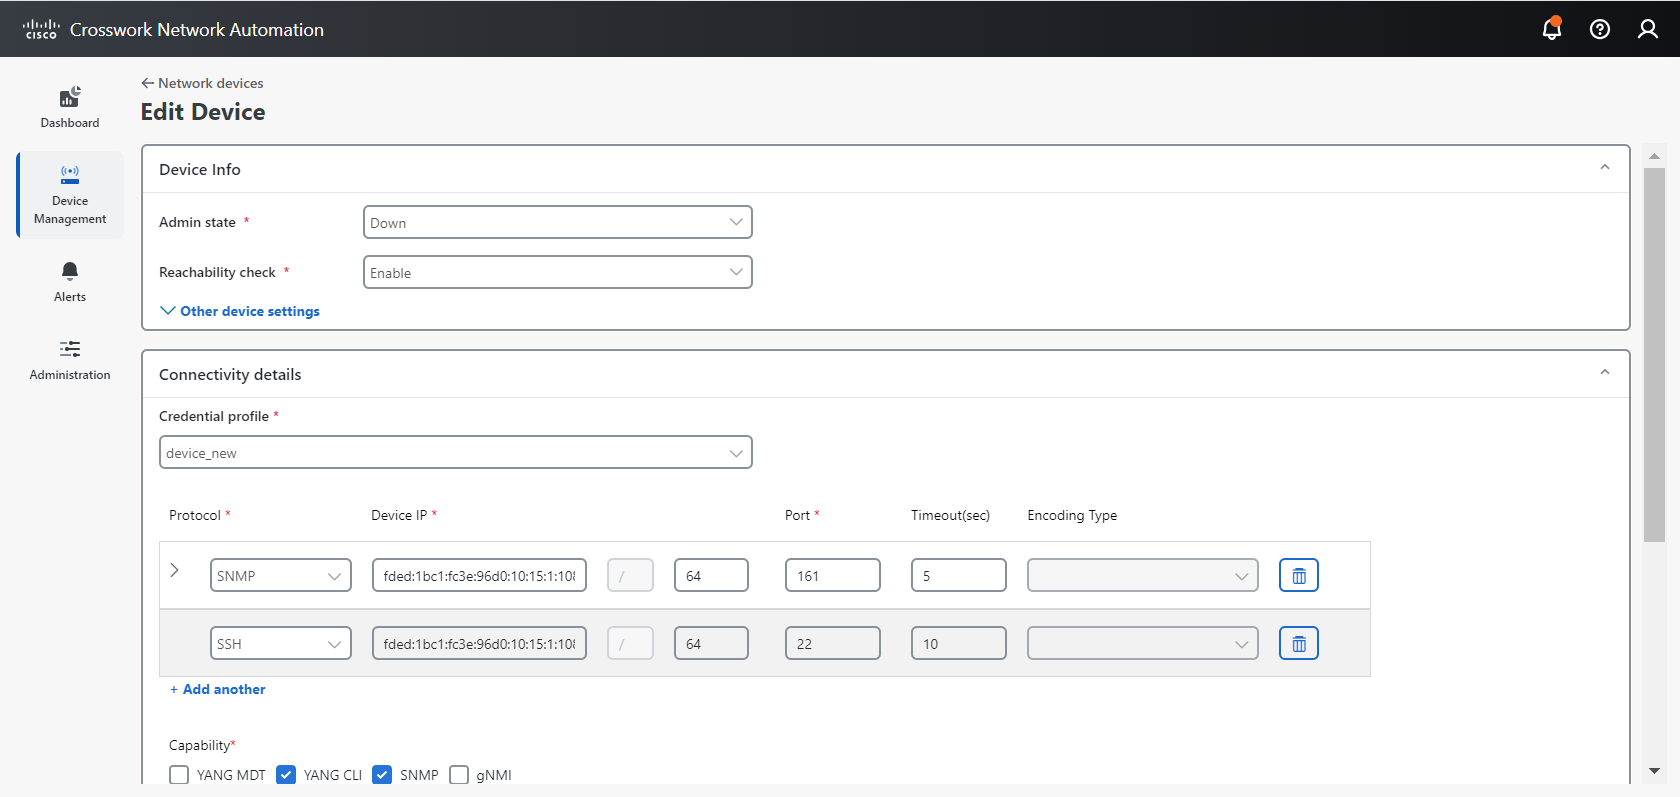
To prevent Embedded Collectors from checking the community string for SNMP traps, select the SNMP Disable Trap Check check box when adding a device through the Crosswork UI. For more information about this option, see Add Devices Through the User Interface.
|
-
For SNMP v3, also validates for user auth and priv protocol and credentials.
Note
|
SNMPV3 auth-priv traps are dependent on the engineId of the device or router to maintain local USM user tables. Therefore,
there will be an interruption in receiving traps whenever the engineId of the device or router changes. Please detach and
attach the respective device to start receiving traps again.
|
filter the traps based on the trap OID mentioned in the sensor path and sends only those requested.
If the collection job is invalid, there is a missing configuration on the device, or no trap is received, the status of the
job remains "Unknown". For list of supported Traps and MIBs, see List of Pre-loaded Traps and MIBs for SNMP Collection.
supports three types of non-yang/OID based traps:
Table 3. List of Supported Non-Yang/OID based Traps
| sensor path |
purpose |
| * |
To get all the traps pushed from the device without any filter. |
| MIB level traps |
OID of one MIB notification
(Ex: 1.3.6.1.2.1.138.0 to get all the isis-mib level traps)
|
| Specific trap |
OID of the specific trap
(Ex: 1.3.6.1.6.3.1.1.5.4 to get the linkUp trap)
|
Following is an SNMP-Trap collection job sample:
{
  "collection_job": {
    "application_context": {
      "context_id": "collection-job1",
      "application_id": "APP1"
    },
    "collection_mode": {
      "lifetime_type": "APPLICATION_MANAGED",
      "collector_type": "TRAP_COLLECTOR"
    },
    "job_device_set": {
      "device_set": {
        "devices": {
          "device_ids": [
            "a9b8f43d-130b-4866-a26a-4d0f9e07562a",
            "8c4431a0-f21d-452d-95a8-84323a19e0d6",
            "eaab2647-2351-40ae-bf94-6e4a3d79af3a"
          ]
        }
      }
    },
    "sensor_input_configs": [
      {
        "sensor_data": {
          "trap_sensor": {
            "path": "1.3.6.1.6.3.1.1.4"
          }
        },
        "cadence_in_millisec": "60000"
      }
    ],
    "sensor_output_configs": [
      {
        "sensor_data": {
          "trap_sensor": {
            "path": "1.3.6.1.6.3.1.1.4"
          }
        },
        "destination": {
          "destination_id": "4c2ab662-2670-4b3c-b7d3-b94acba98c56",
          "context_id": "topic1_696600ae-80ee-4a02-96cb-3a01a2415324"
        }
      }
    ]
  }
}
Enabling Traps forwarding to external applications
We recommended selectively enabling only those traps that are needed by Crosswork on the device.
To identify the type of trap from the data received on the destination, look for oid (OBJECT_IDENTIFIER, for example, 1.3.6.1.6.3.1.1.4.1.0 ) and strValue associated to the oid in the OidRecords (application can match the OID of interest to determine the kind of trap).
Following are the sample values and a sample payload to forward traps to external applications:
-
Link up
1.3.6.1.6.3.1.1.4.1.0 = 1.3.6.1.6.3.1.1.5.4
-
Link Down
1.3.6.1.6.3.1.1.4.1.0 = 1.3.6.1.6.3.1.1.5.3
-
Syslog
1.3.6.1.6.3.1.1.4.1.0 = 1.3.6.1.4.1.9.9.41.2.0.1
-
Cold Start
1.3.6.1.6.3.1.1.4.1.0 = 1.3.6.1.6.3.1.1.5.1
{
  "nodeIdStr": "BF5-XRV9K1.tr3.es",
  "nodeIdUuid": "C9tZ5lJoSJKf5OZ67+U5JQ==",
  "collectionId": "133",
  "collectionStartTime": "1580931985267",
  "msgTimestamp": "1580931985267",
  "dataGpbkv": [
    {
      "timestamp": "1580931985267",
      "name": "trapsensor.path",
      "snmpTrap": {
        "version": "V2c",
        "pduType": "TRAP",
        "v2v3Data": {
          "agentAddress": "172.70.39.227",
          "oidRecords": [
            {
              "oid": "1.3.6.1.2.1.1.3.0",
              "strValue": "7 days, 2:15:17.02"
            },
            {
              "oid": "1.3.6.1.6.3.1.1.4.1.0",  // This oid is the Object Identifier.
              "strValue": "1.3.6.1.6.3.1.1.5.3" // This is the value that determines the kind of trap.
            },
            {
              "oid": "1.3.6.1.2.1.2.2.1.1.8",
              "strValue": "8"
            },
            {
              "oid": "1.3.6.1.2.1.2.2.1.2.8",
              "strValue": "GigabitEthernet0/0/0/2"
            },
            {
              "oid": "1.3.6.1.2.1.2.2.1.3.8",
              "strValue": "6"
            },
            {
              "oid": "1.3.6.1.4.1.9.9.276.1.1.2.1.3.8",
              "strValue": "down"
            }
          ]
        }
      }
    }
  ],
  "collectionEndTime": "1580931985267",
  "collectorUuid": "YmNjZjEzMTktZjFlOS00NTE5LWI4OTgtY2Y1ZmQxZDFjNWExOlRSQVBfQ09MTEVDVE9S",
  "status": {
    "status": "SUCCESS"
  },
  "modelData": {},
  "sensorData": {
    "trapSensor": {
      "path": "1.3.6.1.6.3.1.1.5.4"
    }
  },
  "applicationContexts": [
    {
      "applicationId": "APP1",
      "contextId": "collection-job-snmp-traps"
    }
  ]
}

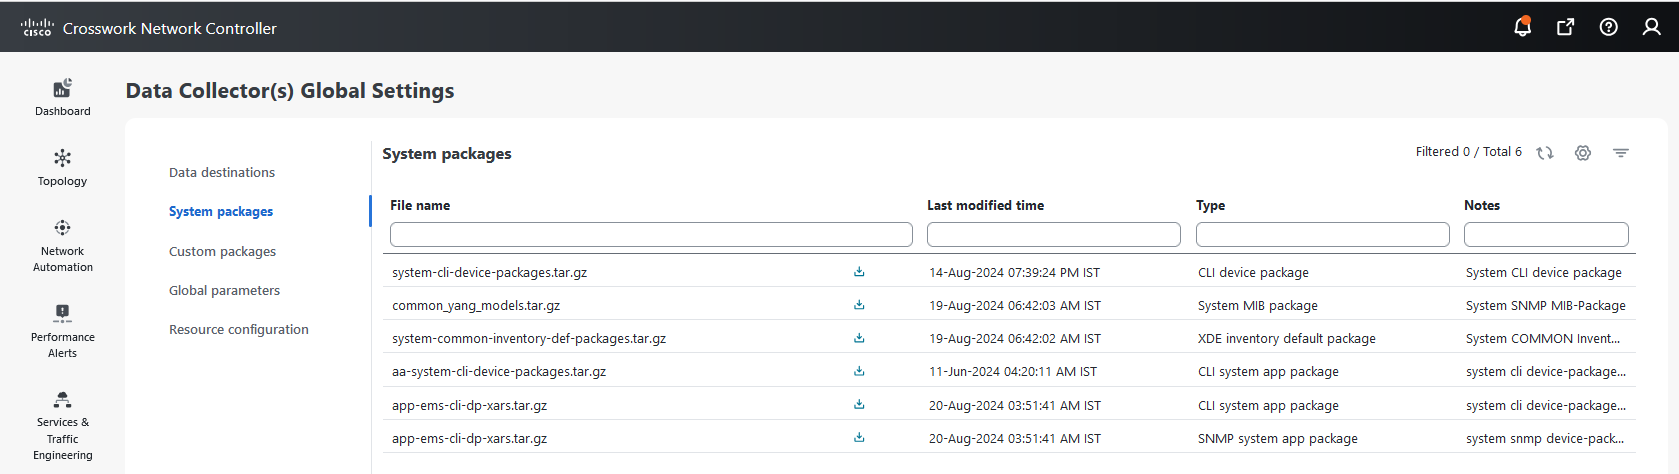
 button next to the package name in the File Name column.


 Feedback