- About This Guide
- Before You Begin
- Getting Started with Cisco Vision Dynamic Signage Director Operation
- Working with TV Displays
- Working with Zones, Groups, and Locations
- Working with Content Deployment
- Working with Screen Templates in Cisco Vision Director
- Working with Content in Cisco Vision Director
- Working with Playlists in Cisco Vision Director
- Working with Video Walls
- Working with Event Scripts
- Monitoring Media Player Operation During an Event Using Device Management
- Troubleshooting Event Operations in Cisco Vision Director
- Managing System Services in Cisco Vision Director
- Managing Server Resources in Cisco Vision Director
- Managing Media Player Operation in Cisco Vision Director
- Managing Backups in Cisco Vision Director
- Glossary of Terms
- Information About Event Scripts
- Event Script
- Event State
- Targeted Advertising
- Dynamic Content Management
- Best Practices for Event Scripts
- How to Set Up Event Scripts
- Guidelines for Event States and Event Scripts
- Prerequisites for Event Script Creation
- Creating a New Event Script
- Creating Event States
- Creating an Emergency State
- Adding a Zone / Group to an Event State
- Assigning Actions and Content to a Zone/Group within an Event State
- Using External Triggers to Control Script Actions
- Editing an Event Script
- Deleting an Event Script
- Copying Event State Actions
- Changing an Event Script Color
- How to Run and Schedule Event Scripts and Series
- Information About the Scheduler Application
- How to Schedule Event Scripts Using the Scheduler Application
- Best Practices for the Scheduler Application
- Guidelines for the Scheduler Application
- Restrictions for the Scheduler Application
- Troubleshooting Event Scripts
- Running Event Operations
Working with Event Scripts
User Role: Administrator / Content Manager
This module describes how to create and schedule event scripts in Cisco Vision Director.
Information About Event Scripts
Event scripts and event states control what, when, and where content displays on the TV screens in a venue over the course of an event.
Create an event script using the Script Management interface screens.
Control (manage, run, start) an event script using Script Management.
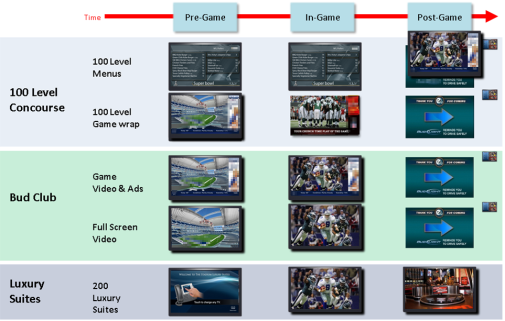
You create event scripts and event states ahead of an event, allowing you to predetermine what will display at a given time and location on each screen in the venue as shown in Figure 1. Prior to the event, you can stage and validate the script and make any necessary adjustments to be sure everything displays correctly.
Then, you run the script at the scheduled event time. The script can be initiated manually or automatically. Once the script is running, you can use the many features of Cisco Vision Director to further manage the ads, content, graphics, and video displayed throughout the course of the event.
Figure 1 illustrates an example of the progression through an event script. At each change in the event state (Pre-Game, In-Game, Post-Game) the screen template and content applied to the TV displays changes within the group and/or zone.
Figure 1 Progression of an Event Script
Event Script
An event script sets where and at which time the ads, video, and graphics will be displayed in the venue and on the screen. The event script is typically tied to a timeline of moments in the game such as pre-game, game, and post-game. If the event is a concert, the event script could be tied to pre-concert, concert, and post-concert. Each of these event segments are called event states in Cisco Vision Director. You can pre-script what is displayed on each screen during each event state.
Event scripts allow you to display content based upon time as well as physical location, allowing ad sponsors to target different advertising for different demographics and locations in the stadium.
Event State
An event state is a point in the script where content changes. Event states are assigned to event scripts and specify actions that a group and zone will display or perform in sequence during the event. You can create event states that specify when, where, and how long to display a screen template, when to turn TVs on and off, and so on. You can define a duration and time transition to play a particular event state or you can invoke the event state manually.
There are three types of event states:
Sequential Event States
Sequential events states are scheduled states that are part of the event script and tied to a period of time in the event such as pre-game, game, and post-game.
■![]() Sequential event states can be controlled by a timeline (Manual or Time-based) where time-based event states can be overridden by manual control.
Sequential event states can be controlled by a timeline (Manual or Time-based) where time-based event states can be overridden by manual control.
■![]() Actions assigned to sequential event states control functions, such as changing screen templates and playlists within a screen template, changing the channel, and turning the TV On/Off.
Actions assigned to sequential event states control functions, such as changing screen templates and playlists within a screen template, changing the channel, and turning the TV On/Off.
Ad Hoc Event States
Ad hoc event states are event states used for a temporary change, such as an unforeseen event delay or to indicate a goal or moment of exclusivity. You can assign graphics to control what you want displayed during an ad hoc state. You can also customize which channel you want your DMP’s videos to display during the temporary change.
Ad hoc event states are usually timed states that have a specific duration assigned and are meant for a temporary change. Once the ad hoc state ends, the event script continues to play.
Emergency Event States
Emergency event states are fixed event states used to signal a change in all zones in the emergency zone to a full screen graphic or the content specified in an emergency playlist. When an emergency state is started, all local TV controls are locked so the emergency message cannot be removed. Emergency states can also be tied to venue alarm systems or automated activation.
Targeted Advertising
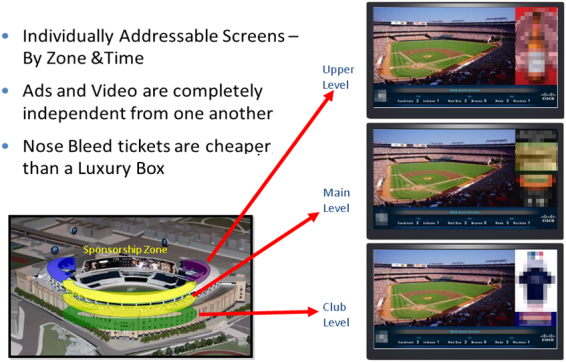
Because each TV screen/DMP in Cisco Vision Director is individually addressable, sponsors can target advertising to a particular location in the venue to increase sales. This “exclusive” advertising is implemented with event scripts that play unique content in a sponsored area such as a club, luxury suite, or concourse level. As shown in Figure 2, you might have a script that plays ads for beer near the cheap seats and plays ads for champagne near the expensive seats. All this adds up to a better fan experience while providing more revenue opportunities for sponsors and the stadium.
Figure 2 Using Targeted Event Scripts
Dynamic Content Management
In addition to providing the ability to segment content by location, Cisco Vision Director also provides the ability to segment content by third-party.
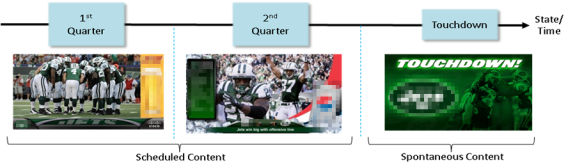
For example, during a touchdown or goal, you can manually play an ad-hoc event script that contains unique sponsored content such as a Touchdown splash screen as shown in Figure 3.
Figure 3 Using an Event Script for Spontaneous Content
Best Practices for Event Scripts
When working with event scripts, consider the following best practices:
■![]() Be sure to regularly manage your script list by removing any test scripts and other outdated scripts from the system. Keep the overall script count to as limited a number as possible and as needed for your venue.
Be sure to regularly manage your script list by removing any test scripts and other outdated scripts from the system. Keep the overall script count to as limited a number as possible and as needed for your venue.
■![]() Finalize script changes before an event.
Finalize script changes before an event.
■![]() Avoid starting scripts during an event, if possible.
Avoid starting scripts during an event, if possible.
■![]() Complete the start of all scripts before the event begins.
Complete the start of all scripts before the event begins.
■![]() Avoid starting a group of scripts at one time. Scripts start sequentially and an attempt to start multiple scripts at once can lead to delays in state changes.
Avoid starting a group of scripts at one time. Scripts start sequentially and an attempt to start multiple scripts at once can lead to delays in state changes.
■![]() When using the Scheduler to control the start/stop of event scripts, be very careful of editing a scheduled script that requires you to manually stop it. The risk is that if you then manually restart that script, the Scheduler will not stop a manually-started script.
When using the Scheduler to control the start/stop of event scripts, be very careful of editing a scheduled script that requires you to manually stop it. The risk is that if you then manually restart that script, the Scheduler will not stop a manually-started script.
Remember to manually stop that script at the appropriate time, or the script is blocked at the next regularly scheduled start time. If this happens, either remove the blocked script or stop the manually-started script.
■![]() Avoid using both triggers and the Scheduler to start an event script which can lead to blocked scripts.
Avoid using both triggers and the Scheduler to start an event script which can lead to blocked scripts.
■![]() Consider developing a content matrix that lists all of the zones / groups throughout the venue and all of the states needed for an event. You can use a spreadsheet to help keep track of the content and playlists needed for each state.
Consider developing a content matrix that lists all of the zones / groups throughout the venue and all of the states needed for an event. You can use a spreadsheet to help keep track of the content and playlists needed for each state.
■![]() For additional information on event content preparation and planning, refer to the Cisco Vision Director Operations Playbook (or the guide that corresponds to your release on Cisco.com).
For additional information on event content preparation and planning, refer to the Cisco Vision Director Operations Playbook (or the guide that corresponds to your release on Cisco.com).
■![]() When working in an environment that has mixed DMP types, carefully consider the device differences and design and plan event scripts accordingly.
When working in an environment that has mixed DMP types, carefully consider the device differences and design and plan event scripts accordingly.
Note : The best practice is to create groups of media players of the same model type and to create zones of like-model groups. For more information, see the Best Practices for Zones and Groups.
■![]() If using RS-232 for TV control, send the TV On/Off commands a couple of times to allow for some TVs that might not respond the first time.
If using RS-232 for TV control, send the TV On/Off commands a couple of times to allow for some TVs that might not respond the first time.
■![]() Use an ad-hoc state to display a moment of exclusivity such as a touchdown, goal, stoppage in play or a sponsor venue domination.
Use an ad-hoc state to display a moment of exclusivity such as a touchdown, goal, stoppage in play or a sponsor venue domination.
■![]() If you want to display different content using the same template in different zones / groups, you can save time by copying assigned actions from one zone / group to another. You can then select different content to display in the template in the copied zone / group.
If you want to display different content using the same template in different zones / groups, you can save time by copying assigned actions from one zone / group to another. You can then select different content to display in the template in the copied zone / group.
■![]() It is important that you allow media players to load the runtime and get into a ready state to receive and process new script actions. Therefore, be sure to define an empty script state (without any actions or commands) as the first state in all event scripts, and configure it to run for a duration of at least two minutes (120 seconds) before changing to a different state.
It is important that you allow media players to load the runtime and get into a ready state to receive and process new script actions. Therefore, be sure to define an empty script state (without any actions or commands) as the first state in all event scripts, and configure it to run for a duration of at least two minutes (120 seconds) before changing to a different state.
TIP: The actual duration for the empty state depends on the number of media players in the system and the amount of time it takes to stage any content. Manually staging content before you run a script can help reduce this time.
■![]() Do not change an event state more frequently than the following:
Do not change an event state more frequently than the following:
–![]() SV-4K and DMP-2K media players: 15 seconds minimum
SV-4K and DMP-2K media players: 15 seconds minimum
■![]() If you are supporting an environment with mixed DMPs that use the same script, it is important to allow for 60 seconds for an event state change.
If you are supporting an environment with mixed DMPs that use the same script, it is important to allow for 60 seconds for an event state change.
■![]() Play the event scripts to visually verify each state and ad hoc states within a venue.
Play the event scripts to visually verify each state and ad hoc states within a venue.
How to Set Up Event Scripts
This section includes the following topics:
■![]() Guidelines for Event States and Event Scripts
Guidelines for Event States and Event Scripts
■![]() Prerequisites for Event Script Creation
Prerequisites for Event Script Creation
■![]() Adding a Zone / Group to an Event State
Adding a Zone / Group to an Event State
■![]() Assigning Actions and Content to a Zone/Group within an Event State
Assigning Actions and Content to a Zone/Group within an Event State
■![]() Changing an Event Script Color
Changing an Event Script Color
Guidelines for Event States and Event Scripts
Consider the following guidelines when creating event states and event scripts:
■![]() Cisco Vision Director displays the default video channel / non-event state on the media players when an event script is not running on it.
Cisco Vision Director displays the default video channel / non-event state on the media players when an event script is not running on it.
■![]() When you use Proof of Play content in your playlist, and especially when your PoP content is included near or up to the end of the playlist, you should define a final script state (without any PoP content) that runs for at least 60 seconds so that all PoP data has time to be captured by Cisco Vision Director. This last event state is commonly set up to turn off the displays in the venue.
When you use Proof of Play content in your playlist, and especially when your PoP content is included near or up to the end of the playlist, you should define a final script state (without any PoP content) that runs for at least 60 seconds so that all PoP data has time to be captured by Cisco Vision Director. This last event state is commonly set up to turn off the displays in the venue.
■![]() When you configure a script action for a zone, then by default all groups within that zone inherit the defined action. You can override this inheritance by configuring a script action for a particular group within that zone.
When you configure a script action for a zone, then by default all groups within that zone inherit the defined action. You can override this inheritance by configuring a script action for a particular group within that zone.
■![]() When a zone contains multiple groups, and if you configure script actions for a particular group, those actions will apply only to that group.
When a zone contains multiple groups, and if you configure script actions for a particular group, those actions will apply only to that group.
■![]() Cisco Vision Director supports only one RS-232 command per event state.
Cisco Vision Director supports only one RS-232 command per event state.
Table 1 describes some guidelines for general script support in Cisco Vision Director.
Note : While these limits have been tested with basic Cisco Vision Director operation, the combination of maximum values and complexity of your system and content can potentially impact the actual limit. Therefore, be sure to test your script content for expected behavior before using in production.
Table 1 Script Guidelines and Limitations for Server Profiles
For all the deployment profile limitations, see Server Profile Limitations.
Prerequisites for Event Script Creation
Before you create event scripts, be sure that the following conditions are met:
■![]() DMPs have been successfully added to the Cisco Vision Director database and are in “production” state.
DMPs have been successfully added to the Cisco Vision Director database and are in “production” state.
–![]() DMPs and IP phones are defined and added for Local Control Areas.
DMPs and IP phones are defined and added for Local Control Areas.
–![]() If used, third-party touch panels are defined and associated for local TV control.
If used, third-party touch panels are defined and associated for local TV control.
■![]() DMPs are linked to locations.
DMPs are linked to locations.
■![]() Zones and groups have been created.
Zones and groups have been created.
Creating a New Event Script
User Role: Administrator / Content Manager
1.![]() Click Script Management. Figure 4 shows the Details screen that appears. Hover over the screen for tool tips. The icons are to:
Click Script Management. Figure 4 shows the Details screen that appears. Hover over the screen for tool tips. The icons are to:
Figure 4 Script Management—Default Screen
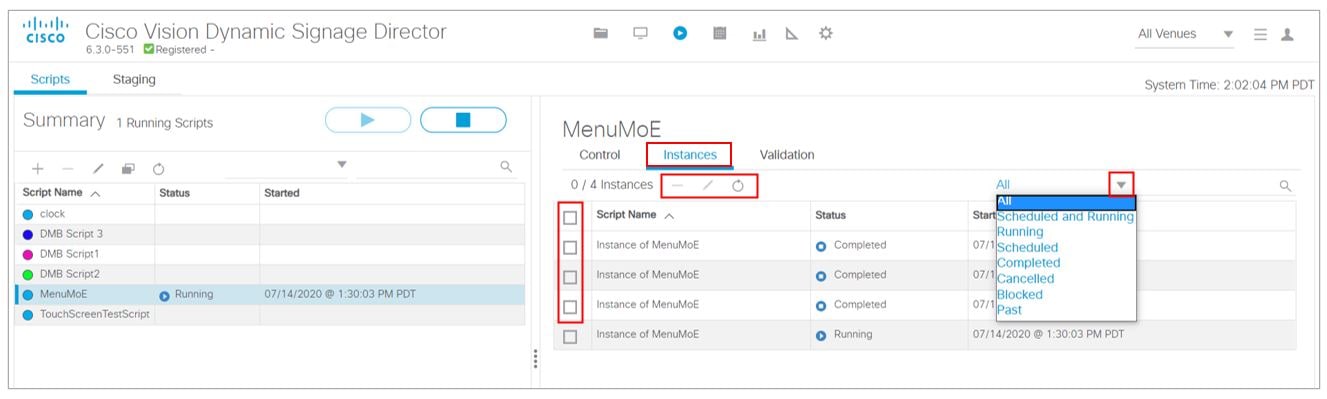
Select a script and use the Start or Stop icons (red box in right panel). Resize the panels to suit your display real estate, all the columns are sortable and use the grey scroll bar (not shown) to locate your scripts or instances. There are action icons in the left panel (shown boxed in red).
Select a script from the left panel and click the Instances tab to see all your script instances. You can also filter what displays by using the drop-down arrow (Figure 5). You can multi-select delete the Instances by checking the boxes and using the Remove icon. A confirmation Warning box appears as a courtesy. You cannot delete a Running script. The Remove icon is disabled.If you start a script, click the Instances tab and see the progress of the script while it prepares to run. Click Refresh to update the window or wait.
Another new nice to have : if you filter the Instances in your panel, navigate away and come back to it, the filter persists, for example, showing all the Scheduled instances.
2.![]() Click the ' + ' icon. A new script window appears (Figure 6).
Click the ' + ' icon. A new script window appears (Figure 6).
4.![]() (Optional) Enter a script description.
(Optional) Enter a script description.
Note : If you choose to save the event script and add state details at a later time, place your cursor in the name or description field and enter a space so the Save button is active.
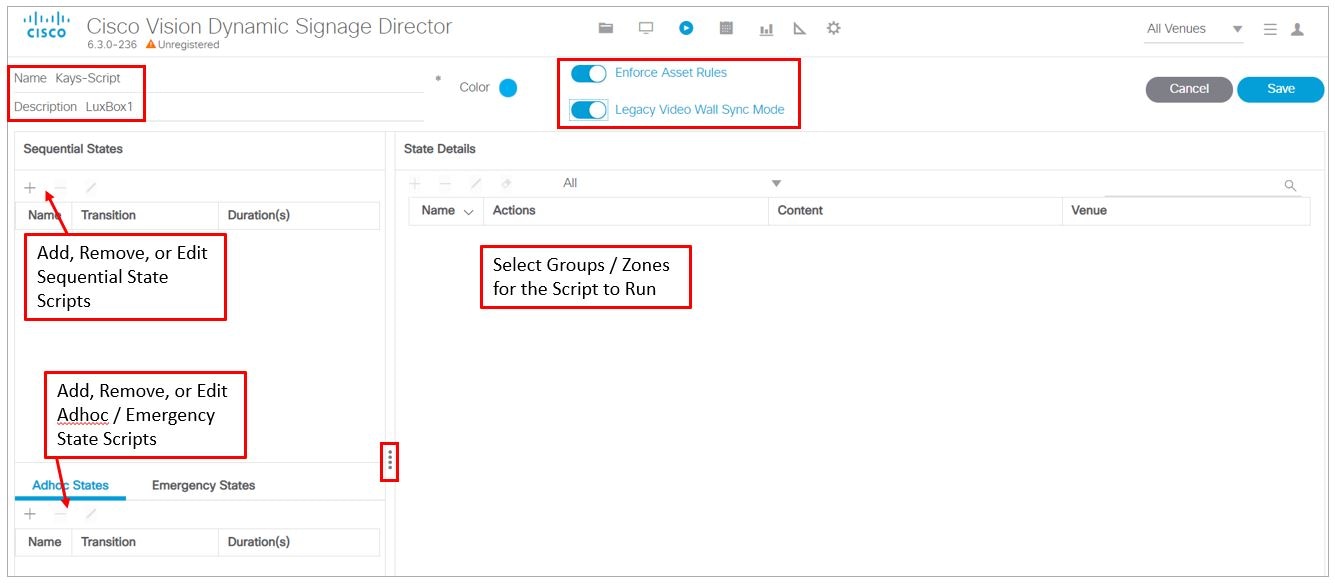
5.![]() (Optional) Click the Color box to assign a color to the script. If you do not select a color, the default color is selected.
(Optional) Click the Color box to assign a color to the script. If you do not select a color, the default color is selected.
Script colors are only used for organization and do not affect any colors displayed on screens by the script. Refer to the Best Practices for the Scheduler Application for additional information.
Note: The Enforce Asset Rules toggle button is ON by default. See Asset (Content) Validation.
You can resize the window to suit your display preferences.
Click Script Management to return to the Details window.
To create event states and assign zones / groups, continue to Creating Event States.
Creating Event States
User Role: Administrator / Content Manager
After creating an event script, add States to the script to define when, where, and the content to display. Something new is the ability to schedule a State more than once. In previous releases, a State which is scheduled already may not be scheduled again. Now you can schedule States (Sequential, Adhoc) multiple times. The Edit Actions functions are mostly identical.
To add states to an event script:
1.![]() With an event script open, click the ' + ' icon under Sequential, Ad-hoc, or Emergency to create a new state.
With an event script open, click the ' + ' icon under Sequential, Ad-hoc, or Emergency to create a new state.
An Add State dialog box appears ( Figure 7).
Figure 7 Sequential State Dialog Box
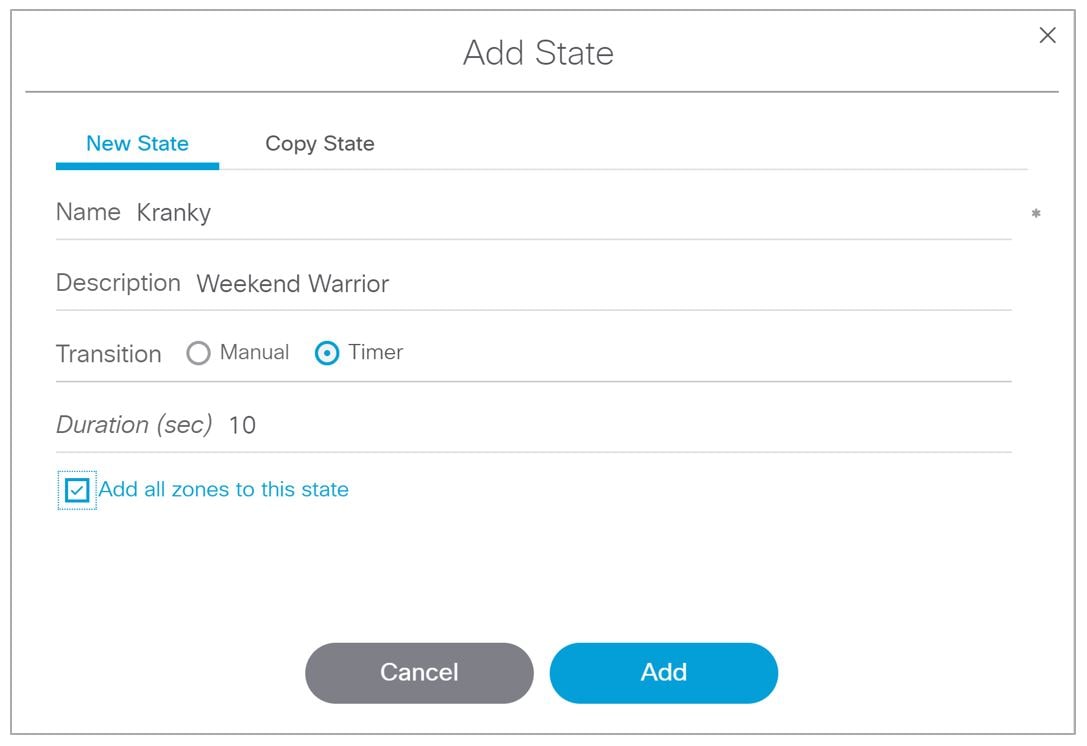
2.![]() (Required) Enter a state name.
(Required) Enter a state name.
3.![]() (Optional) Enter a state description.
(Optional) Enter a state description.
4.![]() Select the transition type:
Select the transition type:
■![]() Manual: Requires you to manually initiate the next event state. Manual states are most useful when the duration is uncertain. Therefore, it is recommended that you use manual states during the game.
Manual: Requires you to manually initiate the next event state. Manual states are most useful when the duration is uncertain. Therefore, it is recommended that you use manual states during the game.
■![]() Timer: Automatically initiated to run for a specific length of time (in seconds) without manual interaction. It is recommended that you use time-based event states at the start and end of a game.
Timer: Automatically initiated to run for a specific length of time (in seconds) without manual interaction. It is recommended that you use time-based event states at the start and end of a game.
Note : An event operator can change the event state transition from time-based to manual at any time while the event script is running from the Script Management window.
5.![]() (Optional) Add all zones to this state: When selecting this, the zones will automatically appear under State Details.
(Optional) Add all zones to this state: When selecting this, the zones will automatically appear under State Details.
6.![]() Click Add. Repeat the steps above to add additional states.
Click Add. Repeat the steps above to add additional states.
Note : Drag and drop the event states to change the order in which they display.
8.![]() Click Close to return to the Details window to add zones / groups at a later time or continue to Assigning Actions and Content to a Zone/Group within an Event State.
Click Close to return to the Details window to add zones / groups at a later time or continue to Assigning Actions and Content to a Zone/Group within an Event State.
Creating an Emergency State
User Role: Administrator / Content Manager
Add an emergency state, in case a real emergency happens (such as a power outage, public safety incident, or serious weather causing evacuation) should occur. Basically, there are two ways to set up an emergency state.
To add an emergency state to an event script:
1.![]() Configure input triggers with different actions assigned (such as START emergency state and STOP emergency state).
Configure input triggers with different actions assigned (such as START emergency state and STOP emergency state).
2.![]() If an emergency happens, send the emergency START trigger. This will activate the emergency event state on all running scripts.
If an emergency happens, send the emergency START trigger. This will activate the emergency event state on all running scripts.
3.![]() Send the second emergency STOP trigger to stop the emergency state and return to the main script.
Send the second emergency STOP trigger to stop the emergency state and return to the main script.
1.![]() For all scripts running in parallel, assign all DMPs of each script to the emergency state.
For all scripts running in parallel, assign all DMPs of each script to the emergency state.
2.![]() If an emergency happens, start the emergency event state on each of the scripts.
If an emergency happens, start the emergency event state on each of the scripts.
This option takes much more time to execute in a real state of emergency.
Adding a Zone / Group to an Event State
User Role: Administrator / Content Manager
Once you have created event states, the next step is to add a zone / group.
To add a zone / group to an event state:
1.![]() With an event script open, select the state that you want to add zones / groups to.
With an event script open, select the state that you want to add zones / groups to.
Note : When opening a saved event script, click Edit in order to make changes to it. If another user has a script open that you want to make changes to, click Release Lock to proceed.
2.![]() Click the ' + ' icon under State Details.
Click the ' + ' icon under State Details.
Figure 8 is an example of available zones / groups to choose from that can be added to the Pre-Game state. Your list will vary depending on your venue set up. The folders represent zones and groups are shown as page icons when you expand or open the folder.
Figure 8 Adding Zone to Event State Dialog Box
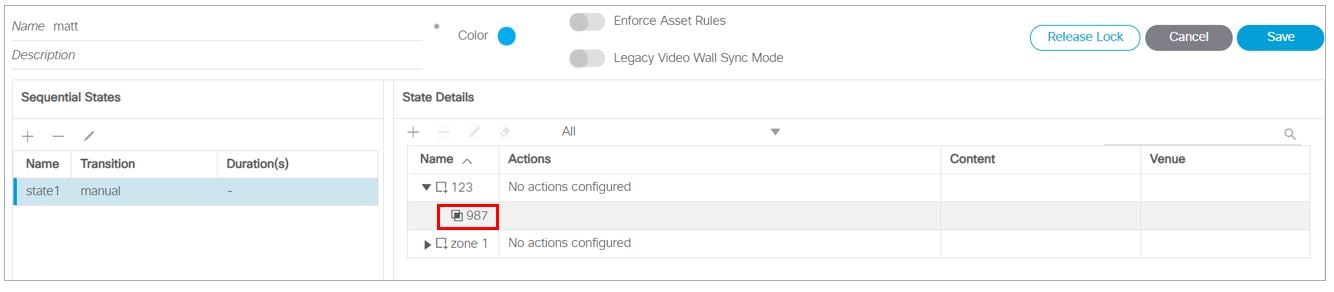
3.![]() Select the specific zone / group that you want to add to the state, click Add. In this example, the Zone (123) and the Group (987) will be added to the state1 state. The State Details screen displays.
Select the specific zone / group that you want to add to the state, click Add. In this example, the Zone (123) and the Group (987) will be added to the state1 state. The State Details screen displays.
Note : The zones will automatically appear if you selected the check box to “Add all zones to this state” when you originally created the state.
Assigning Actions and Content to a Zone/Group within an Event State
User Role: Administrator / Content Manager
Once you have added a zone / group to the event state, the next step is to assign actions and content.
To assign an action to a state:
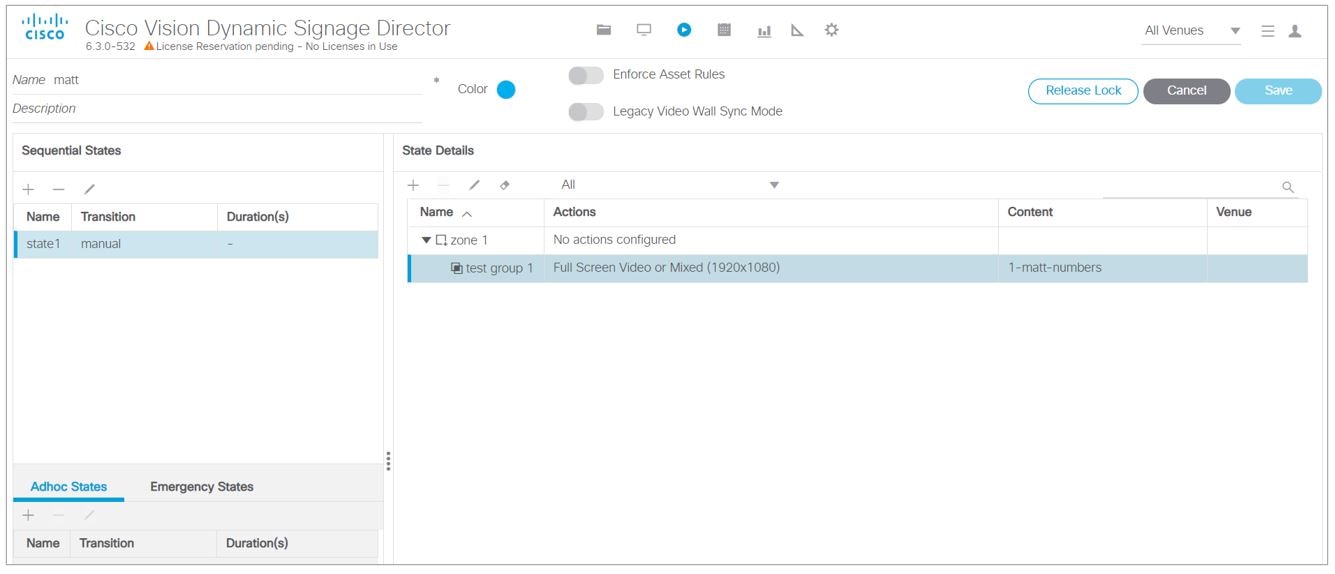
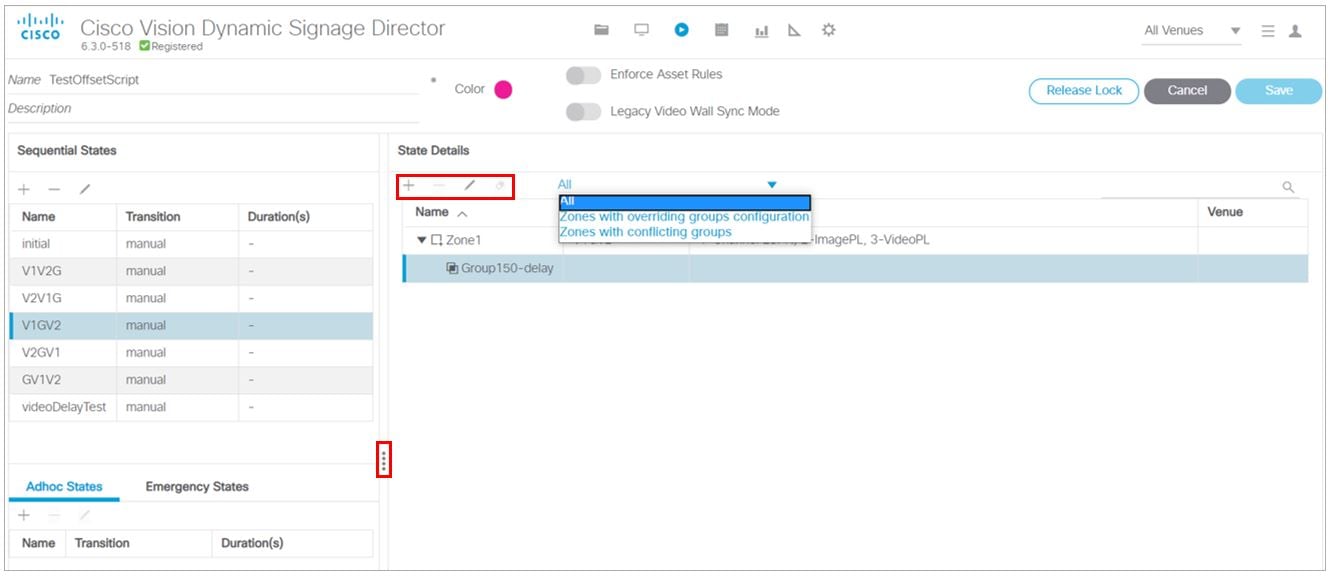
1.![]() With an event script open, select the state and state details (zone / group) that you want to assign an action to ( Figure 9). You can assign an action at the zone level or the group level. Groups can also inherit the actions of the zone.
With an event script open, select the state and state details (zone / group) that you want to assign an action to ( Figure 9). You can assign an action at the zone level or the group level. Groups can also inherit the actions of the zone.
2.![]() Select the zone / group then click the Edit (pencil) icon. Figure 10 displays the Edit Action dialog box where you can assign a template by selecting from the list of available actions.
Select the zone / group then click the Edit (pencil) icon. Figure 10 displays the Edit Action dialog box where you can assign a template by selecting from the list of available actions.
Figure 9 Edit Actions Dialog Box
3.![]() Double-click the Action you want to assign. Once selected, it appears under Assigned Actions. Figure 10 is an example of an assigned Full Screen Video or Mixed (1920x1080) template.
Double-click the Action you want to assign. Once selected, it appears under Assigned Actions. Figure 10 is an example of an assigned Full Screen Video or Mixed (1920x1080) template.
Note : Be sure to double-click on the action to assign it. If the action does not appear in the Assigned Actions list, click the Refresh icon located below the Available Actions heading.
Figure 10 Full Screen Video Example (1920x1080) Example
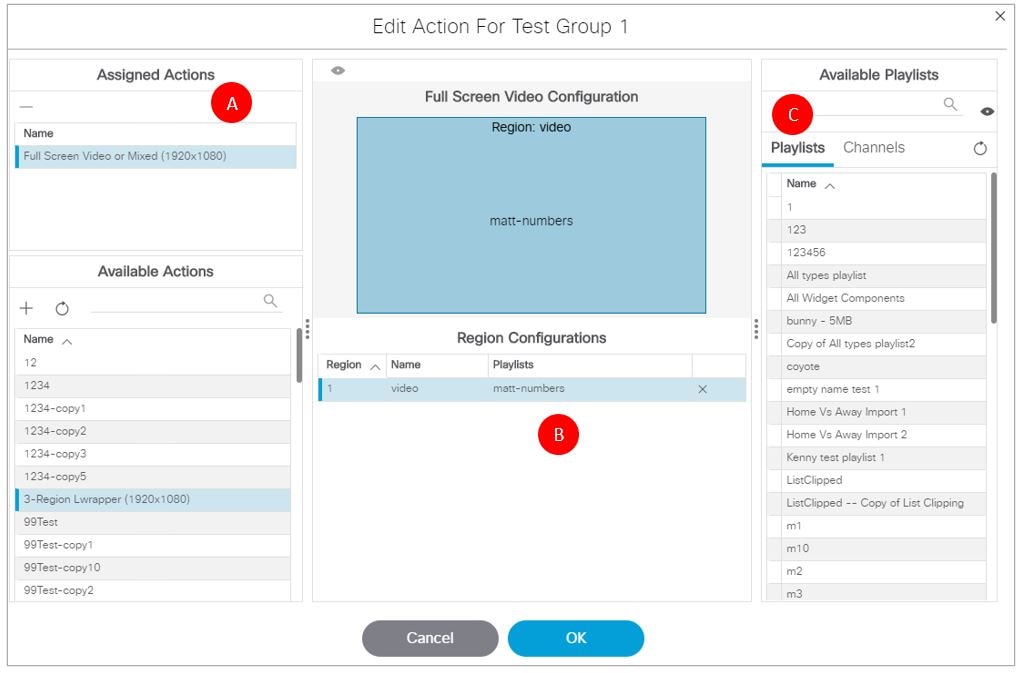
4.![]() Configure the assigned actions and content for the state:
Configure the assigned actions and content for the state:
a.![]() As shown in Figure 10, the Full Screen Videor (1920x1080) action has been assigned and appears on the left under Assigned Actions.
As shown in Figure 10, the Full Screen Videor (1920x1080) action has been assigned and appears on the left under Assigned Actions.
b.![]() The middle column shows which regions are available to assign content. In this example, you can assign content to the video. To assign content you can select from a visual perspective or from a list at the right which shows the available Playlists and Channels. Select the region (when selected, it appears highlighted) that you'd like to assign content to.
The middle column shows which regions are available to assign content. In this example, you can assign content to the video. To assign content you can select from a visual perspective or from a list at the right which shows the available Playlists and Channels. Select the region (when selected, it appears highlighted) that you'd like to assign content to.
Note : When you click on the template region in the middle, only the same content type that matches the region will appear on the right panel. For example, only video or mixed media content will appear in the list when assigning content to the video region in the template.
c.![]() To assign content from a visual perspective, click on a Playlist then click the Eye icon to see a thumbnail of the content displayed in the playlist preview panel on the right. You can also use the search function if you have hundreds of playlists. With the region selected, drag and drop or double-click on a playlist or channel to assign it to the selected region. Once assigned, the name of the playlist or channel will display in the Region Configurations pane and an "x" will appear in the region row. Clicking the "x" will remove the Playlist or Channel assigned.
To assign content from a visual perspective, click on a Playlist then click the Eye icon to see a thumbnail of the content displayed in the playlist preview panel on the right. You can also use the search function if you have hundreds of playlists. With the region selected, drag and drop or double-click on a playlist or channel to assign it to the selected region. Once assigned, the name of the playlist or channel will display in the Region Configurations pane and an "x" will appear in the region row. Clicking the "x" will remove the Playlist or Channel assigned.
5.![]() Once content has been assigned to each region of the template, click OK.
Once content has been assigned to each region of the template, click OK.
6.![]() Click Save in the Script window. Repeat the steps above to assign an action to each zone / group or you can proceed to How to Run and Schedule Event Scripts and Series.
Click Save in the Script window. Repeat the steps above to assign an action to each zone / group or you can proceed to How to Run and Schedule Event Scripts and Series.
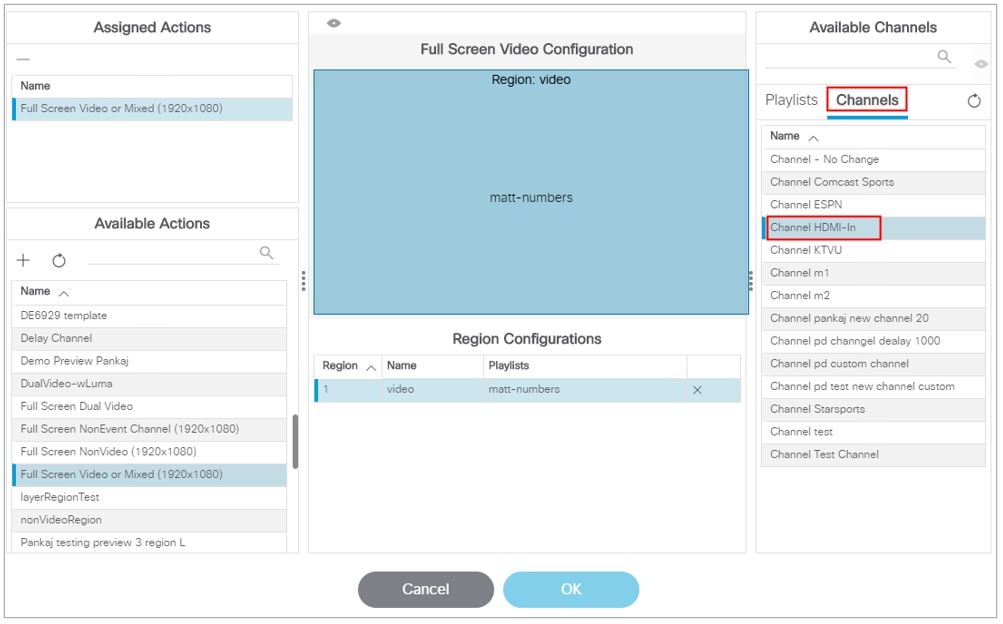
The following are changes to the Edit Actions dialog box (Figure 11):
■![]() Two new script state actions are added under Available Actions: Start Display Streaming and Stop Display Streaming.
Two new script state actions are added under Available Actions: Start Display Streaming and Stop Display Streaming.
■![]() Available Channels/Video Sources changed to Channels.
Available Channels/Video Sources changed to Channels.
■![]() Local HDMI-In source changed to Channel HDMI-In. This reflects the name of the new default local HDMI-In channel 0.
Local HDMI-In source changed to Channel HDMI-In. This reflects the name of the new default local HDMI-In channel 0.
Figure 11 Edit Actions Dialog Box
Using External Triggers to Control Script Actions
Output triggers also can be configured by the administrator to send a Hypertext Transfer Protocol (HTTP) request to notify external systems of a script event and trigger an action externally. Additional information is available at: Release 6.2: Configuring Cisco Vision Dynamic Signage Director for External Triggers.
Triggers are an approachable Advanced Programming Interface (API) mechanism to cause action to happen on Cisco Vision Director. Triggers use web-based mechanisms that connect machine to machine and define action.
Editing an Event Script
User Role: Administrator / Content Manager
If you click Edit from the default menu, (Figure 12) you get the Script Editor screen (States Screen Figure 13). This screen has all the functionality of the previous release. You also have Edit and Save buttons for any changes and editing you do. As before, the State Details panel shows the zones and groups. All the State Detail columns are now sortable. In the panel, roll over the five icons for adding a state, removing a state, editing (pencil icon) a state, removing actions for zones and groups. Resize the panels to suit your display and scroll down to see the entire list of states.
2.![]() Select the script you want to change, then click the Edit (pencil) icon ( Figure 12). The Script State screen appears (Figure 13).
Select the script you want to change, then click the Edit (pencil) icon ( Figure 12). The Script State screen appears (Figure 13).
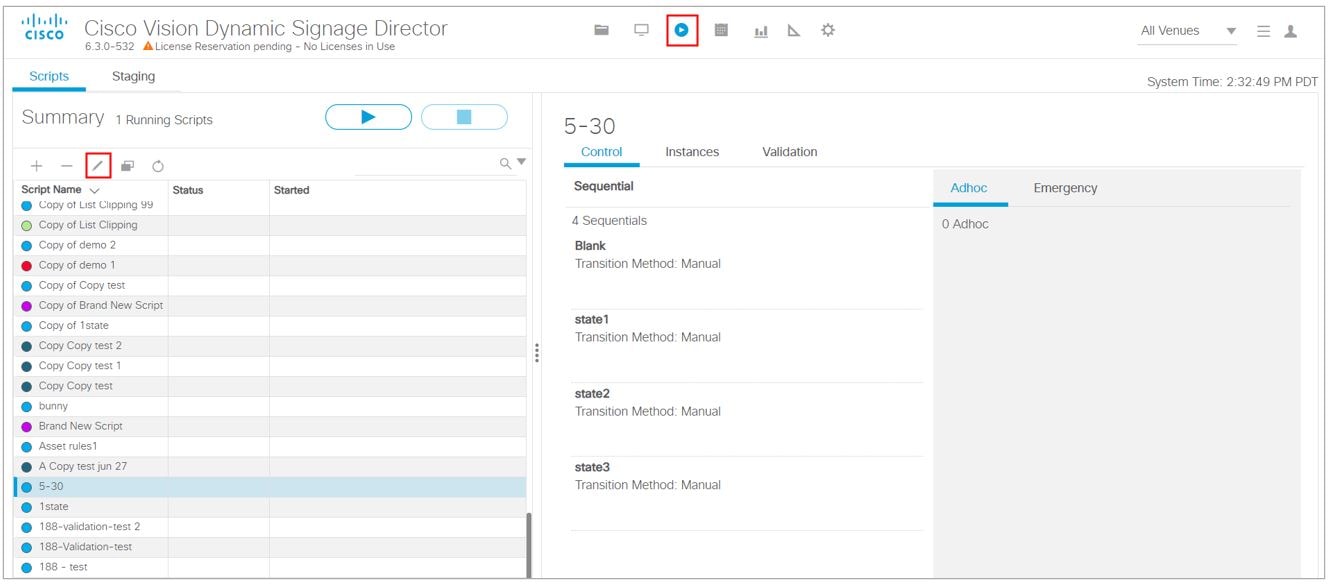
Figure 13 Script States Screen
3.![]() Make the changes and click Save.
Make the changes and click Save.
If you attempt to edit a script and it is being edited by another user, you will see Figure 14. Choose Break Lock to make changes.
Figure 14 Cannot Edit/Delete Script

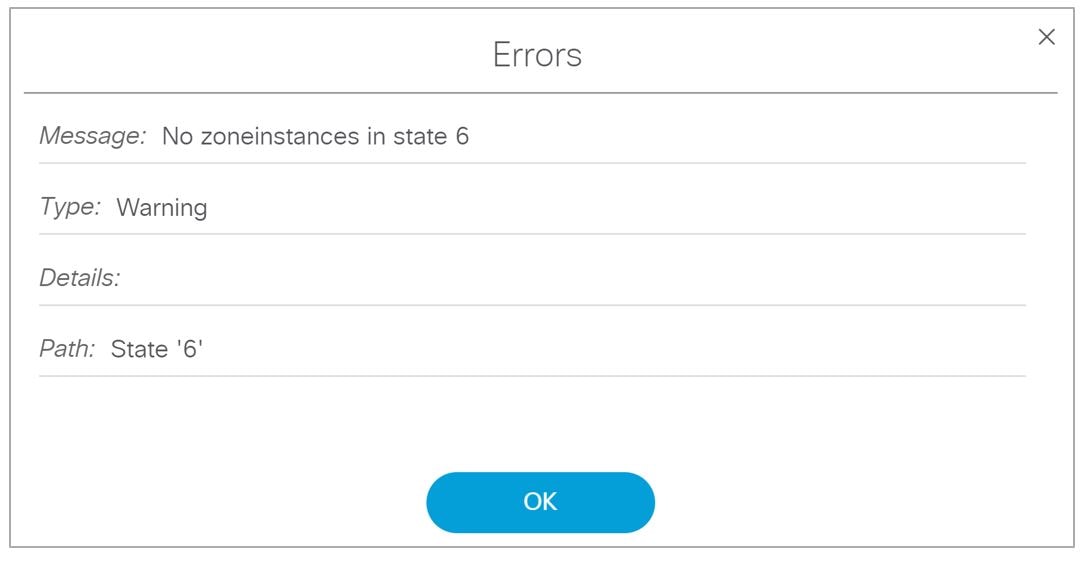
In the default script Summary screen, in the right panel, the Validation tab that lists the Validation Messages and shows the Message, Type, Details, and Path to the selected script (Figure 15). This is similar to the 6.1 and previous releases of Control Panel > Schedule, showing the Script Validation Error panel on the right. If you click on a validation error from the list, a pop-up appears with the details (Figure 16).
Figure 15 Script Validation Summary
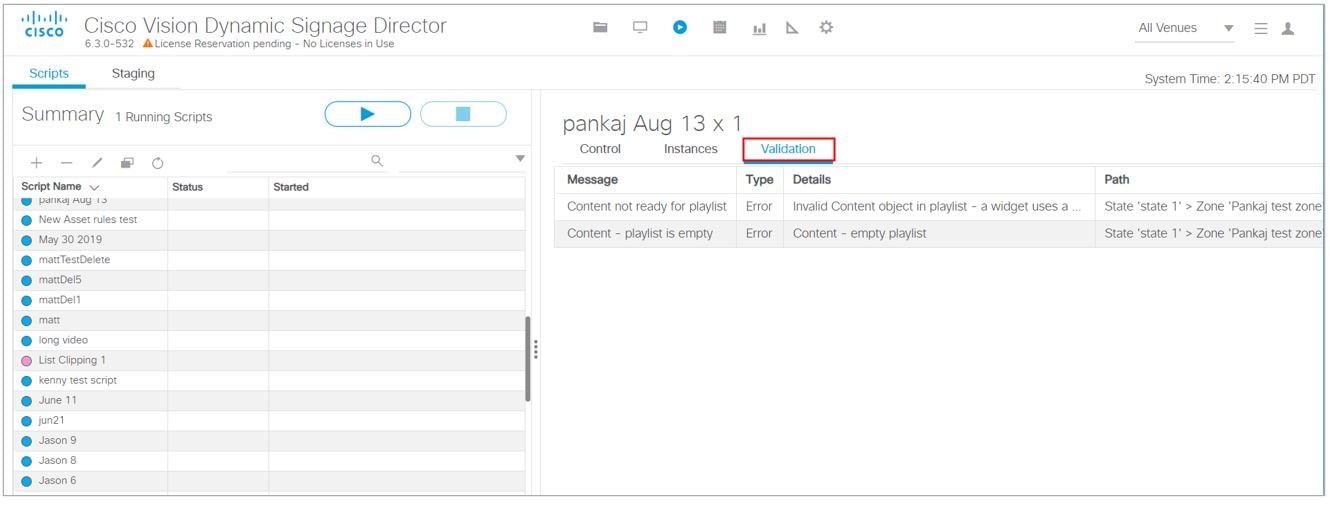
Figure 16 Script Validation Error Message
Once you load instances, see the number of them in parentheses by the name of the script. In this example,
TouchScreenTestScript has one instance.
Deleting an Event Script
User Role: Administrator / Content Manager
2.![]() Select the script you want to remove, then click the " - " icon, next to the Edit icon ( Figure 12). A Confirm Script Delete dialog box appears.
Select the script you want to remove, then click the " - " icon, next to the Edit icon ( Figure 12). A Confirm Script Delete dialog box appears.
Copying Event State Actions
User Role: Administrator / Content Manager
In the case where you have actions assigned to a zone / group and the content you want displayed in another zone / group is similar, you can copy the actions.
For example, if you are using a 3-Region template and want to reuse it with the same ticker, the same video, but a different ad region, copying the template saves time.
To copy actions from one zone / group to another:
2.![]() Open the script, select the state, state details, and the zone / group that you want to copy.
Open the script, select the state, state details, and the zone / group that you want to copy.
3.![]() Click the “+” Add icon from the Sequential States panel. The Add State dialog box appears.
Click the “+” Add icon from the Sequential States panel. The Add State dialog box appears.
4.![]() Click the Copy State tab ( Figure 17).
Click the Copy State tab ( Figure 17).
Figure 17 Copying Event Actions
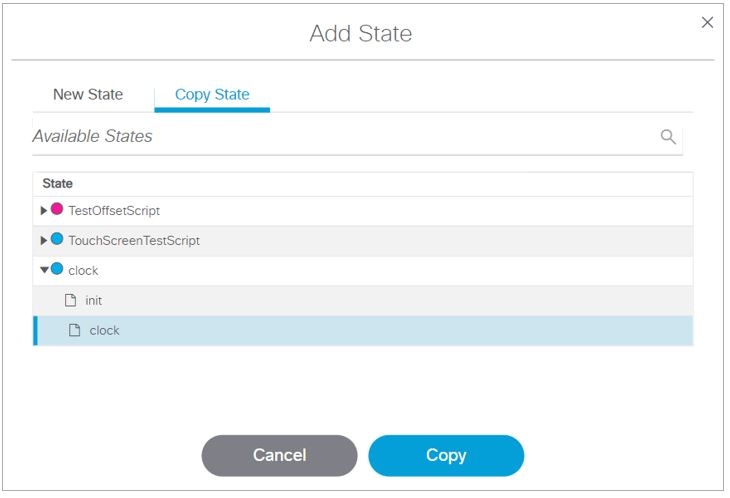
5.![]() Select the states that you want to assign the same actions (template) to. Use Cnt Click to select multiple states.
Select the states that you want to assign the same actions (template) to. Use Cnt Click to select multiple states.
6.![]() Click Copy. The states now appear in the Sequential States panel.
Click Copy. The states now appear in the Sequential States panel.
Changing an Event Script Color
Administrator / Content Manager
To change the color of an event script:
2.![]() Open the event script by clicking the Edit pencil icon.
Open the event script by clicking the Edit pencil icon.
3.![]() Click the color circle and choose the new color from the color picker ( Figure 18).
Click the color circle and choose the new color from the color picker ( Figure 18).
Figure 18 Selecting a New Script Color
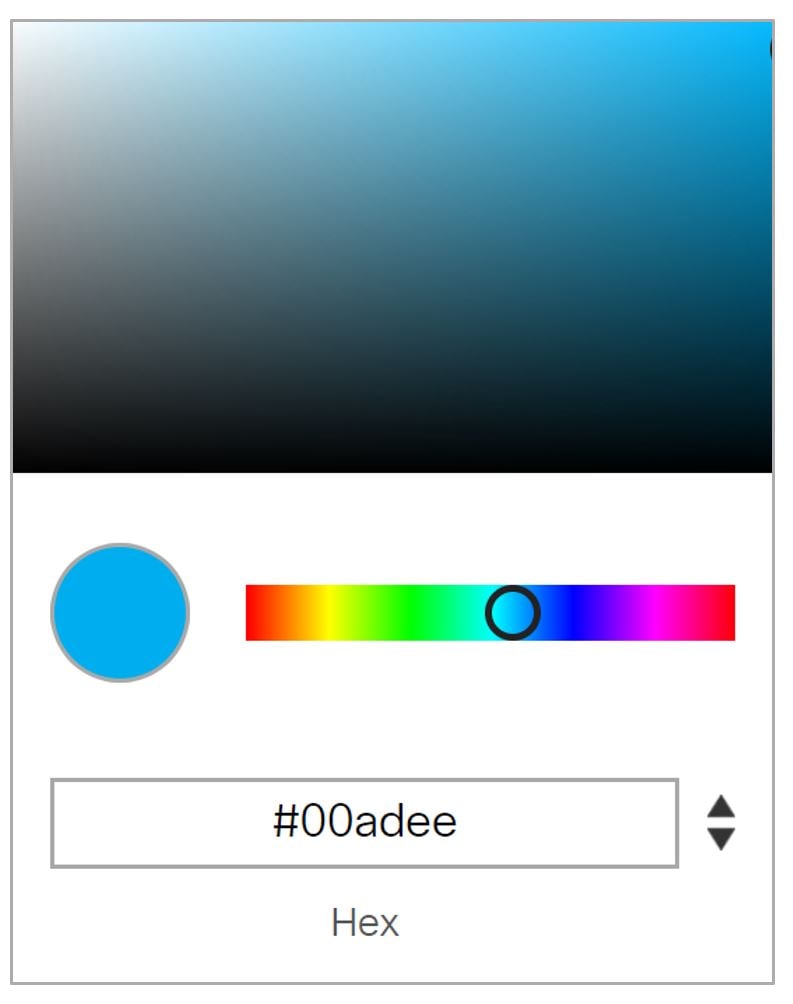
4.![]() Click a color from the color picker to save it and close the box.
Click a color from the color picker to save it and close the box.
The event script appears highlighted with the new color.
Note : If color changes do not appear in the Scheduler application, reload or refresh the web browser.
How to Run and Schedule Event Scripts and Series
There are two ways to run and schedule event scripts:
■![]() From Cisco Vision Director Script Management to run single event scripts and to set single event scripts to run in advance. If you run an event script using this method, the scheduled event script will not appear in the Scheduler application.
From Cisco Vision Director Script Management to run single event scripts and to set single event scripts to run in advance. If you run an event script using this method, the scheduled event script will not appear in the Scheduler application.
■![]() From Cisco Vision Director click Event Management to schedule single events and recurring event script series in the future. If you schedule an event script using this method, it will appear as scheduled in Script Management. You can also cancel the scheduled event script from Script Management or from the Scheduler application.
From Cisco Vision Director click Event Management to schedule single events and recurring event script series in the future. If you schedule an event script using this method, it will appear as scheduled in Script Management. You can also cancel the scheduled event script from Script Management or from the Scheduler application.
Starting an Event Script
User Role: Administrator / Event Operator / Venue Administrator / Venue Operator
Note : When running an event script or setting the run time in advance from Script Management, it will not appear in the Scheduler application. An event script has to be scheduled using the Scheduler application for it to appear there.
1.![]() Go to Script Management. Check to see if any running scripts should be stopped.
Go to Script Management. Check to see if any running scripts should be stopped.
Figure 19 shows the Summary list view and the options available there. As shown below, there is one script currently running.
2.![]() From the Script List (left), select the script that you want to start.
From the Script List (left), select the script that you want to start.
3.![]() Select Start (Play icon on upper right).
Select Start (Play icon on upper right).
The start script dialog box appears ( Figure 20).
Figure 20 Start Script Dialog Box
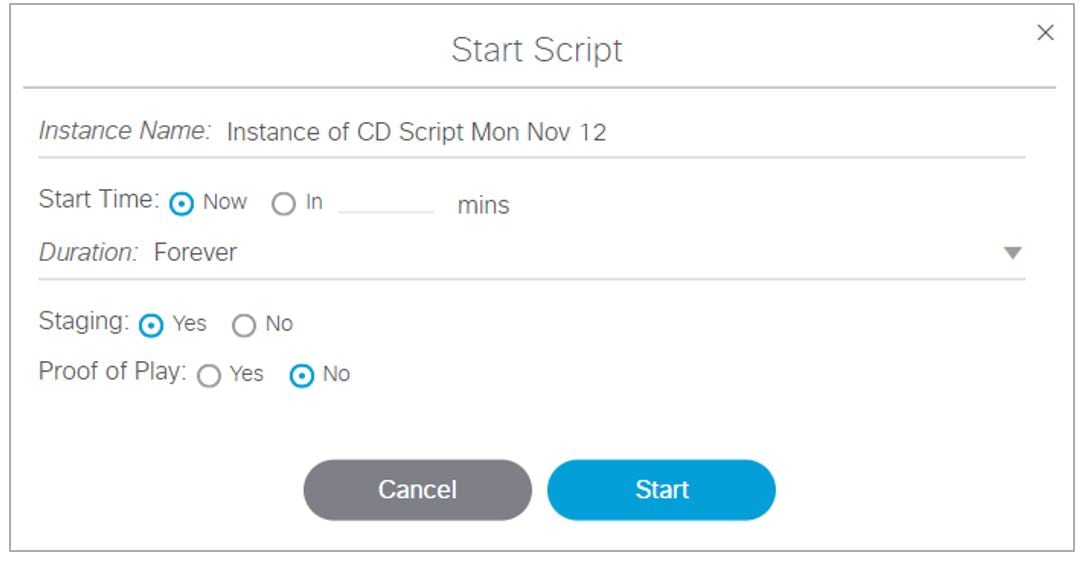
4.![]() (Required) Name the script instance. A name will appear automatically based on the script name.
(Required) Name the script instance. A name will appear automatically based on the script name.
5.![]() (Required) Select Start Time or when you'd like the script to run. Keep in mind that if you select Now, the Start Time includes time to stage the script.
(Required) Select Start Time or when you'd like the script to run. Keep in mind that if you select Now, the Start Time includes time to stage the script.
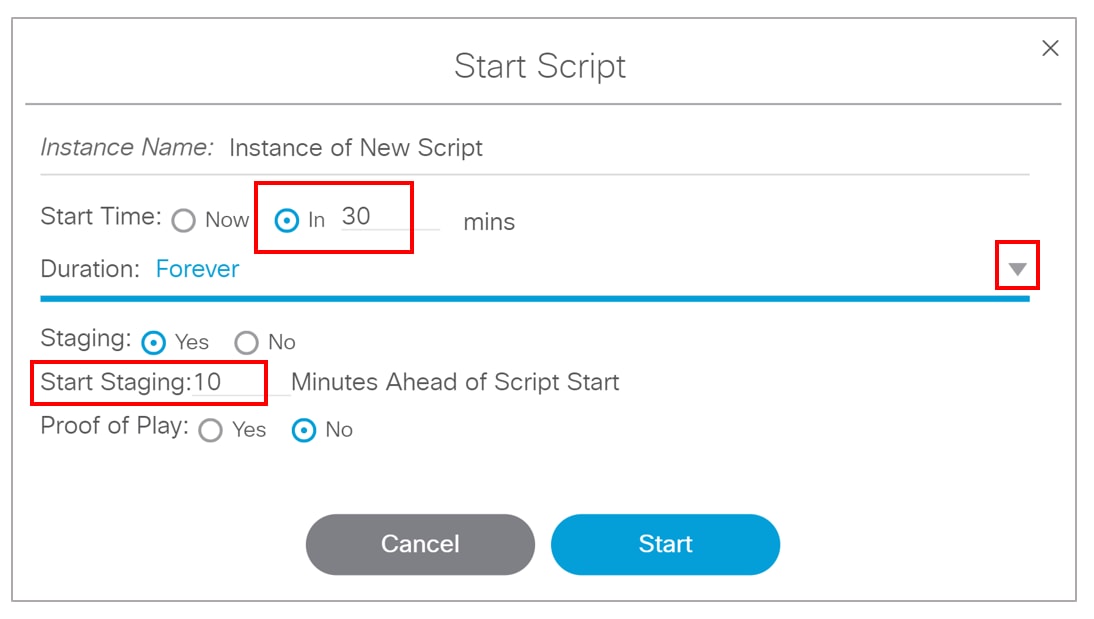
You also have the ability to run the script in the future by entering how many minutes in advance you want the script to run. Click the In radio button then type in the number of minutes from now ( Figure 21. You can also specify the Start Staging time in advance of the script start.
Figure 21 Starting an Event Script in Advance
6.![]() (Required) Select the Duration of the script or how long you want the script to run. Typically this is set to Forever as you don’t know exactly how long the event will take. This also provides the ability to manually end the script when the event is over.
(Required) Select the Duration of the script or how long you want the script to run. Typically this is set to Forever as you don’t know exactly how long the event will take. This also provides the ability to manually end the script when the event is over.
7.![]() (Required) Select whether to stage by selecting Yes or No.
(Required) Select whether to stage by selecting Yes or No.
For more information about staging content, see the Staging Content to the Media Player.
8.![]() (Required) Turn Proof of Play On (yes) or Off (no).
(Required) Turn Proof of Play On (yes) or Off (no).
9.![]() Click Start. As the script starts, the content in the playlist will be staged to the DMPs associated with the zones / groups. When the script is fully staged, the first state will change color to blue in the Summary window and show “Starting.”
Click Start. As the script starts, the content in the playlist will be staged to the DMPs associated with the zones / groups. When the script is fully staged, the first state will change color to blue in the Summary window and show “Starting.”
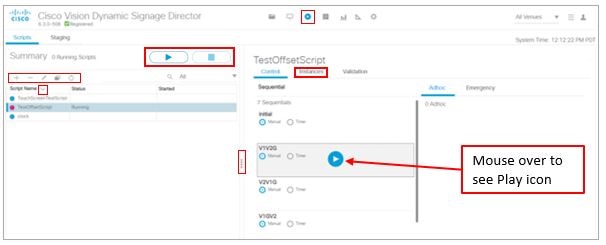
Script states will advance automatically if set, or the event operator can manually advance them as shown in Figure 22.
Figure 22 Example of a Running Script
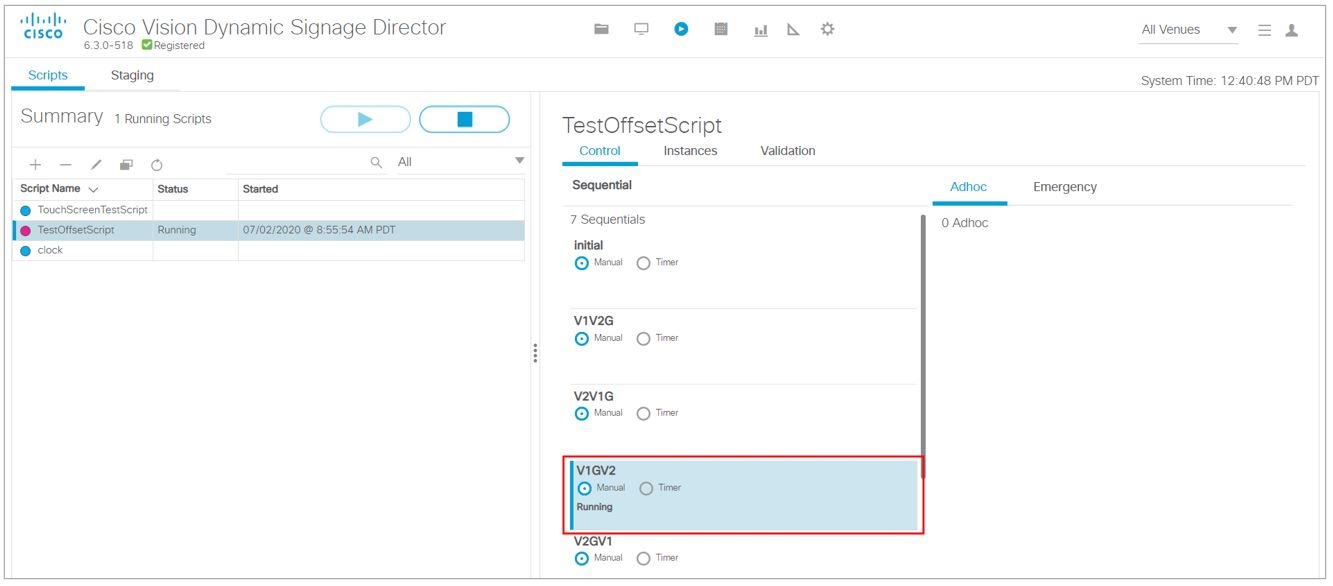
You can see the Instance Details by clicking on a Running script from the left panel list. The right panel changes to show you what instances are coming up for that script.
If you want to change state from Manual to Timer, click the radio button. The Timer window appears (Figure 23).
Figure 23 Confirm Timer Setup Window
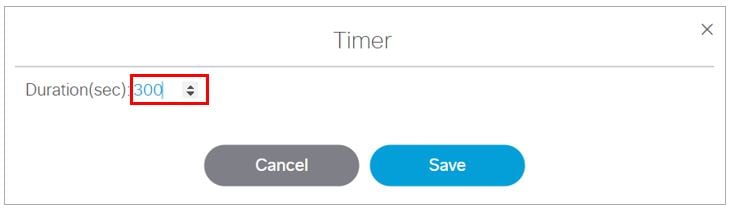
Use the arrows to add or subtract seconds. The default is 300 seconds. Click Save.
Note : When advancing from state to state, it is important that you allow media players to load the runtime and get into a ready state to receive and process new script actions. We recommend that you define an empty script state (without any actions or commands) as the first state in all event scripts. Configure it to run for a duration of at least two minutes (120 seconds) before changing to a different state.
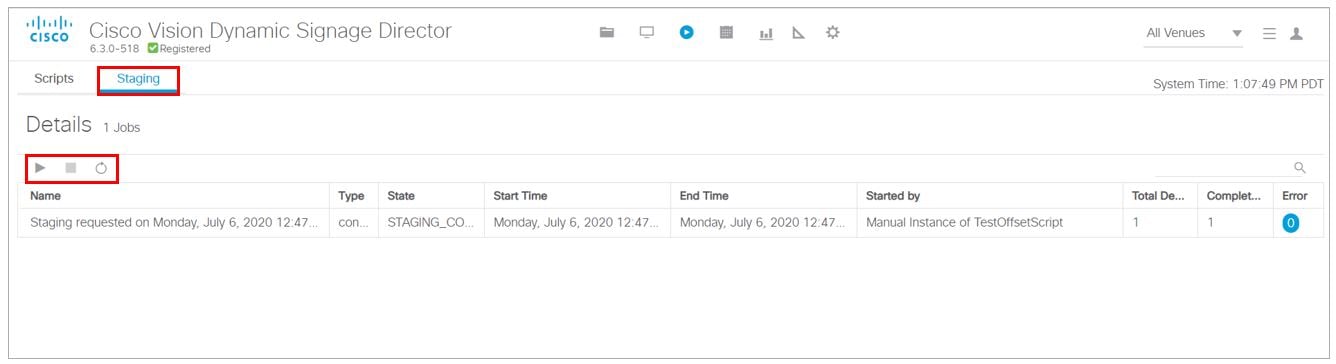
Staging a Script
Staging a script pushes the script information to the DMP to prepare it for displaying onto the monitor.
1.![]() Click Script Management. The Summary window appears.
Click Script Management. The Summary window appears.
2.![]() Click the Staging tab (Figure 24).
Click the Staging tab (Figure 24).
3.![]() Click the Play icon (Start Staging) and select the script from the drop-down list.
Click the Play icon (Start Staging) and select the script from the drop-down list.
4.![]() .Select the target: all DMPs within the script or select a few within the script.
.Select the target: all DMPs within the script or select a few within the script.
5.![]() Click Start to begin staging the scripts to the DMPs.
Click Start to begin staging the scripts to the DMPs.
Figure 24 Start Staging a Script
Stopping an Event Script
User Role: Administrator / Event Operator / Venue Administrator / Venue Operator
2.![]() Locate the running script from the Script List using search, a filter from the drop-down menu, or scrolling down. Select the script.
Locate the running script from the Script List using search, a filter from the drop-down menu, or scrolling down. Select the script.
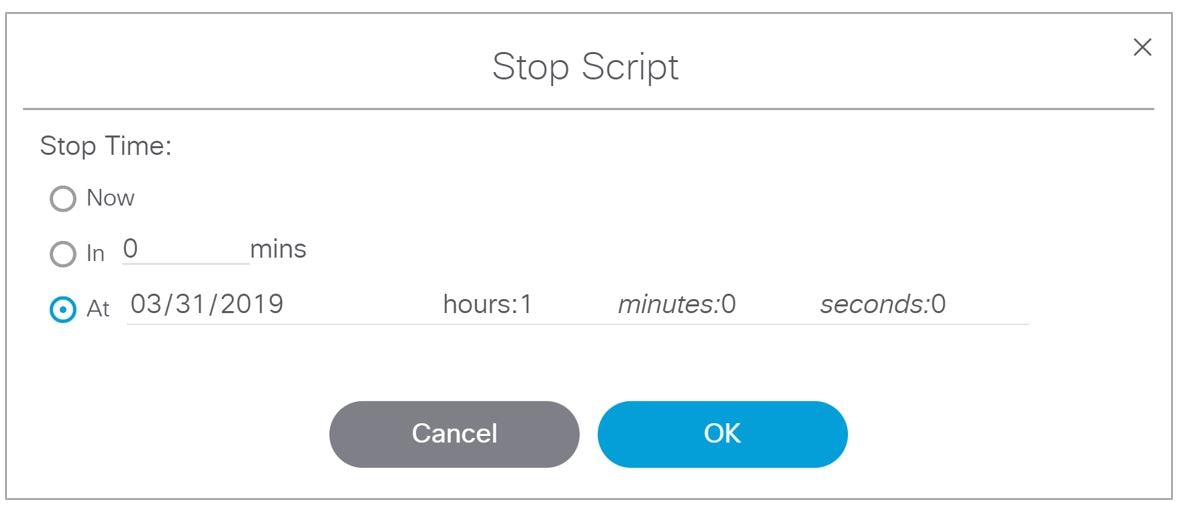
To stop a script at a future time:
4.![]() Click At (Figure 25).
Click At (Figure 25).
5.![]() Click the mm (for month). Use the down arrow for the calendar pop-up.
Click the mm (for month). Use the down arrow for the calendar pop-up.
6.![]() Choose the Date, Hours, Minutes, and Seconds. Use the arrows.
Choose the Date, Hours, Minutes, and Seconds. Use the arrows.
Figure 25 Stopping a Running Event Script
Information About the Scheduler Application
This module describes the Scheduler application that is available from the Cisco Vision Director Main Menu. The Scheduler application was introduced in Release 4.0 to provide a calendar-based script scheduling function. It provides the following capabilities:
■![]() Schedule a single occurrence or recurring event series in advance.
Schedule a single occurrence or recurring event series in advance.
■![]() The Scheduler application uses these already created event scripts to schedule single events or event series. These events or events series created by the Scheduler application will be listed in Script Management under each script folder.
The Scheduler application uses these already created event scripts to schedule single events or event series. These events or events series created by the Scheduler application will be listed in Script Management under each script folder.
■![]() Modify and/or cancel a single occurrence, recurring event series, or an occurrence within a recurring event series.
Modify and/or cancel a single occurrence, recurring event series, or an occurrence within a recurring event series.
■![]() Automate the start and stop of an event script.
Automate the start and stop of an event script.
■![]() Define event script parameters when scheduling an event script.
Define event script parameters when scheduling an event script.
■![]() View scheduled event scripts by day, week, and month.
View scheduled event scripts by day, week, and month.
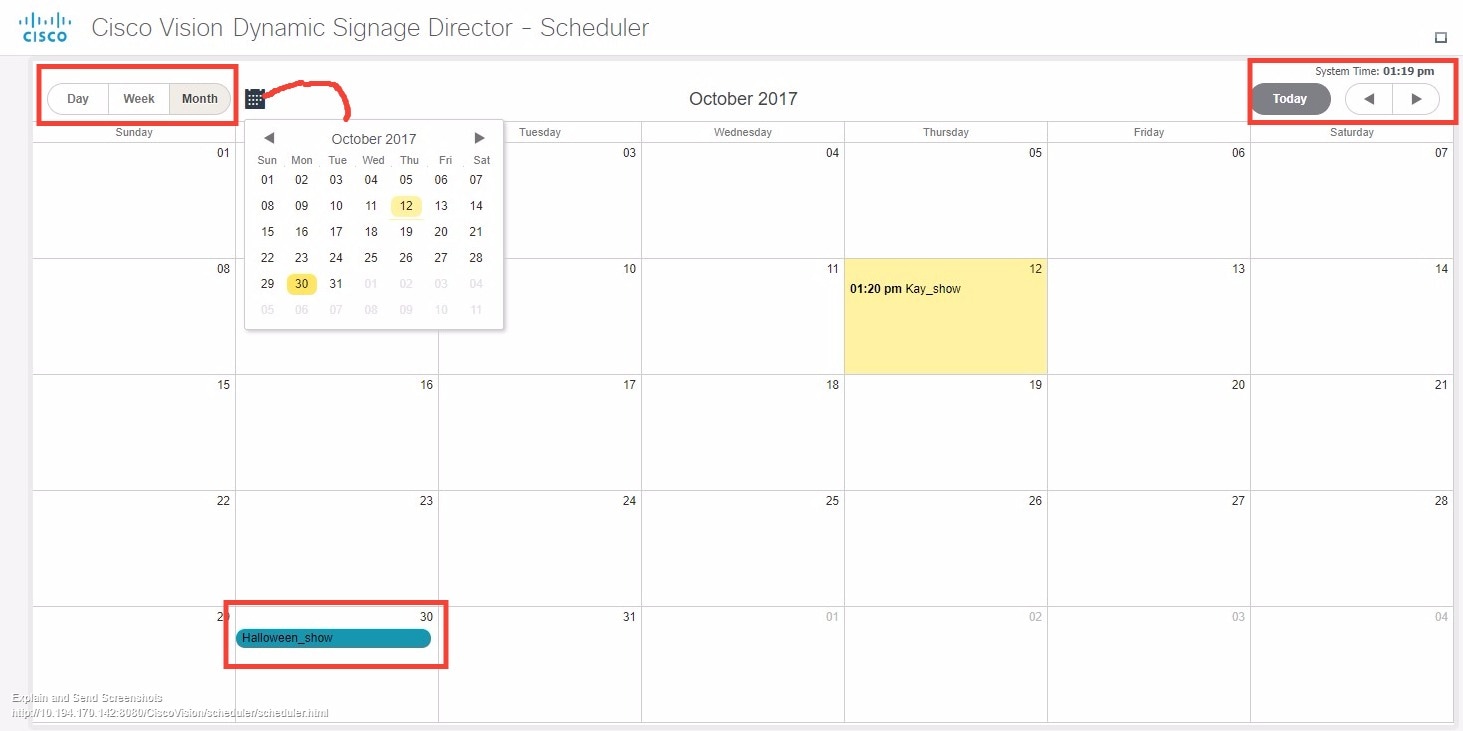
Navigating the Scheduler Application User Interface
The Scheduler application appears as a calendar (Figure 26) that allows you to navigate the user interface by:
■![]() Calendar icon to select a specific time frame.
Calendar icon to select a specific time frame.
Note : Days that have a scheduled event script and the current day appear highlighted.
■![]() Left and right arrows to view previous and future time frames.
Left and right arrows to view previous and future time frames.
■![]() To schedule a new event script, double-click on the day that you want the event script to run.
To schedule a new event script, double-click on the day that you want the event script to run.
■![]() To modify a scheduled event script, double-click on the scheduled event.
To modify a scheduled event script, double-click on the scheduled event.
Figure 26 Scheduler Application Interface
How to Schedule Event Scripts Using the Scheduler Application
This section includes the following tasks:
■![]() Prerequisites for Using the Scheduler Application
Prerequisites for Using the Scheduler Application
■![]() Accessing the Scheduler Application
Accessing the Scheduler Application
■![]() Confirming an Event Script is Scheduled
Confirming an Event Script is Scheduled
■![]() Canceling an Event Script Series or Single Occurrence in a Series
Canceling an Event Script Series or Single Occurrence in a Series
Best Practices for the Scheduler Application
When using the Scheduler application, consider the following best practices:
■![]() For event scripts that need to run fairly soon or on the same day, initiate starting the script using Script Control > St art Script interface.
For event scripts that need to run fairly soon or on the same day, initiate starting the script using Script Control > St art Script interface.
■![]() It is recommended to manually stage scripts for optimal operation. Manually staging scripts ensures the staging process is kept to a minimum. If you rely on automated staging, failures are not easily detected unless you view the staging job status.
It is recommended to manually stage scripts for optimal operation. Manually staging scripts ensures the staging process is kept to a minimum. If you rely on automated staging, failures are not easily detected unless you view the staging job status.
■![]() The Scheduler application is best used for unattended event script starts and ends, such as for store opening and closing.
The Scheduler application is best used for unattended event script starts and ends, such as for store opening and closing.
■![]() You can drag and drop a scheduled event script to take place at the same time on a different day.
You can drag and drop a scheduled event script to take place at the same time on a different day.
■![]() Select a color for the event script at the time of creation. Script colors are only used for organization and do not affect any colors displayed on screens by the script. After the event script is created, you can edit the color by editing the script. The color selected for the script will also be displayed in the Scheduler application. If the script color is changed from Script Management, the new script color will be reflected in the Scheduler application. If a specific color is not selected, a default (blue) color will be assigned.
Select a color for the event script at the time of creation. Script colors are only used for organization and do not affect any colors displayed on screens by the script. After the event script is created, you can edit the color by editing the script. The color selected for the script will also be displayed in the Scheduler application. If the script color is changed from Script Management, the new script color will be reflected in the Scheduler application. If a specific color is not selected, a default (blue) color will be assigned.
■![]() If after scheduling an event script or series it doesn't appear in the Scheduler application calendar view, reload or refresh the web browser.
If after scheduling an event script or series it doesn't appear in the Scheduler application calendar view, reload or refresh the web browser.
■![]() If you scheduled events using the Scheduler application, you can change the event name or cancel the event from the Script Management. Modifications made to events that are scheduled using the Scheduler application are reflected in Script Management.
If you scheduled events using the Scheduler application, you can change the event name or cancel the event from the Script Management. Modifications made to events that are scheduled using the Scheduler application are reflected in Script Management.
■![]() Do not change settings for an event that is in the past. Be careful when editing an event series that has events that have already completed.
Do not change settings for an event that is in the past. Be careful when editing an event series that has events that have already completed.
IMPORTANT: While it is possible to cancel a single occurrence that is part of a series, it is not recommended. For example, if you cancel a single occurrence that is part of a series, then edit and save the series, the changes made to the single occurrence will be lost.
Guidelines for the Scheduler Application
When using the Scheduler application, consider the following guidelines:
■![]() Event scripts must be created in advance of using the Scheduler application.
Event scripts must be created in advance of using the Scheduler application.
■![]() While you can schedule different event scripts to run on the same day and at the same time, only one event script can stage at a time. In practice, the event scripts will not start simultaneously as staging for one script will block the other scripts from staging until they have a chance to stage.
While you can schedule different event scripts to run on the same day and at the same time, only one event script can stage at a time. In practice, the event scripts will not start simultaneously as staging for one script will block the other scripts from staging until they have a chance to stage.
CAUTION: Do not delete a played scheduled event script or series before generating a proof of play report. If a scheduled event script or series is deleted, all proof of play data will be lost. Prior to deleting an event script, we highly recommend to generating a proof of play report.
Restrictions for the Scheduler Application
When using the Scheduler application, consider the following restrictions:
■![]() You cannot schedule the same script to run during the same interval. If you try to do this, a warning will appear.
You cannot schedule the same script to run during the same interval. If you try to do this, a warning will appear.
■![]() Single scheduled event scripts must be edited individually. You cannot select and edit multiple scheduled single event scripts at one time. However, you can edit an entire series at one time by opening any instance from the series.
Single scheduled event scripts must be edited individually. You cannot select and edit multiple scheduled single event scripts at one time. However, you can edit an entire series at one time by opening any instance from the series.
■![]() When using the Scheduler to control the start/stop of event scripts, be very careful of editing a scheduled script that requires you to manually stop it. The risk is that if you then manually restart that script, the Scheduler will not stop a manually-started script.
When using the Scheduler to control the start/stop of event scripts, be very careful of editing a scheduled script that requires you to manually stop it. The risk is that if you then manually restart that script, the Scheduler will not stop a manually-started script.
Remember to manually stop that script at the appropriate time, or the script is blocked at the next regularly scheduled start time. If this happens, either remove the blocked script or stop the manually-started script.
■![]() The Scheduler application will only display events that are created using the Scheduler.
The Scheduler application will only display events that are created using the Scheduler.
■![]() Events created from the Script Management will not appear in the Scheduler application.
Events created from the Script Management will not appear in the Scheduler application.
■![]() You cannot set the zone and group specifics through the Scheduler application.
You cannot set the zone and group specifics through the Scheduler application.
Prerequisites for Using the Scheduler Application
Before you use the Scheduler application, be sure that the following requirements are met:
■![]() You have an Administrator or Event Operator Role Based Access Control for Cisco Vision Director.
You have an Administrator or Event Operator Role Based Access Control for Cisco Vision Director.
■![]() You have created an event script through Script Management.
You have created an event script through Script Management.
Accessing the Scheduler Application
User Role: Administrator / Event Operator
To access the Scheduler application:
1.![]() Log into Cisco Vision Director as an Administrator or Event Operator.
Log into Cisco Vision Director as an Administrator or Event Operator.
2.![]() Click Event Management (Figure 27).
Click Event Management (Figure 27).
Figure 27 Access the Scheduler Application
The Scheduler application opens in a new browser window with the current day highlighted as shown in Figure 26.
Creating a New Event
User Role: Administrator / Event Operator
The following steps summarize the overall workflow to schedule a single event script occurrence using the Scheduler application:
2.![]() Double-click on the day that you want the event script to run. The Create New Event dialog box appears.
Double-click on the day that you want the event script to run. The Create New Event dialog box appears.
3.![]() Complete the Create New Event dialog box (Figure 28).
Complete the Create New Event dialog box (Figure 28).
Figure 28 Creating a New Event
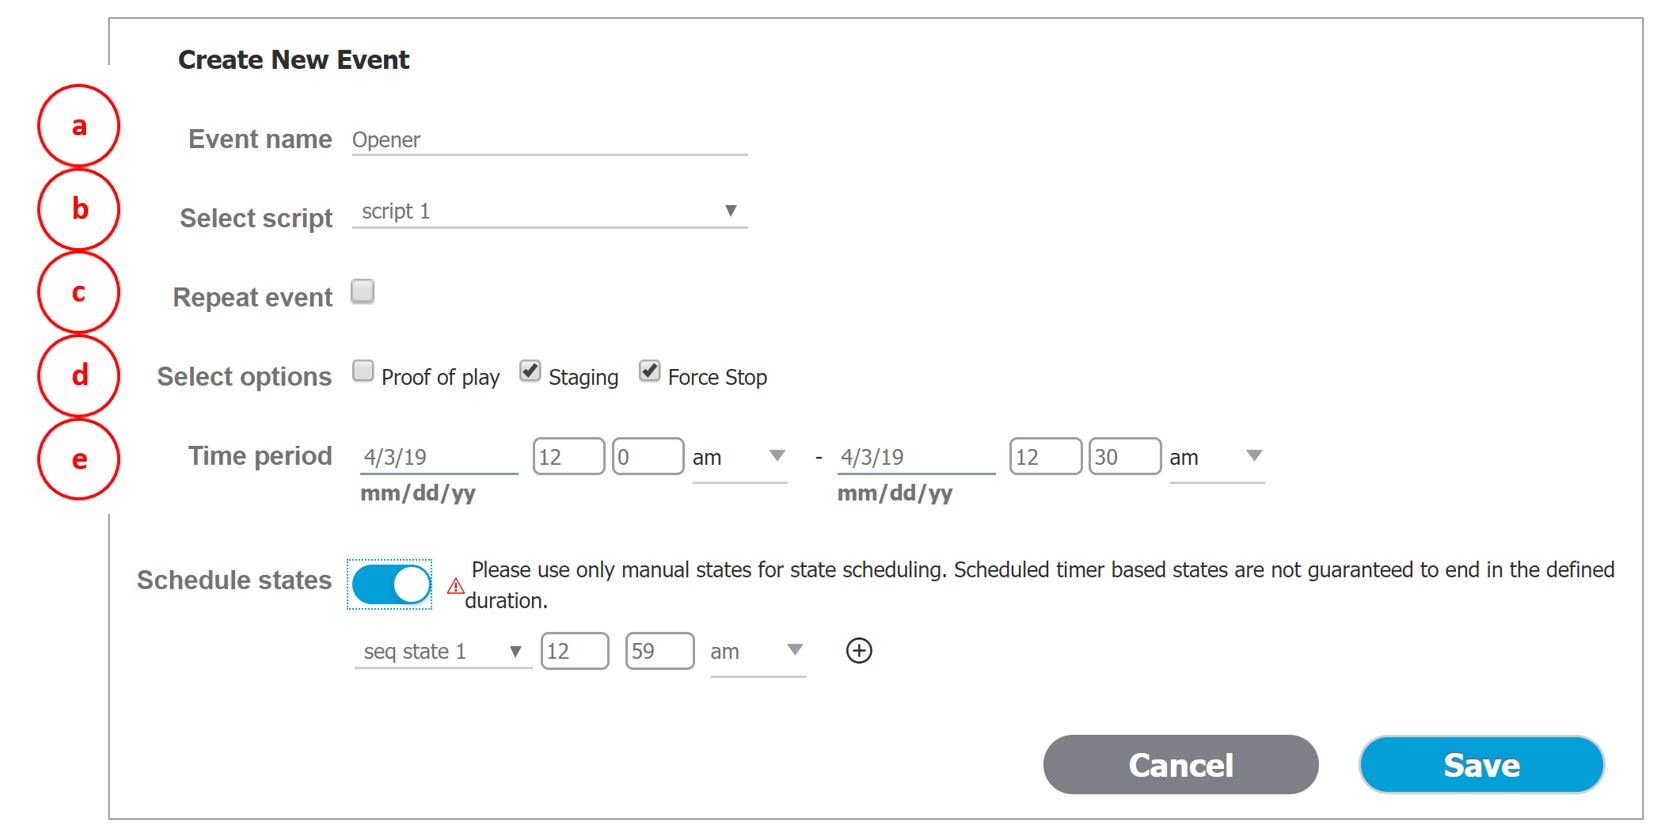
a.![]() Event Name : Type in a name for the event in the Event Name field (required).
Event Name : Type in a name for the event in the Event Name field (required).
b.![]() Select script : Select the event script from the Select Script drop-down menu.
Select script : Select the event script from the Select Script drop-down menu.
c.![]() Repeat event : Leave the check box as is (unchecked) for a single event.
Repeat event : Leave the check box as is (unchecked) for a single event.
d.![]() Select options : Click the check boxes to active or deactivate the following options: Proof of Play, Staging (enabled by default), Force Stop.
Select options : Click the check boxes to active or deactivate the following options: Proof of Play, Staging (enabled by default), Force Stop.
Selecting Force Stop causes the script to end automatically at the scheduled end time. If Force Stop is not selected, the script will continue to run until a user manually stops the event script through the Event Management or if a trigger is received that stops the script.
When you setup your environment to start a script based on calendar time, in recurring mode, and fail to explicitly check the “Force stop” checkbox, you may end up with blocked scripts—if you forget to manually stop the script before the next scheduled script starts.
Note: Previously, when creating a calendar event for scheduling script start, the default behavior was to not force stop the script. Now, the default for a new event is “force stop.”
e.![]() Time period : Select the date and time for the event script to run (Figure 29).
Time period : Select the date and time for the event script to run (Figure 29).
Figure 29 Set the Event Time Period

4.![]() Save the scheduled event script. The Scheduler application appears with the scheduled event script highlighted in the color that was selected when the script was created.
Save the scheduled event script. The Scheduler application appears with the scheduled event script highlighted in the color that was selected when the script was created.
IMPORTANT: When scheduling a recurring event that happens during a Daylight Saving Time change, the UI may show a duplicate event before or after the time change.
Creating a New Event Series
User Role: Administrator / Event Operator
The following steps summarize the overall workflow to schedule an event script series using the Scheduler application:
2.![]() Double-click on the day that you want the event series to run. The Create New Event dialog box appears.
Double-click on the day that you want the event series to run. The Create New Event dialog box appears.
3.![]() Complete the Create New Event dialog box as shown in Figure 30.
Complete the Create New Event dialog box as shown in Figure 30.
Figure 30 Creating a New Event Series
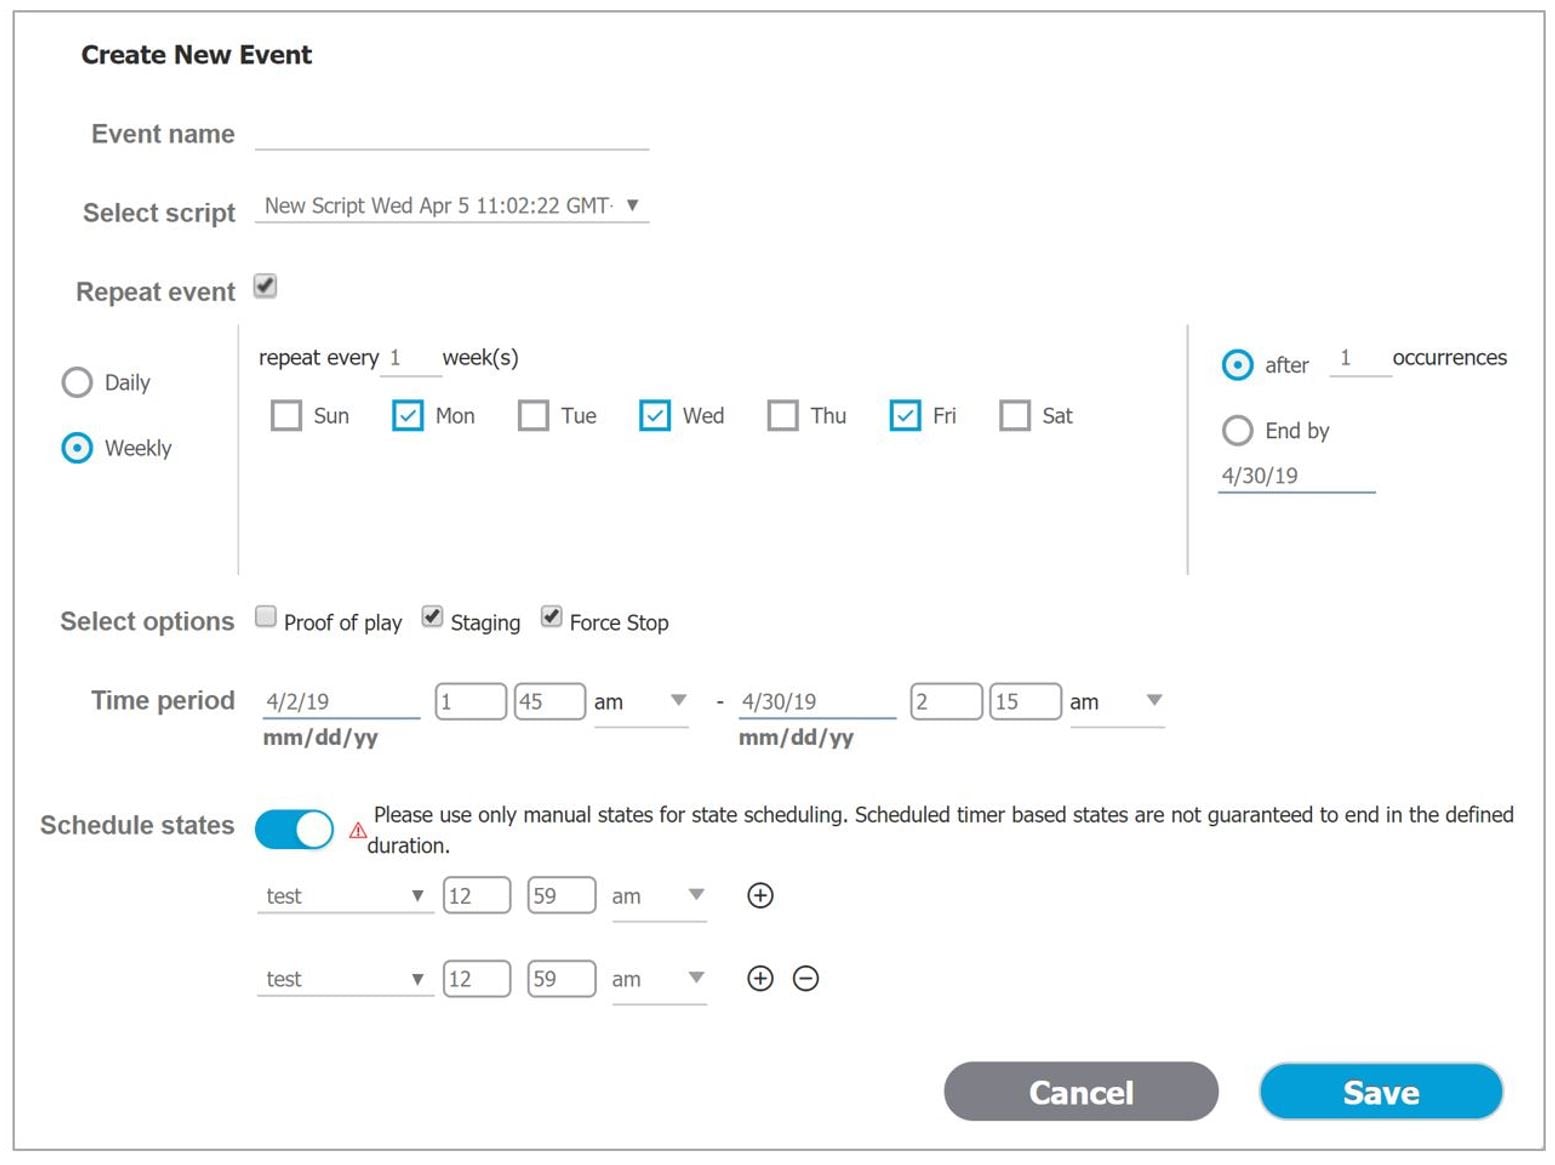
a.![]() Event Name : Type in a name for the event series in the Event Name field (required).
Event Name : Type in a name for the event series in the Event Name field (required).
b.![]() Select script : Select the event script from the Select Script drop-down menu.
Select script : Select the event script from the Select Script drop-down menu.
c.![]() Repeat event : To schedule an event series, check the check box. Once selected, the event series options appear. Set the series as applicable.
Repeat event : To schedule an event series, check the check box. Once selected, the event series options appear. Set the series as applicable.
Daily : Select Daily to repeat an event for a specific number of days. As in the example above, enter the frequency (every other day) and the number of occurrences (1) or set an end date. In this example, the event would be scheduled 1 time on Monday, Wednesday, and Friday ONLY.
Weekly : Select Weekly to repeat an event script on a weekly basis.
Note : Be careful when entering a number of occurrences. In the example above if the number of occurrences was set to 1, the event would only be scheduled 1 time in several weeks >>> not good!
d.![]() Select options : Click the check boxes to activate or deactivate the following options: Proof of Play, Staging (enabled by default), Force Stop.
Select options : Click the check boxes to activate or deactivate the following options: Proof of Play, Staging (enabled by default), Force Stop.
Selecting Force Stop causes the script to end automatically at the scheduled end time. If Force Stop is not selected, the script will continue to run until a user manually stops the event script through the Event Management or if a trigger is received that stops the script.
e.![]() Time period : Select the date and time for the event script series to run.
Time period : Select the date and time for the event script series to run.
f.![]() Schedule states : Slide the button and the fields appear to choose Blank, FS Multicast, or FS Images. Set the times the scripts will display. To add more options, click the “plus” button.
Schedule states : Slide the button and the fields appear to choose Blank, FS Multicast, or FS Images. Set the times the scripts will display. To add more options, click the “plus” button.
4.![]() Save the scheduled event script series. The Scheduler application appears with the scheduled event script series highlighted in the color that was selected when the script was created.
Save the scheduled event script series. The Scheduler application appears with the scheduled event script series highlighted in the color that was selected when the script was created.
Modifying a Scheduled Event
User Role: Administrator / Event Operator
To modify a scheduled event script occurrence or series:
1.![]() Locate the scheduled event script or series in the Scheduler application.
Locate the scheduled event script or series in the Scheduler application.
2.![]() Double-click the scheduled event script to open it.
Double-click the scheduled event script to open it.
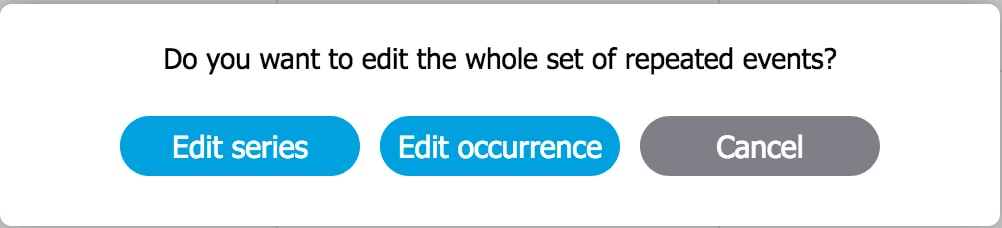
3.![]() Select Edit Series or Edit Occurrence.
Select Edit Series or Edit Occurrence.
4.![]() Change the applicable options and choose Save.
Change the applicable options and choose Save.
Confirming an Event Script is Scheduled
User Role: Administrator / Event Operator
To confirm an event script occurrence or series is scheduled:
1.![]() Click Event Management. If an event script is scheduled, the Status column indicates scheduled.
Click Event Management. If an event script is scheduled, the Status column indicates scheduled.
Canceling a Single Event
User Role: Administrator / Event Operator
To cancel a scheduled event script:
1.![]() Locate the scheduled event script that you want to cancel from Script Management.
Locate the scheduled event script that you want to cancel from Script Management.
2.![]() If using the Scheduler application, double-click the event script to open it.
If using the Scheduler application, double-click the event script to open it.
a.![]() Click Delete in scheduler dialog box.
Click Delete in scheduler dialog box.
b.![]() Click OK in the alert dialog box.
Click OK in the alert dialog box.
c.![]() Navigate to the Scheduler application to view changes.
Navigate to the Scheduler application to view changes.
If changes or cancellations do not appear in the Scheduler application, reload or refresh the web browser.
3.![]() If canceling the event script from Script Management, highlight the script instance, right-click and select Stop.
If canceling the event script from Script Management, highlight the script instance, right-click and select Stop.
Canceling an Event Script Series or Single Occurrence in a Series
User Role: Administrator / Event Operator
To cancel a scheduled event script series or a single occurrence that is part of a series:
1.![]() Locate the scheduled event script series or single occurrence in a series that you want to cancel in the Scheduler application.
Locate the scheduled event script series or single occurrence in a series that you want to cancel in the Scheduler application.
TIP: To cancel a scheduled event series, you can select any instance from the series to cancel the entire series.
2.![]() Double-click the event to open it.
Double-click the event to open it.
a.![]() To cancel the entire event script series, click Edit series. In the scheduler dialog box that appears, click Delete. Next, click OK in the alert dialog box.
To cancel the entire event script series, click Edit series. In the scheduler dialog box that appears, click Delete. Next, click OK in the alert dialog box.
b.![]() To cancel a single occurrence that is part of a series, click Edit occurrence. In the scheduler dialog box that appears, click Delete. Next, click OK in the alert dialog box.
To cancel a single occurrence that is part of a series, click Edit occurrence. In the scheduler dialog box that appears, click Delete. Next, click OK in the alert dialog box.
3.![]() Navigate to the Scheduler application to view changes.
Navigate to the Scheduler application to view changes.
If changes or cancellations do not appear in the Scheduler application, reload or refresh the web browser.
Troubleshooting Event Scripts
Troubleshooting Blocked Scripts
Several conditions can cause a scheduled script to be blocked from running. No error messages occur during these conditions, and it requires manual discovery and correction.
In many cases, a scheduled script has problems because a separate method has been used to control the starting or stopping of that script in addition to the Scheduler application.
A script might become blocked under the following conditions:
■![]() A running scheduled script was manually stopped and restarted.
A running scheduled script was manually stopped and restarted.
The Scheduler application cannot stop a script that was manually started, even if the script had originally been scheduled. If the manually-started script instance is still running at the time of the next scheduled start, then the script is blocked.
Either remove the blocked script or manually stop the currently running script.
■![]() Triggers were used to start a script that is also scheduled.
Triggers were used to start a script that is also scheduled.
The Scheduler application cannot stop a script that was started through an external trigger. If the triggered script instance is still running at the time of the next scheduled script start, then the script is blocked.
Either remove the blocked script, or stop the currently running script manually or using an external trigger.
■![]() When DMPs associated with a blocked script are referenced by another script that is running, the additional script is also blocked.
When DMPs associated with a blocked script are referenced by another script that is running, the additional script is also blocked.
Running Event Operations
Workflow Summary for Running an Event
Table 2 provides a summary of the tasks and related information to run an event in Cisco Vision Director.
 Feedback