- About This Guide
- Before You Begin
- Getting Started with Cisco Vision Dynamic Signage Director Operation
- Working with TV Displays
- Working with Zones, Groups, and Locations
- Working with Content Deployment
- Working with Screen Templates in Cisco Vision Director
- Working with Content in Cisco Vision Director
- Working with Playlists in Cisco Vision Director
- Working with Video Walls
- Working with Event Scripts
- Monitoring Media Player Operation During an Event Using Device Management
- Troubleshooting Event Operations in Cisco Vision Director
- Managing System Services in Cisco Vision Director
- Managing Server Resources in Cisco Vision Director
- Managing Media Player Operation in Cisco Vision Director
- Managing Backups in Cisco Vision Director
- Glossary of Terms
Release 6.4: Cisco Vision Dynamic Signage Director Operations Guide
Bias-Free Language
The documentation set for this product strives to use bias-free language. For the purposes of this documentation set, bias-free is defined as language that does not imply discrimination based on age, disability, gender, racial identity, ethnic identity, sexual orientation, socioeconomic status, and intersectionality. Exceptions may be present in the documentation due to language that is hardcoded in the user interfaces of the product software, language used based on RFP documentation, or language that is used by a referenced third-party product. Learn more about how Cisco is using Inclusive Language.
- Updated:
- August 5, 2020
Chapter: Getting Started with Cisco Vision Dynamic Signage Director Operation
Getting Started with Cisco Vision Dynamic Signage Director Operation
Note : This guide shows Administrator-level privileges only.
This section provides an introduction to some of the basic information to get started using Cisco Vision Director. It includes the following topics:
■![]() Introduction to the Cisco Vision Director User Interface
Introduction to the Cisco Vision Director User Interface
■![]() Introduction to Cisco Vision Director APIs
Introduction to Cisco Vision Director APIs
Introduction to the Cisco Vision Director User Interface
This section provides an introduction to various pieces of the UI. Global navigation consists of the following seven icons:
Next is the More drop-down that provides the following topics:
■![]() Dynamic Menu Boards Application
Dynamic Menu Boards Application
■![]() System State Report Application
System State Report Application
Stricter Password Policies
From Release 6.1 and later, Cisco Vision Dynamic Signage Director users must set stronger passwords. When setting a new password, use the following rules:
■![]() Must have at least 1 lower case character (a-z).
Must have at least 1 lower case character (a-z).
■![]() Must have at least 1 upper case character (A-Z).
Must have at least 1 upper case character (A-Z).
■![]() Must have at least 1 numerical character (0-9).
Must have at least 1 numerical character (0-9).
■![]() Must have at least 1 special character. Special characters are ! @ # $ %
Must have at least 1 special character. Special characters are ! @ # $ %
■![]() Must not contain any of the following characters: space tab newline linefeed backslash (\).
Must not contain any of the following characters: space tab newline linefeed backslash (\).
■![]() Must not contain a character sequence from a predefined list maintained in a dictionary.
Must not contain a character sequence from a predefined list maintained in a dictionary.
■![]() Must not have 3 sequential characters (for example: abc5#pqr is not allowed).
Must not have 3 sequential characters (for example: abc5#pqr is not allowed).
■![]() Must not have a character repeat 4 times (for example: aaaa#2020! is not allowed).
Must not have a character repeat 4 times (for example: aaaa#2020! is not allowed).

Note: There are two Generate Password buttons: when user first logs in and in the User screen to create a user (Configuration > User). The button provides a random password that meets the password rules. Use the “eye” icon to see the new password.
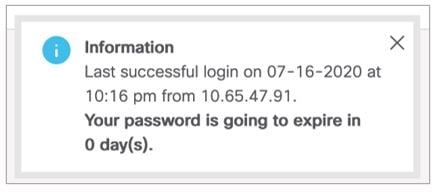
■![]() After logging in to Cisco Vision Director, the UI displays a brief message about when you last logged in, successfully or not.
After logging in to Cisco Vision Director, the UI displays a brief message about when you last logged in, successfully or not.
■![]() If you try to login with failed passwords 5 times in 1 minute or less, your account is temporarily locked for 30 minutes. Upon next successful login, the message shows that the account was locked due to too many failed attempts.
If you try to login with failed passwords 5 times in 1 minute or less, your account is temporarily locked for 30 minutes. Upon next successful login, the message shows that the account was locked due to too many failed attempts.
■![]() In User interface, the “admin” role cannot be deleted.
In User interface, the “admin” role cannot be deleted.
1.![]() Every user can change their own password by entering the current one as a challenge.
Every user can change their own password by entering the current one as a challenge.
2.![]() The Administrator can change anyone’s password without any challenge.
The Administrator can change anyone’s password without any challenge.
3.![]() Except password, other fields of the user’s, like email, can be changed without any challenge.
Except password, other fields of the user’s, like email, can be changed without any challenge.
4.![]() Now password entry has an expiry notification.
Now password entry has an expiry notification.
5.![]() Whenever a user is created or a password gets changed, the change date is logged.
Whenever a user is created or a password gets changed, the change date is logged.
New Default Passwords
There is a default web UI administrator user password and there is a DMP administrator password.
Passwords after Upgrading
When upgrading an existing installation, existing passwords are kept.
Passwords after Fresh Install
After fresh install, the default administrator user is prompted to change the password on the first login. Starting with Release 6.1, the new password must adhere to the password policies or the password is rejected.
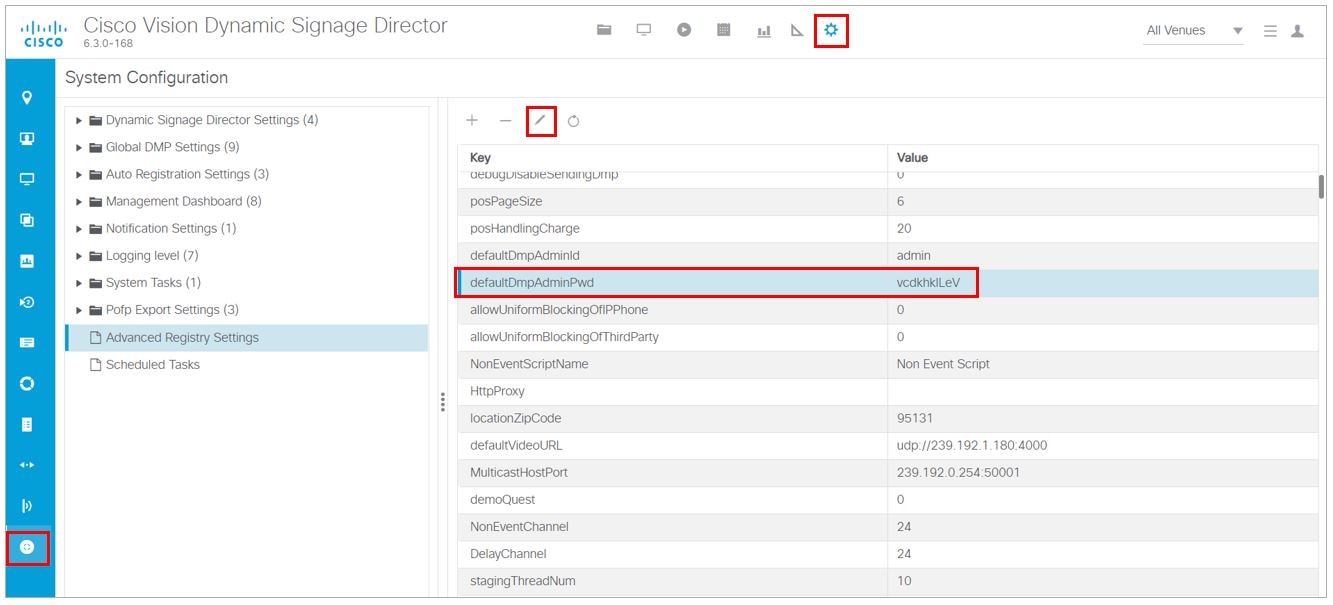
DMP Admin Password
The new default password for the DMP administrator is randomly generated. During a full installation the password isn’t reset.
To find the random DMP password value:
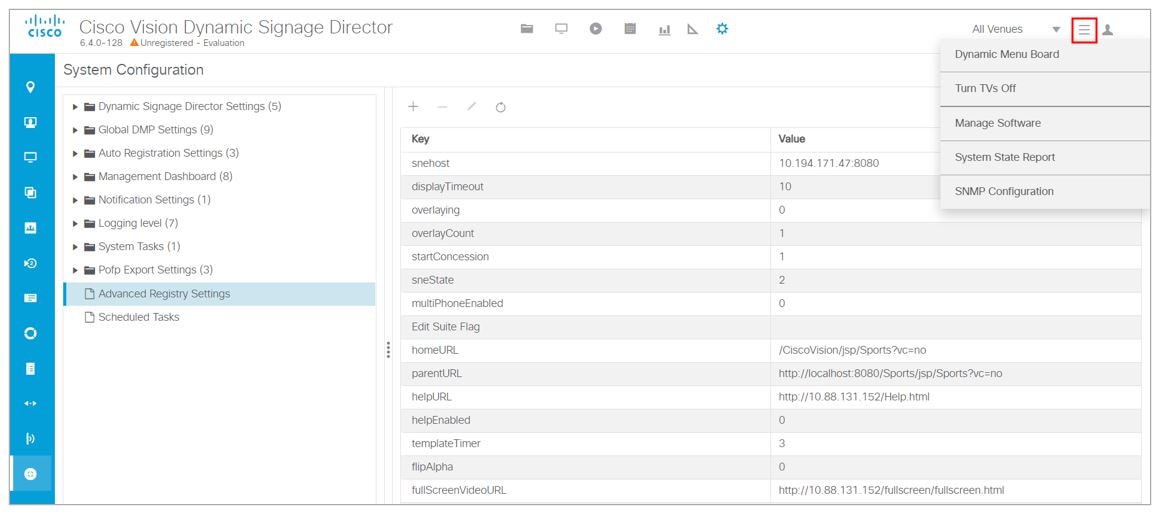
1.![]() Click Configuration > System Configuration > Advanced Registry Settings.
Click Configuration > System Configuration > Advanced Registry Settings.
2.![]() In the Keys list of Registry Data, scroll down to defaultDmpAdminPwd (Figure 2). The random value displays.
In the Keys list of Registry Data, scroll down to defaultDmpAdminPwd (Figure 2). The random value displays.
3.![]() To change the value, click Edit. The Edit – Configuration Setting dialog box appears.
To change the value, click Edit. The Edit – Configuration Setting dialog box appears.
4.![]() Type a new password in the Value field. Click Save.
Type a new password in the Value field. Click Save.
Figure 2 DMP Administrator Password Random Value
The primary element to make updating the DMP password easier is defaultDmpAdminPwdBackup. This registry key will be used as a fallback password when a request to reboot the DMP fails. This fallback password is ignored if not set or is set to the same value as defaultDmpAdminPwd.
Best Practice: Prior to changing defaultDmpAdminPwd, set defaultDmpAdminPwdBackup to the value of defaultDmpAdminPwd.
On full installation of Release 6.2, or when data from Release 6.1 is migrated, defaultDmpAdminPwdBackup is set to empty value.
1.![]() Click Configuration > System Configuration > Advanced Registry Settings.
Click Configuration > System Configuration > Advanced Registry Settings.
2.![]() Copy the registry value in defaultDmpAdminPwd to defaultDmpAdminPwdBackup registry value.
Copy the registry value in defaultDmpAdminPwd to defaultDmpAdminPwdBackup registry value.
3.![]() Change the value of defaultDmpAdminPwd to the new DMP password you want.
Change the value of defaultDmpAdminPwd to the new DMP password you want.
You can choose to keep or clear the value in defaultDmpAdminPwdBackup after the DMPs reboot and update their password.
Enable/Disable Browser Inspector
In Release 6.2, we added a number of security enhancements. One of them includes disabling the DMPs browser inspector, by default. This prevents network access to the DMPs. If you choose to add the registry setting to enable the browser inspector, it stays enabled until and unless you remove the registry data completely and reboot the DMPs.
1.![]() Click Configuration > System Configuration > Advanced Registry Settings (Figure 3).
Click Configuration > System Configuration > Advanced Registry Settings (Figure 3).
2.![]() In the Key panel, click Edit. The Create – Configuration Setting dialog box appears.
In the Key panel, click Edit. The Create – Configuration Setting dialog box appears.
3.![]() Type device.SvDmp.browser.inspector.addresses in the Name field.
Type device.SvDmp.browser.inspector.addresses in the Name field.
4.![]() In the Value field, type the IP address of DMP on which you want to enable the browser inspector function.
In the Value field, type the IP address of DMP on which you want to enable the browser inspector function.
Figure 3 Adding Browser Inspector Address to Registry Data

5.![]() Reboot the DMP for changes to take effect.
Reboot the DMP for changes to take effect.
To disable browser inspector capabilities:
1.![]() Remove IP address from list.
Remove IP address from list.
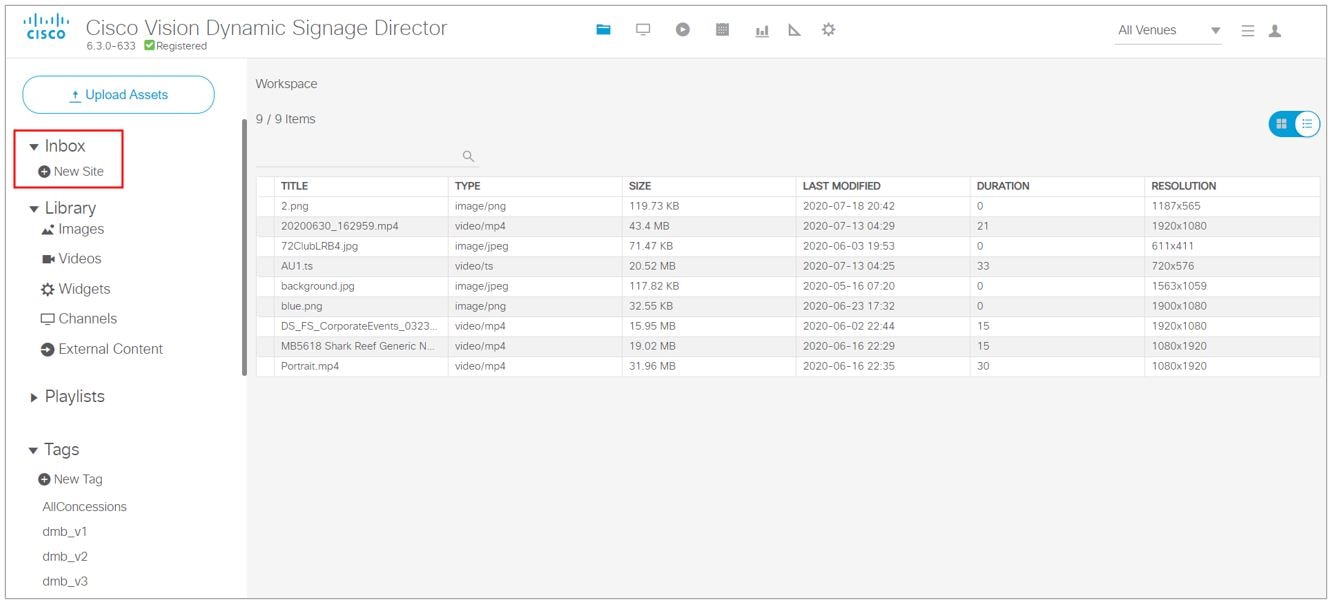
Library

When you log into Cisco Vision Director, the Library is a web-based portal landing (Figure 4). Hover over the icons in the top middle banner. These icons are the central point of operation for the following seven areas:
■![]() Library—Manipulate and upload all assets/content (images, videos, widgets, channels, and external content), create playlists, add tags to content, and organize your content into folders.
Library—Manipulate and upload all assets/content (images, videos, widgets, channels, and external content), create playlists, add tags to content, and organize your content into folders.
■![]() Device Management—Control your devices and TVs, set channels, filter/search for DMP state, health, models, TV status or health, device Location, Wifi Enabled, or Power over Ethernet, Power On and Off devices, Refresh the set criteria for the TVs and Reboot devices.
Device Management—Control your devices and TVs, set channels, filter/search for DMP state, health, models, TV status or health, device Location, Wifi Enabled, or Power over Ethernet, Power On and Off devices, Refresh the set criteria for the TVs and Reboot devices.
■![]() Script Management—Create, control and stage new event scripts. Centrally control the display of emergency or delay signage for designated areas. Change content “ad hoc” on displays during such things as a touchdown or home run.
Script Management—Create, control and stage new event scripts. Centrally control the display of emergency or delay signage for designated areas. Change content “ad hoc” on displays during such things as a touchdown or home run.
■![]() Event Management—Schedule and set the scripts to whichever devices you choose, whenever you choose.
Event Management—Schedule and set the scripts to whichever devices you choose, whenever you choose.
■![]() System Status—Displays a dashboard Overview of the servers and DMPs and shows the Monitor and Status details of all services.
System Status—Displays a dashboard Overview of the servers and DMPs and shows the Monitor and Status details of all services.
■![]() Designer—Widget and Template designer to help you create snappy content to display to devices.
Designer—Widget and Template designer to help you create snappy content to display to devices.
■![]() Configuration—Global navigation for managing and monitoring the services and status of the DMPs, TVs, and the Cisco Vision Dynamic Signage Director Server.
Configuration—Global navigation for managing and monitoring the services and status of the DMPs, TVs, and the Cisco Vision Dynamic Signage Director Server.
Library displays a list view of the assets (content).
Figure 4 Cisco Vision Director Library Screen
The Library interface allows you to manage file-based content, external URL content, playlists, and sub-folders. There are separate menus (not part of Library) for managing event scripts, scheduled events, and screen templates/widgets.
These options are available to the Cisco Vision Dynamic Signage Director Administrator, Content Manager, and Event (and venue) Operator roles.
■![]() Adjusting bars to size the panels (available in playlist interface)
Adjusting bars to size the panels (available in playlist interface)
■![]() Click an asset (content) or playlist to see the detail panel
Click an asset (content) or playlist to see the detail panel
■![]() Upload, List View and Trash icons in detail panel
Upload, List View and Trash icons in detail panel
■![]() Down-sized thumbnails for better visibility (accessible from List View)
Down-sized thumbnails for better visibility (accessible from List View)
■![]() Size, Last Modified, Duration and Resolution columns to give you greater granularity for your assets
Size, Last Modified, Duration and Resolution columns to give you greater granularity for your assets
■![]() The ability to drag and drop tagged content to a playlist
The ability to drag and drop tagged content to a playlist
Note : In the left panel of the Library interface, the Library drop-down menu shows All Assets only when the registry setting for multiVenueDeployment is set to false. If multiVenueDeployment is set to true, All Assets is not visible. See Asset Items Panel for detailed information.
For detailed information on the new Inbox feature to automate import of content, see Library Inbox.
We enhanced the Playlist interface with a Randomize icon (see red box Figure 5). Hover over these icons for Tool Tips. Randomize allows you to add content to your playlist and “shuffle” the content that displays.
Figure 5 Adjusting the Library Screen While in Playlist Detail View
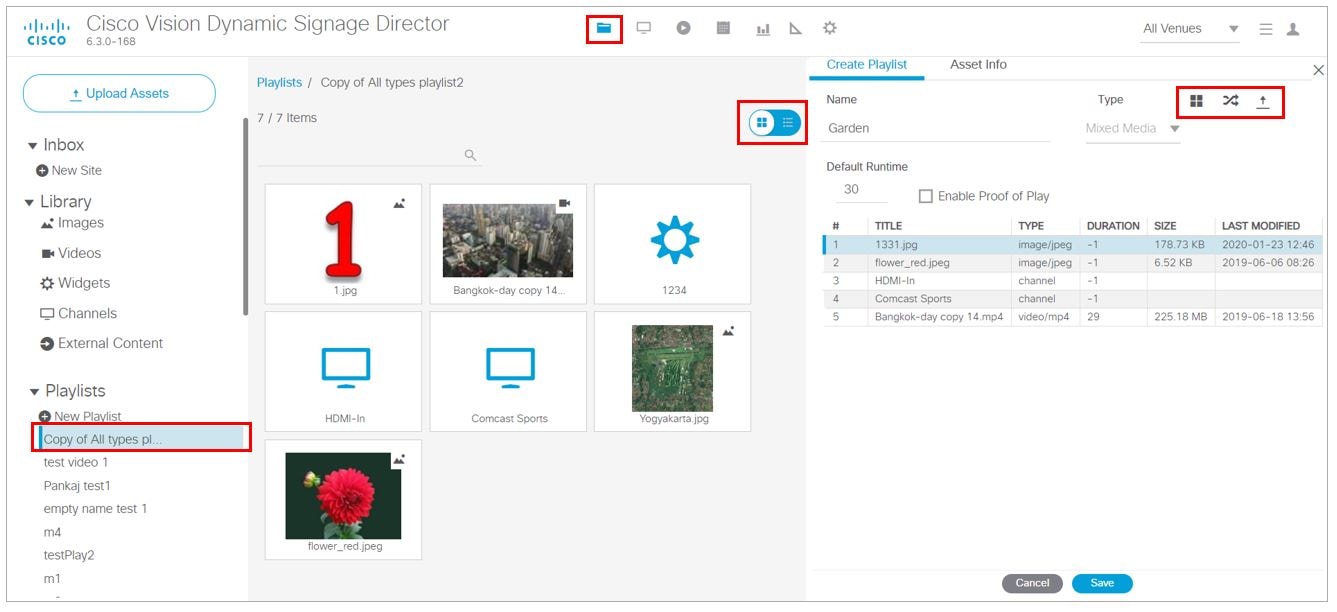
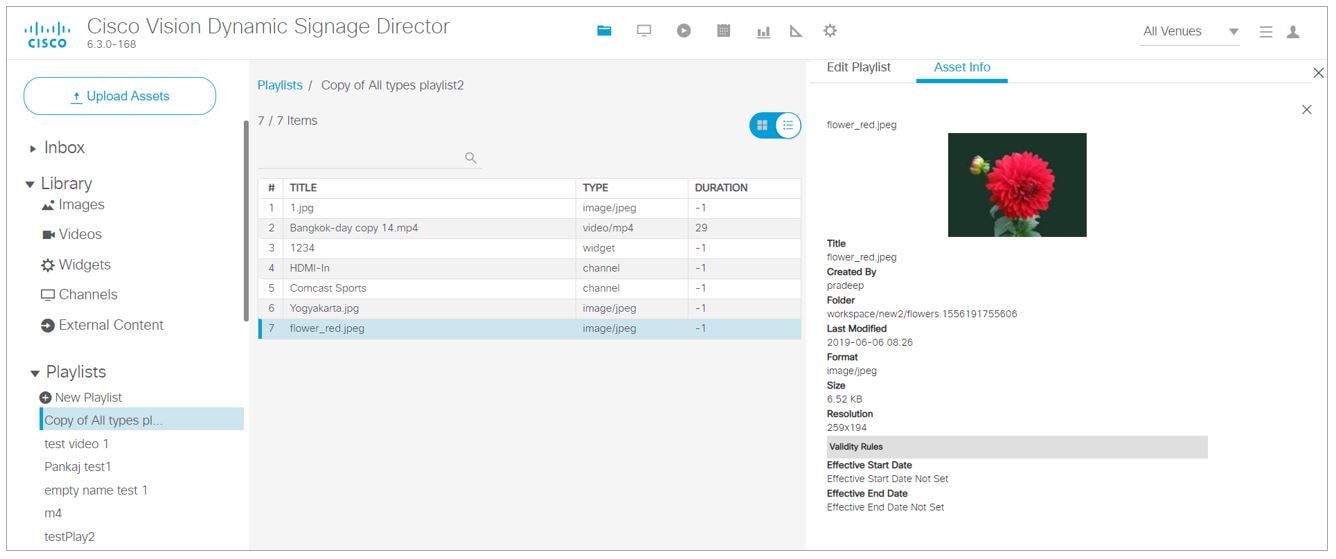
To see more metadata on your content:
1.![]() Click Asset Info at the top of the right panel (Figure 5). The metadata appears for the content you chose (Figure 6).
Click Asset Info at the top of the right panel (Figure 5). The metadata appears for the content you chose (Figure 6).
Figure 6 Metadata for an Asset (Content)
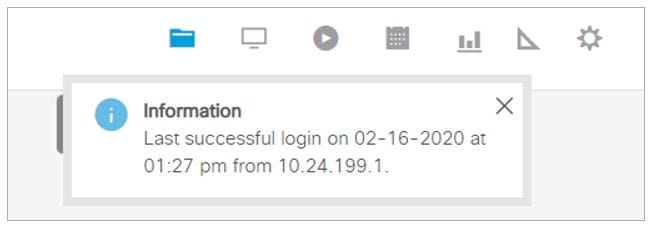
Login Notification Screens and Lockout
For Release 6.2, we made our customer experience more secure by adding lockout protection. Now, if someone attempts to login and fails five times in 1 minute, they are locked out for 30 minutes.
The login information always appears now. Periodically check if the time stamp is accurate for your login information. Here is an example of the information that displays.
Main Menu Logout Only
For added usability, you logout from the Main Menu only.
To log out of Cisco Vision Director:
1.![]() Go to the Main Menu in Cisco Vision Director.
Go to the Main Menu in Cisco Vision Director.
2.![]() Click Account profile > Logout (Figure 7).
Click Account profile > Logout (Figure 7).
Figure 7 Logging Out of Cisco Vision Director

Device Management
Device Management (icon accessFigure 8) shows at-a-glance device status information for media players and their attached TV displays during an event. Select the TV/monitor icon for access (Figure 9). For this release, we moved a lot of DMP and TV Control and Monitor and Status > Services information from the retired Management Dashboard to this interface. See Monitoring Media Player Operation During an Event Using Device Management for full details on what’s new.

Figure 9 Accessing Device Management

Device Management Application Highlights
■![]() Is accessible from the Main Menu.
Is accessible from the Main Menu.
■![]() Supports multi-venue site selection.
Supports multi-venue site selection.
■![]() Allows you to select media players that you want to monitor by Zones and Groups, Luxury Suites, Auto Registered, or All Devices. We further enhanced this interface by allowing Search, Find, or Filter on devices by Location Name, Model, IP or MAC Address, Firmware, TV Status, Status, and Description. See Monitoring Media Player Operation During an Event Using Device Management for full details on what’s new.
Allows you to select media players that you want to monitor by Zones and Groups, Luxury Suites, Auto Registered, or All Devices. We further enhanced this interface by allowing Search, Find, or Filter on devices by Location Name, Model, IP or MAC Address, Firmware, TV Status, Status, and Description. See Monitoring Media Player Operation During an Event Using Device Management for full details on what’s new.
■![]() Allows you to pin devices to the list, toggle to a tree view, refresh the screen and gets you to TV control.
Allows you to pin devices to the list, toggle to a tree view, refresh the screen and gets you to TV control.
■![]() Provides a fast way for Administrator to reboot digital media players.
Provides a fast way for Administrator to reboot digital media players.
Note: Not all commands or display areas apply to all digital media players. Some features are unique to media player type. Some areas might not report the information for a particular device.
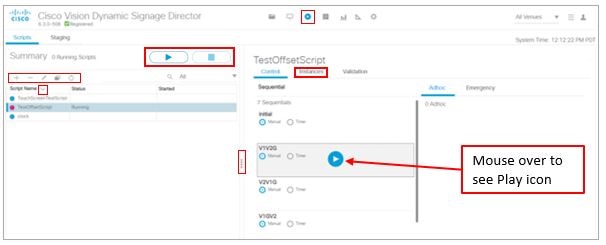
Script Management

Script Management is the place to create, control, stage and run fabulous scripts to engage your audiences and make your venues pop. Here are some highlights of the UI updates:
■![]() Global navigation from the Main Menu to Script Management.
Global navigation from the Main Menu to Script Management.
■![]() Added customizable color schemes for your UI experience.
Added customizable color schemes for your UI experience.
■![]() Added hover on rows, added Start and Stop icons for event scripts, and new “State of my Stuff” icons.
Added hover on rows, added Start and Stop icons for event scripts, and new “State of my Stuff” icons.
■![]() Improved search and filters for your scripts.
Improved search and filters for your scripts.
■![]() Status “icons” telling you the precise instance of your scripts.
Status “icons” telling you the precise instance of your scripts.
■![]() At a glance, you see: the script name, the status, when it was started, a description, and the running state. All these rows are editable on hover or right click.
At a glance, you see: the script name, the status, when it was started, a description, and the running state. All these rows are editable on hover or right click.
■![]() Added dragging and resizing everything to maximize real estate on your screen, columns are even collapsible.
Added dragging and resizing everything to maximize real estate on your screen, columns are even collapsible.
■![]() Added an Instance tab in the center panel to control instances. Instances are now visible after you select a script from the Summary panel.
Added an Instance tab in the center panel to control instances. Instances are now visible after you select a script from the Summary panel.
Here’s the new screen for managing scripts (Figure 10).
Note: We consolidated script control and script editing. More information on scripts is covered later in this document.
Event Management
The Scheduler application provides a calendar-based script scheduling function that you access from the Cisco Vision Dynamic Signage Director Main Menu > Event Management.

Note : The Scheduler Application is only available to Administrator and Event Operator roles.
The application opens a calendar (Figure 11) that allows you to perform the following tasks:
■![]() Schedule a single occurrence or recurring event series in advance.
Schedule a single occurrence or recurring event series in advance.
■![]() Modify and/or cancel a single occurrence, recurring event series, or an occurrence within a recurring event series.
Modify and/or cancel a single occurrence, recurring event series, or an occurrence within a recurring event series.
■![]() Automate the start and stop of an event script.
Automate the start and stop of an event script.
■![]() Define event script parameters when scheduling an event script.
Define event script parameters when scheduling an event script.
■![]() View scheduled event scripts by day, week, and month.
View scheduled event scripts by day, week, and month.
■![]() Schedule a state within a script.
Schedule a state within a script.
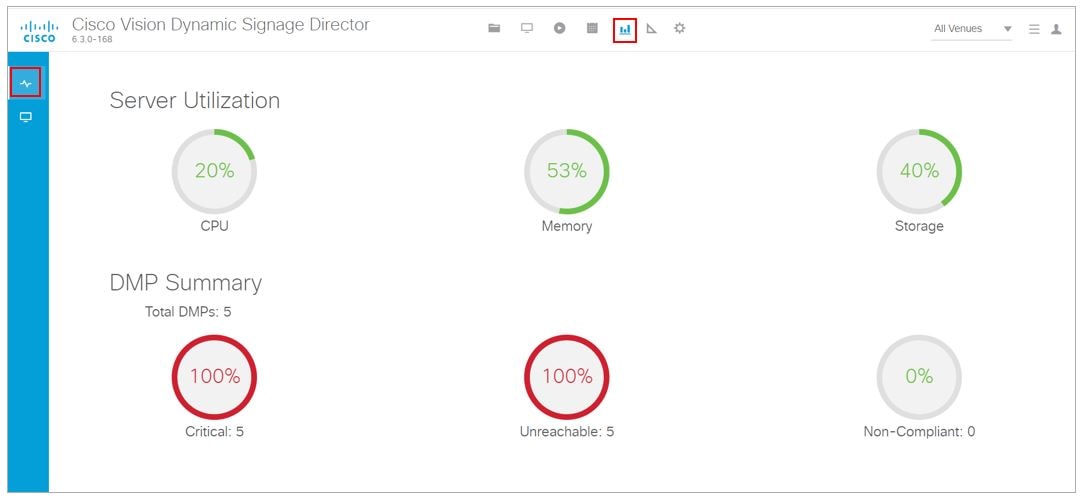
System Status
We added a new icon for some of the retired Management Dashboard access. A lot of the services are now available through Configuration > System Configuration.

System Status displays a dashboard Overview of the servers and DMPs (Figure 12). This is top-level view showing Server Utilization and a DMP Summary. This is informational only; you cannot troubleshoot or access the devices here. For detailed information, see Managing Server Resources in Cisco Vision Director.
Figure 12 System Status and DMP Summary
Click the Monitor and Status icon to check on the overall status of your devices (Figure 13). In this example, it shows venue 1. You can choose which venue to view. For detailed information, see Managing System Services in Cisco Vision Director.
Figure 13 Monitor and Status of Services Interface
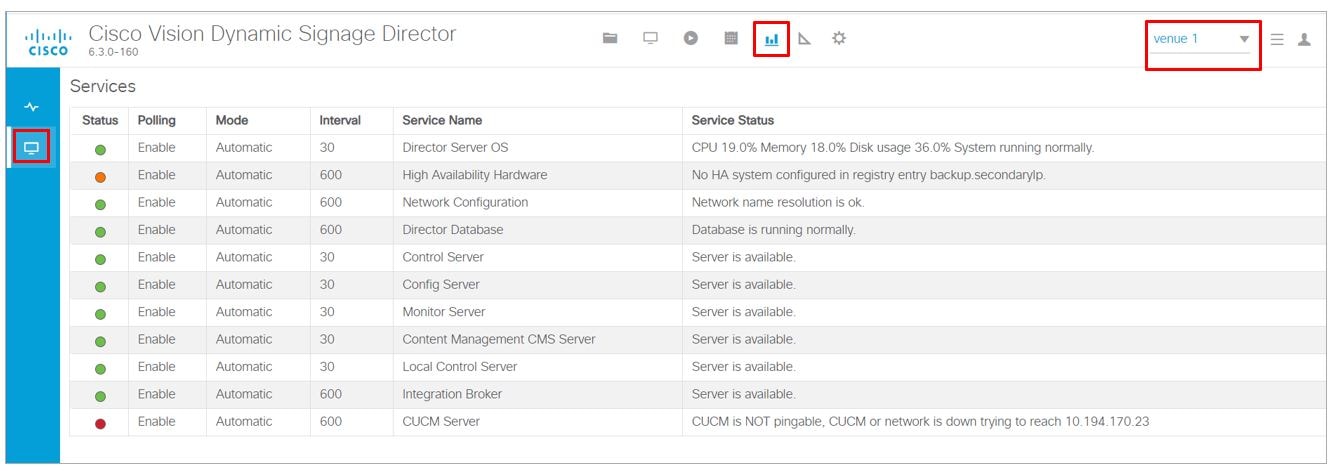
Detailed status for devices and monitored services is easily accessible from the System Status interface to help you pinpoint and troubleshoot issues occurring on the network.
Designer
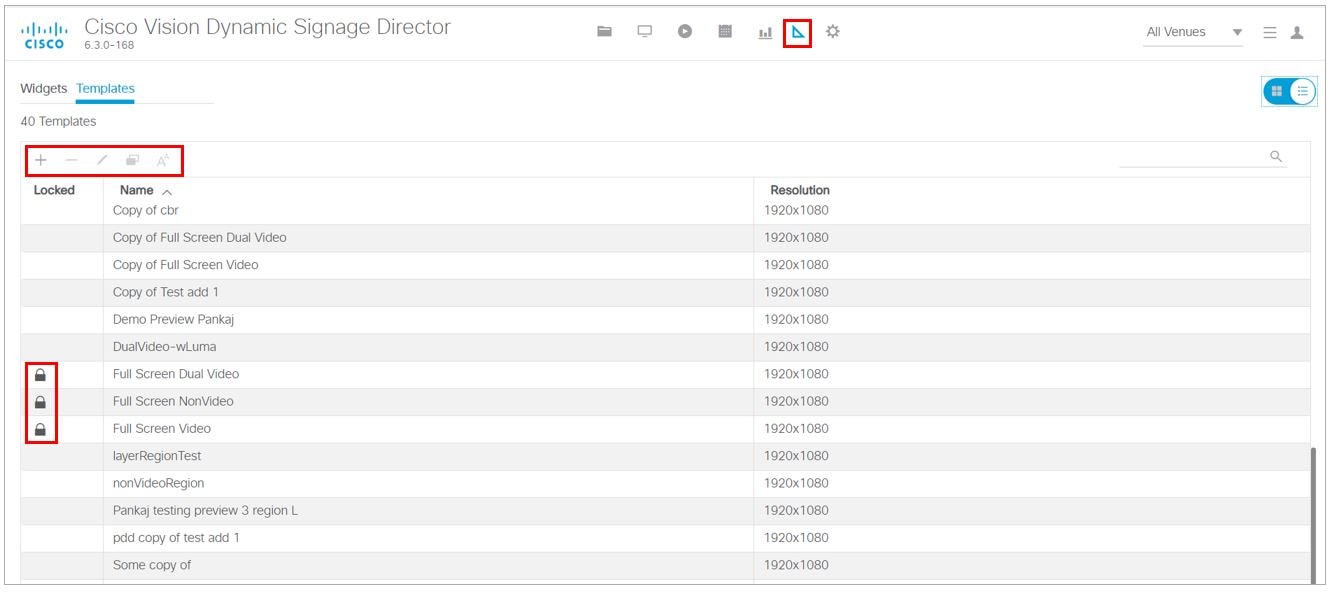
The updated Designer interface is the gateway for creating your displays in regions with interesting and engaging ads, tickers, menus, videos and graphics. This interface allows you to edit widgets and templates.

This interface is now fully searchable, sortable, and scalable, shows the resolution values of each of your templates, and shows if it is locked with a padlock icon. The padlock indicates this template cannot be altered. For more detailed information on using the widgets or templates, see Working with Screen Templates in Cisco Vision Director.
Figure 14 Designer Interface—Widgets and Templates
Configuration

This interface is the powerhouse for configuring your venue zone by zone, group by group, and location by location. You can set up channels and create channel guides. You can quickly tabulate your types of devices, create luxury suite groupings and assign types of devices to them. You can work with your input and output triggers and ingest external data. Figure 15 shows the Configuration UI options. Hover down the left blue banner for tool tips.
Figure 15 Configuration Interface

The Configuration interface replaces Control Panel > Setup. Configuration provides a comprehensive interface for setting up device and venue controls for content display in Groups&Zones, Luxury Suites, Channels, Devices, Triggers, Proof of Play and Data Integration. Each of these tabs has a multitude of options to aid in setting up your venue experience.
Here are the icon highlights of the Configuration interface:
■![]() Venues—Assign your content by venue location. This interface is visible after it is enabled and is role specific.
Venues—Assign your content by venue location. This interface is visible after it is enabled and is role specific.
■![]() Users—Create users and manage their roles from the drop-down menu.
Users—Create users and manage their roles from the drop-down menu.
■![]() Devices—Add, edit, import and export devices to your venue set up. Devices can be configured by Locations and DMPs, Location-DMP Mapping, IP Phones, Local Control, and Display Specifications.
Devices—Add, edit, import and export devices to your venue set up. Devices can be configured by Locations and DMPs, Location-DMP Mapping, IP Phones, Local Control, and Display Specifications.
■![]() Groups & Zones—Sets the Zone and Group names in the venue “areas” so you can track and organize what devices are connected to what TV displays.
Groups & Zones—Sets the Zone and Group names in the venue “areas” so you can track and organize what devices are connected to what TV displays.
■![]() Luxury Suites—Map the suites of your venues to the DMPs to ensure an engaged experience for the guests.
Luxury Suites—Map the suites of your venues to the DMPs to ensure an engaged experience for the guests.
■![]() Channel Definitions—Create channels and video channel profiles. We added a new DMP Encoding Profiles tab.
Channel Definitions—Create channels and video channel profiles. We added a new DMP Encoding Profiles tab.
■![]() Channel Guide—Create and assign channel guides to associate to specific devices in the luxury suites.
Channel Guide—Create and assign channel guides to associate to specific devices in the luxury suites.
■![]() Data Integration—Integrate data from external sources to Cisco Vision Director.
Data Integration—Integrate data from external sources to Cisco Vision Director.
■![]() Proof of Play—When selected, compiles a record of the exact content that displayed per DMP.
Proof of Play—When selected, compiles a record of the exact content that displayed per DMP.
■![]() Triggers—Configure the input and output triggers here.
Triggers—Configure the input and output triggers here.
■![]() TV Off Configuration—The Turn TVs Off application allows a Facility Operator or Administrator to control the power to all TVs within one or more zones, or across the entire venue.
TV Off Configuration—The Turn TVs Off application allows a Facility Operator or Administrator to control the power to all TVs within one or more zones, or across the entire venue.
■![]() System Configuration—Provides a comprehensive interface for managing and monitoring the services and status of the DMPs, TVs, the Cisco Vision Dynamic Signage Director Server, and DMP-to-switch connections for your deployment.
System Configuration—Provides a comprehensive interface for managing and monitoring the services and status of the DMPs, TVs, the Cisco Vision Dynamic Signage Director Server, and DMP-to-switch connections for your deployment.
Note: For Facility Operator, the TV Off Configuration will show a special TV Off screen with one large Turn TVs Off button.
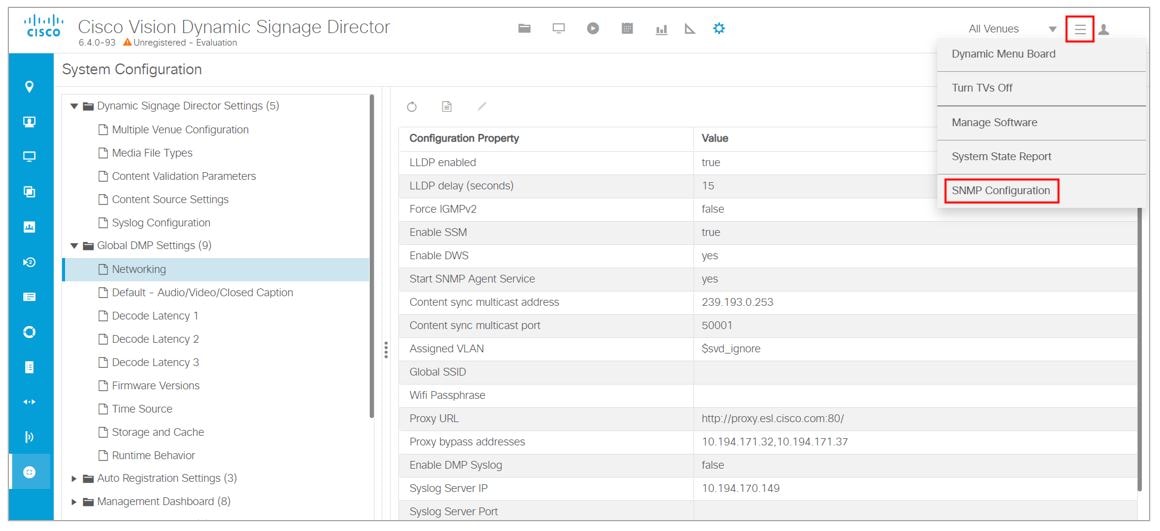
More Grid (Hamburger)
Use the More drop-down menu to access the following options (Figure 16):
■![]() Dynamic Menu Boards—Provides dynamic control of the content on menu boards in the concession stands during an event.
Dynamic Menu Boards—Provides dynamic control of the content on menu boards in the concession stands during an event.
■![]() Turn TVs Off—Provides for quick control and to power off the TVs.
Turn TVs Off—Provides for quick control and to power off the TVs.
■![]() Manage Software —Provides interface to upload the latest DMP firmware, upgrade the latest software or Service Pack, upload the latest language packs available, control the fonts you use, manage the DMP, Data Integration, and DSD certificates, upload a new DSD login background image, a DMP background image, or a channel guide background image, manage your DSD software licensing information, and perform system backups.
Manage Software —Provides interface to upload the latest DMP firmware, upgrade the latest software or Service Pack, upload the latest language packs available, control the fonts you use, manage the DMP, Data Integration, and DSD certificates, upload a new DSD login background image, a DMP background image, or a channel guide background image, manage your DSD software licensing information, and perform system backups.
■![]() System State Report—Provides easy capture and export of system state data for the Cisco Vision Director server. This information can be sent to a remote support engineer to help troubleshoot any issues that occur with the system.
System State Report—Provides easy capture and export of system state data for the Cisco Vision Director server. This information can be sent to a remote support engineer to help troubleshoot any issues that occur with the system.
■![]() SNMP Configuration—Enables Cisco Vision Director to respond to Simple Network Management Protocol (SNMP) information requests sent from a Network Management Server.
SNMP Configuration—Enables Cisco Vision Director to respond to Simple Network Management Protocol (SNMP) information requests sent from a Network Management Server.
Dynamic Menu Boards Application
The Dynamic Menu Board (DMB) Application is now completely contained within Cisco Vision Director and allows you to add your own content for display in a particular menu theme and layout. The default configuration of the DMB application provides sample menu themes. You can copy a sample theme to create menus of your own items that will use the predefined format and layout of that theme. The DMB menu themes support background graphics and both textual and graphical content depending on the predefined format for the selected theme and layout.
You can add content to a menu, or you can link to content that are already defined in Cisco samples in Cisco Vision Director. The benefit of linking to content in a store is that you can make a change within the store, such as hiding a menu item or changing its price, and populate the change across all menus that are appropriately configured with a link to that item.
Note: For a new installation, there are no content samples of images, layouts, and themes included.
For a summary of these menu board creation methods, see Menu Board Content. Figure 17 shows the interface with the Themes tab displayed. For a details on how to use the new interface, see. Cisco Vision Director Dynamic Menu Board Configuration Guide.
Figure 17 Dynamic Menu Boards UI
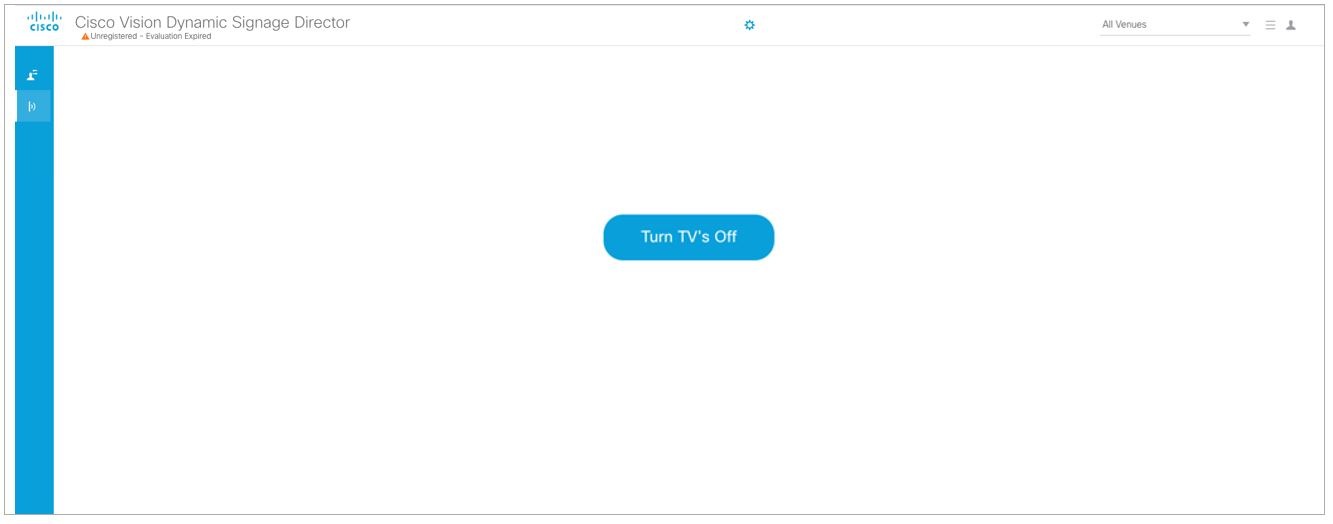
Turn TVs Off Application
Note: Turn TVs Off function is only available to Administrator and Facility Operator roles.
With so many TVs in each Cisco Vision Director deployment, it is important to turn all TVs off after use. The Turn TVs Off application allows an Administrator to control the power to all TVs within one or more zones, or across the entire venue. Only authorized users can access the Turn TVs Off application (Figure 18). For detailed information on the roles and their access privileges, see Role-Based Access Control, RBAC.

The Turn TVs Off application provides the following functionality:
■![]() Administrators can define zones, allowing bulk numbers of TVs to be controlled.
Administrators can define zones, allowing bulk numbers of TVs to be controlled.
■![]() TVs in unassigned zones cannot be controlled by the Turn TVs Off application.
TVs in unassigned zones cannot be controlled by the Turn TVs Off application.
■![]() Administrators can exclude certain TVs, for example those in the back offices, from being controlled by the Turn TVs Off application.
Administrators can exclude certain TVs, for example those in the back offices, from being controlled by the Turn TVs Off application.
■![]() A non-IT person, for example the Facility Operator, can access the page to turn off the TVs (as defined by the Administrator, Figure 19).
A non-IT person, for example the Facility Operator, can access the page to turn off the TVs (as defined by the Administrator, Figure 19).
Figure 19 Facility Operator Access to Turn TVs Off
■![]() Email notifications, similar to Status notifications, are sent to configured email IDs in Management Dashboard.
Email notifications, similar to Status notifications, are sent to configured email IDs in Management Dashboard.
When the Turn TVs Off button is clicked from the Main Menu:
■![]() Commands to turn the TVs off are sent to the DMPs attached to all TVs in the configured zones.
Commands to turn the TVs off are sent to the DMPs attached to all TVs in the configured zones.
■![]() An email notification is sent to a pre-defined set of users.
An email notification is sent to a pre-defined set of users.
■![]() The change in TV status is logged in Cisco Vision Dynamic Signage Director.
The change in TV status is logged in Cisco Vision Dynamic Signage Director.
Manage Software Application
The Manage Software application (Figure 20) is used only by the Administrator to:
■![]() Upload and install the latest DMP firmware
Upload and install the latest DMP firmware
■![]() Upgrade Cisco Vision Director software
Upgrade Cisco Vision Director software
■![]() Upload and install language packs for user interface (UI) localization.
Upload and install language packs for user interface (UI) localization.
■![]() Install custom fonts to use in widgets
Install custom fonts to use in widgets
■![]() Install DMP, Data Integration, or DSD certificates
Install DMP, Data Integration, or DSD certificates
■![]() Upload a custom image for the login background screen, DMP background or Channel Guide background
Upload a custom image for the login background screen, DMP background or Channel Guide background
■![]() Manage and upload the licensing information for Cisco Vision Director
Manage and upload the licensing information for Cisco Vision Director
Figure 20 Manage Software Interface
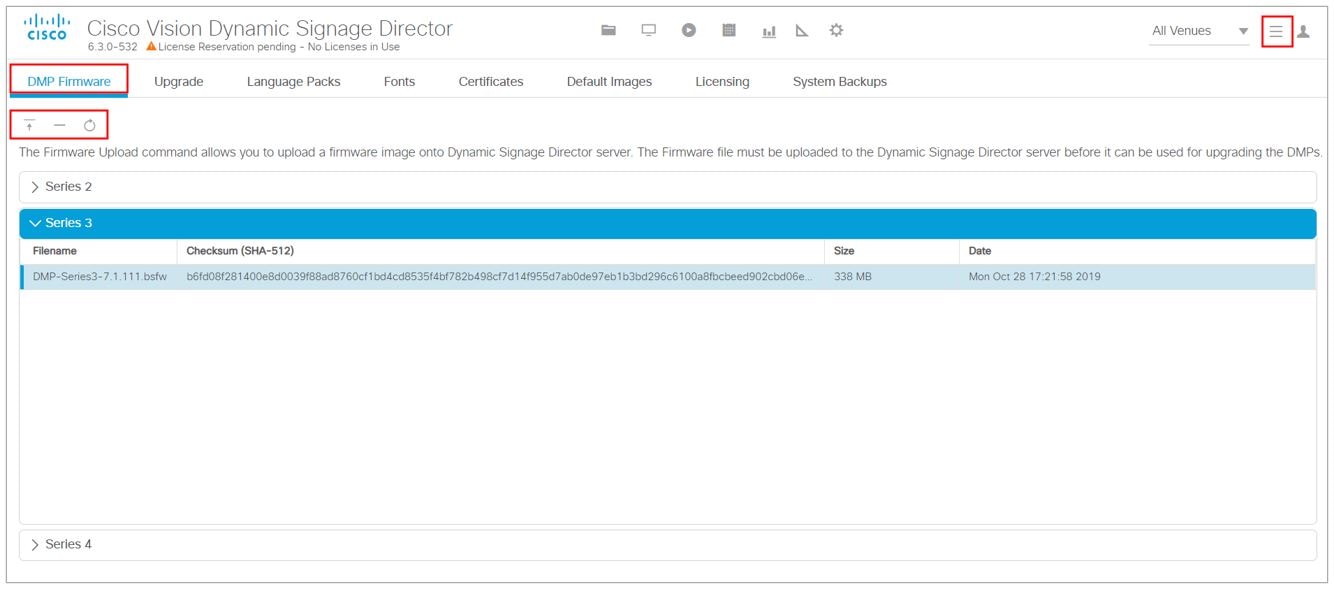
For more information about how to use the Manage Software application, see the Cisco Vision Software Installation and Upgrade Guide: Dynamic Signage Director. For information on what’s new in the Manage Software interface, see the Release Notes for 6.4.
System State Report Application
The System State Report application (Figure 21) enables easy capture and export of system state data for the Cisco Vision Director server. This information can be sent to a remote support engineer to help troubleshoot any issues that occur with the system.
Figure 21 System State Report Interface
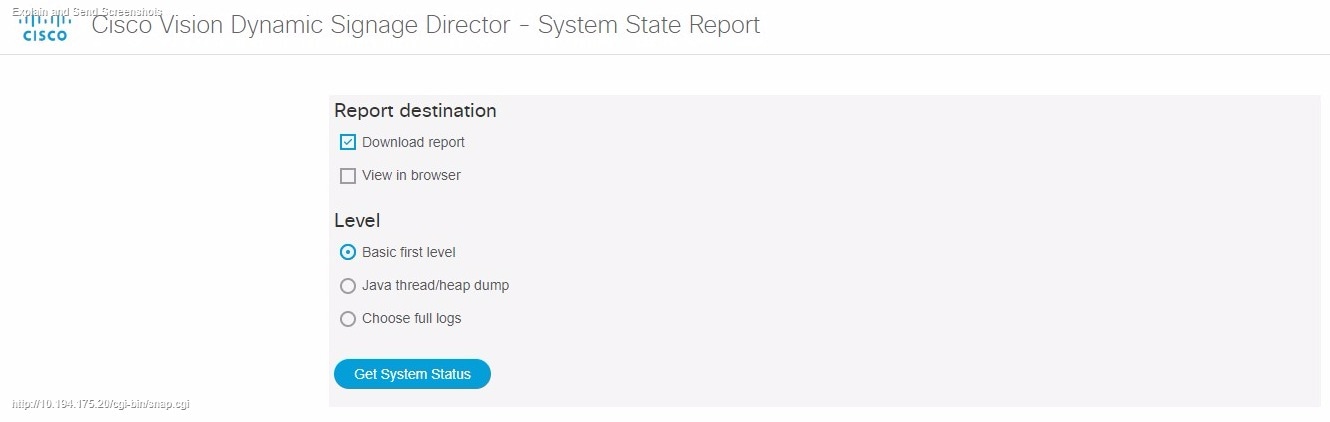
For more information, see the System State Reports module of the Cisco Vision Administration Guide, Dynamic Signage Director.
SNMP Configuration
Release 6.4 allows you to enable Cisco Vision Director to respond to Simple Network Management Protocol (SNMP) information requests sent from a Network Management Server.
1.![]() Click More > SNMP Configuration (Figure 22). The screen updates showing the configuration and trap thresholds.
Click More > SNMP Configuration (Figure 22). The screen updates showing the configuration and trap thresholds.
2.![]() Click the slider to SNMP enable (Figure 23). Use the scroll bar to see all the Trap Threshold Configurations.
Click the slider to SNMP enable (Figure 23). Use the scroll bar to see all the Trap Threshold Configurations.
Figure 22 Accessing SNMP for Director
Roll over any fields and see the arrows appear. Make changes, if necessary.
Figure 23 Set SNMP Configuration Information

Note: By default this is not configured. You must enable SNMP and choose settings. Then choose the trap threshold values.
Introduction to Cisco Vision Director APIs
This section summarizes the Application Programming Interfaces (APIs) that are supported in Cisco Vision Director.
Note: All APIs in the Cisco Vision Dynamic Signage Director are made available by special agreement. Contact your Cisco Systems representative for more information.
Event Trigger API
Cisco Vision Dynamic Signage Director supports an inbound HTTP-based Representational State Transfer (REST) API that a third party can use to trigger one or more actions by the Cisco Vision Dynamic Signage Director software. Cisco Vision Dynamic Signage Director can also send an HTTP-based command to a downstream third-party system.
For more information about support for external input triggers, see the Configuring Cisco Vision Dynamic Signage Director for External Triggers guide. Event Trigger API is not supported by Cisco Technical Assistance Center personnel.
Note : If you want to control external triggers from a software application, you can contact your Cisco Systems representative to obtain the Event Trigger API that is made available by special agreement. “TriggerSVD” is an example of a third-party demo application for the Event Trigger API on iOS (supporting Apple iTouch, iPhone, and iPad products) and is available as a free download from the iTunes store.
Media Planner Import API
Cisco Vision Director supports the Media Planner Import API that is used to import external, third-party generated playlists. The API can be used to support automatic updates to an already imported playlist that has been placed in a script, or an external playlist can be manually imported.
The Media Planner API supports the following features:
■![]() Automatically creates playlist and populates it with existing content.
Automatically creates playlist and populates it with existing content.
■![]() Automatically links missing content to playlist after each missing content item is uploaded.
Automatically links missing content to playlist after each missing content item is uploaded.
■![]() Updates to playlists tied to a script that have all content items requires no human intervention.
Updates to playlists tied to a script that have all content items requires no human intervention.
Special User Interface Indications
■![]() Imported playlist are easily identifiable as “external playlist.”
Imported playlist are easily identifiable as “external playlist.”
■![]() Indicates playlist with missing content.
Indicates playlist with missing content.
■![]() Warn user when trying to assign a missing content playlist to template.
Warn user when trying to assign a missing content playlist to template.
■![]() Warn user when starting a script with missing content playlist.
Warn user when starting a script with missing content playlist.
■![]() Works in the same way as a manually created playlist, but with more granularity.
Works in the same way as a manually created playlist, but with more granularity.
■![]() Automatic insertion of Proof of Play (POP) tag for each time slot play.
Automatic insertion of Proof of Play (POP) tag for each time slot play.
User Interface Example
The API automatically creates the playlist, which you can easily identify by an icon that tags it as an external playlist source (Figure 24).
Figure 24 External Playlists in Content Screen

The playlist is populated with existing content in Cisco Vision Director and you are alerted to any missing content in the playlist. The missing content item is identified with a question mark. Once you import any missing content, it is automatically linked to the external playlist.
Current proof of play reporting is fully supported for external playlist sources and PoP tags are automatically created for specified sponsor IDs. Any missing content is not included in the PoP report.
For more information about how to use the POS integration with Data Integration, see the Release 6.4: Cisco Vision Director Data Integration Guide.
User Control API
Cisco Vision Director supports the in-suite API, which allows querying as well as sending control information to Cisco Vision Director.
The API supports the following areas:
For more information about Local Control APIs, contact your local or Cisco representative for details.
HDMI-In Control
The following API HDMI-In controls are available on the DMPs:
Information Retrieval
The API information capabilities include:
■![]() Query of which suites that can be controlled.
Query of which suites that can be controlled.
■![]() Query of all players that can be controlled.
Query of all players that can be controlled.
■![]() Query of all players with in a suite that can be controlled.
Query of all players with in a suite that can be controlled.
■![]() Query control features that exist within all suites.
Query control features that exist within all suites.
■![]() Query control features that exist within a specific suite.
Query control features that exist within a specific suite.
■![]() Query control features that exist for all players.
Query control features that exist for all players.
■![]() Query control features that exist for a specific player.
Query control features that exist for a specific player.
■![]() Query A/V inputs that exist for all players.
Query A/V inputs that exist for all players.
■![]() Query A/V inputs that exist for a specific player.
Query A/V inputs that exist for a specific player.
■![]() Query of closed captioning capabilities of Vision Director.
Query of closed captioning capabilities of Vision Director.
■![]() Query the channel guide for a specific suite. If a channel is marked as a favorite, the favorite order is included.
Query the channel guide for a specific suite. If a channel is marked as a favorite, the favorite order is included.
■![]() Query the status of all players that can be controlled.
Query the status of all players that can be controlled.
Security
The API security capabilities include:
■![]() Unique permanent PIN for each suite in order to access and control the devices within.
Unique permanent PIN for each suite in order to access and control the devices within.
■![]() Temporary PIN for each suite that changes per event script run, can be displayed on TV. The temporary PIN is changed every day at 4 a.m. (default) based on the default scheduled task in Cisco Vision Director. It also can be changed on demand using the UI.
Temporary PIN for each suite that changes per event script run, can be displayed on TV. The temporary PIN is changed every day at 4 a.m. (default) based on the default scheduled task in Cisco Vision Director. It also can be changed on demand using the UI.
TV Control
The API TV control capabilities include:
■![]() Channel change to a channel within the guide.
Channel change to a channel within the guide.
■![]() Channel change up or down from the current channel in the guide.
Channel change up or down from the current channel in the guide.
■![]() Channel favorites and favorite order.
Channel favorites and favorite order.
■![]() Volume change to a specific value.
Volume change to a specific value.
■![]() Volume change up or down from current value.
Volume change up or down from current value.
■![]() Mute the audio with a specific on or off.
Mute the audio with a specific on or off.
■![]() Mute and unmute the audio with a toggle.
Mute and unmute the audio with a toggle.
■![]() Closed caption on with specific CC setting.
Closed caption on with specific CC setting.
Video Replay
Beginning in Cisco Vision Dynamic Signage Director Release 5.0, the User Control API is enhanced to support video replay functions on suite TVs using a mobile application.
The API video replay capabilities include:
■![]() Start the replay application.
Start the replay application.
■![]() Load the replay application on multiple DMPs or group of DMPs.
Load the replay application on multiple DMPs or group of DMPs.
■![]() Start playback of the replay video from encoded URL on specified devices.
Start playback of the replay video from encoded URL on specified devices.
■![]() Stop playback of the replay video on specified devices.
Stop playback of the replay video on specified devices.
Understanding User Roles
Before you begin to work with Cisco Vision Director, it is important that you understand Role-Based Access Control (RBAC).
Cisco Vision Director deployments normally have a team of people who are responsible for different aspects of the site setup and event operation. For example, in addition to a System Administrator, there is usually an Event Operator, a Content Manager, and a Technical Support person, among other personnel. Each person has different skills and needs for working with the Cisco Vision Director software.
The Cisco Vision Director software implements RBAC to control permissions and user access to only the portions of the system for which they are trained and authorized to use. More than one user can be assigned to the same role in the software. However, only a single role can be assigned to each user name.
For more details about RBAC in a multi-venue environment, see Role-Based Access Control for Hierarchical Management of Multiple Venues in the Cisco Vision Administration Guide: Dynamic Signage Director, 6.4.
Administrator Role
Note : This section describes the primary (or central) Administrator role in a Cisco Vision Director system.A Venue Administrator has a subset of administrative permissions that are authorized on a per-venue basis.
The primary Administrator role has unrestricted access to the Cisco Vision Director software and is the only role that can add users and assign RBAC privileges to them. The Administrator role is pre-configured in Cisco Vision Director and cannot be deleted. However, you can change the password. You also can have more than one user assigned with Administrator privileges.
The Cisco Vision Administrator is the person who is responsible for deploying the Cisco Vision solution throughout the venue.
Note : Administrators have global access to all venues in a multi-venue environment. Venue Administrators only have access to those venues for which they are authorized by a primary Cisco Vision Director Administrator.
The primary administrator has sufficient permissions to do all functions and is the only role able to do the following tasks:
■![]() Use the Software Manager to install language packs, fonts, all certificate types, all default image types, upload DMP firmware, upgrade software, manage licenses on Cisco Vision Director products, and perform system backups
Use the Software Manager to install language packs, fonts, all certificate types, all default image types, upload DMP firmware, upgrade software, manage licenses on Cisco Vision Director products, and perform system backups
■![]() Configure multiple venue support and Cisco Vision Director Remote servers
Configure multiple venue support and Cisco Vision Director Remote servers
■![]() Create additional users and assign roles
Create additional users and assign roles
■![]() Add devices to Cisco Vision Director
Add devices to Cisco Vision Director
■![]() Configure local control areas such as luxury suites, back offices, and bars
Configure local control areas such as luxury suites, back offices, and bars
■![]() Configure Point of Sale (POS)
Configure Point of Sale (POS)
Adding Users by Role
Create new users and assign their roles. This is very important for the Administrator to have people to assign levels of access to venues, folders (content), or locations in a venue.
1.![]() Click Configuration > Users. The User interface appears ()Figure 25.
Click Configuration > Users. The User interface appears ()Figure 25.
2.![]() Click + (Add). New User appears in the field.
Click + (Add). New User appears in the field.
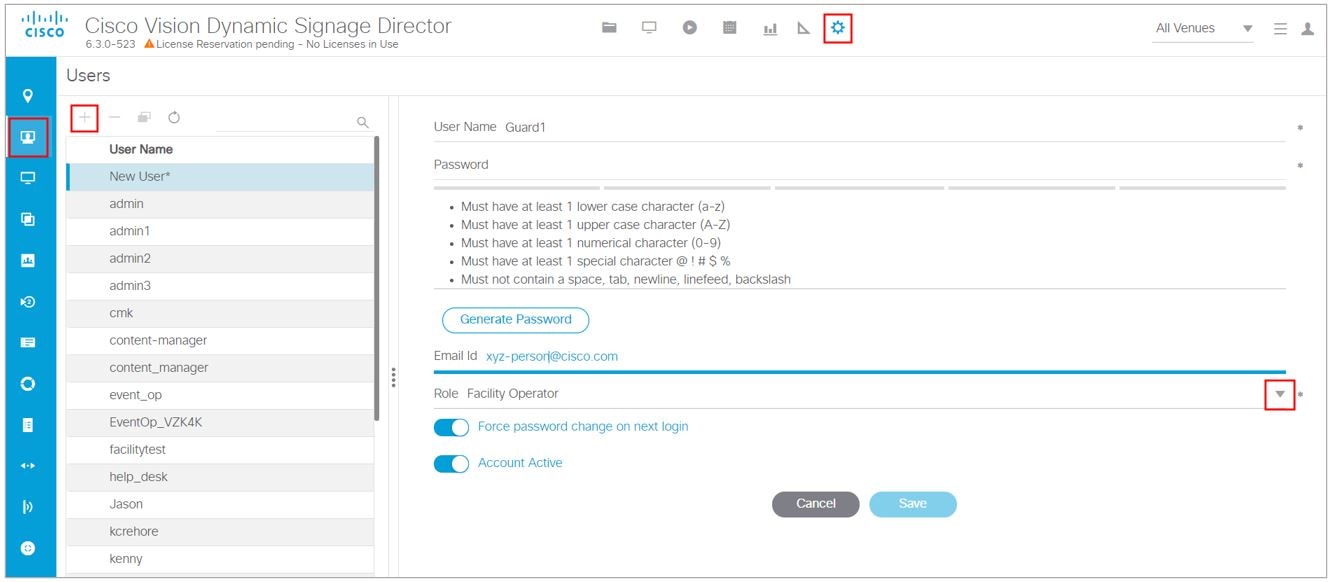
5.![]() Choose a Role from the drop-down menu.
Choose a Role from the drop-down menu.
6.![]() Click Generate Password. The color bars appear under the Password field.
Click Generate Password. The color bars appear under the Password field.
7.![]() Click the eye icon to see the actual password and add more characters to increase the password strength.
Click the eye icon to see the actual password and add more characters to increase the password strength.
Best practice: the password bars are all green.
In this example, a Facility Operator can turn the TVs on and off, after they are added and assigned venues and locations, etc., by the Administrator. See Figure 19.
Assigning Users
Once a user has been created, the Administrator can assign that User to certain items in a venue, such as a location or folder (Dynamic Menu Board content).
1.![]() Click Configuration > Venues. The Venues interface appears (Figure 26).
Click Configuration > Venues. The Venues interface appears (Figure 26).
2.![]() Click the Users tab. Now the Assigned Users and Available Users panels appear.
Click the Users tab. Now the Assigned Users and Available Users panels appear.
3.![]() Select an available user from the list using the check box.
Select an available user from the list using the check box.
4.![]() Click the motion arrows to move that user to the Assigned Users panel.
Click the motion arrows to move that user to the Assigned Users panel.
Figure 26 Assign a User to a Venue
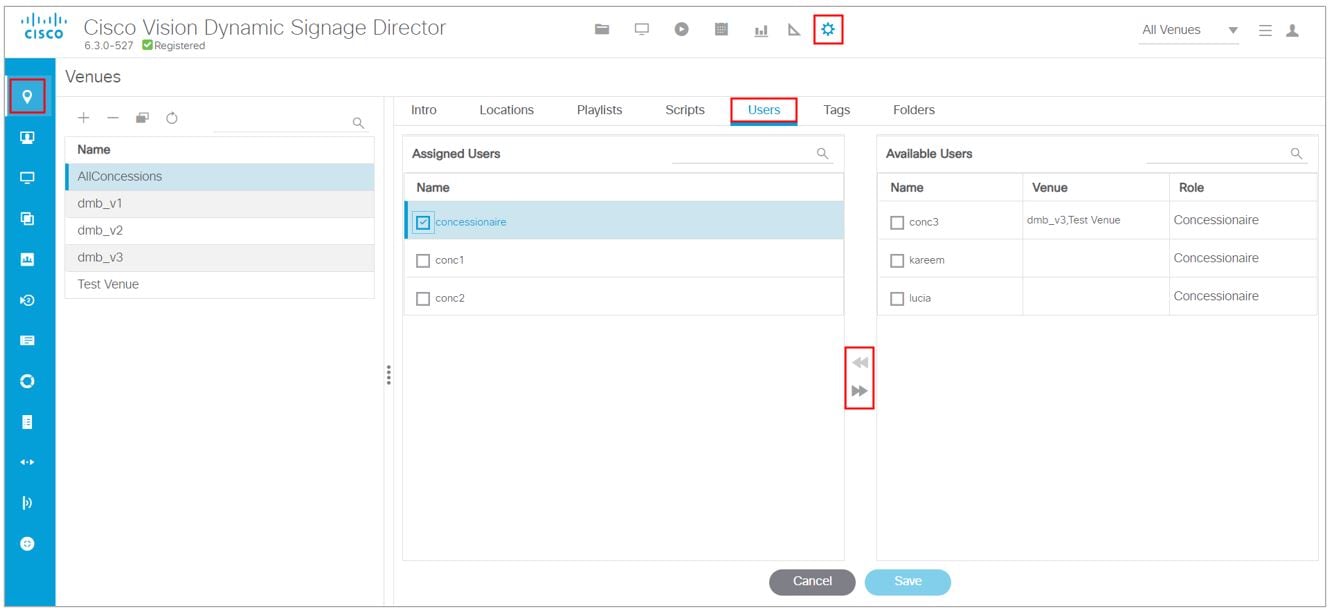
In this example, Concessionaire was assigned to AllConcessions (in all the venues).
RBAC
Table 1 provides an overview of the roles that can be assigned by the Administrator in Cisco Vision Dynamic Signage Director.
Note : Venue Administrators, Venue Operators, and Concessionaires are the only roles that have venue-specific permissions. For more information, see Configuring Cisco Vision Dynamic Signage Director for Multiple Venue Support in the Cisco Vision Administration Guide: Dynamic Signage Director, 6.4.
Access Summary By Role
Table 2 provides a summary of the areas of access in the Cisco Vision Director software by each user role.
|
|
|
|
|
|
|
|
|
|
|
|---|---|---|---|---|---|---|---|---|---|
|
|
|
|
|
|
|
|
|
|
|
|
|
|||||||||
|
|
|
|
|
|
|
|
|
|
|
|
|
|
|
|
|
|
|
|
|
|
|
|
|
|
|
|
|
|
|
|
|
|
|
|
|
|
|
|
|
|
|
|
|
|
|
|
|
|
|
|
|
|
|
|
|
|
|
|
|
|
|
|
|
|
|
|
|
|
|
|
|
|
|
|
|
|
|
|
|
|
|
|
|
|
|
|
|
|
|
|
|
|
|
|
|
|
|
|
|
|
|
|
|
|
|
|
|
|
|
|
|
|
|
|
|
|
|
|
|
|
|
|
|
|
|
|
|
|
|
|
|
|
|
|
|
|
|
|
|
|
|
|
|
|
|
|
|
|
|
|
|
|
|
|
|||||||||
|
|
|
|
|
|
|
|
|
|
|
|
|
|
|
|
|
|
|
|
|
|
|
|
|
|
|
|
|
|
|
|
|
|
|
|
|
|
|
|
|
|
|
|
|
|
|
|
|
|
|
|
|
|
|
|
|
|
|
|
|
|
|
|
|
|
|
|
|
|
|
|
|
|
|
|
|
|
|
|
|
|
|
|
|
|
|
|
|
|
|
|
|
|
|
|
|
|
|
|
|
|
|
|
|
|
|
|
|
|
|
|
|
|
|
|
|
|
|
|
|
|
|
|
|
|
|
|
|
|
|
|
 Feedback