Release 6.0: Configuring Cisco Vision Dynamic Signage Director for External Triggers
Available Languages
Table of Contents
Configuring Cisco Vision Dynamic Signage Director for External Triggers
Prerequisites for Cisco Vision Director for External Triggers
Restrictions for Cisco Vision Director for External Triggers
Information About External Triggers in Cisco Vision Director
HTTP Methods and URLs for External Triggers
Input Trigger HTTP Methods and URLs
Output Trigger HTTP Methods and URLs
Authentication for External Triggers
Use Cases for External Triggers
Moment of Exclusivity Use Case for Input Triggers
Moment of Exclusivity Use Case for Input and Output Triggers
Management Dashboard Registry Settings
Management Dashboard Registry Settings for Input Triggers
Management Dashboard Registry Settings for Output Triggers
How to Configure Cisco Vision Director for External Triggers
How to Configure Input Triggers
Configuring the HTTP Method for Input Triggers
Configuring Authentication for Input Triggers
Configuring Actions for a Received Trigger
How to Configure Output Triggers
Configuring Actions for an Output Trigger
Enabling and Disabling an External Trigger
How to Monitor External Trigger History
How to Configure Advanced External Trigger Settings in the Registry
Feature Information for Cisco Vision Director External Triggers
Configuring Cisco Vision Dynamic Signage Director for External Triggers
This document is intended for Cisco Vision Director administrators who are responsible for working with third-party developers and system integrators to establish connectivity for external input triggers to initiate certain actions by the Cisco Vision Director software, such as to start an event script to control display of content for a desired “moment of exclusivity” or make an emergency notification at a venue.
Beginning in Cisco StadiumVision Director Release 3.1, output triggers also can be configured by the administrator to send a Hypertext Transfer Protocol (HTTP) request to notify external systems of a script event and trigger an action externally. This functionality can be used with the Cisco StadiumVision Mobile Streamer to trigger actions on mobile devices, such as for ad insertion.
Contents
■![]() Prerequisites for Cisco Vision Director for External Triggers
Prerequisites for Cisco Vision Director for External Triggers
■![]() Restrictions for Cisco Vision Director for External Triggers
Restrictions for Cisco Vision Director for External Triggers
■![]() Information About External Triggers in Cisco Vision Director
Information About External Triggers in Cisco Vision Director
■![]() How to Configure Cisco Vision Director for External Triggers
How to Configure Cisco Vision Director for External Triggers
■![]() How to Monitor External Trigger History
How to Monitor External Trigger History
■![]() How to Configure Advanced External Trigger Settings in the Registry
How to Configure Advanced External Trigger Settings in the Registry
■![]() Feature Information for Cisco Vision Director External Triggers
Feature Information for Cisco Vision Director External Triggers
Prerequisites for Cisco Vision Director for External Triggers
Before you configure Cisco Vision Director for External Triggers, be sure that the following requirements are met:
■![]() Your backend devices that support contact closure, such as the Crestron QM-RMC Room Media Controller, are installed and properly configured by a qualified system integrator for your third-party devices.
Your backend devices that support contact closure, such as the Crestron QM-RMC Room Media Controller, are installed and properly configured by a qualified system integrator for your third-party devices.
■![]() If you are going to support contact-closure triggers coming inbound from hardware, then the physical signal must be converted to an IP-based HTTP request by some conversion device, such as a General-Purpose Input/Output (GPIO) gateway.
If you are going to support contact-closure triggers coming inbound from hardware, then the physical signal must be converted to an IP-based HTTP request by some conversion device, such as a General-Purpose Input/Output (GPIO) gateway.
■![]() If you want to support output triggers from Cisco Vision Director to a GPIO-controlled device or system, convert the HTTP request to a GPIO signal using a device to make that signal conversion.
If you want to support output triggers from Cisco Vision Director to a GPIO-controlled device or system, convert the HTTP request to a GPIO signal using a device to make that signal conversion.
■![]() For input triggers, the Cisco Vision Director server is reachable by the contact closure application or device on the Internet Protocol (IP) network.
For input triggers, the Cisco Vision Director server is reachable by the contact closure application or device on the Internet Protocol (IP) network.
■![]() For output triggers, the GPIO device or external HTTP server should be reachable by Cisco Vision Director.
For output triggers, the GPIO device or external HTTP server should be reachable by Cisco Vision Director.
Restrictions for Cisco Vision Director for External Triggers
Before you configure Cisco Vision Director for External Triggers, consider the following restrictions:
■![]() The Triggers interface is not venue aware, which means that you cannot apply venue-specific scope of control using the venue selector. All triggers have a global scope in Cisco Vision Director.
The Triggers interface is not venue aware, which means that you cannot apply venue-specific scope of control using the venue selector. All triggers have a global scope in Cisco Vision Director.
■![]() The Event Trigger Application Programming Interface (API) calls are one-way.
The Event Trigger Application Programming Interface (API) calls are one-way.
■![]() The script duration, proof of play, and staging registry settings are global and cannot be configured on a per-action basis.
The script duration, proof of play, and staging registry settings are global and cannot be configured on a per-action basis.
■![]() Both HTTP and HTTPS protocols are automatically available and unable to be individually disabled.
Both HTTP and HTTPS protocols are automatically available and unable to be individually disabled.
■![]() No payload in an HTTP POST can be passed to the external system in an output trigger.
No payload in an HTTP POST can be passed to the external system in an output trigger.
■![]() You can configure an output trigger to loop back to Cisco Vision Director using an input trigger, but no verification is made to prevent a loop.
You can configure an output trigger to loop back to Cisco Vision Director using an input trigger, but no verification is made to prevent a loop.
■![]() If you are saving a trigger in the enabled state, at least one HTTP action must be configured. Otherwise, you get an error while attempting to save the trigger.
If you are saving a trigger in the enabled state, at least one HTTP action must be configured. Otherwise, you get an error while attempting to save the trigger.
Information About External Triggers in Cisco Vision Director
This section includes the following topics:
■![]() Overview of External Triggers
Overview of External Triggers
■![]() HTTP Methods and URLs for External Triggers
HTTP Methods and URLs for External Triggers
■![]() Authentication for External Triggers
Authentication for External Triggers
■![]() Use Cases for External Triggers
Use Cases for External Triggers
■![]() Management Dashboard Registry Settings
Management Dashboard Registry Settings
Overview of External Triggers
This section describes the input and output trigger support in Cisco Vision Director.
Multiple Venues
The Triggers interface in the Setup area of the Cisco Vision Director Control Panel is not venue aware. All defined triggers in Cisco Vision Director are global in scope in a centralized Cisco Vision Director server configuration with multiple venues. However, triggers can be applied to venue-associated scripts.
Input Trigger Support
Cisco Vision (StadiumVision) Dynamic Signage Director Release 3.0 and later supports an HTTP-based API that a software or hardware contact closure source can use to trigger one or more actions by the Cisco Vision Director software.
Cisco Vision Director has 16 default (with a configurable maximum of 256) input trigger IDs that serve as placeholders for a Cisco Vision Director administrator to define and enable for your system. The user interface options are defined in Extensible Markup Language (XML) code that can be accessed by an application using the Event Trigger API.
Note : If you want to control external triggers from a software application, contact your Cisco Systems representative to obtain the Event Trigger API by special agreement. “TriggerSVD” is an example of a demo application for the Event Trigger API on iOS (supporting Apple iTouch, iPhone, and iPad products) and is available as a free download from the iTunes store.
Building management and life safety systems as well as the broadcast control room in a stadium typically allow external integration by using dry contact closure and/or GPIO devices. It is expected that networked surveillance cameras, video routers, and other broadcast equipment already have these input/output (I/O) modules built into the hardware.
Figure 1 shows the different sources of contact closure that can be used as external input triggers to an event script on the Cisco Vision Director server.
■![]() The virtual contact closure option represents a software application that can initiate an HTTP request directly and also use the Event Trigger API for retrieval of input trigger configuration from Cisco Vision Director. You can obtain a free sample software application called “TriggerSVD” on the Apple iTunes site.
The virtual contact closure option represents a software application that can initiate an HTTP request directly and also use the Event Trigger API for retrieval of input trigger configuration from Cisco Vision Director. You can obtain a free sample software application called “TriggerSVD” on the Apple iTunes site.
■![]() The physical contact closure option represents a hardware device, such as those used for life safety or building management systems, which produce an electrical signal that requires another device to convert the signal to an IP-based HTTP request. Figure 1 Option B shows this conversion being done by a GPIO gateway to initiate the HTTP request after receiving the trigger from the physical contact closure device. The Crestron QM-RMC is an example of a third-party hardware device that accepts two-wire signals and sends commands to Cisco Vision Director.
The physical contact closure option represents a hardware device, such as those used for life safety or building management systems, which produce an electrical signal that requires another device to convert the signal to an IP-based HTTP request. Figure 1 Option B shows this conversion being done by a GPIO gateway to initiate the HTTP request after receiving the trigger from the physical contact closure device. The Crestron QM-RMC is an example of a third-party hardware device that accepts two-wire signals and sends commands to Cisco Vision Director.
Figure 1 Input Sources of Contact Closure to Cisco Vision Director

Output Trigger Support
Beginning in Cisco StadiumVision Director Release 3.1, the External Triggers feature supports output triggers which allow a script event to trigger notification to external systems. Cisco Vision Director has 64 default output trigger IDs, with a configurable maximum of 256. These are initially disabled and serve as placeholders for a Cisco Vision Director administrator to define and enable for your system.
Each output trigger is identified or addressed by its trigger ID, numbered sequentially similar to the pins on a GPIO device. An output trigger defines a script event that will be used to trigger one or more outbound actions using an HTTP GET or POST request.
Cisco Vision Director maintains a history of what actions were taken and the responses. An HTTP output request is considered successful when HTTP code 200 (success status) is received.
Figure 2 shows the different methods that can be used as external output triggers from an event script on the Cisco Vision Director server. Just as with input triggers, the supported methods include an HTTP call (like a software-based, virtual contact closure) with a 3rd party application, or a standard contact closure.
In addition, the Cisco Vision Mobile Streamer can be used with the HTTP call method to initiate actions on mobile devices.
Figure 2 Output Trigger Methods From Cisco Vision Director

HTTP Methods and URLs for External Triggers
This section describes the HTTP methods and URLs used to support input and output triggers in Cisco Vision Director.
Input Trigger HTTP Methods and URLs
The HTTP method used by the trigger device can be a GET or POST, depending on the device requirements. You can configure the inbound HTTP method per input trigger in Cisco Vision Director. The default is GET.
Note : The payload of a POST is ignored by Cisco Vision Director.
Each time an external system sends an HTTP request to Cisco Vision Director as an input trigger, the set of actions associated with that input trigger are taken. There is a registry key (ExternalTrigger.input.minInterval) that specifies how much time to elapse before Cisco Vision Director processes any succeeding HTTP request to the same input trigger. For more information, see the Management Dashboard Registry Settings for Input Triggers and the How to Configure Advanced External Trigger Settings in the Registry.
Cisco Vision supports both HTTP and HTTPS API calls using the following sample URLs, where svd-server-ip is the IP address of your Cisco Vision Director server, and id is the number of the input trigger:
■![]() http:// svd-server-ip :8080/StadiumVision/ws/rest/trigger/input/ id
http:// svd-server-ip :8080/StadiumVision/ws/rest/trigger/input/ id
■![]() https:// svd-server-ip /StadiumVision/ws/rest/trigger/input/ id
https:// svd-server-ip /StadiumVision/ws/rest/trigger/input/ id
Note : To further protect access using these URLs, you can configure authentication by both password and IP address. For more information, see Authentication for External Triggers.
Consider the following when using HTTPS:
■![]() Cisco Vision Director uses self-signed certificates. Depending on how the API consumer application is designed, it might require automatic acceptance of the certificate.
Cisco Vision Director uses self-signed certificates. Depending on how the API consumer application is designed, it might require automatic acceptance of the certificate.
Output Trigger HTTP Methods and URLs
Just as with input triggers, the HTTP method used by output triggers in Cisco Vision Director can be a GET or POST, depending on the external device or application requirements. You can configure the outbound HTTP method per output trigger in Cisco Vision Director.
Note : Cisco Vision Director cannot send any payload in a POST request.
The URL that Cisco Vision Director specifies in its output HTTP request is determined by the target application or hardware device consuming the trigger event. However, the URL to the target external system must be configured in the output trigger when you define the HTTP action.
Sample Output Trigger URL to GPIO Device
The following is a sample URL when sending an output trigger to a hardware GPIO device:
■![]() http:// gpio-server-ip /state.xml?relay X State= n
http:// gpio-server-ip /state.xml?relay X State= n
–![]() gpio-server-ip —Specifies the IP address of the GPIO device.
gpio-server-ip —Specifies the IP address of the GPIO device.
–![]() X —Specifies the relay number that you want to trigger (1 or 2).
X —Specifies the relay number that you want to trigger (1 or 2).
–![]() n —Specifies the numeric value that corresponds to the state that you want to assign to the relay (for example, 0 is off, 1 is on, and 2 pulses the relay on for a default of 1 second, then off).
n —Specifies the numeric value that corresponds to the state that you want to assign to the relay (for example, 0 is off, 1 is on, and 2 pulses the relay on for a default of 1 second, then off).
Sample Output Trigger URL to Cisco Vision Mobile Streamer
The following is a sample URL when sending an output trigger to Cisco Vision Mobile Streamer with a configured data channel and optionally using a third-party client application to process a message string:
■![]() http:// svm-streamer-ip /streamer/svd.php?channel= channel-name &message= string1 + string2 &src_url=http:// xyz .com
http:// svm-streamer-ip /streamer/svd.php?channel= channel-name &message= string1 + string2 &src_url=http:// xyz .com
–![]() svm-streamer-ip —(Required) Specifies the IP address of the Cisco Vision Mobile Streamer.
svm-streamer-ip —(Required) Specifies the IP address of the Cisco Vision Mobile Streamer.
–![]() channel-name —(Required) Specifies the data channel that is configured in the Cisco Vision Mobile Streamer for your trigger.
channel-name —(Required) Specifies the data channel that is configured in the Cisco Vision Mobile Streamer for your trigger.
For example, a data channel named “d41 - 1.2” would be specified as “channel=d41+-+1.2”.
–![]() message= string1 + string2— (Optional) Specifies a message string to be sent, where spaces are replaced by “+” symbol.
message= string1 + string2— (Optional) Specifies a message string to be sent, where spaces are replaced by “+” symbol.
Authentication for External Triggers
Cisco Vision Director supports Basic Authorization for both input and output triggers. This section describes the methods supported to secure the use of input and output triggers in Cisco Vision Director.
Input Trigger Authentication
Cisco Vision Director supports two forms of authentication that you can configure per input trigger:
For added security, both forms of authentication can be enabled.
Output Trigger Authentication
Cisco Vision Director supports a username and password authentication that you can configure per output trigger as part of the HTTP action definition.
These are credentials required by the external system. For example, consider an external web server's REST API that can only be called by clients that provide credentials. Then, configure an input trigger (10) in Cisco Vision Director to require authentication. If you wanted to loop an output trigger to that input trigger 10, the username/password for this output trigger must match what is set in input trigger 10.
External Trigger Actions
This section describes the trigger actions that are supported for input and output triggers. For input triggers, you define what script actions should happen when an inbound trigger is received. For output triggers, you define a URL to be sent from Cisco Vision Director when a particular script action occurs.
Input Trigger Actions
Cisco Vision Director can perform certain script actions or TV controls upon receipt of an input trigger. Each input trigger can be configured to have multiple actions.
You can configure the following script actions to occur upon receipt of an input trigger:
■![]() Leave the current ad-hoc state.
Leave the current ad-hoc state.
■![]() Go to the next sequential state.
Go to the next sequential state.
■![]() Go to the previous sequential state.
Go to the previous sequential state.
You can configure the following TV control actions to occur upon receipt of an input trigger:
Output Trigger Actions
Cisco Vision Director supports configuration of a URL to be sent outbound when a designated script starts, stops, or changes to a specified state.
If a script is configured in an outbound trigger, and then you remove the script (or you remove a state, and the trigger refers to a state in the script), Cisco Vision Director will auto-disable the trigger.
Use Cases for External Triggers
This section provides a high-level description of some specific use cases for input and output triggers in Cisco Vision Director.
Moment of Exclusivity Use Case for Input Triggers
Figure 3 shows the use case of a single button that can be used when a goal occurs during the match that can trigger multiple display changes at once, including a Cisco Vision Director event script change to an ad-hoc state that displays new content on multiple TVs in the venue.
Figure 3 Moment of Exclusivity for a Goal During Match with Input Trigger

Moment of Exclusivity Use Case for Input and Output Triggers
Figure 4 also shows the use case of a moment of exclusivity for a goal during a match. In this example, an input trigger occurs when a single button is used to identify a goal. Cisco Vision Director responds to the input trigger action with an event script change to an ad-hoc state that displays new content on multiple TVs in the venue. In addition, an output trigger is defined that sends an output URL to the Cisco Vision Mobile Streamer that displays a message on mobile devices.
Figure 4 Moment of Exclusivity for a Goal During Match with Input and Output Triggers

Management Dashboard Registry Settings
This section describes the registry keys in the Cisco Vision Management Dashboard for input and output triggers. The registry values are global and apply to all input or output triggers.
Management Dashboard Registry Settings for Input Triggers
Default Registry Settings for Input Triggers describes the registry keys in the Management Dashboard that support input trigger configuration and operation.
Management Dashboard Registry Settings for Output Triggers
Default Registry Settings for Output Triggers describes the registry keys in the Management Dashboard that support output trigger configuration and operation.
Maximum number of days that the output trigger history is kept before it is purged.1 |
||
Length of time (in seconds) to wait before processing the first configured trigger action. This registry is ignored if an output trigger is disabled. |
||
Length of time (in seconds) to wait before processing the next configured action in the output trigger. This delay does not account for the time required to send an HTTP request to the external system. This registry is ignored if an output trigger is disabled. |
How to Configure Cisco Vision Director for External Triggers
This section includes the following topics:
■![]() How to Configure Input Triggers
How to Configure Input Triggers
■![]() How to Configure Output Triggers
How to Configure Output Triggers
How to Configure Input Triggers
This section includes the following tasks:
■![]() Defining an Input Trigger (required)
Defining an Input Trigger (required)
■![]() Configuring the HTTP Method for Input Triggers (optional)
Configuring the HTTP Method for Input Triggers (optional)
■![]() Configuring Authentication for Input Triggers (optional)
Configuring Authentication for Input Triggers (optional)
■![]() Configuring Actions for a Received Trigger (required)
Configuring Actions for a Received Trigger (required)
Defining an Input Trigger
By default, Cisco Vision Director supports 16 placeholder triggers that are undefined (unmapped) in the user interface. To support an external trigger, define one of the unmapped triggers and enable it.
You can change this number of supported triggers in the Management Dashboard registry. For more information How to Configure Advanced External Trigger Settings in the Registry.
1.![]() Log into the Cisco Vision Director server as an administrator.
Log into the Cisco Vision Director server as an administrator.
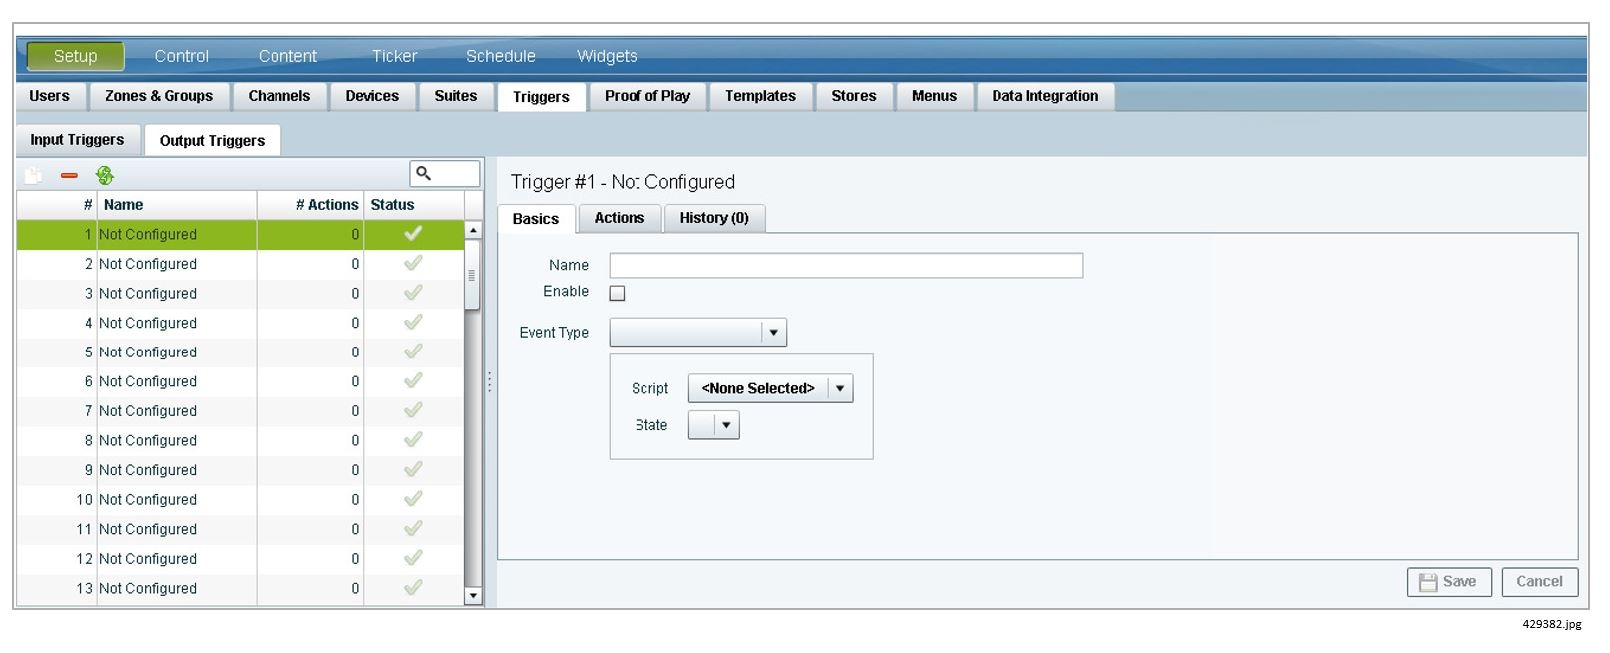
2.![]() From the Main Menu click Event Management > Control Panel > Setup.
From the Main Menu click Event Management > Control Panel > Setup.
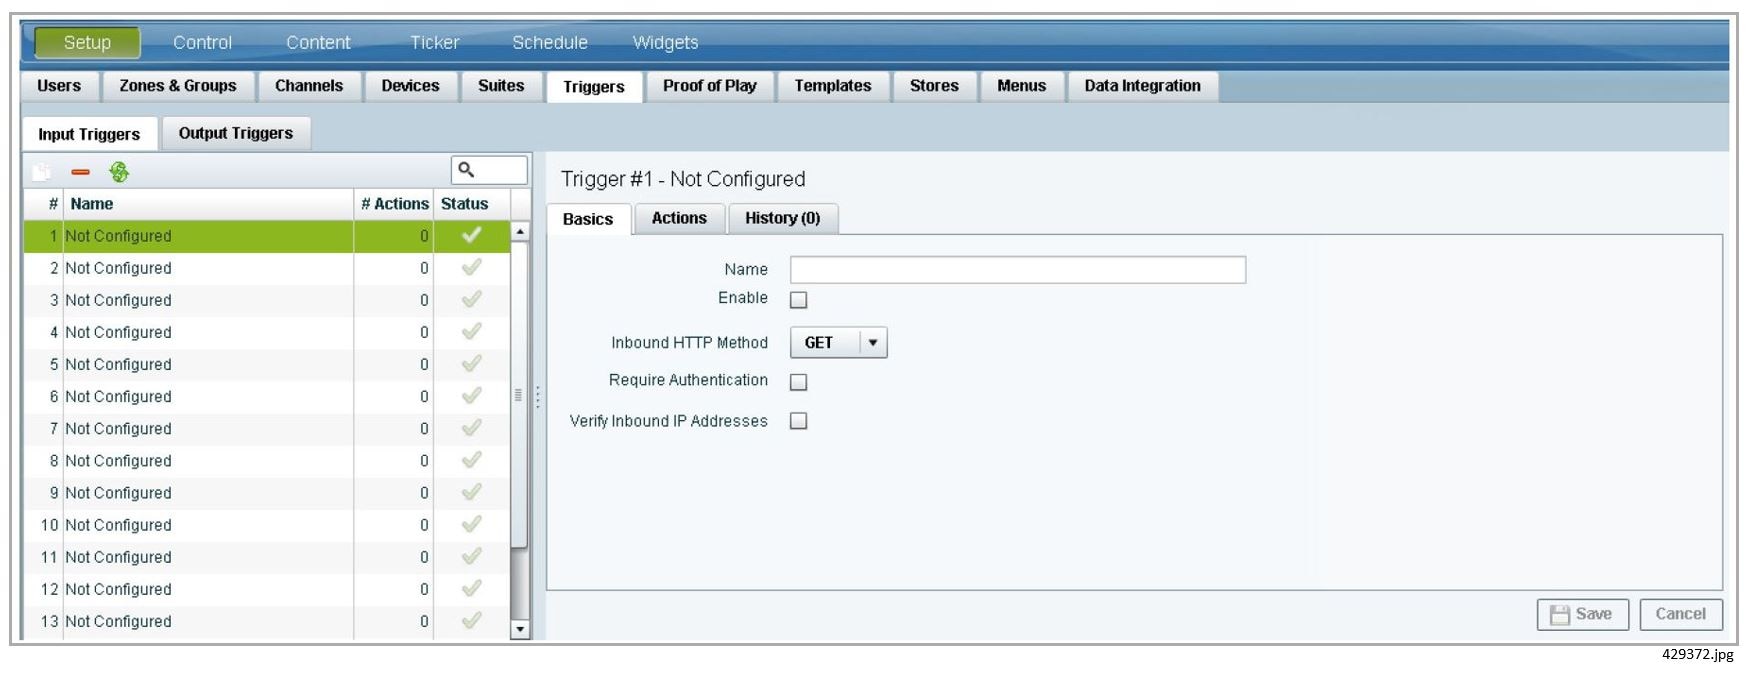
4.![]() In the Input Triggers list, select a trigger number that is “Not Configured.”
In the Input Triggers list, select a trigger number that is “Not Configured.”
The trigger that you selected is highlighted and the trigger configuration is shown in the Basics panel on the right (Figure 5).
Figure 5 New Input Trigger Basics Panel
5.![]() In the Name box, type a name for the external trigger.
In the Name box, type a name for the external trigger.
6.![]() (Optional) Configure the HTTP method.
(Optional) Configure the HTTP method.
For more information, see Configuring the HTTP Method for Input Triggers.
7.![]() (Optional) Configure authentication of the trigger source.
(Optional) Configure authentication of the trigger source.
For more information, see Configuring Authentication for Input Triggers.
8.![]() Configure the actions for the trigger.
Configure the actions for the trigger.
For more information, see Configuring Actions for a Received Trigger.
9.![]() To activate the trigger, click the Enable checkbox.
To activate the trigger, click the Enable checkbox.
TIP : You can only enable a trigger if actions are defined for it.
For more information, see Enabling and Disabling an External Trigger.
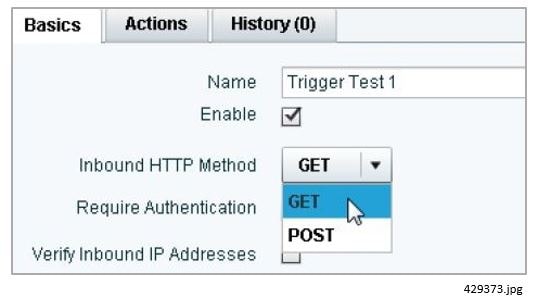
Configuring the HTTP Method for Input Triggers
The default HTTP method is a GET operation in Cisco Vision Director. A GET operation is also required for external devices that use the Event Trigger API to get the list of defined triggers.
Cisco Vision Director ignores any payload updates that might be included in a POST operation. Therefore, you only need to configure the HTTP method if your device only supports the POST HTTP method, or if you prefer to support a POST.
To configure the HTTP method for input triggers:
1.![]() From Main Menu > Event Management > Control Panel > Setup > Triggers, select a trigger number in the Input Triggers list.
From Main Menu > Event Management > Control Panel > Setup > Triggers, select a trigger number in the Input Triggers list.
The configuration for the trigger that you selected appears in the Basics panel.
2.![]() In the Inbound HTTP Method drop-down box, click the arrow to display options and select GET or POST (Figure 6).
In the Inbound HTTP Method drop-down box, click the arrow to display options and select GET or POST (Figure 6).
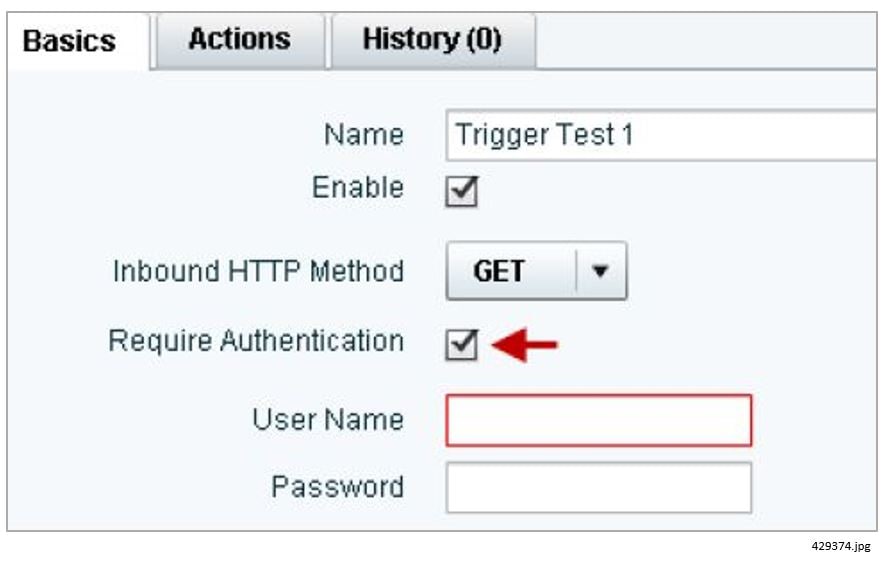
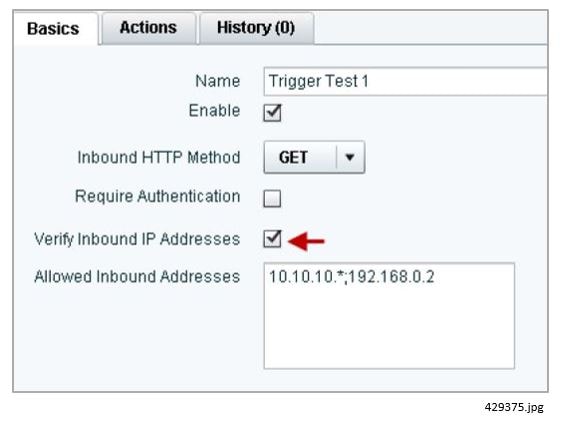
Configuring Authentication for Input Triggers
You can authenticate an external input trigger by user name and password, and/or IP address.
Note : The trigger user name and password has no relationship to any Cisco Vision Director user accounts. You can define any ASCII set of characters for an external trigger user name and password.
You can configure multiple IP addresses to be accepted using a semi-colon separator between addresses, and also using an asterisk (*) as a wild card symbol to match any number that appears in the position where the asterisk is specified.
For example, 10.10.10.* accepts an external input trigger from any IP address in the range 10.10.10.0 through 10.10.10.255.
To configure authentication for input triggers:
1.![]() From Main Menu > Event Management > Control Panel > Setup > Triggers, select a trigger number in the trigger list.
From Main Menu > Event Management > Control Panel > Setup > Triggers, select a trigger number in the trigger list.
The configuration for the trigger that you selected appears in the Basics panel.
2.![]() To authenticate the external trigger by username and password:
To authenticate the external trigger by username and password:
a.![]() Select the Require Authentication checkbox (Require Authentication for Input Triggers).
Select the Require Authentication checkbox (Require Authentication for Input Triggers).
b.![]() In the User Name box, type the user name that you want to allow.
In the User Name box, type the user name that you want to allow.
c.![]() In the Password box, type the password for the specified user name.
In the Password box, type the password for the specified user name.
Figure 7 Require Authentication for Input Triggers
3.![]() To authenticate the external trigger by IP address:
To authenticate the external trigger by IP address:
a.![]() Select the Verify Inbound IP Addresses checkbox.
Select the Verify Inbound IP Addresses checkbox.
b.![]() In the Address List box, type one or more IP addresses separated by a semi-colon (;).
In the Address List box, type one or more IP addresses separated by a semi-colon (;).
Figure 8 Verify Inbound IP Addresses
Configuring Actions for a Received Trigger
Cisco Vision Director can perform certain script actions or TV controls upon receipt of an input trigger. Each input trigger can be configured to have multiple actions.
The script and device controls available for selection are based on what is already configured in the Cisco Vision Director Control Panel.
To configure the actions for a received trigger:
1.![]() From Main Menu > Event Management > Control Panel > Setup > Triggers, select a trigger number in the trigger list.
From Main Menu > Event Management > Control Panel > Setup > Triggers, select a trigger number in the trigger list.
The configuration for the trigger that you selected appears in the Basics panel.
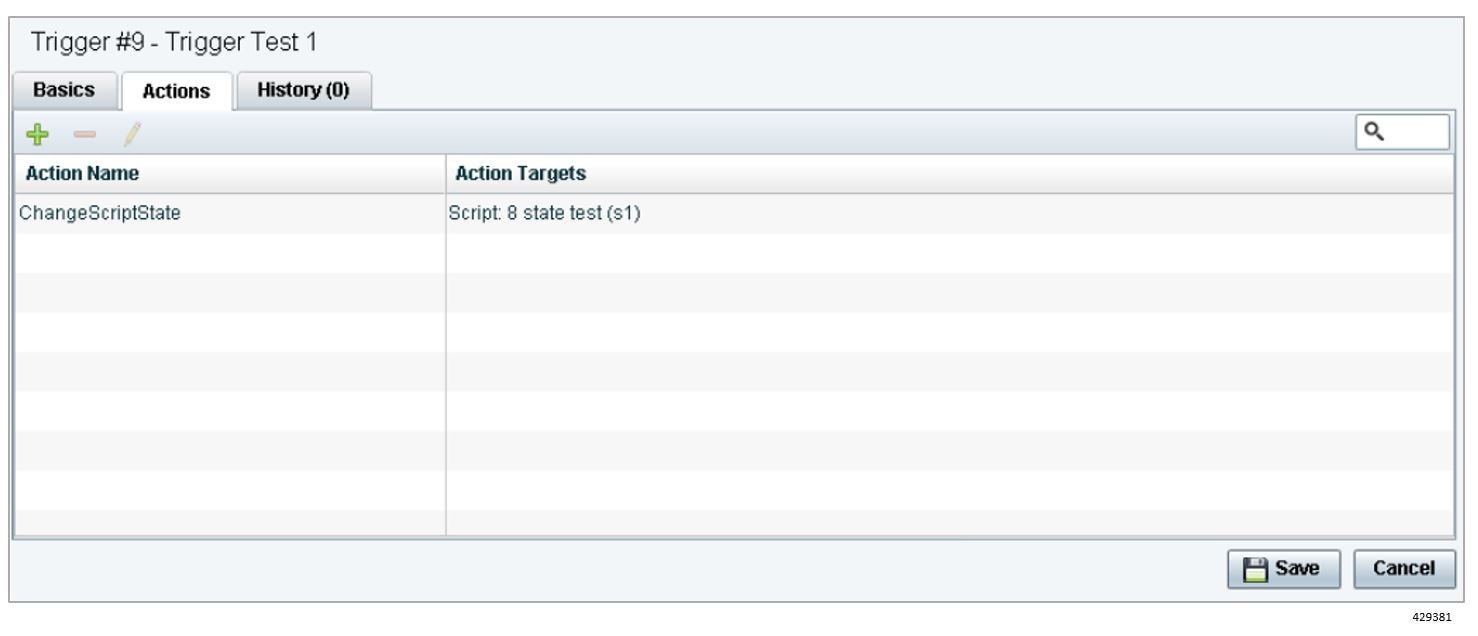
2.![]() Click the Actions tab. The Actions panel displays (Input Trigger Actions Panel).
Click the Actions tab. The Actions panel displays (Input Trigger Actions Panel).
Figure 9 Input Trigger Actions Panel

3.![]() Click the plus (+) icon to add an action for the selected input trigger.
Click the plus (+) icon to add an action for the selected input trigger.
4.![]() At the top of the dialog box, select the drop-down list and choose one of the following actions and associated sub-options shown in the figure below and described in External Trigger Script Actions and Sub-Options.
At the top of the dialog box, select the drop-down list and choose one of the following actions and associated sub-options shown in the figure below and described in External Trigger Script Actions and Sub-Options.
The action that you added is shown under the Actions panel of the Input Triggers screen.
6.![]() Repeat from Step Click the Actions tab. The Actions panel displays (Figure 9). to add multiple actions for the trigger.
Repeat from Step Click the Actions tab. The Actions panel displays (Figure 9). to add multiple actions for the trigger.
How to Configure Output Triggers
This section includes the following tasks:
■![]() Defining an Output Trigger (required)
Defining an Output Trigger (required)
■![]() Configuring Actions for an Output Trigger (required)
Configuring Actions for an Output Trigger (required)
■![]() Enabling and Disabling an External Trigger (required)
Enabling and Disabling an External Trigger (required)
Defining an Output Trigger
By default, Cisco Vision Director supports 64 placeholder triggers that are undefined (unmapped) in the user interface for output triggers. To support an external trigger, you need to define one of the unmapped triggers and enable it.
You can change this number of supported triggers in the Management Dashboard registry. For more information see How to Configure Advanced External Trigger Settings in the Registry.
1.![]() Log into the Cisco Vision Director server as an administr ator.
Log into the Cisco Vision Director server as an administr ator.
2.![]() From the Main Menu click Event Management > Control Panel > Setup.
From the Main Menu click Event Management > Control Panel > Setup.
5.![]() In the Output Triggers list, select a trigger number that is “Not Configured.
In the Output Triggers list, select a trigger number that is “Not Configured.
The trigger that you selected is highlighted and the trigger configuration is shown in the Basics panel on the right (New Output Trigger Basics Panel).
Figure 10 New Output Trigger Basics Panel
6.![]() In the Name box, type a name for the external trigger.
In the Name box, type a name for the external trigger.
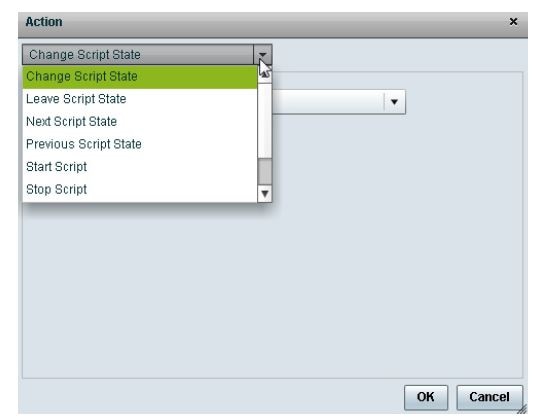
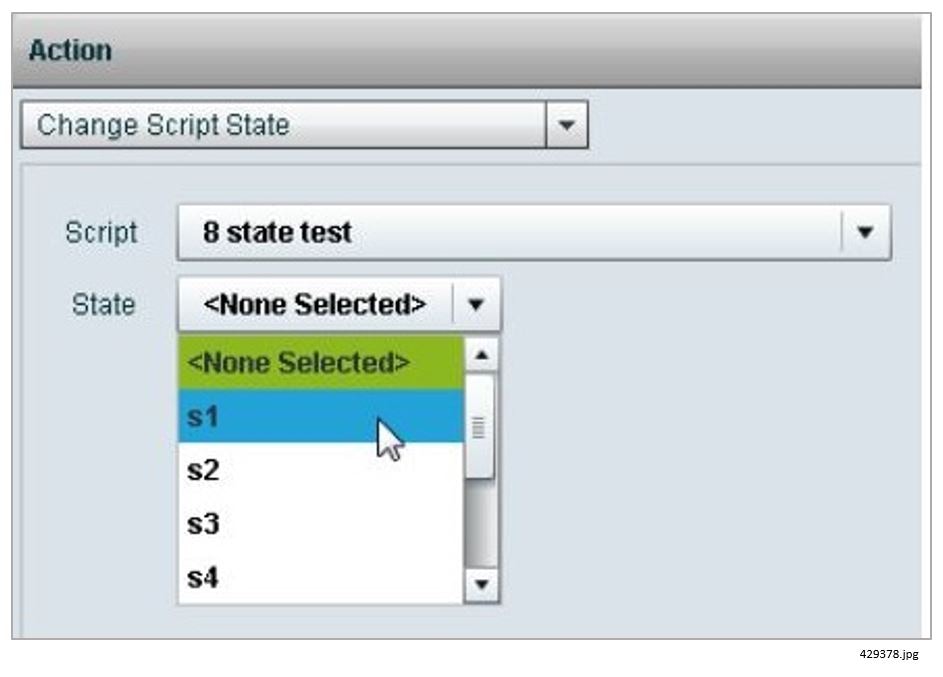
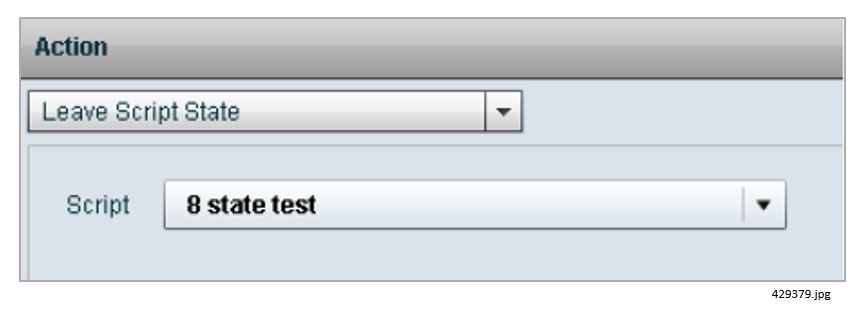
7.![]() Configure the Event Type, by completing the following steps:
Configure the Event Type, by completing the following steps:
a.![]() In the Event Type drop-down box, choose the type of script event that will be used to initiate the output trigger actions.
In the Event Type drop-down box, choose the type of script event that will be used to initiate the output trigger actions.
–![]() ChangeScriptState —Specifies that output trigger actions begin when a change to the specified state for the selected script occurs.
ChangeScriptState —Specifies that output trigger actions begin when a change to the specified state for the selected script occurs.
–![]() StartScript —Specifies that output trigger actions begin when the specified script starts.
StartScript —Specifies that output trigger actions begin when the specified script starts.
–![]() StopScript —Specifies that output trigger actions begin when the specified script stops.
StopScript —Specifies that output trigger actions begin when the specified script stops.
b.![]() In the Script drop-down box, select the script name for the specified event type.
In the Script drop-down box, select the script name for the specified event type.
c.![]() (ChangeScriptState only) In the State drop-down box, select the state of the specified script that will be used to initiate the output trigger actions.
(ChangeScriptState only) In the State drop-down box, select the state of the specified script that will be used to initiate the output trigger actions.
8.![]() Configure the actions for the trigger.
Configure the actions for the trigger.
For more information, see the Configuring Actions for an Output Trigger.
9.![]() To activate the trigger, click the Enable checkbox.
To activate the trigger, click the Enable checkbox.
TIP : You can only enable a trigger if actions are defined for it.
For more information, see the Enabling and Disabling an External Trigger.
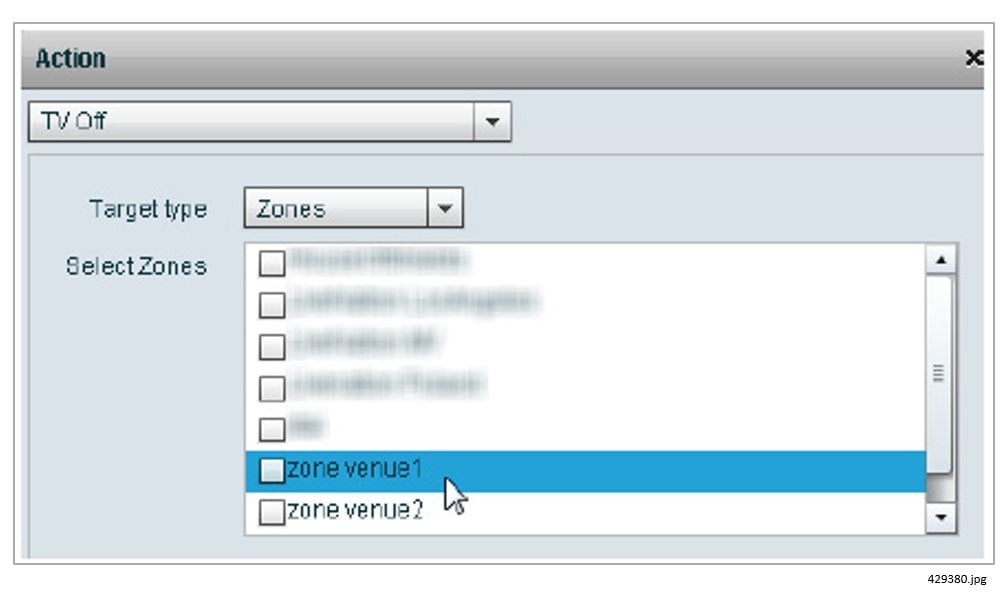
Configuring Actions for an Output Trigger
Cisco Vision Director can send an output URL based on a specified script event. Each output trigger can be configured to have multiple actions.
The scripts available for selection are based on what is already configured in the Cisco Vision Director Control Panel.
To configure the actions for an output trigger:
1.![]() From Control Panel > Setup > Triggers, select a trigger number in the trigger list.
From Control Panel > Setup > Triggers, select a trigger number in the trigger list.
The configuration for the trigger that you selected appears in the Basics panel.
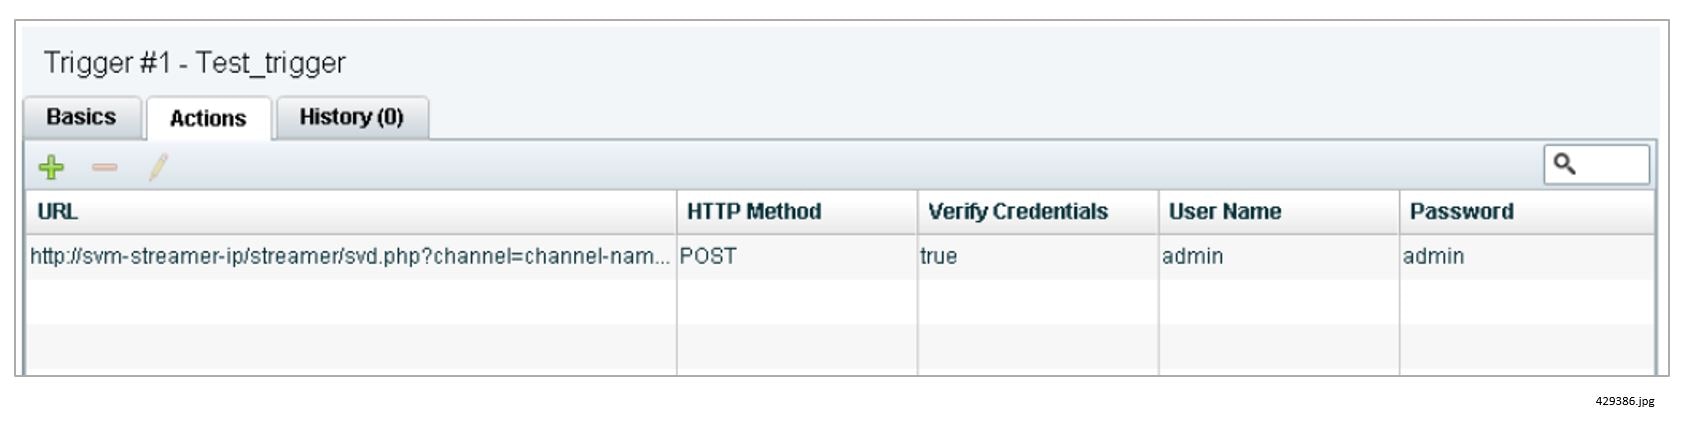
The Actions panel is displayed (Output Trigger Actions Panel).
Figure 11 Output Trigger Actions Panel
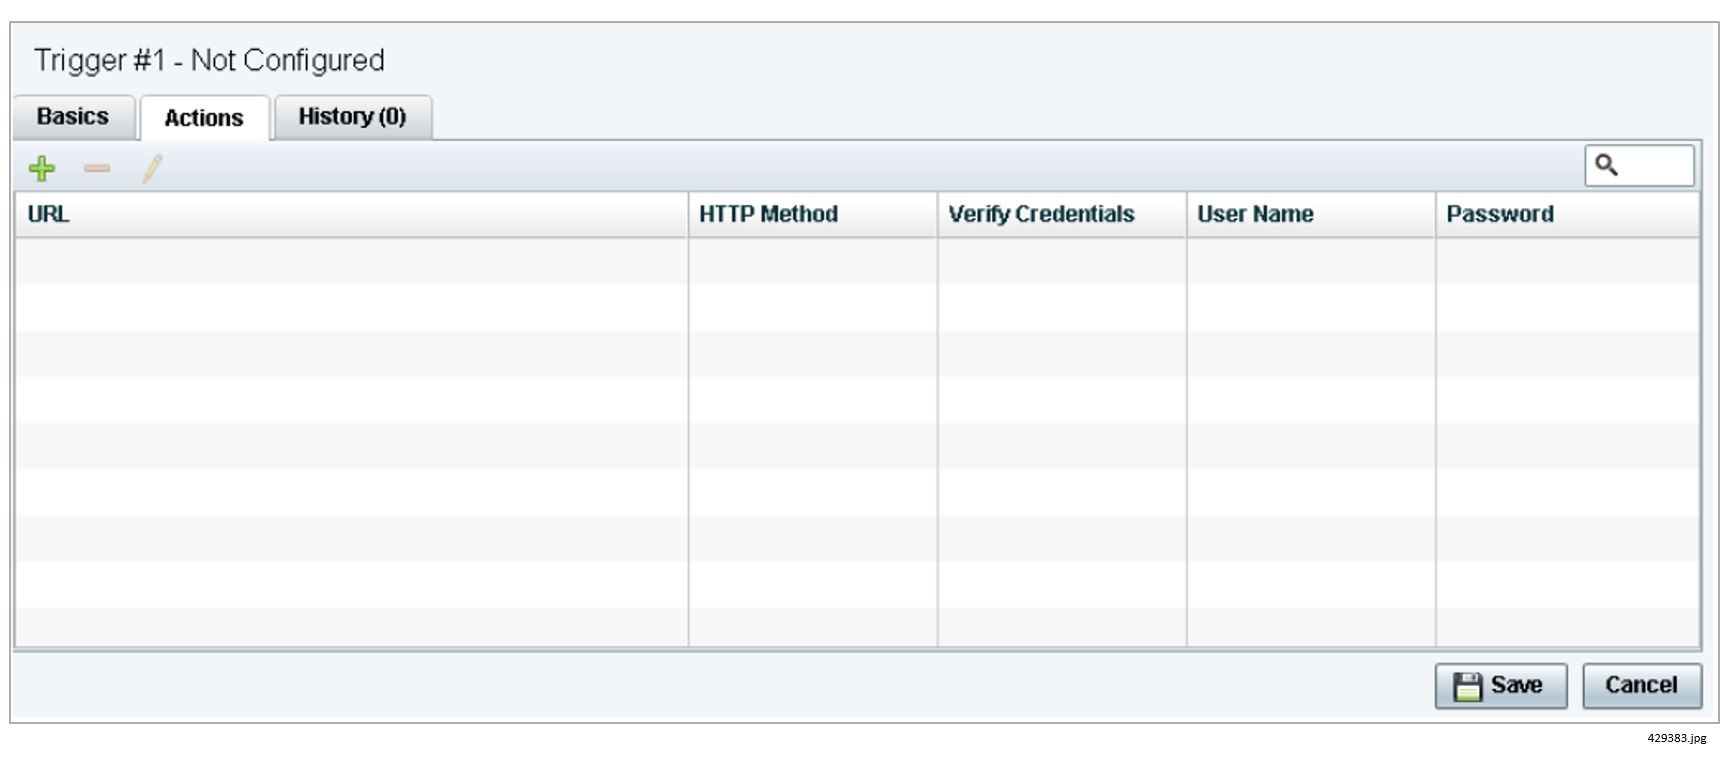
3.![]() Click the plus (+) icon to add an action for the selected output trigger.
Click the plus (+) icon to add an action for the selected output trigger.
The HTTP Action dialog box opens (HTTP Action Dialog Box for Output Triggers).
Figure 12 HTTP Action Dialog Box for Output Triggers
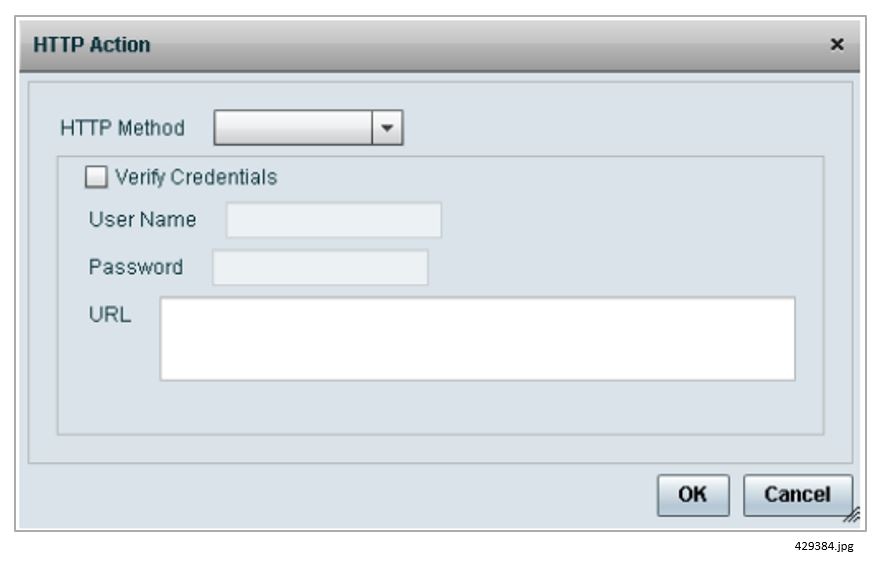
4.![]() In the HTTP Method drop-down box, click the arrow to display options and select GET or POST.
In the HTTP Method drop-down box, click the arrow to display options and select GET or POST.
5.![]() To specify authentication for the outbound URL, click the Verify Credentials checkbox (Verify Credentials for Output Triggers).
To specify authentication for the outbound URL, click the Verify Credentials checkbox (Verify Credentials for Output Triggers).
Figure 13 Verify Credentials for Output Triggers
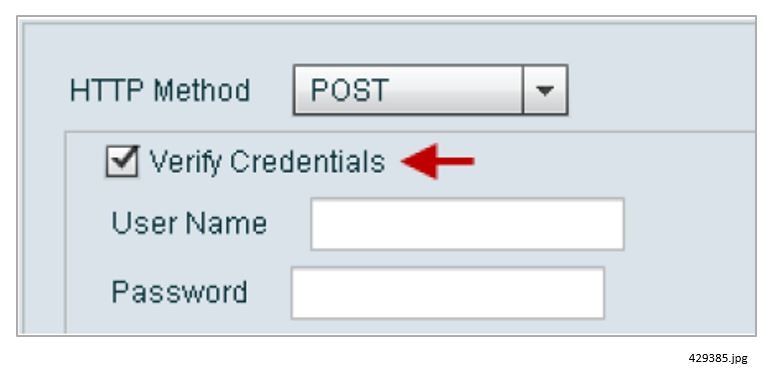
a.![]() In the User Name box, type the user name that you want to allow.
In the User Name box, type the user name that you want to allow.
b.![]() In the Password box, type the password for the specified user name.
In the Password box, type the password for the specified user name.
6.![]() In the URL box, type the URL to be sent by the output trigger when the specified event type occurs.
In the URL box, type the URL to be sent by the output trigger when the specified event type occurs.
Enter only a single URL in this box. Be careful if you are copying and pasting from another source to be sure that the entire URL appears correctly and as a single string.
The action that you added is shown in a list in the Actions panel of the Output Triggers screen.
8.![]() Repeat from Click the plus (+) icon to add an action for the selected output trigger. to add multiple actions for the trigger.
Repeat from Click the plus (+) icon to add an action for the selected output trigger. to add multiple actions for the trigger.
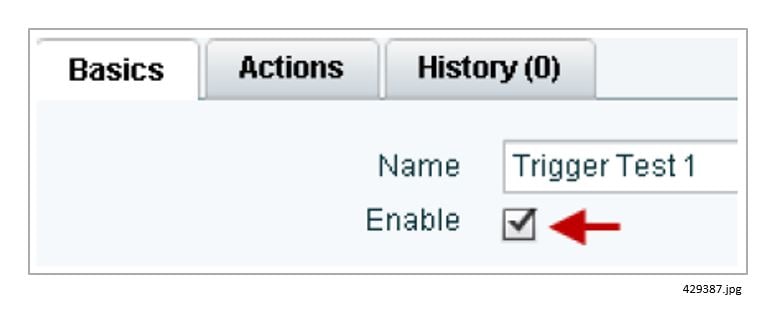
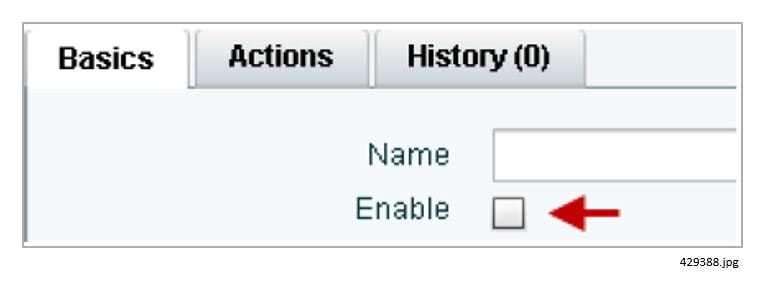
Enabling and Disabling an External Trigger
You can define external triggers in Cisco Vision Director, but independently enable or disable them from operation. By default, external triggers are disabled.
Disabled triggers are indicated by a gray checkmark in the Status column of the corresponding trigger. When a trigger is enabled, the checkmark turns green in the Status column for the trigger name.
Note : You can only enable a trigger if actions are defined for it.
To enable and disable an external trigger:
1.![]() From the Main Menu, click Event Management > Control Panel > Setup > Triggers, click Input Triggers or Output Triggers.
From the Main Menu, click Event Management > Control Panel > Setup > Triggers, click Input Triggers or Output Triggers.
2.![]() Select a trigger number in the trigger list.
Select a trigger number in the trigger list.
The configuration for the trigger that you selected appears in the Basics panel.
3.![]() In the Basics panel, do one of the following:
In the Basics panel, do one of the following:
■![]() To enable the external trigger configuration, select the Enable checkbox.
To enable the external trigger configuration, select the Enable checkbox.
A checkmark appears in the box when the option has been enabled.
■![]() To disable the external trigger configuration, select the Enable checkbox to clear the checkmark.
To disable the external trigger configuration, select the Enable checkbox to clear the checkmark.
How to Monitor External Trigger History
You can view a log of activity for a particular external trigger using the History feature. There is currently no way to see a global set of events that occurred.
To monitor external trigger history:
1.![]() From the Main Menu, click Event Management > Control Panel > Setup > Triggers, click Input Triggers or Output Triggers.
From the Main Menu, click Event Management > Control Panel > Setup > Triggers, click Input Triggers or Output Triggers.
2.![]() Select a trigger number in the trigger list.
Select a trigger number in the trigger list.
The configuration for the trigger that you selected appears in the Basics panel.
The logged messages and times for the selected trigger are displayed.
How to Configure Advanced External Trigger Settings in the Registry
You can change some of the default settings for external triggers in the Cisco Vision Director registry. Be certain that you understand the purpose and impact of the registry values before changing anything.
Refer to Default Registry Settings for Input Triggers for a description of the registry keys and their default values.
To configure advanced external trigger options in the registry:
1.![]() Log into Cisco Vision Director server as an administrator.
Log into Cisco Vision Director server as an administrator.
2.![]() From the Main Menu, click the Gear icon > Management Dashboard.
From the Main Menu, click the Gear icon > Management Dashboard.
3.![]() Using the Management Dashboard drawers, go to Tools > Advanced > Registry.
Using the Management Dashboard drawers, go to Tools > Advanced > Registry.
4.![]() In the Registry Data box, find the keys that begin with “ExternalTrigger.”
In the Registry Data box, find the keys that begin with “ExternalTrigger.”
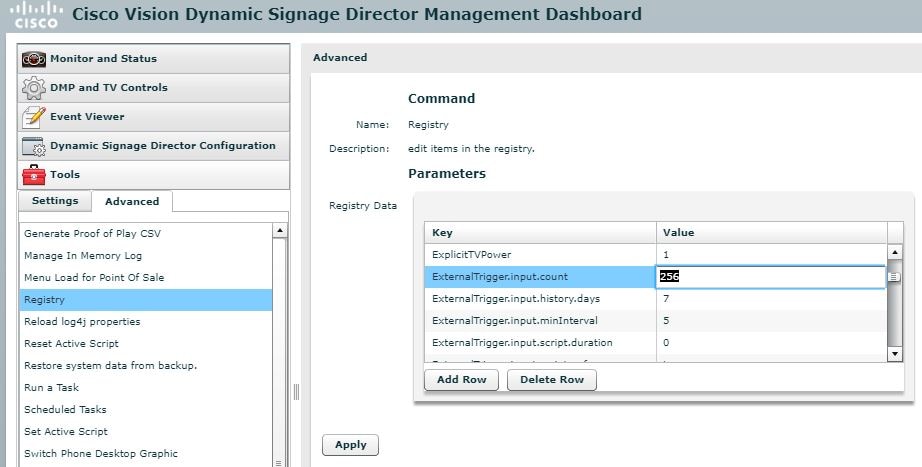
5.![]() In the Value box for the ExternalTrigger key that you want to change, type the new value that you want to apply.
In the Value box for the ExternalTrigger key that you want to change, type the new value that you want to apply.
7.![]() Click OK when the “Registry values saved (success)” message appears.
Click OK when the “Registry values saved (success)” message appears.
Feature Information for Cisco Vision Director External Triggers
Feature Information for Cisco Vision Director External Triggers lists the release history for this feature.
Initial release for Cisco StadiumVision Director Release 3.0. |
Cisco and the Cisco logo are trademarks or registered trademarks of Cisco and/or its affiliates in the U.S. and other countries. To view a list of Cisco trademarks, go to this URL: www.cisco.com/go/trademarks. Third-party trademarks mentioned are the property of their respective owners. The use of the word partner does not imply a partnership relationship between Cisco and any other company. (1721R)
Any Internet Protocol (IP) addresses and phone numbers used in this document are not intended to be actual addresses and phone numbers. Any examples, command display output, network topology diagrams, and other figures included in the document are shown for illustrative purposes only. Any use of actual IP addresses or phone numbers in illustrative content is unintentional and coincidental.
© 2018 Cisco Systems, Inc. All rights reserved.
 Feedback
Contact Cisco
- Open a Support Case

- (Requires a Cisco Service Contract)