Configure Local Authentication on FlexConnect Mode
Available Languages
Contents
Introduction
This document describes how FlexConnect local authentication works and how to configure it using Cisco Catalyst 9800 Series Wireless Controller (WLC)
Background Information
FlexConnect Overview and Requirements
FlexConnect enables Access Point (AP) at remote or branch offices to connect to a centralized controller while allowing local processing of wireless traffic. Unlike traditional centralized wireless deployments where all wireless traffic is tunneled to the controller using CAPWAP (Control and Provisioning of Wireless Access Points) —FlexConnect allows traffic to be locally switched and handled directly by the branch AP. This local switching provides the AP with a degree of autonomy, enabling key services such as security, roaming, and Quality of Service (QoS) to function independently of the controller.
Although FlexConnect is primarily designed for local traffic switching, it also offers the flexibility to centrally switch specific SSIDs (Service Set Identifier) when needed. For instance, if certain traffic must pass through a central firewall, those SSIDs can be sent back to the controller via CAPWAP for centralized switching. This dual capability allows a single FlexConnect AP to simultaneously support both locally and centrally switched WLANs (Wireless Local Area Network).
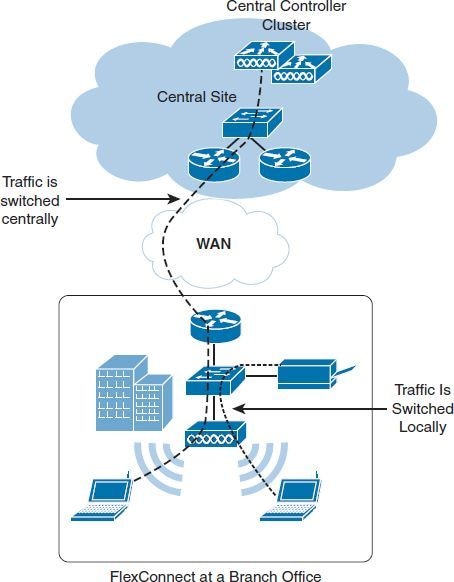 A FlexConnect AP Deployed at a Branch Locally Switches One SSID While Another Is Centrally Switched
Modes of Operation
FlexConnect APs operate in two modes: connected mode and standalone mode.
- Connected mode, the AP maintains an active connection to the controller via the CAPWAP control channel.
- Standalone mode is a fallback state that occurs when the AP loses connectivity to the controller.
Under normal conditions, FlexConnect APs function in connected mode, where the controller manages critical services such as centralized authentication, client profiling, and Radio Resource Management (RRM). While the AP is expected to remain in this mode most of the time, it automatically switches to standalone mode if communication with the controller is lost. In standalone mode, the AP continues to operate, locally switching traffic and allowing clients to remain connected. The APs independently authenticates clients without forwarding authentication requests to a central controller. However, certain controller-dependent services—such as RRM and centralized client authentication—become temporarily unavailable.
For instance, if a WAN (Wide Area Network) outage disrupts the connection between the AP and the controller but Internet access remains active, the AP transitions to standalone mode and continue to process locally switched traffic without interruption. Existing clients remain connected, but new clients requiring central authentication are unable to join the network—unless local authentication is configured. FlexConnect APs can be set up to perform local authentication during WAN failures, ensuring continued service even when the controller is unreachable.
While in standalone mode, these features are not available to the AP:
-
Client web authentication
- Guest authentication (portal redirection)
-
Any centrally switched SSIDs
-
RRM
-
IPv6 Layer-3 mobility
-
Native profiling
-
Policy classification
-
Service Discovery Gateway
-
Configuration updates
For a complete list of features and WLAN configurations supported in standalone mode (local authentication), see the feature matrix: Feature Matrix for Cisco Wireless Access Points
A common FlexConnect failure scenario involves a complete loss or significant degradation of the WAN, which disrupts the CAPWAP control channel. When the AP loses connectivity to the controller due to WAN issues, it immediately switches to standalone mode.
The primary objective during a WAN failure is to restore communication with the controller as quickly as possible to resume full functionality.
When a FlexConnect AP enters standalone mode due to a WAN failure, active clients remain connected and can roam seamlessly between APs within the FlexConnect domain/site tag, but roaming between different FlexConnect site tags can require full reauthentication. However, new clients attempting to join the locally switched WLAN are unable to authenticate because the AAA server (Authentication, Authorization, and Accounting Server) at the central location is unreachable.
Fast Secure Roaming
EAP (Extensible Authentication Protocol) authentication introduces higher latency compared to PSK (Pre-Shared Key) authentication due to the exchange of EAP frames with the AAA server. However, with fast secure roaming, a client undergoes a full 802.1X/EAP authentication only during its initial association with the network. On subsequent roams to neighboring APs, the EAP exchange is bypassed, leaving only the four-way handshake, which is significantly faster since it does not involve the AAA server. This table outlines the various fast secure roaming methods supported by the 9800 WLC in both local mode and FlexConnect deployments.
| Feature |
Local Mode |
FlexConnect (Connected Mode; Central Authentication) |
FlexConnect (Connected Mode—Local Authentication) |
FlexConnect (Standalone) |
| Sticky Key Caching (SKC) |
Not Supported |
Not Supported |
Not Supported |
Not Supported |
| Opportunistic Key Caching (OKC) |
Supported |
Supported |
Supported |
Supported (Until the client session expires) |
| Cisco Centralized Key Management (CCKM) |
Supported |
Supported |
Supported |
Not Supported |
| FT-802.11r/ Adaptive 11r (Fast Transition) (Over the Air) |
Supported |
Supported |
Supported |
Supported (Until the client session expires) |
| FT-802.11r/ Adaptive 11r (Fast Transition) (Over the DS) |
Supported |
Supported |
Not Supported |
Not Supported |
In standalone mode, fast roaming depends on cached key material remaining valid. When the cached PMK (Pairwise Master Key)/session expires, the AP cannot obtain new controller-derived key information until controller connectivity is restored.
FlexConnect High Scale Mode
From Cisco IOS XE 17.8.1 onwards, the flex site site capacity has been scaled up to accommodate 300 APs and 3000 802.1x clients.
PMK propagation allows APs within the same FlexConnect site to share PMK information, reducing the need for a complete EAP exchange during roaming. PMK propagation is not enabled by default.
Use these commands to verify PMK propagation and to enable PMK:
-
show wireless stats pmk-propagation
-
pmk propagate
Wi-Fi 7 FlexConnect Support
This table summarizes FlexConnect features supported across the CW917x Wi-Fi 7 AP family.
| Feature | Support |
| Local Switching | Supported |
| Central Switching | Supported |
| WLAN-VLAN Mapping | Supported |
| Local Authentication with External RADIUS | Supported |
| WPA3-Enterprise | Supported |
| FT-802.11r Fast Roaming | Supported |
| Multi Link Operation (MLO) | Supported |
| Local Authentication with Internal RADIUS | Not Supported |
| WPA3-Enterprise-192 | Not Supported |
FlexConnect Resiliency Scenarios
- In an N+1 resiliency setup, multiple active controllers share a common backup controller that takes over if any active controller fails. When a primary controller goes offline, FlexConnect APs immediately switch to standalone mode and start searching for the backup controller. During this disconnection period, centrally switched clients are disconnected from the APs. Once the APs locate and synchronize with the backup controller, clients requiring access to centrally switched SSIDs are reconnected. Meanwhile, locally switched clients remain unaffected and continue to operate without noticing the service disruption.
- Provide a backup AAA server at the remote location, accessible by the FlexConnect group. With local authentication enabled, this backup RADIUS server is only used when the APs enter standalone mode—it remains inactive while the APs are in connected mode. When FlexConnect APs use the local backup AAA server for authentication, the authentication keys are distributed across all APs in the FlexConnect group, just as they would be with a centralized AAA server. This ensures that new clients can still roam seamlessly between APs without needing to reauthenticate, even when the backup RADIUS server is in use.
- Any method present on the Feature Matrix for Cisco Wireless Access Points that allows Local Authentication.
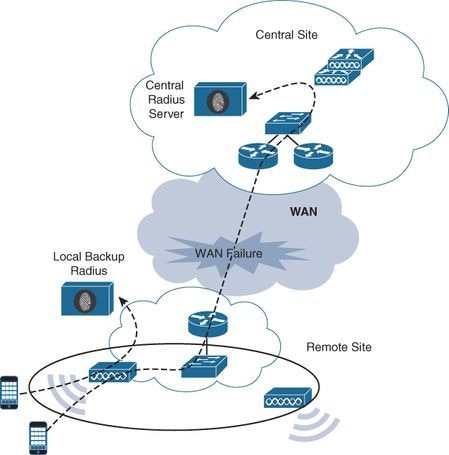 Clients Authenticate Against a Local Backup AAA Server When the Central AAA Server Becomes Unavailable Due to a WAN Failure
Prerequisites
Requirements
There are no specific requirements for this document.
Components Used
The information in this document is based on these software and hardware versions:
- Catalyst C9800-CL Wireless Controller for Cloud with Cisco IOS® XE Dublin 17.18.3
- Catalyst CW9164I-ROW Access Point v17.18.3.18
- Aironet® AIR-AP2802I-E-K9 Access Point v17.18.3.18
- 2 x Identity Services Engine v3.2.0.542
The information in this document was created from the devices in a specific lab environment. All of the devices used in this document started with a cleared (default) configuration. If your network is live, ensure that you understand the potential impact of any command.
Configure
Network Diagram
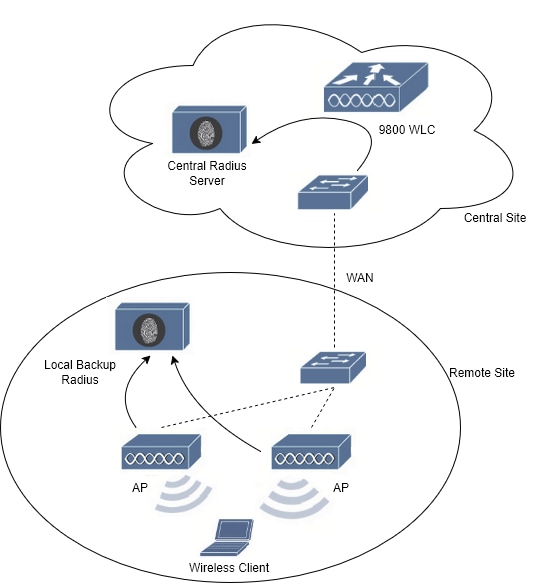 Network Diagram
Configure AAA servers
Step 1. To configure a 802.1x WLAN you need to create the AAA server group on the 9800 WLC.
Create a AAA server for each site - the one on the central site, and the other one on the remote site.
Navigate to Configuration > Security > AAA > Server/Groups > Servers and select +Add. Give a name to the server, its IP address, the key (and confirm key), enable CoA (Change of Authorization) support, and enter the CoA server key (and confirm CoA server key). The keys must be the same.
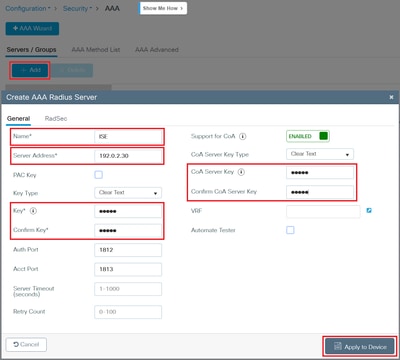
Click Apply to Device.
Step 2. Create the other AAA server:
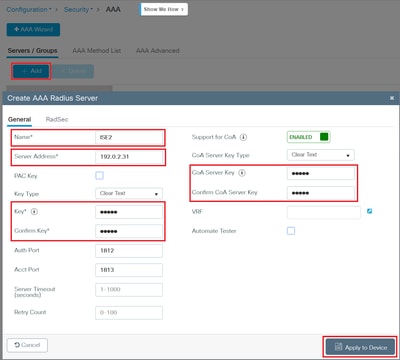
Click Apply to Device.
You now see your AAA servers configured:
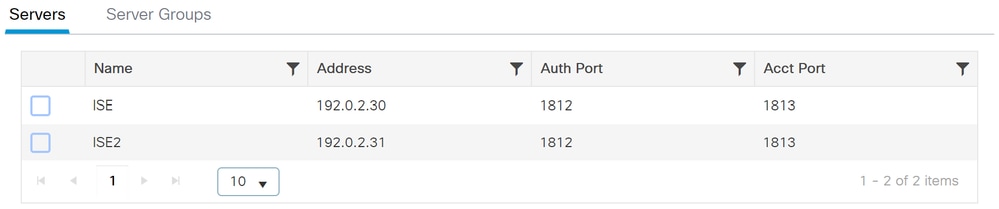
Step 3. Navigate to Configuration > Security > AAA > Server/Groups > Server Groups and select +Add. Give a name to the group server, and select the previous created AAA servers to the Assigned Servers column:
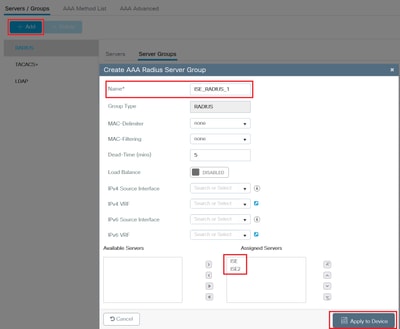
Click Apply to Device.
You then see the AAA server group configured:

CLI:
aaa new-model
!
radius server ISE
address ipv4 192.0.2.30 auth-port 1812 acct-port 1813
key keystring
!
radius server ISE2
address ipv4 192.0.2.31 auth-port 1812 acct-port 1813
key keystring
!
aaa server radius dynamic-author
client 192.0.2.30 server-key keystring
client 192.0.2.31 server-key keystring
!
aaa group server radius ISE_RADIUS_1
server name ISE
server name ISE2
deadtime 5
Configure FlexConnect mode on the remote site
Step 1. The first step is to configure FlexConnect on the remote site.
Use this guide to change your APs mode to Flex: Understand FlexConnect on Catalyst 9800 Wireless Controller.
The APs in this guide/lab use the same Flex Profile.
Step 2. Navigate to Configuration > Tags & Profiles > Flex.
Create a new Flex Profile Name with +Add. On the General tab give a name to the profile, enter the Native VLAN (Virtual Local Area Network) ID, and enable PMK Propagation.
Enable PMK propagation to facilitate seamless wireless client roaming by sharing PMK information among AP within a single site.
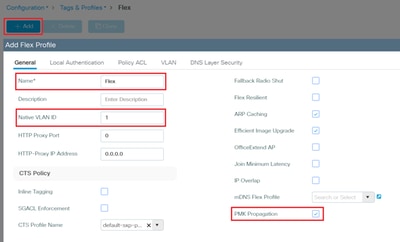
Step 3. For 802.1x WLAN, on the tab Local Authentication select the Radius Server Group and enable RADIUS:
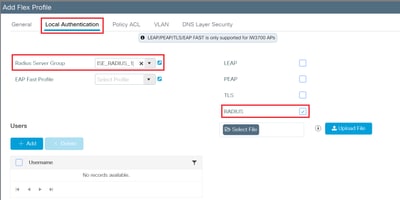

Tip: For a PSK WLAN, you do not need to add anything on this tab.
Step 4. On the tab VLAN add all the VLANs that are used by clients, APs, and RADIUS Server. Make sure you make the right correspondence of each VLAN name to the correct VLAN id:
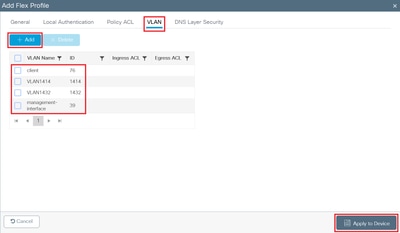
At the end click on Update & Apply to Device.
Step 5. Navigate to Configuration > Tags & Profiles > Tags > Site and select +Add.
Create the site tag with the Flex Profile created previously. Give it a name, select the right Flex Profile, and disable Enable Local Site. Make sure that the AP Join Profile is the correct one.
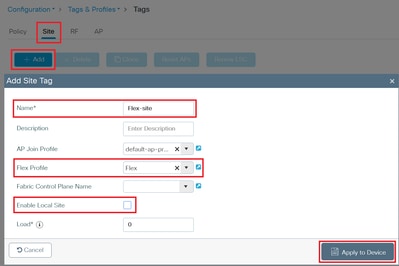
Click Apply to Device.
Step 6. Navigate to Configuration > Wireless > Access Points.
Select your AP, on General > Tags change the Site Tag to the previously configured tag:
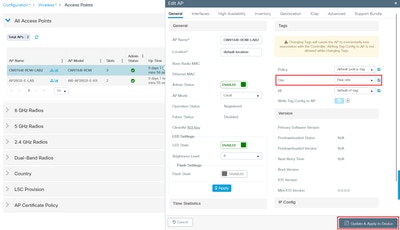
Click on Update & Apply to Device.
The AP disconnects from the WLC and re-join with Flex AP mode.
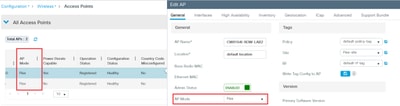
On the same page, when the AP re-joins, you can check the AP mode on the column AP Mode.
If you select the AP, it displays the new Site tag:
CLI:
wireless profile flex Flex
ip http client proxy 0.0.0.0 0
local-auth radius-server-group ISE_RADIUS_1
vlan-name client
vlan-id 76
vlan-name VLAN1414
vlan-id 1414
vlan-name VLAN1432
vlan-id 1432
vlan-name management-interface
vlan-id 39
pmk propagate
!
wireless tag site Flex-site
ap-profile default-ap-profile
no local-site
flex-profile Flex
!
ap h.h.h (AP Radio MAC address)
policy-tag default-policy-tag
site-tag Flex-site
rf-tag default-rf-tag
Configure 802.1x WLAN with local authentication using an external RADIUS server
Step 1. Create the Authentication Method List.
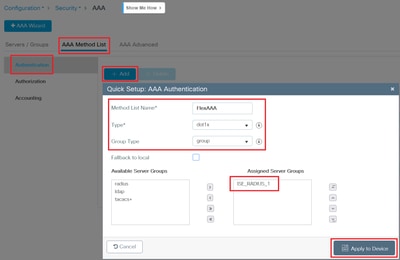
Navigate to Configuration > Security > AAA, on AAA Method List > Authentication tab.
Select +Add, give a name to the method list name, select dot1x as type, select group as group type, and assign the AAA server group on the Assigned Server Groups column:
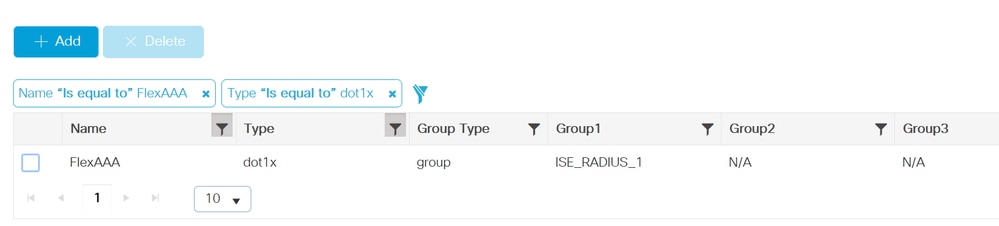
You now see the created AAA method list:
Step 2. Create the WLAN.
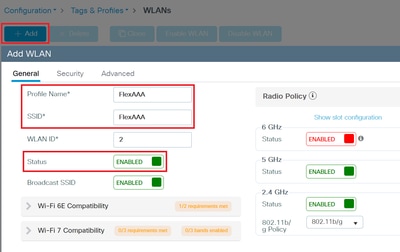
Navigate to Configuration > Tags & Profiles > WLANs, select +Add.
On General tag create a name to the Profile Name, SSID, and enable Status:
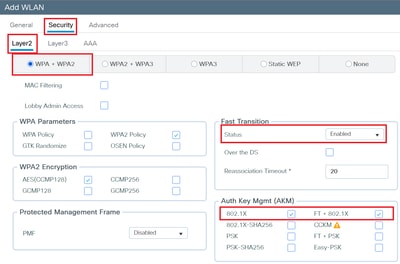
Step 3. Navigate to Security > Layer 2 tab, select WPA+WPA2 (Wi-Fi Protected Access), Fast Transition as Enabled, Auth Key Mgmt 802.1X and FT+802.1X:
Step 4. Navigate to Security > AAA tab, on the Authentication List drop down menu select the list created previously:
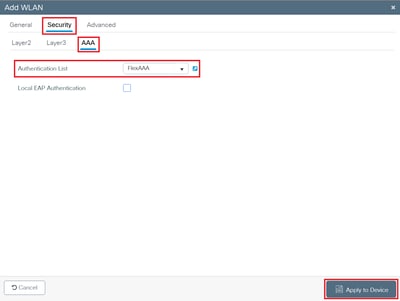
Click on Update & Apply to Device.
You then see the created WLAN:

Step 5. Create the Policy Profile.
Navigate to Configuration > Tags & Profiles > Policy.
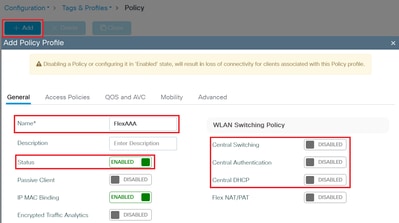
Select +Add and on General tab give a name to the policy profile, enable the status, and disable central switching, central authentication, and central DHCP (Dynamic Host Configuration Protocol):
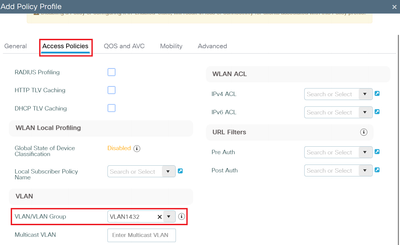
Step 6. Navigate to tab Access Policies, select the VLAN:
Step 7. Navigate to the tab Advanced, enable Allow AAA Override.:
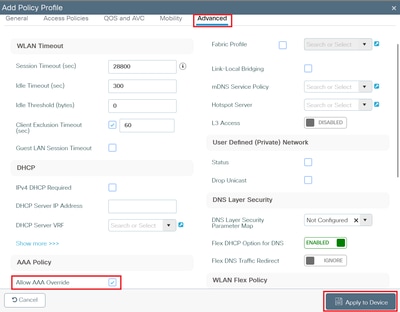
Click Update & Apply to Device.
You can see the policy profile on the list:
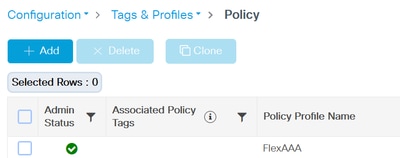
Step 8. Create Policy Tag.
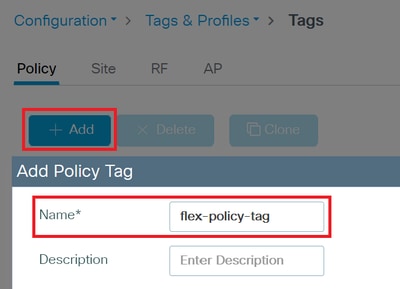
Navigate to Configuration > Tags & Profiles > Tags
On Policy tab select +Add. Give a name to the Policy Tag:
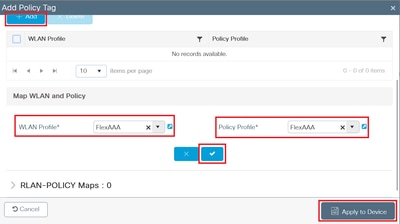
Scroll down and select +Add under WLAN-POLICY Maps. On WLAN Profile select the WLAN created previously from the drop down menu. On Policy Profile select the Policy Profile created previously from the drop down menu. Click on the check button, and then on Apply to Device:
You can see the policy tag on the list:
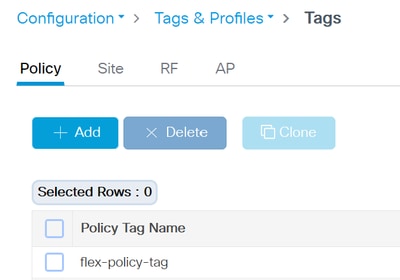
Step 9. Assign the policy tag on the APs tag.
Navigate to Configuration > Wireless > Access Points. Select the AP to change the tag.
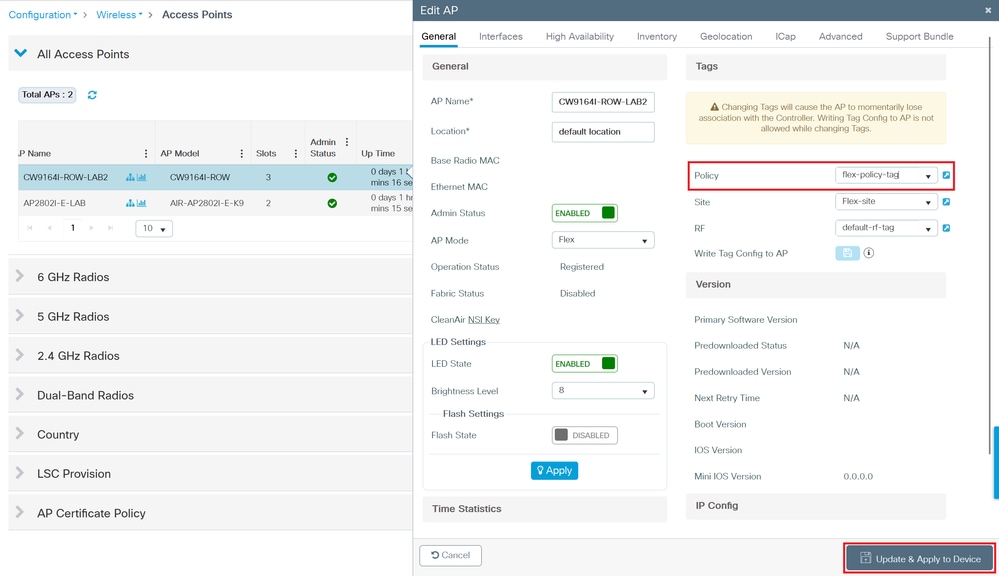
Click on Update & Apply to Device.
The AP disjoins and join back with the new policy tag.
When the AP joins back, you can check the Access Points list, confirm that the AP is on Flex mode, and the assigned tags:

CLI:
aaa authentication dot1x FlexAAA group ISE_RADIUS_1
!
wlan FlexAAA 4 FlexAAA
radio policy dot11 24ghz
radio policy dot11 5ghz
security ft
security wpa akm ft dot1x
security dot1x authentication-list FlexAAA
no shutdown
!
wireless profile policy FlexAAA
aaa-override
no central authentication
no central dhcp
no central switching
vlan VLAN1432
no shutdown
!
wireless tag policy flex-policy-tag
wlan FlexAAA policy FlexAAA
!
ap h.h.h (AP Radio MAC address)
policy-tag flex-policy-tag
site-tag Flex-site
rf-tag default-rf-tag
Configure ISE
Now you need to configure ISE to be able to authenticate clients when they are in local authentication.
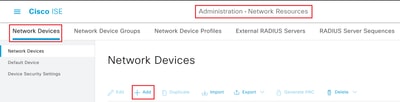
Step 1.Navigate to Administration > Network Resources > Network Devices. Select +Add.
Step 2. Add the 9800 WLC. Give it a name, add its IP address, enable RADIUS Authentication Settings, and add the Shared Secret key. This key must be the same key you configured previously when you created the AAA servers on the 9800 WLC.
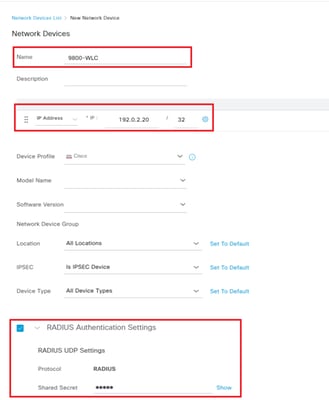
On the bottom right corner, click on Save.
Step 3. We need to add the APs on the Network Devices list, for them to be able to act as AAA authenticators/forwarders when the remote site looses the WAN link (and when the APs move to Standalone mode).
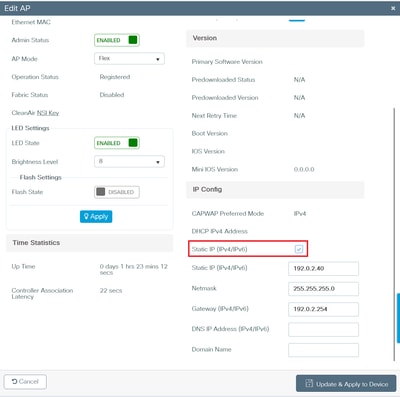
Navigate to Configuration > Wireless > Access Points on the 9800 WLC GUI and take note of each AP IP addresses.

Note: Configure the IP address of each Flex AP to Static. When the APs loose and regain connection to the 9800 WLC, they can come back with a different IP address from DHCP, and hence loosing communication with ISE.
Enable Static IP (IPv4/IPv6). Click Update & Apply to Device:
Step 4. Back on ISE, navigate to Administration > Network Resources > Network Devices. Select +Add.
Add your APs as Network Devices, the same configuration as the 9800 WLC:
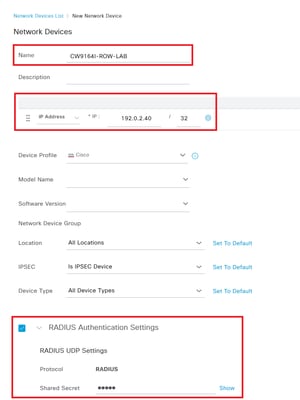
On the bottom right corner, click on Save.
For the second AP:
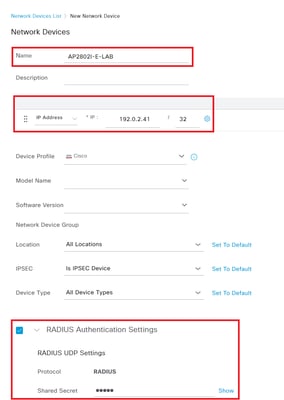
On the bottom right corner, click on Save.
You can see this list of Network Devices:
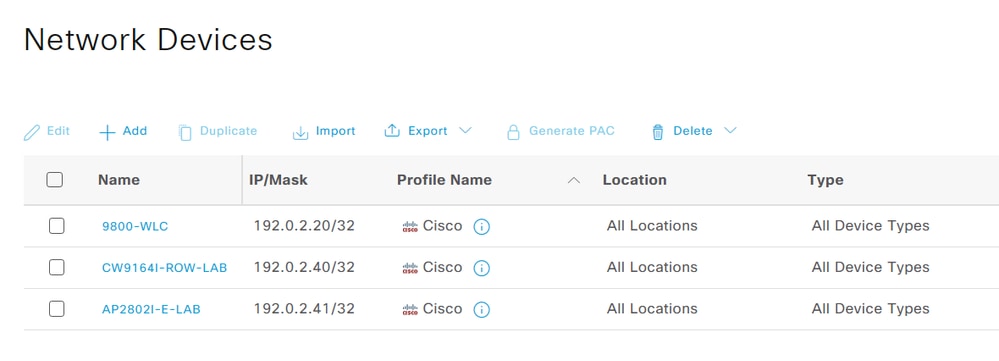
If your APs are in contiguous IP ranges, you can use the mask feature to configure a single entry that defines the shared secret for an entire group (if not all) of APs. There is no actual need to configure one network device per AP in ISE. Note however, that by using wildcards and masks, you leave some room for a rogue device to try to act as forwarder to ISE.
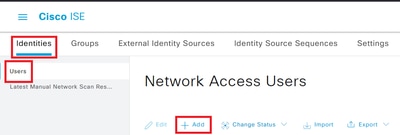
Step 5. Navigate to Administration > Identity Management > Identities, on Users tab, and create a user for 802.1x authentication. Select +Add:
Create a Username, the Password (and type the same password on Re-Enter Password), and select ALL_ACCOUNTS (default) from the User Groups drop down menu:
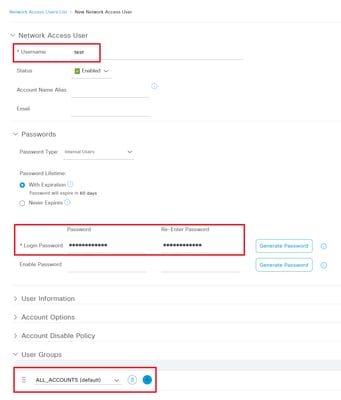
On the bottom right corner, click on Submit.
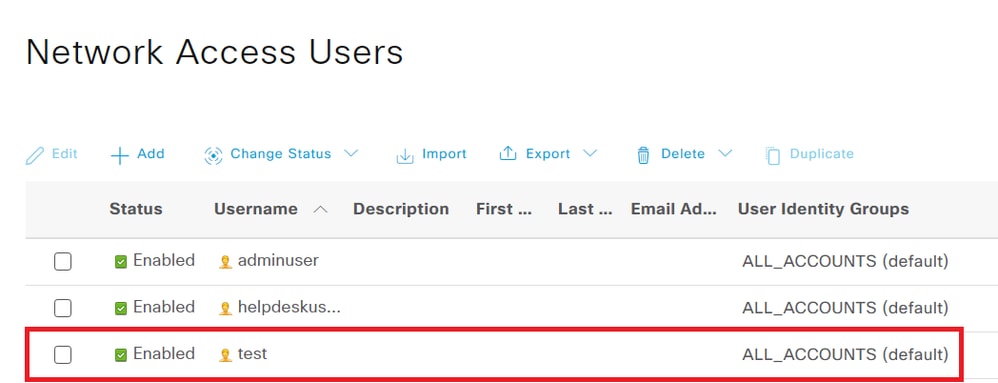
You can see the user on the Network Access Users list:
Step 6. Navigate to Policy > Policy Elements > Results. On Authorization > Authorization Profiles tab, select +Add.
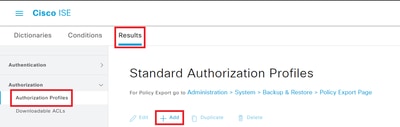
Create the authorization profile for the VLAN that the local authentication clients are assigned:
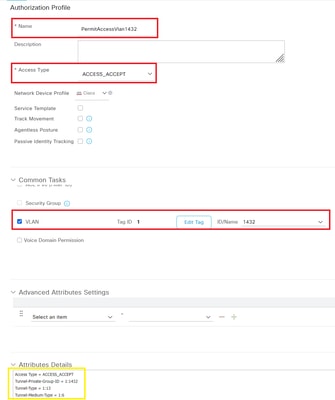
On the bottom right corner, click on Submit.
You see the attributes details that ISE sends to the WLC/APs in a successful scenario.
Step 7. Navigate to Policy > Policy Sets. Create a new policy set.
Click on the + sign:
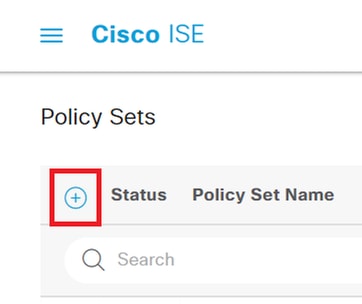
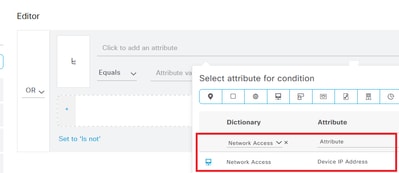
Give a name to the policy set. On the column Conditions, add the OR rule and add the dictionary Network Access, with the Attribute Device IP Address, select Equals:
Add the 9800 WLC and the APs IP addresses:
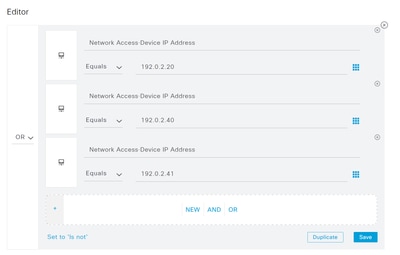
On the bottom right corner, click on Use.
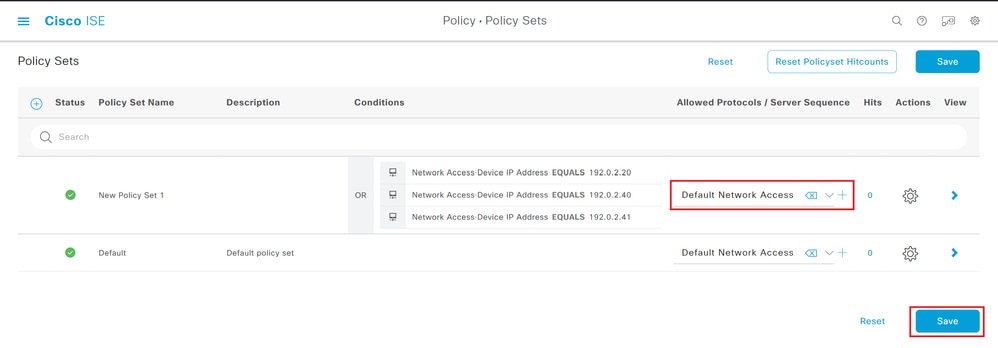
Step 8. On the column Allowed Protocols select Default Network Access. At the end, click on Save:
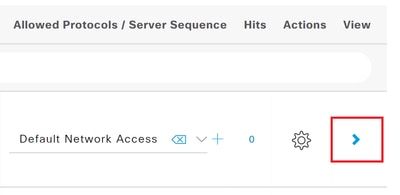
Step 9. On the column View, click on the arrow sign:
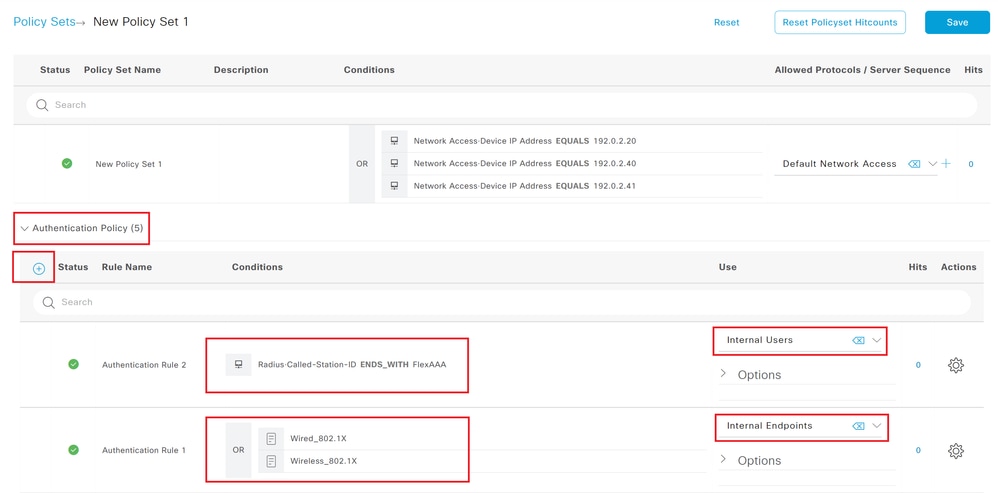
Step 10. Expand Authentication Policy, create two new policies: one for WLAN name, the other for the 802.1X configuration:
For the WLAN name, create the Condition with the dictionary Radius and Attribute Called-Station-ID. Select Ends With and type the WLAN name:
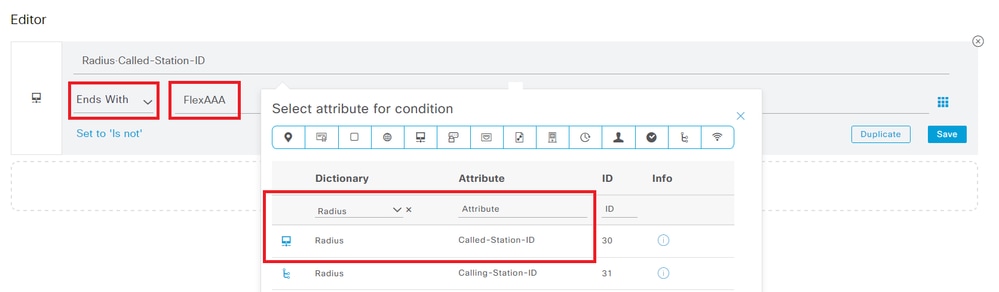
On the bottom right corner, click on Use. For this policy, on column Use, select Internal Users.
Step 11. For the 802.1X policy, create the Condition with the Wired_802.1X and Wireless_802.1X library available on ISE. You can drag and drop these items, and select the condition OR:
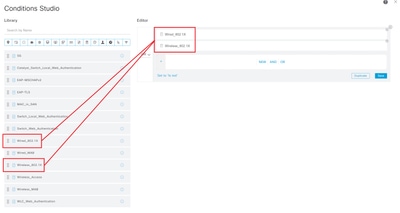
On the bottom right corner, click on Use. For this policy, on column Use, select Internal Endpoints.
Step 12. Scroll down to Authorization Policy and create a new policy. Give it a name, and create the same Condition as the one created for WLAN name on the Authentication Policy.
On the column Profiles select from the drop down menu the profile PermitAccessVlan1432:

On the bottom right corner, click on Save.
Configure PSK WLAN with local authentication
Step 1. First configure the APs in Flex mode as described on the section Configure FlexConnect mode on the remote site.
Step 2. Create the WLAN.
Navigate to Configuration > Tags & Profiles > WLANs, select +Add.
On General tag create a name to the Profile Name, SSID, and enable Status:
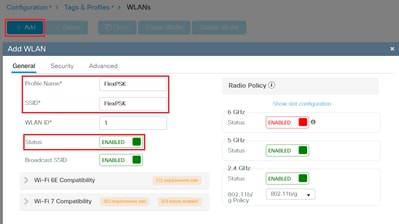
Step 3. Navigate to Security > Layer 2 tab select WPA+WPA2, Fast Transition as Enabled, Auth Key Mgmt PSK and FT+PSK, choose the PSK Format and PSK Type you want, and type the Pre-Shared Key you want your clients to use:
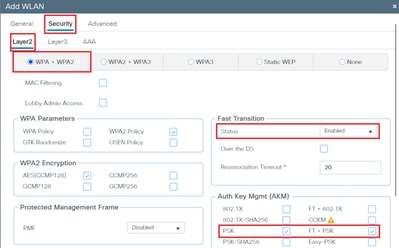
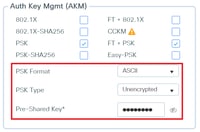
Click on Update & Apply to Device.
You can see the created WLAN:

Step 4. Create the Policy Profile.
Navigate to Configuration > Tags & Profiles > Policy.
Select +Add and on General tab give a name to the policy profile, enable the status, and disable central switching, central authentication, and central DHCP:
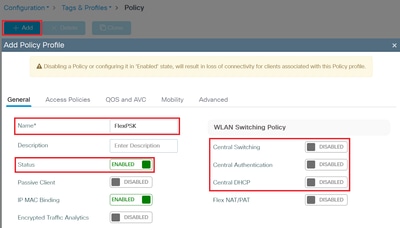
Step 5. Navigate to the tab Access Policies, select the VLAN:
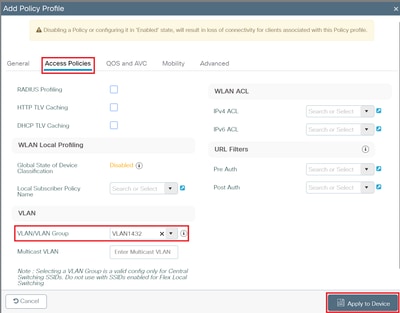
Click on Update & Apply to Device.
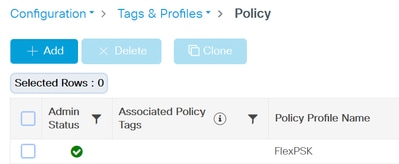
You can see the policy profile on the list:
Step 6. You can create a new Policy tag, or edit the exiting one.
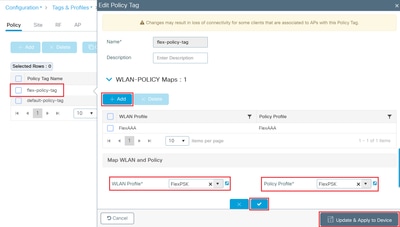
Navigate to Configuration > Tags & Profiles > Tags to edit the existing policy tag. Select the tag to edit.
Select +Add under WLAN-POLICY Maps. On WLAN Profile select the WLAN created previously from the drop down menu. On Policy Profile select the Policy Profile created previously from the drop down menu. Click on the check button, and then on Apply to Device:
If the policy tag is already assigned on the AP you do not need to do anything else.
If not, assign the policy tag on the APs tag. Navigate to Configuration > Wireless > Access Points. Select the AP to change the policy tag, and click on "Update & Apply to Device".
The AP disjoints and join back with the new policy tag.
When the AP joins back, you can check the Access Points list, confirm that the AP is on Flex mode, and it has the correct assigned tags.
CLI:
wlan FlexPSK 5 FlexPSK
radio policy dot11 24ghz
radio policy dot11 5ghz
security ft
security wpa psk set-key ascii 0 Password123
no security wpa akm dot1x
security wpa akm ft psk
security wpa akm psk
no shutdown
!
wireless profile policy FlexPSK
no central authentication
no central dhcp
no central switching
vlan VLAN1432
no shutdown
!
wireless tag policy flex-policy-tag
wlan FlexAAA policy FlexAAA
wlan FlexPSK policy FlexPSK
!
ap h.h.h (AP Radio MAC address)
policy-tag flex-policy-tag
site-tag Flex-site
rf-tag default-rf-tag
Verify
For 802.1x WLAN:
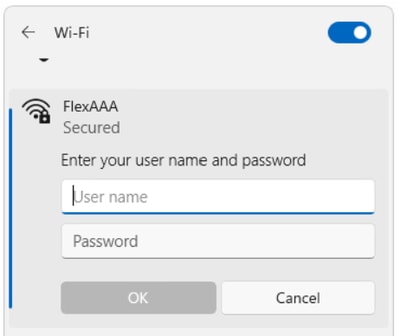
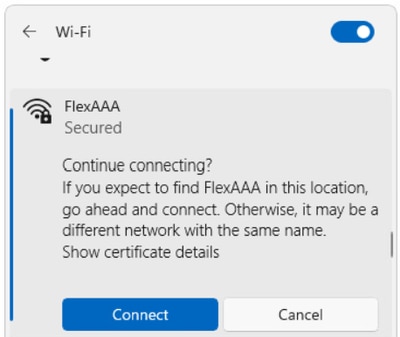
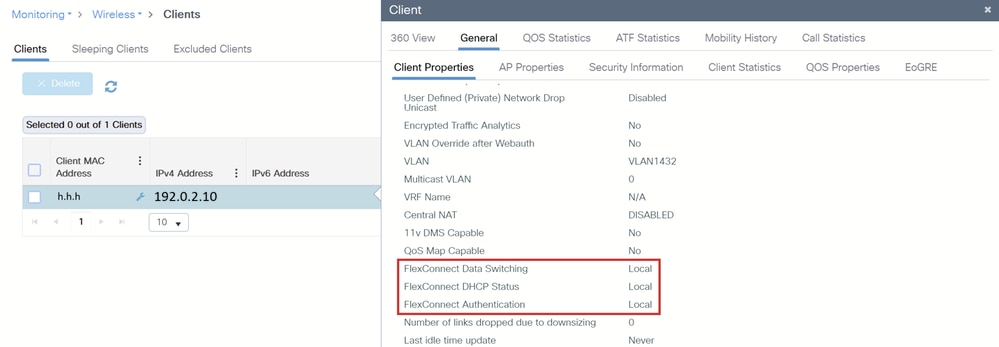
CLI:
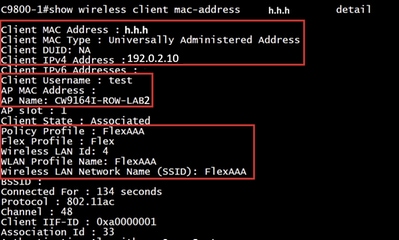

On the AP CLI:

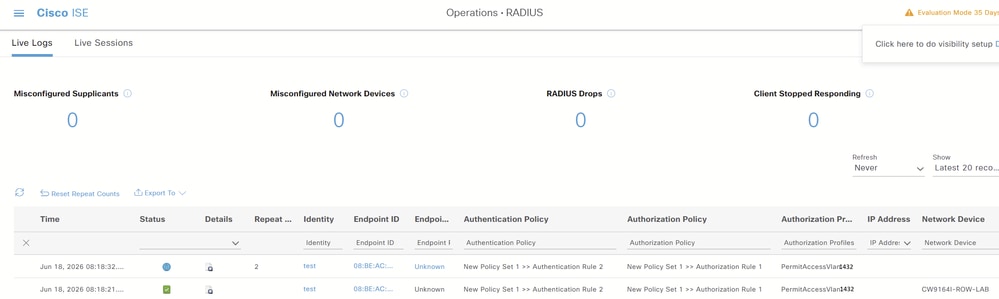
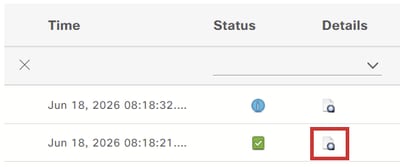
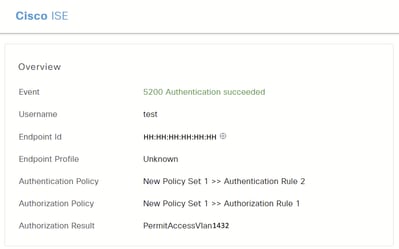
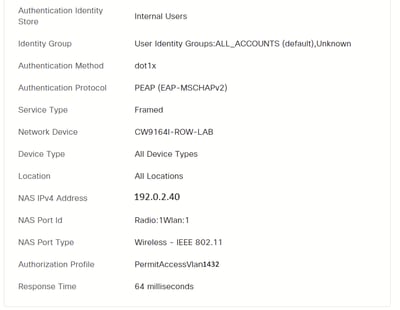
On ISE

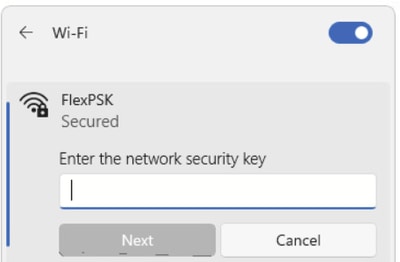
For PSK WLAN:
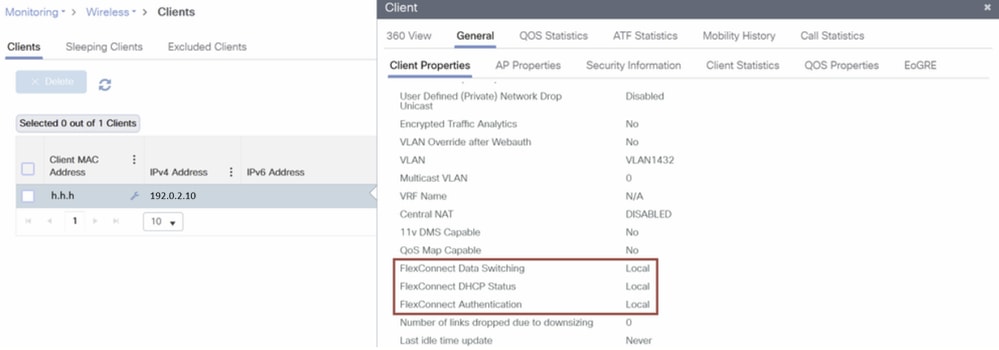
CLI:
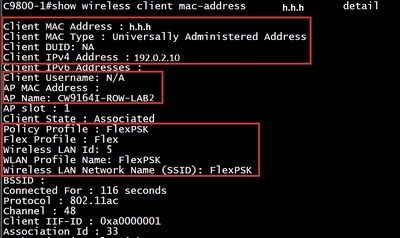

On AP CLI:

Troubleshoot
Enable AP debugs and RA trace with the client mac address, in sync.
On the AP enable these debugs:
debug flexconnect event
debug flexconnect pmk
debug flexconnect dot11r
debug dot11 client management information
debug dot11 client management critical
debug dot11 client management errors
debug dot11 client management events
For 802.1x WLAN:
AP debugs logs with successful authentication:
The AP handles the 802.11 state machine and local key management.
The AP processes the association and prepares the client for authentication.
[*06/19/2026 06:49:00.1836] CLSM[HH:HH:HH:HH:HH:HH]: client moved from UNASSOC to AUTH
[*06/19/2026 06:49:00.1890] wcp/flex_roam_st :: Flexconnect 11r enabled for client HH:HH:HH:HH:HH:HH
[*06/19/2026 06:49:00.1908] CLSM[HH:HH:HH:HH:HH:HH]: client moved from AUTH to ASSOC
[*06/19/2026 06:49:00.1909] Sending ADD MOBILE to client SM for local auth client mac HH:HH:HH:HH:HH:HH on radio 1 vap 0,auth_key_mgmt 0x000fac03 encrypt_type 0x00000200
[*06/19/2026 06:49:00.1931] CLSM[HH:HH:HH:HH:HH:HH]: client moved from ASSOC to 8021X
The AP processes the authorization, applies the VLAN override, and moves the client to the FWD (Forwarding) state.
[*06/19/2026 06:49:20.3601] received WCP_EVENT_CLIENT_AUTHORIZE (non) roaming case clearing roam flags
[*06/19/2026 06:49:20.3601] CLSM[HH:HH:HH:HH:HH:HH]: WCP_EVENT_CLIENT_AUTHORIZE : Plumbing key info to driver
[*06/19/2026 06:49:20.3612] wcp/flex_roam_st :: Flexconnect AAA Override Vlan with WLAN mapping: 1432 for client HH:HH:HH:HH:HH:HH
[*06/19/2026 06:49:20.3625] CLSM[HH:HH:HH:HH:HH:HH]: client moved from 8021X to IPLEARN_PENDING
[*06/19/2026 06:49:20.3627] wcp/flex_roam_st :: Flexconnect Sending HREAP_APAUTH_CLIENT_ADD
[*06/19/2026 06:49:20.3627] CLSM[HH:HH:HH:HH:HH:HH]: Retrieved key for FT+FT_DOT1X algono: 8, vlanId: 1432
[*06/19/2026 06:49:20.3627] CLSM[HH:HH:HH:HH:HH:HH]: Local auth (Add) on radio 1 Vap 0 reported to WLC
[*06/19/2026 06:49:20.3701] chatter: pmk_tracker :: PMKTracker: add dot11r entry for client HH:HH:HH:HH:HH:HH
[*06/19/2026 06:49:20.4313] CLSM[HH:HH:HH:HH:HH:HH]: Authorize succeeded to radio intf apr1v0
[*06/19/2026 06:49:20.4317] CLSM[HH:HH:HH:HH:HH:HH]: Local auth on radio 1 Vap 0 IP 192.0.2.10 updatereported to WLC
[*06/19/2026 06:49:20.4318] CLSM[HH:HH:HH:HH:HH:HH]: client moved from IPLEARN_PENDING to FWD
RA trace logs for the same successful authentication:
The RA trace logs the WLC’s orchestration of the session. The WLC validates the client identity and policy.
WLC recognizes the FlexConnect association.
2026/06/19 06:49:20.934325580 {wncd_x_R0-1}{1}: [client-orch-sm] [18318]: (note): MAC: hhhh.hhhh.hhhh HREAP Local auth payload received BSSID bbbb.bbbb.bbbb, WLAN FlexAAA, slot 1 AP dddd.dddd.dddd CW9164I-ROW-LAB2, AID 33WlanId: 4
2026/06/19 06:49:20.936543415 {wncd_x_R0-1}{1}: [dot1x] [18318]: (info): [hhhh.hhhh.hhhh:capwap_90400006] Dot1x authentication started for (hhhh.hhhh.hhhh)
2026/06/19 06:49:20.936579730 {wncd_x_R0-1}{1}: [auth-mgr] [18318]: (info): [hhhh.hhhh.hhhh:capwap_90400006] Authc success from Dot1X, Auth event success
2026/06/19 06:49:20.936600851 {wncd_x_R0-1}{1}: [auth-mgr] [18318]: (info): [hhhh.hhhh.hhhh:capwap_90400006] Context changing state from 'Idle' to 'Running'
2026/06/19 06:49:20.936654791 {wncd_x_R0-1}{1}: [ewlc-infra-evq] [18318]: (note): Authentication Success. Resolved Policy bitmap:11 for client hhhh.hhhh.hhhh
2026/06/19 06:49:20.936769433 {wncd_x_R0-1}{1}: [auth-mgr] [18318]: (info): [hhhh.hhhh.hhhh:capwap_90400006] Context changing state from 'Running' to 'Authc Success'
WLC pushes the policy to the AP.
2026/06/19 06:49:20.937447786 {wncd_x_R0-1}{1}: [svm] [18318]: (info): [hhhh.hhhh.hhhh] Applied User Profile: :
2026/06/19 06:49:20.937451734 {wncd_x_R0-1}{1}: [aaa-attr-inf] [18318]: (info): Applied User Profile: clid-mac-addr 0 hh hh hh hh hh hh
2026/06/19 06:49:20.937452534 {wncd_x_R0-1}{1}: [aaa-attr-inf] [18318]: (info): Applied User Profile: target-scope 0 0 [client]
2026/06/19 06:49:20.937455590 {wncd_x_R0-1}{1}: [aaa-attr-inf] [18318]: (info): Applied User Profile: vlan-id 0 1432 (0x598)
2026/06/19 06:49:20.937456177 {wncd_x_R0-1}{1}: [aaa-attr-inf] [18318]: (info): Applied User Profile: method 0 0 [dot1x]
2026/06/19 06:49:20.937458436 {wncd_x_R0-1}{1}: [aaa-attr-inf] [18318]: (info): Applied User Profile: username 0 "test"
2026/06/19 06:49:20.937462127 {wncd_x_R0-1}{1}: [aaa-attr-inf] [18318]: (info): Applied User Profile:tunnel-private-group-id 0 "1432"
2026/06/19 06:49:20.937462755 {wncd_x_R0-1}{1}: [aaa-attr-inf] [18318]: (info): Applied User Profile: tunnel-type 0 13 [vlan]
2026/06/19 06:49:20.937463426 {wncd_x_R0-1}{1}: [aaa-attr-inf] [18318]: (info): Applied User Profile: tunnel-medium-type 0 6 [ALL_802]
2026/06/19 06:49:20.937464035 {wncd_x_R0-1}{1}: [aaa-attr-inf] [18318]: (info): Applied User Profile: timeout 0 28800 (0x7080)
Authorization success.
2026/06/19 06:49:20.937594042 {wncd_x_R0-1}{1}: [auth-mgr] [18318]: (info): [hhhh.hhhh.hhhh:capwap_90400006] Raised event AUTHZ_SUCCESS (11)
2026/06/19 06:49:20.937597878 {wncd_x_R0-1}{1}: [auth-mgr] [18318]: (info): [hhhh.hhhh.hhhh:capwap_90400006] Context changing state from 'Authc Success' to 'Authz Success'
Client parameters.
2026/06/19 06:49:20.939394217 {wncd_x_R0-1}{1}: [dot11] [18318]: (note): MAC: hhhh.hhhh.hhhh Client datapath entry params - ssid:FlexAAA,slot_id:1 bssid ifid: 0x0, radio_ifid: 0x90400008, wlan_ifid: 0xf0400004
WLC learns the IP via local DHCP/ARP.
2026/06/19 06:49:21.001000218 {wncd_x_R0-1}{1}: [client-iplearn] [18318]: (note): MAC: hhhh.hhhh.hhhh Client IP learn successful. Method: IP Snooping IP: 192.0.2.10
Client is fully connected.
2026/06/19 06:49:21.002363496 {wncd_x_R0-1}{1}: [errmsg] [18318]: (info): %CLIENT_ORCH_LOG-6-CLIENT_ADDED_TO_RUN_STATE: R0/1: wncd: Username entry (test) joined with ssid (FlexAAA) for device with MAC: hhhh.hhhh.hhhh on channel (48)
2026/06/19 06:49:21.002795009 {wncd_x_R0-1}{1}: [client-orch-state] [18318]: (note): MAC: hhhh.hhhh.hhhh Client state transition: S_CO_IP_LEARN_IN_PROGRESS -> S_CO_RUN
Standalone scenario
Behavior during AP-WLC connectivity loss and subsequent recovery.
The AP is joined to the WLC. The client performs successful 802.1X authentication, and the AP transitions the client to the FWD (Forwarding) state.
On ISE RADIUS Live Logs we see the client session.
[*07/06/2026 20:26:05.8590] chatter: pmk_tracker :: PMKTracker: add dot11r entry for client HH:HH:HH:HH:HH:HH
[*07/06/2026 20:26:05.9330] CLSM[HH:HH:HH:HH:HH:HH]: Authorize succeeded to radio intf apr0v0
[*07/06/2026 20:26:05.9330] CLSM[HH:HH:HH:HH:HH:HH]: Local auth on radio 0 Vap 0 IP 192.0.2.10 updatereported to WLC
[*07/06/2026 20:26:05.9330] CLSM[HH:HH:HH:HH:HH:HH]: client moved from IPLEARN_PENDING to FWD


CW9164I-ROW-LAB2#show dot11 clients

Total dot11 clients: 1
Client MAC Slot ID WLAN ID AID WLAN Name RSSI Maxrate is_wgb_wired is_mld_sta
HH:HH:HH:HH:HH:HH 0 1 1 FlexAAA -40 M7 No No
The AP fails to reach the WLC, exhausts its retransmission count, and switches to Standalone Mode. Existing clients remain connected locally.
[*07/06/2026 20:28:47.0840] Re-Tx Count=1, Max Re-Tx Value=5, SendSeqNum=33, NumofPendingMsgs=4
[*07/06/2026 20:28:50.0860] Re-Tx Count=2, Max Re-Tx Value=5, SendSeqNum=34, NumofPendingMsgs=5
[*07/06/2026 20:28:53.0870] Re-Tx Count=3, Max Re-Tx Value=5, SendSeqNum=35, NumofPendingMsgs=6
[*07/06/2026 20:28:56.0990] Re-Tx Count=4, Max Re-Tx Value=5, SendSeqNum=35, NumofPendingMsgs=6
[*07/06/2026 20:28:59.1000] Re-Tx Count=5, Max Re-Tx Value=5, SendSeqNum=35, NumofPendingMsgs=6
[*07/06/2026 20:29:02.1010] Max retransmission count exceeded, going back to DISCOVER mode.
[*07/06/2026 20:29:02.1020] Flexconnect Switching to Standalone Mode!
[*07/06/2026 20:29:02.2170] CAPWAP State: DTLS Teardown
But client is still connected:
CW9164I-ROW-LAB2#show dot11 clients
Total dot11 clients: 1
Client MAC Slot ID WLAN ID AID WLAN Name RSSI Maxrate is_wgb_wired is_mld_sta
HH:HH:HH:HH:HH:HH 0 1 1 FlexAAA -40 M7 No No
When the client roams to another AP in Standalone mode, the EAP handshake fails due to the inability to reach the RADIUS server. The client is deauthorized and removed from the AP.
[*07/06/2026 20:34:44.7240] CLSM[HH:HH:HH:HH:HH:HH]: Session timeout
[*07/06/2026 20:36:15.2670] hostapd:apr0v0: CTRL-EVENT-EAP-RETRANSMIT hh:hh:hh:hh:hh:hh
[*07/06/2026 20:36:15.2670] hostapd:apr0v0: CTRL-EVENT-EAP-TIMEOUT-FAILURE hh:hh:hh:hh:hh:hh
[*07/06/2026 20:36:15.2680] wcp/flex_roam_st :: Flexconnect hapdev: Received UNAUTHORIZE for hh:hh:hh:hh:hh:hh
[*07/06/2026 20:36:15.2680] wcp/flex_roam_st :: Flexconnect hapdev: recv'd UNAUTH with DISCONNECT REQUEST. Delete DCDS entry
[*07/06/2026 20:36:15.2680] CLSM[HH:HH:HH:HH:HH:HH]: Client delete initiated with timeout of 10 seconds
[*07/06/2026 20:36:15.2770] CLSM[HH:HH:HH:HH:HH:HH]: Remove success from ClientIPTable on apr0v0
[*07/06/2026 20:36:15.2780] CLSM[HH:HH:HH:HH:HH:HH]: Not sending DELETE to cont, reason CLIENT_DEL_EAP_REQ_TIMEOUT
[*07/06/2026 20:36:15.2780] CLSM[HH:HH:HH:HH:HH:HH]: Deauthorize succeeded to radio intf apr0v0
[*07/06/2026 20:36:15.2780] CLSM[HH:HH:HH:HH:HH:HH]: client moved from FWD to DELETE_PENDING
[*07/06/2026 20:36:15.2880] CLSM[HH:HH:HH:HH:HH:HH]: Send Deauth with reason 2 force 1 - Radio 0 Vap 0 success
[*07/06/2026 20:36:25.0830] CLSM[HH:HH:HH:HH:HH:HH]: Delete timeout
[*07/06/2026 20:36:25.0830] CLSM[HH:HH:HH:HH:HH:HH]: Delete client reassoc 0 succeeded to radio intf apr0v0
AP sends the client session to the backup RADIUS server.
The AP regains connectivity to the WLC. The AP switches back to Connected Mode and synchronizes the local client session information with the WLC.
The client session transitions between Primary and Backup ISE nodes based on the AP connectivity status.
The AP and client show as connected on the WLC, and the client did not notice any disconnections or flap when the connectivity between AP and WLC was down.
CW9164I-ROW-LAB2#show dot11 clients

Total dot11 clients: 0


Upon roaming back, the client undergoes local authentication. The AP processes the association and moves the client back to the FWD state.

[*07/06/2026 20:48:49.2830] CLSM[HH:HH:HH:HH:HH:HH]: US Auth(b0) seq 2653 IF 23 slot 0 vap 0 len 30 state NULL
[*07/06/2026 20:48:49.2840] CLSM[HH:HH:HH:HH:HH:HH]: DS Auth len 30 slot 0 vap 0
[*07/06/2026 20:48:49.2850] CLSM[HH:HH:HH:HH:HH:HH]: Driver send mgmt frame success Radio 0 Vap 0
[*07/06/2026 20:48:49.2850] CLSM[HH:HH:HH:HH:HH:HH]: client moved from UNASSOC to AUTH
[*07/06/2026 20:48:49.2920] CLSM[HH:HH:HH:HH:HH:HH]: US Reassoc Req(20) seq 2654 IF 23 slot 0 vap 0 len 188 state AUTH
[*07/06/2026 20:48:49.2930] CLSM[HH:HH:HH:HH:HH:HH]: AUTH TYPE RSNIE DOT1X
[*07/06/2026 20:48:49.2940] CLSM[HH:HH:HH:HH:HH:HH]: Populate client capability: cap_from_click=true, max_cap_found=2, assoc_cap=2, max_cap=2, ht=true, vht=false, he=false, he6e=false, eht=false
[*07/06/2026 20:48:49.2940] Flexconnect local_auth 1 local_assoc 1 frame subtype 32
[*07/06/2026 20:48:49.2940] CLSM[HH:HH:HH:HH:HH:HH]: radio id: 0, vap id: 0, max clients for this wlan: 200, num of clients this wlan: 0, max_client_per_ap: 400, num_client_at_ap: 0
[*07/06/2026 20:48:49.2940] CLSM[HH:HH:HH:HH:HH:HH]: radio state: 1, client state: 1, max_client_per_radio: 200, num_clients_at_radio: 0
[*07/06/2026 20:48:49.2940] Adding RM Capable IE - Len = 5, RRM[0] = 73, RRM[1] = c0
[*07/06/2026 20:48:49.2940] DS [re]Assoc 1 req_len=201 resp_len=146 11r_len=0 cckm 0 qos_flag 1 status 0
[*07/06/2026 20:48:49.2940] CLSM[HH:HH:HH:HH:HH:HH]: DS Reassoc Resp(30) IF 0 slot 0 vap 0 state AUTH, generated by AP
[*07/06/2026 20:48:49.2950] CLSM[HH:HH:HH:HH:HH:HH]: Driver send mgmt frame success Radio 0 Vap 0
[*07/06/2026 20:48:49.2950] CLSM[HH:HH:HH:HH:HH:HH]: client moved from AUTH to ASSOC
[*07/06/2026 20:48:49.2950] Sending ADD MOBILE to client SM for local auth client mac HH:HH:HH:HH:HH:HH on radio 0 vap 0,auth_key_mgmt 0x000fac01 encrypt_type 0x00000200
[*07/06/2026 20:48:49.2960] wcp/flex_roam_st :: Flexconnect Sending ADD_MOBILE_PAYLOAD (v4-client-acl-name: ) Client State: 2
[*07/06/2026 20:48:49.2960] wcp/flex_roam_st :: Flexconnect encode_and_send_add_mobile_to_dott11_client_sm for client Aid 1 HH:HH:HH:HH:HH:HH
[*07/06/2026 20:48:49.2960] CLSM[HH:HH:HH:HH:HH:HH]: ADD_MOBILE AID 1
[*07/06/2026 20:48:49.2960] CLSM[HH:HH:HH:HH:HH:HH]: Driver Add Client success AID 1 Radio 0 Vap 0 Enc 4
[*07/06/2026 20:48:49.2960] CLSM[HH:HH:HH:HH:HH:HH]: Added to ClientIPTable on apr0v0
[*07/06/2026 20:48:49.2970] CLSM[HH:HH:HH:HH:HH:HH]: client moved from ASSOC to 8021X
[*07/06/2026 20:48:49.2970] CLSM[HH:HH:HH:HH:HH:HH]: Added to WCP client table AID 1 Radio 0 Vap 0 Enc 4
[*07/06/2026 20:48:49.2980] wcp/flex_roam_st :: Flexconnect hapdev: client WCP_EVENT_CLIENT_ASSOC/REASSOC
[*07/06/2026 20:48:49.6360] received WCP_EVENT_CLIENT_AUTHORIZE (non) roaming case clearing roam flags
[*07/06/2026 20:48:49.6360] wcp/flex_roam_st :: Flexconnect (AUTHORIZE) received PTK thru wcp_event
[*07/06/2026 20:48:49.6370] wcp/flex_roam_st :: Flexconnect HH:HH:HH:HH:HH:HH client ACL , Qos Profile: -1, VLAN 1432, VLAN NAME , VLAN NAME LEN 0, AAA override 1, session_timeout 0
[*07/06/2026 20:48:49.6370] wcp/flex_roam_st :: Flexconnect AAA Override Vlan with WLAN mapping: 1432 for client HH:HH:HH:HH:HH:HH
[*07/06/2026 20:48:49.6370] wcp/flex_roam_st :: Flexconnect Sending ADD_MOBILE_PAYLOAD (v4-client-acl-name: ) Client State: 3
[*07/06/2026 20:48:49.6370] wcp/flex_roam_st :: Flexconnect encode_and_send_add_mobile_to_dott11_client_sm for client Aid 1 HH:HH:HH:HH:HH:HH
[*07/06/2026 20:48:49.6370] CLSM[HH:HH:HH:HH:HH:HH]: ADD_MOBILE AID 1
[*07/06/2026 20:48:49.6380] CLSM[HH:HH:HH:HH:HH:HH]: check vlan override vlan 1432
[*07/06/2026 20:48:49.6380] CLSM[HH:HH:HH:HH:HH:HH]: Client ADD Encrypt Key success AID 1 Radio 0 Enc 4 Key Len 16 Key idx 0 Key bd 36
[*07/06/2026 20:48:49.6380] CLSM[HH:HH:HH:HH:HH:HH]: client moved from 8021X to IPLEARN_PENDING
[*07/06/2026 20:48:49.6390] wcp/flex_roam_st :: Flexconnect Sending HREAP_APAUTH_CLIENT_ADD
[*07/06/2026 20:48:49.6900] CLSM[HH:HH:HH:HH:HH:HH]: Authorize succeeded to radio intf apr0v0
[*07/06/2026 20:48:49.6910] CLSM[HH:HH:HH:HH:HH:HH]: client moved from IPLEARN_PENDING to FWD


CW9164I-ROW-LAB2#show dot11 clients

Total dot11 clients: 1
Client MAC Slot ID WLAN ID AID WLAN Name RSSI Maxrate is_wgb_wired is_mld_sta
HH:HH:HH:HH:HH:HH 0 1 1 FlexAAA -39 M7 No No
*07/06/2026 20:59:57.7690] Discovery Response from 192.0.2.20
[*07/06/2026 21:00:08.0080] CAPWAP State: DTLS Setup
[*07/06/2026 21:00:08.4820] CAPWAP State: Join
[*07/06/2026 21:00:09.3740] Sending Join request to 192.0.2.20 through port 5253, packet size 1376
[*07/06/2026 21:00:09.3780] Join Response from 192.0.2.20, packet size 1397
[*07/06/2026 21:00:09.4040] CAPWAP State: Image Data
[*07/06/2026 21:00:09.5020] CAPWAP State: Configure
[*07/06/2026 21:00:12.5510] CAPWAP State: Run
[*07/06/2026 21:00:12.6480] AP has joined controller C9800-1
[*07/06/2026 21:00:12.6490] Flexconnect Switching to Connected Mode!
[*07/06/2026 21:00:12.6520] CLSM[HH:HH:HH:HH:HH:HH]: AP_REAP_CLIENT_INFO_PAYLOAD Client MAC HH:HH:HH:HH:HH:HH Slot 0 VAP 1 Assoc ID 1 VLAN ID 1432 State 6 Client Type 2 Client IP 192.0.2.10
[*07/06/2026 21:00:12.6520] AssocTimeAtAP 1783371169 clientBitmap=0x13
[*07/06/2026 21:00:12.6520] CLSM[00:00:00:00:00:00]: Numbers of Local Switching clients to report : 1
[*07/06/2026 21:00:14.8270] chatter: pmk_tracker :: PMKTracker: add dot11r entry for client HH:HH:HH:HH:HH:HH
[*07/06/2026 21:00:14.8270] chatter: bssid BB:BB:BB:BB:BB:BB, life_time 1783371774, created_at 1783371614, vlanOverride 1432, aclOverride , IPv6aclOverride , qosOverride 0, username
[*07/06/2026 21:00:14.8280] chatter: pmk_tracker :: PMKTracker: add dot11r entry for client HH:HH:HH:HH:HH:HH
[*07/06/2026 21:00:14.8280] chatter: bssid BB:BB:BB:BB:BB:BB, life_time 1783371774, created_at 1783371614, vlanOverride 1432, aclOverride , IPv6aclOverride , qosOverride 0, username
CW9164I-ROW-LAB2# show dot11 clients
Total dot11 clients: 1
Client MAC Slot ID WLAN ID AID WLAN Name RSSI Maxrate is_wgb_wired is_mld_sta
HH:HH:HH:HH:HH:HH 0 1 1 FlexAAA -40 M7 No No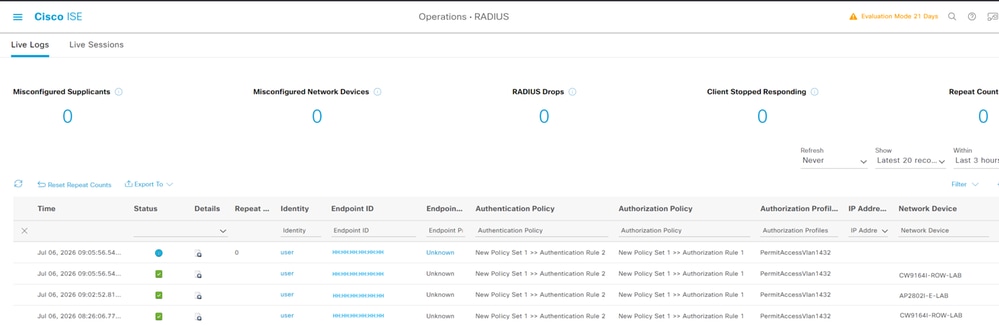
Primary ISE: Records the initial session (08:26:06) and the resumed session after WLC connectivity restoration (09:02:52).
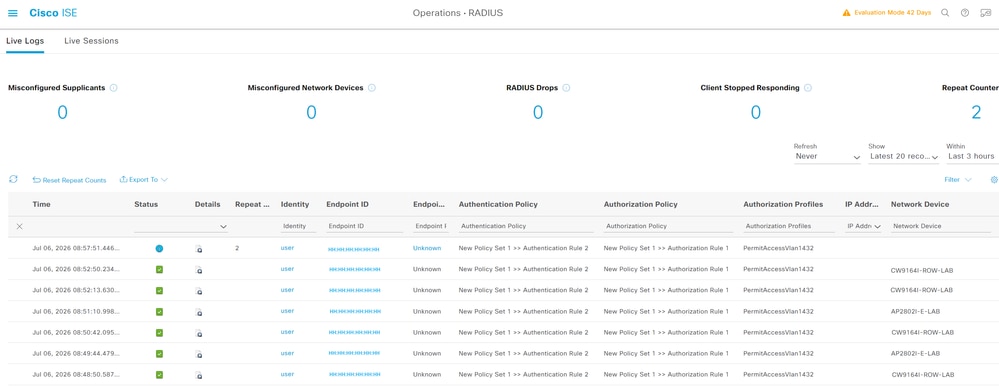
Backup ISE: Captures the session activity (08:48:50 – 08:57:51) while the AP was operating in Standalone Mode.
The first session was at 08:26:06, after that the AP lost connectivity to the WLC and moved to Standalone Mode.
The session 09:02:52 is the first session after AP reestablished the connectivity with the WLC.
Related Information
- CCNP Enterprise Wireless Design ENWLSD 300-425 and Implementation ENWLSI 300-430 Official Cert Guide, 2nd Edition
- Cisco Catalyst 9800 Series Wireless Controller Software Configuration Guide, Cisco IOS XE 17.8.x - Chapter: FlexConnect
- Release Notes for Cisco Catalyst 9800 Series Wireless Controller, Cisco IOS XE Cupertino Release 17.8.x
- Feature Matrix for Cisco Wireless Access Points
- Cisco Technical Support & Downloads
Revision History
| Revision | Publish Date | Comments |
|---|---|---|
1.0 |
12-Nov-2026
|
Initial Release |

 Feedback
Contact Cisco
- Open a Support Case

- (Requires a Cisco Service Contract)