Validate and Recover Catalyst APs on 17.12 Impacted by Upgrade Failure
Available Languages
Contents
Introduction
This document describes the validation and recovery procedure when Access Points are affected by Cisco bug ID CSCwf25731 and CSCwf37271.
Interactive assistance
If you log in with your CCO credentials, Cisco AI Assistant for Support can help to interactively determine if this bug is applicable to your network, and if it is then to determine recovery options. To get started:
- Click on the Cisco AI Assistant for Support icon located in the bottom-right corner of the document.
- Log in using your Cisco credentials.
- Once logged in, refresh your browser tab/document.
- Click the bot icon located in the bottom-right corner to begin asking questions related to this document.


For the best results, start with simple questions and gradually increase complexity. If a response is unsatisfactory, please click the thumbs down icon to give us feedback. You can always refer back to this document if the Cisco AI Assistant for Support answers are unclear.
Context
Upgrades or APSPs applied to systems currently running 17.12.4/5/6/6a or previously ran these versions for considerable amount of time can cause affected Access Point models (please check Affected Access Points list below) to enter into boot loop under certain conditions, triggered by image install failure due to insufficient disk space on Access Point storage. While this does not affect daily operations or SMUs, it is a critical risk during ISSU, full controller code upgrades or APSP installs since these procedures involve Access Points image upgrades.
Additional process need to be followed which requires mandatory upgrade prechecks steps mentioned in this document, as no configuration workaround exists.
To resolve this, you must install the specific APSP version fix (shown in the Fixed Codes table below) in the WLC before the Access Points attempt to upgrade, or use the cleanup APSP (available for 17.15.4d and 17.18.2) if you have already moved to a later release but ran any of the affected versions. Even if you are unsure of your system history, it is highly recommended to perform storage checks before any upgrade or APSP install if the affected versions were ever present in your environment.
Root Cause Details
Access Points running 17.12.4 through 17.12.6a are affected by a library bug that generates a persistent log file: /storage/cnssdaemon.log. This file grows by 5MB daily and is not cleared by reboots, eventually exhausting the device storage space. Consequently, if the Access Point is running from boot partition 1 (Part1), and boot partition 2 (Part2) is full due to the log file, the upgrade process will fail because it cannot store the new image in boot partition 2, potentially leading to a boot loop. To prevent this, you must clear the storage or ensure the Access Point has booted from partition 2 before attempting any further upgrades by executing the instructions in this document.
Affected Codes and Access Points
Affected Access Points
The following Access Point models are the only ones susceptible to this issue. If your network does not utilize any of these specific models, your environment is not affected and no further action is required.
- Catalyst 9124 (I/D/E)
- Catalyst 9130 (I/E)
- Catalyst 9136I
- Catalyst 9162I
- Catalyst 9163E
- Catalyst 9164I
- Catalyst 9166 (I/D1)
- Catalyst IW9167 (I/E)
Affected Codes
To verify this across your network, execute the following command from all the WLCs and verify if the code present in your WLCs is listed in the table below.
WLC# show version | in VersionAlternatively, you can do the same from the Access Points. Check the output to see if either the Primary or Backup image is running an affected image from the ones listed in the table.
AP# show version | in Image| Controller affected code | Access Point affected image |
| 17.12.4 | From 17.12.4.0 to 17.12.4.212 |
| 17.12.5 | From 17.12.5.0 to 17.12.5.208 |
| 17.12.6/6a | From 17.12.6.0 to 17.12.6.200 |

Note: Note: In general, if the network is not running and has not run 17.12.4, 17.12.5, 17.12.6/6a in the past, the issue is not applicable.
Fixed Codes
The following table lists the WLC software versions and their corresponding APSPs (Access Point Service Packs) that contain the fix for this bug. Please note that for the versions listed below, the fix is currently available only via APSP installation at the time of this writing.
| Controller and APSP fixed code | Access Point fixed image |
| 17.12.4 + APSP13 | 17.12.4.213 |
| 17.12.5 + APSP9 | 17.12.5.209 |
| 17.12.6a + APSP1 | 17.12.6.201 |
| 17.12.7a | 17.12.7.13 |
| 17.15.3 + APSP12 | 17.15.3.212 |
| 17.15.4b + APSP6 | 17.15.4.206 |
| 17.15.4d + APSP1 | 17.15.4.225 |
| 17.15.5 | 17.15.5.36 |
| 17.18.1 + APSP3 | 17.18.1.203 |
| 17.18.2 + APSP2 | 17.18.2.202 |
| 17.18.3 | 17.18.3.18 |
| 26.1.1 | 26.1.1.11 |
Upgrade Path and Bug Applicability
Use the table below to determine if your current WLCs and Access Points software versions apply for this bug and what upgrade steps to take. If your current deployment matches any of these releases in the Bug applicable and upgrade path table, you must perform the storage prechecks explained in the Upgrade Prechecks section before attempting any further upgrades.
Bug not applicable and upgrade path
The following table shows if your WLCs and Access Pointsdo not apply for this bug:
| Current code | Target code | Bug applicability | Before upgrade - precheck needed | Target/Upgrade path | Upgrade precheck | Comments |
| 17.3.x / 17.6.x / 17.9 x | 17.12.x | No | No | 17.12.4 + APSPx 17.12.5 + APSPx17.12.6a + APSPx17.12.7 | No | Check destination Release Notes |
| 17.9.x | Any (Except 17.12.4/5/6/6a) | No | No | Follow destination upgrade path | No | 17.9.1 to .5 do not support direct upgrade to 17.15, use 17.9.6 or higher for more information check release notes |
| 17.12.1 to 17.12.3 | Any (Except 17.12.4/5/6/6a) | No | No | Follow destination upgrade path | Regular Process | Check destination Release Notes |
| 17.15+New deployment | Any | No | No | Any | No | |
| 17.18.+New deployment | Any | No | No | Any | No |
Bug applicable and upgrade path
The following table shows if your WLCs and Access Points do apply for this bug:
| Current code | Target code | Bug applicability | Before upgrade - precheck needed | Target/Upgrade path | Upgrade precheck | Comments |
| 17.12.4/5/6/6a | 17.12.x(4,5,6,6a etc), APSP | Yes | Yes: refer to Upgrade precheck section | 17.12.4 + APSP, 17.12.5 + APSP, 17.12.6a + APSP, 17.12.7 | Yes | After installing a fixed APSP, no additional prechecks are needed for future 17.12 upgrades |
| 17.12.4/5/6/6a | 17.15.x / 17.18.x | Yes | Yes: refer to Upgrade precheck section | Upgrade respective 17.12.x APSP then upgrade to 17.15.x + APSP or 17.18.x + APSP | Yes for the first 17.12 APSP upgrade and no for the subsequent upgrades. | |
| Any release, but previous image was one of 17.12.4/5/6/6a | 17.15.x | Yes | Yes: refer to Upgrade precheck section | 17.15.x + APSP | Yes | |
| Any release, but previous image was one of 17.12.4/5/6/6a | 17.18.x | Yes | Yes: refer to Upgrade precheck section | 17.18.x + APSP | Yes |
Upgrade Prechecks
To ensure Access Points have sufficient free space in partition 2 (part2) for code or APSP installation, the following steps must be followed to safely recover storage space:
- Identify: Execute the manual or automated pre-checks to identify which specific Access Points are applicable for the bug. Automated precheck is highly recommended.
- Recover: For any Access Points flagged with low space in part 2, follow the recovery procedures mentioned in the Space Recovery section.
- Verify: Re-run the prechecks to confirm all devices are healthy and the space availability in part2 issue is resolved.
- Upgrade: Proceed with the upgrade to the fixed APSPs listed in the Fixed Codes section.
There are 2 prechecks methods:
- Manual
- Automated
The recommended is the Automated method since it saves time and avoid human errors.
Manual Precheck
1. From the WLC you can check the Primary and Backup image columns to confirm if your Access Points are running any of the impacted releases (check the Affected Codes section above).
WLC# show ap image
Total number of APs  : 4

AP Name             Primary Image          Backup Image            Predownload Status   Predownload Version  Next Retry Time   Retry Count   Method
------------------------------------------------------------------------------------------------------------------------------------------------------------------
Ap117.12.5.41        17.12.4.201                None                  0.0.0.0             N/A                 0           N/A
Ap217.12.5.41        17.12.4.201                None                  0.0.0.0             N/A                 0           N/A
Ap317.12.5.41        17.12.4.201                None                  0.0.0.0             N/A                 0           N/A
Ap417.12.5.41        17.12.4.201                None                  0.0.0.0             N/A                 0           N/A
You can also perform a similar verification directly at the Access Point level by running the following command to check both image partitions:
AP# show version
AP Running Image     :17.12.5.41
Primary Boot Image   : 17.12.5.41
Backup Boot Image    : 17.12.5.209
Verify the active boot partition. Use the "show boot" command and confirm that the "BOOT path-list" points to part1; this indicates that the Access Point is currently running from the primary partition and attempting to upgrade into the secondary part (part2) which could trigger the problem.
AP# show boot
--- Boot Variable Table ---
BOOT path-list: part1
2. Verify current filesystem usage by checking the /dev/ubivol/part2 partition. If the "Available" column shows less than 85M, the partition does not have space enough to install the APSP, which causes the upgrade to fail and potentially trigger a boot loop.
AP# show filesystems
Filesystem                Size      Used Available Use% Mounted on
devtmpfs                880.9M         0    880.9M   0% /dev
/sysroot                883.8M    219.6M    664.1M  25% /
tmpfs                     1.0M     56.0K    968.0K   5% /dev/shm
tmpfs                   883.8M         0    883.8M   0% /run
tmpfs                   883.8M         0    883.8M   0% /sys/fs/cgroup
/dev/ubivol/part1       372.1M     79.7M    292.4M  21% /part1
/dev/ubivol/part2       520.1M    291.3M    228.9M  56% /part2
3. Verify the image integrity for both partitions to ensure they are not corrupted. All fields for both Primary and Backup images must display a status of "Good"; if any field shows otherwise, stop the process move to the section When to Open a TAC Case.
AP# show image integrity
/part1(Backup) 17.12.5.209
    part.bin : Good
    ramfs_data_cisco.squashfs : Good
    iox.tar.gz : Good
/part2(primary) 17.12.5.41
    part.bin : Good
    ramfs_data_cisco.squashfs : Good
    iox.tar.gz : Good
List all the Access Points booting from part1 and showing less than 85M available in the /dev/ubivol/part2 since they will need space recovery. You can move to the Recovery section of this document.
Automated Precheck
For the automated precheck, utilize the WLANPoller tool. This tool allows you to run the needed commands across all your Access Points simultaneously to identify impacted Access Points; you can download it directly from the following link: https://developer.cisco.com/docs/wireless-troubleshooting-tools/wlan-poller-wlan-poller/
Note: Download the version of WLANPoller compatible with your operating system (Windows, Intel Mac, or ARM Mac). Ensure the host machine has SSH connectivity to the Access Points.
Steps:
1. Extraction – Unzip the WLANPoller file to your preferred directory. After unzipping, you will find two directories and an application named as follows:
- data
- confd
- WlanPollerGUI
Note: If you experience errors when running the application after extracting with native Windows tools, please use a third-party utility like 7-Zip to extract the files.
Note: For MacOS to run the application, open a terminal with root access and navigate to the directory where WLANPoller was extracted. Execute the following command: sudo ./Wpgui_Mac_Arm64_Ver505/WlanPollerGUI.app/Contents/MacOS/WlanPollerGUI
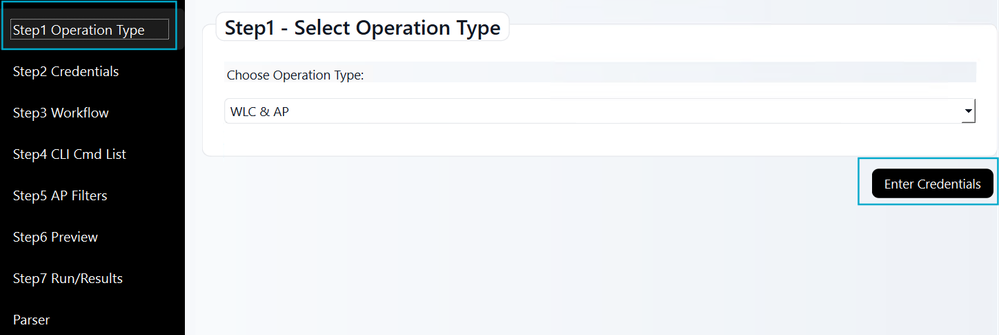
2. Configuration - Launch the WlanPollerGUI application and configure the settings as follows:
Operation type: Select WLC and AP. For the Access PointOnly option, upload a ".txt" file listing your Access Points in a comma-separated format (for example 192.168.166.105, Timpadil9166). Then, click Enter Credentials.
For Access Point Only mode, ensure your ".txt" file follows this example:

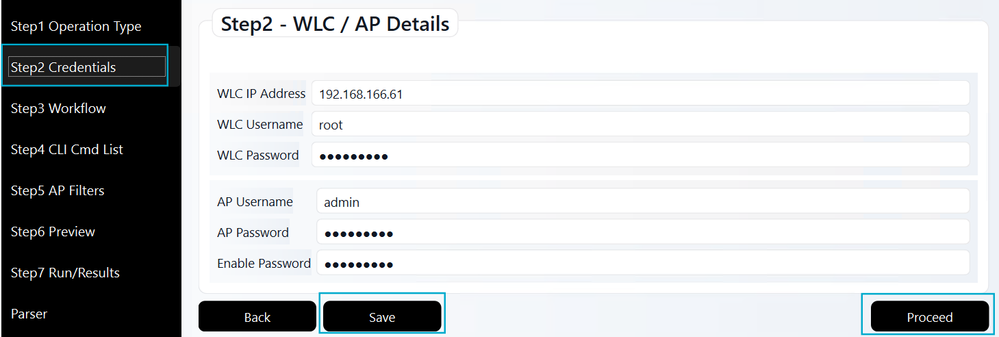
Credentials: Input the WLC IP address and credentials. Include the Access Point username, password, and enable password from the Access Point Join Profile. Click Save followed by Proceed.
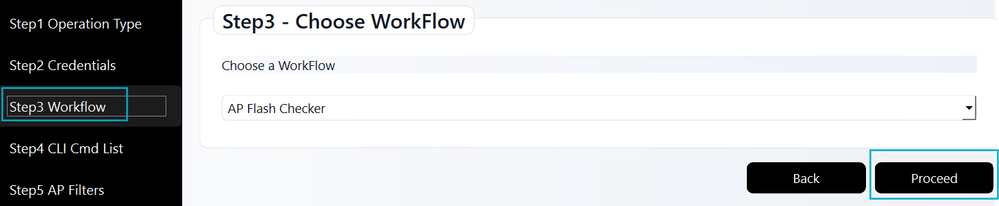
Workflow: Choose the Access Point Flash Checker workflow to run the required diagnostic commands. Then, click Proceed.
CLI Cmd List: This step is skipped automatically; the required command list is already included in the Access Point Flash Checker workflow (Step 3).
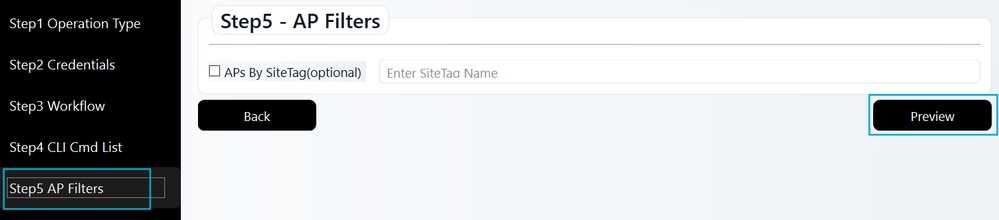
Access Point Filters: This optional step allows you to filter by a specific site. If you use it, check the box and enter the Site Tag name (case-sensitive). Once finished, or if skipping this step, click Preview.
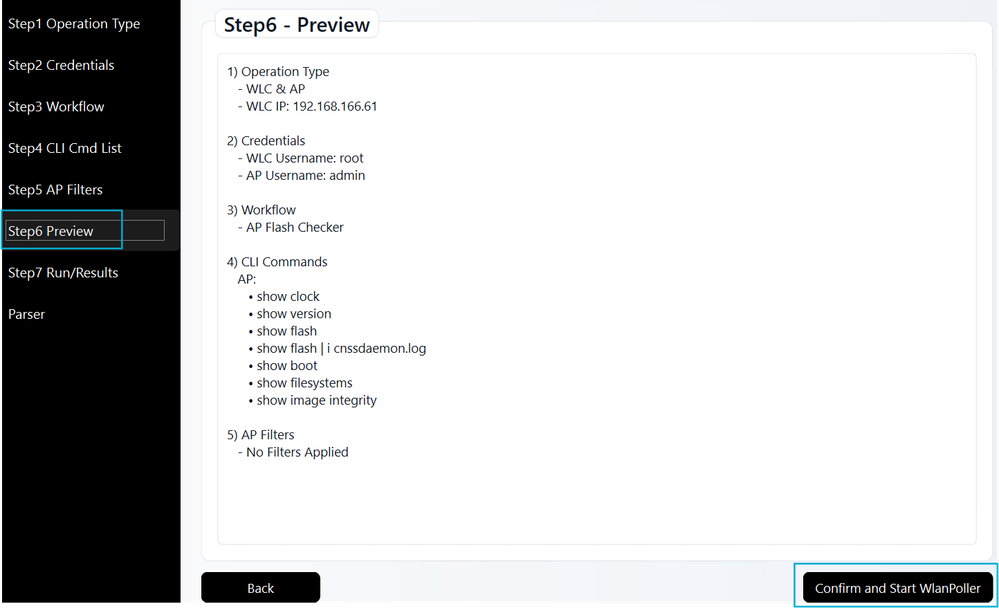
Preview: Review your WLANPoller settings here. The required CLI commands are pre-populated from the previous workflow step. After confirming the details, click Confirm and Start WLANPoller to begin SSH connection and data collection.
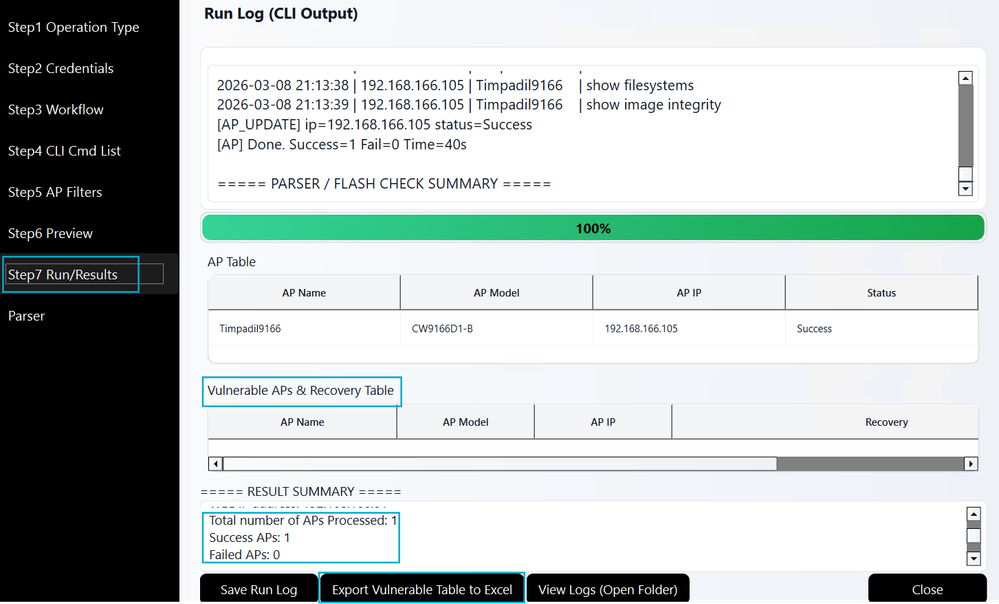
3. Results: The tool establishes SSH connections to your Access Points to run the necessary commands. Results are displayed to help you identify Access Points needing recovery. A record of this data is automatically saved in the data sub-folder within your WLANPoller extraction directory.
Note: The Export Vulnerable Table to Excel feature lists only Access Points needing recovery. If an Access Point is not listed, it means it is unaffected.
Prechecks results
Based on the scan, WLANPoller categorizes affected Access Points into one of the following options:
- Safe state but Access Point has buggy image in the back up partition: The Access Point is currently safe to upgrade, and you may proceed with the code/APSP installation. However, be aware that the backup partition still contains a susceptible image.
- Recover with image partition swap: The Access Point is currently booted from partition 1, but partition 2 does not have sufficient space for the upgrade. An Access Point boot partition swap required.
- Recover with devshell: The Access Point requires recovery via devshell because there is insufficient space in either partition to install the new code or APSP.
- Image integrity check has failed for this AP: The image in partition 1 or partition 2 has failed the integrity check. Manual intervention may be required.
Recovery
Based on the precheck results, you can select the appropriate recovery option that best fits your network as follows:
| Result | Recovery options |
| Safe state but Access Point has buggy image in the back up partition | Informational, you can proceed with the code/APSP install |
| Recover with image partition swap | There are 4 options: 1. Delete Access Point core files. 2. Factory reset the Access Points. 3. Access Point image boot partition swap. 4. Delete cnssdaemon.log file (Access Point devshell). Choose the recovery option most suitable for your environment and resource availability. |
| Recover with devshell | There are 2 options: 1. Delete cnssdaemon.log file (Access Point devshell). 2. Factory reset the Access Points. Choose the recovery option most suitable for your environment and resource availability. |
| Image integrity check has failed for this Access Point | Follow procedure: When to open a TAC case |
There are two recovery paths depending on the current state of your Access Points. The state of the Access Points can be:
- Low space availability in Partition 2: This occurs during the pre-upgrade phase (found during Upgrade Prechecks) when attempting a code/APSP installation.
- Access Point bootloop: This occurs post-upgrade if the code/APSP installation was attempted despite insufficient space.
Detailed recovery steps for each of the possible states of the Access Points are described below.
Low space availability in partition 2
If the Upgrade Precheck identifies Access Points booting with partition 1 and with insufficient space in partition 2, use one of the following methods to make space in the partition.
- Delete Access Point core files: Access Points store core dumps in /dev/ubivol/part2. If these files exist, deleting them may free up enough space. After deletion, you must re-run the Upgrade Precheck to validate that the available space meets the installation requirements.
- Factory reset the Access Point: Performing a factory reset returns the Access Point to its default configuration. This process temporarily clears cnssdaemon.log file from the storage, typically providing enough space in partition 2 (part 2) to successfully install the code/APSP.
- Delete cnssdaemon.log file (Access Point devshell): This process involves accessing the Access Points devshell to manually remove the cnssdaemon.log file. Note that this requires administrative access and coordination with TAC to enter the devshell environment.
- Boot Partition Swap: If Partition 2 (part2) does not have space enough to install the code/APSP but already contains a functional image, you can boot the Access Point from part2 and target the installation to Partition 1 (part1), which generally has available space.
Please review the details for each of the options to ensure you understand the requirements. Select the method that best aligns with your network environment and operational needs.
Delete access points core files
Core files can be deleted manually by accessing each Access Point via SSH. Alternatively, you can use WLANPoller to automate this process and perform deletions in bulk mode for multiple Access Points simultaneously.
Manual mode
Access each Access Point via SSH and execute the following commands:
AP# delete /force cores
AP# reload
Proceed with reload? [confirm] yes
Automated mode
Launch the WLANPoller application and follow these steps:
Operations type: Select operation type WLC & AP.
Credentials: Enter WLC and Access Point credentials.
Workflow: Update the selection to Custom CLI Commands and click Proceed.

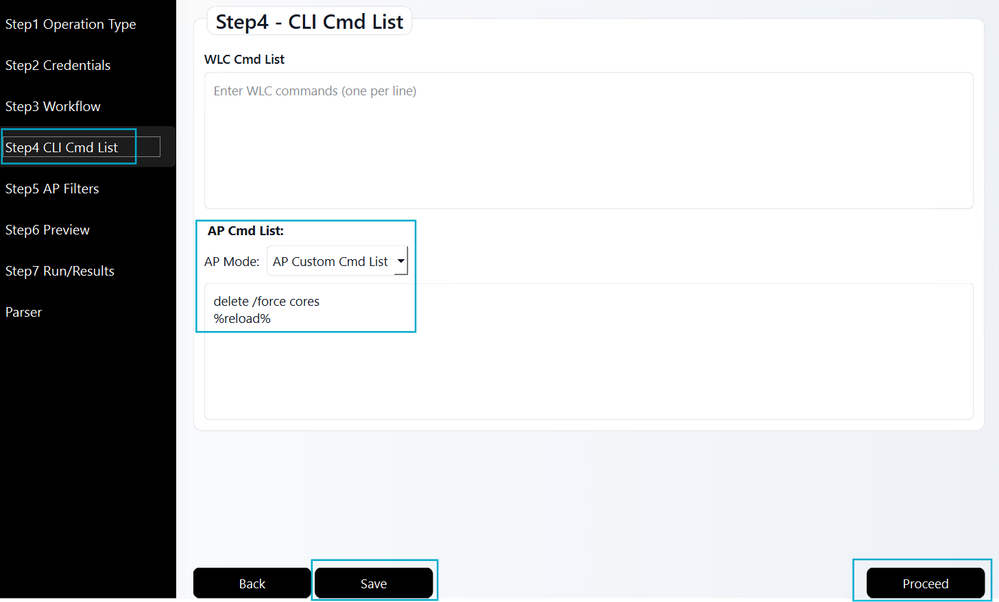
CLI Cmd List: Input the following Access Point commands exactly as displayed. Click Save, then click Proceed.
Access Point Filters: Leave all checkboxes unselected unless a specific filter is required for your environment, then click on Preview.
Preview: Review the summary, then click Confirm and Start WLANPoller.
Results: Verify that the WLANPoller execution completed successfully for all targeted Access Points.
After recovery, repeat the Upgrade Precheck as described in that section. Check if the affected Access Points still show low space availability. If they do, move to ant of the next options that fits better your resources; if they are cleared from the list, the recovery is successful, and you may proceed with the code/APSP in those Access Points.
Factory reset the Access Points
Resetting the Access Point to factory defaults will temporarily delete the cnssdaemon.log file. To ensure a successful code/APSP installation, please proceed with the code/APSP installation within 48 hours of the factory reset.
There are three ways to factory reset the Access Points:
-
Via the WLC (CLI or GUI).
-
Via the Access Point CLI,
-
Via the Access Point physical reset button.

Warning: A factory reset removes all persistent configurations (for example, hostname, HA settings, Tags, LSCs and more). You must reconfigure the Access Point after it rejoins the WLC. Ensure that CAPWAP discovery (DHCP Option 43, DNS and so on) is functional so the Access Point can successfully find and join the controller post-reset.
Via WLC CLI
WLC# clear ap config <APNAME> keep-ip-config
Via WLC GUI
Navigate to Configuration > Wireless > Access Points. Select the desired Access Point, then navigate to Advanced > Set to Factory Default. Choose the option Clear Config except Static IP and click Update & Apply to Device.
Via Access Point CLI
AP# capwap ap erase all
WARNING :" capwap ap erase all" is altered to perform DATA WIPE on COS AP.
The following files will be cleared as part of this process
1) Config ,Bak config files
2) Crashfiles
3) syslogs
4) Boot variables
5) Pktlogs
6) Manually created files
Are you sure you want continue? [confirm] yes
AP# reload
Proceed with reload command (cold)? [confirm] yes
Via Access Point mode button
1. Disconnect the Access Point from its power source.
2. Press and hold the Mode button.
3. Reconnect the power source while continuing to hold the button.
4. Once the Access Point status LED turns solid red, keep the Mode button pressed for an additional 10 seconds.
5. Release the button.
6. The Access Point reboots with factory default settings.
Note: The timing of the Mode button press is critical. If the button is pressed for less than 20 seconds, the cnssdaemon.log file will not be deleted. Conversely, if it is held for more than 60 seconds, the Access Point will not reset to factory defaults. Please ensure the button is held for between 30 and 50 seconds for a successful reset
Delete cnssdaemon.log file (Access Point devshell)
Technical Assistance Center (TAC) can perform manual recovery by clearing the cnssdaemon.log file directly from devshell on affected Access Points. Depending on the scale of the impact, there are two methods:
- Small Number of Affected Access Points: For a small amount of affected Access Points, TAC can proceed using one of two approaches:
-
Manual devshell access: Access each Access Point individually via devshell to manually clear the cnssdaemon.log file.
-
Automated (bulk) devshell access: Use the RADKit tool to automate the cleanup process of the cnssdaemon.log file to all the affected Access Points.
-
- Large Number of Affected Access Points: TAC shall use RADKit tool, this allows for bulk devshell access to all affected Access Points in an automated way to execute the cleanup process efficiently.
Note: We recommend using RADKit for Access Point devshell recovery procedure to ensure maximum efficiency and operational consistency across your environment.
Access RADKit download and installation instructions via the links below:
To delete cnssdaemon.log file in the Access Points via RADKit, ensure all Access Points are listed in the inventory. This is an Admin-only task and cannot be performed remotely by TAC. Use the following steps to bulk-add Access Points to the RADKit inventory:
1. WLC in RADKit: Ensure the WLC is already added to the RADKit inventory. If you need assistance with this process, please follow the Adding Devices section here from official RADKit documentation
2. WLC inventory icon: Under the Devices tab, locate your WLC and click the Inventory icon within the Actions column.

3. Bulk Import: Select the Bulk Import button to begin the Access Points addition process to RADKit.
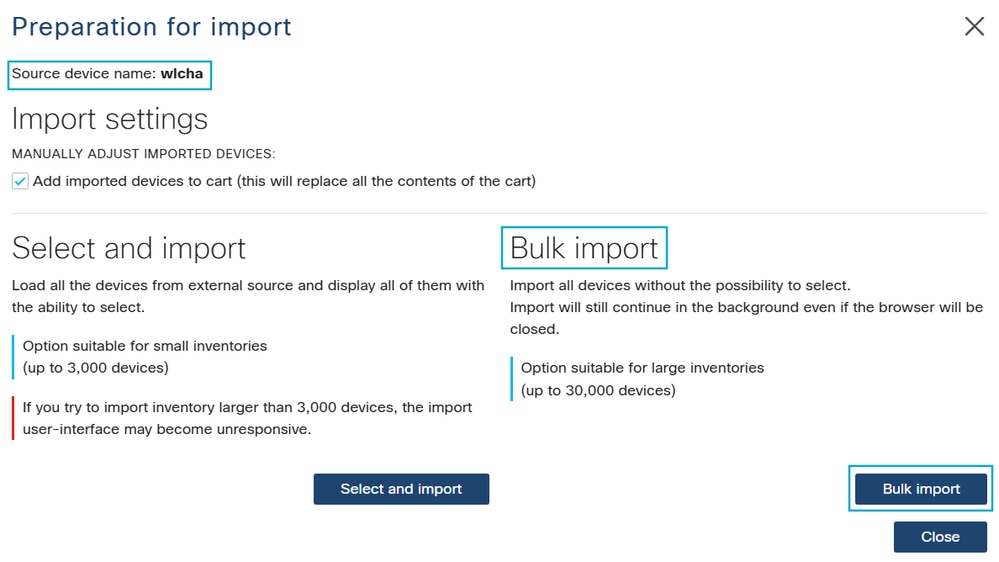
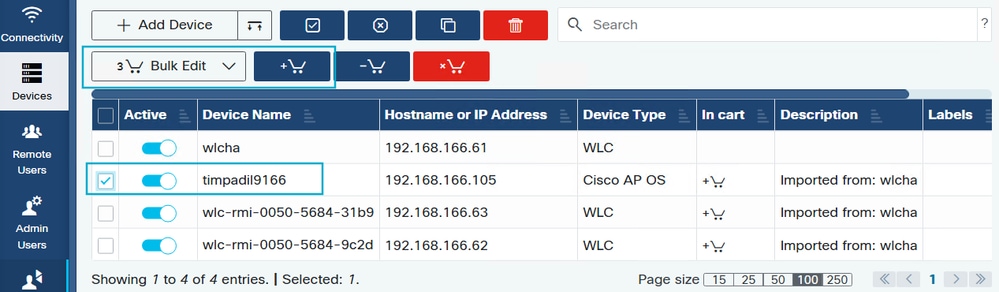
4. Bulk Configuration: Select the checkboxes for all Access Points requiring cnssdaemon.log file deletion. Click the Add to Cart icon (cart with a plus sign), then select the Bulk Edit button.
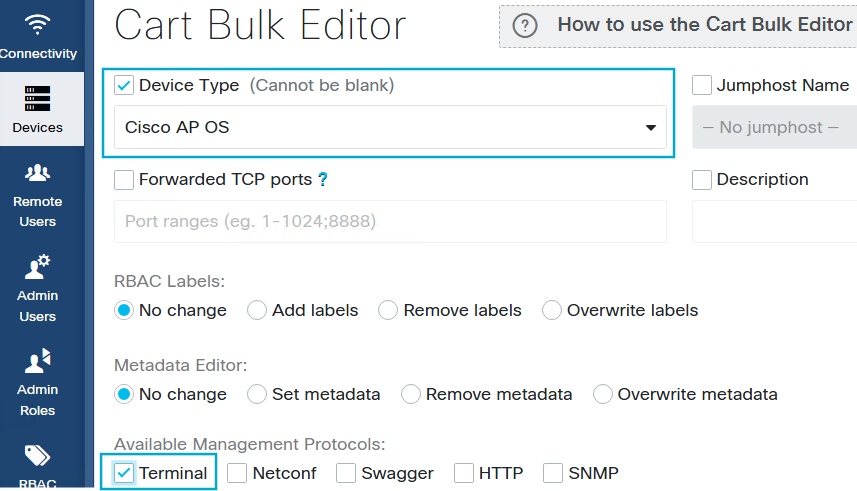
5. Enable Terminal & Configure SSH: In the Cart Bulk Editor, check Device Type and select Cisco AP OS. Enable the Terminal toggle to allow SSH configuration for the Access Points.
Note: If Role Based Access Control (RBAC) is enabled, click Add Labels and ensure Read-only is present in the Selected Labels field (create this label if it does not already exist). If RBAC is disabled, this labeling step is not required.
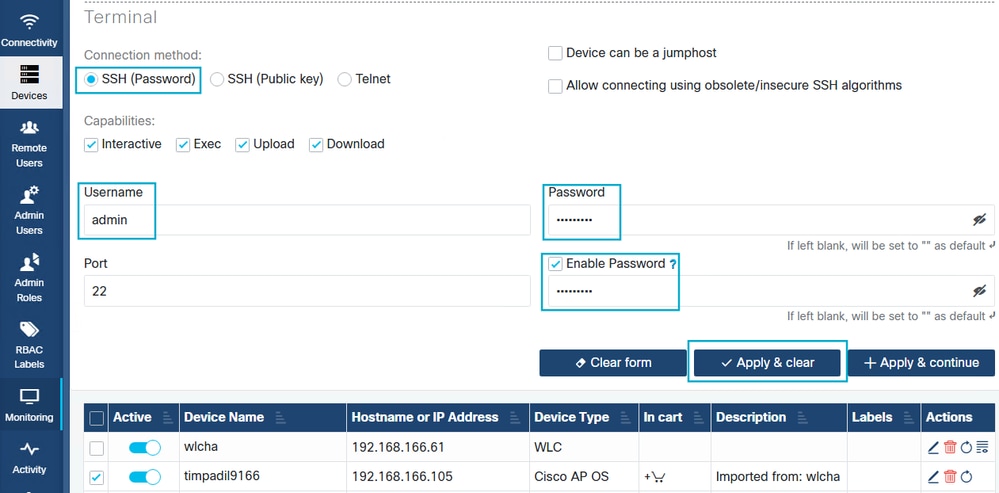
6. Configure SSH Credentials: Click SSH (Password) and enter the Access Point credentials. Select the Enable Password checkbox and enter the password. Click Apply & Clear to save these settings and close the window. Confirm that SSH is enabled in the WLC via AP Join Profile and that the username and password are up to date and correct.
7. Add Remote User: Add the Cisco CCO ID of the engineer assigned to your TAC case by following the Adding Remote Users steps here in the official RADKit documentation.
8. Targeted Access Point List: Collect the exact names of the affected Access Points (note: these are case-sensitive) in a file, and upload the file to your TAC case.
After setup and file upload with the Access Points names, Cisco TAC will have the necessary remote access via RADKit to perform the bulk deletion of the cnssdaemon.log files.
Access Point image boot partition swap
The boot partition swap can be done either manually Access Point by Access Point or automated via Access Point access in bulk with WLANPoller.
Manually
SSH to the Access Points and run the following commands:
AP# config boot path 2
AP# reload
Proceed with reload? [confirm] yes
Automated
Use WLANPoller to run the boot part command in bulk to different Access Points.
- Isolate Access Points affected – make sure the Access Points affected have no connectivity with the WLC:
- Make sure SSH is enabled in the Access Points join profile and Access Points are SSH accessible (or use console)
- Ensure the Access Points do not have connectivity with the WLC, but, you still have SSH access to the Access Points. This can be accomplished by having an ACL in the gateway or moving the Access Points to an isolated Vlan. If the Access Points get access to the WLC the Access Point could revert back to boot Partition 1 (part1) and will be back to the affected state.
2. Configure boot path 2 and reboot the Access Points affected – Configure WlanPoller to instruct the affected Access Points via command line to change the boot part from 1 to 2 and then reboot.
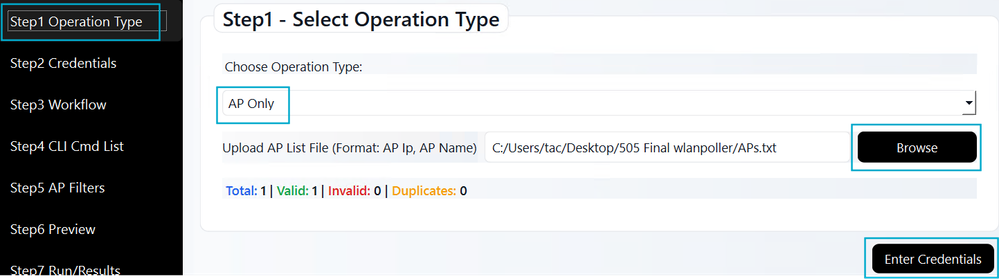
Operation Type: Select the option AP Only, then in a text editor (preferably) add the Access Points IP Adddres and Name (case sensitive), click on Browse and select the file with the Access Points IP Address and names. Then click on Enter Credentials.
Access Pointlist format:

Operation type selection:
Credentials: Enter the Access Points credentials, click on Save and then Proceed.
Workflow: Select Custom CLI Commands and then click on Proceed.
CLI Cmd List: Configure the commands to make the Access Point boot with part2 and reload. Then click on Save and then Proceed.

Preview: The preview shows you the 2 commands that will be run to the Access Points. Click on Confirm and Start WlanPoller.
3. Upgrade – Install in the WLC the needed APSP in your current code, or, if you were going to upgrade the code move to a new code and make sure APSP is installed as well.
4. Reconnect – Once the controller upgrade is complete, remove the communication stopper between the Access Point and the WLC. The Access Point will join the WLC and automatically download the new and fixed image in boot Part1.
Access Point bootloop
If you did a code/APSP install without following the Upgrade Prechecks first and your Access Points ended up in a bootloop there are 2 options to follow:
- Factory reset the Access Point with the mode button as explained in section Factory reset the Access Points.
- Get console access and open a TAC case so TAC can proceed to recover the Access Point.
When to open a TAC case
Open a TAC case if any of the following conditions occur:
- Failed Recovery: If the recovery procedures cannot be implemented in your environment, or, if they are failing.
- Integrity Issues: Manual or automated prechecks return an "Image Integrity Check: Bad".
- Storage Exhaustion: If after upgrade/APSP install the partition "/dev/ubivol/part2" shows still a critically high usage.
FAQs
Q: Does this issue apply only to full code upgrades, or does it also affect APSP installations?
A: This issue affects both scenarios. If your environment meets the criteria for this bug, the issue can occur during a full code upgrade or APSP installation (including the APSP with the bug fix). Please complete the Upgrade prechecks section to determine if you need to follow the Recovery steps before applying any updates or APSPs.
Q: My WLC and Access Pointsare on 17.9.x (or earlier) and I need to upgrade to 17.12.x, What must I do?
A: You can perform a direct upgrade from 17.9.x to 17.12.x. However, if your Access Point models are susceptible to this bug, ensure you install the recommended APSP immediately following the upgrade.
Q: My WLC and Access Points are on 17.9.x (or earlier) and I need to upgrade to 17.15.x or higher.
A: There are two possible scenarios:
- Direct Upgrade: If your environment allows a direct upgrade (please verify via the Release Notes for your target code), proceed with the upgrade and then install the APSP for that target code.
- Intermediate Upgrade: If you must follow an upgrade path (for example, 17.9.x → 17.12.x → 17.15.x), we recommend completing the entire sequence to 17.15.x within the same day. Because the cnssdaemon.log file grows by 5 MB daily, completing the upgrade quickly prevents the file from reaching a critical size. If a same-day upgrade is not possible, you must install the APSP at the 17.12.x stage before eventually proceeding to 17.15.x and installing its respective APSP.
Q: I am already on 17.15.x. Does that mean I am not affected by this bug?
A: Not necessarily. If your Access Points previously ran version 17.12.4, 17.12.5, or 17.12.6/6a (on 9800-L/40/80/CL), the problematic log file may have already been generated and remains in storage. We strongly recommend following the Upgrade Prechecks section to ensure any residual files are cleaned up.
Q: I use the 9800-M, 9800-H1, or 9800-H2 platforms, which were first supported in 17.15, Am I affected?
A: There are two possible scenarios:
- First ever joined WLC: If your Access Points joined a 9800-M/H1/H2 as their first ever controller, you are not impacted.
- Previous WLCs joined: If those Access Points were previously joined to a different controller running an affected version (17.12.4/5/6/6a) before moving to the 9800-M/H1/H2, they may still carry the problematic file. In this case, please follow the Upgrade prechecks section.
Q: We have separate WLCs for Lab testing and staggered upgrades, How to handle them?
A: Ensure all WLCs in your environment are running the appropriate APSP. Because the cnssdaemon.log file grows by 5 MB daily, any Access Point that joins a WLC running affected code, even temporarily for testing, potentially becomes susceptible to this bug.
Revision History
| Revision | Publish Date | Comments |
|---|---|---|
4.0 |
24-Mar-2026
|
Updated recovery mechanism and included improved automation using WLAN poller. |
3.0 |
27-Feb-2026
|
Added FAQ and additional recovery scenarios |
2.0 |
23-Feb-2026
|
Added details for Upgrade path applicability |
1.0 |
30-Jan-2026
|
Initial Release |
 Feedback
Contact Cisco
- Open a Support Case

- (Requires a Cisco Service Contract)
This Document Applies to These Products
Unleash the Power of TAC's Virtual Assistance