Configure 9800 WLC Lobby Ambassador with RADIUS and TACACS+
Available Languages
Download Options
Bias-Free Language
The documentation set for this product strives to use bias-free language. For the purposes of this documentation set, bias-free is defined as language that does not imply discrimination based on age, disability, gender, racial identity, ethnic identity, sexual orientation, socioeconomic status, and intersectionality. Exceptions may be present in the documentation due to language that is hardcoded in the user interfaces of the product software, language used based on RFP documentation, or language that is used by a referenced third-party product. Learn more about how Cisco is using Inclusive Language.
Contents
Introduction
This document describes how to configure Catalyst 9800 Wireless Controllers for RADIUS and TACACS+ external authentication of Lobby Ambassador users.
Prerequisites
Requirements
Cisco recommends that you have knowledge of these topics:
- 9800 Wireless LAN Controller Lobby Admin concepts
- Authentication, Authorization and Accounting (AAA) RADIUS concepts
- TACACS+ concepts
Components Used
The information in this document is based on these software and hardware versions:
- Catalyst 9800 Wireless Controller Series (Catalyst 9800-CL)
- Cisco IOS® XE Gibraltar 16.12.1s
- Identity Service Engine (ISE) 2.3.0
The information in this document was created from the devices in a specific lab environment. All of the devices used in this document started with a cleared (default) configuration. If your network is live, ensure that you understand the potential impact of any command.
Background Information
The Lobby Ambassador is created by the administrator of the network. A Lobby Ambassador is capable to create a guest user entry in the Wireless LAN Controller (WLC) that includes username, password, description and lifetime. It also has the capability to delete the guest user. The Lobby Ambassador can create the guest user via Graphical USer Interface (GUI) or Command Line Interface (CLI).
Configure
Network Diagram
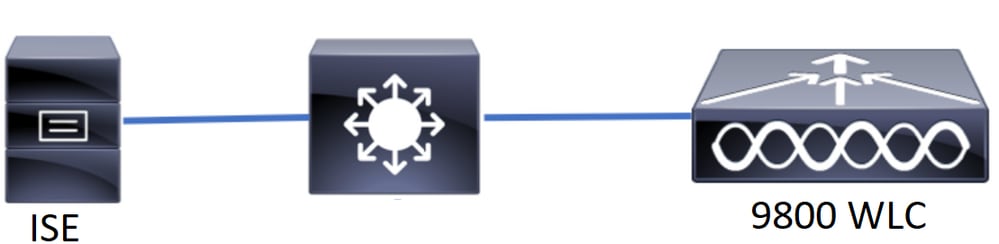 Network Diagram
The configuration in this document is based in two Lobby Ambassadors, the first Lobby Ambassador is named lobby and it authenticates against the RADIUS Server, the second Lobby Ambassador is named lobbyTac and it authenticates against TACACS+. Both have the ability to configure guest users in the WLC.
Lobby Ambassador RADIUS Authentication
Configure a RADIUS Server on Wireless LAN Controller
WLC GUI
Navigate to Configuration > Security > AAA > Servers/Groups > RADIUS > Servers > + Add as shown in the image.
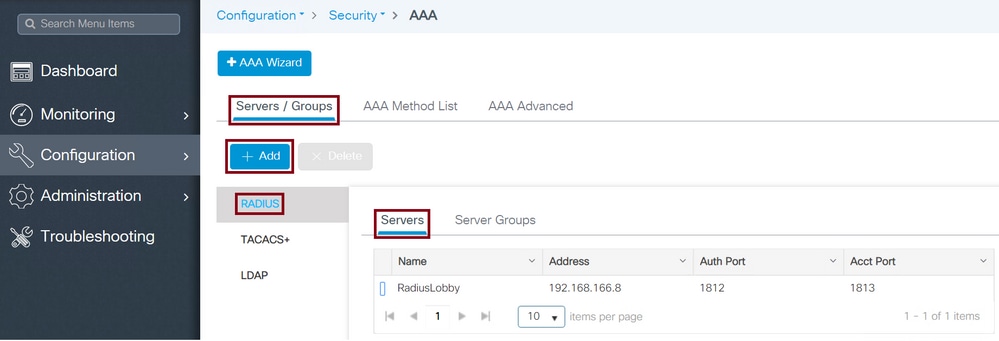 Radius Server on WLC
When the configuration window opens, the mandatory configuration parameters are the RADIUS Server Name, the RADIUS Server IP ADDRESS, and Radius Server Shared Secret. Any other parameter can be left as default, or can be configured as desired.
WLC CLI
Tim-eWLC1(config)#radius server RadiusLobby
Tim-eWLC1(config-radius-server)#address ipv4 192.168.166.8 auth-port 1812 acct-port 1813
Tim-eWLC1(config-radius-server)#key 0 Cisco1234
Tim-eWLC1(config)#end
Add the RADIUS Server to a Server Group
WLC GUI
Navigate to Configuration > Security > AAA > Servers / Groups > RADIUS > Server Groups > + Add as shown in the image.
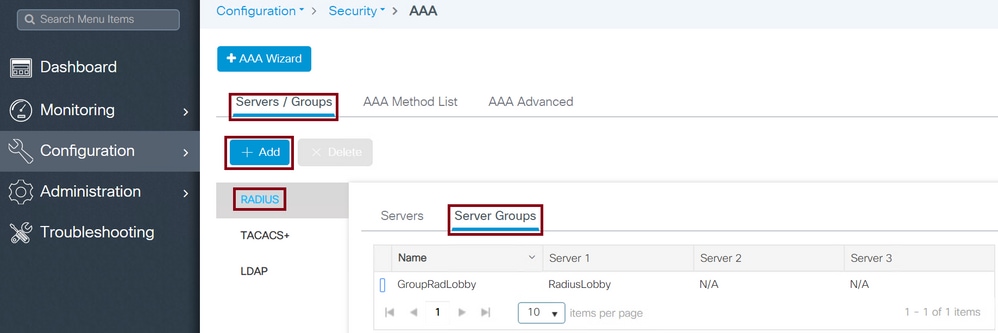 Radius Server on Server Group
When the configuration window opens, configure a Name to the group, move the configured RADIUS Servers from the Available Servers list to the Assigned Servers list.
WLC CLI
Tim-eWLC1(config)#aaa group server radius GroupRadLobby
Tim-eWLC1(config-sg-radius)#server name RadiusLobby
Tim-eWLC1(config-sg-radius)#end
Create an AAA Authentication Method List
WLC GUI
Navigate to Configuration > Security > AAA > AAA Method List > Authentication > + Add as shown in the image.
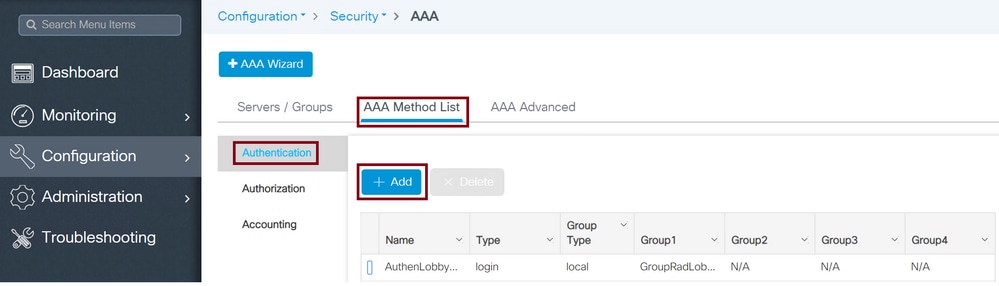 Authentication Method List
When the configuration window opens, configure a Name, select the Type option as Login and assign the Server Group created previously. The Group Type can be selected as Local or Group
AAA Method List Group Type Local First
Group Type as Local makes the WLC first check if the user exists in the local database, and then falls back to the Server Group only if the Lobby Ambassador user is not found in the local database.
WLC CLI
Tim-eWLC1(config)#aaa authentication login AuthenLobbyMethod local group GroupRadLobby
Tim-eWLC1(config)#end

Note: Please be aware of Cisco bug ID CSCvs87163 when using AAA Method List Group Type Local First.
AAA Method List Group Type Group
Group Type as Group and no fallback to local option checked makes the WLC check the user against the Server Group and does not check in its local database.
WLC CLI
Tim-eWLC1(config)#aaa authentication login AuthenLobbyMethod group GroupRadLobby
Tim-eWLC1(config)#end
AAA Method List Group Type Group with Fallback
Group Type as Group and Fallback To Local option checked makes the WLC check the user against the Server Group and does a query the local database unless the RADIUS Server times out the response. If the Radius Server responds even with a reject, the WLC does not trigger a local authentication.
WLC CLI
Tim-eWLC1(config)#aaa authentication login AuthenLobbyMethod group GroupRadLobby local
Tim-eWLC1(config)#end
Create an AAA Authorization Method List
WLC GUI
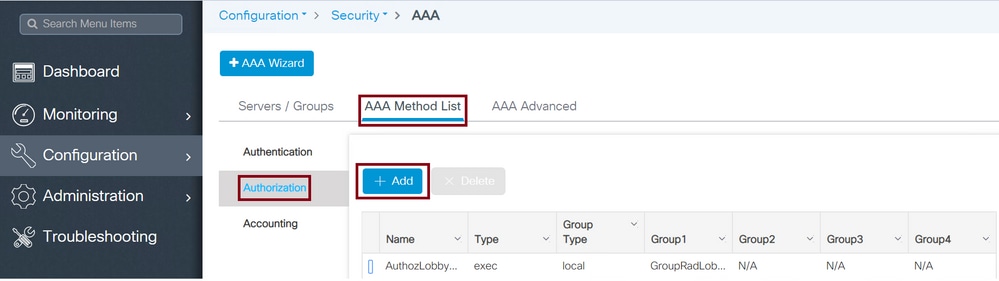
Navigate to Configuration > Security > AAA > AAA Method List > Authorization > + Add as shown in the image.
 Authorization Method List
When the configuration window opens to provide a Name, select the type option as exec and assign the Server Group created previously.
The Group Type applies the same way it was explained in the Create an AAA Method List section.
WLC CLI
AAA Method List Group Type Local First.
Tim-eWLC1(config)#aaa authorization exec AuthozLobbyMethod local group GroupRadLobby
Tim-eWLC1(config)#end
AAA Method List Group Type Group.
Tim-eWLC1(config)#aaa authorization exec AuthozLobbyMethod group GroupRadLobby
Tim-eWLC1(config)#end
AAA Method List Group Type Group with Fallback.
Tim-eWLC1(config)#aaa authorization exec AuthozLobbyMethod group GroupRadLobby local
Tim-eWLC1(config)#end
AAA Method Lists Assignments
Assign the AAA Authentication and Authorization Method to the HyperText Transfer Protocol (HTTP) and Virtual TeleType (VTY) of the WLC.
These steps cannot be done from GUI, hence they need to be done from CLI.
HTTP Configuration.
Tim-eWLC1(config)#ip http authentication aaa login-authentication AuthenLobbyMethod
Tim-eWLC1(config)#ip http authentication aaa exec-authorization AuthozLobbyMethod
Tim-eWLC1(config)#end
It is recommended to restart the HTTP services.
Tim-eWLC1(config)#no ip http server
Tim-eWLC1(config)#no ip http secure-server
Tim-eWLC1(config)#ip http server
Tim-eWLC1(config)#ip http secure-server
Tim-eWLC1(config)#end
VTY Configuration.
Tim-eWLC1(config)#line vty 0 15
Tim-eWLC1(config-line)#login authentication AuthenLobbyMethod
Tim-eWLC1(config-line)#authorization exec AuthozLobbyMethod
Tim-eWLC1(config-line)#end
Due to Cisco bug ID CSCvu29748 a WLC running a version prior to 17.3.3 or 17.14 and 17.15 must configure via CLI the configuration shown next. This is not needed if the WLC runs a version in 17.3 family code from 17.3.4 to 17.3.8a, or if it runs 17.16.1 and onwards codes.
WLC CLI
Tim-eWLC1(config)#aaa remote username lobby
Configure ISE for Radius Authentication
Add the WLC to ISE
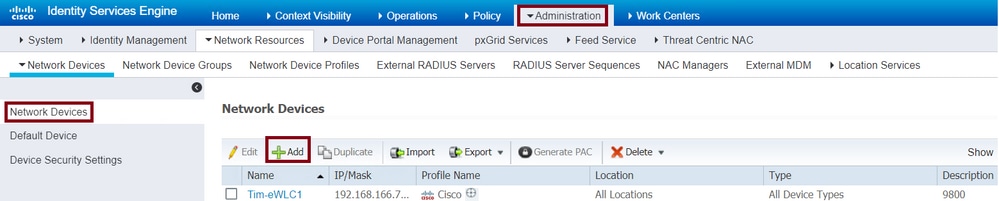
Navigate to Administration > Network Resources > Network Devices > + Add as shown in the image.
 Add WLC to ISE
When the configuration window opens, configure a Name, IP ADDRESS, enable RADIUS Authentication Settings, and under Protocol Radius enter the Shared Secret.
Create the Lobby Ambassador User on ISE
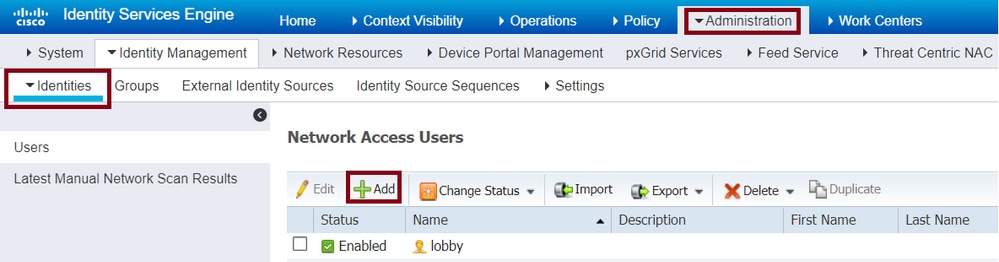
Navigate to Administration > Identity Management > Identities > Users > + Add as shown in the image.
 Lobby Ambassador username and password in ISE
When the configuration window opens, provide the Name and Password for the Lobby Ambassador user, also ensure the Status shows as Enabled.
This username and password configuration is the assigned to the Lobby Ambassador in charge to create the guest users in the WLC, in other words, this is the username and password the Network Administrator assigns to the Lobby Ambassador.
Create a Results Authorization Profile
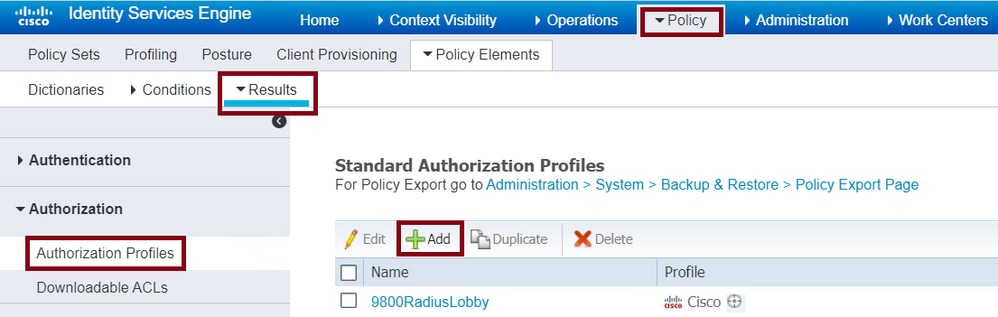
Navigate to Policy > Policy Elements > Results > Authorization > Authorization Profiles > + Add as shown in the image.
 Authorization Profile in ISE
Ensure that the profile is configured to send an Access-Accept as shown in the image.
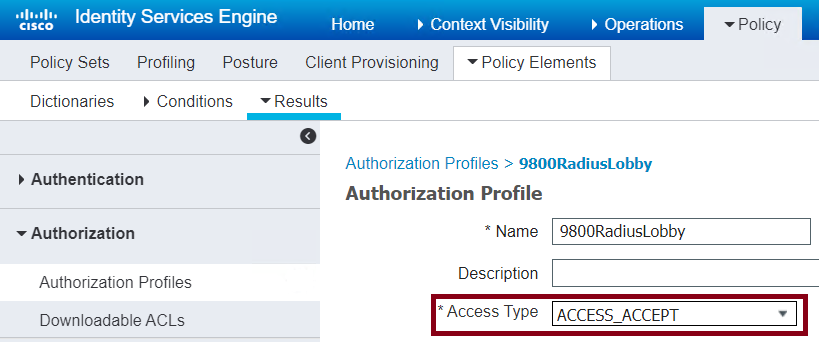 Access Type Access-Accept
Add the attributes manually under Advanced Attributes Settings. The attributes are needed to define the user as Lobby Ambassador and to provide the privilege to allow the Lobby Ambassador to make the needed changes in the WLC to add the guest users.
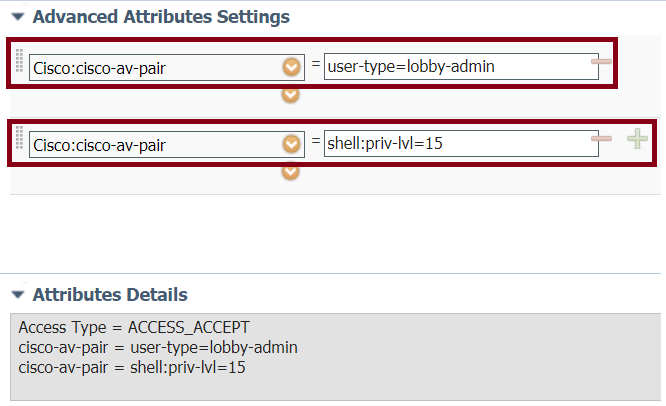 Advance Attributes Settings in ISE
Create an Authentication Policy
Navigate to Policy > Policy Sets > Add as shown in the image.
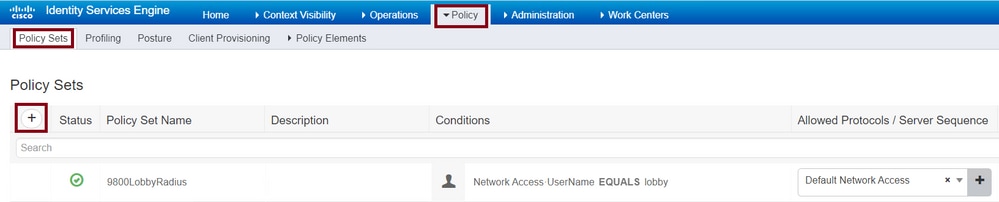 Authentication Policy in ISE
The conditions to configure the policy relies upon the Administrator decision. Network Access-Username condition and the Default Network Access protocol are used in this example.
It is mandatory to ensure under the Authorization Policy the profile configured under the Results Authorization is selected, that way the correct attributes are returned to the WLC.
Click the Authorization Policy configured, the configuration window opens to configure the Authorization Policy with the proper Result Profile. The Authentication Policy can be left as default.
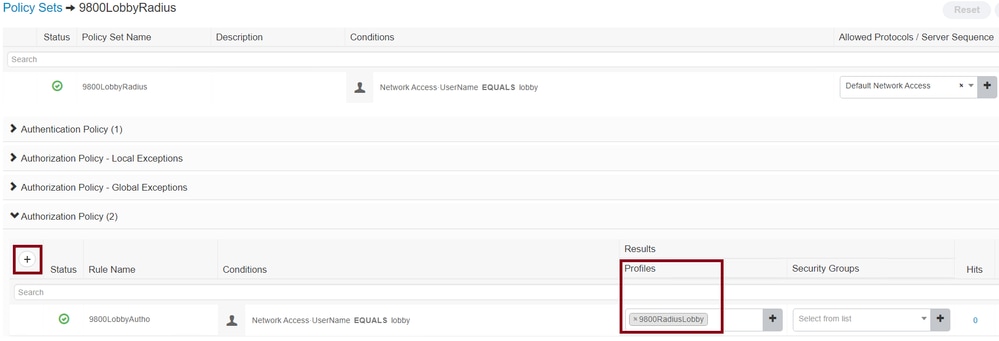 Authorization Policy Configuration
Lobby Ambassador TACACS+ Authentication
Configure a TACACS+ Server on Wireless LAN Controller
WLC GUI
Navigate to Configuration > Security > AAA > Servers/Groups > TACACS+ > Servers > + Add as shown in the image.
 Add TACACS to WLC
When the configuration window opens, the mandatory configuration parameters are the TACACS+ Server Name, the TACACS Server IP ADDRESS, and the Shared Secret. Any other parameter can be left as default, or configured as needed.
WLC CLI
Tim-eWLC1(config)#tacacs server TACACSLobby
Tim-eWLC1(config-server-tacacs)#address ipv4 192.168.166.8
Tim-eWLC1(config-server-tacacs)#key 0 Cisco123
Tim-eWLC1(config-server-tacacs)#end
Add the TACACS+ Server to a Server Group
WLC GUI
Navigate to Configuration > Security > AAA > Servers / Groups > TACACS > Server Groups > +Add as shown in the image.
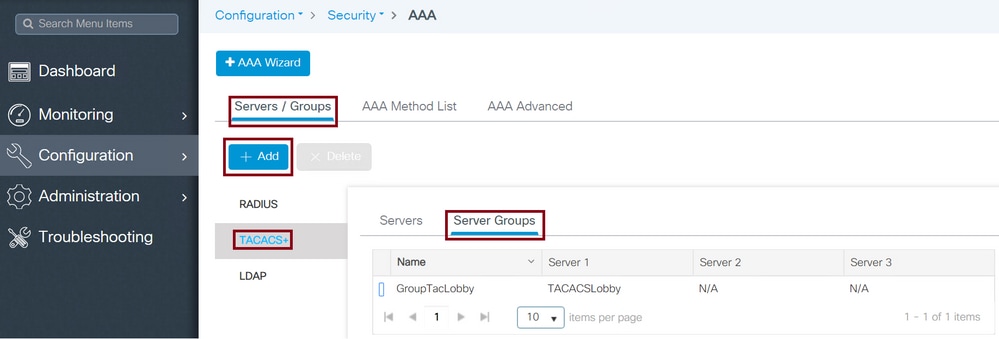 TACACS Server Group
When the configuration window opens, configure a Name to the group and move the desired TACACS+ Servers from the Available Servers list to the Assigned Servers list.
WLC CLI
Tim-eWLC1(config)#aaa group server tacacs+ GroupTacLobby
Tim-eWLC1(config-sg-tacacs+)#server name TACACSLobby
Tim-eWLC1(config-sg-tacacs+)#end
Create an Authentication Method List
WLC GUI
Navigate to Configuration > Security > AAA > AAA Method List > Authentication > +Add as shown in the image.
 TACACS AAA Method List Configuration
When the configuration window opens, configure a Name, select the type option as Login and assign the Server Group created previously.
AAA Method List Group Types
TACACS+ authentication supports different Method List Types such as Local and Group. Refer to the previous section of the document named Create an AAA Authentication Method List to understand each of the types.
Next, the commands to configure the TACACS+ Method Lists via CLI.
WLC CLI
AAA Method List Group Type Local First.
Tim-eWLC1(config)#aaa authentication login AutheTacMethod local group GroupTacLobby
Tim-eWLC1(config)#end
AAA Method List Group Type Group.
Tim-eWLC1(config)#aaa authentication login AutheTacMethod group GroupTacLobby
Tim-eWLC1(config)#end
AAA Method List Group Type Group with Fallback.
Tim-eWLC1(config)#aaa authentication login AutheTacMethod group GroupTacLobby local
Tim-eWLC1(config)#end
Create an AAA Authorization Method List
WLC GUI
Navigate to Configuration > Security > AAA > AAA Method List > Authorization > +Add as shown in the image.
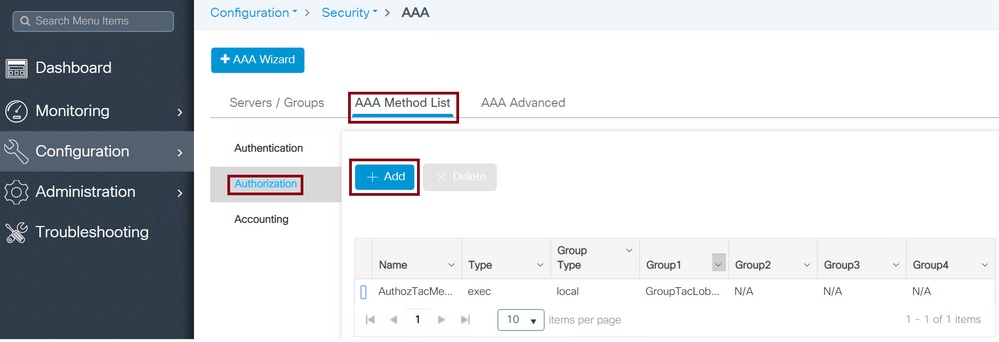 TACACS Authorization List Configuration
When the configuration window opens, configure a Name, select the Type option as exec and assign the Server Group created previously.
The Group Type applies the same way it was explained in the Create an AAA Method List section.
WLC CLI
AAA Method List Group Type Local First.
Tim-eWLC1(config)#aaa authorization exec AuthozTacMethod local group GroupTacLobby
Tim-eWLC1(config)#end
AAA Method List Group Type Group.
Tim-eWLC1(config)#aaa authorization exec AuthozTacMethod group GroupTacLobby
Tim-eWLC1(config)#end
AAA Method List Group Type Group with Fallback.
Tim-eWLC1(config)#aaa authorization exec AuthozTacMethod group GroupTacLobby local
Tim-eWLC1(config)#end
AAA Method Lists Assignments
Assign the AAA Authentication and Authorization Method to the HTTP and VTY of the WLC.
These steps cannot be done from GUI, hence they need to be done from CLI.
HTTP Configuration.
Tim-eWLC1(config)#ip http authentication aaa login-authentication AutheTacMethod
Tim-eWLC1(config)#ip http authentication aaa exec-authorization AuthozTacMethod
Tim-eWLC1(config)#end
It is recommended to restart the HTTP services.
Tim-eWLC1(config)#no ip http server
Tim-eWLC1(config)#no ip http secure-server
Tim-eWLC1(config)#ip http server
Tim-eWLC1(config)#ip http secure-server
Tim-eWLC1(config)#end
VTY Configuration.
Tim-eWLC1(config)#line vty 0 15
Tim-eWLC1(config-line)#login authentication AutheTacMethod
Tim-eWLC1(config-line)#authorization exec AuthozTacMethod
Tim-eWLC1(config-line)#end
Due to Cisco bug ID CSCvu29748 a WLC running a version before 17.3.3 or 17.14 and 17.15 must configure the configuration next. This is not needed if the WLC runs a version in 17.3 family code from 17.3.4 to 17.3.8a, or if it runs 17.16.1 and onwards codes.
CLI:
Tim-eWLC1(config)#aaa remote username lobbyTac
Configure ISE for TACACS+ Authentication
Enable Device Admin
Navigate to Administration > System > Deployment as shown in the image.
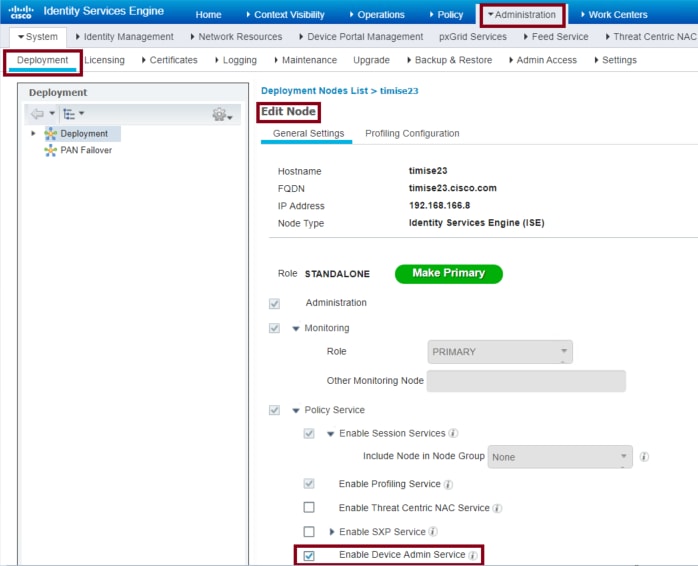 Device Admin in ISE for TACACS
Select Enable Device Admin Service and ensure that it has been enabled.
Add the WLC to ISE
Navigate to Administration > Network Resources > Network Devices > + Add as shown in the image.
 Add WLC to ISE
When the configuration window opens to configure a Name, IP ADDRESS, enable TACACS+ Authentication Settings and enter the Shared Secret.
Create the Lobby Ambassador User on ISE
Navigate to Administration > Identity Management > Identities > Users > + Add as shown in the image.
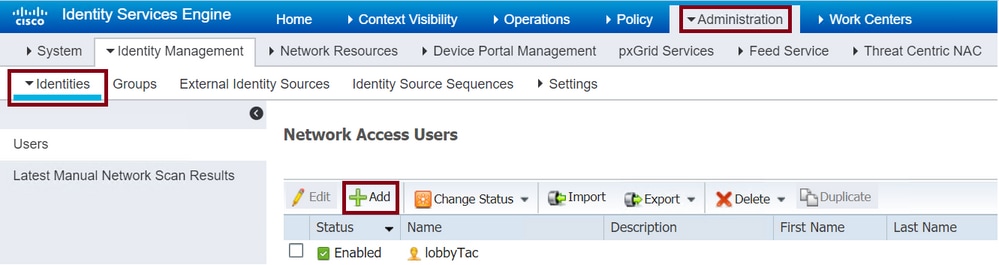 Lobby Ambassador username and password in ISE
When the configuration window opens, provide the Name and Password for the Lobby Ambassador user, also ensure the Status shows as Enabled.
This username and password configuration is the assigned to the Lobby Ambassador in charge to create the guest users in the WLC. In other words, this is the username and password the Network Administrator assigns to the Lobby Ambassador.
Create a Results TACACS+ Profile
Navigate to Work Centers > Device Administration > Policy Elements > Results > TACACS Profiles as shown in the image.
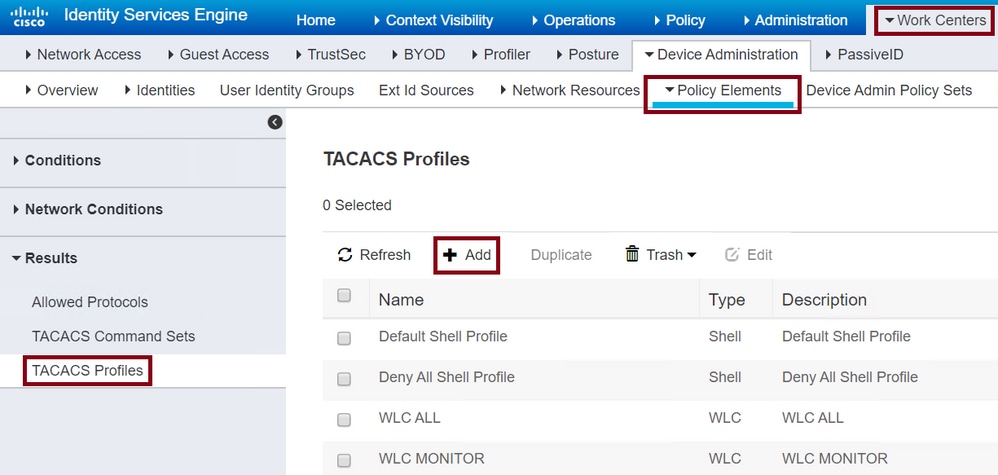 TACACS Profile
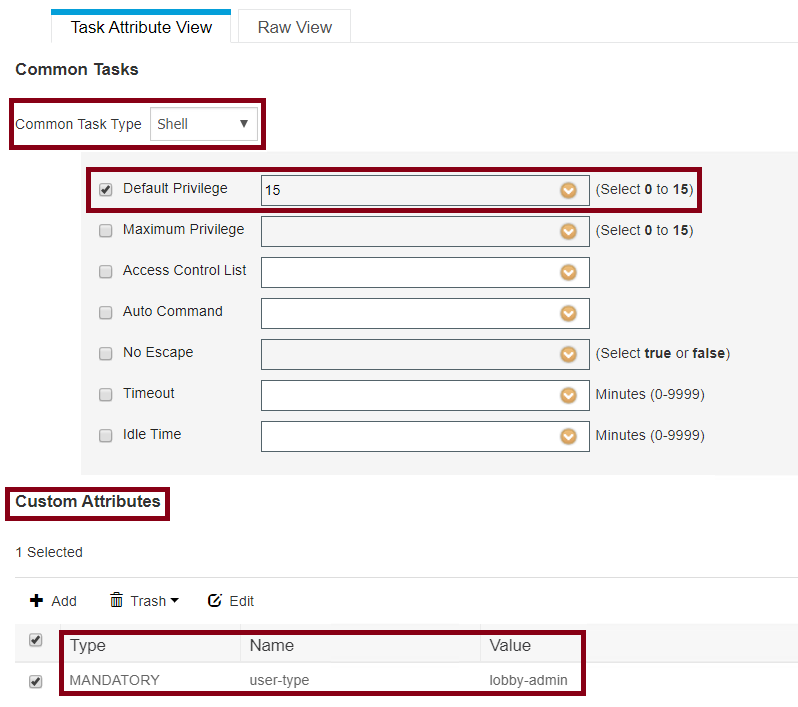
After you click +Add, the configuration window opens as shown in the next image. Configure a Name to the profile.
Ensure the Common Task Type is selected as Shell, configure a Default Privileged 15 and a Custom Attribute as Type Mandatory, Name as user-type, and the Value as lobby-admin.
 TACACS Profile Shell Configuration
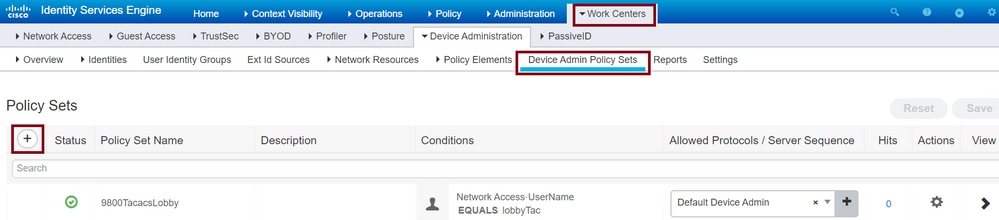
Create a Policy Set
Navigate to Work Centers > Device Administration > Device Admin Policy Sets as shown in the image
 TACACS Policy Set Configuration
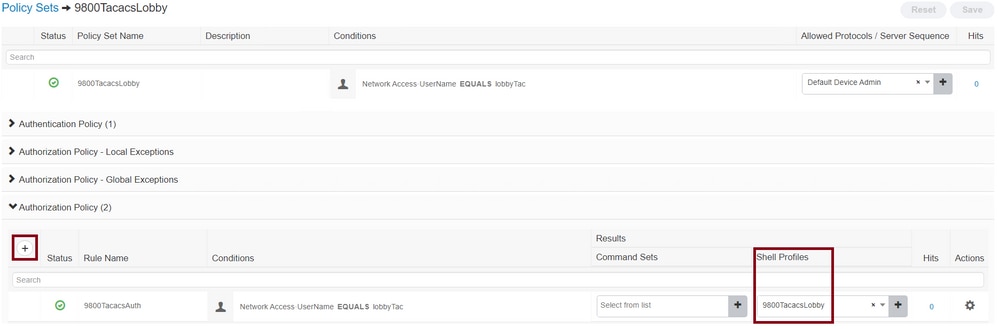
The conditions to configure the policy rely upon the Administrator decision. For this document, the Network Access-Username condition and the Default Device Admin protocol are used. It is mandatory to ensure under the Authorization Policy that the profile configured under the Results Authorization is selected, this makes the correct attributes to be returned to the WLC.
Click the Policy configured, and the configuration window opens. Configure the Authorization Policy with the proper Shell Profile. The Authentication Policy can be left as default as shown in the image.
 TACACS Policy Set Authorization Configuration
Verify
Use this section to confirm that your configuration is correct.
show run aaa
show run | sec remote
show run | sec http
show aaa method-lists authentication
show aaa method-lists authorization
show aaa servers
show tacacs
This is how the Lobby Ambassador Graphical User Interface (GUI) looks after successful authentication with either AAA Radius or TACACS+.
 Lobby Ambassador View from WLC
Troubleshoot
This section provides information you can use to troubleshoot your configuration.
AAA Radius Authentication
For RADIUS authentication, these debugs can be used:
Tim-eWLC1#debug aaa authentication
Tim-eWLC1#debug aaa authorization
Tim-eWLC1#debug aaa attr
Tim-eWLC1#terminal monitor
Ensure the right method list is selected from the debug. Also, the correct attributes are returned by the ISE Server with the right username, user-type and privilege.
Feb 5 02:35:27.659: AAA/AUTHEN/LOGIN (00000000): Pick method list 'AuthenLobbyMethod'
Feb 5 02:35:27.681: ADD-DELETE: AAA/ATTR(00000000): add attr: sublist(0x7FBA5500C860) index(0):
 7FBA5500C870 0 00000081 username(450) 5 lobby
Feb 5 02:35:27.681: ADD-DELETE: AAA/ATTR(00000000): add attr: sublist(0x7FBA5500C860) index(1):
 7FBA5500C8B0 0 00000001 user-type(1187) 4 lobby-admin
Feb 5 02:35:27.681: ADD-DELETE: AAA/ATTR(00000000): add attr: sublist(0x7FBA5500C860) index(2):
 7FBA5500C8F0 0 00000001 priv-lvl(335) 4 15(F)
Feb 5 02:35:27.683: %WEBSERVER-5-LOGIN_PASSED: Chassis 1 R0/0: nginx: Login Successful from host
192.168.166.104 by user 'lobby' using crypto cipher 'ECDHE-RSA-AES128-GCM-SHA256'
TACACS+ Authentication
For TACACS+ authentication, this debug can be used:
Tim-eWLC1#debug tacacs
Tim-eWLC1#terminal monitor
Ensure that the authentication is processed with the right username and ISE IP ADDRESS. Also, the status PASS must be seen. In the same debug, right after the authentication phase, the authorization process is presented. In this authorization phase, ensure the right username is used along with the correct ISE IP ADDRESS. The attributes that are configured on ISE are seen in the debug, along with the Lobby Ambassador user with the right privilege.
Authentication phase example:
Feb 5 02:06:48.245: TPLUS: Queuing AAA Authentication request 0 for processing
Feb 5 02:06:48.245: TPLUS: Authentication start packet created for 0(lobbyTac)
Feb 5 02:06:48.245: TPLUS: Using server 192.168.166.8
Feb 5 02:06:48.250: TPLUS: Received authen response status GET_PASSWORD (8)
Feb 5 02:06:48.266: TPLUS(00000000)/0/7FB7819E2100: Processing the reply packet
Feb 5 02:06:48.266: TPLUS: Received authen response status PASS (2)
Authorization phase example:
Feb 5 02:06:48.267: TPLUS: Queuing AAA Authorization request 0 for processing
Feb 5 02:06:48.267: TPLUS: Authorization request created for 0(lobbyTac)
Feb 5 02:06:48.267: TPLUS: Using server 192.168.166.8
Feb 5 02:06:48.279: TPLUS(00000000)/0/7FB7819E2100: Processing the reply packet
Feb 5 02:06:48.279: TPLUS: Processed AV priv-lvl=15
Feb 5 02:06:48.279: TPLUS: Processed AV user-type=lobby-admin
Feb 5 02:06:48.279: TPLUS: received authorization response for 0: PASS
The debug examples mentioned previously for RADIUS and TACACS+ have the key steps for a successful login of a Lobby Admin.
In order to disable the debugs, this command can be used:
Tim-eWLC1#undebug all
Revision History
| Revision | Publish Date | Comments |
|---|---|---|
3.0 |
21-Jan-2025
|
Updated Alt Text, Machine Translation, Style Requirements, Article Description, and Formatting. |
1.0 |
18-Jun-2020
|
Initial Release |
Contributed by Cisco Engineers
- Tim J PadillaCustomer Delivery Engineering Technical Leader
 Feedback
Contact Cisco
- Open a Support Case

- (Requires a Cisco Service Contract)