Introduction
This document describes a configuration example for Bi Directional Rate Limit (BDRL) on Catalyst 9800 Series Wireless Controllers with AAA Override.
Prerequisites
Requirements
Cisco recommends that you have knowledge of these topics:
Components Used
The information in this document is based on these software and hardware versions:
- Cisco Catalyst 9800-CL Wireless Controller on version 16.12.1s
- Identity Service Engine on version 2.2
The information in this document was created from the devices in a specific lab environment. All of the devices used in this document started with a cleared (default) configuration. If your network is live, ensure that you understand the potential impact of any command.
Background Information
QoS in 9800 WLC platform uses the same concepts and components as the Catalyst 9000 platforms.
This section provides a global overview of how these components work and how can they be configured to achieve different results.
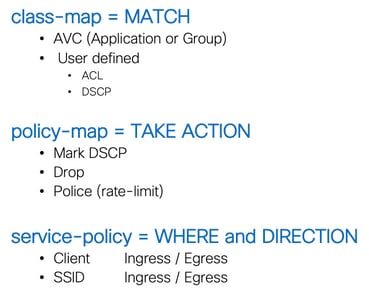
In essence, QoS recursion works like this:
1. Class-Map: Identifies a certain type of traffic. Class-maps can leverage the Application Visibility and Control (AVC) engine.
Also, the user can define custom Class-maps to identify traffic that matches a Access Control Lists (ACL) or Differentiated Services Code Point (DSCP)
2. Policy-Map: Are policies that apply to Class-maps.
These policies could mark DSCP, drop or rate limit the traffic that matches the Class-map
4. Service-Policy: Policy-maps can be applied on the Policy Profile of an SSID or Per-Client on a certain direction with the service-policy command.
3. (Optional) Table-Map: They are used to convert one type of mark to another, for instance, CoS to DCSP.
Note: In the table map, specify the values to be changed (4 to 32); in the policy map, the technology is specified (COS to DSCP).
Note: In case two or more policies are applicable per target, policy resolution is chosen based on this priority ranking:
• AAA Override (highest)
• Native profiling (Local policies)
• Configured Policy
• Default Policy (lowest)
More details can be found in the official QoS configuration guide for 9800.
Additional information about QoS theory can be found in the 9000 series QoS configuration guide.
Example: Guest and Corp QoS Policies
This example demonstrates how the explained QoS components apply in a real world scenario.
The intention is to configure a QoS Policy for guest that:
- Remarks DSCP
- Drops Youtube and Netflix video
- Rate Limits a host specified in an ACL to 50Kbps
- Rate Limits all other traffic to 100Kbps
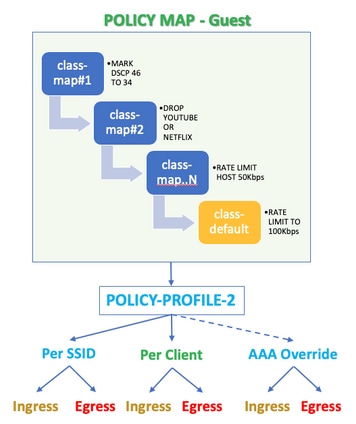
For the example, the QoS Policy must be applied Per SSID in both directions Ingress and Egress to the Policy Profile that links to the Guest WLAN.
Configure
AAA Server and Method List
Step 1. Navigate to Configuration > Security > AAA > Authentication > Servers/Groups and select +Add.
Enter the AAA server name, IP address and key, which has to match the shared secret under Administration > Network Resources > Network Devices on ISE.
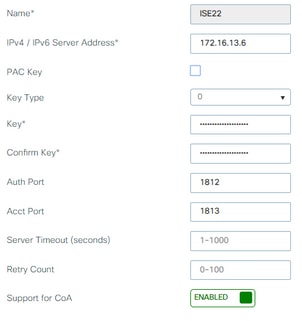
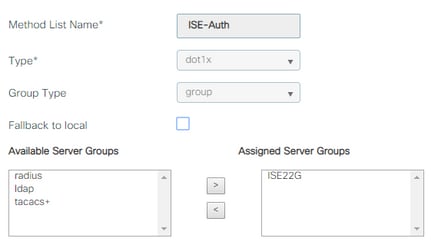
Step 2. Navigate to Configuration > Security > AAA > Authentication > AAA Method List and select +Add. Select the Assigned Server Groups from the Available Server Groups.
Step 3. Navigate to Configuration > Security > AAA > Authorization > AAA method List and select Add. Chose the default method and "network" as the type.
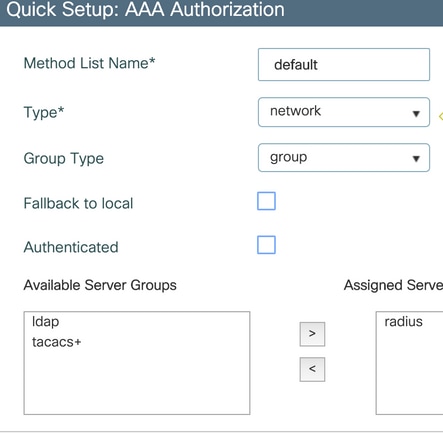
This is required for the controller to apply the authorization attributes (for example the QoS policy here) returned by the AAA server. Otherwise, the policy received from RADIUS is not applied.
WLAN Policy, Site Tag and AP Tag
Step 1. Navigate to Configuration > Wireless Setup > Advanced > Start Now > WLAN Profile and select +Add to create a new WLAN. Configure the SSID, Profile Name, WLAN ID, and set status to enabled.
Then, navigate to Security > Layer 2 and configure the Layer 2 authentication parameters:
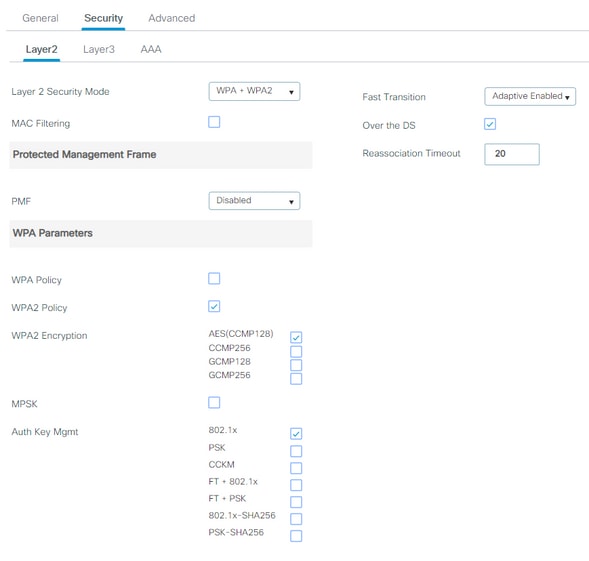
The SSID security does not have to be 802.1x as a requisite for QoS, yet is used in this configuration example for AAA override.
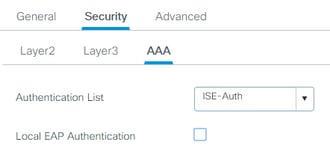
Step 2. Navigate to Security > AAA and select the AAA server in the Authentication List drop-down box.
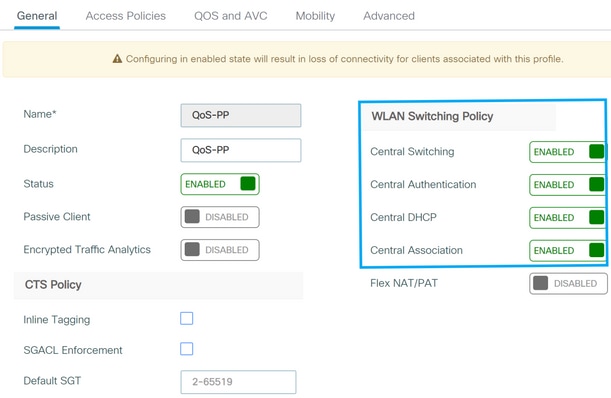
Step 3. Select Policy Profile and select +Add. Configure the Policy Profile name.
Set the Status as Enabled; also enable Central Switching, Authentication, DHCP and association:
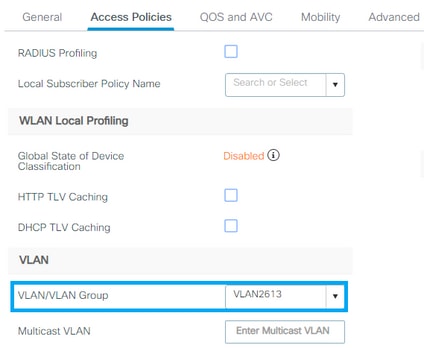
Step 4. Navigate to Access Policies and configure the VLAN the wireless client is assigned to when client connects to the SSID:
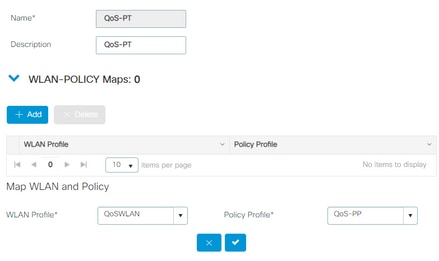
Step 5. Select Policy Tag and select +Add. Configure the Policy Tag name.
Under WLAN-Policy Maps, on +Add, select the WLAN Profile and Policy Profile from the drop down menus, select the check for the map to be configured.
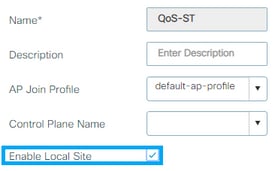
Step 6. Select Site Tag and select +Add. Check the Enable Local Site box for the APs to operate in Local Mode (or leave it uncheked for FlexConnect):
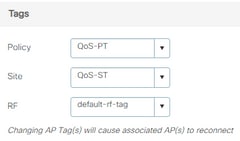
Step 7. Select Tag APs, choose the APs and add the Policy, Site and RF tag:
QoS
Step 1. Navigate to Configuration > Services > QoS and select +Add to create a QoS Policy.
Name it (for this example : BWLimitAAAClients).
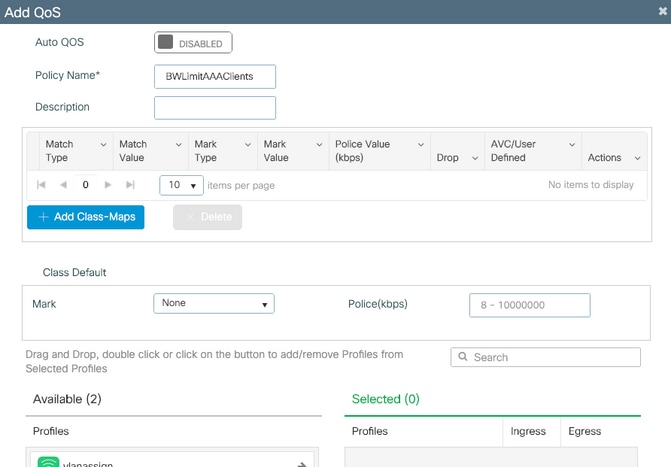
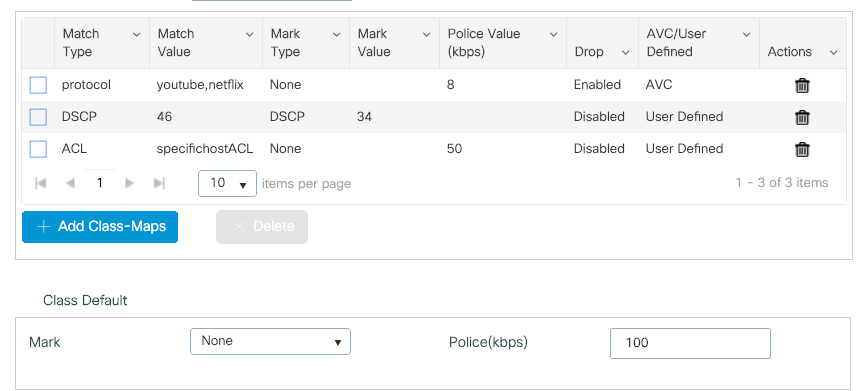
Step 2. Add a class map to drop Youtube and Netflix. Click on Add Class-Maps. Select AVC, match any, drop action and chose both protocols.
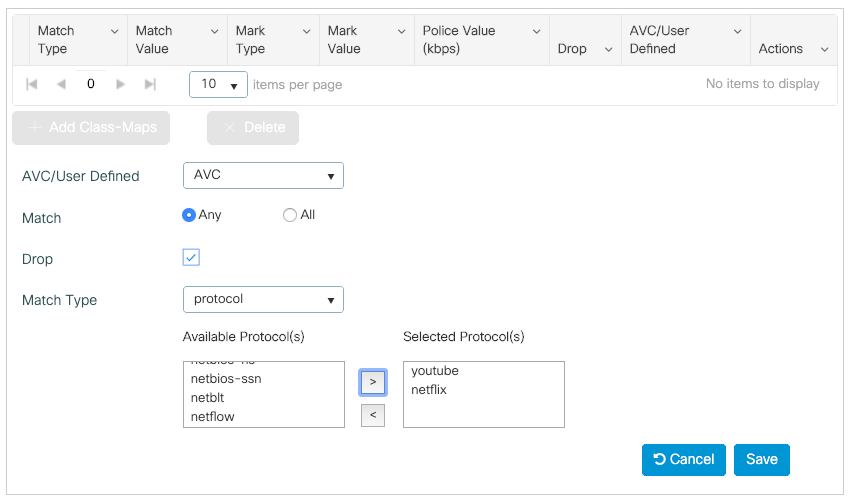
Click Save.
Step 3. Add a class map that remarks DSCP 46 to 34.
Click Add Class-Maps.
- Match any, User Defined
- Match type DSCP
- Match value 46
- Mark type DSCP
- Mark value 34
.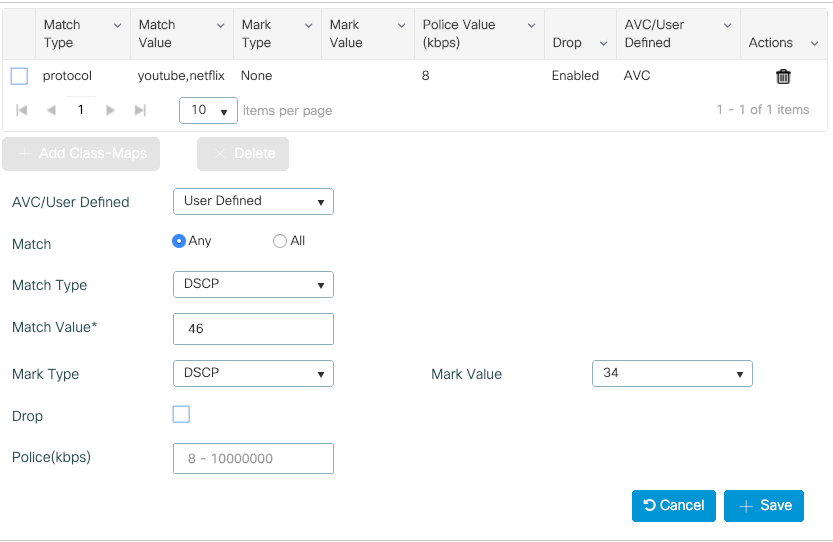
Hit Save.
Step 4. To define a class map that rules traffic to a specific host, create an ACL for it.
Click Add Class-Maps,
Choose User Defined, match any, match type ACL, chose your ACL name (here, specifichostACL), mark type none and chose the rate limit value.
Click Save.
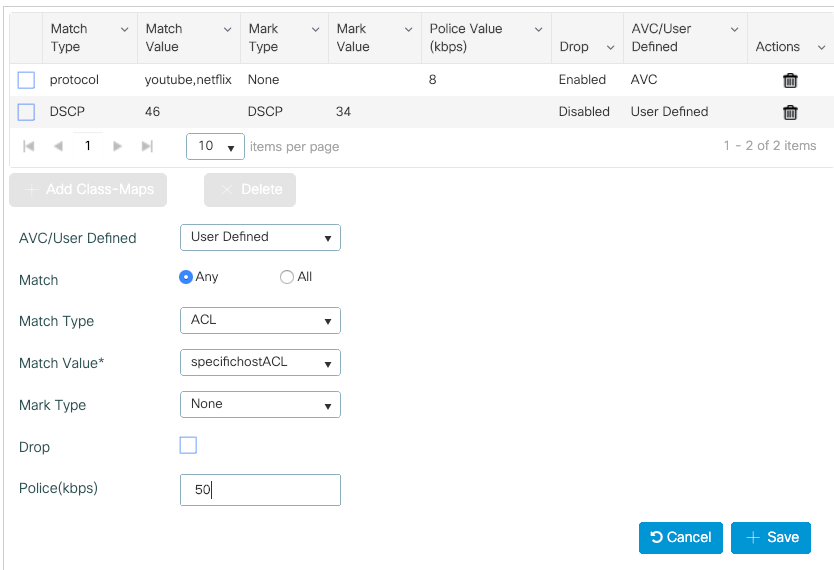
Here is an example of ACL that we use to identify a specific host traffic:

Step 5. Under the class maps frame, use the default class to set the rate limit for all the other traffic.
This sets a rate limit on all the client traffic that is not targeted by one of the aforementioned rules.
Step 6. Click on Apply to Device at the bottom.
CLI equivalent configuration:
policy-map BWLimitAAAclients
 class BWLimitAAAclients1_AVC_UI_CLASS
  police cir 8000
   conform-action drop
   exceed-action drop
 class BWLimitAAAclients1_ADV_UI_CLASS
  set dscp af41
 class BWLimitAAAclients2_ADV_UI_CLASS
  police cir 50000
   conform-action transmit
   exceed-action drop
 class class-default
  police cir 100000
   conform-action transmit
   exceed-action drop


class-map match-all BWLimitAAAclients1_AVC_UI_CLASS
  description BWLimitAAAclients1_AVC_UI_CLASS UI_policy_DO_NOT_CHANGE
 match protocol youtube
 match protocol netflix
class-map match-any BWLimitAAAclients1_ADV_UI_CLASS
  description BWLimitAAAclients1_ADV_UI_CLASS UI_policy_DO_NOT_CHANGE
 match dscp ef
class-map match-all BWLimitAAAclients2_ADV_UI_CLASS
  description BWLimitAAAclients2_ADV_UI_CLASS UI_policy_DO_NOT_CHANGE
 match access-group name specifichostACL
Note: In this example, no Profiles were selected under the QoS Policy since it is applied by AAA override. However, in order to apply the QoS policy to a Policy Profile manually, do select the desired Profiles.
Step 2. On ISE, navigate to Policy > Policy Elements > Results > Authorization Profiles and select on +Add to create an Authorization profile.
To apply the QoS policy, add them as Advanced Attributes Settings through Cisco AV Pairs.
It is assumed that ISE Authentication and Authorization policies are configured to match the right rule and get this authorization result.
The attributes are ip:sub-qos-policy-in=<policy name> and ip:sub-qos-policy-out=<policyname>
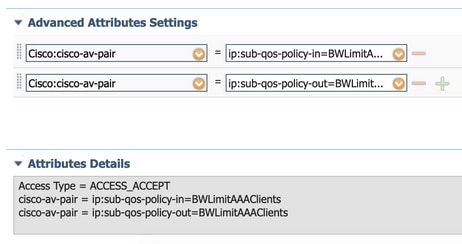
Note: Policy names are case sensitive. Make sure the case is correct !
Verify
Use this section to confirm that your configuration works properly.
On the WLC
# show run wlan
# show run aaa
# show aaa servers
# show ap tag summary
# show ap name <AP-name> tag detail
# show wireless tag policy summary
# show wireless tag policy detailed <policy-tag-name>
# show wireless profile policy detailed <policy-profile-name>
# show policy-map <policy-map name>
# sh policy-map interface wireless ssid/client profile-name <WLAN> radio type <2.4/5GHz> ap name <name>input/output

# show wireless client mac <client-MAC-address> detail
# show wireless client mac <client-MAC-address> service-policy input
# show wireless client mac <client-MAC-address> service-policy output

To verify EDCS parameters :
sh controllers dot11Radio 1 | begin EDCA
9800#show wireless client mac e836.171f.a162 det

Client MAC Address : e836.171f.a162
Client IPv4 Address : 192.168.1.11
Client IPv6 Addresses : fe80::c6e:2ca4:56ea:ffbf
                        2a02:a03f:42c2:8400:187c:4faf:c9f8:ac3c
                        2a02:a03f:42c2:8400:824:e15:6924:ed18
                        fd54:9008:227c:0:1853:9a4:77a2:32ae
                        fd54:9008:227c:0:1507:c911:50cd:2062
Client Username : Nico
AP MAC Address : 502f.a836.a3e0
AP Name: AP780C-F085-49E6
AP slot : 1
Client State : Associated

(...)

  Local Policies:
  	Service Template : wlan_svc_QoS-PP (priority 254)
  		VLAN             : 1
  		Absolute-Timer   : 1800
  Server Policies:
  		Input QOS        : BWLimitAAAClients
  		Output QOS       : BWLimitAAAClients
  Resultant Policies:
  		VLAN Name         : default
  		Input QOS        : BWLimitAAAClients
  		Output QOS       : BWLimitAAAClients
  		VLAN             : 1
  		Absolute-Timer   : 1800
On the AP
No troubleshooting is required on the AP when the AP is in local mode or the SSID in Flexconnect Central Switching mode as the QoS and service policies are done by the WLC.
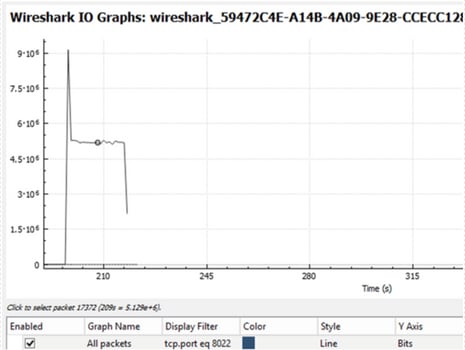
Packet Captures IO Graph analysis
Troubleshoot
This section provides information to troubleshoot your configuration.
Step 1. Clear all pre-existing debug conditions.
# clear platform condition all
Step 2. Enable the debug for the wireless client in question.
# debug wireless mac <client-MAC-address> {monitor-time <seconds>}
Step 3. Connect the wireless client to the SSID in order to reproduce the issue.
Step 4. Stop the debugs once the issue is reproduced.
# no debug wireless mac <client-MAC-address>
The logs captured during the test are stored on the WLC on a local file with the name:
ra_trace_MAC_aaaabbbbcccc_HHMMSS.XXX_timezone_DayWeek_Month_Day_year.log
If GUI workflow is used to generate this trace, the filename saved is debugTrace_aaaa.bbbb.cccc.txt.
Step 5. To collect the file generated previously, either copy the ra trace .log to an external server or display the output directly on the screen.
Check the name of the RA traces file with this command:
# dir bootflash: | inc ra_trace
Copy the file to an external server:
# copy bootflash:ra_trace_MAC_aaaabbbbcccc_HHMMSS.XXX_timezone_DayWeek_Month_Day_year.log tftp://a.b.c.d/ra-FILENAME.txt
Alternatively display the content:
# more bootflash:ra_trace_MAC_aaaabbbbcccc_HHMMSS.XXX_timezone_DayWeek_Month_Day_year.log
Step 6. Remove the debug conditions.
# clear platform condition all
Flexconnect Local Switching (or Fabric/SDA) Scenario
In case of flexconnect local switching (or fabric / SDA), it is the AP that applies any QoS policy that you defined on the WLC.
On wave2 and 11ax Access Points, rate-limit occurs at a per-flow (5 tuple) level and not per-client or per-SSID before 17.6. This applies to AP in Flexconnect/Fabric, Embedded Wireless Controller on Access Point (EWc-AP) deployments.
As of 17.5, AAA override can be leveraged to push the attributes to achieve per-client rate-limit.
As of 17.6, Per Client bi-directional rate limit is supported on 802.11ac Wave 2 and 11ax APs in Flex local switching configuration.
Note: Flex APs do not support the presence of ACLs in QoS policies. They also do not support BRR (bandwidth remain) and policy priority which are configurable through the CLI but not available in the 9800 web UI and not supported on 9800. Cisco bug ID CSCvx81067 tracks the support of ACLs in QoS policies for flex APs.
Configuration
The configuration is exactly the same as the first part of this article with two exceptions:
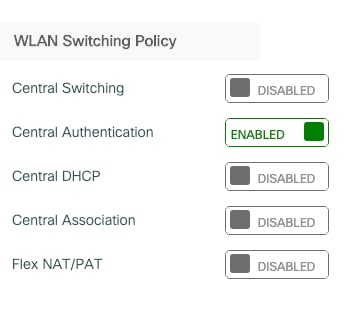
1. The policy profile is set to local switching. Flex deployment requires Central Association be disabled until Bengaluru 17.4 release.
As of 17.5, this field is not available for user configuration as it is hardcoded.
2. The site tag is set to not be local site.

Troubleshoot Flexconnect/Fabric
Because the AP is the device which applies the QoS policies, these commands can help narrow down what is applied.
show dot11 qos
show policy-map
show rate-limit client
show rate-limit bssid
show rate-limit wlan
show flexconnect client
AP780C-F085-49E6#show dot11 qos
Qos Policy Maps (UPSTREAM)
ratelimit targets:
Client: A8:DB:03:6F:7A:46
platinum-up targets:
VAP: 0 SSID:LAB-DNAS
VAP: 1 SSID:VlanAssign
VAP: 2 SSID:LAB-Qos
Qos Stats (UPSTREAM)
total packets: 29279
dropped packets: 0
marked packets: 0
shaped packets: 0
policed packets: 182
copied packets: 0
DSCP TO DOT1P (UPSTREAM)
Default dscp2dot1p Table Value:
[0]->0 [1]->2 [2]->10 [3]->18 [4]->26 [5]->34 [6]->46 [7]->48
Active dscp2dot1p Table Value:
[0]->0 [1]->2 [2]->10 [3]->18 [4]->26 [5]->34 [6]->46 [7]->48
Trust DSCP Upstream : Disabled
Qos Policy Maps (DOWNSTREAM)
ratelimit targets:
Client: A8:DB:03:6F:7A:46
Qos Stats (DOWNSTREAM)
total packets: 25673
dropped packets: 0
marked packets: 0
shaped packets: 0
policed packets: 150
copied packets: 0
DSCP TO DOT1P (DOWNSTREAM)
Default dscp2dot1p Table Value:
[0]->0 [1]->-1 [2]->1 [3]->-1 [4]->1 [5]->-1 [6]->1 [7]->-1
[8]->-1 [9]->-1 [10]->2 [11]->-1 [12]->2 [13]->-1 [14]->2 [15]->-1
[16]->-1 [17]->-1 [18]->3 [19]->-1 [20]->3 [21]->-1 [22]->3 [23]->-1
[24]->-1 [25]->-1 [26]->4 [27]->-1 [28]->-1 [29]->-1 [30]->-1 [31]->-1
[32]->-1 [33]->-1 [34]->5 [35]->-1 [36]->-1 [37]->-1 [38]->-1 [39]->-1
[40]->-1 [41]->-1 [42]->-1 [43]->-1 [44]->-1 [45]->-1 [46]->6 [47]->-1
[48]->7 [49]->-1 [50]->-1 [51]->-1 [52]->-1 [53]->-1 [54]->-1 [55]->-1
[56]->7 [57]->-1 [58]->-1 [59]->-1 [60]->-1 [61]->-1 [62]->-1 [63]->-1
Active dscp2dot1p Table Value:
[0]->0 [1]->0 [2]->1 [3]->0 [4]->1 [5]->0 [6]->1 [7]->0
[8]->1 [9]->1 [10]->2 [11]->1 [12]->2 [13]->1 [14]->2 [15]->1
[16]->2 [17]->2 [18]->3 [19]->2 [20]->3 [21]->2 [22]->3 [23]->2
[24]->3 [25]->3 [26]->4 [27]->3 [28]->3 [29]->3 [30]->3 [31]->3
[32]->4 [33]->4 [34]->5 [35]->4 [36]->4 [37]->4 [38]->4 [39]->4
[40]->5 [41]->5 [42]->5 [43]->5 [44]->5 [45]->5 [46]->6 [47]->5
[48]->7 [49]->6 [50]->6 [51]->6 [52]->6 [53]->6 [54]->6 [55]->6
[56]->7 [57]->7 [58]->7 [59]->7 [60]->7 [61]->7 [62]->7 [63]->7
Profinet packet recieved from
wired port:
0
wireless port:
�
AP780C-F085-49E6#show policy-map
2 policymaps
Policy Map BWLimitAAAClients type:qos client:default
Class BWLimitAAAClients_AVC_UI_CLASS
drop
Class BWLimitAAAClients_ADV_UI_CLASS
set dscp af41 (34)
Class class-default
police rate 5000000 bps (625000Bytes/s)
conform-action
exceed-action
Policy Map platinum-up type:qos client:default
Class cm-dscp-set1-for-up-4
set dscp af41 (34)
Class cm-dscp-set2-for-up-4
set dscp af41 (34)
Class cm-dscp-for-up-5
set dscp af41 (34)
Class cm-dscp-for-up-6
set dscp ef (46)
Class cm-dscp-for-up-7
set dscp ef (46)
Class class-default
no actions
AP780C-F085-49E6#show rate-limit client
Config:
mac vap rt_rate_out rt_rate_in rt_burst_out rt_burst_in nrt_rate_out nrt_rate_in nrt_burst_out nrt_burst_in
A8:DB:03:6F:7A:46 2 0 0 0 0 0 0 0 0
Statistics:
name up down
Unshaped 0 0
Client RT pass 0 0
Client NRT pass 0 0
Client RT drops 0 0
Client NRT drops 0 38621
9 54922 0
AP780C-F085-49E6#
AP780C-F085-49E6#show flexconnect client
Flexconnect Clients:
mac radio vap aid state encr aaa-vlan aaa-acl aaa-ipv6-acl assoc auth switching key-method roam key-progmed handshake-sent wgb SGT
A8:DB:03:6F:7A:46 1 2 1 FWD AES_CCM128 none none none Local Central Local Other regular No Yes No 0
AP780C-F085-49E6#References
Catalyst 9000 16.12 QoS guide
9800 QoS configuration guide
Catalyst 9800 configuration model
Cisco IOS® XE 17.6 Release Notes


 Feedback