Configure RADIUS & TACACS+ for GUI & CLI Auth on 9800 WLCs
Available Languages
Download Options
Bias-Free Language
The documentation set for this product strives to use bias-free language. For the purposes of this documentation set, bias-free is defined as language that does not imply discrimination based on age, disability, gender, racial identity, ethnic identity, sexual orientation, socioeconomic status, and intersectionality. Exceptions may be present in the documentation due to language that is hardcoded in the user interfaces of the product software, language used based on RFP documentation, or language that is used by a referenced third-party product. Learn more about how Cisco is using Inclusive Language.
Contents
Introduction
This document describes how to configure a Catalyst 9800 for RADIUS or TACACS+ external authentication.
Prerequisites
Requirements
Cisco recommends that you have knowledge of these topics:
- Catalyst Wireless 9800 configuration model
- AAA, RADIUS, and TACACS+ concepts
Components Used
The information in this document is based on these software and hardware versions:
- C9800-CL v17.9.2
- ISE 3.2.0
The information in this document was created from the devices in a specific lab environment. All of the devices used in this document started with a cleared (default) configuration. If your network is live, ensure that you understand the potential impact of any command.
Background Information
When a user tries to access the CLI or the GUI of the WLC, they are prompted to input a username and password. By default, these credentials are compared against the local database of users, which is present on the device itself. Alternatively, the WLC can be instructed in order to compare the input credentials against a remote AAA server: the WLC can either talk to the server with the use of RADIUS or TACACS+. Those are the two only external authentication methods for admin users (no LDAP for example).
Configure
In this example, two types of users on the AAA server (ISE), respectively the adminuser, and the helpdeskuser are configured. These users are part of the admin-group and the helpdesk-group groups respectively. The user adminuser, part of the admin-group, is expected to be granted full access to the WLC. On the other hand, the helpdeskuser, part of the helpdesk-group, is meant to only be granted monitor privileges to the WLC. Hence, there is no configuration access.
This article first configures the WLC and ISE for RADIUS authentication, and later performs the same for TACACS+.
Read-Only User Restrictions
When TACACS+ or RADIUS is used for 9800 WebUI authentication, these restrictions exist:
- Users with privilege level 0 exist but have no access to the GUI
-
Users with privilege levels 1-14 can only view the Monitor tab (this is equivalent to the privilege level of a read-only locally authenticated user)
-
Users with privilege level 15 have full access
-
Users with privilege level 15 and a command set that allows specific commands only are not supported. The user can still be able to execute configuration changes through the WebUI
These considerations cannot be changed or modified.
Configure RADIUS Authentication for the WLC
Step 1. Declare the RADIUS server.
From GUI:
Firstly, create the ISE RADIUS server on the WLC. This can be done from the tab Servers/Groups > RADIUS > Servers from the GUI WLC page accessible in https://<WLC-IP>/webui/#/aaa, or if you navigate to Configuration > Security > AAA , as shown in this image.
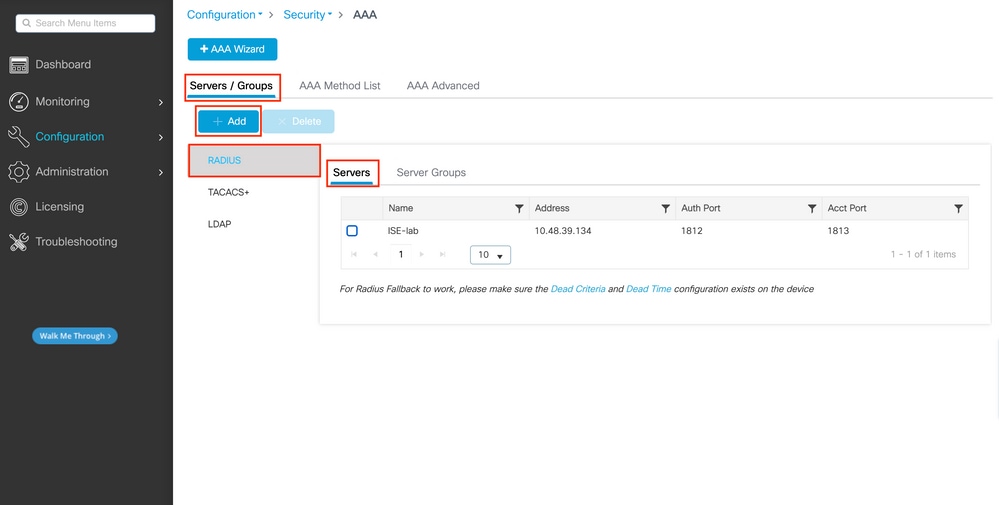
To add a RADIUS server on the WLC, click the Add button framed in red in the image. This opens the popup window depicted in the screenshot.
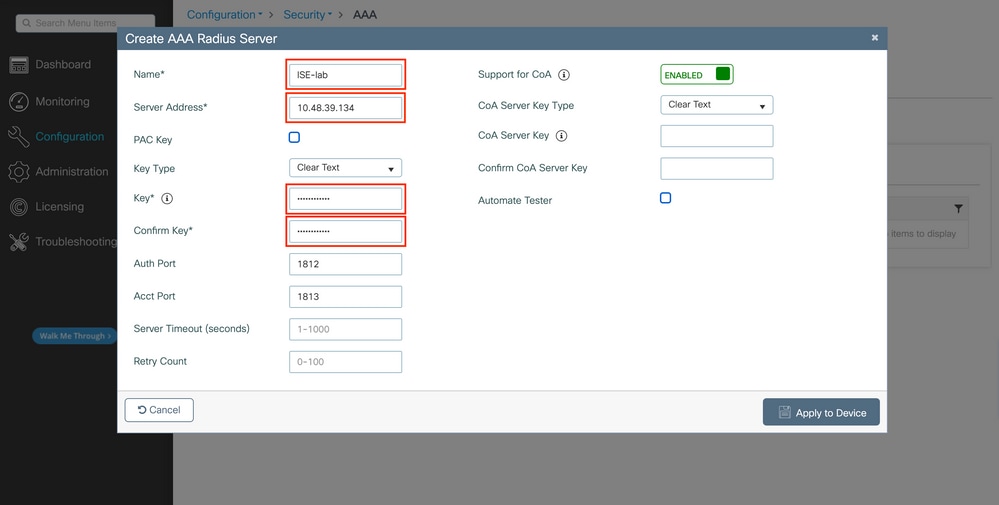
In this popup window, you must provide:
- The server name (note that it does not have to match the ISE system name)
- The server IP address
- The shared secret between the WLC and the RADIUS server
Other parameters can be configured, such as the ports used for authentication and accounting, but these are not mandatory and are left as default for this documentation.
From CLI:
WLC-9800(config)#radius server ISE-lab
WLC-9800(config-radius-server)#address ipv4 10.48.39.134 auth-port 1812 acct-port 1813
WLC-9800(config-radius-server)#key Cisco123
Step 2. Map the RADIUS server to a Server Group.
From GUI:
In case you have multiple RADIUS servers that can be used for authentication, it is recommended to map all these servers to the same Server Group. The WLC takes care of load balancing different authentications among the servers in the server group. RADIUS server groups are configured from the Servers/Groups > RADIUS > Server Groups tab from the same GUI page as the one mentioned in Step 1., as shown in the image.
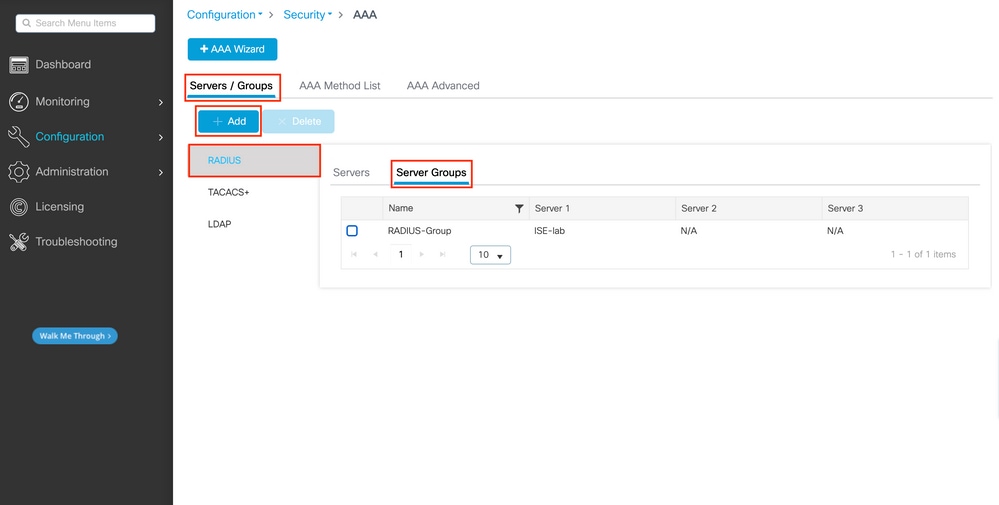
As for the server creation, a popup window appears when you click the Add button (framed in the previous image), which is depicted here.
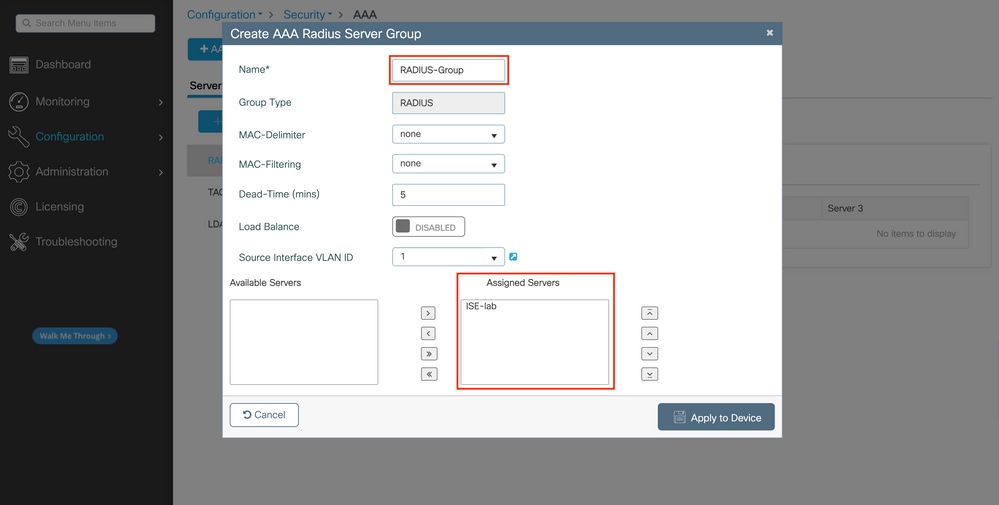
In the popup, provide a name to the group, and move the desired servers to the Assigned Servers list.
From CLI:
WLC-9800(config)# aaa group server radius RADIUS-Group
WLC-9800(config-sg-radius)# server name ISE-lab
Step 3. Create an AAA authentication log in method that points to the RADIUS server group.
From GUI:
Still from the GUI page https://<WLC-IP>/webui/#/aaa, navigate to the AAA Method List > Authentication tab and create an authentication method as shown in this image.
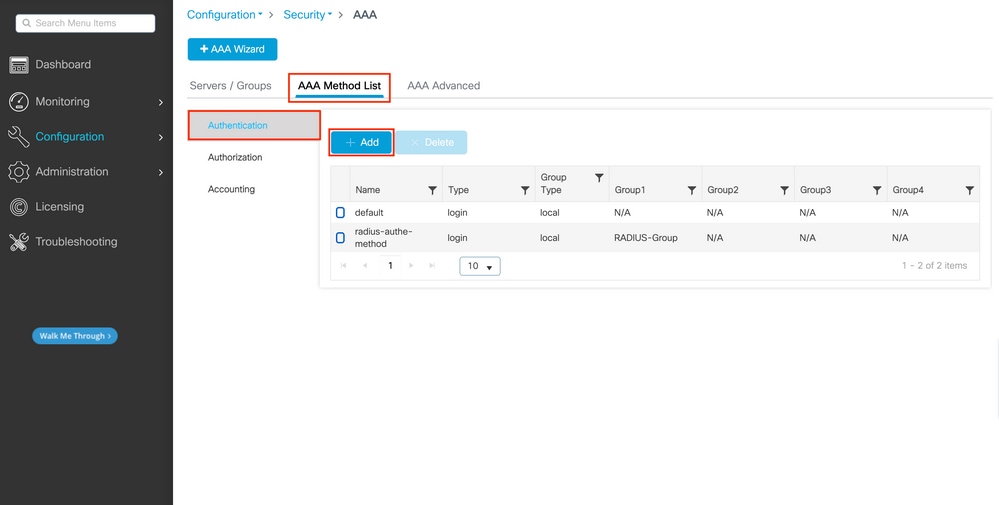
As usual, when you use the Add button to create an authentication method, a configuration popup window appears, similar to the one depicted in this image.
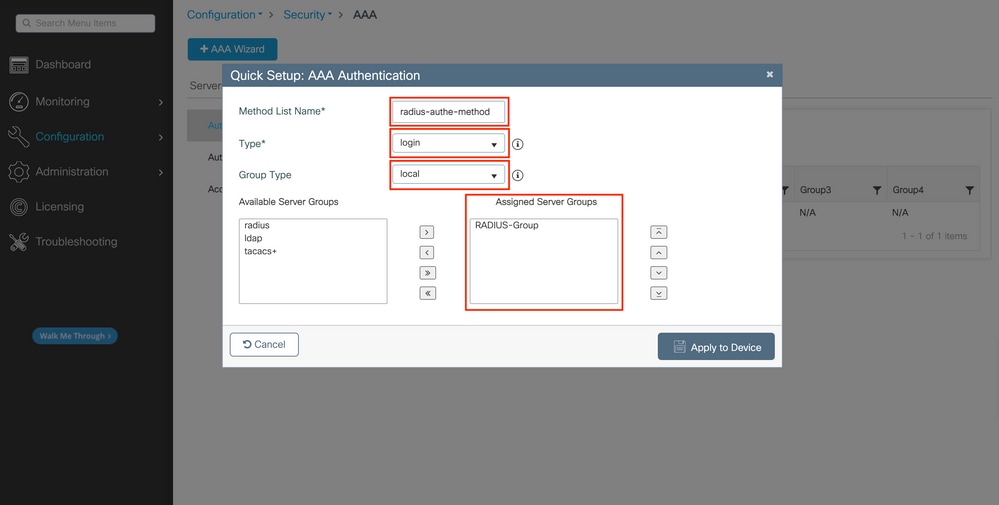
In this popup window, provide a name for the method. Choose Type as log in, and add the group server created in the previous step to the Assigned Server Groups list. With regards to the Group Type field, several configurations are possible.
- If you choose Group Type as local, the WLC first checks if the user credentials exist locally, and then falls back to the server group.
- If you choose Group Type as a group and do not check the Fall back to local option, the WLC just checks the user credentials against the server group.
- If you choose Group Type as a group and check the Fallback to local option, the WLC checks the user credentials against the server group and queries the local database only if the server does not respond. If the server sends a reject, the user is to be authenticated, even though it can exist on the local database.
From CLI:
If you want user credentials to be checked with a server group only if they are not found locally first, use:
WLC-9800(config)#aaa authentication login radius-authe-method local group RADIUS-Group
If you want the user credentials to be checked only with a server group, use:
WLC-9800(config)#aaa authentication login radius-authe-method group RADIUS-Group
If you want user credentials to be checked with a server group and if this last does not respond with local entry, use:
WLC-9800(config)#aaa authentication login radius-authe-method group RADIUS-Group local
In this example setup, there are some users who are only created locally, and some users only on the ISE server, hence, make use of the first option.
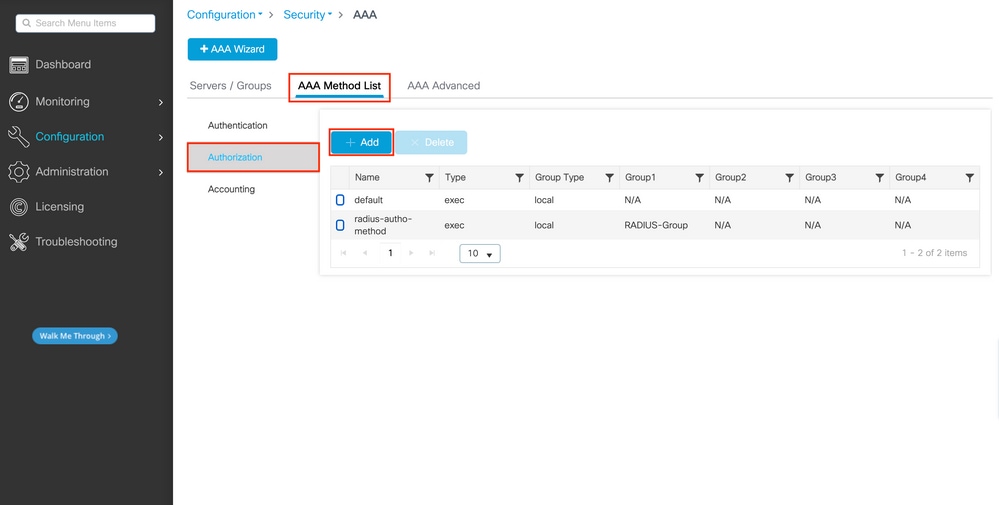
Step 4. Create a AAA authorization exec method that points to the RADIUS server group.
From GUI:
The user has to be also authorized in order to be granted access. Still from the GUI Page Configuration > Security > AAA, navigate to the AAA Method List > Authorization tab, and create an authorization method as shown in this image.
 Authorization method creation
An authorization method configuration popup similar to the one depicted appears when you add a new one with the Add button.
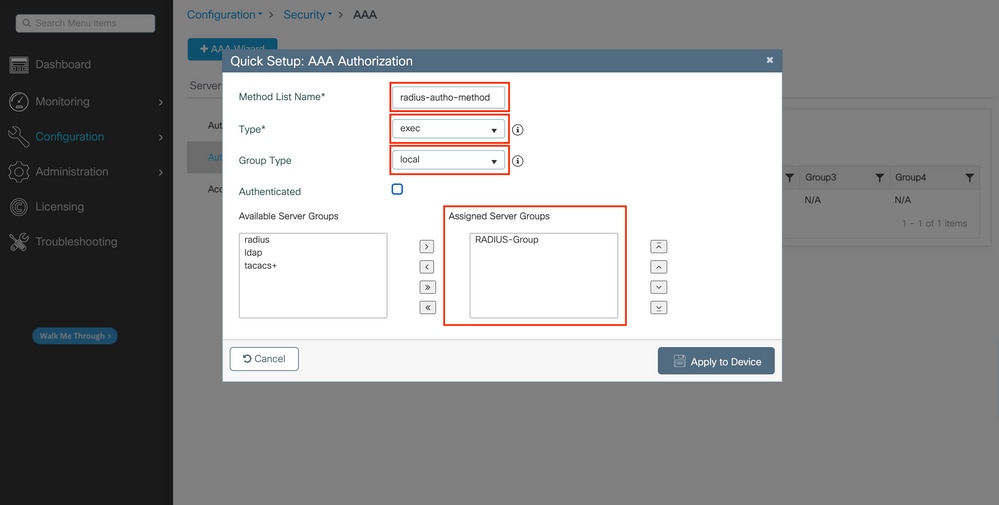
In this configuration popup, provide a name for the authorization method, choose the Type as exec, and use the same order of Group Type as the one used for the authentication method in Step 3.
From CLI:
As for the authentication method, authorization is assigned first to check users against local entries, then against entries in a server group.
WLC-9800(config)#aaa authorization exec radius-autho-method local group RADIUS-Group
Step 5. Assign the methods to the HTTP configurations and to the VTY lines used for Telnet/SSH.
From GUI:
The created authentication and authorization methods can be used for HTTP and/or Telnet/SSH user connection, which is configurable from the AAA Advanced > AAA Interface tab still from the GUI WLC page accessible in https://<WLC-IP>/webui/#/aaa, as shown in this image:
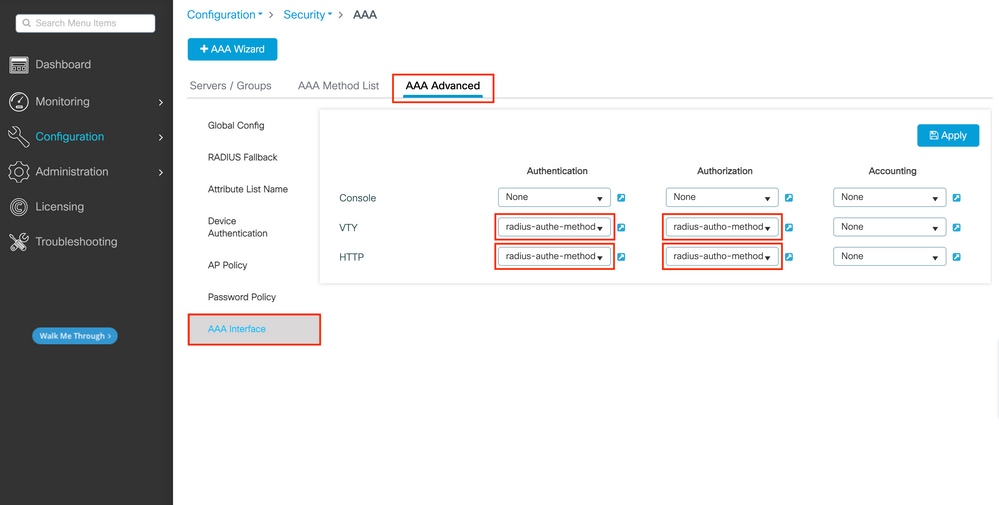
CLI For GUI authentication:
WLC-9800(config)#ip http authentication aaa login-authentication radius-authe-method
WLC-9800(config)#ip http authentication aaa exec-authorization radius-autho-method
CLI For Telnet/SSH authentication:
WLC-9800(config)#line vty 0 15
WLC-9800(config-line)#login authentication radius-authe-method
WLC-9800(config-line)#authorization exec radius-autho-method
Note that when changes are performed to the HTTP configurations, it is best to restart the HTTP and HTTPS services. This can be achieved with these commands:
WLC-9800(config)#no ip http server
WLC-9800(config)#no ip http secure-server
WLC-9800(config)#ip http server
WLC-9800(config)#ip http secure-server
Configure ISE for RADIUS
Step 1. Configure the WLC as a network device for RADIUS.
From GUI:
In order to declare the WLC used in the previous section as a network device for RADIUS in ISE, navigate to Administration > Network Ressources > Network Devices and open the Network devices tab, as shown in the next image.
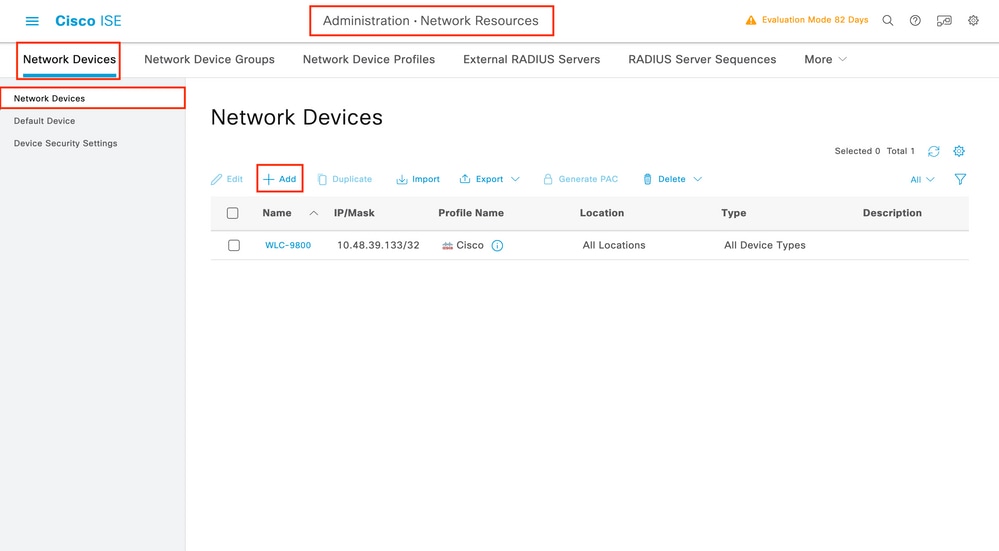
To add a network device, use the Add button, which opens the new network device configuration form.
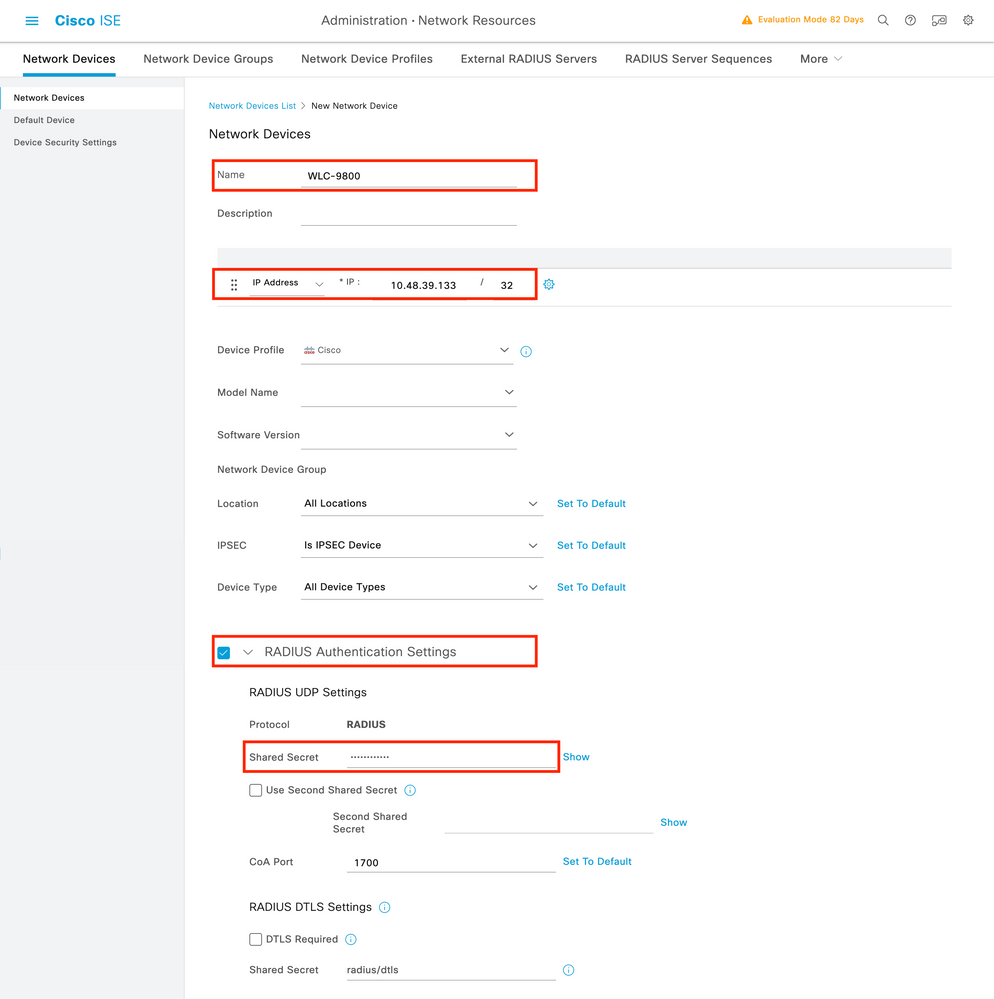
In the new window, provide a name for the network device, and add its IP address. Choose the RADIUS Authentication Settings and configure the same RADIUS Shared Secret as the one used on the WLC.
Step 2. Create an authorization result, to return the privilege.
From GUI:
In order to have administrator access rights, the adminuser needs to have a privilege level of 15, which allows to access the exec prompt shell. On the other hand, the helpdeskuser does not need exec prompt shell access and can therefore be assigned with a privilege level lower than 15. In order to assign the proper privilege level to users, authorization profiles can be used. These can be configured from the ISE GUI Page Policy > Policy Elements > Results, under the tab Authorization > Authorization Profiles shown in the next picture.

To configure a new authorization profile, use the Add button, which opens the new authorization profile configuration form. This form must especially look like this to configure the profile that is assigned to the adminuser.
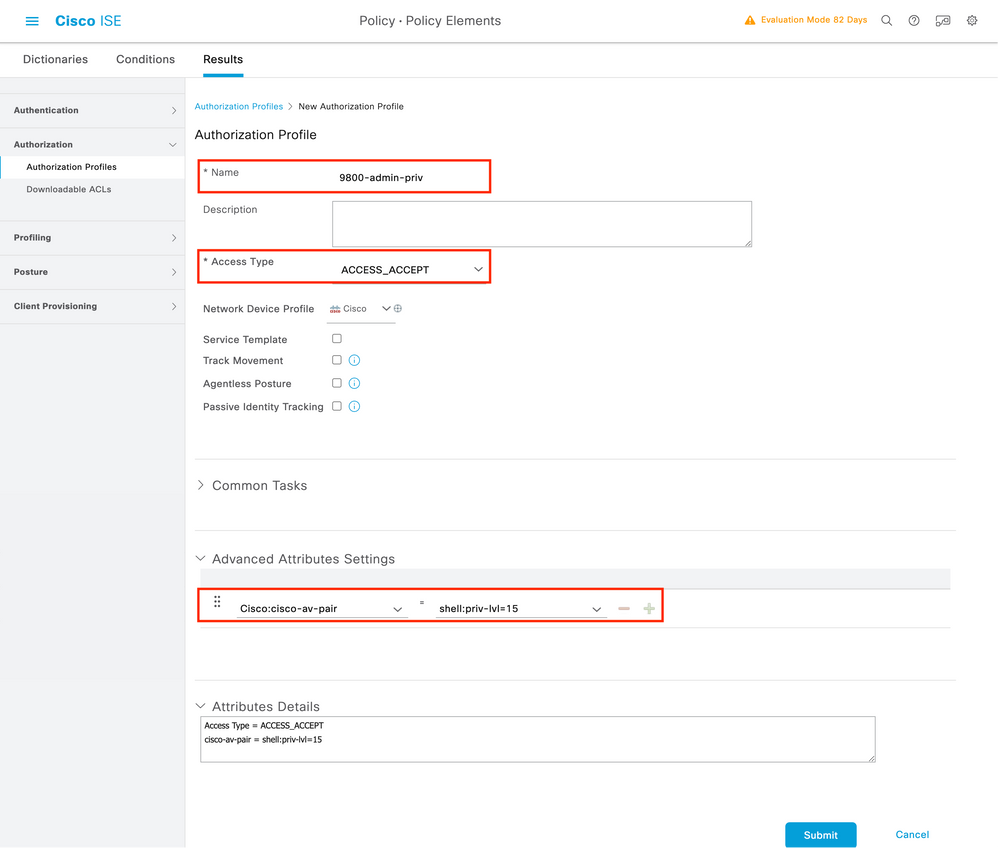
The configuration showed grants privilege level 15 to any user to which it is associated. As mentioned before, this is the expected behavior for the adminuser that is created during the next step. However, the helpdeskuser must have a lower privilege level, and therefore a second policy element must be created.
The policy element for the helpdeskuser is similar to the one created just above, except that the string shell:priv-lvl=15 must be changed to shell:priv-lvl=X, and replace X with the desired privilege level. In this example, 1 is used.
Step 3. Create user groups on ISE.
From the GUI:
ISE user groups are created from the tab User Identity Groups of the Administration > Identity Management > Groups GUI Page, which is shown in the screen capture.
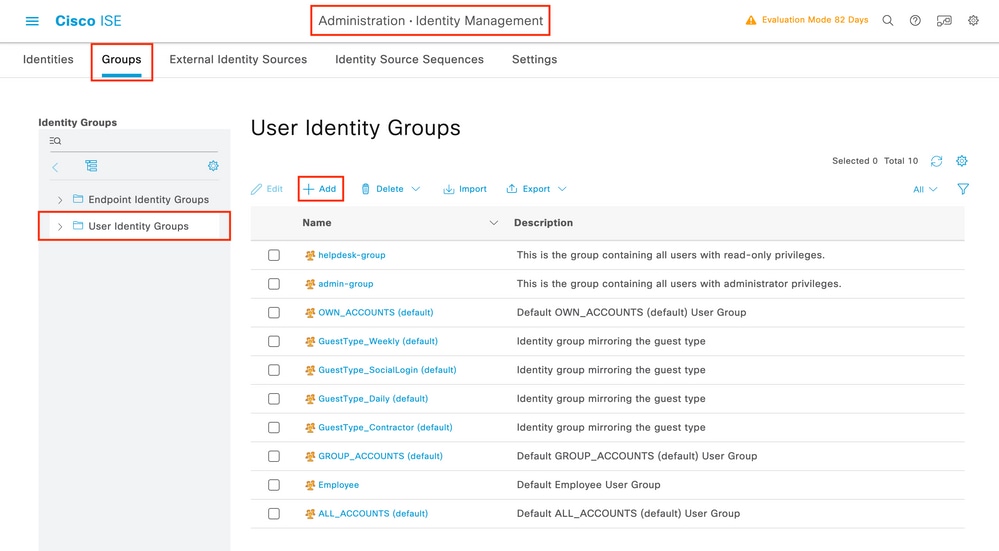
To create a new user, use the Add button, which opens the new user identity group configuration form as shown.
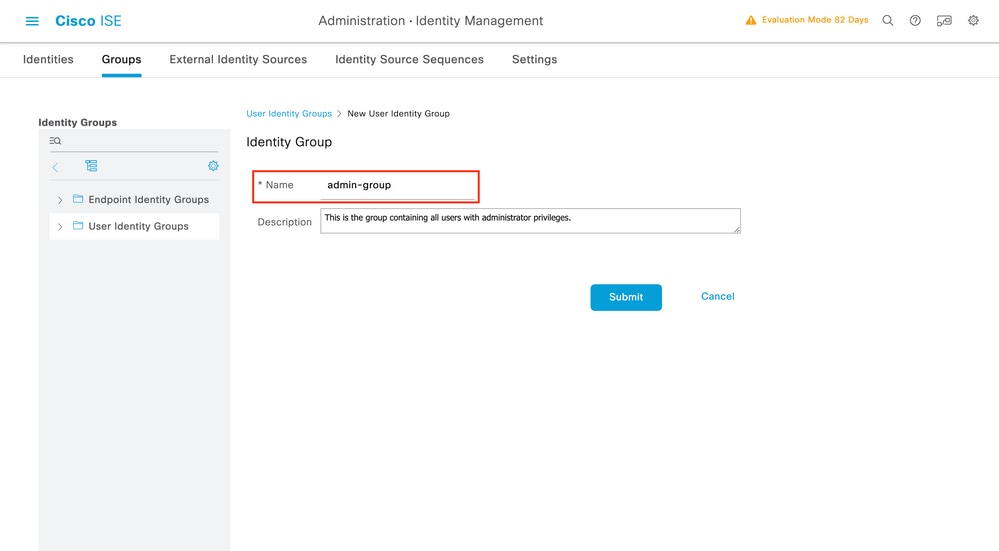
Provide the name of the group that is created. Create the two user groups discussed above, namely the admin-group and helpdesk-group.
Step 4. Create users on ISE.
From the GUI:
ISE users are created from the tab Users of the Administration > Identity Management > Identities GUI Page, which is shown in the screen capture.

To create a new user, use the Add button to open the new network access user configuration form as shown.
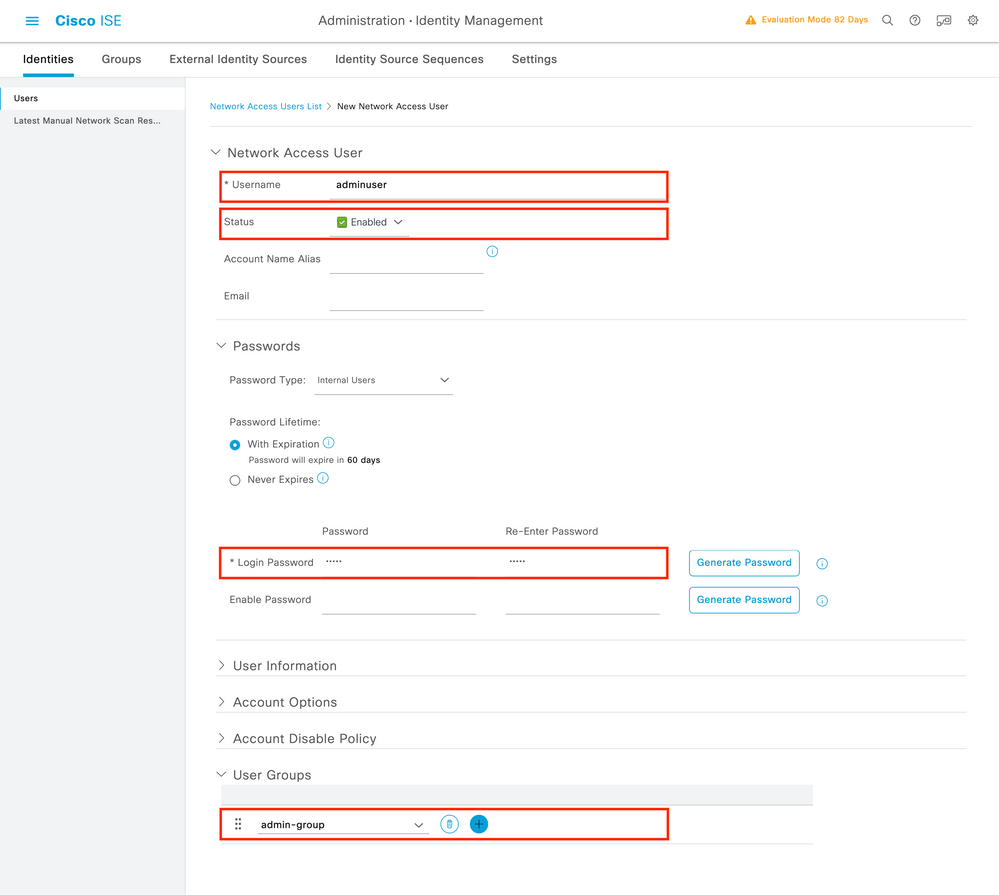
Provide the credentials to the users, namely his/her username and password, which are the ones that are used to authenticate on the WLC. Also, ensure that the Status of the user is Enabled. Finally, add the user to its related group, which has been created in Step 4., with the User Groups drop-down menu at the end of the form.
Create the two users discussed above, namely the adminuser and helpdeskuser.
Step 5. Authenticate the users.
From GUI:
In this scenario, the authentication policy of the default Policy Sets of ISE, which is already preconfigured, allows default network access. This policy set can be seen from the Policy > Policy Sets of the ISE GUI page, as shown in this picture. Hence, there is no need to change it.

Step 6. Authorize the users.
From GUI:
After the log in attempt passes the authentication policy, it needs to be authorized and ISE needs to return the authorization profile created earlier (permit accept, along with the privilege level).
In this example, log in attempts are filtered based on the device IP address (which is the WLC IP address) and distinguish the privilege level to be granted based on the group to which a user belongs. Another valid approach is to filter users based on their usernames since each group only contains a single user in this example.
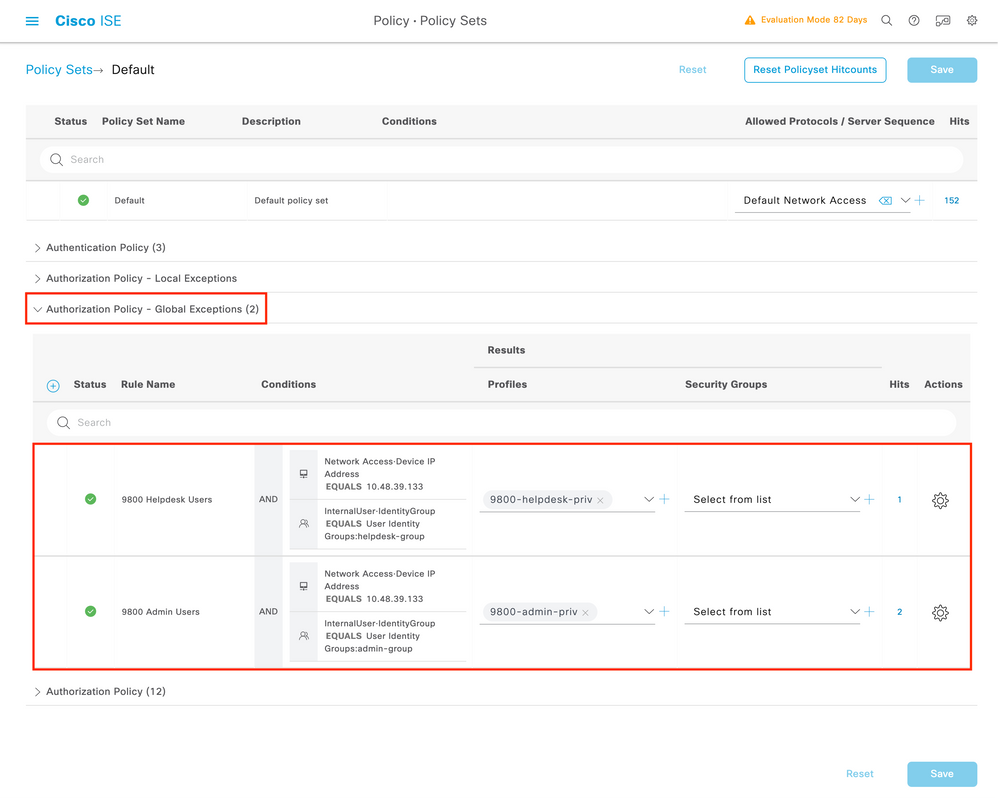
After this step has been completed, the credentials configured for adminuser and helpdesk user can be used to authenticate in the WLC via the GUI or through Telnet/SSH.
Configure TACACS+ WLC
Step 1. Declare the TACACS+ server.
From GUI:
First of all, create the Tacacs+ server ISE on the WLC. This can be done from the tab Servers/Groups > TACACS+ > Servers from the GUI WLC page accessible in the https://<WLC-IP>/webui/#/aaa, or if you navigate to Configuration > Security > AAA, as shown in this image.
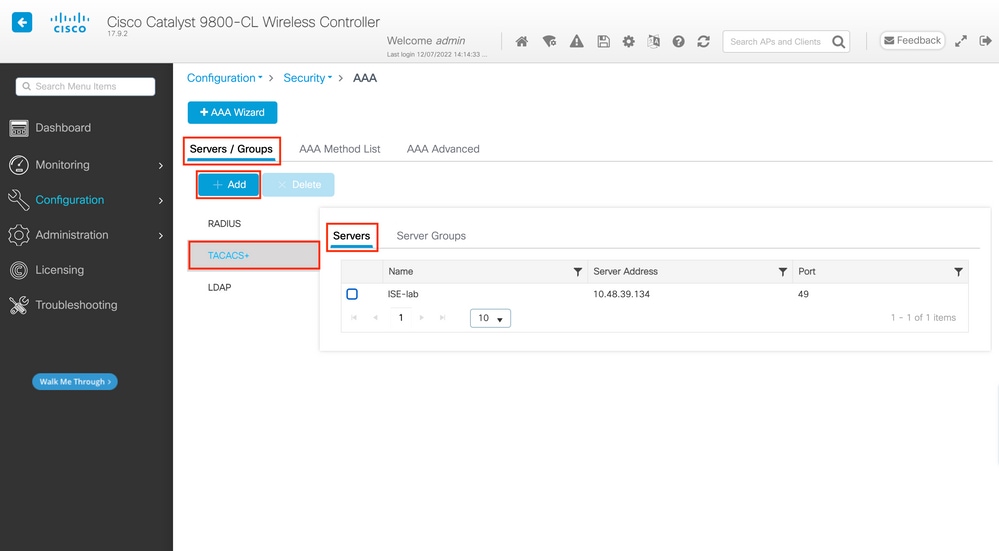
To add a TACACS server on the WLC, click the Add button framed in red in the image above. This opens the popup window depicted.
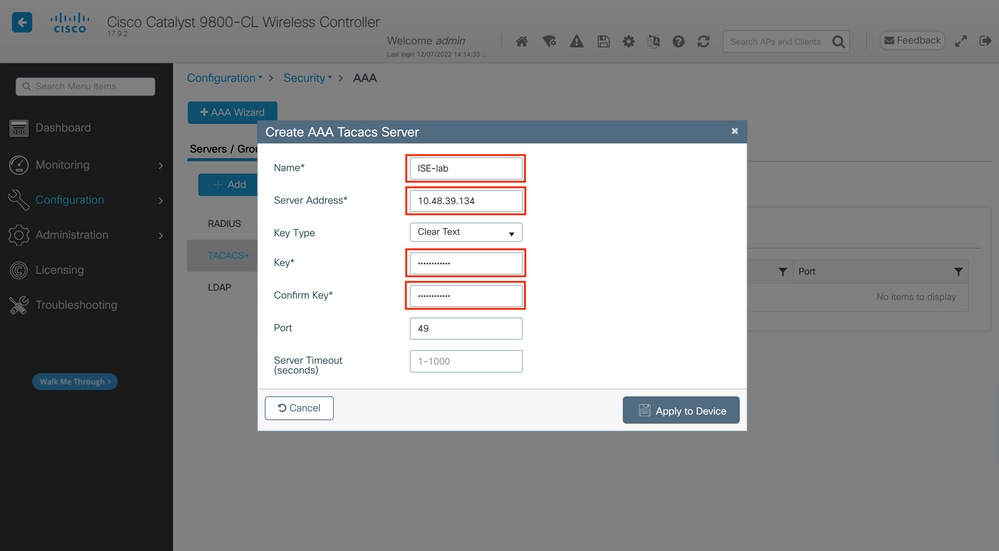
When the popup window opens, provide the server name (it does not have to match the ISE system name), its IP address, the shared key, the port used, and the timeout.
In this popup window, you must provide:
- The server name (note that it does not have to match the ISE system name)
- The server IP address
- The shared secret between the WLC and the TACACS+ server
Other parameters can be configured, such as the ports used for authentication and accounting, but these are not mandatory and left as default for this documentation.
From CLI:
WLC-9800(config)#tacacs server ISE-lab
WLC-9800(config-server-tacacs)#address ipv4 10.48.39.134
WLC-9800(config-server-tacacs)#key Cisco123
Step 2. Map the TACACS+ server to a Server Group.
From GUI:
In case you have multiple TACACS+ servers that can be used for authentication, it is recommended to map all these servers to the same Server Group. The WLC then takes care of load balancing different authentications among the servers in the server group. TACACS+ server groups are configured from the Servers/Groups > TACACS > Server Groups tab from the same GUI page as the one mentioned in Step 1., which is shown in the image.
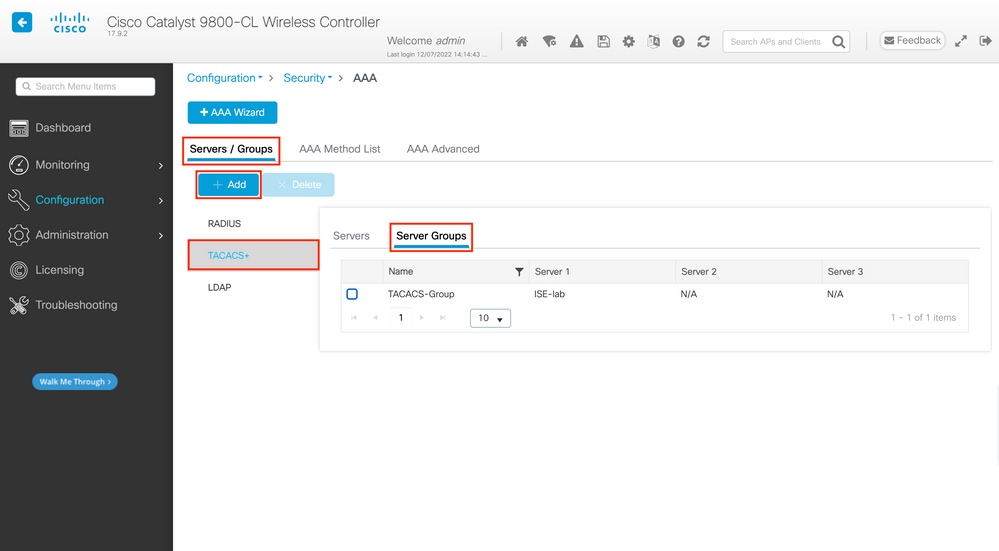
As for the server creation, a popup window appears when you click the Add button framed in the earlier image, which is depicted in the image.
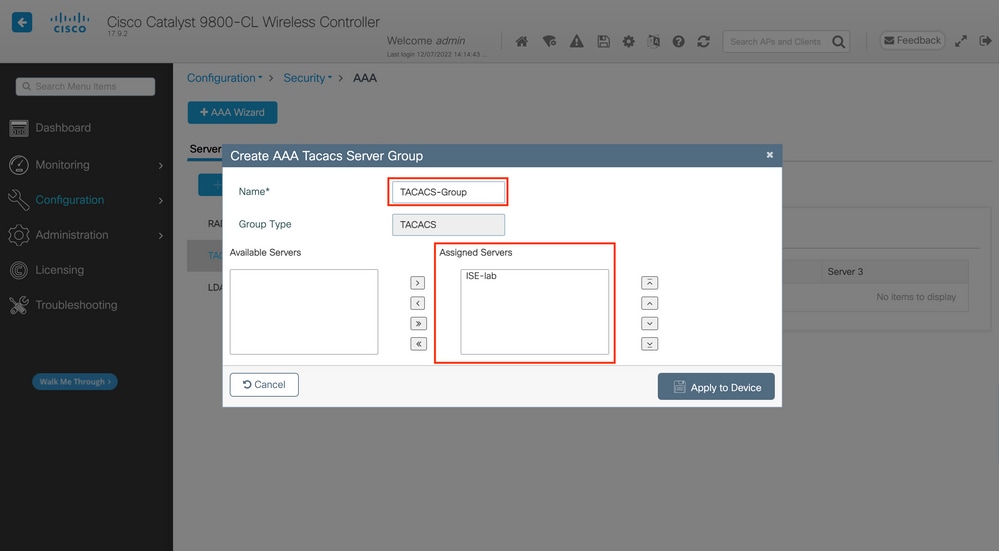
In the popup, give a name to the group, and move the desired servers to the Assigned Servers list.
From CLI:
WLC-9800(config)#aaa group server tacacs+ TACACS-Group
WLC-9800(config-sg-tacacs+)#server name ISE-lab
Step 3. Create an AAA authentication log in method that points to the TACACS+ server group.
From GUI:
Still from the GUI page https://<WLC-IP>/webui/#/aaa, navigate to the AAA Method List > Authentication tab, and create an authentication method as shown in the image.
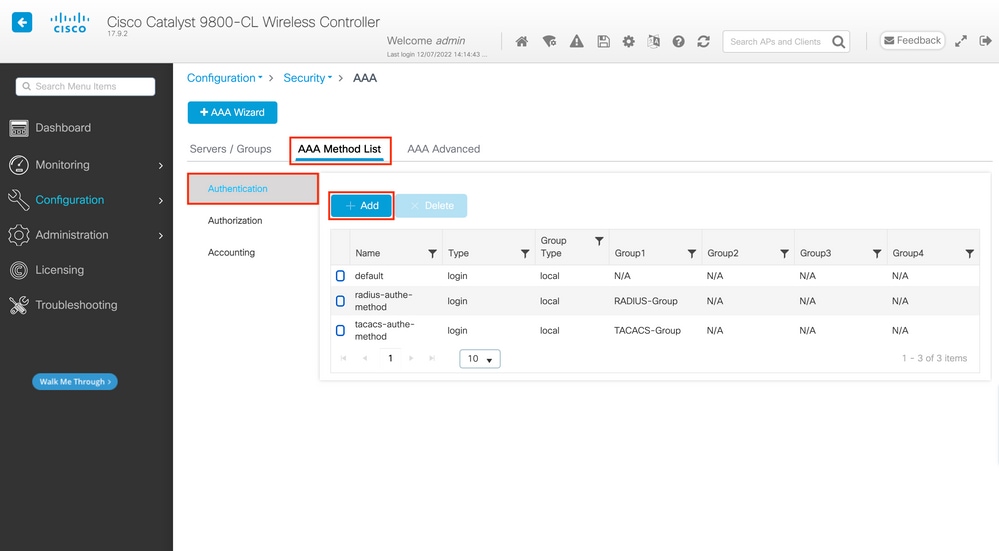
As usual, when you use the Add button to create an authentication method, a configuration popup window appears, similar to the one depicted in this image.
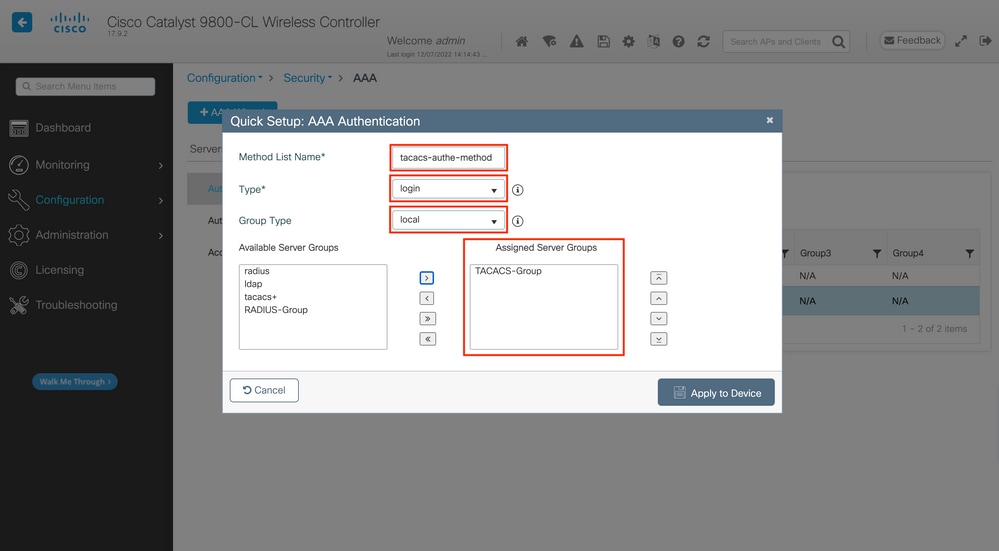
In this popup window, provide a name for the method, choose Type as login, and add the group server created in the previous step to the Assigned Server Groups list. With regards to the Group Type field, several configurations are possible.
- If you choose Group Type as local, the WLC first checks if the user credentials exist locally, and then falls back to the server group.
- If you choose Group Type as a group and do not check the Fall back to local option, the WLC just checks the user credentials against the server group.
- If you choose Group Type as a group and check the Fallback to local option, the WLC checks the user credentials against the server group and queries the local database only if the server does not respond. If the server sends a reject, the user is to be authenticated, even though it can exist on the local database.
From CLI:
If you want user credentials to be checked with a server group only if they are not found locally first, use:
WLC-9800(config)#aaa authentication login tacacs-authe-method local group TACACS-Group
If you want user credentials to be checked only with a server group, use:
WLC-9800(config)#aaa authentication login tacacs-authe-method group TACACS-Group
If you want user credentials to be checked with a server group and if this last does not respond with a local entry, use:
WLC-9800(config)#aaa authentication login tacacs-authe-method group TACACS-Group local
In this example setup, there are some users who are only created locally, and some users only on the ISE server, hence make use of the first option.
Step 4. Create an AAA authorization exec method that points to the TACACS+ server group.
From GUI:
The user has to also be authorized in order to be granted access. Still from the GUI page, Configuration > Security > AAA, navigate to the AAA Method List > Authorization tab, and create an authorization method as shown in the image.

An authorization method configuration popup similar to the one depicted appears when you add a new one with the Add button.
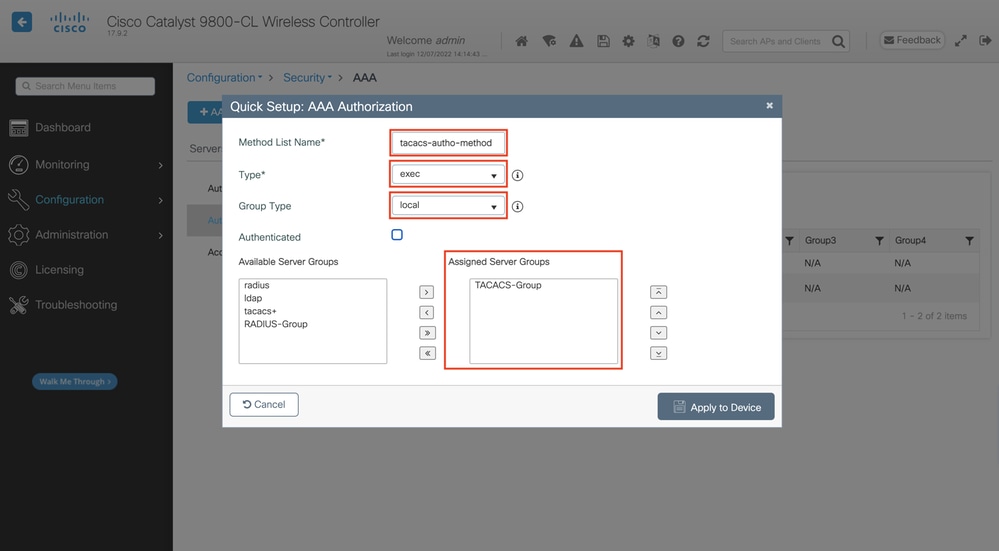
In this configuration popup, provide a name for the authorization method, choose Type as exec and use the same order of Group Type as the one used for the authentication method in the previous step.
From CLI:
WLC-9800(config)#aaa authorization exec tacacs-autho-method local group TACACS-Group
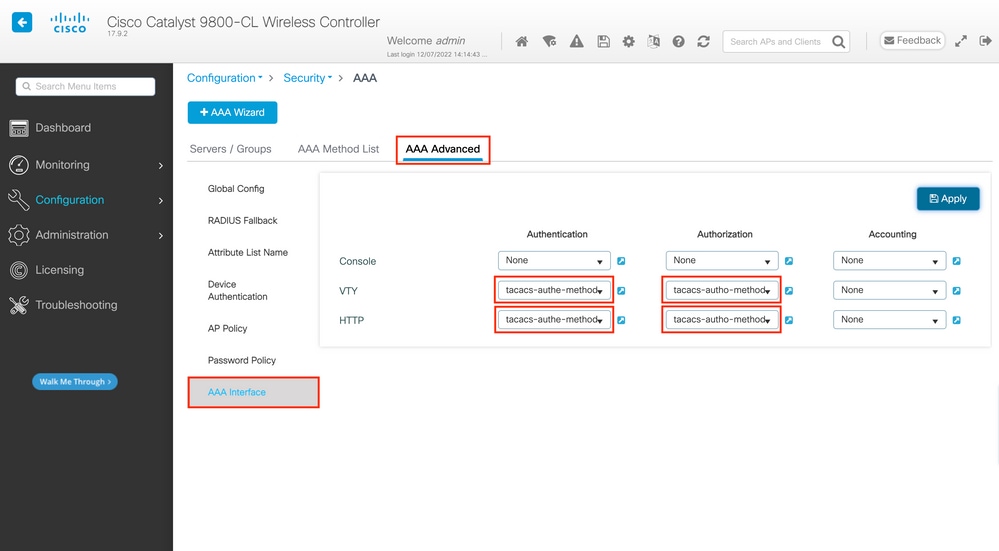
Step 5. Assign the methods to the HTTP configurations and to the VTY lines used for Telnet/SSH.
From GUI:
The created authentication and authorization methods can be used for HTTP and/or Telnet/SSH user connection, which is configurable from the AAA Advanced > AAA Interface tab still from the GUI WLC page accessible in https://<WLC-IP>/webui/#/aaa, as shown in the image.
From CLI:
For the GUI authentication:
WLC-9800(config)#ip http authentication aaa login-authentication tacacs-authe-method
WLC-9800(config)#ip http authentication aaa exec-authorization tacacs-autho-method
For Telnet/SSH authentication:
WLC-9800(config)#line vty 0 15
WLC-9800(config-line)#login authentication tacacs-authe-method
WLC-9800(config-line)#authorization exec tacacs-autho-method
Note that when changes are performed to the HTTP configurations, it is best to restart the HTTP and HTTPS services. This can be achieved with these commands.
WLC-9800(config)#no ip http server
WLC-9800(config)#no ip http secure-server
WLC-9800(config)#ip http server
WLC-9800(config)#ip http secure-server
TACACS+ ISE Configuration
Step 1. Configure the WLC as a network device for TACACS+.
From GUI:
In order to declare the WLC used in the previous section as a network device for RADIUS in ISE, navigate to Administration > Network Resources > Network Devices and open the Network devices tab, as shown in this image.
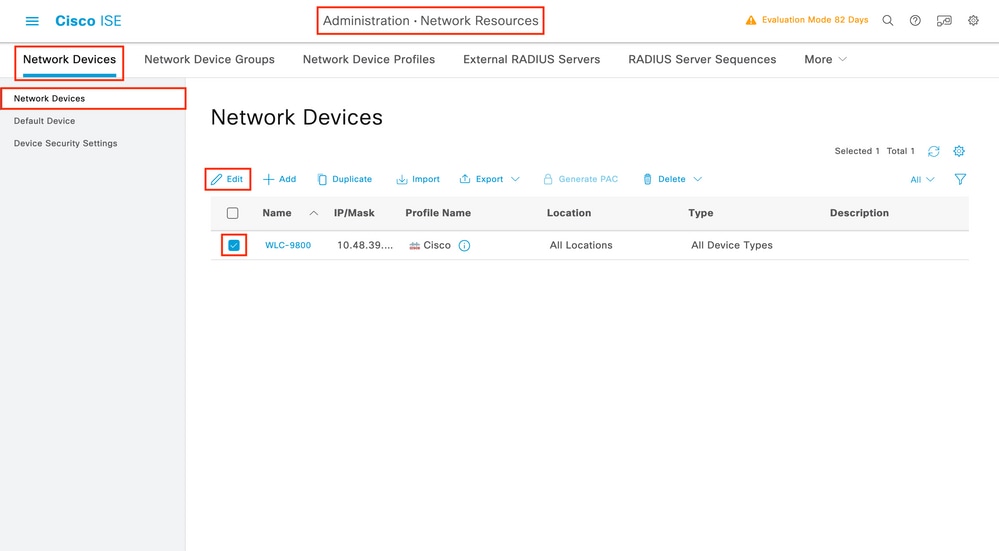
In this example, the WLC has already been added for RADIUS authentication (refer to Step 1. of the section Configure RADIUS ISE). Therefore, its configuration simply needs to be modified to configure TACACS authentication, which can be done when you choose the WLC in the network devices list and click the Edit button. This opens the network device configuration form as shown in this image.
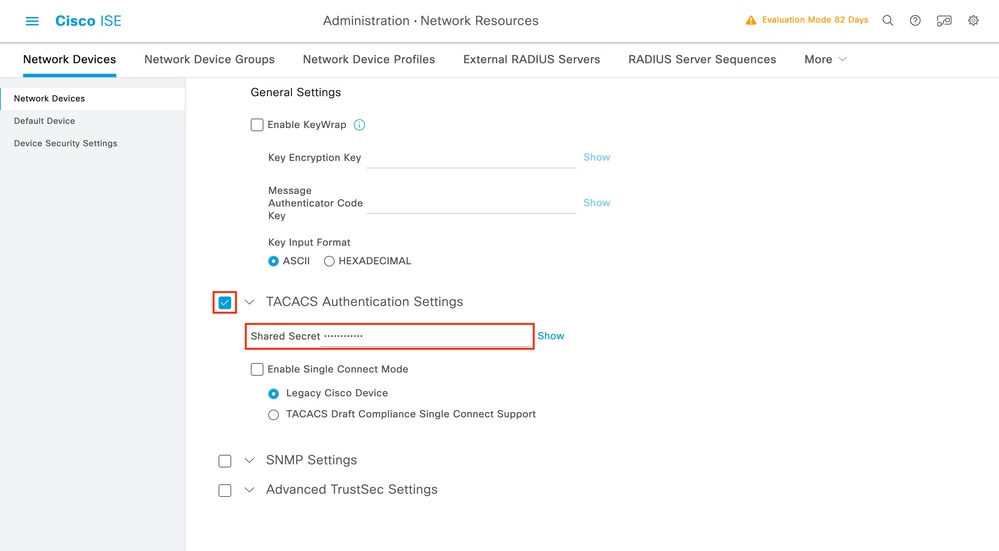
Once the new window has opened, scroll down to the TACACS Authentication Settings section, enable these settings, and add the shared secret entered during Step 1. of the section Configure TACACS+ WLC.
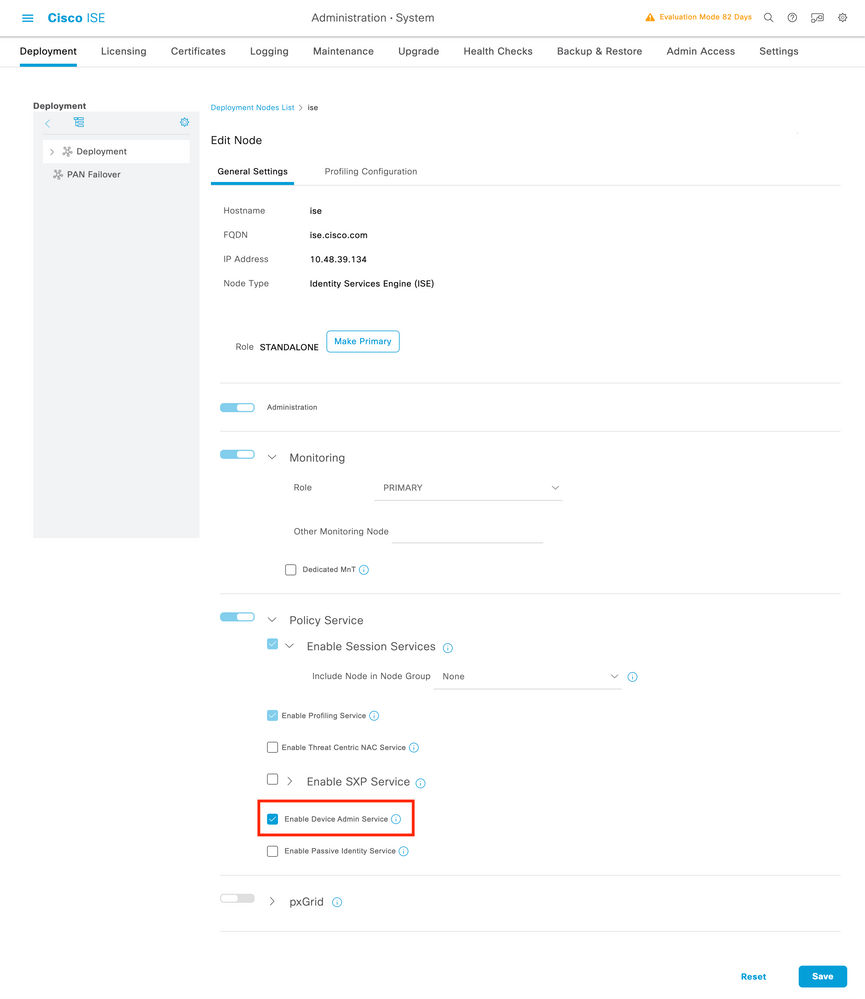
Step 2. Enable the Device Admin feature for the node.

Note: In order to use ISE as the TACACS+ server, you must have a Device Administration license package and either a Base or a Mobility license.
From GUI:
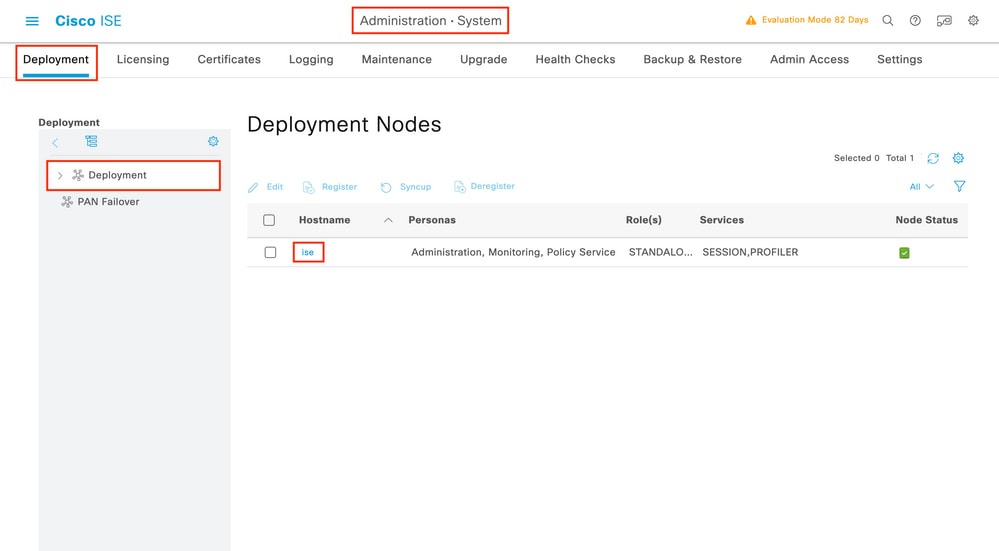
Once the Device Administration licenses are installed, you must enable the Device Admin feature for the node in order to be able to use ISE as the TACACS+ server. In order to do so, edit the configuration of the ISE deployment node used, which can be found under Administrator > Deployment, and click its name or do so with the help of the Edit button.
Once the node configuration window is opened, check the Enable Device Admin Service option under the Policy Service section, as shown in this image.
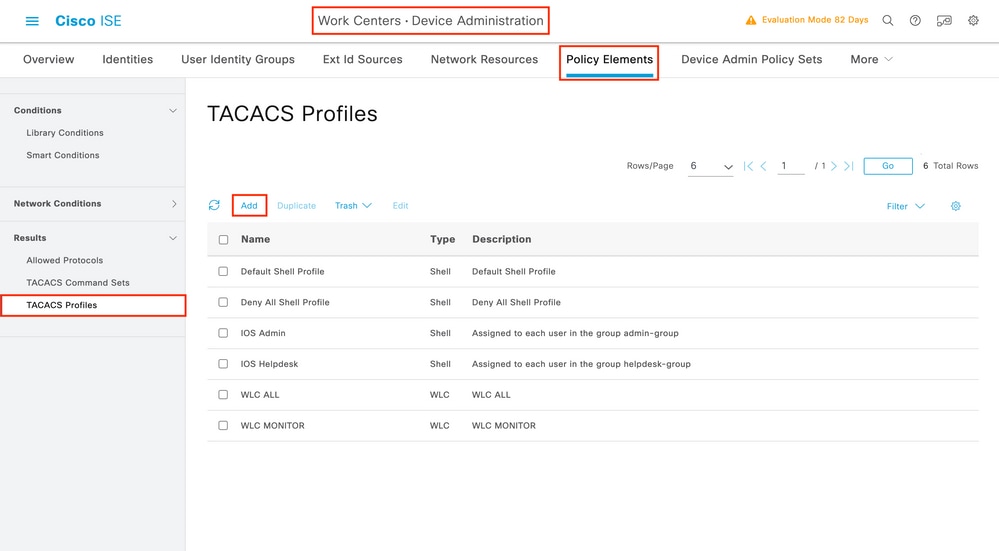
Step 3. Create TACACS Profiles, to return the privilege.
From GUI:
In order to have administrator access rights, the adminuser needs to have a privilege level of 15, which allows to access the exec prompt shell. On the other hand, the helpdeskuser does not need exec prompt shell access and can therefore be assigned with a privilege level lower than 15. In order to assign the proper privilege level to users, authorization profiles can be used. These can be configured from the ISE GUI page Work Centers > Device Administration > Policy Elements, under the tab Results > TACACS Profiles as shown in the next picture.
In order to configure a new TACACS profile, use the Add button, which opens the new profile configuration form similar to the one shown in the picture. This form must especially look like this to configure the profile that is assigned to the adminuser (which is, with shell privileges level 15).
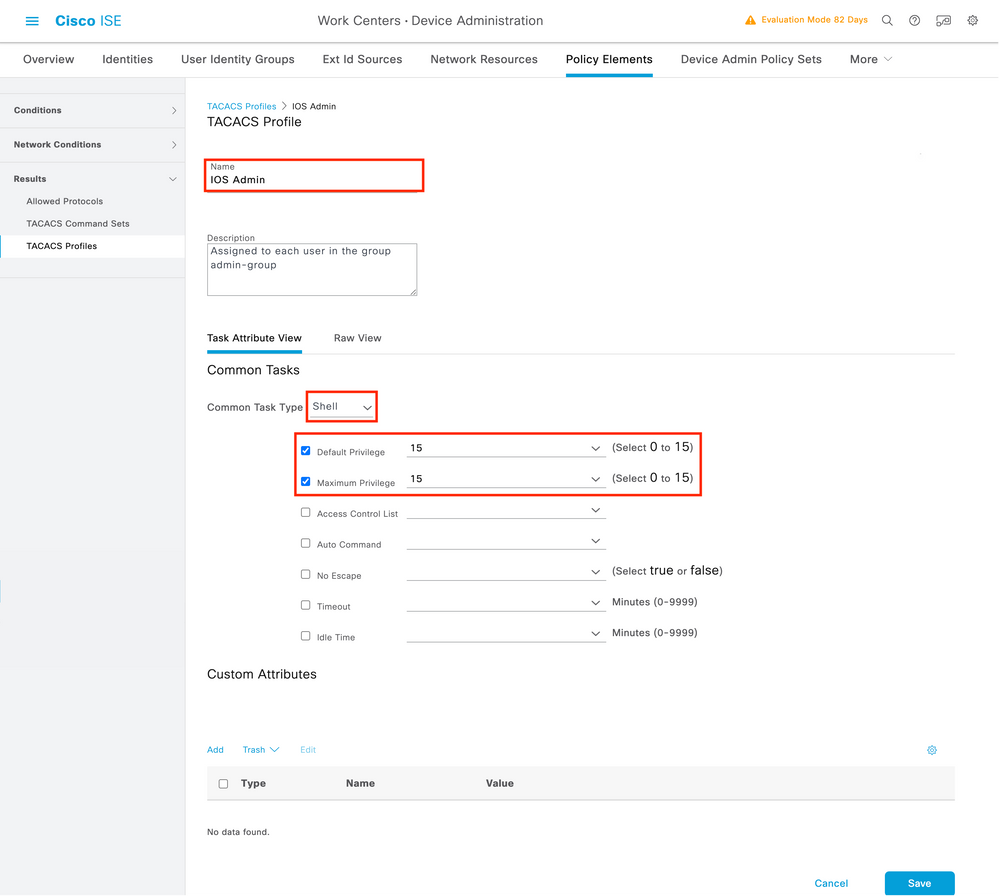
Repeat the operation for the helpdesk profile. For this last, the Default Privilege, as well as Maximum Privilege, are both set to 1.
Step 4. Create user groups on ISE.
This is the same as presented In Step 3. of the section Configure RADIUS ISE of this document.
Step 5. Create the users on ISE.
This is the same as presented in Step 4. of the section Configure RADIUS ISE of this document.
Step 6. Create a Device Admin Policy Set.
From GUI:
As for RADIUS access, once users are created, their authentication and authorization policies still need to be defined on ISE in order to grant them the proper access rights. The TACACS authentication uses Device Admin Policy Sets to that end, which can be configured from the Work Centers > Device Administration > Device Admin Policy Sets GUI Page as shown.
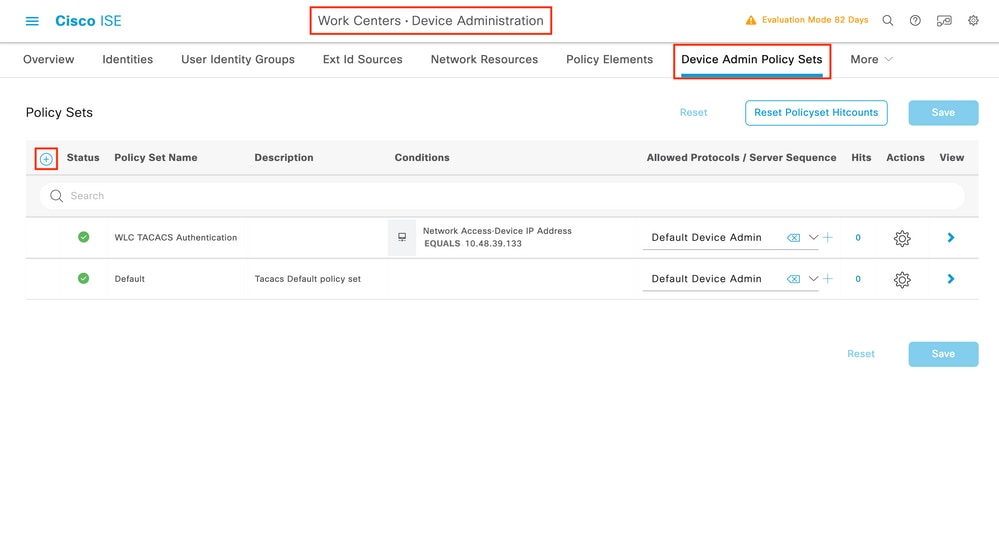
To create a device administration policy set, use the add button framed in red in the previous image, this adds an item to the policy sets list. Provide a name for the newly created set, a condition under which it must be applied, and the Allowed Protocols/Server Sequence (here, the Default Device Admin suffices). Use the Save button to finalize the addition of the policy set and use the arrowhead on its right to access its configuration page, as it looks on the one depicted.
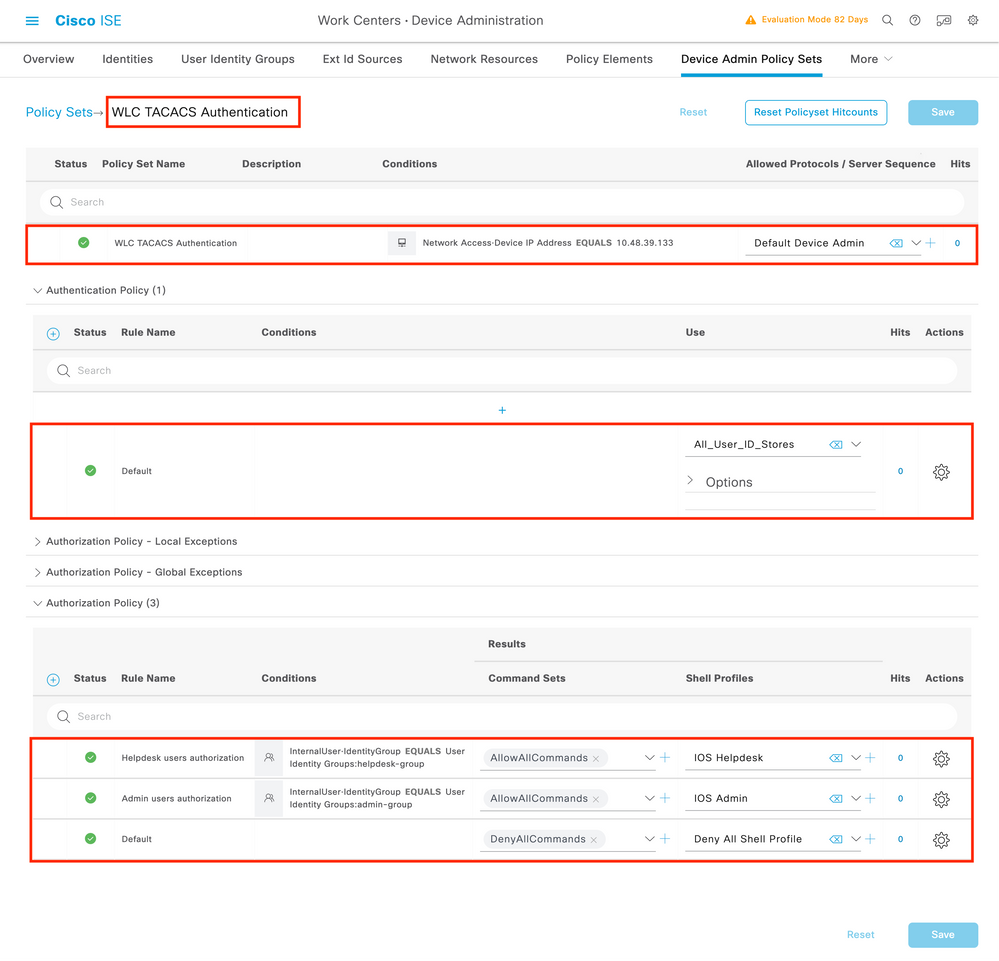
The specific Policy Set 'WLC TACACS Authentication' in this example filters requests with the IP Address equal to the example C9800 WLC IP address.
As an authentication policy, the Default Rule has been left since it meets the need of the usecase. Two Authorization rules have been set up:
- The first one is triggered when the user belongs to the defined group
admin-group. It permits all commands (via the defaultPermit_allrule) and assigns privilege 15 (via the definedIOS_AdminTACACS profile). - The second one is triggered when the user belongs to the defined group
helpdesk-group. It permits all commands (via the defaultPermit_allrule) and it assigns privilege 1 (via the definedIOS_HelpdeskTACACS profile).
After this step has been completed, the credentials configured for adminuser and helpdesk users can be used to authenticate in the WLC via the GUI or with Telnet/SSH.
Troubleshoot
If your RADIUS server expects the service-type RADIUS attribute to be sent, you can add on the WLC :
radius-server attribute 6 on-for-login-authTroubleshoot WLC GUI or CLI RADIUS/TACACS+ Access via the WLC CLI
In order to troubleshoot the TACACS+ access to the WLC GUI or CLI, issue the debug tacacs command, along with terminal monitor one and see the live output when a login attempt is made.
As an example, a successful login followed by a logout of the adminuser user generates this output.
WLC-9800#terminal monitor
WLC-9800#debug tacacs
TACACS access control debugging is on
WLC-9800#
Dec 8 11:38:34.684: TPLUS: Queuing AAA Authentication request 15465 for processing
Dec 8 11:38:34.684: TPLUS(00003C69) login timer started 1020 sec timeout
Dec 8 11:38:34.684: TPLUS: processing authentication start request id 15465
Dec 8 11:38:34.685: TPLUS: Authentication start packet created for 15465(adminuser)
Dec 8 11:38:34.685: TPLUS: Using server 10.48.39.134
Dec 8 11:38:34.685: TPLUS(00003C69)/0/NB_WAIT/7FD29013CA68: Started 5 sec timeout
Dec 8 11:38:34.687: TPLUS(00003C69)/0/NB_WAIT: socket event 2
Dec 8 11:38:34.688: TPLUS(00003C69)/0/NB_WAIT: wrote entire 45 bytes request
Dec 8 11:38:34.688: TPLUS(00003C69)/0/READ: socket event 1
Dec 8 11:38:34.688: TPLUS(00003C69)/0/READ: Would block while reading
Dec 8 11:38:34.701: TPLUS(00003C69)/0/READ: socket event 1
Dec 8 11:38:34.701: TPLUS(00003C69)/0/READ: read entire 12 header bytes (expect 15 bytes data)
Dec 8 11:38:34.701: TPLUS(00003C69)/0/READ: socket event 1
Dec 8 11:38:34.701: TPLUS(00003C69)/0/READ: read entire 27 bytes response
Dec 8 11:38:34.701: TPLUS(00003C69)/0/7FD29013CA68: Processing the reply packet
Dec 8 11:38:34.701: TPLUS: Received authen response status GET_PASSWORD (8)
Dec 8 11:38:38.156: TPLUS: Queuing AAA Authentication request 15465 for processing
Dec 8 11:38:38.156: TPLUS(00003C69) login timer started 1020 sec timeout
Dec 8 11:38:38.156: TPLUS: processing authentication continue request id 15465
Dec 8 11:38:38.156: TPLUS: Authentication continue packet generated for 15465
Dec 8 11:38:38.156: TPLUS(00003C69)/0/WRITE/7FD3796079D8: Started 5 sec timeout
Dec 8 11:38:38.156: TPLUS(00003C69)/0/WRITE: wrote entire 29 bytes request
Dec 8 11:38:38.183: TPLUS(00003C69)/0/READ: socket event 1
Dec 8 11:38:38.183: TPLUS(00003C69)/0/READ: read entire 12 header bytes (expect 6 bytes data)
Dec 8 11:38:38.183: TPLUS(00003C69)/0/READ: socket event 1
Dec 8 11:38:38.183: TPLUS(00003C69)/0/READ: read entire 18 bytes response
Dec 8 11:38:38.183: TPLUS(00003C69)/0/7FD3796079D8: Processing the reply packet
Dec 8 11:38:38.183: TPLUS: Received authen response status PASS (2)
Dec 8 11:38:38.184: %SEC_LOGIN-5-LOGIN_SUCCESS: Login Success [user: adminuser] [Source: 10.61.80.151] [localport: 22] at 12:38:38 CET Thu Dec 8 2022
Dec 8 11:38:38.259: TPLUS: Queuing AAA Authorization request 15465 for processing
Dec 8 11:38:38.260: TPLUS(00003C69) login timer started 1020 sec timeout
Dec 8 11:38:38.260: TPLUS: processing authorization request id 15465
Dec 8 11:38:38.260: TPLUS: Protocol set to None .....Skipping
Dec 8 11:38:38.260: TPLUS: Sending AV service=shell
Dec 8 11:38:38.260: TPLUS: Sending AV cmd*
Dec 8 11:38:38.260: TPLUS: Authorization request created for 15465(adminuser)
Dec 8 11:38:38.260: TPLUS: using previously set server 10.48.39.134 from group TACACS-Group
Dec 8 11:38:38.260: TPLUS(00003C69)/0/NB_WAIT/7FD3796079D8: Started 5 sec timeout
Dec 8 11:38:38.260: TPLUS(00003C69)/0/NB_WAIT: socket event 2
Dec 8 11:38:38.260: TPLUS(00003C69)/0/NB_WAIT: wrote entire 64 bytes request
Dec 8 11:38:38.260: TPLUS(00003C69)/0/READ: socket event 1
Dec 8 11:38:38.260: TPLUS(00003C69)/0/READ: Would block while reading
Dec 8 11:38:38.285: TPLUS(00003C69)/0/READ: socket event 1
Dec 8 11:38:38.285: TPLUS(00003C69)/0/READ: read entire 12 header bytes (expect 18 bytes data)
Dec 8 11:38:38.285: TPLUS(00003C69)/0/READ: socket event 1
Dec 8 11:38:38.285: TPLUS(00003C69)/0/READ: read entire 30 bytes response
Dec 8 11:38:38.285: TPLUS(00003C69)/0/7FD3796079D8: Processing the reply packet
Dec 8 11:38:38.285: TPLUS: Processed AV priv-lvl=15
Dec 8 11:38:38.285: TPLUS: received authorization response for 15465: PASS
Dec 8 11:38:44.225: %SYS-6-LOGOUT: User adminuser has exited tty session 7(10.61.80.151)
Dec 8 11:38:44.225:Socket I/O cleanup message sent to TACACS
TPLUS Proc:SOCKET IO CLEANUP EVENT
Dec 8 11:38:44.226: %HA_EM-6-LOG: catchall: logout
Dec 8 11:39:18.689: %SYS-6-LOGOUT: User admin has exited tty session 5(10.61.80.151)
Dec 8 11:39:18.690:Socket I/O cleanup message sent to TACACS
TPLUS Proc:SOCKET IO CLEANUP EVENT
It can be seen from these logs that the TACACS+ server returns the correct privilege (which is AV priv-lvl=15).
When you do RADIUS authentication, a similar debug output is shown, which concerns the RADIUS traffic.
The commands debug aaa authenticationdebug aaa authorization instead, show which method list is chosen by the WLC when the user tries to log in.
Troubleshoot WLC GUI or CLI TACACS+ Access via the ISE GUI
From page Operations > TACACS > Live Logs, every user authentication made with the TACACS+ up to the last 24 hours can be viewed. To expand the details of either a TACACS+ authorization or authentication, use the Details button related to this event.
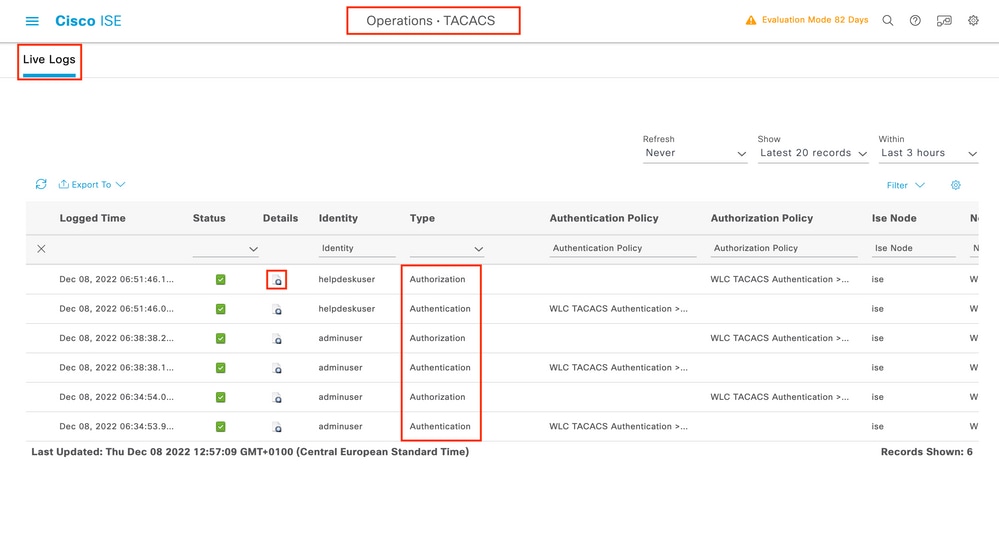
When expanded, a successful authentication attempt for the helpdeskuser looks like this:
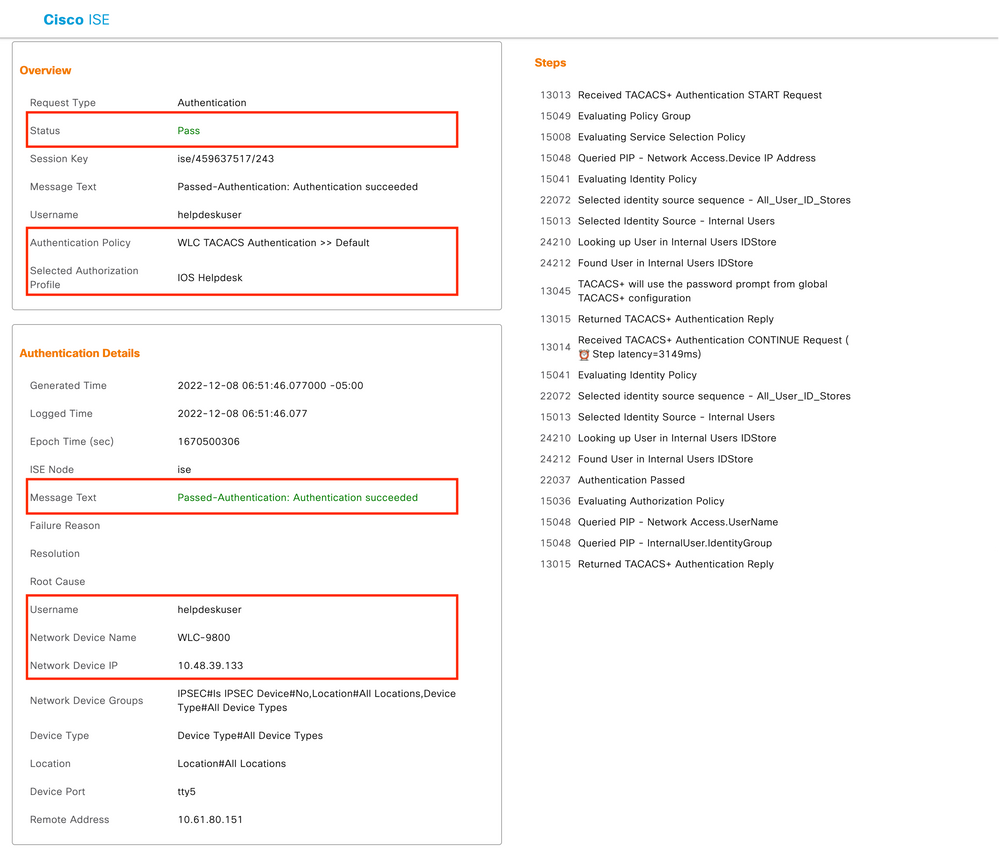
From this, you can see that the user helpdeskuser has been successfully authenticated to the network device WLC-9800 with the help of the authentication policy WLC TACACS Authentication > Default. Furthermore, the authorization profile IOS Helpdesk has been assigned to this user, and granted the privilege level 1.
Revision History
| Revision | Publish Date | Comments |
|---|---|---|
4.0 |
28-Mar-2024
|
Recertification |
3.0 |
24-Feb-2023
|
Major update regarding RADIUS and TACACS authentication including CLI. |
2.0 |
15-Nov-2021
|
Added a note about privilege levels and web UI |
1.0 |
04-Jun-2019
|
Initial Release |
Contributed by Cisco Engineers
- Paolo FusconiCisco TAC Engineer
- Guilian DeflandreCisco TAC Engineer
 Feedback
Contact Cisco
- Open a Support Case

- (Requires a Cisco Service Contract)