Introduction
This document describes how to configure FlexConnect with central or local authentication on Catalyst 9800 Wireles LAN controller.
Prerequisites
Requirements
Cisco recommends that you have knowledge of these topics:
- Catalyst Wireless 9800 configuration model
- FlexConnect
- 802.1x
Components Used
The information in this document is based on these software and hardware versions:
- C9800-CL, Cisco IOS-XE® 17.3.4
The information in this document was created from the devices in a specific lab environment. All of the devices used in this document started with a cleared (default) configuration. If your network is live, ensure that you understand the potential impact of any command.
Background Information
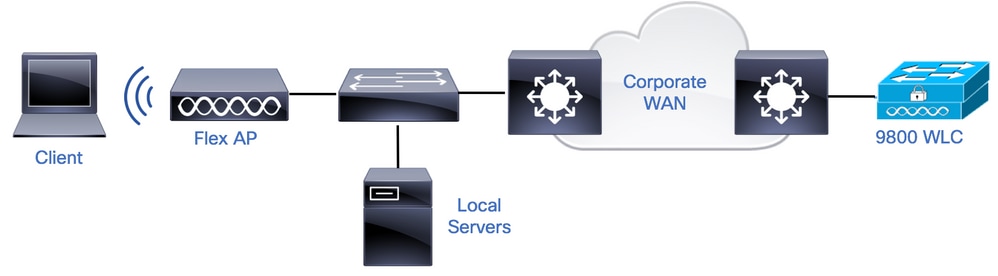
FlexConnect is a wireless solution for remote office deployment. It allows you to configure Access Points (APs) in remote locations from the corporate office through a Wide Area Network (WAN) link without the need to deploy a controller in each location. The FlexConnect APs can switch the client data traffic locally and perform client authentication locally when the connection to the controller is lost. In connected mode, the FlexConnect APs can also perform local authentication.
Configure
Network Diagram
Configurations
AAA Configuration on 9800 WLCs
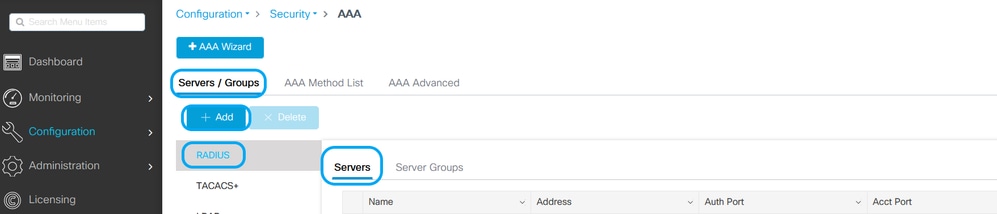
Step 1. Declare RADIUS server. From GUI: Navigate to Configuration > Security > AAA > Servers / Groups > RADIUS > Servers > + Addand enter the RADIUS server information.
Ensure that Support for CoA is enabled if you plan to use any kind of security that requires CoA in the future.
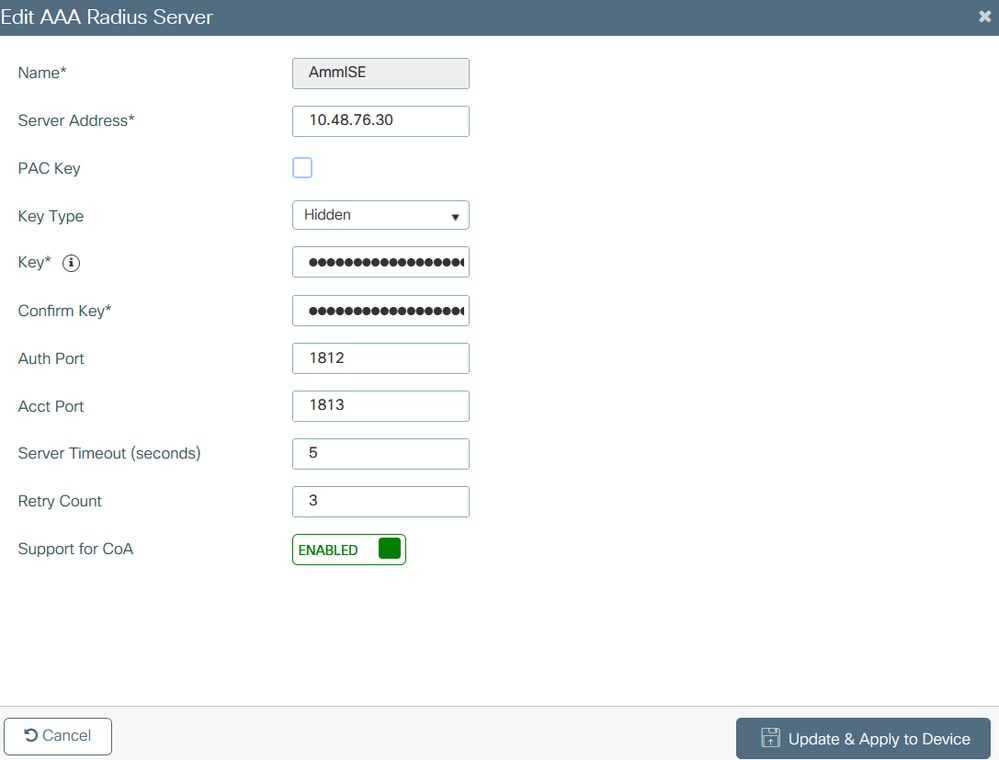
Note: Note: Radius CoA is not supported in Flex connect local auth deployment. .
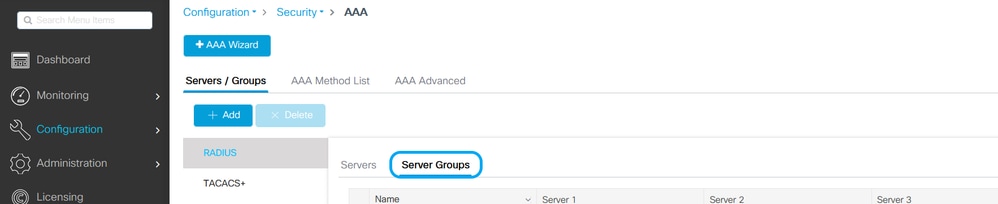
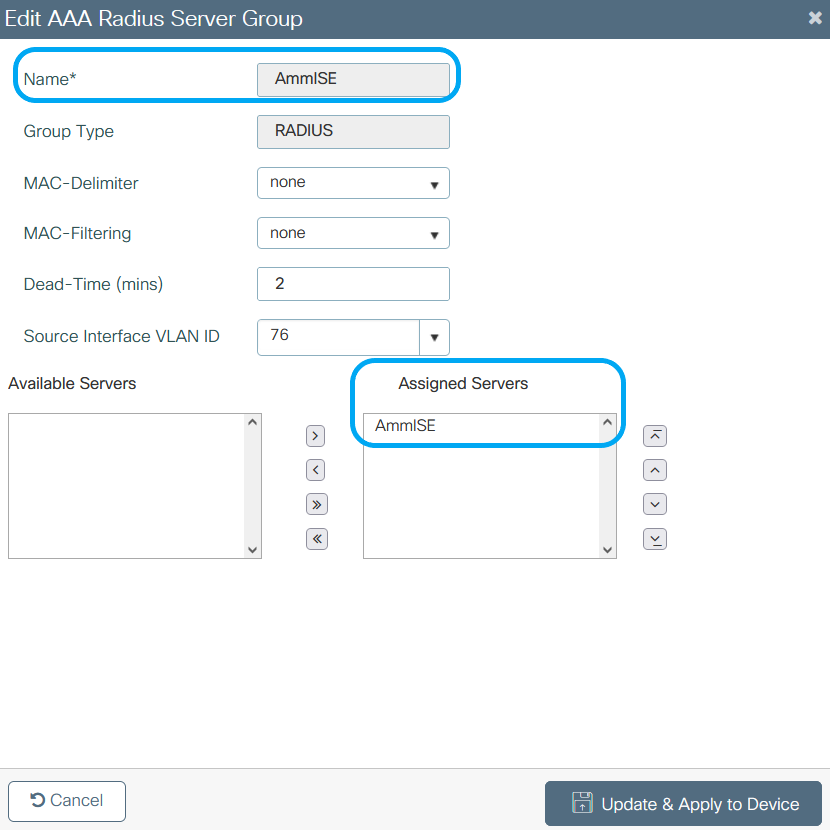
Step 2. Add the RADIUS server to a RADIUS group. From GUI: Navigate to Configuration > Security > AAA > Servers / Groups > RADIUS > Server Groups > + Add.
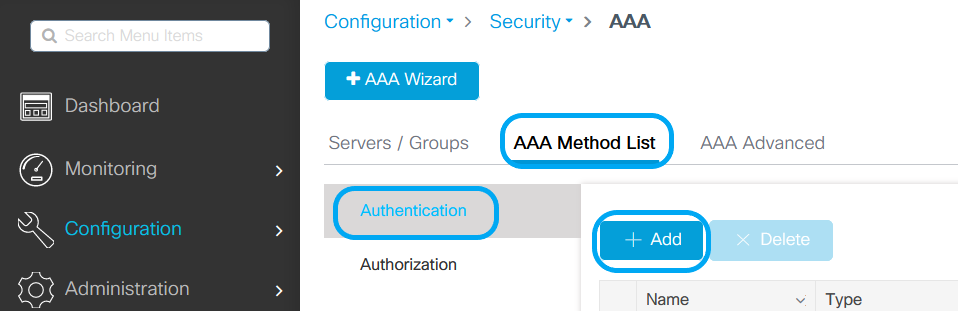
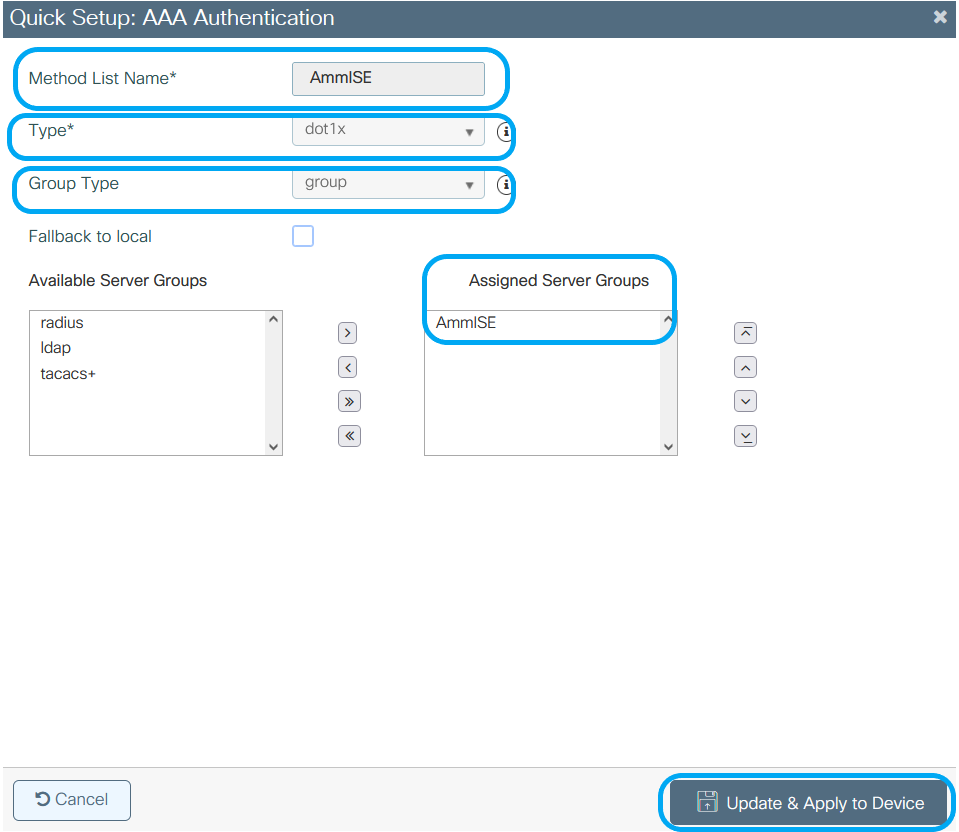
Step 3. Create an Authentication Method List. From GUI: Navigate to Configuration > Security > AAA > AAA Method List > Authentication > + Add
From CLI:
# config t
# aaa new-model

# radius server <radius-server-name>
# address ipv4 <radius-server-ip> auth-port 1812 acct-port 1813
# timeout 300
# retransmit 3
# key <shared-key>
# exit

# aaa group server radius <radius-grp-name>
# server name <radius-server-name>
# exit

# aaa server radius dynamic-author
# client <radius-server-ip> server-key <shared-key>

# aaa authentication dot1x <dot1x-list-name> group <radius-grp-name>
WLAN Configuration
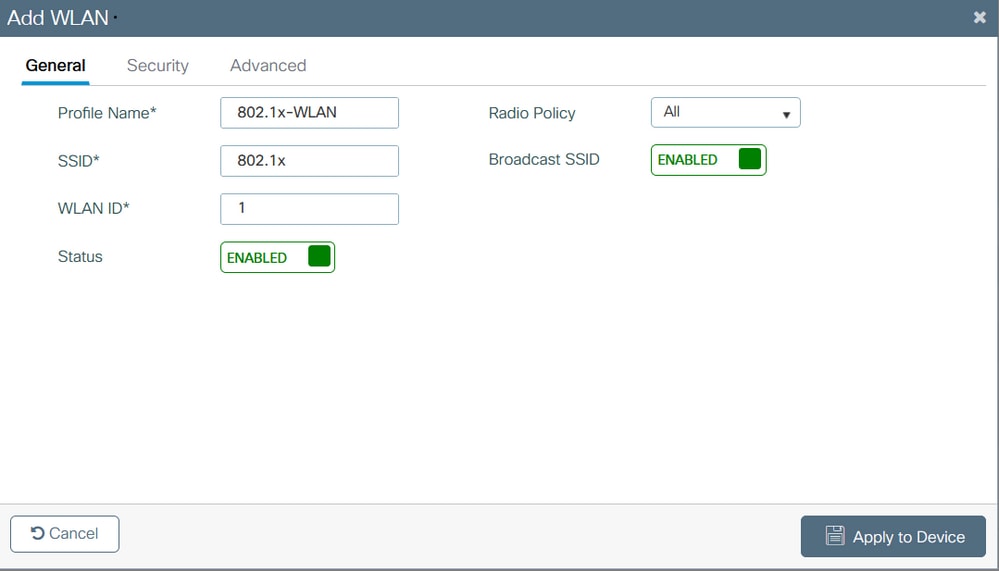
Step 1. From GUI: Navigate to Configuration > Wireless > WLANs and click +Add to create a new WLAN, and enter the WLAN information. Then click Apply to Device.

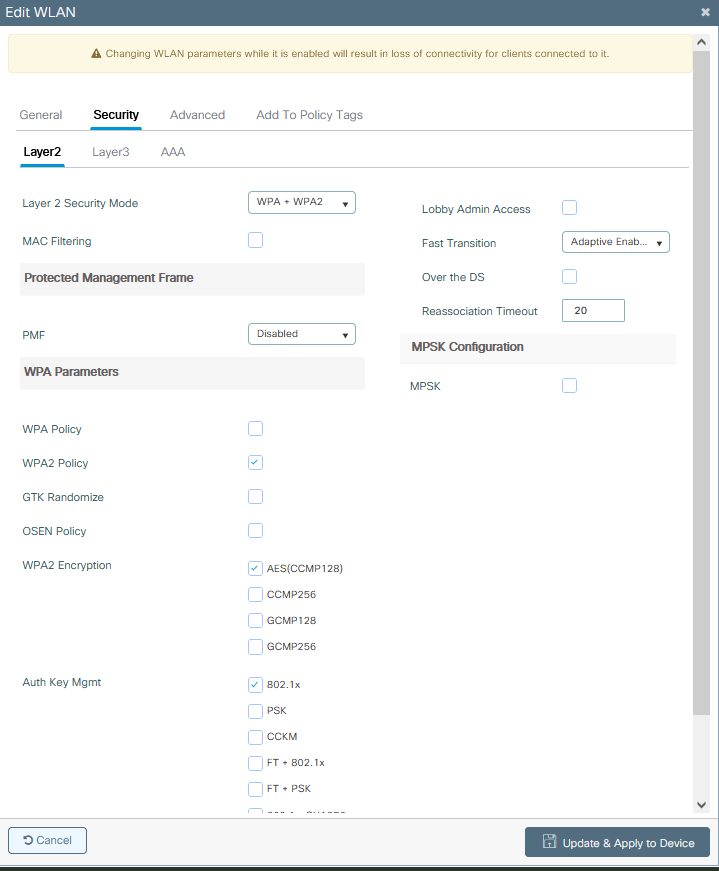
Step 2. From GUI: Navigate to the Security tab to configure the Layer2/Layer3 security mode as long as the encryption method, and Authentication List in case 802.1x is in use. Then click Update & Apply to Device.
Policy Profile Configuration
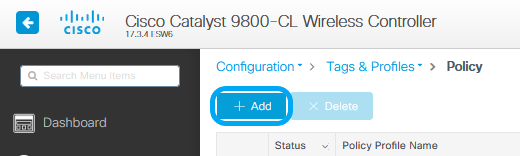
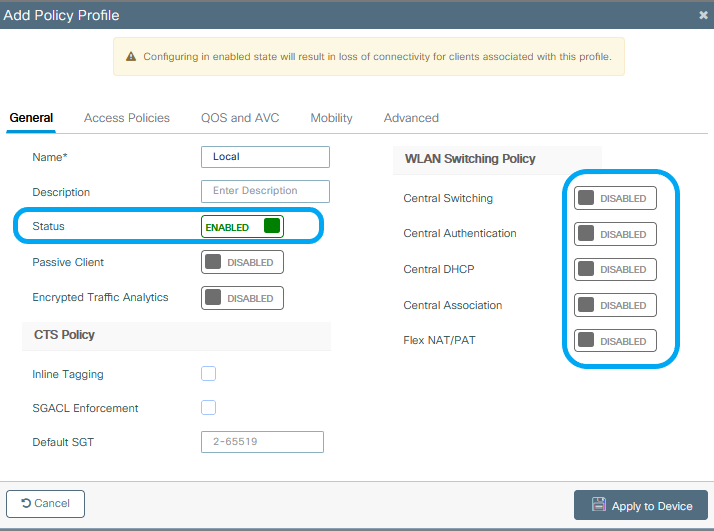
Step 1. From GUI: Navigate to Configuration > Tags & Profiles > Policy and click +Add to create a Policy Profile.
Step 2. Add the name and uncheck the Central Switching box. With this setup, the controller handles client authentication, and the FlexConnect Access Point switches client data packets locally.

Note: Association and switching must be always paired, if central switching is disabled central association must disable as well on all policy profiles when Flexconnect APs are used.
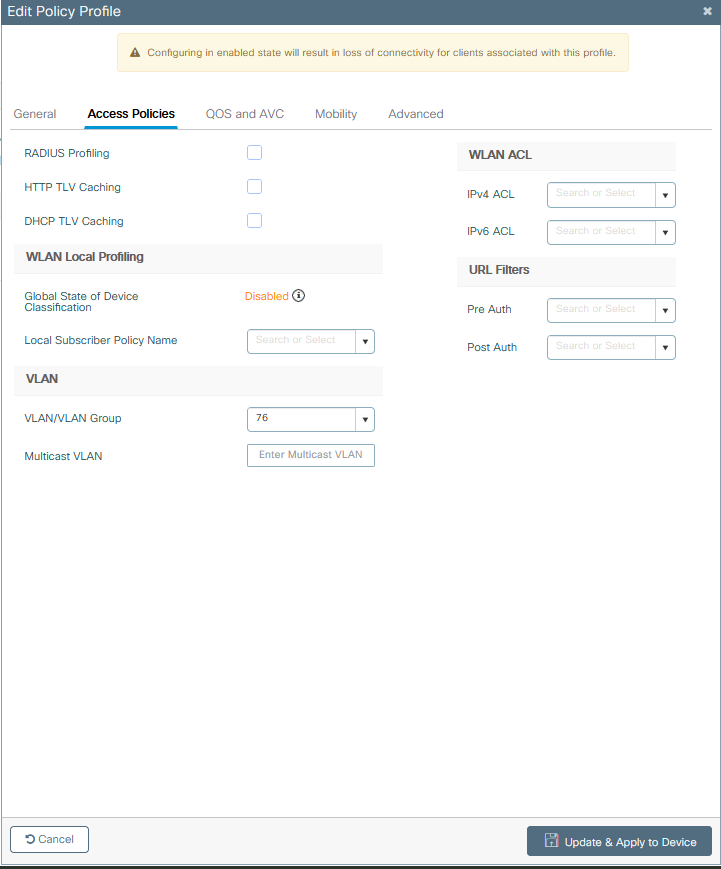
Step 3. From GUI: Navigate to the Access Policies tab to assign the VLAN to which the wireless clients can be assigned when they connect to this WLAN by default.
You can either select one VLAN name from the drop-down or as a best practice, manually type a VLAN ID.
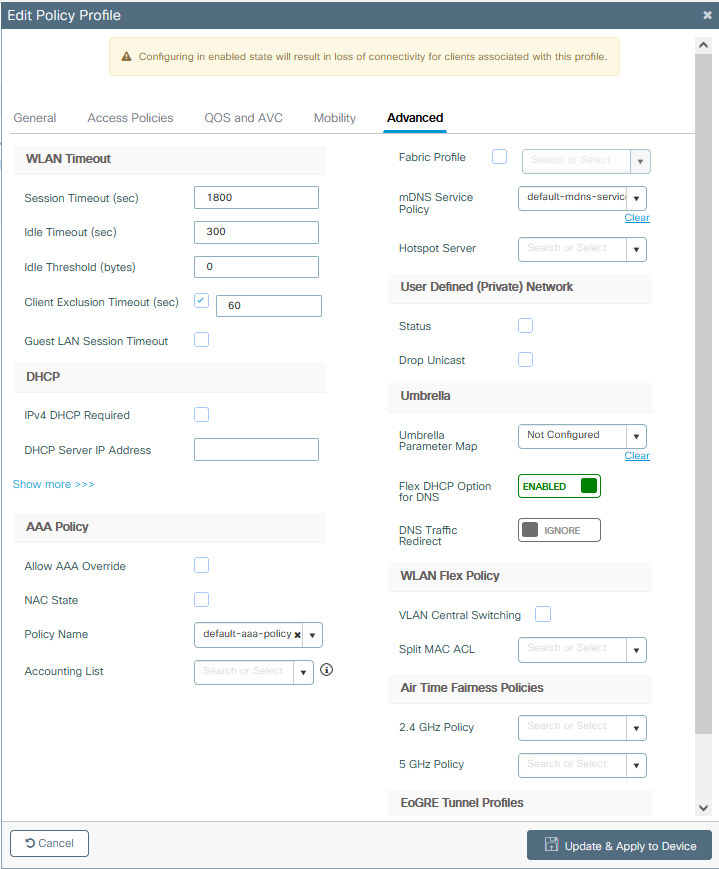
Step 4. From GUI: Navigate to the Advanced tab to configure the WLAN timeouts, DHCP, WLAN Flex Policy, and AAA policy in case they are in use. Then click Update & Apply to Device.
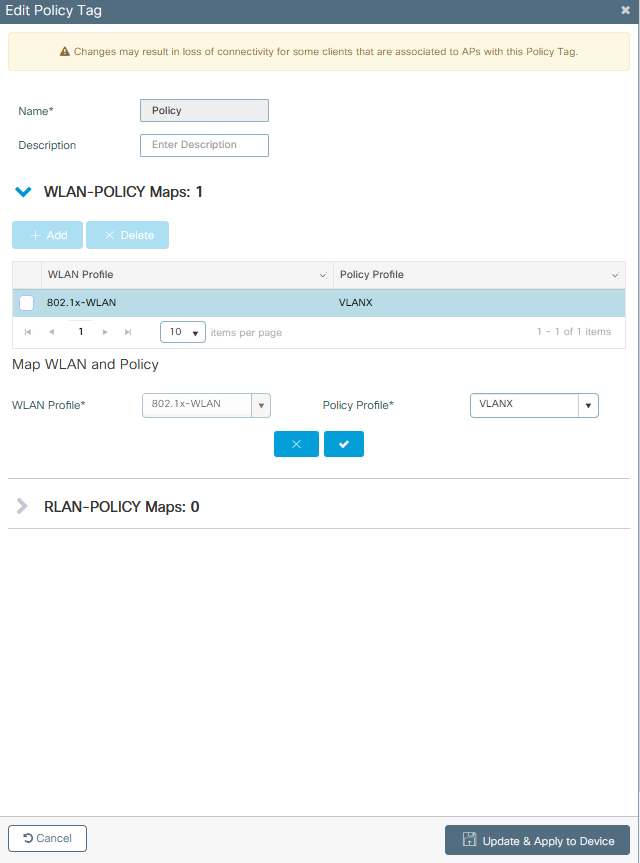
Policy Tag Configuration
Step 1. From GUI: Navigate to Configuration > Tags & Profiles > Tags > Policy > +Add.

Step 2. Assign a name, and map the Policy Profile and WLAN Profile create before.
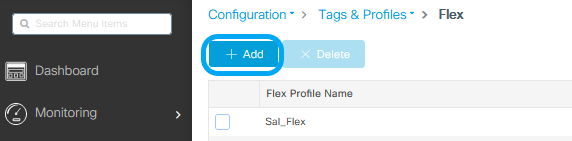
Flex Profile Configuration
Step 1. From GUI: Navigate to Configuration > Tags & Profiles > Flex and click +Add to create a new one.
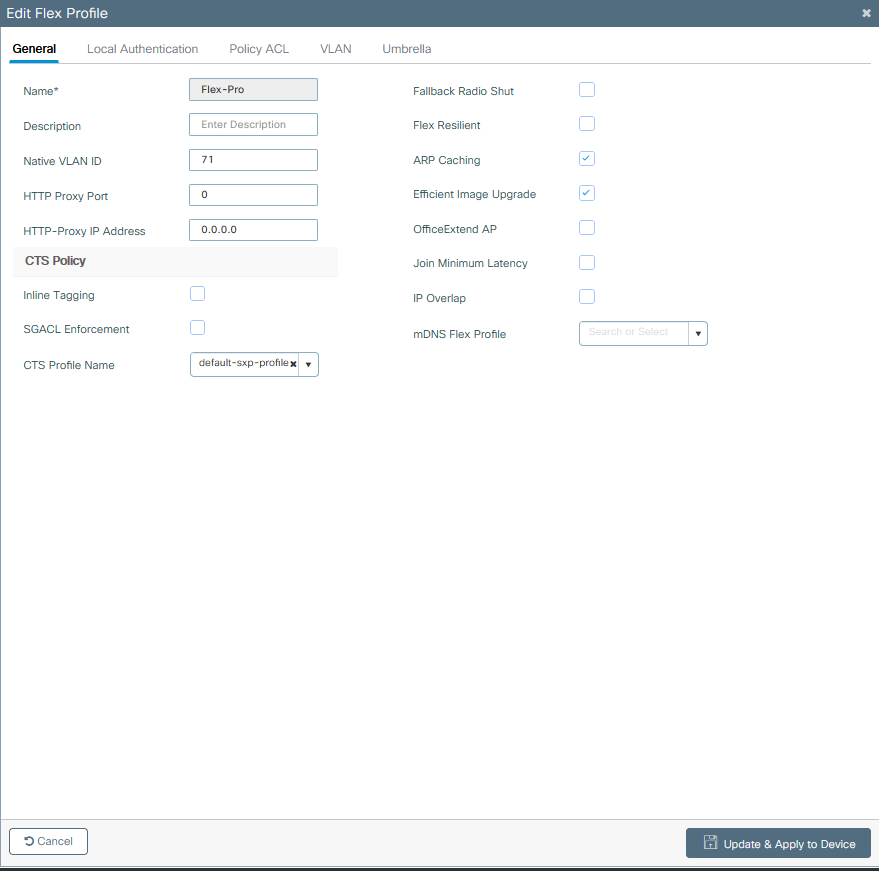
Note: Native VLAN ID refers to the VLAN used by the APs that can get this Flex Profile assigned, and it must be the same VLAN ID configured as native on the switch port where the APs are connected.
Step 2. Under the VLAN tab, add the needed VLANs, those assigned by default to the WLAN through a Policy Profile, or the ones pushed by a RADIUS server. Then click Update & Apply to Device.
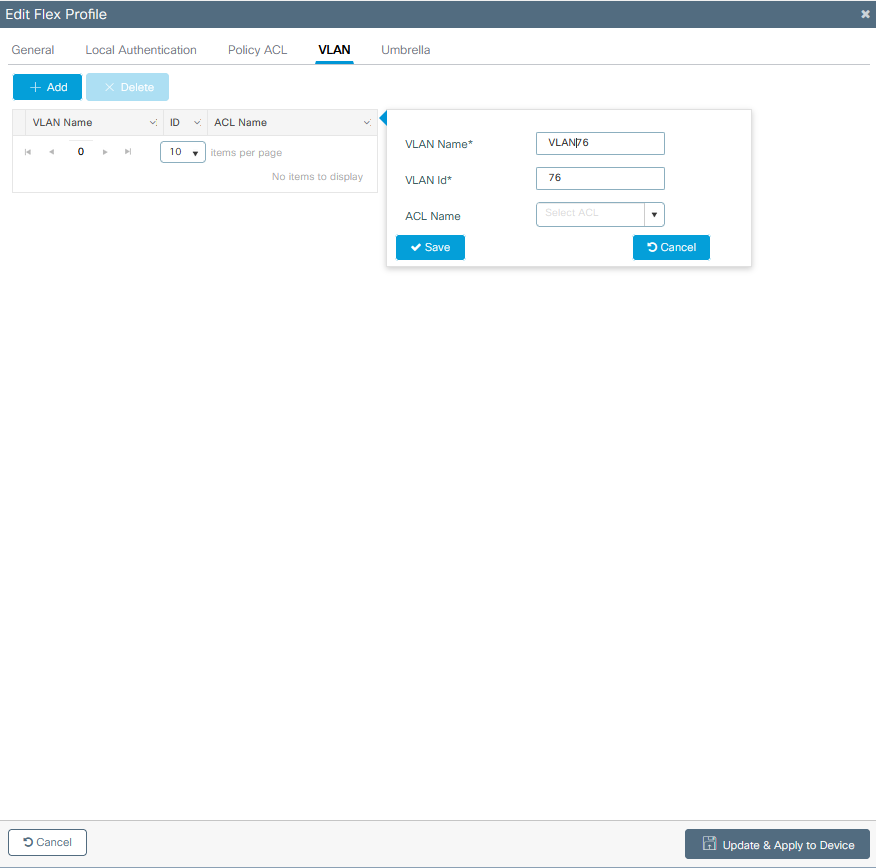
Note: For Policy Profile, when you select the default VLAN assigned to the SSID. If you use a VLAN name on that step, ensure that you use the same VLAN name on the Flex Profile configuration, otherwise, clients are not be able to connect to the WLAN.
Note: To configure an ACL for flexConnect with AAA override, only configure it on "policy ACL", if ACL is assigned to a specific VLAN, add ACL on when you add the VLAN and then add the ACL on the "policy ACL".
Site Tag Configuration
Step 1. From GUI: Navigate to Configuration > Tags & Profiles > Tags > Site and click +Add to create a new Site tag. Uncheck the Enable Local Site box to allow APs to switch the client data traffic locally, and add the Flex Profile created previously.
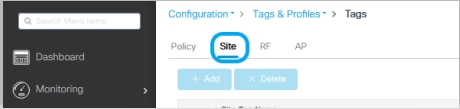

Note: As Enable Local Site is disabled, the APs that get this Site tag assigned can be configured as FlexConnect mode.
Step 2. From GUI: Navigate to Configuration > Wireless > Access Points > AP name to add the Site Tag and Policy Tag to an associated AP. This can cause the AP to restart its CAPWAP tunnel and join back to the 9800 WLC.
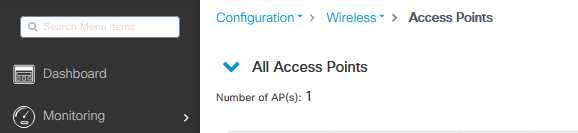
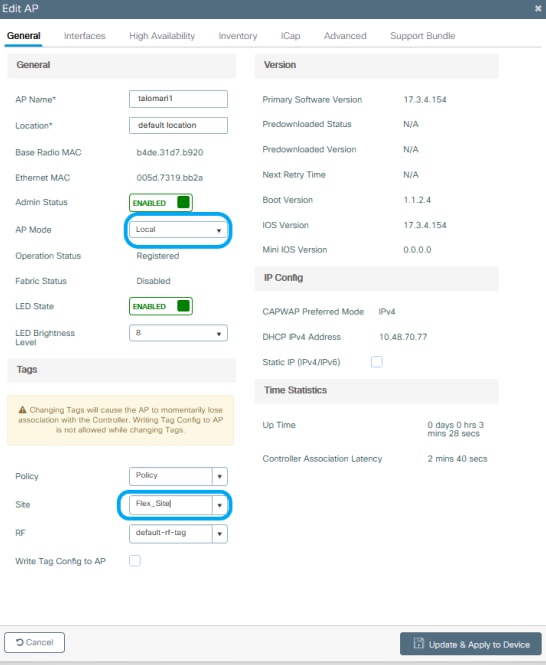
Once the AP joins back, notice the AP is now in FlexConnect mode.

Local Authentication with external RADIUS Server
Step 1. Add the AP as a network device into the RADIUS server. For an example refer to How to use Identity Service Engine (ISE) as the RADIUS server
Step 2. Create a WLAN.
The configuration can be the same as the one previously configured.

Step 3. Policy Profile Configuration.
You can either create a new one or use the previously configured. This time, uncheck the Central Switching, Central Authentication, Central DHCP, and Central Association Enable boxes.
Step 4. Policy tag configuration.
Associate the WLAN configured and the Policy Profile created.
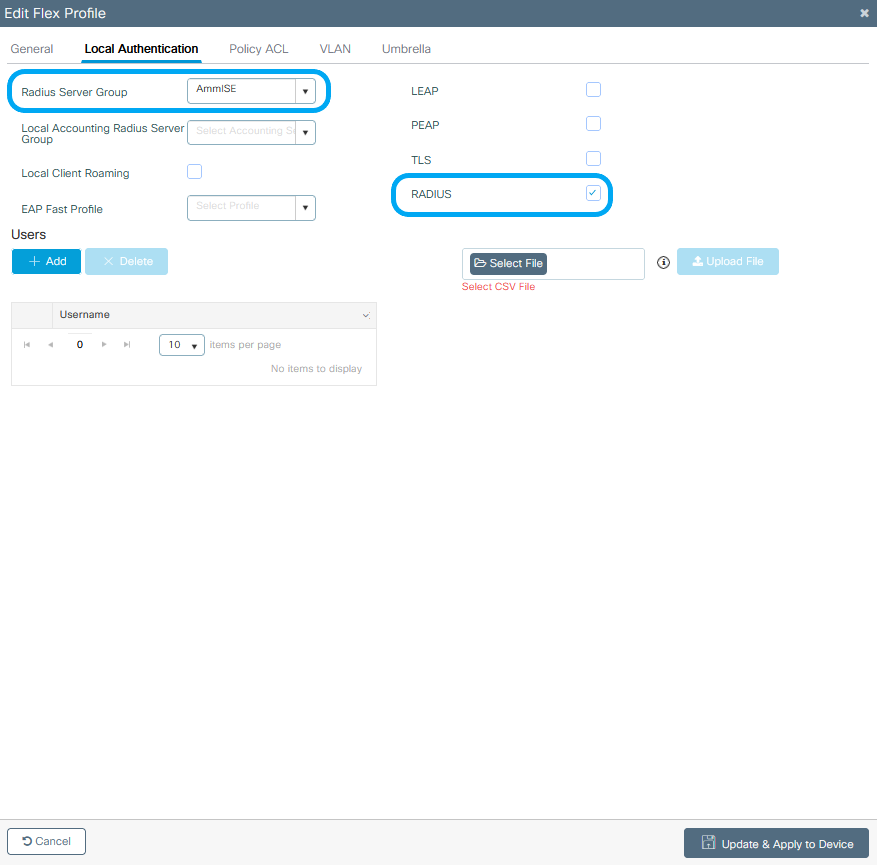
Step 5. Flex Profile Configuration.
Create a Flex Profile, navigate to the Local Authentication tab, configure the Radius Server Group and check the RADIUS box.
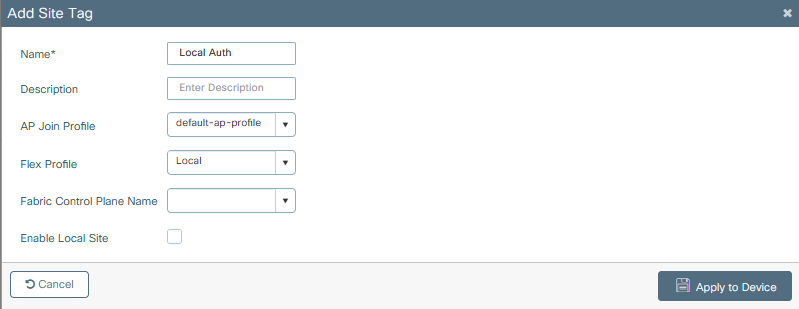
Step 6. Site tag configuration.
Configure the Flex Profile configured in step 5, and uncheck the Enable Local Site box.
Verify
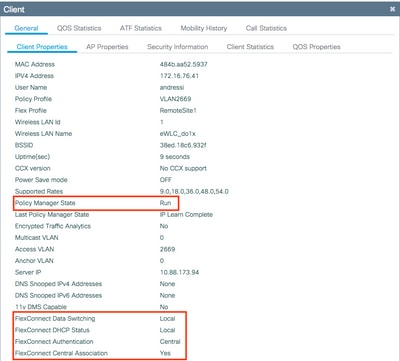
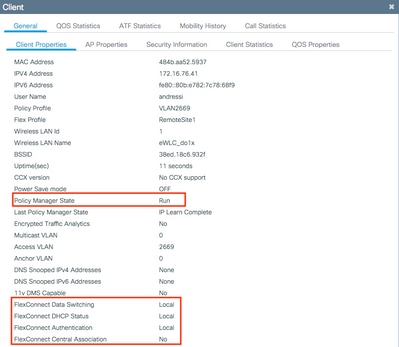
From GUI: Navigate to Monitoring > Wireless > Clients and confirm the Policy Manager State and the FlexConnect parameters.
Central Authentication:
Local Authentication:
You can use these commands to verify the current configuration:
From CLI:
# show wlan { summary | id | name | all }
# show run wlan
# show run aaa
# show aaa servers
# show ap config general
# show ap name <ap-name> config general
# show ap tag summary
# show ap name <AP-name> tag detail
# show wlan { summary | id | name | all }
# show wireless tag policy detailed <policy-tag-name>
# show wireless profile policy detailed <policy-profile-name>
Troubleshoot
WLC 9800 provides ALWAYS-ON trace capabilities. This ensures all client connectivity related errors, warnings, and notice level messages are constantly logged and you can view logs for an incident or failure condition after it has occurred.
Note: Based on the volume of logs generated, you can go back few hours to several days.
In order to view the traces that 9800 WLC collected by default, you can connect via SSH/Telnet to the 9800 WLC and go through these steps (ensure you log the session to a text file).
Step 1. Check the controller current time so you can track the logs in the time back to when the issue happened.
From CLI:
# show clock
Step 2. Collect syslogs from the controller buffer or the external syslog as dictated by the system configuration. This provides a quick view into the system health and errors if any.
From CLI:
# show logging
Step 3. Verify if any debug conditions are enabled.
From CLI:
# show debugging
IOSXE Conditional Debug Configs:

Conditional Debug Global State: Stop

IOSXE Packet Tracing Configs:


Packet Infra debugs:

Ip Address                                               Port
------------------------------------------------------|----------
Note: If you find any condition listed, it means the traces are logged up to debug level for all the processes that encounter the enabled conditions (mac address, ip address and so on). This would increase the volume of logs. Therefore, it is recommended to clear all conditions when not actively debugging
Step 4. If you assume the mac address under test was not listed as a condition in Step 3, collect the always-on notice level traces for the specific mac address.
From CLI:
# show logging profile wireless filter { mac | ip } { <aaaa.bbbb.cccc> | <a.b.c.d> } to-file always-on-<FILENAME.txt>
You can either display the content on the session or you can copy the file to an external TFTP server.
From CLI:
# more bootflash:always-on-<FILENAME.txt>
or
# copy bootflash:always-on-<FILENAME.txt> tftp://a.b.c.d/path/always-on-<FILENAME.txt>
Conditional Debug and Radio Active Trace
If the always-on traces do not give you enough information to determine the trigger for the problem under investigation, you can enable conditional debugging and capture Radio Active (RA) trace, which can provide debug level traces for all processes that interact with the specified condition (client mac address in this case). In order to enable conditional debugging, go through these steps.
Step 5. Ensure there are no debug conditions are enabled.
From CLI:
# clear platform condition all
Step 6. Enable the debug condition for the wireless client mac address that you want to monitor.
This command starts to monitor the provided mac address for 30 minutes (1800 seconds). You can optionally increase this time to up to 2085978494 seconds.
From CLI:
# debug wireless mac <aaaa.bbbb.cccc> {monitor-time <seconds>}
Note: In order to monitor more than one client at a time, run debug wireless mac <aaaa.bbbb.cccc> command per mac address.
Note: You do not see the output of the client activity on the terminal session, as everything is buffered internally to be viewed later.
Step 7. Reproduce the issue or behavior that you want to monitor.
Step 8. Stop the debugs if the issue is reproduced before the default or configured monitor time is up.
From CLI:
# no debug wireless mac <aaaa.bbbb.cccc>
Once the monitor-time has elapsed or the debug wireless has been stopped, the 9800 WLC generates a local file with the name:
ra_trace_MAC_aaaabbbbcccc_HHMMSS.XXX_timezone_DayWeek_Month_Day_year.log
Step 9. Collect the file of the mac address activity. You can either copy the ra trace .log to an external server or display the output directly on the screen.
Check the name of the RA traces file
From CLI:
# dir bootflash: | inc ra_trace
Copy the file to an external server:
From CLI:
# copy bootflash:ra_trace_MAC_aaaabbbbcccc_HHMMSS.XXX_timezone_DayWeek_Month_Day_year.log tftp://a.b.c.d/ra-FILENAME.txt
Display the content:
From CLI:
# more bootflash:ra_trace_MAC_aaaabbbbcccc_HHMMSS.XXX_timezone_DayWeek_Month_Day_year.log
Step 10. If the root cause is still not obvious, collect the internal logs which are a more verbose view of debug level logs. You do not need to debug the client again because you took a detailed look at debug logs that have been already collected and internally stored.
From CLI:
# show logging profile wireless internal filter { mac | ip } { <aaaa.bbbb.cccc> | <a.b.c.d> } to-file ra-internal-<FILENAME>.txt
Note: This command output returns traces for all logging levels for all processes and is quite voluminous. Please engage Cisco TAC to help parse through these traces.
You can either copy the ra-internal-FILENAME.txt to an external server or display the output directly on the screen.
Copy the file to an external server:
From CLI:
# copy bootflash:ra-internal-<FILENAME>.txt tftp://a.b.c.d/ra-internal-<FILENAME>.txt
Display the content:
From CLI:
# more bootflash:ra-internal-<FILENAME>.txt
Step 11. Remove the debug conditions.
From CLI:
# clear platform condition all
Note: Ensure that you always remove the debug conditions after a troubleshooting session.
 Feedback