Configure Integration of Office 365 (Microsoft Graph API) with IM&P for Calendar/Meeting and Out-of-Office Status in Jabber.
Available Languages
Introduction
This document describes the steps to configure "Calendar/Meeting and Out of Office status" for Cisco Jabber.
Prerequisites
Cisco recommends that you have knowledge of these topics:
-
Windows/Mac
-
Jabber
-
Cisco Unified Communication Manager server(CUCM)
-
Instant Messaging & Presence server(IMP)
-
Office 365 account
-
Microsoft outlook
Components Used
The information in this document is based on these software versions:
- CUCM 15SU4
- IMP 15SU4
- Jabber 15.1
The information in this document was created from the devices in a specific lab environment. All of the devices used in this document started with a cleared (default) configuration. If your network is live, ensure that you understand the potential impact of any command.

Note: Background Information Microsoft is deprecating EWS for third-party applications to integrate with Microsoft 365 and replacing it with Graph API. Starting October 1, 2026, Microsoft blocks EWS requests from non-Microsoft apps to Microsoft 365. For more details please refer Field Notice.
Configure
Steps include configuring the “Calendar/Meeting and Out of Office Status" feature and integrating the IM&P server with Office 365.
Step 1. Configure Office 365 and Microsoft Graph API Permissions
-
Log in to the Microsoft Azure portal
-
Register a new application and obtain the Application (client) ID and Directory (tenant) ID using theInstructions
-
Create a Client Secret by Going to Manage > Certificates & Secrets > New Client Secret, then copy and save the client secret value.
Note: Use the same Application (client) ID, Directory (tenant) ID, and Client Secret when configuring the IM and Presence Service during Presence Gateway setup.
-
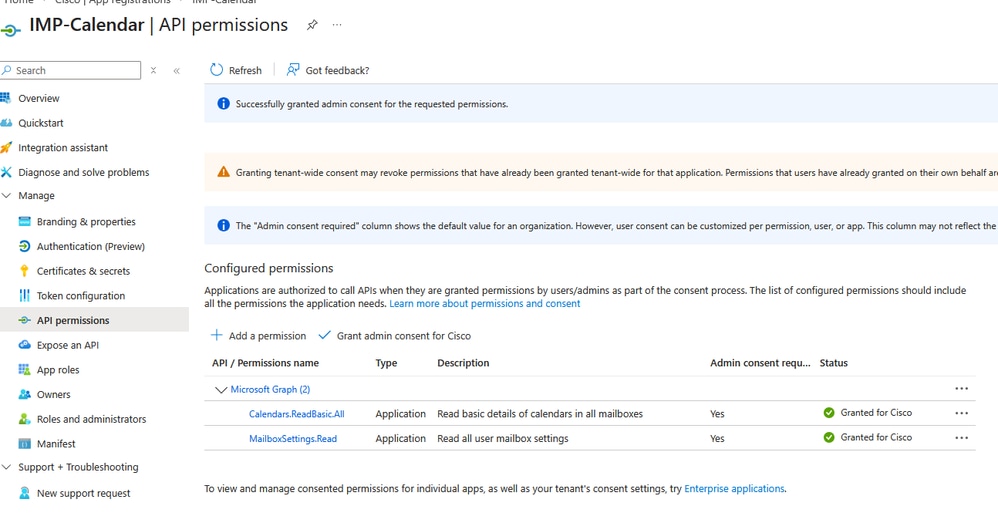
Go to Manage > API Permissions > Add a permission, then select Office 365 Exchange Online under “APIs my organization use.”
-
Click Add an application permission and Select Application permissions, choose Calendars.ReadBasic.All, and click Add permissions.
Note: To retrieve Out of Office information, also grant the MailBoxSettings.Read permission.
-
Navigate to Manage > API permissions and Under Grant consent, click Grant admin consent for "Registered Azure Active Directory", then select Yes.
-
Verify that a green check mark appears in the Status column for the assigned permissions.
Step 2. Configuring the Office 365 Presence Gateway
Use these steps to configure the Presence Gateway on the IM and Presence (IM&P) server:
-
From Cisco Unified CM IM and Presence Administration, navigate to Presence > Gateways.
-
Click Add New.
-
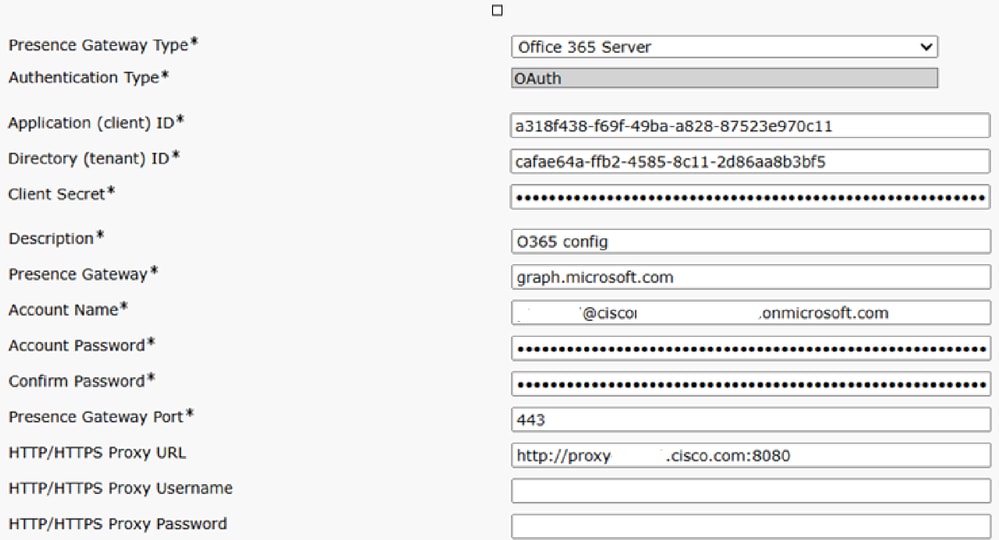
From the Presence Gateway Type field, choose Office 365 Server from the drop down list
-
If Office 365 Server is selected, the Authentication Type defaults to OAuth.
-
The fields Application (client) ID, Directory (tenant) ID, and Client Secret apply only to Office 365 Server.
-
These values must match those configured in Step 1 on the Office 365 server.
-
- In the Description field, enter a description to distinguish the presence gateway instance.
- In the Presence Gateway field, enter the fully qualified domain name (FQDN) or IP address of the Presence Gateway server.

Warning: In the Account Name field, enter the account name created in Office 365. Enter the password for the account in both the Account Password and Confirm Password fields.
-
In the Presence Gateway Port field, enter the port used to connect to the calendaring service (default is 443)
- In the HTTP/HTTPS Proxy URL field, enter the proxy server details if IM and Presence Service does not have direct access to the Office 365 server.
Step 3. Upload Microsoft Certificates to IM and Presence Service
-
Download the Office 365 root certificate and intermediate certificate. Refer to the link for the list of supported root and intermediate certificates:
-
Upload all downloaded certificates to the cup-trust and tomcat-trust stores on all the IM and Presence Servers
Step 4. Enable Calendar Out of Office in IM and Presence Cluster
-
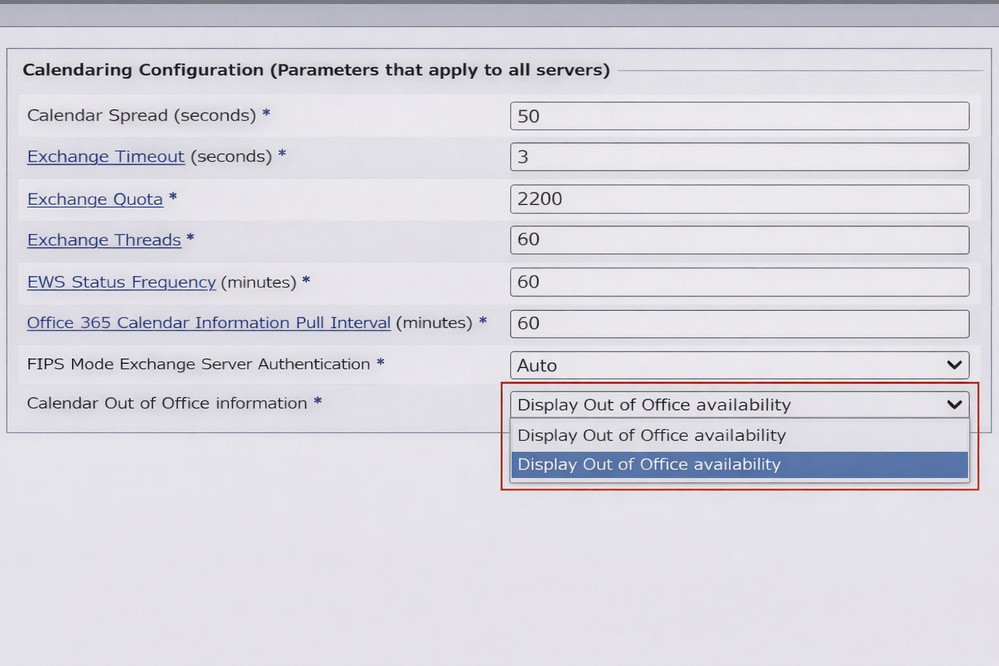
From Cisco Unified CM IM and Presence Administration, choose System > Service Parameters.
-
From the Server drop-down list, select the IM and Presence publisher node.
-
From the Service drop-down list, select Cisco Presence Engine.
-
In the Calendar Out of Office information service parameter, select Display Out of Office availability to update the user’s availability status in Cisco Jabber to “Out of Office” whenever it is set in Microsoft Office 365 or Exchange.
-
Click Save.
Step 5. Restart the Cisco Presence Engine
-
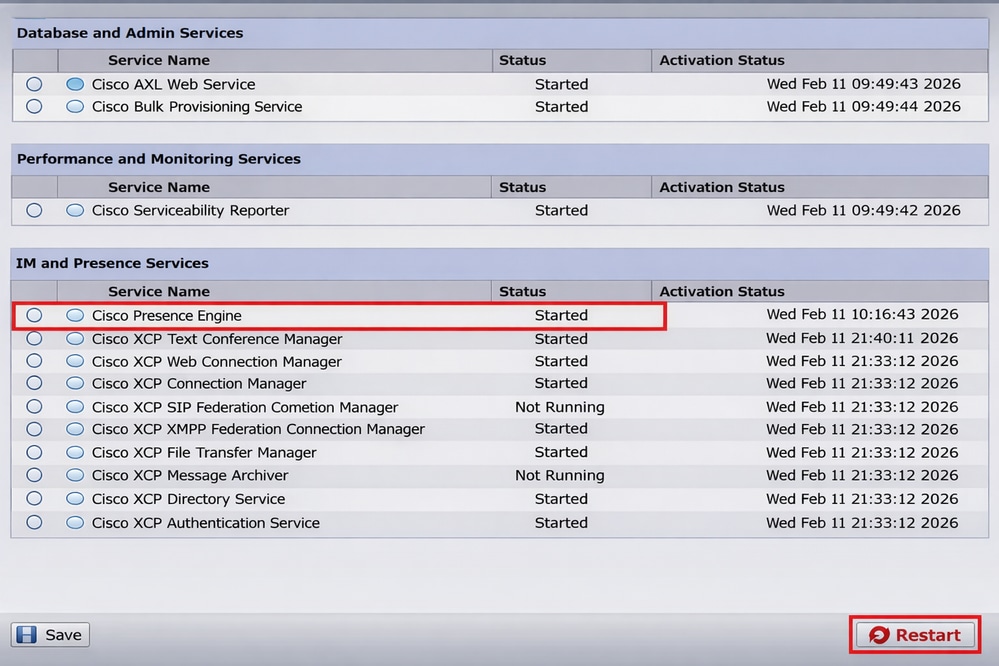
From Cisco Unified IM and Presence Serviceability, choose Tools > Control Center – Feature Services.
-
From the Server drop-down list, select the IM and Presence server, then click Go.
-
Under IM and Presence Services, select Cisco Presence Engine and click Restart.
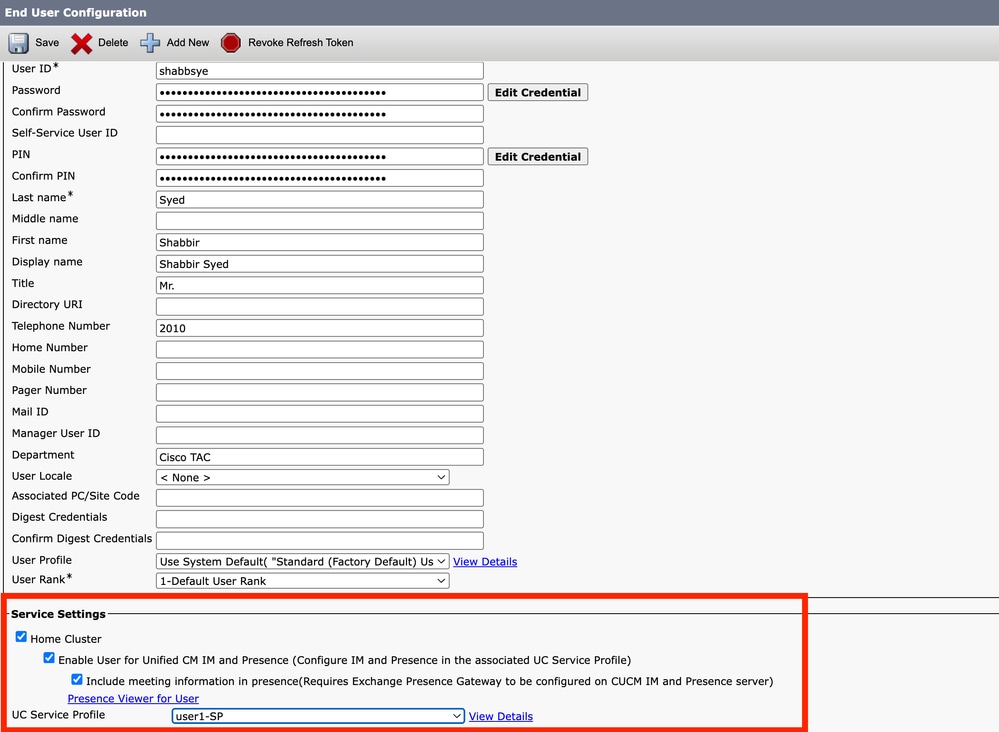
Step 6. Configure End User for Calendaring integration
1. Go to cucm administrator > Navigate to User Management > End User and click Find to display the full list of end users. Select user from the list and check the box Include meeting information in presence
Verify
Step 1. Verify 'Out of office' Status
1. Apply and Test the Out of Office Configuration,We configure the Out of Office and test with user account on jabber
Open Outlook (a shortcut is in the Windows taskbar). Go to File > Automatic Replies (Out of Office) and check the box Send automatic replies.

2. Add any Out of Office message into the Automatically replay field for Inside / Outside MyOrganization. Click OK to activate Out of Office on Exchange.
Note: By default, IM&P retrieves this information from Office 365 and updates the client every 60 minutes. This interval can be reduced to a minimum of 10 minutes. In Step 4, there is an option called the Office 365 Calendar Pull Information Timer, which is set to 60 minutes by default; you can change it to 10 minutes if required. If an immediate update is needed, restart the Presence Engine service, ensuring this is performed during a maintenance window.
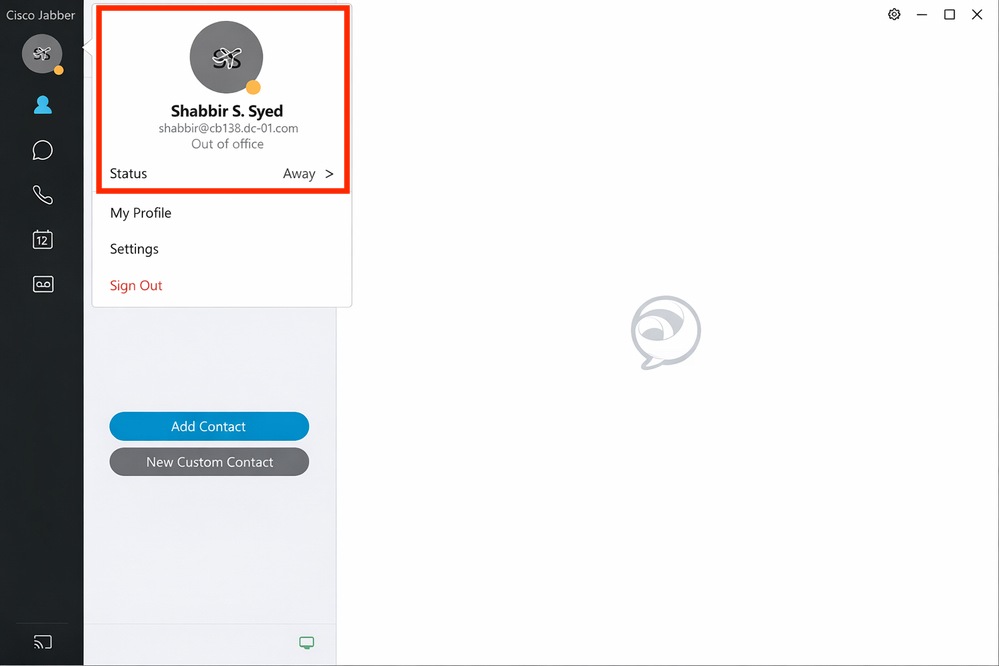
Navigate back to the Jabber client; you can notice the out-of-office icon showing on your profile.
Step 2. Verify 'Calendar Meeting' status
Schedule a calendar meeting in your Outlook.
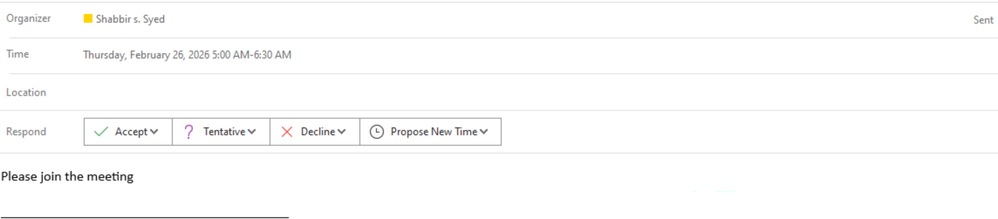
Verify the status in the Jabber client; it displays as “In a meeting.”

Revision History
| Revision | Publish Date | Comments |
|---|---|---|
1.0 |
31-Mar-2026
|
Initial Release |
 Feedback
Contact Cisco
- Open a Support Case

- (Requires a Cisco Service Contract)