Introduction
This document describes the Expressway/Video Communication Server (VCS) certificate renewal process.
Background Information
The information in this document applies to both Expressway and VCS. The document references Expressway but this can be interchanged with VCS.
Note: While this document is designed to help you with the certificate renewal process, it is a good idea to also check the Cisco Expressway Certificate Creation and Use Deployment Guide for your version.
Whenever a certificate is to be renewed, two main points must be considered in order to verify that the system continues to function properly after the new certificate is installed:
1. The attributes of the new certificate must match those of the old certificate (mainly the Subject Alternate Name and Extended key usage).
2. The Certification Authority (CA) that signs the new certificate must be trusted by other servers that communicate directly with the Expressway (for example, CUCM, Expressway-C, Expressway-E, and so on).
Process
A) Get Information from the Current Certificate
1. Open Expressway Webpage Maintenance > Security > Server certificate > Show decoded.
2. In the new window that opens, copy the Subject Alternative name and Authority Key Identifier X509v3 extensions to a notepad document.
 Show Decoded Certification Window
B) Generate the Certificate Signing Request (CSR) and Send it to the Certification Authority (CA) for Signing
1. Navigate to Expressway Webpage Maintenance > Security > Server certificate > Generate CSR.
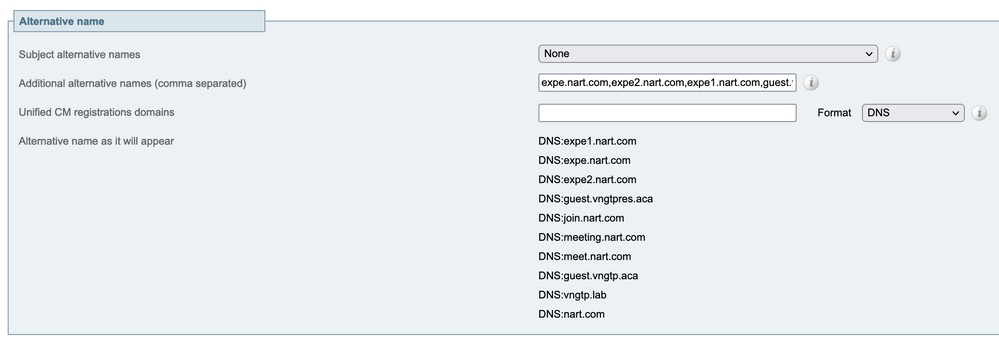
2. In the Generate CSR window, in the Additional alternative names (comma separated) field, enter all the values for Subject Alternative Names that were saved in the section A, and remove DNS: and separate the list with commas.
In this image, next to Alternative name as it appears, there is a a list of all the SANs to be used in the certificate:
 Generate CSR SAN Entries
3. Input the rest of the information under the Additional Information section (such as country, company, state, and so on) and click Generate CSR.
4. After you have generated the CSR, the page Maintenance > Security > Server Certificate shows an option to Discard CSR and Download. Choose Download and send the CSR to the CA for signing.
Note: Do not Discard CSR before the new certificate is installed. If Discard CSR was done and then an attempt is made to install a certificate signed with the CSR that was discarded, the certificate install fails.
C) Check the SAN List and Extended/Enhanced Key Usage Attribute in the New Certificate
Open the newly signed certificate in Windows certificate manager and verify:
1. The SAN list matches the SAN list that you saved in section A which you used and generated the CSR.
2. The Extended/Enhanced key usage attribute must include both Client Authentication and Server Authentication.
Note: If the certificate has the .pem extension, rename it to .cer or .crt to be able to open it with Windows Certificate Manager. Once the certificate is open with Windows Certificate Manager, you can go to the Details tab > Copy to File and export it as a Base64 encoded file, a base64 encoded file normally has "-----BEGIN CERTIFICATE-----" at the top and "-----END CERTIFICATE-----" at the bottom when opened in a text editor
D) Check if the CA Which Signed the New Certificate is the Same as the CA Which Signed the Old Certificate
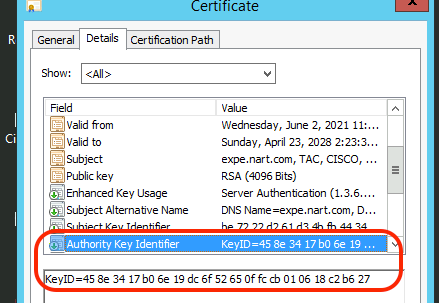
Open the newly signed certificate in Windows certificate manager and copy the Authority Key Identifier value and compare it with the Authority Key Identifier value that you saved in section A.
 New Certification Opened with Windows Certification Manager
If both values are the same, that means the same CA was used to sign the new certificate as the one that was used to sign the old certificate, and you can proceed to section E to upload the new certificate.
If the values are different, this means that the CA used to sign the new certificate is different than the CA used to sign the old certificate, and the steps to take before you can proceed to section E are:
1. Get all the Intermediate CA certificate(s), if any, and the Root CA certificate.
2. Navigate to Maintenance > Security > Trusted CA certificate, click Browse, then search for the intermediate CA certificate on your computer and upload it. Do the same for any other intermediate CA certificates and the root CA certificate.
3. Do the same on any Expressway-E (if the certificate to be renewed is an Expressway-C certificate) that connects to this server or any Expressway-C (if the certificate to be renewed is an Expressway-E certificate) that connects to this server.
4. If the certificate to be renewed is an Expressway-C certificate and you have MRA or have secure zones to CUCM.
- Verify that CUCM trusts the new root and intermediate CA.
- Upload the root and intermediate CA certificates to CUCM tomcat-trust and callmanager-trust stores.
- Restart the relevant services on CUCM.
E) Install the New Certificate
Once all the previous points have been checked, you can install the new certificate on the Expressway from Maintenance > Security > Server Certificate.
Click Browse and select the new certificate file from your computer and upload it.
You must restart the Expressway after you install a new certificate.
Note: Verify that the certificate to be uploaded to Expressway from Maintenance > Security > Server Certificate contains only the Expressway server certificate and not the full certificate chain and verify that it is a Base64 certificate.
Adding a Single Certificate to Multiple Expressways:
- Create a single certificate for the whole expressway-e cluster.
- Create a CSR that contains all the Frequently Qualified Domain Names (FQDNs) plus the extra features that you use on your expressways (if CMS webrtc, the join url and domain, if MRA, your registrations/login domains)
Example:
Exwycluster.domain
Exwy1.domain
Exwy2.domain
Exwy3.domain
Exwy4.domain
Extra features (domains or CMS URL)
- After the CSR is done, you can extract the private key of this CSR by using a SFTP program (Recommend WinSCP as it is used a lot.).
- Open WinSCP and connect to the expressway-e that created the CSR.
- Navigate to tandberg/persistent/certs/ CSR or certificate signing request (might show as pending).
- Copy the private key from the expressway-e into your desktop.
- After that is done, you can use the same certificate for all your 4 nodes.
 Feedback