Initial Configuration of your WAP571 or WAP571E using the Setup Wizard
Available Languages
Objective
Wireless Access Points (WAPs) provide a simple, cost-effective way to extend highly secure, high-performance mobile networking to your employees and guests, so they can stay connected anywhere in the office, regardless of the wireless device they use. This flexible solution allows your employees to stay connected, and can be scaled to accommodate additional users and changing business needs.
WAPs are easy to set up and use, with intuitive Setup Wizard configuration to get you up and running in minutes. The Setup Wizard is a set of interactive instructions that guides you through the initial configuration of the WAP. These instructions cover the basic configurations needed to operate the WAP.
Note: The Access Point Setup Wizard screen automatically appears the first time you log in to the recent models of WAP, but can also be used at any point.
This article explains how to configure the WAP571 or WAP571E through the use of the Setup Wizard.
Applicable Devices
- WAP500 Series — WAP571, WAP571E
Software Version
- 1.0.0.15 - WAP571, WAP571E
Configure WAP using the Setup Wizard
Note: The images below are captured from a WAP571.
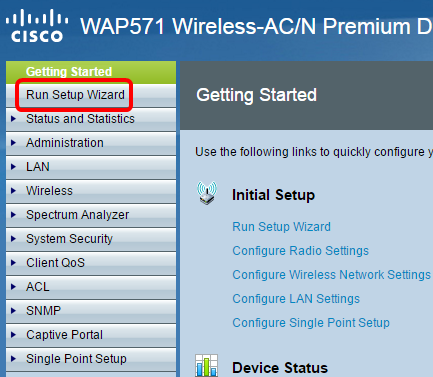
Step 1. Log in to the web-based utility and choose Run Setup Wizard.
Note: If this is the first time you are setting up your WAP, the Setup Wizard will automatically pop-up.
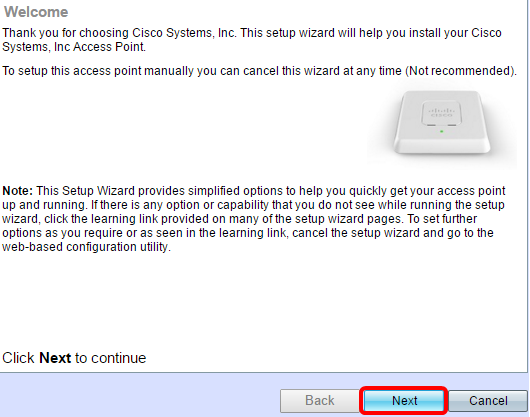
Step 2. Click Next to continue.
Step 3. Once the Configure Device — IP Address screen appears, click the radio button that corresponds to the method you want to use to determine the IP address of the WAP.
The options are:
-
Dynamic IP Address (DHCP) (Recommended) — The IP address of the WAP is assigned by a Dynamic Configuration Host Protocol (DCHP) server. In this example, this option is chosen.
-
Static IP Address — Allows you to create a fixed (static) IP address for the WAP. A static IP address does not change.
— Static IP Address — This IP address is created by you and should not be used by another device in the network.
— Subnet Mask — The subnet mask of the IP address.
— Default Gateway — The IP address of the default gateway for the WAP. The default gateway is usually the private IP address assigned to your router.
— DNS — The IP address of the primary domain name system (DNS). If you want to access web pages outside of your network, the IP address of the DNS server should be given by your Internet Service Provider (ISP).
— Secondary DNS — The IP address of the secondary DNS.
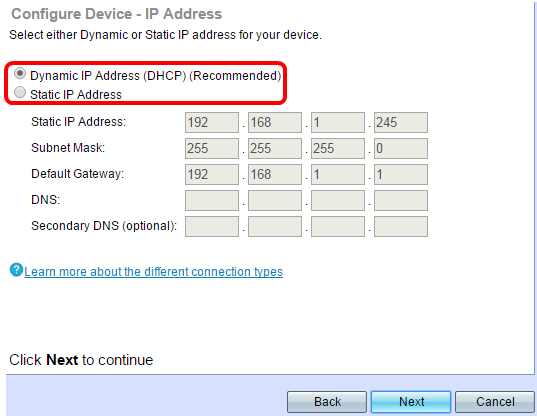
Step 4. Click Next to continue.
Step 5. In the Single Point Setup — Set A Cluster screen, click the radio button that corresponds with the cluster settings you would like to use. A cluster allows you to configure multiple access points (APs) as a single device. If you choose not to use a cluster, you have to configure them individually.
The options are:
-
Create a New Cluster — Create a new cluster for WAPs.
— In the New Cluster Name field, enter a new cluster name. In the AP Location field, enter the physical location of the WAP.
-
Join an Existing Cluster — Joins an existing AP cluster in your network.
— If you choose this option, the WAP configures the rest of the settings based on the cluster. When you click Next, a confirmation page will ask you if you are sure you want to join the cluster. Click Submit to join the cluster. After the configuration is complete, click Finish to exit the Setup Wizard.
-
Do not Enable Single Point Setup
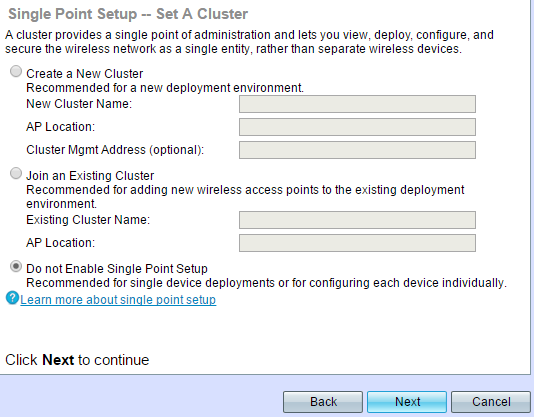
Step 6. Click Next to continue.
Step 7. Choose a time zone from the Time Zone drop-down list.
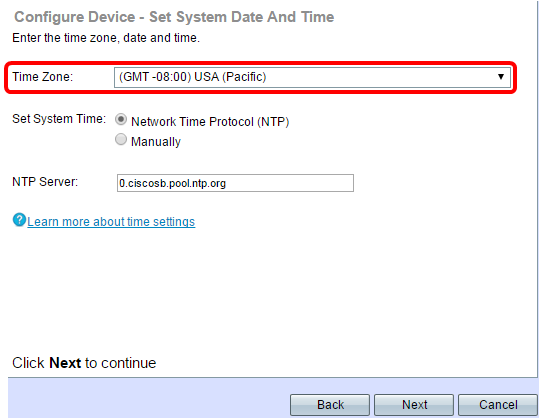
Step 8. Click the radio button that corresponds with the method you wish to use to set the time of the WAP.
-
Network Time Protocol (NTP) — The WAP gets the time from an NTP server.
-
Manually — The time is manually entered into the WAP.
Step 9. (Optional) If you choose Manually, choose the month, day, and year from the System Date drop-down lists, respectively.
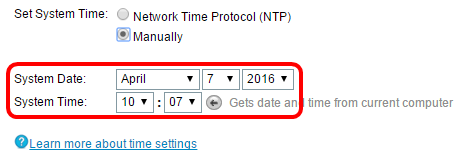
Step 10. (Optional) From the System Time drop-down lists, choose the hour and minutes, respectively.
Step 11. Click Next to continue.
Step 12. In the Configure Device — Set Password screen, enter the same password in the New Password and Confirm Password fields.
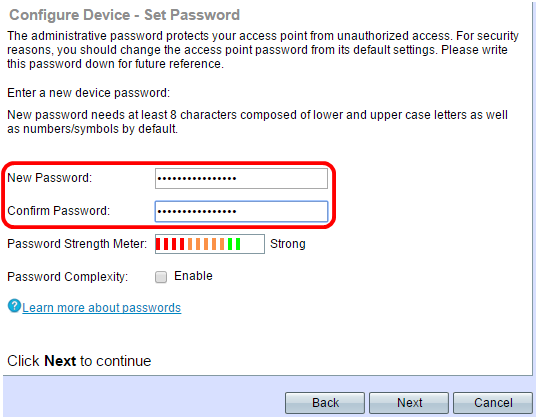
Note: As you enter a password, the number and color of vertical bars change to indicate the password strength, which are as follows:
-
Red — The password fails to meet the minimum complexity requirements.
-
Orange — The password meets the minimum complexity requirements but the password strength is weak.
-
Green — The password is strong.
Step 13. (Optional) To enable password complexity, check the Enable check box. This requires that the password is at least 8 characters long and composed of lower and upper case letters and number/symbols.
Step 14. Click Next to continue.
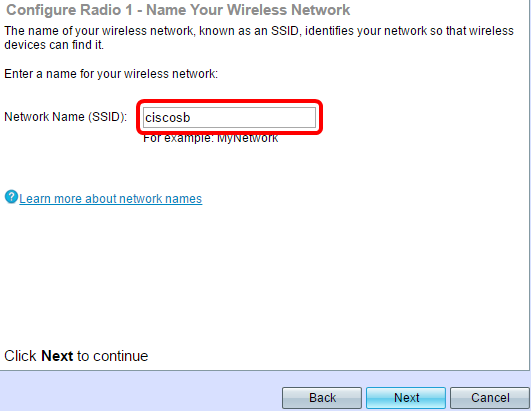
Step 15. In the Configure Radio 1 - Name Your Wireless Network screen, enter the network name in the Network Name (SSID) field. The SSID is the name of the wireless local area network.
Step 16. Click Next to continue.
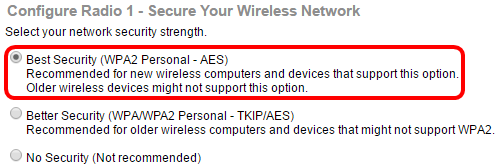
Step 17. In the Configure Radio 1 - Secure Your Wireless Network screen, click the radio button that corresponds with the network security you would like to apply to your wireless network.
-
Best Security (WPA2 Personal - AES) — WPA2 is the second version of WPA security and access control technology for Wi-Fi wireless networking, which includes AES-CCMP encryption. This protocol version provides the best security per the IEEE 802.11i standard. All client stations on the network will need to be able to support WPA2. WPA2 does not allow use of the protocol Temporal Key Integrity Protocol (TKIP) that has known limitations.
-
Better Security (WPA/WPA2 Personal - TKIP/AES) — WPA Personal is a Wi-Fi Alliance IEEE 802.11i standard, which includes AES-CCMP and TKIP encryption. It provides security when there are older wireless devices that support the original WPA but do not support the newer WPA2.
-
No Security (Not recommended) — Wireless network does not require a password and can be accessed by anyone. If you chose No Security, skip to Step 25.
Note: In the image below, Best Security (WPA2 Personal - AES) is used as an example.
Step 18. In the Security Key field, enter the password for your network.
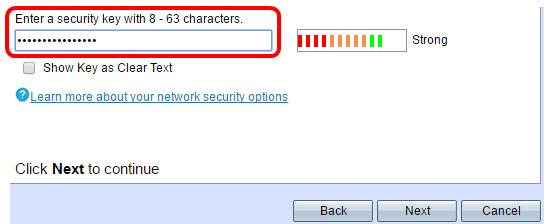
Step 19. (Optional) To see the password as you type, check the Show Key as Clear Text check box.
Step 20. Click Next to continue.
Step 21. In the Configure Radio 1 - Assign The VLAN ID For Your Wireless Network screen, enter the ID number of the VLAN that you would like the WAP to belong to in the VLAN ID field.
Note: The VLAN ID should match one of the VLAN IDs that is supported on the port of the remote device that is connected to the WAP.
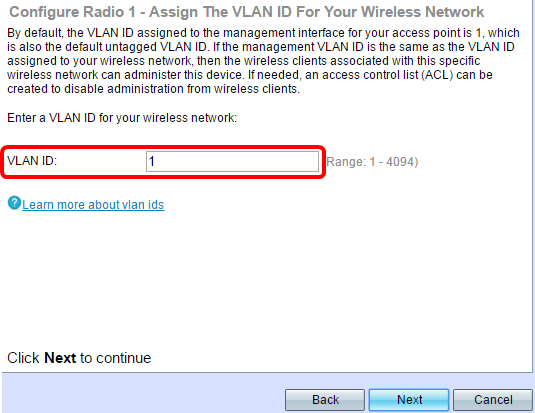
Step 22. Click Next to continue.
Step 23. (Optional) In the Configure Radio 2 - Name Your Wireless Network screen, repeat Steps 15 — 22 to configure your Radio 2.
Step 24. Choose a radio button in the Enable Captive Portal — Create Your Guest Network screen.
-
Yes — To configure the Captive Portal feature of your WAP, click here to proceed with the detailed instructions.
-
No, thanks. — Skip this step to configure Captive Portal at a later time.
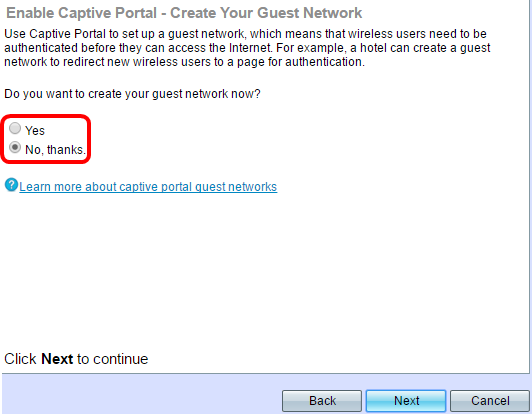
Step 25. Click Next to continue.
Step 26. Review and confirm the settings on your WAP.
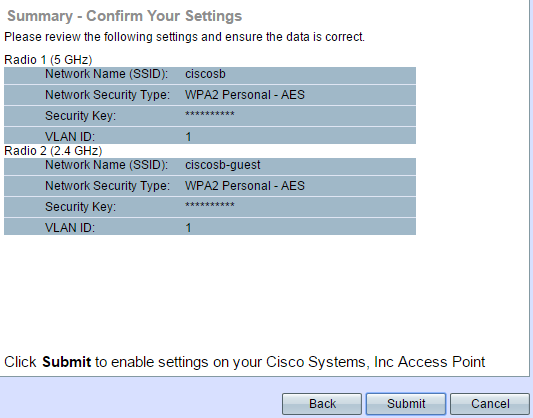
Step 27. (Optional) If you would like to edit a setting you made, click Back.
Step 28. (Optional) If you would like to exit the Setup Wizard and undo all the changes you made, click Cancel.
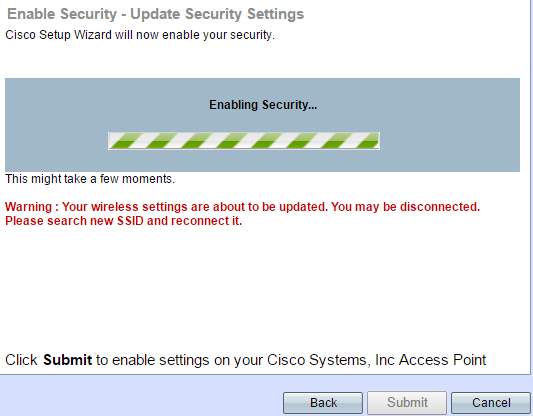
Step 29. Click Submit to enable the settings on the WAP. A loading bar will appear as the WAP enables your settings.
Note:Step 29 will only be applicable if you click Submit in the Summary - Confirm Your Settings screen.
Step 30. Click Finish to exit the Setup Wizard.
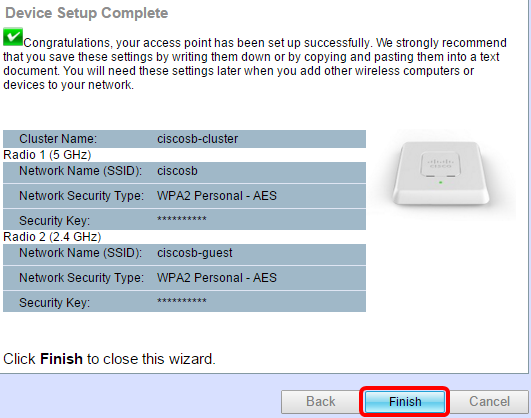
You should now have configured your WAP571 or WAP571E using the Setup Wizard.
 Feedback