Wi-Fi Protected Setup (WPS) Enrollment Configuration on the WAP121 and WAP321 Access Points
Available Languages
Objective
Wi-Fi Protected Setup (WPS) is a standard that enables simple establishment of wireless networks without the compromise of network security. The network name, keys and various other configurations need not be entered if WPS is enabled. WPS requires either a device PIN code, usually an 8-digit number, or a push button event to allow a new WPS capable client to join the network.
This article explains how to configure WPS on WAP121 and WAP321 access points.
Applicable Devices
- WAP121
- WAP321
Software Version
- 1.0.3.4
Client Enrollment
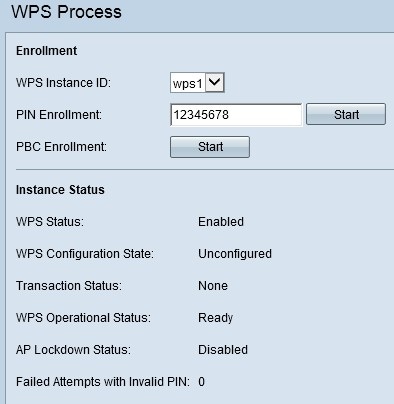
Step 1. Log in to the web configuration utility and choose Wireless > WPS Process The WPS Process page opens:

You can use either one of these methods to enroll a wireless client into the WAP device.
- PIN Enrollment — The Personal Identification Number (PIN) is located on a product label or can be viewed on WPS Setup page.
- PBC Enrollment — The Push Button Configuration (PBC) is performed either on the product or through the software utility of the device.
Client Enrollment by PIN Method
Follow the steps given below to enroll the wireless client to the WAP device by PIN method.

Step 1. Choose the instance of WPS from the WPS Instance ID drop-down list on which to enroll the device. It is used as an identifier for the instance; however, the WAP only supports one instance of WPS.
Step 2. Enter the PIN of the wireless client in the PIN Enrollment field. The PIN may be printed on the hardware of the client device or may be obtained through the software utility of the device.
Step 3. Click Start to begin the enrollment process.
Note: You can also start the enrollment process from the wireless client device. The PIN of the WAP can be generated on the WPS Setup page (use the Access Point Configuration Utility to choose Wireless > WPS Setup). Refer the article entitled Wi-Fi Protected Setup (WPS) Configuration on WAP121 and WAP321 Access Points for further details on how to setup WPS PIN and other configurations.
Client Enrollment by PBC Method
Follow the steps given below to enroll the wireless client to the WAP device by the PBC Method.
Note: Only the wireless devices that have the WPS hardware button can use the PBC method of client enrollment.

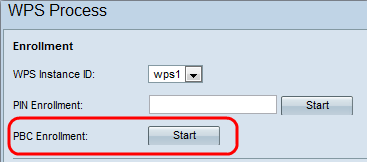
Step 1. Choose the instance of WPS from the WPS Instance ID drop-down list on which to enroll the device. However, the WAP only supports one instance of WPS.
Step 2. Click Start to begin the enrollment process by the PBC enrollment method. Within two minutes, press the WPS hardware button on the client device to get it connected to the WAP.
Instance Information

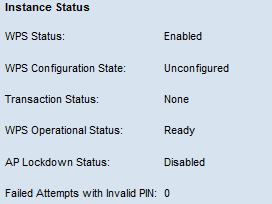
Scroll down to the Instance Status area which has the following information:
- WPS Status — Displays whether the WPS process is enabled or disabled on the WAP device.
- WPS Configuration State — Displays the WPS configuration state on the WAP device.
– Unconfigured — Indicates that the Virtual Access Point (VAP) settings are configured by WPS, after which the state changes to Configured.
– Configured — Indicates that the VAP settings cannot be configured by the external registrar and retains the present configuration.
- Transaction Status — Displays the current transaction status between the WAP device and the wireless client. When the enrollment process is completed, the Transaction Status changes from None to Success.
- WPS Operational Status — Displays the current WPS operational status. When the user enters the PIN on the client device, the WPS Operational Status changes to Adding Enrollee. When the enrollment process is completed, the WPS Operational Status changes to Ready.
- AP Lockdown Status — Displays whether the current instance is in lockdown state, which blocks the other registrars outside the network. The available options are:
– Temporary — The device is lockdown temporarily and the duration of the lockdown is displayed.
– Permanent — The device is lockdown permanently.
- Failed Attempts with Invalid PIN — Displays the number of times the authentication has failed due to an incorrect or invalid password.

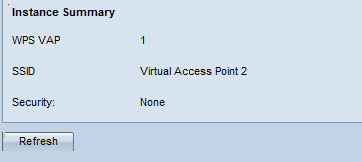
Scroll down to the Instance Summary area which has the following information:
- WPS VAP — Displays the Virtual Access Point (VAP) ID associated with the WPS instance. A VAP is the wireless equivalent of a Virtual LAN (VLAN) which segments the wireless LAN and simulates multiple access points in one physical device.
- SSID — Displays the SSID which is used in the WPS instance. SSID is used to identify the Wireless LAN.
- Security — Displays the type of security which is used in the WPS instance.
Step 1. (Optional) Click Refresh to view the most recent status of the page.
Revision History
| Revision | Publish Date | Comments |
|---|---|---|
1.0 |
12-Dec-2018
|
Initial Release |
 Feedback