Proxy and Registration on SPA100 Series Phone Adapter
Available Languages
Objective
To use an Internet phone service, the ATA must be registered to the Internet Telephony Service Provider (ITSP). Each line is to be configured individually. Also, each line can be configured for a different ITSP. It provides support for sends an outbound registrations based on incomes registrations.The configuration also includes the proxy features which supports outbound requests and proxy registration renewals within short intervals as it expires. This article explains the Proxy and Registration details on the SPA100 Series Phone Adapters.
Applicable Device
• SPA122 Series Phone Adapters
Software Version
• 1.3.1
Proxy and Registration Configuration
Note: The proxy and registration is applicable for both lines. This article explains how to configure Line 1 of the ATA. Line 2 can also be configured in the same manner to the user desired settings.
Step 1. Log in to the web configuration utility and choose Voice > Line1. The Line 1 page opens:
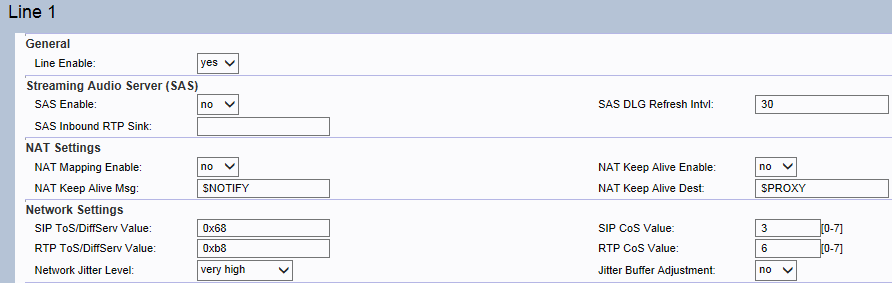
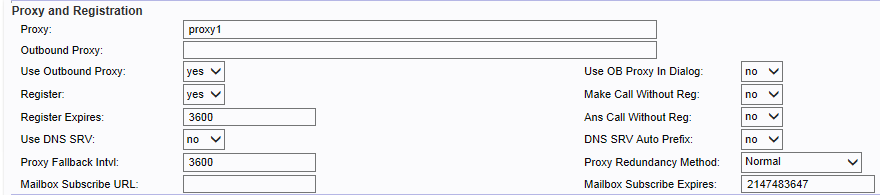
Step 2. Scroll down to the Proxy and Registration section of the page.
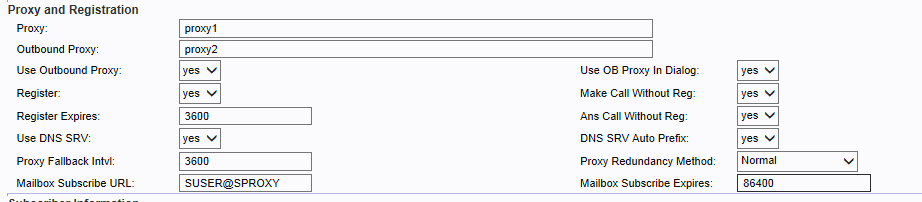
Step 3. Enter the name of the proxy server for all outbound requests in the Proxy field. A proxy server plays the primary role of route is to ensure the request is sent to the entity that is closer to the targeted user.
Step 4. Enter the name of the proxy server in the Outbound Proxy field where all outbound requests are sent as the first hop.
Step 5. Choose Yes from the Use Outbound Proxy drop-down list to enable the use of an Outbound Proxy. Otherwise choose No to disable the Outbound Proxy and Use OB Proxy in Dialog parameters.
Step 6. Choose Yes from the Use OB Proxy In Dialog drop-down list to make SIP requests be sent to the outbound proxy. Otherwise choose No to disable.
Note: OB stands for Outbound Proxy.
Step 7. Choose Yes from the Register field drop-down list to enable periodic registration with the proxy parameter. This enables the user to save time to re register the device with proxy parameter. Otherwise choose No if the proxy is not specified.
Step 8. Choose Yes from the Make Call Without Reg drop-down list in order to be able to make outbound calls without dynamic registration by the proxy unit. Otherwise choose No. No dial tone is played and the user is not able to make an outbound call without registration of the device first.
Step 9. Enter the time (in seconds) in the Register Expires field so that the registration expires after the given time is elapsed to enhance the security of the device by renewed registration. The ATA will periodically renews registration shortly before the current registration expired. Otherwise choose No to disable it. Range: 0 – 2147483647 sec. Default setting: 3600.
Step 10. Choose Yes from the Ans Call Without Reg drop-down list to allow the answering of inbound calls without successful (dynamic) registration by the unit. Otherwise choose No to disable the ability to answer inbound calls.
Step 11. Choose Yes from the Use DNS SRV field to use DNS SRV lookup for Proxy and Outbound Proxy. Otherwise choose No to disable SRV lookup for Proxy and Outbound Proxy
Note: The use of multiple DNS records per server name does not allow the notion of priority, so all hosts will be considered at the same priority and the ATA will not attempt to fall back after a failover.
Step 12. Enter a value (in seconds) in the Proxy Fallback Intvl field so that after failing over to a lower priority server, the ATA waits for the specified Proxy Fallback Interval before retrying the highest priority proxy (or outbound proxy) servers. This parameter is useful only for record lookups for proxy and its priority. The default setting is 3600 seconds.
Step 13. Choose Normal from the Proxy Redundancy Method drop-down list to enable a list that contains proxies ranked by weight and priority. Otherwise choose Based so that the ATA performs selection on the basis of the first listed proxy port.
Step 14. Enter a value (in seconds) in the Mailbox Subscribe Expires field. This value sets the subscription interval for the voice mail message waiting indication.
Step 15. Enter a URL in the Mailbox Manage URL field to access the voicemail server.
Step 16. To verify your progress, perform the following tasks:
• From the Voice navigation pane, click Info. Scroll down to the Line section of the page for the line you configured. Verify that the line is registered.
• Use an external phone to place an inbound call to the telephone number that was assigned by your ITSP. Assume that you have left the default settings in place, the phone should ring and you can pick up the phone to get two-way audio.
• If the line is not registered, you may need to refresh the browser several times because it can take a few seconds for the registration to complete. Also verify that DNS is configured properly.
Step 17. Click Submit after making any recommended changes or click Refresh so that the user recommended values will be refreshed.
 Feedback