Configure and Troubleshoot Radius Authentication on UCSM
Available Languages
Contents
Introduction
This document describes the steps to configure and troubleshoot Radius on UCS Manager using a Windows Server 2022 DataCenter.
Prerequisites
- UCS Manager - 4.2(3o) or higher
- Windows Server 2022 DataCenter
Configuration on Windows Server
Install Active Directory Domain Services
Refer Microsoft document - Install AD DS using Server Manager on Windows Server 2022.
Create the Active Directory User (Login Account)
1. Open Server Manager > Tools > Active Directory Users and Computers.
2. Right-click your created domain New > User.
3. Enter the login name (Example - testuser), set a password, uncheck User must change password at next logon, and check Password never expires (for a service/admin account) > Finish (subject to your local security requirements/policies).
Create an AD Security Group for UCS Admins
-
In the same console, right-click your domain New > Group (Example - testRadius, Security). Add the AD user testuser) to this group.
- This group name is what you have to later map to a UCS role.
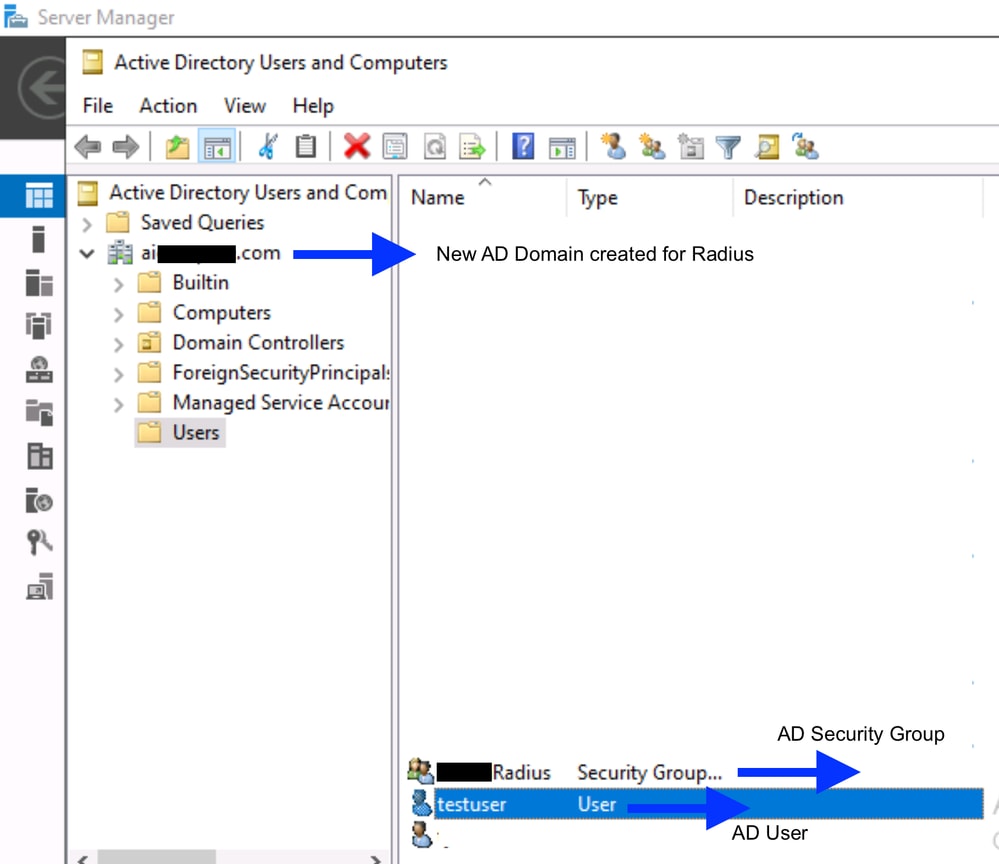
Install the NPS (RADIUS role) and Register NPS in Active Directory
1. Navigate to Server Manager > Manage > Add Roles and Features.
2. Select Network Policy and Access Services > Complete the wizard to install Network Policy Server (NPS).
3. Open Tools > Network Policy Server. Right-click NPS (Local) > Register server in Active Directory > OK. This lets NPS read AD user/group membership.
Add the UCS Fabric Interconnects as RADIUS Clients
-
This tells NPS to trust requests from UCSM. In NPS, expand RADIUS Clients and Servers > RADIUS Clients. right-click New.
-
Provide:
-
Friendly name: Example - UCSM
-
Address (IP): the management IP of FI-A
-
Shared Secret: create a strong secret and write it down — you are to enter this exact shared secret string in UCSM later.
-
-
Repeat for Fabric Interconnect B and, if you are to authenticate against the cluster VIP, add that IP too.
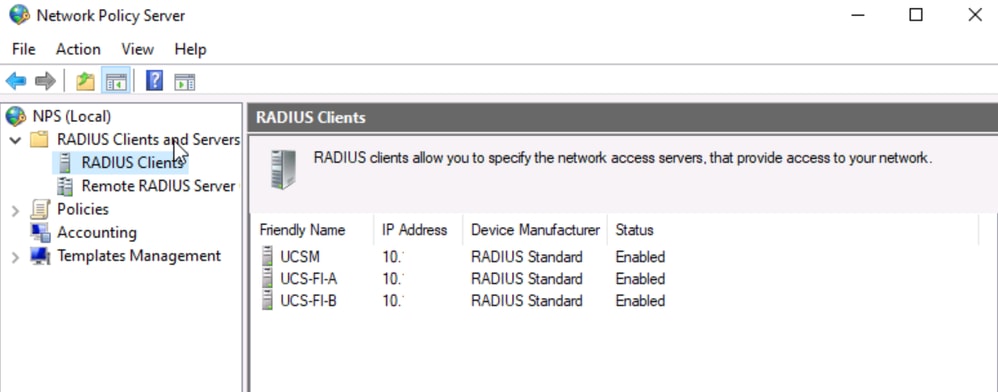 Radius Clients
Create a Connection Request Policy and Network Policy (Authorization and Role Mapping)
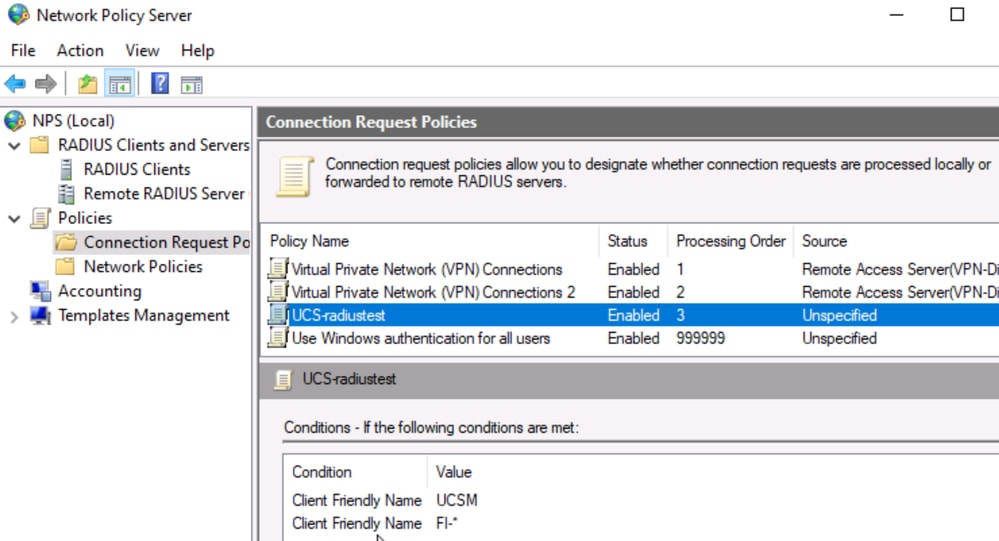
- Policies > Connection Request Policies > New > Name it (Example - UCS-radiustest), add the condition for 'Client Friendly Name' which allows it to authenticate locally. For example : FI-* or UCSM,
- Policies > Network Policies > New > Policy name
- Conditions: add Windows Groups. Select the testRadius group you made in Step 3.
- Access permission: Grant access
- Authentication Methods: enable Unencrypted authentication (PAP/SPAP) and/or the methods UCS uses. (UCS RADIUS commonly uses PAP.)
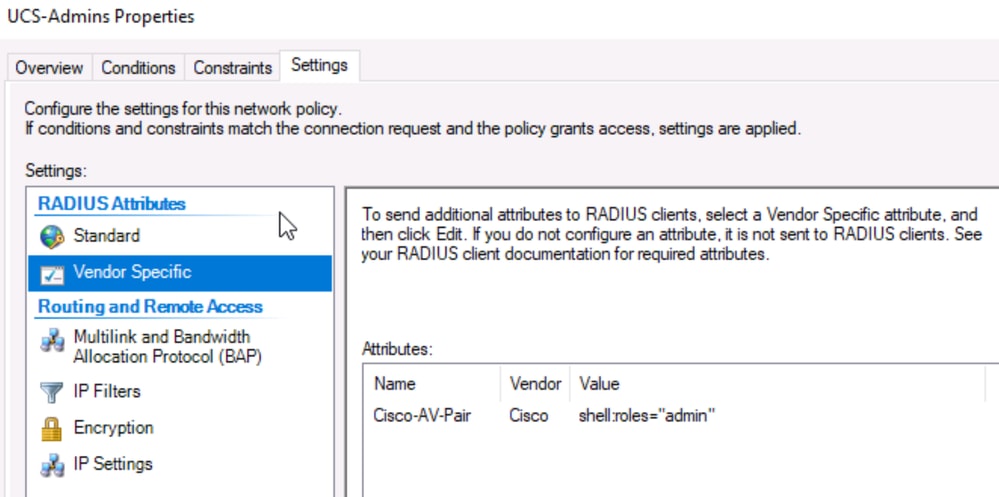
- Configure Settings > Vendor Specific Attributes (this is the key part that maps the AD user to a UCS role): Add a Vendor-Specific attribute > Cisco AV-Pair
- Set the value to the UCS role/locale string, Example - shell:roles="admin" (If you skip this attribute, the user logs in as read-only).
Connection Request Policy
Network Policy
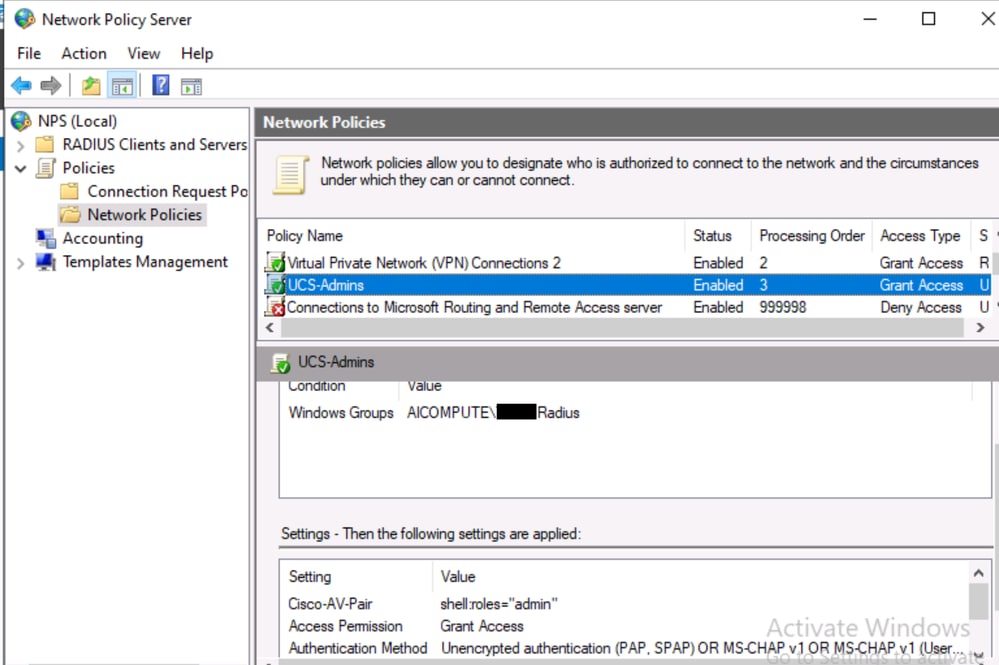
Vendor Specific Attribute
Configuration on UCSM
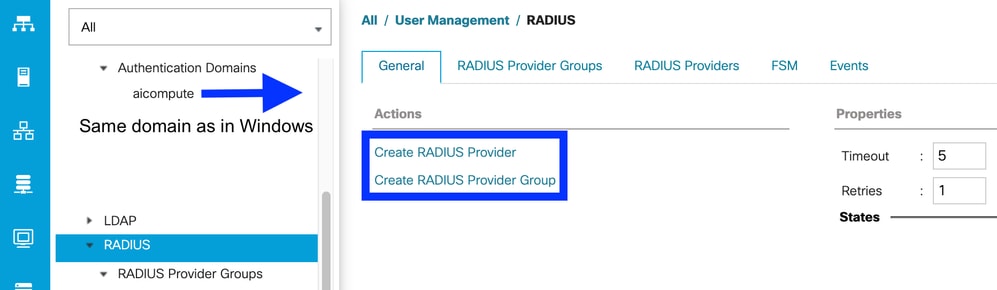
Create a Radius Provider and Add to a Provider Group
1. Log in to UCS Manager GUI and navigate to Admin > User Management > RADIUS.
2. Click Create RADIUS Provider (the +/ Create option) and fill in:
- Hostname/FQDN or IP: your Windows NPS server.
- Key: the exact Shared Secret you set in NPS Step 5.
- Authorization Port: 1812 (must match NPS)
- Timeout / Retries: leave defaults to start.
3. Under Admin >User Management > RADIUS, create a Provider Group (Example - RADIUS-Grp) and add the provider from earlier.
Create an Authentication Domain
This is the piece that ties it all together.
1. Navigate to Admin > User Management > Authentication > Authentication Domains.
2. Click Create a Domain (Example - RADIUS - domain name recommended to be the same as the domain created in NPS).
3. Set Realm = RADIUS.
4. Assign the Provider Group you created (RADIUS-Grp) and Save.
Verify
From Windows Server - Confirm Firewall / Ports
RADIUS authentication uses UDP port 1812 (and accounting 1813). Ensure the Windows firewall and any network firewall allow these from the FI mgmt IPs.
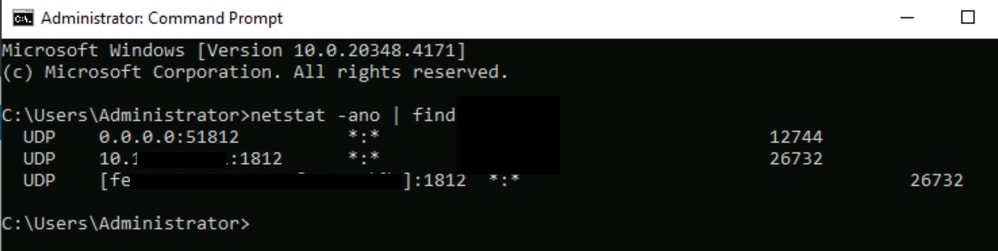
1. Confirm NPS / Radius service is listening through the netstat -ano | findstr 1812 command.
-
(You are to see a line with UDP and *:1812 (or the server IP:1812). This confirms the NPS/RADIUS service is actively listening.
-
If nothing shows, NPS could not be running — check Services > Network Policy Server (IAS) is Started.)
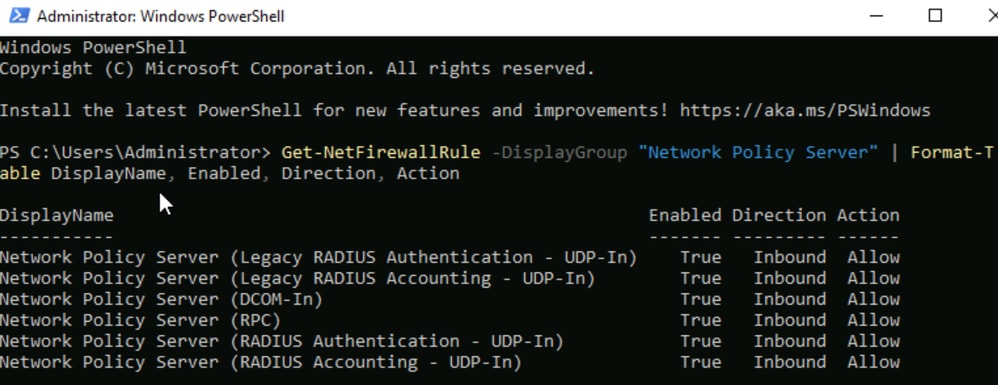
- On Windows Powershell, run the command :
- Get-NetFirewallRule -DisplayGroup "Network Policy Server" | Format-Table DisplayName, Enabled, Direction, Action.
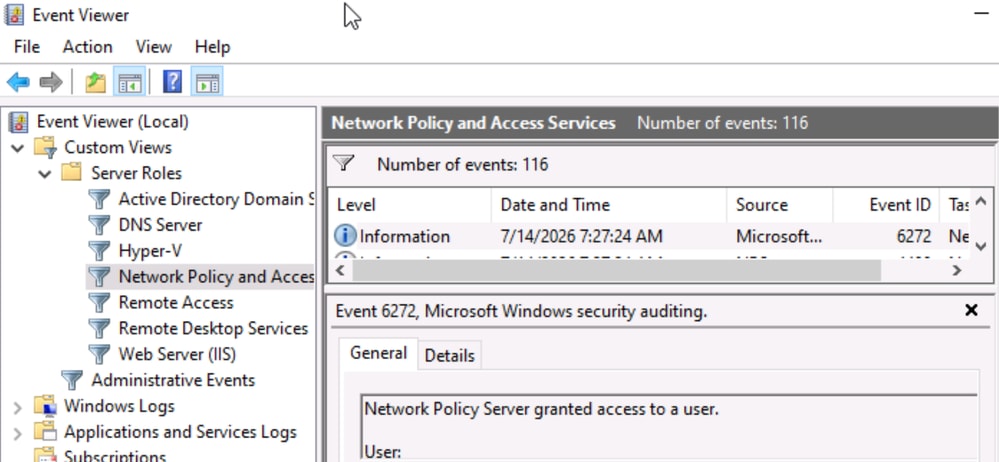
- On Windows Event Viewer :
- Custom Views > Server Roles > Network Policy and Access Services > Packets are reaching.
Test Login From UCSM
1. Log out and Login by choosing Domain dropdown as per the created Radius domain.
2. Configure user password. (Refer to Windows configuration Step 2).
- If the login works and you land with admin privileges, the Cisco AV-Pair mapping (Windows configuration Step 6) is correct.
Troubleshoot Radius Authentication
From Windows Server
1. Execute these commands in Powershell for packet capture:
- pktmon filter add -p 1812
- pktmon start --capture --pkt-size 0 -f C:\radius_capture.etl
2. Initiate login from UCSM and stop capture using commands :
- pktmon stop
- pktmon etl2pcap C:\radius_capture.etl -o C:\radius_capture.pcap
3. Open radius_capture.pcap in Wireshark: RADIUS > Attribute Value Pairs > confirm Message-Authenticator (or attribute 80) is present. This implies NPS is signing the reply.
From UCSM CLI
When running pktmon on Windows, simultaneously from UCSM CLI,
1. run:
- connect nxos
- terminal monitor
- debug radius all
2. attempt a UCSM login after initiating debug.
A successful login looks similar to 2026 Jul 3 09:54:02.917044 radius:Verified Message Authenticator in response from: 10.xxx.xx.xx.
- If packets are sent and received but login is failing with message authenticator is probably incorrect. in the debug output - this implies the port and reachability are fine.
- Try reconfiguring the shared secret in Windows NPS server and the UCSM key once again (these need to be exactly matched).
- If issue persists while logging in post reconfiguring, we could be hitting a known Cisco bug ID CSCwm80801 : User cannot login to UCSM using Radius after Microsoft patch KB5040434 requiring an upgrade to a mentioned fixed release.
Related Information
Revision History
| Revision | Publish Date | Comments |
|---|---|---|
2.0 |
09-Sep-2026
|
Fixed typo in a header |
1.0 |
03-Sep-2026
|
Initial Release |

 Feedback
Contact Cisco
- Open a Support Case

- (Requires a Cisco Service Contract)