Revert Secure Web Appliance to Previous Version
Available Languages
Contents
Introduction
This document describes the steps to revert the Secure Web Appliance (SWA) to previous version.
Prerequisites
Requirements
Cisco recommends knowledge of these topics:
- Access ToGraphic User Interface (GUI)of SWA
- Administrative Access to the SWA
- Access to Cisco Software Licensing Portal or the SWA license file
- Active Directory privileged user access to join the SWA to domain and create DNS records
Components Used
This document is not restricted to specific software and hardware versions.
The information in this document was created from the devices in a specific lab environment. All of the devices used in this document started with a cleared (default) configuration. If your network is live, ensure that you understand the potential impact of any command.
Before You Begin
Reverting the appliance is extremely destructive.
Thia iis the data that is destroyed in the process and must be backed up:
- Current system configuration file.
- All log files (For more information visit: Access Secure Web Appliance Logs )
- All reporting data (including saved scheduled and archived reports)
- Any custom end user notification pages.
Preparing and Backing Up the SWA
Use these steps to collect the necessary files and configuration from the SWA before reverting:
Step 1. Export the Configuration File |
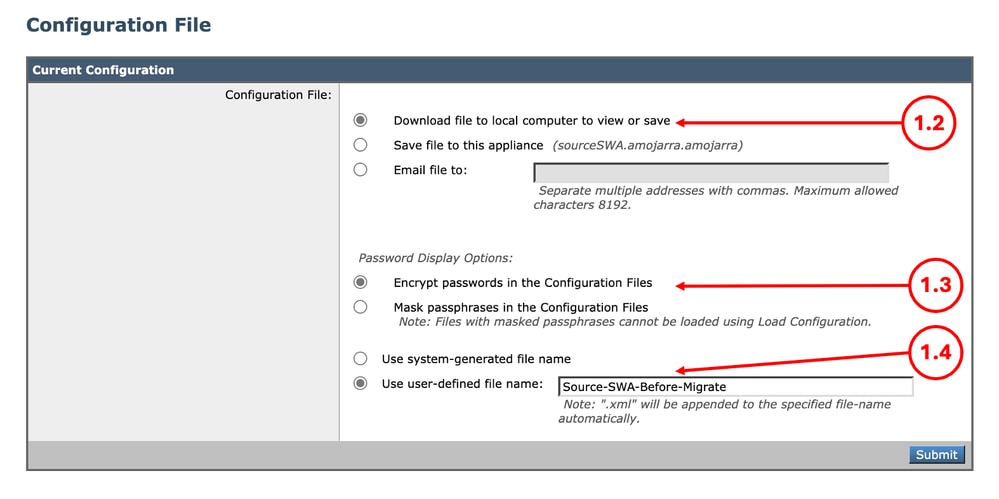
Step 1.1. From the GUI, Navigate to System Administration and choose Configuration File. Step 1.2. Make sure Download file to local computer to view or save is selected. Step 1.3. Choose Encrypt passwords in the Configuration Files Step 1.4. (Optional) Choose a name for the configuration file. Step 1.5. Click Submit.
|
Step 2. Export the Decryption Certificate |
Step 2.1. From the GUI, Navigate to Security Services and click HTTPS Proxy. Step 2.2. Click Edit Settings. Step 2.3. Download the HTTPS Decryption Certificate, by clicking Download Certificate... link.
|
Step 3. Export the Custom Trust Root Certificates |
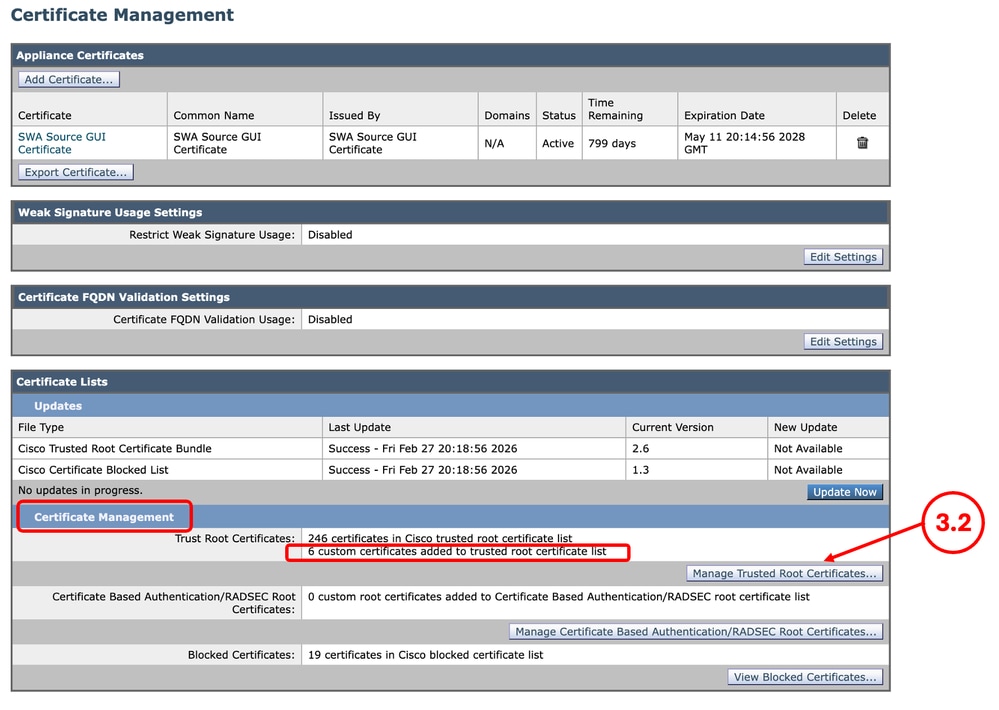
Step 3.1. From the GUI, navigate to Network and click Certificate Management. Step 3.2. In the Certificate Management section, click Manage Trusted Root Certificates.
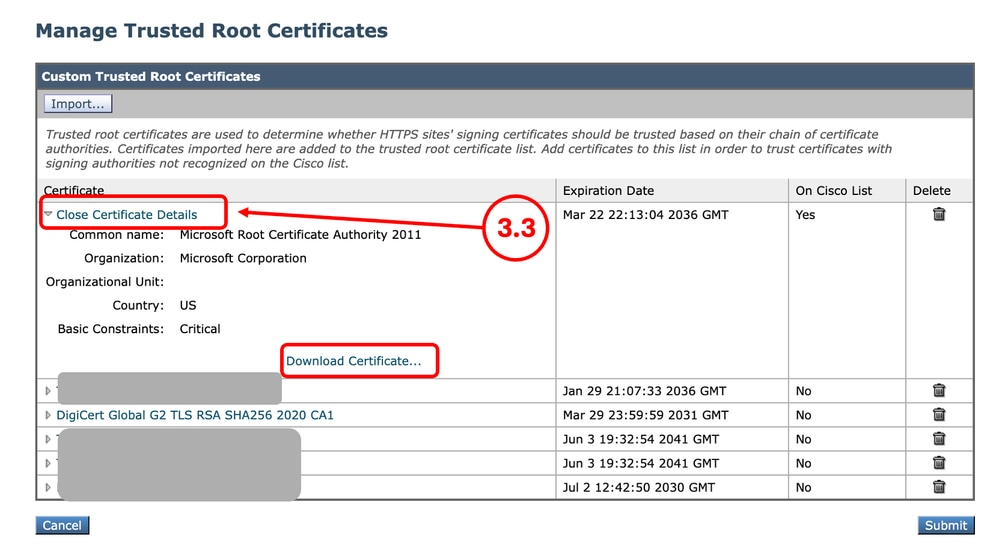
Step 3.3. Expand each Custom Trusted Root Certificates by clicking their name and click Download Certificate... |
Step 4. Export the GUI Certificate |
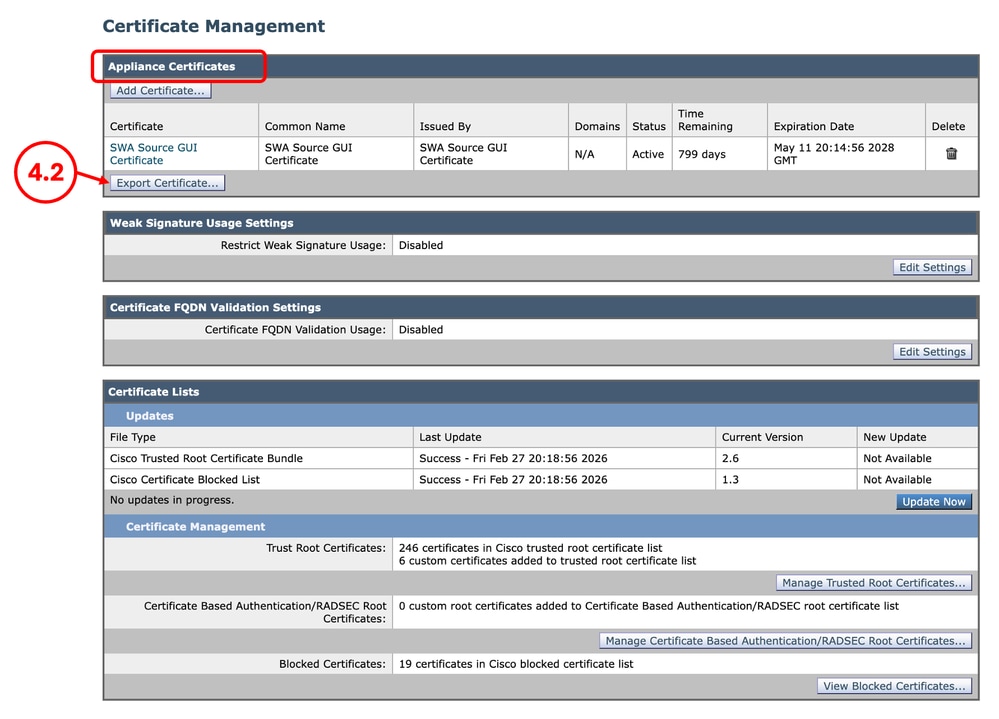
Step 4.1. From the GUI, Navigate to Network and click Certificate Management. Step 4.2. In the Appliance Certificates section, click Export Certificate.
|
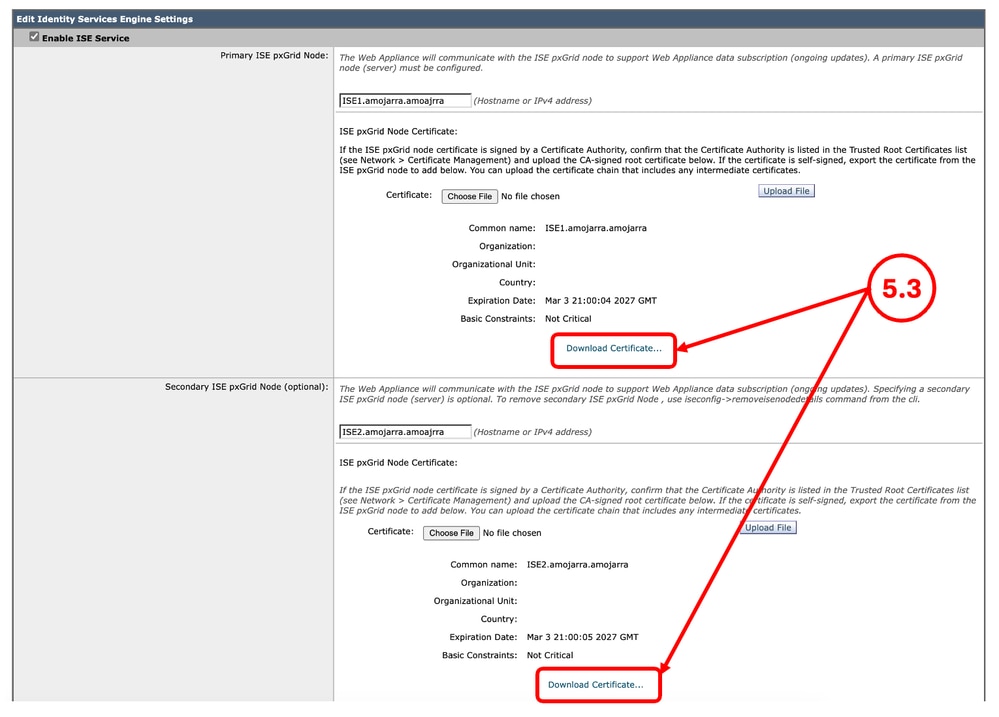
Step 5. Export the ISE Certificates |
Step 5.1. From the GUI, Navigate to Network and click Identity Services Engine. Step 5.2. Click Edit Settings. Step 5.3. Download all available certificates.
|
Step 6. Licences / Features |
Step 6.1. From the GUI, Navigate to System Administration and click Licenses or Features depends on the type of the license you are using. Step 6.2. Take a screenshot of your Licenses / Features. |
Step 7. Authentication Redirection Certificate |
Step 7.1. From the GUI, Navigate to Network and click Authentication. Step 7.2. If the Credential Encryption is enabled, Make sure you have the Certificate and the Key. Step 7.3. Take a screenshot of the current configuration.
|
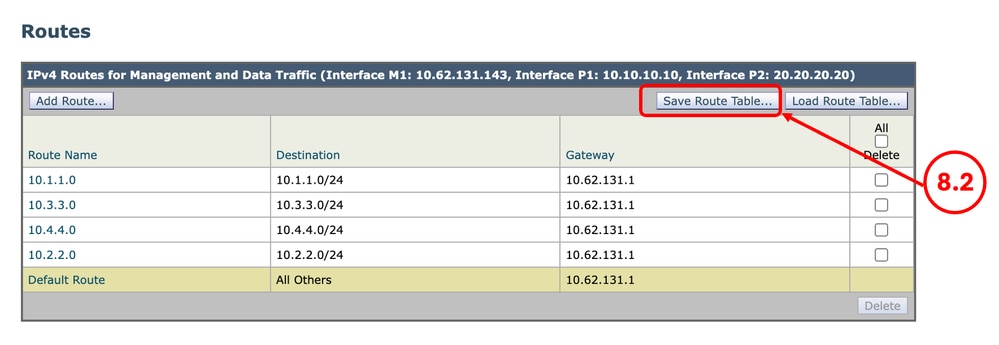
Step 8. Export Static Routes |
Step 8.1. From the GUI, Navigate to Network and click Routes. Step 8.2. For each routing table, click Save Route Table.
|
Step 9. DNS Settings |
Step 9.1. From the GUI, Navigate to Network and click DNS. Step 9.2. Take a screenshot of the DNS configuration. |


Revert the SWA
Step 10. Reverting the SWA |
Step 10.1. Connect to the CLI. Step 10.2. Type revert and press enter. Step 10.3. Type Y and press Enter for "Do you want to continue? [N]> " Step 10.4. Type Y and press Enter for "Are you sure you want to continue? [N]>" Step 10.5. Choose the Number associated with the version you want to revert back from the list and press Enter. |
Configuration Reverted SWA
Step 11. License the SWA |
Step 11.1. For more information visit: Configure Secure Web Appliance Initial Setup. |
Step 12. Run the System Setup Wizard |
Step 12.1. For more information visit: Configure Secure Web Appliance Initial Setup. |
Step 13. Import Custom Trusted Root Certificates |
Step 13.1. From the GUI, Navigate to Network and click Certificate Management. Step 13.2. In the Certificate Management section, click Manage Trusted Root Certificates. Step 13.3. Click Import. Step 13.4. Upload the certificates that previously was downloaded in Step 3. |
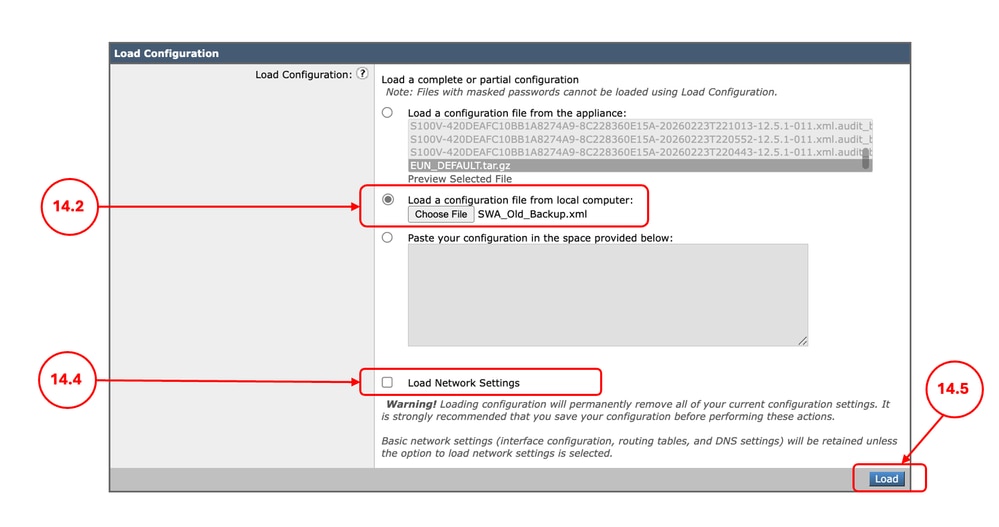
Step 14. Import the Configuration File |
Step 14.1. From the GUI, Navigate to System Administration and choose Configuration File. Step 14.2. In the Load Configuration section, Select Load a configuration file from local computer. Step 14.3. Click Choose File and select the XML configuration file related to the current version. Step 14.4. (Optional) If the revert removed the IP address and network configuration ,Select the check box Load Network Settings, else do not select this option. Step 14.5. Click Load. Step 14.6. Click Continue in the Confirm Load Configuration pop up.
Step 14.7. Commit the changes. |
Step 15. Import the Routes |
Step 15.1. From the GUI, Navigate to Network and click Routes. Step 15.2. For each routing table, click Load Route Table. Step 15.3. Choose the file you exported on Step 8. Step 15.4. Click Submit. Step 15.5. Commit the changes. |
Step 16. Configure the DNS Settings |
Step 16.1. From the GUI, Navigate to Network and click DNS. Step 16.2. Click Edit Settings. Step 16.3. Use the screenshot from Step 9 Step 16.4. Click Submit. Step 16.5. Commit the changes. |
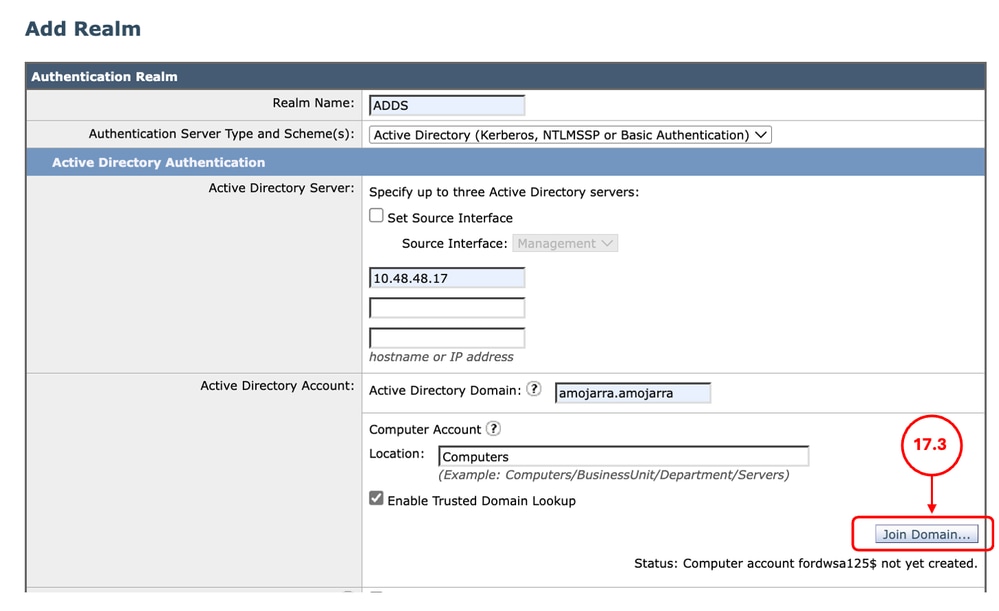
Step 17. Join/Rejoin the SWA to the Active Directory |
Step 17.1. From the GUI, Navigate to Network and click Authentication. Step 17.2. Click the name of the Authentication Realm Name. Step 17.3. Click Join Domain and enter the credentials:
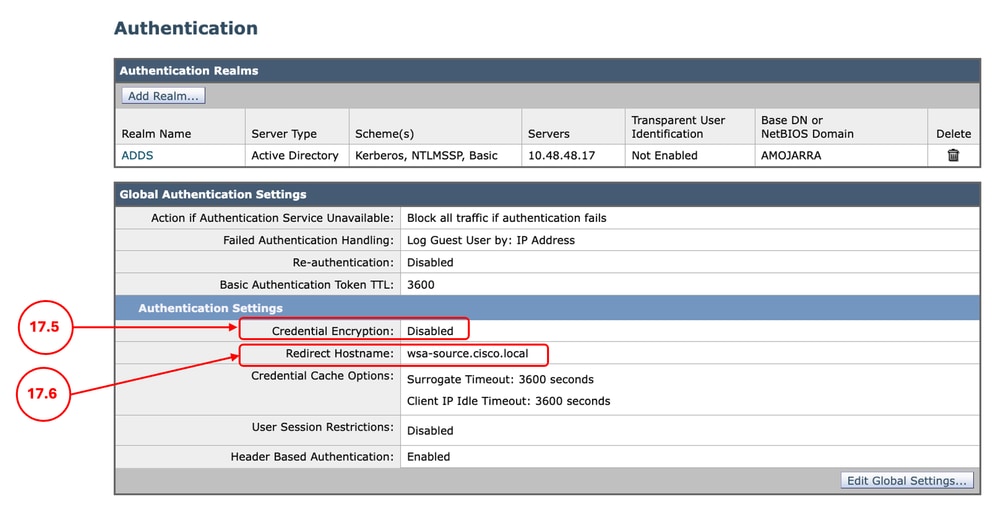
Step 17.4. Click Submit. Step 17.5. If the Credential Encryption is enabled, Import the Secure Authentication Certificate. Step 17.6. Make sure the Redirect Hostname is correct.
Step 17.7. Commit the changes. |
Related Information
Revision History
| Revision | Publish Date | Comments |
|---|---|---|
1.0 |
24-Apr-2026
|
Initial Release |
 Feedback