Deploy CSC for iOS on Additional MDM Platforms
Available Languages
Download Options
Bias-Free Language
The documentation set for this product strives to use bias-free language. For the purposes of this documentation set, bias-free is defined as language that does not imply discrimination based on age, disability, gender, racial identity, ethnic identity, sexual orientation, socioeconomic status, and intersectionality. Exceptions may be present in the documentation due to language that is hardcoded in the user interfaces of the product software, language used based on RFP documentation, or language that is used by a referenced third-party product. Learn more about how Cisco is using Inclusive Language.
Introduction
This document describes how to depoloy Cisco Security Connector for iOS on additional mobile device management platforms.
Background Information
The Cisco Security Connector (CSC) for iOS is full Umbrella DNS protection for your iPhone. Before using this guide for deployments, please read the CSC deployment documentation. Your device must be in the supervised mode to use the CSC.
This document summarizes additional mobile device management (MDM) software support for the CSC. These MDMs have been validated by a successful deployment but are not yet directly present on the Dashboard.
To verify that a profile exists on an iOS device:
- Navigate to Settings > General > Device Management > [MDM Profile Name] > More details.
- Confirm that the profile type DNS Proxy is present along with these details:
- App details:
com.cisco.ciscosecurity.app - Provider bundle details:
com.cisco.ciscosecurity.ciscoumbrella
- App details:
Read more about which iOS profile details to configure on the Apple MDM site.
All MDMs
These steps apply for deployment to all MDMs and must be completed first:
- Ensure your admin email address is added to the dashboard under the Mobile Devices page "Settings" option.
- Download the
Cisco_Umbrella_Root_CA.cerfile for use on the iOS device. This certificate allows for errorless HTTPS block pages. To obtain the Root CA:- Navigate to Deployments > Configuration > Root Certificate.
- Select Download Certificate.
- Save the download as a
.cerfile.
MobileIron Cloud
Currently, the MobileIron download on the dashboard only supports the on premise version. The Cloud version uses different device variables than the on premise software. Deployment is very similar to on premise, with several exceptions. MobileIron Core depending on version can require this modification.
To deploy to MobileIron Cloud:
- Ensure your admin email address is added to the dashboard under the Mobile Devices page "Settings" option.
- Download the Mobile Iron profile from the Umbrella dashboard.
- Replace these variables:
Generic placeholder variable
New variable
“$DEVICE_SN$”${deviceSN}“$DEVICE_MAC$”*${deviceWifiMacAddress}
*This is only used for the Clarity component of the CSC, not for the Umbrella component. If you do not use Clarity, there are no $DEVICE_MAC$ to replace.
Citrix Endpoint Management MDM
To deploy to Citrix, complete these preparation steps in the dashboard:
- Ensure your admin email address is added to the dashboard under the Mobile Devices page "Settings" option.
- Download the generic MDM configuration from Umbrella (AMP is configured in the same way).
- Download the root certificate for Umbrella:
- Navigate to Deployments > Configuration > Root Certificate.
- Select Download Certificate.
- Save the download as a
.cerfile.
- Modify the configuration & replace the generic placeholder with the correct variable for the Citrix MDM:
Generic placeholder variable
New variable
Serial_Number${device.serialnumber}MAC_Address*${device.MAC_ADDRESS}
*This is only used for the Clarity component of the CSC, not for the Umbrella component.
Then, complete these MDM steps:
- Configure the MDM to install the CSC app using Apple Business Manager (ABM) (formerly known as VPP, Volume Purchase Program).
- Upload the Umbrella and/or Clarity configuration modified in the preparation steps.
- Use the steps in the Citrix documentation to import the profile.
- Upload the certificate for the device to trust the Umbrella Root Certificate Authority.
- Configure the policies to push the profiles, 1 CA, and the 1 CSC app to the required device(s).
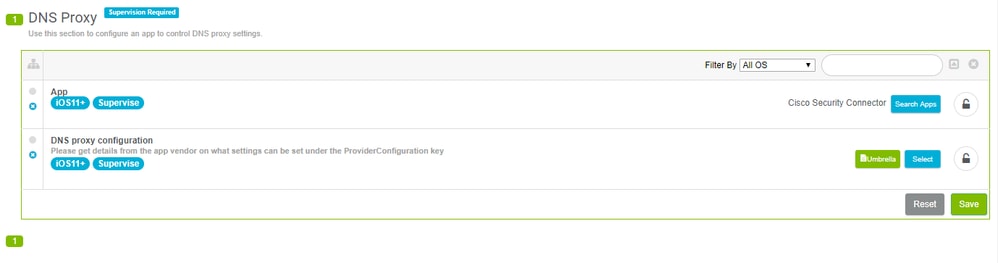
Lightspeed MDM
Lightspeed MDM supports text-based configuration of the iOS DNS proxy. This can be accomplished by modifying the generic MDM profile.
- Download the “generic mobileconfig file” and change the file extension from .xml to .txt.
- Open the file and change the placeholder serial number string on line 58 to
%serial_number% - In Lightspeed, add the Cisco Security Connection to the DNS Proxy Profile as shown
 360019477192
 - Add the modified generic mobileconfig file to the DNS proxy configuration option underneath the app.
 360019477152
 - Finally, download the Cisco Root CA from Umbrella and deploy it in Lightspeed to ensure certificate-free block pages.
 360019477132
These steps apply for deployment to all MDMs. Please use these steps first.
JAMF Schools
Deploying CSC with JAMF Schools differs from JAMF. Start with the generic profile and see the steps in the JAMF documentation.
Here is an example configuration of where to select and which variable to use for the serial number:
<?xml version="1.0" encoding="UTF-8"?><!DOCTYPE plist PUBLIC "-//Apple//DTD PLIST 1.0//EN" "http://www.apple.com/DTDs/PropertyList-1.0.dtd"><plist version="1.0"><dict> <key>PayloadContent</key> <dict> <key>AppBundleIdentifier</key> <string>com.cisco.ciscosecurity.app</string> <key>PayloadDescription</key> <string>Cisco Umbrella</string> <key>PayloadDisplayName</key> <string>Cisco Umbrella</string> <key>PayloadIdentifier</key> <string>com.apple.dnsProxy.managed.{pre-filled in the download}</string> <key>PayloadType</key> <string>com.apple.dnsProxy.managed</string> <key>PayloadUUID</key> <string>{pre-filled in the download}</string> <key>PayloadVersion</key> <integer>1</integer> <key>ProviderBundleIdentifier</key> <string>com.cisco.ciscosecurity.app.CiscoUmbrella</string> <key>ProviderConfiguration</key> </dict> <array> <dict> <key>disabled</key> <false/> <!-- Copy from here to paste into the Jamf School UI to provision a DNS proxy --> <dict> <key>disabled</key> <false/> <key>internalDomains</key> <array> <string>10.in-addr.arpa</string> <string>16.172.in-addr.arpa</string> <string>17.172.in-addr.arpa</string> <string>18.172.in-addr.arpa</string> <string>19.172.in-addr.arpa</string> <string>20.172.in-addr.arpa</string> <string>21.172.in-addr.arpa</string> <string>22.172.in-addr.arpa</string> <string>23.172.in-addr.arpa</string> <string>24.172.in-addr.arpa</string> <string>25.172.in-addr.arpa</string> <string>26.172.in-addr.arpa</string> <string>27.172.in-addr.arpa</string> <string>28.172.in-addr.arpa</string> <string>29.172.in-addr.arpa</string> <string>30.172.in-addr.arpa</string> <string>31.172.in-addr.arpa</string> <string>168.192.in-addr.arpa</string> <string>local</string> </array> <key>logLevel</key> <string>verbose</string> <key>orgAdminAddress</key> <string>{pre-filled in the download}</string> <key>organizationId</key> <string>{pre-filled in the download}</string> <key>regToken</key> <string>{pre-filled in the download}</string> <key>serialNumber</key> <string>%SerialNumber%</string> </dict> <!-- End copy --> </dict> </array> <key>PayloadDisplayName</key> <string>Cisco Security</string> <key>PayloadIdentifier</key> <string>com.cisco.ciscosecurity.app.CiscoUmbrella.{pre-filled in the download}</string> <key>PayloadRemovalDisallowed</key> <false/> <key>PayloadType</key> <string>Configuration</string> <key>PayloadUUID</key> <string>{pre-filled in the download}</string> <key>PayloadVersion</key> <integer>1</integer></dict></plist>- Create a new profile in JAMF School.
For more information, see the JAMF documentation on Device Profiles. - Use the DNS Proxy payload to configure these settings:
-
In the App Bundle ID field, enter
com.cisco.ciscosecurity.app. -
In the Provider Bundle ID field, enter
com.cisco.ciscosecurity.app.CiscoUmbrella.
-
-
Add the XML file you created in step 2 of the JAMF documentation to the Provider Configuration.
JAMF Earlier Than 10.2.0
Deploying the CSC with JAMF requires significant profile modification. Use these steps to deploy the CSC with JAMF MDM.
- Ensure your admin email address is added to the dashboard under the Mobile Devices page Settings option.
- Add the Umbrella root CA:
- Navigate to Deployments > Configuration > Root Certificate.
- Select Download Certificate.
- Save the download as a .cer file.
- Provide a name for the certificate and select Upload Certificate.
- Upload the .cer and leave the password field blank.
- Apply to the scope of your devices to push out this certificate.
- Download the generic profile from the Umbrella dashboard.
- If you are using JAMF Pro v.10.2.0 or higher, you can skip this step. You can import as-is by adding these:
<key>serialNumber</key>
<string>$SERIALNUMBER</string>
<key>label</key>
<string>$DEVICENAME</string> - If you are using a JAMF version earlier than v.10.2.0, edit the XML profile extensively as shown in this example profile. Do not copy this example, it is not functional as-is. Only use the generic download configuration from your dashboard.
<?xml version="1.0" encoding="UTF-8"?>
<!DOCTYPE plist PUBLIC "-//Apple//DTD PLIST 1.0//EN" "http://www.apple.com/DTDs/PropertyList-1.0.dtd">
<plist version="1.0">
<dict>
<key>PayloadContent</key>
<array>
<dict>
<key>AppBundleIdentifier</key>
<string>com.cisco.ciscosecurity.app</string>
<key>PayloadDescription</key>
<string>Cisco Umbrella</string>
<key>PayloadDisplayName</key>
<string>Cisco Umbrella</string>
<key>PayloadIdentifier</key>
<string>com.apple.dnsProxy.managed.DBE2A157-E134-3E8C-B4FB-23EDF48A0CD1</string>
<key>PayloadType</key>
<string>com.apple.dnsProxy.managed</string>
<key>PayloadUUID</key>
<string>59401AAF-CDBF-4FD7-9250-443A58EAD706</string>
<key>PayloadVersion</key>
<integer>1</integer>
<key>ProviderBundleIdentifier</key>
<string>com.cisco.ciscosecurity.app.CiscoUmbrella</string>
<key>ProviderConfiguration</key>
<dict>
<key>disabled</key>
<false/>
<key>internalDomains</key>
<array>
<string>10.in-addr.arpa</string>
<string>16.172.in-addr.arpa</string>
<string>17.172.in-addr.arpa</string>
<string>18.172.in-addr.arpa</string>
<string>19.172.in-addr.arpa</string>
<string>20.172.in-addr.arpa</string>
<string>21.172.in-addr.arpa</string>
<string>22.172.in-addr.arpa</string>
<string>23.172.in-addr.arpa</string>
<string>24.172.in-addr.arpa</string>
<string>25.172.in-addr.arpa</string>
<string>26.172.in-addr.arpa</string>
<string>27.172.in-addr.arpa</string>
<string>28.172.in-addr.arpa</string>
<string>29.172.in-addr.arpa</string>
<string>30.172.in-addr.arpa</string>
<string>31.172.in-addr.arpa</string>
<string>168.192.in-addr.arpa</string>
<string>local</string>
<string>cisco.com</string>
</array>
<key>logLevel</key>
<string>{pre-filled in the download}</string>
<key>orgAdminAddress</key>
<string>{pre-filled in the download}</string>
<key>organizationId</key>
<string>{pre-filled in the download}</string>
<key>regToken</key>
<string>{pre-filled in the download}</string>
<key>serialNumber</key>
<string>$SERIALNUMBER</string>
<key>label</key>
<string>$DEVICENAME</string>
</dict>
</dict>
</array>
<key>PayloadDisplayName</key>
<string>Cisco Security</string>
<key>PayloadIdentifier</key>
<string>com.cisco.ciscosecurity.app.CiscoUmbrella.{pre-filled in the download}</string>
<key>PayloadRemovalDisallowed</key>
<false/>
<key>PayloadType</key>
<string>Configuration</string>
<key>PayloadUUID</key>
<string>{pre-filled in the download}</string>
<key>PayloadVersion</key>
<integer>{pre-filled in the download}</integer>
</dict>
</plist> - Import to JAMF:
- Under the main MDM configuration window, click New to create a new profile.

Note: This must be a separate profile and must not be used with the certificate profile created. For the app to work, these two profiles must be pushed to the device separately.
- Name the profile and navigate to DNS Proxy.
- Under the DNS proxy, click Configure.
- Set the proxy configuration to Umbrella details:
-
In the App Bundle ID field, enter
com.cisco.ciscosecurity.app. -
In the Provider Bundle ID field, enter
com.cisco.ciscosecurity.app.CiscoUmbrella. -
Paste the edited XML content from Umbrella
into the Provider Configuration
XML section.
-
-
Click Scope and apply to the proper scope of devices.
- Under the main MDM configuration window, click New to create a new profile.
InTune
InTune is directly added to the Umbrella dashboard. Please review the Umbrella InTune documentation for more information.
Note: Clarity is a product of Cisco AMP for Endpoints. If you are not currently licensed for this product, please skip the related setup portion.
Mosyle
Mosyle support is in the form of the DNS Proxy configuration:
-
In the App Bundle ID field, enter
com.cisco.ciscosecurity.app. -
In the Provider Bundle ID field, enter
com.cisco.ciscosecurity.app.CiscoUmbrella.
Add the content within the XML <key>ProviderConfiguration</key> to the Mosyle Provider Configuration field:
<dict>
<key>anonymizationLevel</key>
<integer>0</integer>
***
<key>serialNumber</key>
<string>%SerialNumber%</string>
</dict>
Note: The settings require the devices to be scoped to receive the configuration, and scopes are not added by default.
Securly
Configure Securly on the DNS Proxy profile page:
- In the App Bundle ID field, enter
com.cisco.ciscosecurity.app - In the Provider Bundle ID field , enter
com.cisco.ciscosecurity.app.CiscoUmbrella
Use these steps to configure the .plist file:
- Start with the iOS Common Config template and edit the file into a
.plistwith only the<dict>through</dict>inside the<key>ProviderConfiguration</key>comments. - Replace the
serialNumberkey with the$serialnumbervariable as defined by Securly. - The
.plistfile content can look very similar to this example. Upload this to the DNS Proxy configuration:
<plist version="1.0"><dict><key>anonymizationLevel</key><integer>0</integer><key>disabled</key><false/><key>internalDomains</key><array><string>10.in-addr.arpa</string><string>16.172.in-addr.arpa</string><string>17.172.in-addr.arpa</string><string>18.172.in-addr.arpa</string><string>19.172.in-addr.arpa</string><string>20.172.in-addr.arpa</string><string>21.172.in-addr.arpa</string><string>22.172.in-addr.arpa</string><string>23.172.in-addr.arpa</string><string>24.172.in-addr.arpa</string><string>25.172.in-addr.arpa</string><string>26.172.in-addr.arpa</string><string>27.172.in-addr.arpa</string><string>28.172.in-addr.arpa</string><string>29.172.in-addr.arpa</string><string>30.172.in-addr.arpa</string><string>31.172.in-addr.arpa</string><string>168.192.in-addr.arpa</string><string>local</string></array><key>logLevel</key><string>{pre-filled in the download}</string><key>orgAdminAddress</key><string>{pre-filled in the download}</string><key>organizationId</key><string>{pre-filled in the download}</string><key>regToken</key><string>{pre-filled in the download}</string><key>serialNumber</key><string>$serialnumber</string></dict></plist>Revision History
| Revision | Publish Date | Comments |
|---|---|---|
1.0 |
23-Sep-2025
|
Initial Release |
Contributed by Cisco Engineers
 Feedback
Contact Cisco
- Open a Support Case

- (Requires a Cisco Service Contract)