Introduction
This document describes how to capture network traffic with Wireshark.
Prerequisites
Requirements
There are no specific requirements for this document.
Components Used
The information in this document is based on Umbrella DNS Layer Security.
The information in this document was created from the devices in a specific lab environment. All of the devices used in this document started with a cleared (default) configuration. If your network is live, ensure that you understand the potential impact of any command.
Overview
There are times when Cisco Umbrella Support staff asks for a packet capture of Internet traffic flowing between your computer and the network. The capture allows Umbrella support to analyse the traffic at a low level and identify potential problems.
In most cases it is useful to compare two sets of packet captures demonstrating both a working and non-working scenario.
- Ensure you can replicate the problem and complete these steps whilst the issue is occurring. Generate a packet capture showing a non-working scenario. Please note the date and time with timezone so that this info can be correlated with other data.
- If possible, repeat these instructions with Umbrella software (and/or Umbrella DNS forwarding) disabled. Generate a packet capture showing the working scenario. Please note the date and time with timezone so that this info can be correlated with other data.
Wireshark Instructions
Preparations
- Download Wireshark.
- Disconnect any unnecessary network connections.
- Disconnect VPN connections unless they are required to replicate the problem.
- Use only wired or wireless connection and not both together.
- Close any other software that is not required to replicate the problem.
- Clear the Cookies and Cache from your browser.
- Flush your DNS Cache. On Windows with the command:
ipconfig /flushdns
Basic Wireshark Capture
- Launch Wireshark.
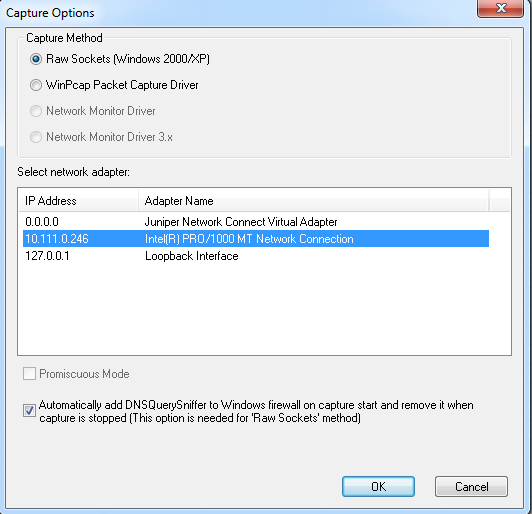
- The Capture panel shows your network interfaces. Select the relevant interfaces. Multiple interfaces can be selected using the CTRL key (WIndows) or CMD key (Mac) while selecting.
 wireshark_1.png

Caution: It is important to select the correct interface(s) that contain network traffic. Use the "ipconfig" command (Windows) or "ifconfig" command (Mac) to view more details about your network interfaces. Roaming Client users must additionally select the NPCAP Loopback Adapter OR Loopback: lo0 interfaces. If in doubt, select all interfaces.
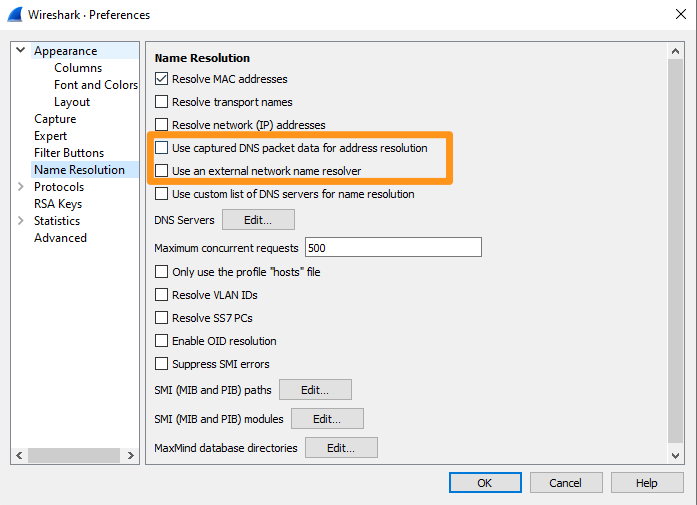
- Ensure that Use captured DNS packet data for address resolution and Use an external network name resolver are NOT selected to ensure Wireshark is not making DNS queries as this can complicate the capture and affect AnyConnect. Settings are valid as of Wireshark 3.4.9:
 Capture_PNG.png
- Select Capture > Start or select the Blue start icon.
 wireshark_2.png
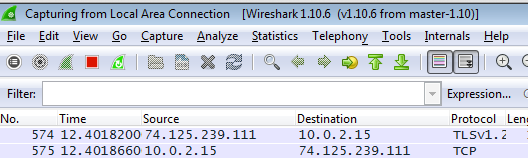
- While Wireshark is running in the background, replicate the problem.
 wireshark_3.png
- Once the issue has been fully replicated, select Capture > Stop or use the red Stop icon.
- Navigate to File > Save As and select a place to save the file. Ensure that the file is saved as a PCAPNG type. The saved file can be submitted to Cisco Umbrella support for review.
Roaming Client - Additional Steps
There are additional steps that must be completed for both standalone Roaming Client and AnyConnect Roaming Module users:
Loopback Traffic
When selecting an interface, you must also capture traffic on the loopback interface (127.0.0.1) in addition to other network interfaces. The Roaming Client's DNS proxy listens on this interface, so it is vital to see traffic going between the operating system and the Roaming Client.
- Windows: Select NPCAP Loopback Adapter
- Mac: Select Loopback: lo0
Caution: Newer Windows versions of Wireshark ship with the NPCAP capture driver, which supports the loopback driver. If the loopback adapter is missing, update to the latest version of Wireshark or use the rawcap.exe instructions.
Encrypted DNS Traffic
In normal circumstances, the traffic between the Roaming Client and Umbrella is encrypted and not human readable. In some cases, Umbrella support can request that you disable DNS encryption to see the DNS traffic between the Roaming Client and Umbrella cloud. There are two methods to do this:
- Create a local firewall block for UDP 443 to 208.67.220.220 and 208.67.222.222.
- Or, create the file depending on your OS and version of the Roaming Client:
- Windows:
C:\ProgramData\OpenDNS\ERC\force_transparent.flag
- Windows AnyConnect:
C:\ProgramData\Cisco\Cisco AnyConnect Secure Mobility Client\Umbrella\data\force_transparent.flag
- Windows Secure Client:
C:\ProgramData\Cisco\Cisco Secure Client\Umbrella\data\force_transparent.flag
- macOS:
/Library/Application Support/OpenDNS Roaming Client/force_transparent.flag
- mac OS AnyConnect:
/opt/cisco/anyconnect/umbrella/data/force_transparent.flag
- mac OS Secure Client:
/opt/cisco/secureclient/umbrella/data/force_transparent.flag
After doing this, restart the service or your computer.
Caution: Newer versions of Wireshark on Windows include NPCAP capture driver ,which does not support the Umbrella VPN interface. On Windows, you might need to use the rawcap.exe tool as an alternative.
DNSQuerySniffer - Windows Alternative
DNSQuery Sniffer is a DNS-only network sniffer for Windows which monitors and displays tons of useful data. Unlike Wireshark or Rawcap, it is only used for DNS, and is much easier to examine and extract relevant information. However, it does not have the powerful filtering tools of Wireshark.
This is a lightweight and easy-to-use tool. An advantage of using this is that you can sniff packets while the Roaming Client service is disabled, start the capture, and you can see every DNS query that the Roaming Client sends from the moment it starts rather than starting a capture after the Roaming Client has already started.
There are two capture methods:
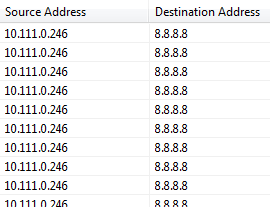
- If you select the regular network interface, you can see only queries that are on the Internal Domains list, or that did not specifically go through the dnscryptproxy.
 dns_1.png

Note: These columns appear way to the right in the capture and you have to scroll over quite a bit to see them.
 DNSSniffer columns
- If you select the Loopback interface, you see all DNS queries that are sent through the dnscryptproxy, but you cannot see the true destination IP address for domains on the Internal Domains list. It still, however, displays the query and answer.
 dns_2.jpg
Note: These columns appear way to the right in the capture, and you have to scroll over quite a bit to see them.
 DNSSniffer columns
The results look like this:
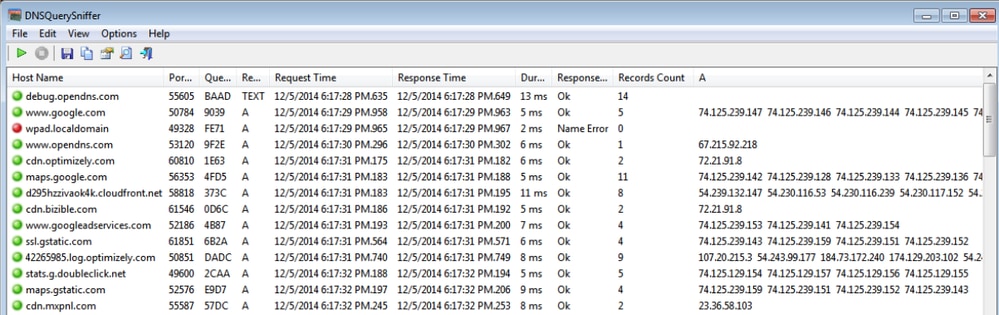 dns_3.png
View of an individual lookup:
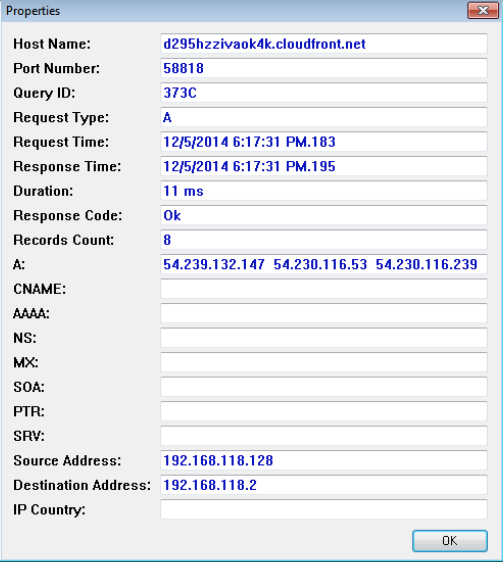 dns_4.png
RawCap.exe - Windows Alternative
In some circumstances, the interface you need to work with is not supported by the packet capture driver included with Wireshark. This can be a problem for the loopback interface.
In these instances, we can use RawCap.exe:
- Complete the steps from earlier in the article to use Wireshark to capture normal traffic.
- At the same time, run RawCap.exe.
- Select the interface by specifying the corresponding list number.
- Specify an output filename and off it goes.
- SelectControl-Cwhen you want to stop the capture.
The saved file is placed in the folder from which you ran RawCap.exe:
 rawcap_1.jpg
 Feedback