Configure NetFlow in FMC
Available Languages
Introduction
This document describes how to configure Netflow in the Cisco Secure Firewall Management Center running version 7.4 or higher.
Prerequisites
Requirements
Cisco recommends that you have knowledge of these topics:
- NetFlow Protocol
- Cisco Secure Firewall Threat Defense (FTD)
- Cisco Secure Firewall Management Center (FMC)
Components Used
The information in this document is based on these software and hardware versions:
-
- Secure Firewall Runs v7.4.1
Secure Firewall Management Center for VMWare runs v7.4.1
The information in this document was created from the devices in a specific lab environment. All of the devices used in this document started with a cleared (default) configuration. If your network is live, ensure that you understand the potential impact of any command.
Background Information
Specific requirements for this document include:
- Cisco Secure Firewall Threat Defense running version 7.4 or higher
- Cisco Secure Firewall Management Center running version 7.4 or higher
Add Collector in NetFlow
Step 1. Navigate to Devices > Platform Settings:
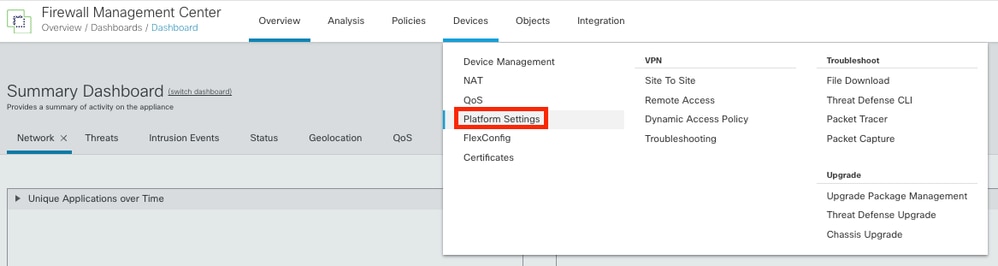 Accessing Platform Settings
Step 2. Edit the Platform Settings Policy assigned to the Monitor Device:
 Policy Edition
Step 3. Choose Netflow:
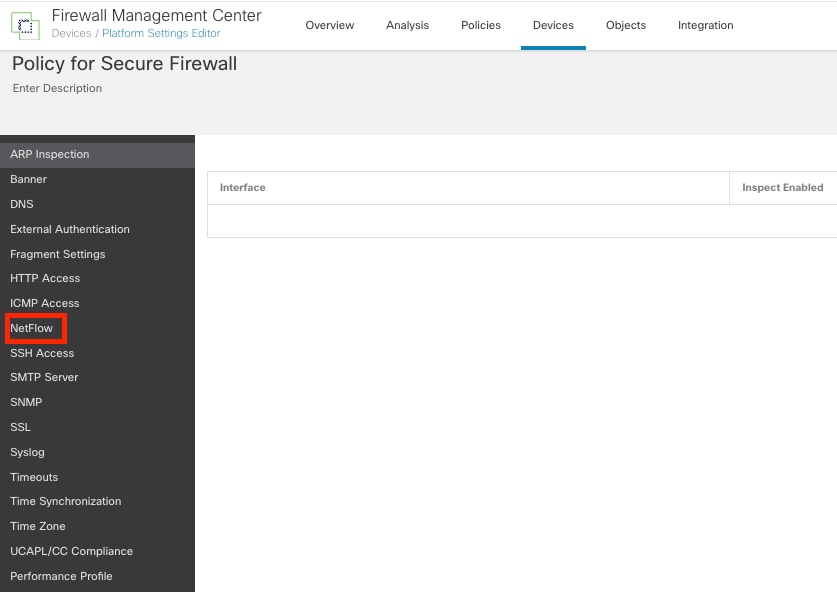 Accessing NetFlow Settings
Step 4. Enable the Flow Export toggle to enable the NetFlow data export:
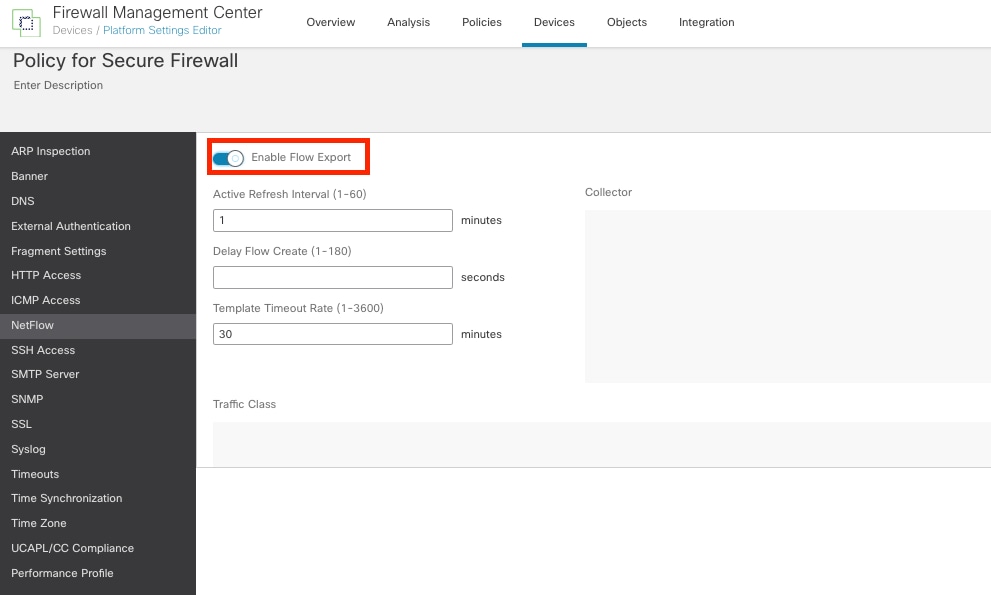 Enabling NetFlow
Step 5. Click Add Collector:
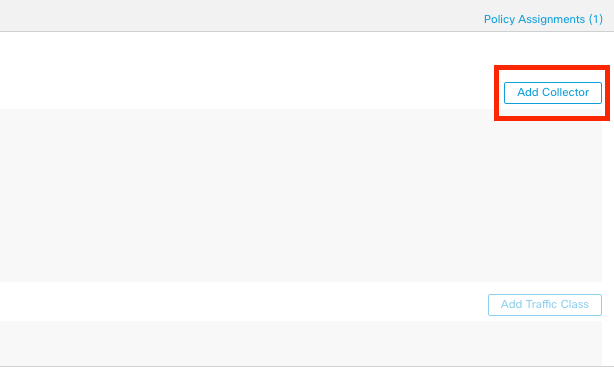 Adding Collector
Step 6. Choose the Collector Host IP Object of the NetFlow event collector. Then select the UDP port on the collector where the NetFlow packets must be sent and choose the Interface Group where the collector must be reached, and click OK:
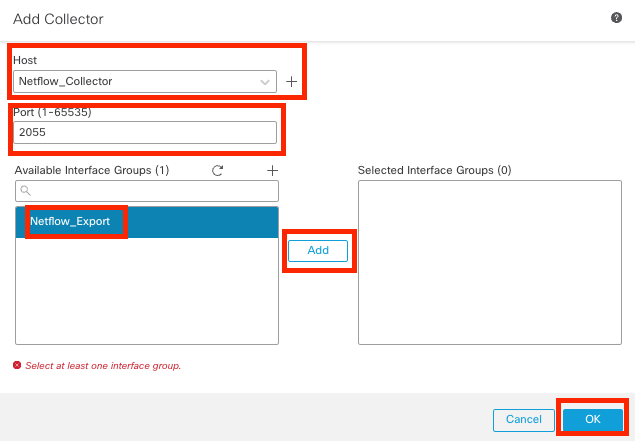 Collector Settings
Add Traffic Class to NetFlow
Step 1. Click Add Traffic Class:
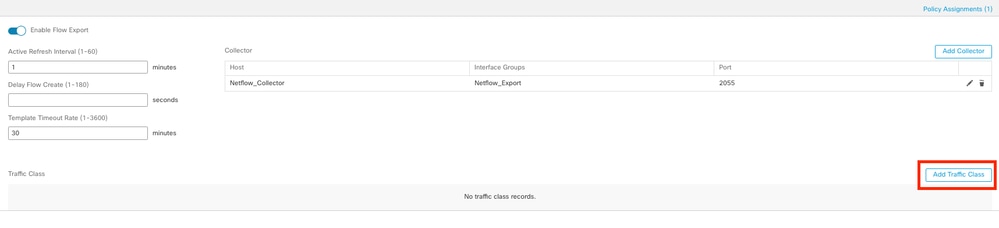 Adding Traffic Class
Step 2. Enter the Name field of the traffic class that must match the NetFlow events. Enter the ACL to specify the traffic class that must match the traffic captured for the NetFlow events. And select the checkboxes for the different NetFlow events you want to send to the collectors and click OK:
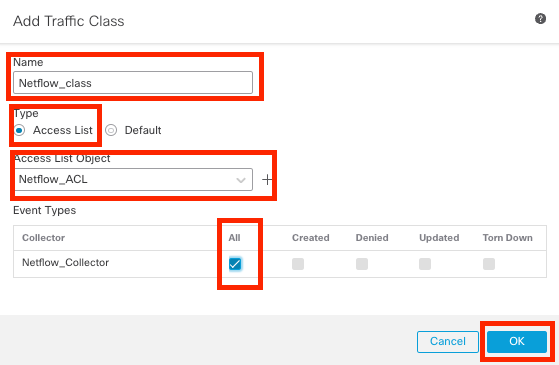 Traffic Class Settings
Deploy
Save and Deploy the changes to your FTD.
Troubleshooting
Step 1. You can verify the configuration from FTD CLI.
1.1. From FTD CLI, enter to system support diagnostic-cli:
>system support diagnostic-cli
1.2 Check policy-map configuration:
firepower#show running-config policy-map
!
policy-map type inspect dns preset_dns_map
parameters
message-length maximum client auto
message-length maximum 512
no tcp-inspection
policy-map type inspect ip-options UM_STATIC_IP_OPTIONS_MAP
parameters
eool action allow
nop action allow
router-alert action allow
policy-map global_policy
class inspection_default
inspect dns preset_dns_map
inspect ftp
inspect h323 h225
inspect h323 ras
inspect rsh
inspect rtsp
inspect sqlnet
inspect skinny
inspect sunrpc
inspect sip
inspect netbios
inspect tftp
inspect icmp
inspect icmp error
inspect ip-options UM_STATIC_IP_OPTIONS_MAP
class class_snmp
inspect snmp
class Netflow_class_Netflow_ACL
flow-export event-type all destination 192.168.31.1
class class-default
set connection advanced-options UM_STATIC_TCP_MAP
!
1.3. Check the flow-export configuration:
firepower#show running-config flow-export
flow-export destination Inside 192.168.31.1 2055

Note: In this example, "Inside", is the name of the interface configured in the Interface Group called Netflow_Export.
Step 2. Verify the hit count for the ACL:
firepower#show access-list Netflow_ACL
access-list Netflow_ACL; 1 elements; name hash: 0xbad5d4bf
access-list Netflow_ACL line 1 extended permit ip object Inside_Network any (hitcnt=44) 0xb704fc5b
access-list Netflow_ACL line 1 extended permit ip 10.1.2.0 255.255.255.0 any (hitcnt=44) 0xb704fc5b
Step 3. Verify Netflow counters:
firepower#show flow-export counters

destination: Inside 192.168.31.1 2055
Statistics:
packets sent                                              101
Errors:
block allocation failure                                    0
invalid interface                                           0
template send failure                                       0
no route to collector                                       0
failed to get lock on block                                 0
source port allocation failure                              0
Related Information
Revision History
| Revision | Publish Date | Comments |
|---|---|---|
3.0 |
28-Sep-2026
|
Updated spelling/grammar, inserted horizontal lines to separate sections for readability. |
2.0 |
10-Apr-2025
|
Updated Formatting. |
1.0 |
02-Feb-2024
|
Initial Release |

 Feedback
Contact Cisco
- Open a Support Case

- (Requires a Cisco Service Contract)