Generate and Configure Self-Signed Certificates for ESA/SMA SAML SSO
Available Languages
Introduction
This document describes how to create self-signed certificates for Security Assertion Markup Language (SAML) Service Provider (SP) configuration.
Prerequisites
Use this document to generate self-signed certificates for Security Assertion Markup Language (SAML) 2.0 Single Sign-On (SSO) Service Provider (SP) configuration on Email Security Appliance (ESA) and Security Management Appliance (SMA).
Requirements
Method 1 (ESA Web UI): ESA administrative access in the Web UI and permission to manage certificates.
Method 2 (OpenSSL command): OpenSSL installed and available from the command line.
Windows: Install OpenSSL.
macOS, Linux, or Unix: OpenSSL is typically available by default or through the operating system package manager.
Components Used
There are no specific hardware and software requirements.
The information in this document was created from the devices in a specific lab environment. All of the devices used in this document started with a cleared (default) configuration. If your network is live, ensure that you understand the potential impact of any command.
Background Information
This document applies to Email Security Appliance (ESA) and Security Management Appliance (SMA) deployments that use Security Assertion Markup Language (SAML) 2.0 Single Sign-On (SSO). SAML SP configuration requires Secure Sockets Layer (SSL) certificates for the Service Provider setup. Certificates can come from internal certificate tools, a certificate authority (CA), or a self-signed certificate.
Problem
Self-signed certificates are required in some SAML SP deployments for ESA and SMA. This document describes how to create the certificate and private key, and optionally encrypt the private key with a passphrase.
Resolution
- On Windows, install OpenSSL for Windows. There are tutorials available online with instructions on how to do this.
- On Unix, macOS, and Linux, OpenSSL is typically available by default.
- Use the ESA Web UI method when ESA already manages the certificate and the certificate must be exported for SAML SP use.
- Use the OpenSSL command method when a certificate and key pair must be created directly from the command line.
Method 1: Create and Export a Self-signed Certificate in the ESA Web UI
Use this method when ESA already manages the certificate and the certificate must be exported for SAML SP use.
Create the certificate.
1. In the ESA Web UI, navigate to Network > Certificates. Select Add Certificate, then Select Create Self-Signed Certificate.
2. Enter the template fields: Common Name, Organization, Organizational Unit, City, State, Country, and Duration (1-18250 days).
3. Set Private Key Size to 2048.
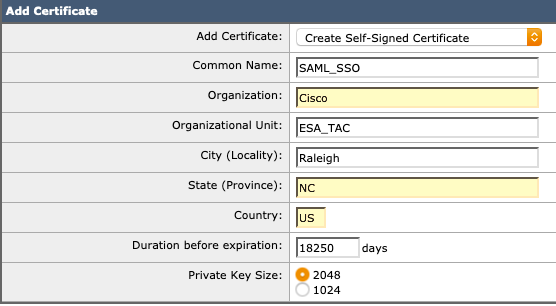 Complete Self-Signed Certificate Template
4. Submit the certificate, review the result, and Select Commit Changes.
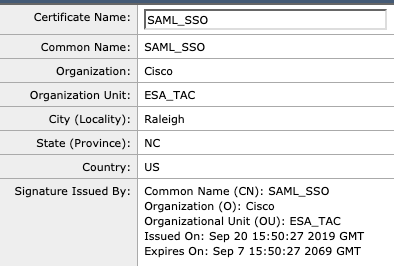 View after Configuration
Export the certificate.
1. In the ESA Web UI, navigate to Network > Certificates > Export Certificate.
2. Select the certificate to export, create a passphrase, select Export, and save the file to a directory.

Note: SAML SSO for Administration can import PKCS#12 (PFX) certificates. If private key encryption is not required, the remaining conversion steps are optional.
Convert the certificate.
The exported certificate is in PKCS#12/PFX format and requires conversion to Privacy-Enhanced Mail (PEM).
Run this OpenSSL command to convert the PFX file to PEM format.
openssl pkcs12 -in <certname>.pfx -nokeys -out cert.pem -nodes
openssl pkcs12 -in SAML_SSO.pfx -out UNIX_FULL.pem -nodes
Edit the contents and split the output into two files.
1. The newly converted file requires minor editing.
2. Open two blank files in a text editor and name them <name>.crt and <name>.key.
3. Copy the section -----BEGIN CERTIFICATE----- through -----END CERTIFICATE----- from the converted file.
4. Paste the contents into the <name>.crt file and save it.
5. Copy the section -----BEGIN PRIVATE KEY----- through -----END PRIVATE KEY----- from the converted file.
6. Paste the contents into the <name>.key file and save it.
7. The certificate and key can now be loaded into the SAML SP portion of the configuration.
Method 2: Use the OpenSSL Command to Create a Self-signed Certificate and Key Pair
Use this method when a certificate and key pair must be created directly from the command line.
Create the certificate and key pair.
Run the OpenSSL command in a Unix, Linux, or macOS command-line interface. Replace domain with the required name.
openssl req -newkey rsa:2048 -nodes -keyout domain.key -x509 -days 1095 -out domain.crt
During creation, prompts for the fields listed are displayed.
Two files are generated in the directory where the command runs: saml_ssl.crt and saml_ssl.key.
$ openssl req -newkey rsa:2048 -nodes -keyout saml_sso.key -x509 -days 1095 -out saml_sso.crt
Generating a 2048 bit RSA private key
..........+++
................................................................................................................................+++
writing new private key to 'saml_sso.key'
-----
You are about to be asked to enter information that will be incorporated
into your certificate request.
What you are about to enter is what is called a Distinguished Name or a DN.
There are quite a few fields but you can leave some blank
For some fields there will be a default value,
If you enter '.', the field will be left blank.
-----
Country Name (2 letter code) []:US
State or Province Name (full name) []:NC
Locality Name (for example, city) []:Raleigh
Organization Name (for example, company) []:Cisco
Organizational Unit Name (for example, section) []:ESA_TAC
Common Name (for example, fully qualified host name) []:SAML_SSO
Email Address []:user@example.com
Encrypt the private key (optional; not required for configuration).
Note: Do not reuse example passphrases. This key is for example purposes only.
This OpenSSL command takes an unencrypted private key (unencrypted.key) and outputs an encrypted key (encrypted.key):
openssl rsa -des3 -in unencrypted.key -out encrypted.key
openssl rsa -des3 -in saml_sso.key -out saml_secure.key
$ openssl rsa -des3 -in saml_sso.key -out saml_secure.key
writing RSA key
Enter PEM pass phrase:
Verifying - Enter PEM pass phrase:


$ ls

saml_sso.crt
saml_sso.key
saml_secure.key
The certificate and key are ready for the SAML SSO SP or Spam SSO SP setup.
Related Information
Cisco Email Security Appliance - End-User Guides
Cisco Content Security Management Appliance - End-User Guides
Cisco Web Security - End-User Guides
Revision History
| Revision | Publish Date | Comments |
|---|---|---|
1.0 |
14-Jul-2026
|
Initial Release |

 Feedback
Contact Cisco
- Open a Support Case

- (Requires a Cisco Service Contract)