Introduction
This document describes how to configure Okta as the SAML 2.0 identity provider for Cisco Secure Email SMA end-user quarantine access.
Prerequisites
- Product: Cisco Secure Email Security Management Appliance (SMA)
- Feature: SAML SSO for End User Quarantine (EUQ)
- Identity provider: Okta (SAML 2.0)
- Applies to: SMA deployments that provide EUQ access on virtual or hardware platforms. Replace example hostnames and ports with values from your environment.
- Version context: This procedure applies to SMA releases that support SAML for EUQ. Verify the available fields and menu options in your installed version.

Note: This document focuses on SMA EUQ SAML configuration. ESA is referenced only for certificate generation when SMA cannot generate a self-signed certificate.
Requirements
Before you begin, verify that you have:
- Administrative access to the SMA web interface.
- Administrative permissions in Okta to create SAML 2.0 applications and assign users or groups.
- A certificate and private key for the SMA service provider configuration. A self-signed certificate is acceptable for testing.
- A reachable SMA EUQ fully qualified domain name (FQDN) and port that end users can access from their browsers.
- The SMA SAML Assertion URL and SP Entity ID values (from System Administration > SAML after you create the SP entry).
- User accounts in Okta that are assigned to the Okta application.
- Directory-synchronized users, if your deployment uses directory integration.
Note: Okta is a third-party identity provider. This document provides a sample configuration for customer reference.
Components Used
The information in this document was created from the devices in a specific lab environment. All of the devices used in this document started with a cleared (default) configuration. If your network is live, ensure that you understand the potential impact of any command.
Background Information
The goal is to configure single sign-on (SSO) for the spam quarantine portal so that users are redirected to Okta to authenticate, complete multifactor authentication (MFA) if it is enabled in Okta, and then return to the SMA EUQ portal. This document applies to SMA only. Cisco Secure Email Gateway, formerly Email Security Appliance (ESA), is referenced only for certificate generation when SMA cannot generate a self-signed certificate.
Problem: Users must authenticate to the SMA spam quarantine portal with Okta by using SAML SSO and optional MFA.
Resolution: Configure SMA as the service provider, configure a SAML application in Okta, import the Okta IdP settings into SMA, assign users in Okta, and verify access.
SAML flow:
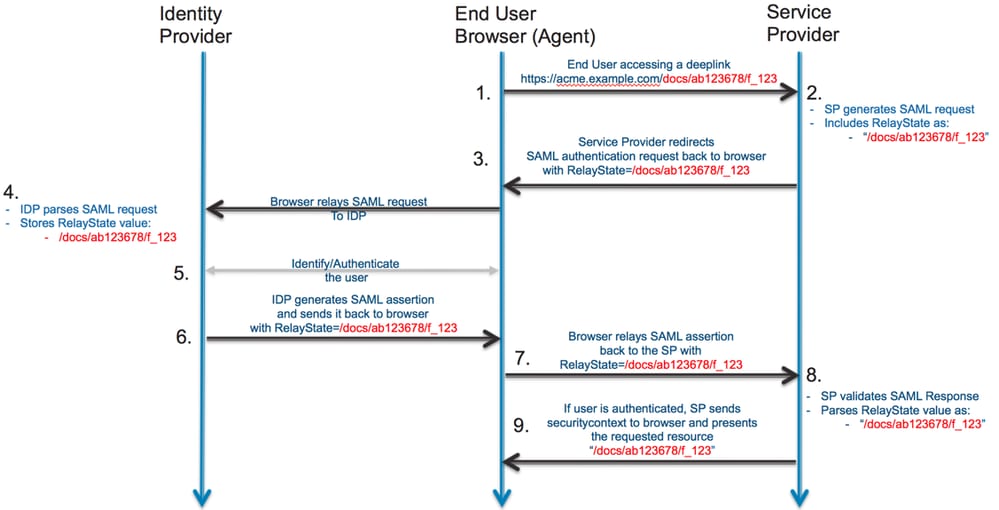
Configuration
Configure the Service Provider (SP) on the SMA Appliance
To configure the SMA as a SAML service provider for EUQ access, complete these steps:
- Log in to the SMA web interface.
- Navigate to System Administration > SAML.
- Select Add Service Provider.
- In Service Provider Entity ID, enter the entity ID that you can also configure in Okta.
- Verify that Name ID Format and the Assertion Consumer Service (ACS) URL are populated for the EUQ interface.
- In SP Certificate, upload a certificate to sign SAML requests.
Note: SMA cannot generate a self-signed certificate. You can also generate a certificate on an ESA and export it for use on the SMA.
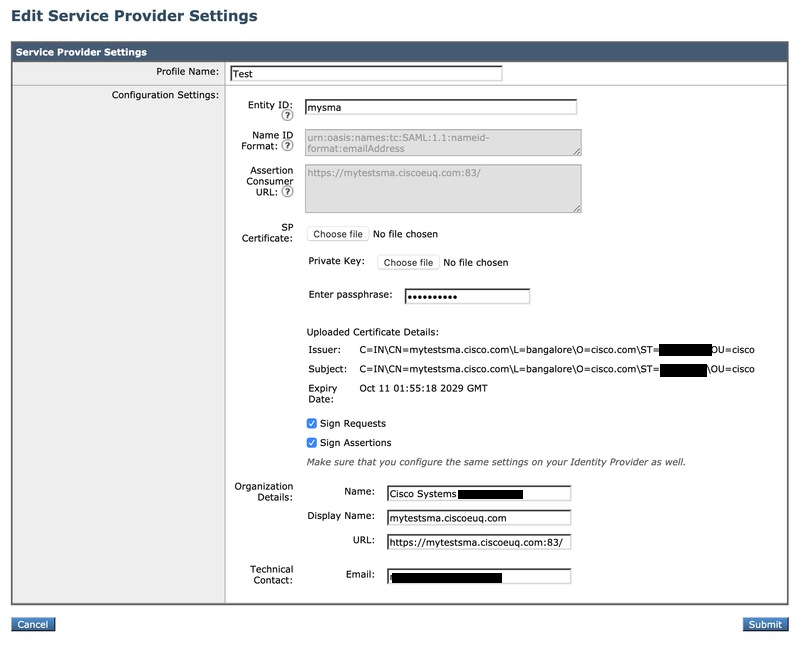 Service Provider Setting in GUI
Configure the SAML Application in Okta
To create a SAML 2.0 application in Okta for SMA EUQ access, complete these steps:
- Log in to Okta as an administrator.
- Navigate to Applications > Applications, then select Create App Integration.
- Select SAML 2.0, then select Next.
- Enter an App name, for example, SMA EUQ, then select Next.
- In Single sign-on URL, enter the SMA ACS URL from the SMA service provider settings.
- In Audience URI (SP Entity ID), enter the same entity ID configured on the SMA.
- For Name ID format, select EmailAddress.
- For Application username, select the appropriate Okta username format for your deployment.
- Complete the wizard, then open the new application and copy the IdP metadata XML file or the metadata URL.
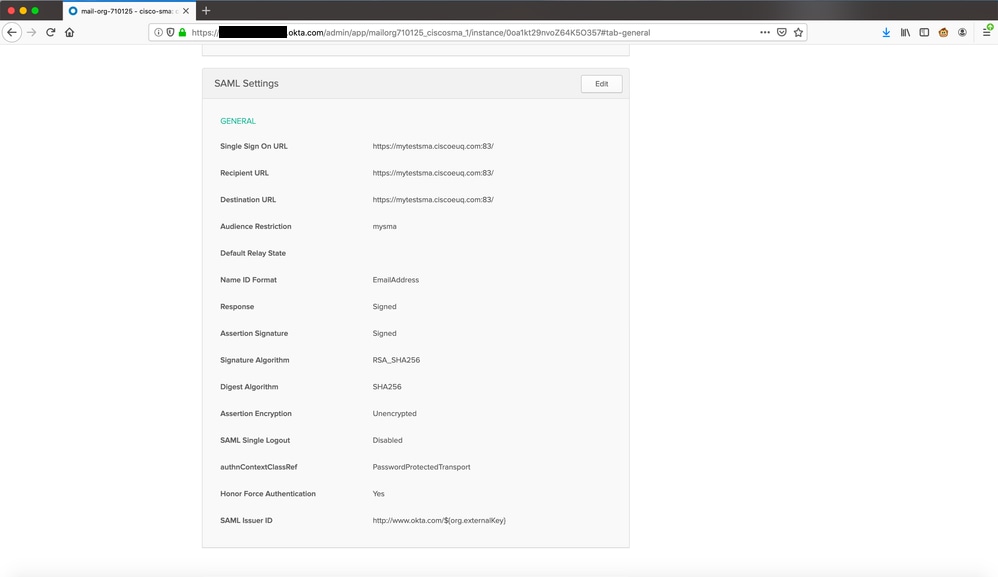 View Okta Portal
Configure the Identity Provider (IdP) on the SMA Appliance
To configure Okta as the identity provider (IdP) on the SMA, complete these steps:
- Log in to the SMA web interface.
- Navigate to System Administration > SAML.
- Under Identity Provider Settings, import the Okta IdP metadata from the previous section or enter the values manually.
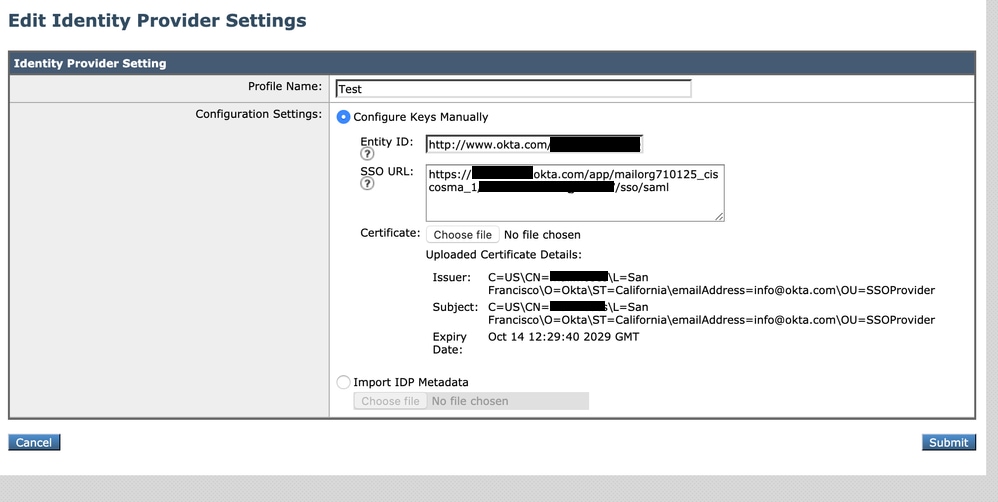 IdP Profiles Settings in SMA GUI
Assign Users to the Okta Application
To allow users to authenticate to SMA EUQ through Okta, assign users or groups to the Okta application:
- In Okta, open the application you created.
- Navigate to Assignments > People, then select Assign.
- Select Assign next to each user, then select Done.
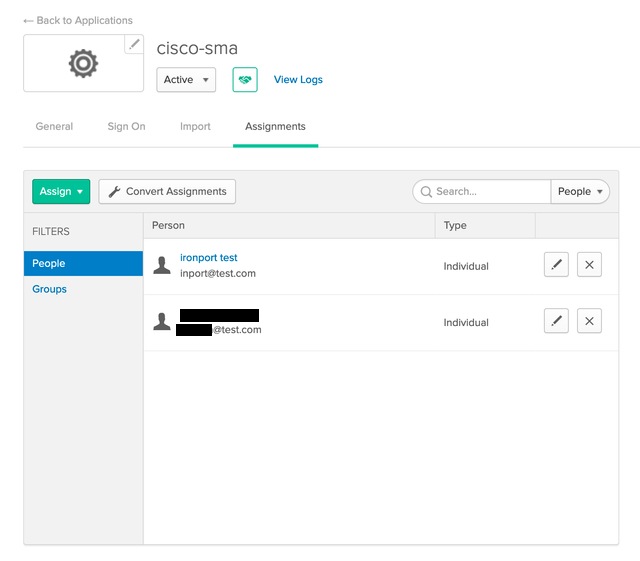 Assigning Users in Okta Portal
Note: You can assign users manually, synchronize users from Active Directory, or use another directory integration that Okta supports.
Configure MFA in Okta (Optional)
If you want multifactor authentication (MFA) for EUQ access, configure MFA policies in Okta for the application:
- In Okta Admin, navigate to Security > Authentication.
- Configure the required factors, for example, Okta Verify, Google Authenticator, or SMS, and apply the policy to the SMA EUQ application.
Verify SAML Login
Expected Result: To verify the configuration, complete these steps:
- Browse to your SMA EUQ URL, for example, https://<sma-fqdn>:<port>/.
- Confirm that the browser redirects to Okta for authentication.
- If MFA is enabled, complete the MFA challenge.
- Confirm that you are redirected back to the SMA spam quarantine portal and can access quarantine functions.
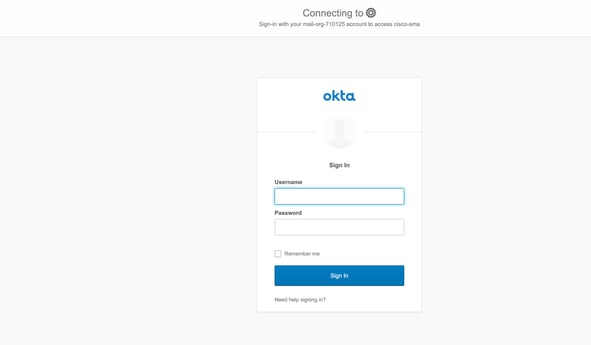 Logging in using Okta
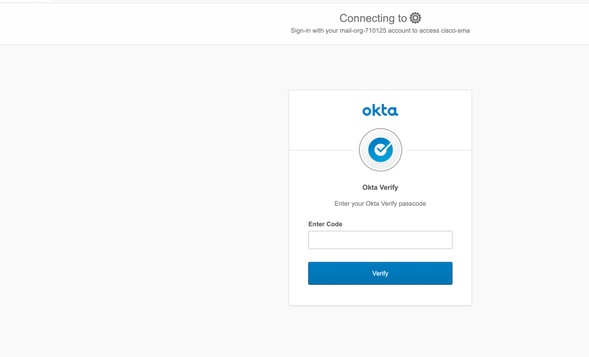 Enter Code for Okta Verify
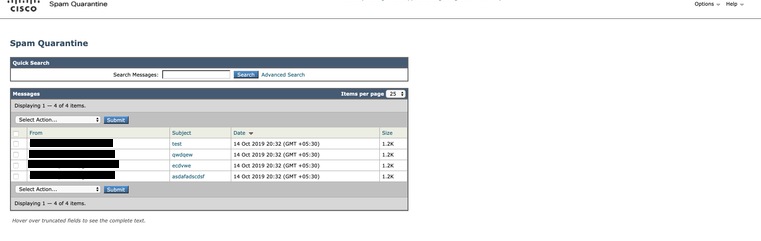 View of the Spam Quarantine after Logging in with Okta

 Feedback