Introduction
This document describes configuring remote access VPN on Firepower Threat Defense (FTD) managed by Firepower Management Center (FMC) with certificate authentication.
Prerequisites
Requirements
Cisco recommends that you have knowledge of these topics:
- Manual certificate enrollment and basics of Secure Sockets Layer (SSL)
- FMC
- Basic Authentication knowledge for Remote Access VPN
- Third-party Certificate Authority (CA) like Entrust, Geotrust, GoDaddy, Thawte, and VeriSign
Components Used
The information in this document is based on these software versions:
- Secure Firepower Threat Defense version 7.4.1
- FMC version 7.4.1
- Secure Client version 5.0.05040
- Microsoft Windows Server 2019 as the CA server
The information in this document was created from the devices in a specific lab environment. All of the devices used in this document started with a cleared (default) configuration. If your network is live, ensure that you understand the potential impact of any command.
Configure
Network Diagram
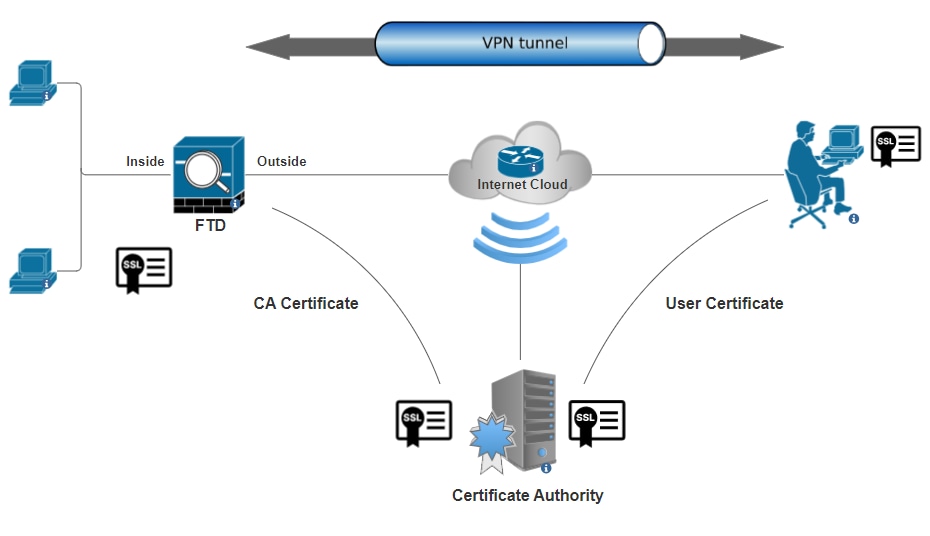 Network Diagram
Configurations
Create/Import a Certificate Used for Server Authentication

Note: On FMC, a Certificate Authority (CA) certificate is needed before you can generate the CSR. If CSR is generated from an external source (OpenSSL or 3rd party), the manual method fails and PKCS12 certificate format must be used.
Step 1. Navigate to Devices > Certificatesand click Add. Choose Device and click the plus sign (+) under Cert Enrollment.
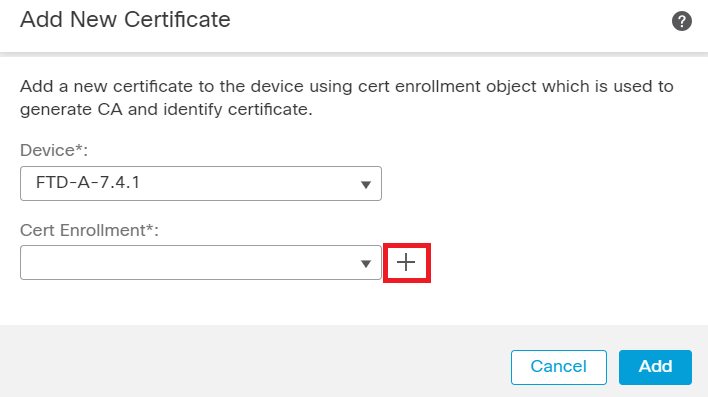 Add Cert Enrollment
Step 2. Under the CA Information, choose the Enrollment Type as Manual and paste the CA certificate used to sign the CSR.
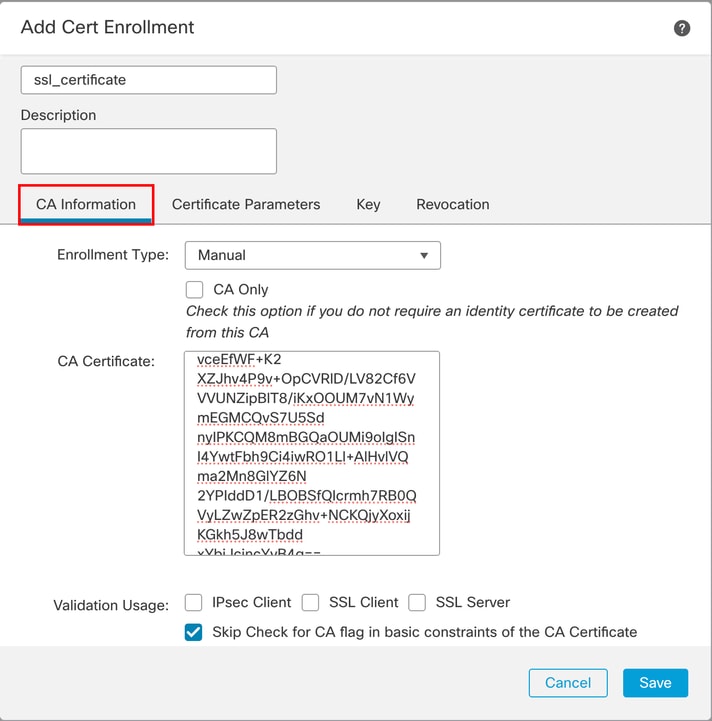 Add CA Information
Step 3. Choose Skip Check for CA flag in basic constraints of the CA Certificate as shown in the earlier image.
Step 4. Under Certificate Parameters, fill in the subject name details.
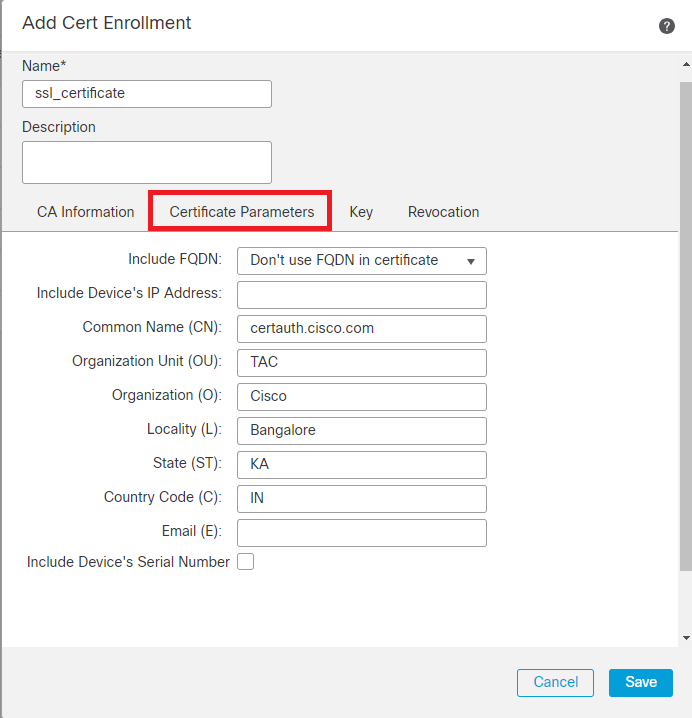 Add Certificate Parameters
Step 5. Under Keychoose the key type as RSA with a key name and size. ClickSave.
Note: For RSA key type, the minimum key size is 2048 bits.
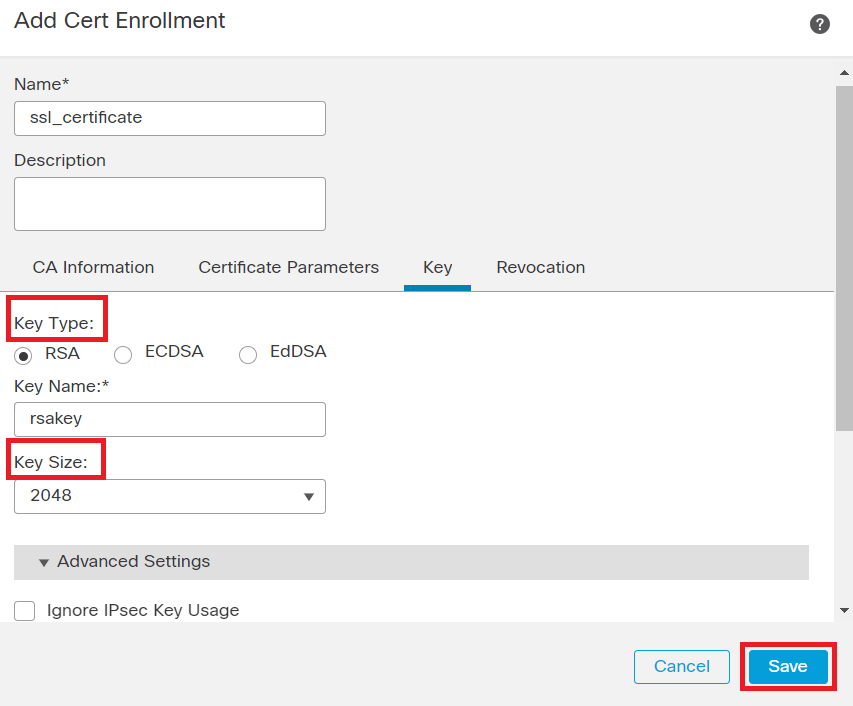 Add RSA key
Step 6. Under Cert Enrollment, choose the trust point from the dropdown which was just created and click Add.
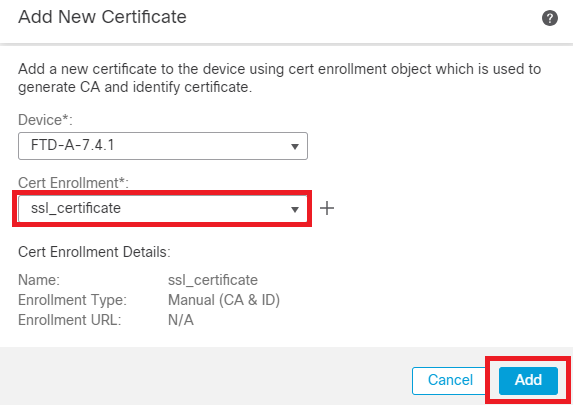 Add new Certificate
Step 7. Click ID, then click Yes on further prompt in order to generate the CSR.
 Generate CSR
Step 8. Copy the CSR and get it signed by the Certificate authority. Once, the Identity certificate is issued by CA, import it by clicking Browse Identity Certificate and click Import.
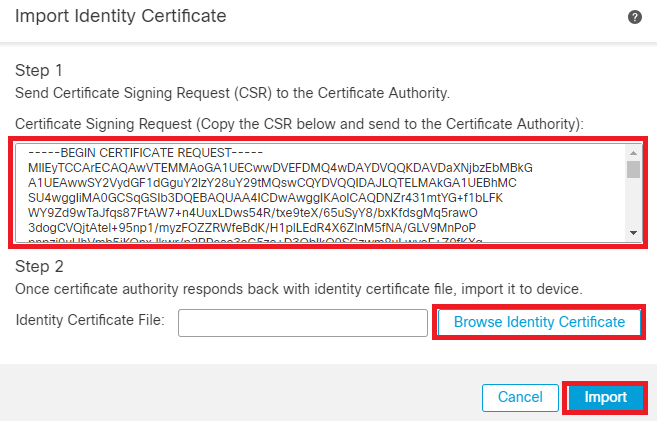 Import ID Certificate
Note: If the issuance of the ID certificate takes time, you can repeat Step 7. later. This will generate the same CSR and you can import the ID certificate.
Add a Trusted/Internal CA Certificate
Step 1. Navigate to Devices > Certificates and click Add.
Choose Device and click the plus sign (+) under Cert Enrollment.
Here, auth-risaggar-ca is used in order to issue identity/user certificates.
 auth-risaggar-ca
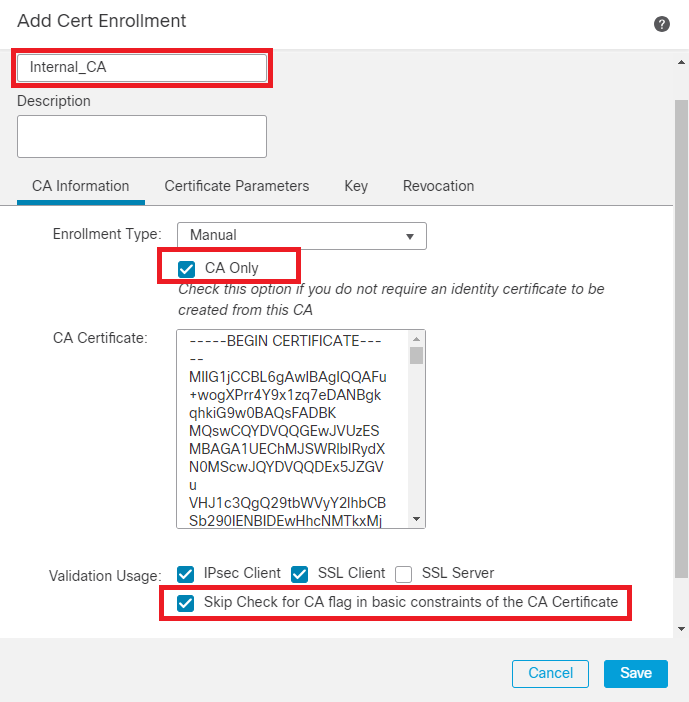
Step 2. Enter a trustpoint name and chooseManual as the enrollment type under CA information.
Step 3. Check CA Onlyand paste the trusted/internal CA certificate in pem format.
Step 4. Check Skip Check for CA flag in basic constraints of the CA Certificateand click Save.
 Add Trustpoint
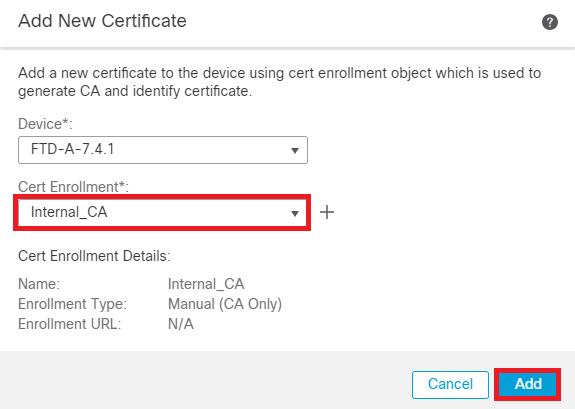
Step 5. Under Cert Enrollment, choose the trustpoint from the dropdown which was just created and click Add.
 Add Internal CA
Step 6. The certificate added earlier is shown as:
 Added Certificate
Configure Address Pool for VPN Users
Step 1. Navigate to Objects > Object Management > Address Pools > IPv4 Pools.
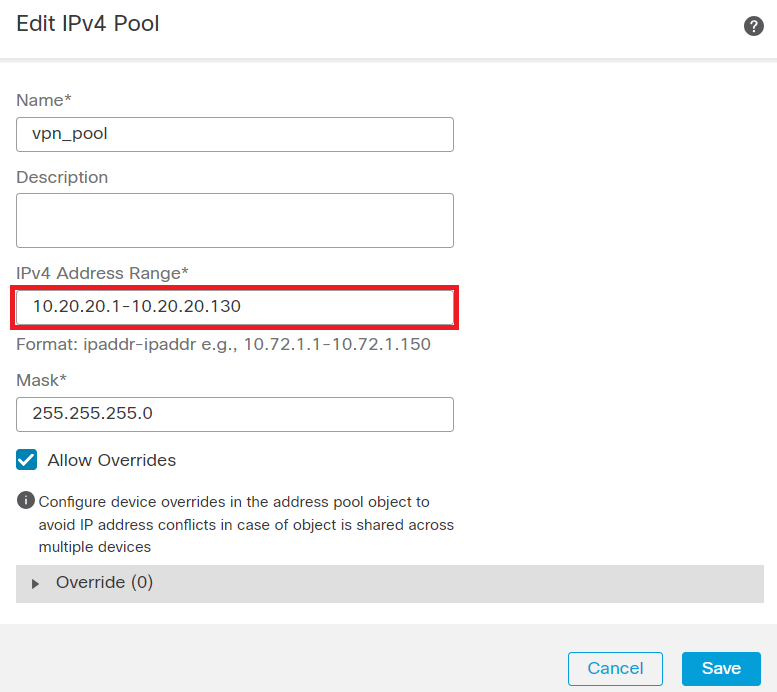
Step 2. Enter the name and IPv4 address range with a mask.
 Add IPv4 Pool
Upload Secure Client Images
Step 1. Download webdeploy secure client images as per OS from Cisco Software site.
Step 2. Navigate to Objects > Object Management > VPN > Secure Client File > Add Secure Client File.
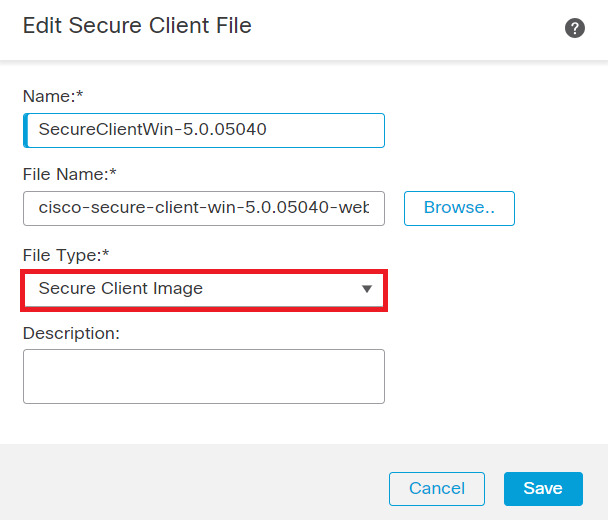
Step 3. Enter the name and choose the Secure Client file from the disk.
Step 4. Choose the file type as Secure Client Image and click Save.
 Add Secure Client Image
Create and Upload XML Profile
Step 1. Download and install the Secure Client Profile Editor from Cisco Software site.
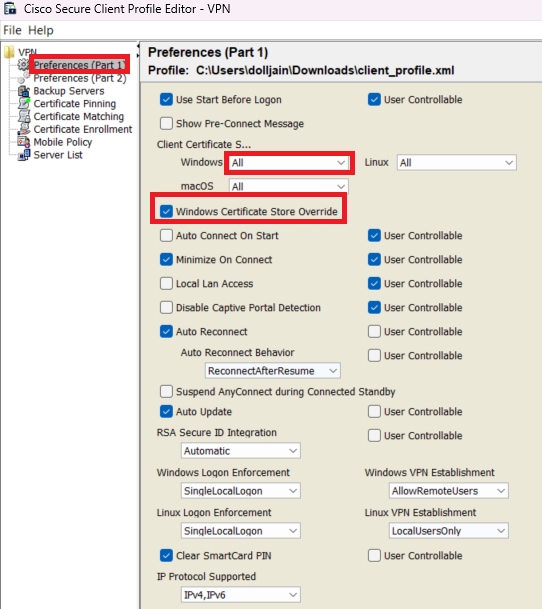
Step 2. Create a new profile and choose All from the Client Certificate Selection dropdown. It mainly controls which certificate store(s) Secure Client can use in order to store and read certificates.
Two other available options are:
- Machine - Secure Client is restricted to certificate lookup on the Windows local machine certificate store.
- User - Secure Client is restricted to certificate lookup on the local Windows user certificate store.
Set Certificate Store Override as True.
This allows an administrator to direct Secure Client to utilize certificates in the Windows machine (Local System) certificate store for client certificate authentication. Certificate Store Override only applies to SSL, where the connection is initiated, by default, by the UI process. When using IPSec/IKEv2, this feature in the Secure Client Profile is not applicable.
 Add Preferences (Part1)
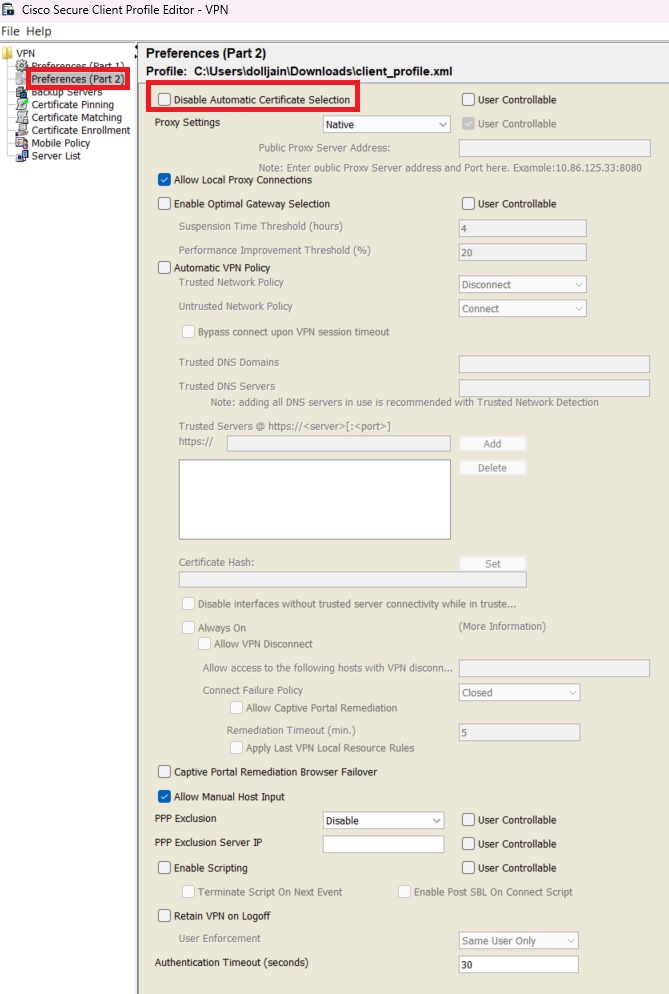
Step 3. (Optional) Uncheck the Disable Automatic Certificate Selection as it avoids the prompt for the user to choose the authentication certificate.
 Add Preferences (Part2)
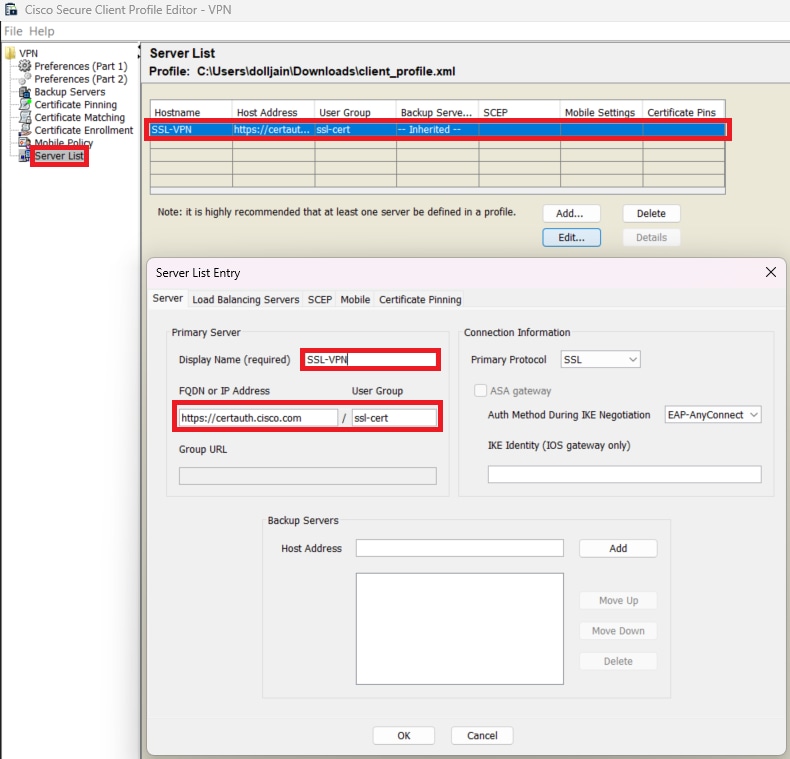
Step 4. Create a Server List Entry for setting up a profile in Secure Client VPN by providing group-alias and group-url under the Server List and save the XML profile.
 Add Server List
Step 5. Finally, the XML profile is ready for use.
 XML Profile
Location of XML profiles for various operating systems:
- Windows - C:\ProgramData\Cisco\Cisco Secure Client\VPN\Profile
- MacOS - /opt/cisco/anyconnect/profile
- Linux - /opt/cisco/anyconnect/profile
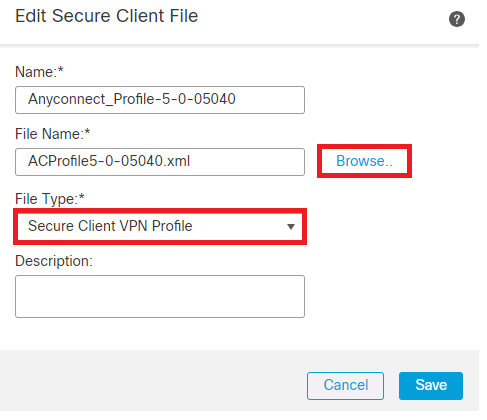
Step 6. Navigate to Objects > Object Management > VPN > Secure Client File > Add Secure Client Profile.
Enter the name for the file and click Browse in order to choose the XML profile. Click Save.
 Add Secure Client VPN Profile
Remote Access VPN Configuration
Step 1. Create an ACL as per requirement in order to allow access to internal resources.
Navigate to Objects > Object Management > Access List > Standard and click Add Standard Access List.
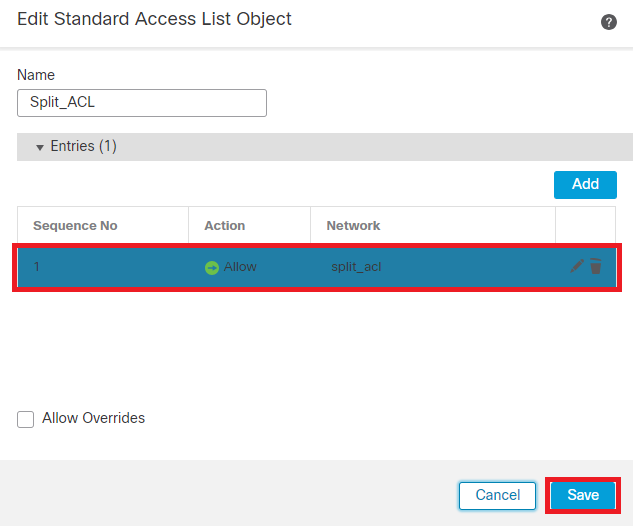 Add Standard ACL
Note: This ACL is used by Secure Client to add secure routes to internal resources.
Step 2. Navigate to Devices > VPN > Remote Access and click Add.
Step 3. Enter the name of the profile, then choose the FTD device and click Next.
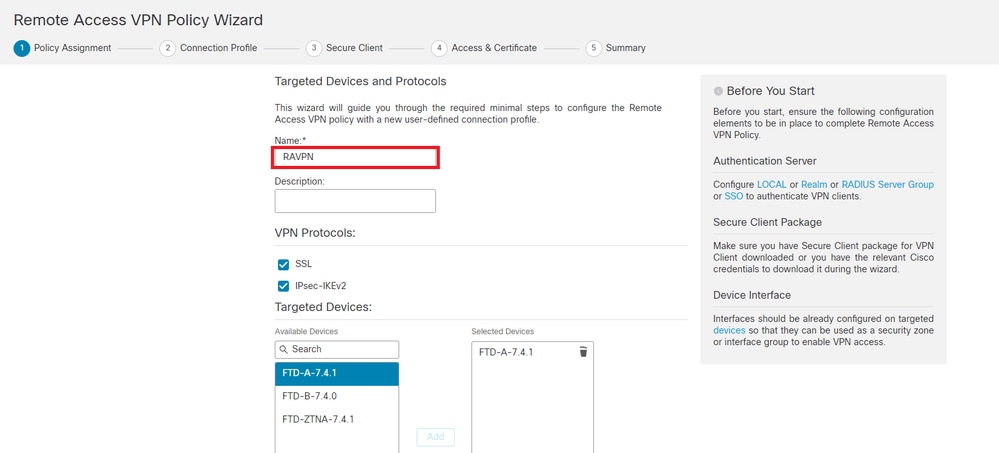 Add Profile Name
Step 4. Enter the Connection Profile Nameand choose the Authentication Method as Client Certificate Only under Authentication, Authorization, and Accounting (AAA).
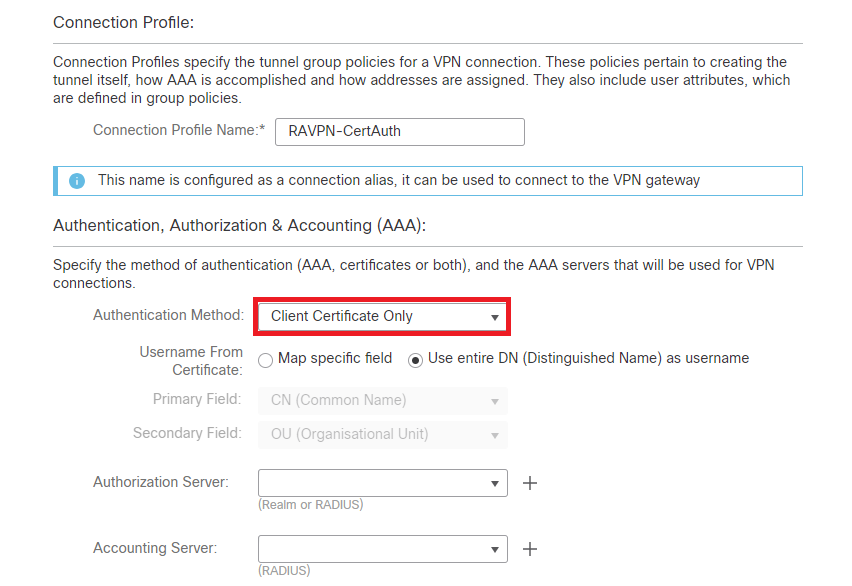 Select Authentication Method
Step 5. Click Use IP Address Pools under Client Address Assignment and choose the IPv4 Address Pool created earlier.
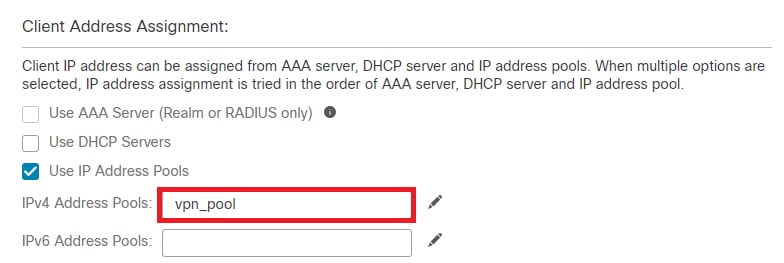 Select Client Address Assignment
Step 6. Edit the Group Policy.
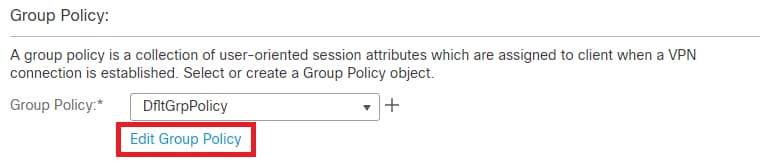 Edit Group Policy
Step 7. Navigate to General > Split Tunneling, choose Tunnel networks specified below and then Standard Access List under Split Tunnel Network List Type.
Choose the ACL created earlier.
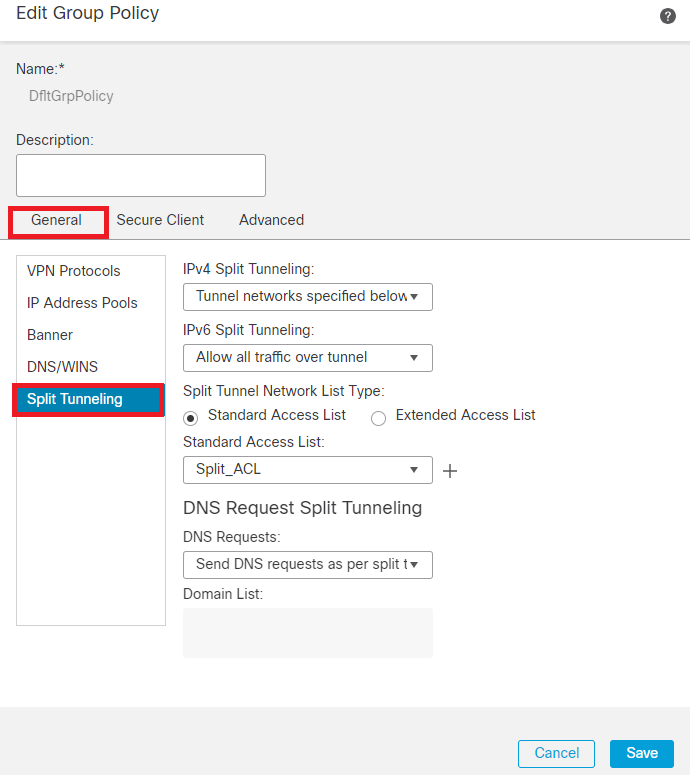 Add Split Tunneling
Step 8. Navigate to Secure Client > Profile, choose the Client Profile and click Save.
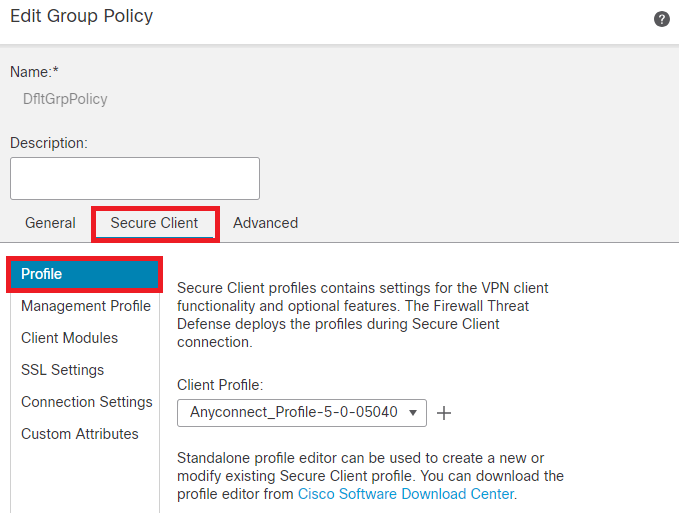 Add Secure Client Profile
Step 9. Click Next, then choose the Secure Client Image and click Next.
 Add Secure Client Image
Step 10. Choose the Network Interface for VPN Access, choose the Device Certificates and check sysopt permit-vpn and click Next.
 Add Access Control for VPN Traffic
Step 11. Finally, review all the configurations and click Finish
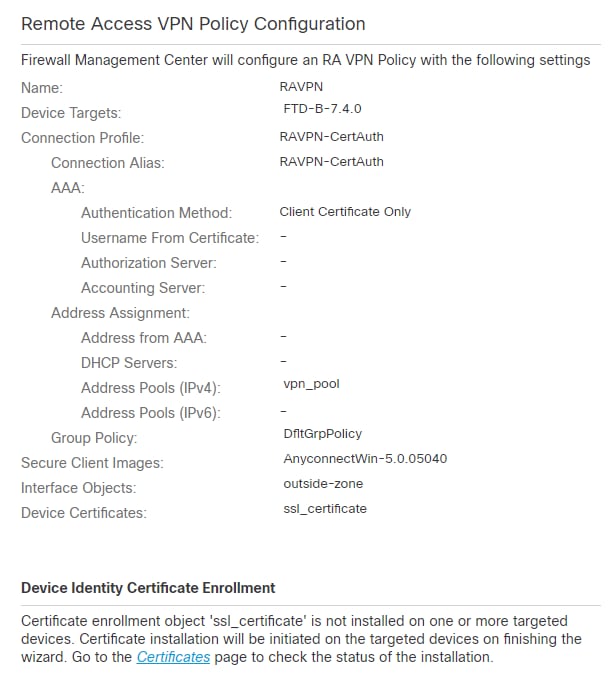 Remote Access VPN Policy Configuration
Step 12. Once the initial setup of Remote Access VPN is complete, edit the Connection Profile created and navigate to Aliases.
Step 13. Configure group-alias by clicking the plus icon (+).
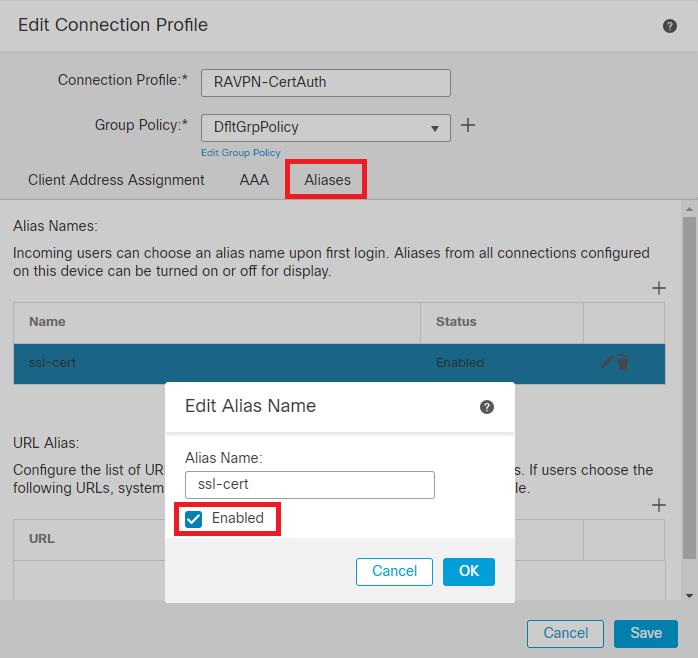 Edit Group Alias
Step 14. Configure group-url by clicking the plus icon (+). Use the same Group URL configured earlier in the Client Profile.
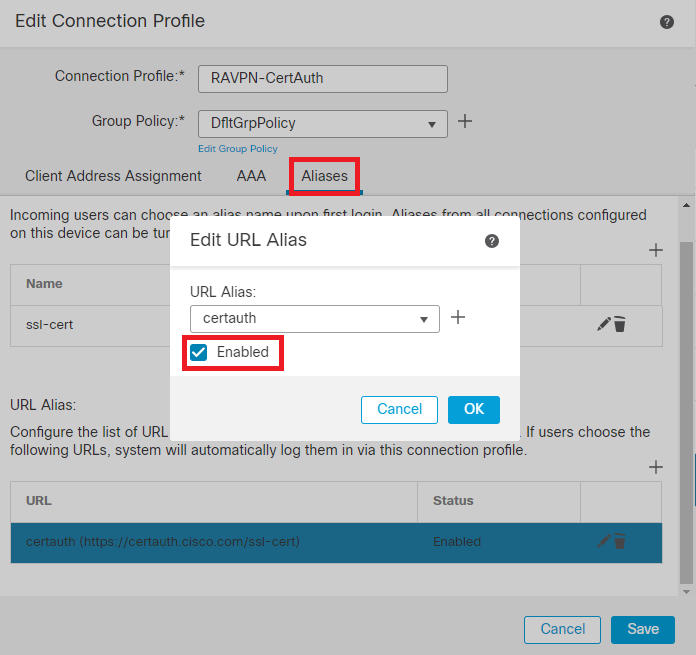 Edit Group URL
Step 15. Navigate to Access Interfaces. Choose the Interface Truspoint and the SSL Global Identity Certificate under the SSL settings.
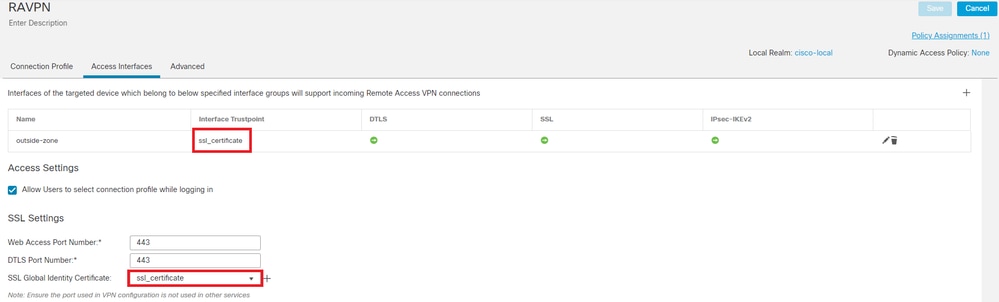 Edit Access Interfaces
Step 16. ClickSave and deploy these changes.
Verify
Use this section in order to confirm that your configuration works properly.
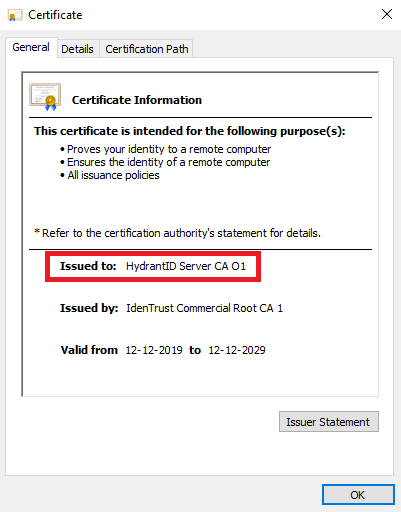
1. The secure client PC must have the certificate installed with a valid date, subject, and Enhanced Key Usage (EKU) on the PC of the user. This certificate must be issued by the CA whose certificate is installed on FTD as shown earlier. Here, the identity or user certificate is issued by auth-risaggar-ca.
 Certificate Highlights
Note: The client certificate must have the Client Authentication EKU.
2. Secure Client must establish the connection.
 Successful Secure Client Connection
3. Run show vpn-sessiondb anyconnect in order to confirm the connection details of the active user under the used tunnel group.
firepower# show vpn-sessiondb anyconnect

Session Type: AnyConnect

Username     : dolljain.cisco.com     Index        : 8
Assigned IP  : 10.20.20.1             Public IP    : 72.163.X.X
Protocol     : AnyConnect-Parent SSL-Tunnel
License      : AnyConnect Premium
Encryption   : AnyConnect-Parent: (1)none  SSL-Tunnel: (1)AES-GCM-128
Hashing      : AnyConnect-Parent: (1)none  SSL-Tunnel: (1)SHA256
Bytes Tx     : 14402                  Bytes Rx     : 9652
Group Policy : DfltGrpPolicy          Tunnel Group : RAVPN-CertAuth
Login Time   : 08:32:22 UTC Mon Mar 18 2024
Duration     : 0h:03m:59s
Inactivity   : 0h:00m:00s
VLAN Mapping : N/A                    VLAN         : none
Audt Sess ID : 0ac5de050000800065f7fc16
Security Grp : none                   Tunnel Zone  : 0
Troubleshoot
This section provides information you can use in order to troubleshoot your configuration.
1. Debugs can be run from the diagnostic CLI of the FTD:
debug crypto ca 14
debug webvpn anyconnect 255
debug crypto ike-common 255
2. Refer to this guide for common problems.
 Feedback