Configure Secure Access with Fortigate Firewall
Available Languages
Introduction
This document describes how to configure Secure Access with Fortigate Firewall.
Prerequisites
- Configure User Provisioning
- ZTNA SSO Authentication Configuration
- Configure Remote Access VPN Secure Access
Requirements
Cisco recommends you have knowledge of these topics:
- Fortigate 7.4.x Version Firewall
- Secure Access
- Cisco Secure Client - VPN
- Cisco Secure Client - ZTNA
- Clientless ZTNA
Components Used
The information in this document is based on:
- Fortigate 7.4.x Version Firewall
- Secure Access
- Cisco Secure Client - VPN
- Cisco Secure Client - ZTNA
The information in this document was created from the devices in a specific lab environment. All of the devices used in this document started with a cleared (default) configuration. If your network is live, ensure that you understand the potential impact of any command.
Background Information
Cisco has designed Secure Access to protect and provide access to private applications, both on-premise and cloud-based. It also safeguards the connection from the network to the internet. This is achieved through the implementation of multiple security methods and layers, all aimed at preserving the information as it is accessed via the cloud.
Configure
Configure the VPN on Secure Access
1. Navigate to the admin panel of Secure Access.
2. Click Connect > Network Connections > Network Tunnels Groups.
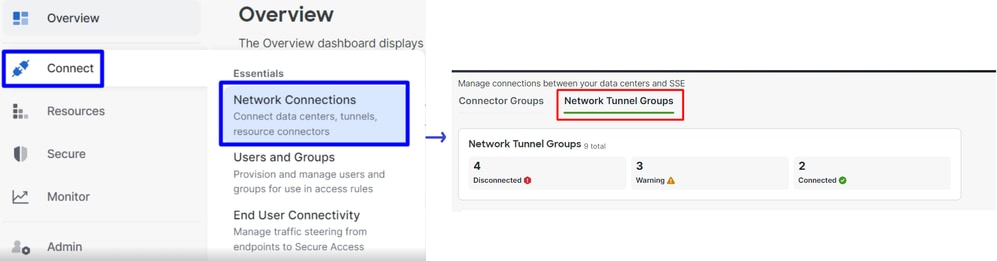
3. Under Network Tunnel Groups, click on +Add.

4. Configure the Tunnel Group Name, Region and Device Type.
5. Click Next.
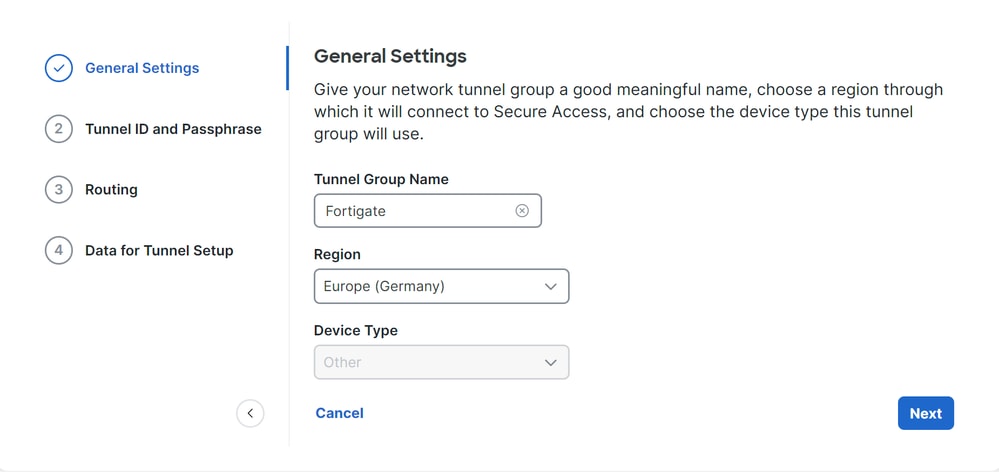

Note: Choose the region closest to the location of your firewall.
6. Configure the Tunnel ID Format and Passphrase.
7. Click Next.

8. Configure the IP address ranges or hosts that you configured on your network and want to pass the traffic through Secure Access.
9. Click Save.
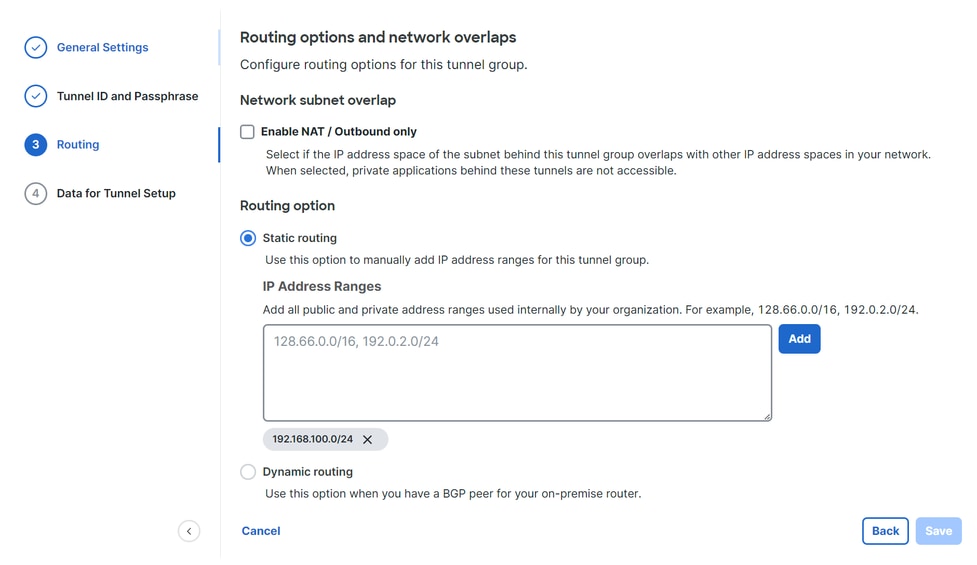
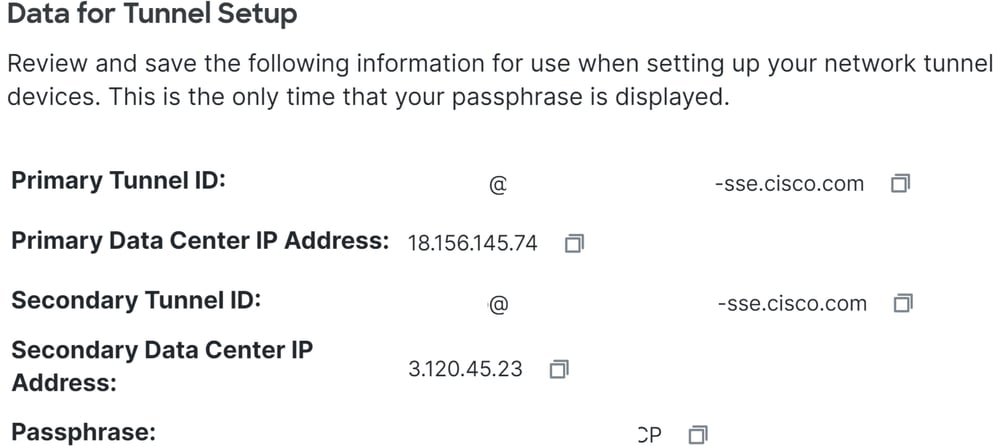
10. Once you Save, the information on the tunnel displays. Save this information for the next step; Configure the VPN Site to Site on Fortigate.
Tunnel Data
Configure the VPN Site to Site on Fortigate
1. Navigate to your Fortigate dashboard.
2. Click VPN > IPsec Tunnels.

3. Click Create New > IPsec Tunnels.
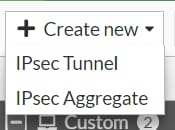
4. Click Custom, configure a Name, and click Next.

In the next image, you can see how to configure the settings for the Network.
Network
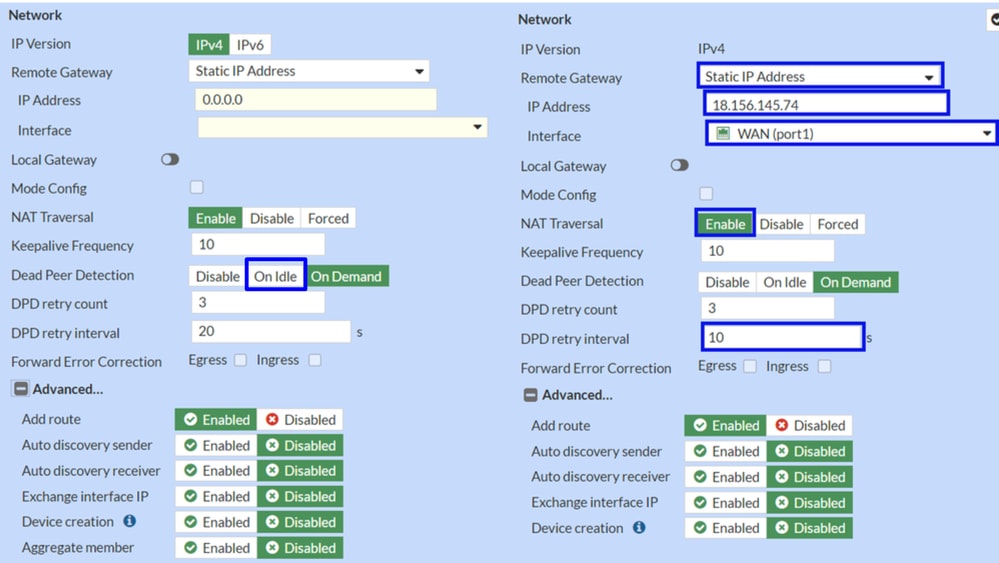
Network
- IP Version: IPv4
- Remote Gateway: Static IP Address
- IP Address: Use the IP Address of the Primary IP Data Center IP Address, provided in the Tunnel Data
- Interface: Choose the WAN interface that you plan to use to establish the tunnel
- Local Gateway: Disable as default
- Mode Config: Disable as default
- NAT Traversal: Enable
- Keepalive Frequency: 10
- Dead Peer Detection: On Idle
- DPD Retry Count: 3
- DPD Retry Interval : 10
- Forward Error Correction: Do not check any box
- Advanced...: Refer to Phase 2 for configuration steps
Now, configure the IKE Authentication.
Authentication

- Authentication
- Method: Pre-Shared Key as default
- Pre-shared Key:Use the Passphrase provided in the Tunnel Data step
- IKE
- Version: Choose Version 2
Note: Secure Access only supports IKEv2.
Next, configure the Phase 1 Proposal.
Phase 1 Proposal
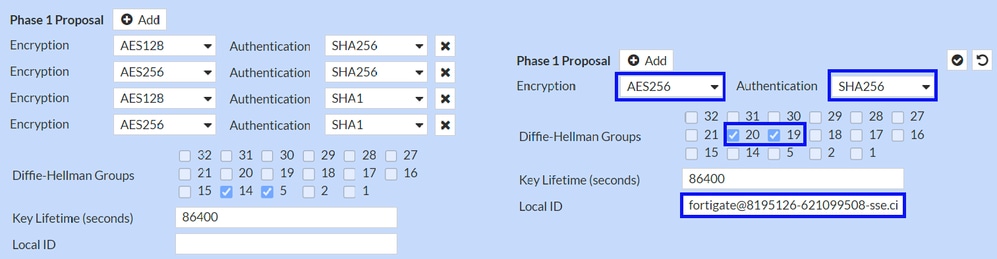
- Phase 1 Proposal
- Encryption: Choose AES256
- Authentication: Choose SHA256
- Diffie-Hellman Groups: Only choose
20, you can have problems later on if you choose multiples - Key Lifetime (seconds): 86400 as default
- Local ID: Use the Primary Tunnel ID, given in the Tunnel Data step
Now configure the Phase 2 Proposal.
Phase 2 Proposal

- New Phase 2
- Name: Leave as default (this value matches your VPN connection name)
- Local Address: Leave as default (0.0.0.0/0.0.0.0)
- Remote Address: Let as default (0.0.0.0/0.0.0.0)
- Advanced
- Encryption: Choose AES128
- Authentication: Choose SHA256
- Enable Replay Detection: Leave as default (Enabled)
- Enable Perfect Forward Secrecy (PFS
Deselect the checkbox - Local Port: Leave as default (Enabled)
- Remote Port: Leave as default (Enabled)
- Protocol: Leave as default (Enabled)
- Auto-Negotiate: Leave as default (Unmarked)
- Auto-key Keep Alive: Leave as default (Unmarked)
- Key Lifetime: Leave as default (Seconds)
- Seconds: Leave as default (43200)
After that, click OK. You'll the VPN was established with Secure Access and you can continue with the next step; Configure the Tunnel Interface.

Configure the Tunnel Interface
After the tunnel is created, a new interface displays behind the port that you are using as a WAN interface to communicate with Secure Access.
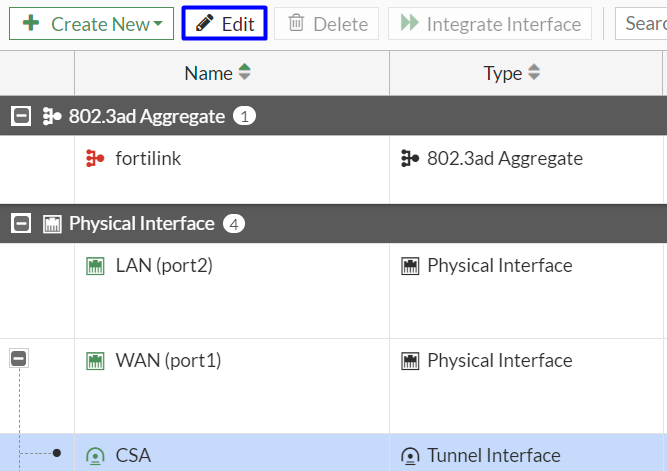
1. To check this, navigate to Network > Interfaces.
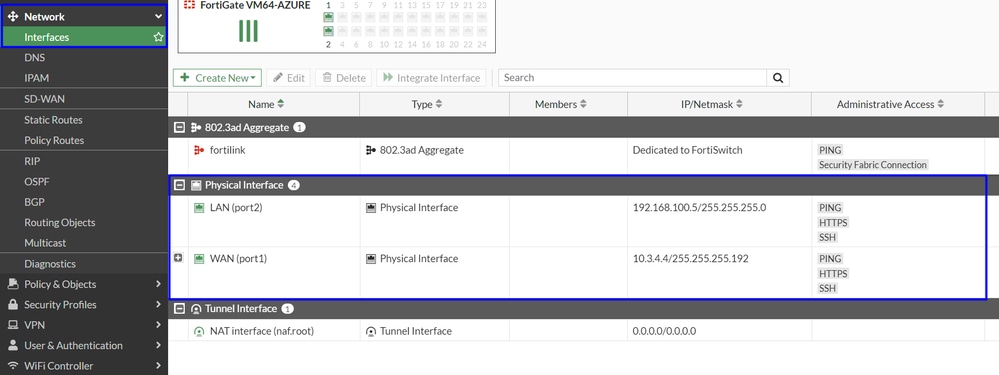
2. Expand the port you use to communicate with Secure Access; in this case, the WAN interface.
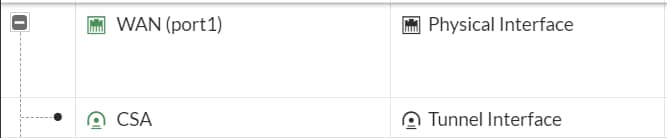
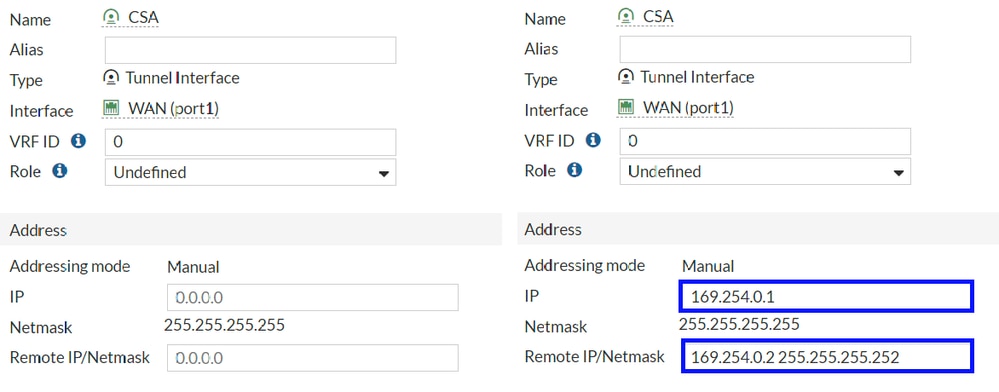
3. Click on your Tunnel Interface and click Edit.
4. Refer to the image to configure the settings.
Interface Configuration
- IP: Configure a non-routable IP that is not in your network (for example, 169.254.0.1).
- Remote IP/Netmask: Configure the Remote IP as the next IP for your interface IP and with a Netmask of 30 (for example, 169.254.0.2 255.255.255.252).
5. Click OK to save the configuration settings and proceed with the next step; Configure Policy Route (Origin-based routing).

Warning: After completion, configure FortiGate firewall policies to permit traffic from your device to Secure Access and from Secure Access to your destination networks.
Configure Policy Route
At this point, you have your VPN configured and established to Secure Access. Now, you must reroute the traffic to Secure Access to protect your traffic or access to your private applications behind your FortiGate firewall.
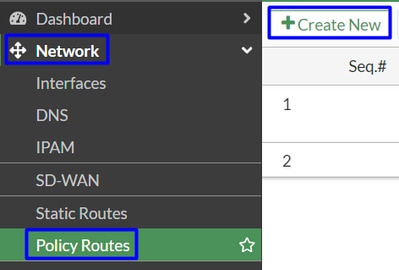
1. Navigate to Network > Policy Routes.
2. Configure the policy.
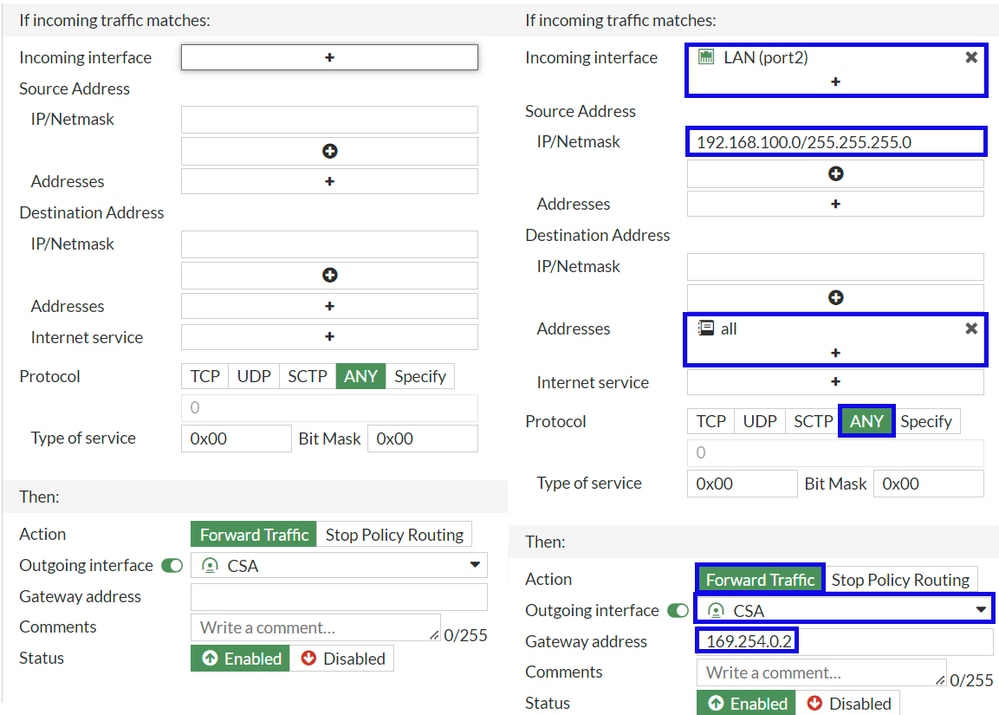
- If incoming traffic matches:
- Incoming Interface: Choose the interface where you plan to reroute the traffic to Secure Access (origin of traffic).
- Source Address
- IP/Netmask: Use this option if you only route a subnet of an interface.
- Addresses: Use this option if you have an object created and the source of the traffic comes from multiple interfaces and multiple subnets.
- Destination Addresses
- Addresses: Choose all if you want to protect internet traffic. If you want private access you must add your VPN Profile IP Pool and CGNAT Range 100.64.0.0/10.
- Protocol: Choose ANY.
- Then
- Action: Choose Forward Traffic
- Outgoing Interface: Choose the Tunnel Interface you modified in the Configure Tunnel Interface step.
- Gateway Address: Configure the Remote IP configured in the RemoteIPNetmask step.
- Status: Choose Enabled.
3. Click OK to save the configuration settings. Verify if the traffic to your devices was rerouted to Secure Access.
Verify
To verify if the traffic was rerouted from to Secure Access, you have two options; you can check on the internet and check for your public IP, or you can run the command with curl:
C:\Windows\system32>curl ipinfo.io
{
  "ip": "151.186.197.1",
  "city": "Frankfurt am Main",
  "region": "Hesse",
  "country": "DE",
  "loc": "50.1112,8.6831",
  "org": "AS16509 Amazon.com, Inc.",
  "postal": "60311",
  "timezone": "Europe/Berlin",
  "readme": "https://ipinfo.io/missingauth"
}
The public range where you can see your traffic is:
- Min Host: 151.186.176.1
- Max Host: 151.186.207.254
Note: These IPs are subject to change, Cisco can extend this range in the future.
If you see a change to your public IP, that means you are protected by Secure Access. You can configure your private application on the Secure Access dashboard to access your applications from VPNaaS or ZTNA.
Revision History
| Revision | Publish Date | Comments |
|---|---|---|
2.0 |
04-Jun-2026
|
Updated spelling, grammar, sentence structure, edit alt text, and numbering. |
1.0 |
02-Aug-2024
|
Initial Release |
 Feedback
Contact Cisco
- Open a Support Case

- (Requires a Cisco Service Contract)