Integrate ISE with Smart Licensing Server
Available Languages
Contents
Introduction
This document describes how to configure Smart Licensing on Cisco ISE.
Prerequisites
Requirements
Cisco recommends that you have knowledge of these topics:
- ISE 3.x release
- Access to Smart Software Licensing
- Cisco License Central for On-Prem (Optional)
Components Used
This document is not restricted to specific software and hardware versions.
The information in this document was created from the devices in a specific lab environment. All of the devices used in this document started with a cleared (default) configuration. If your network is live, ensure that you understand the potential impact of any command.
Background Information

Beginning with Cisco ISE 3.0, Smart Licensing is required. Cisco Smart Licensing simplifies license procurement, deployment, and management by enabling devices to self-register and report usage in these ways:
- When a smart license token is active and registered in the Cisco ISE administration portal, Cisco License Central monitors the consumption of licenses by each endpoint session per product license.
- Smart Licensing notifies the administrator about license consumption by endpoint sessions with a simple table layout in Cisco ISE.
- Smart Licensing reports the peak usage of each enabled license to the centralized database daily.
- Cisco ISE takes internal samples of license consumption every 30 minutes. License compliance and consumption are updated accordingly.
- From the time you register your Cisco ISE Primary Administration node (PAN) with Cisco License Central, Cisco ISE reports peak counts of license consumption to the Cisco License Central server every six hours.
- The peak count reports help ensure that license consumption in Cisco ISE is in compliance with the licenses purchased and registered.
- Cisco ISE communicates with the Cisco License Central server by storing a local copy of the Cisco License Central certificate.
- The Cisco License Central certificate is automatically reauthorized during the daily synchronization, and when you refresh the Licenses table. Typically, Cisco License Central certificates are valid for six months.
- As a result, Cisco ISE needs network connectivity in order to reach Cisco License Central.
License Consumption Flow
TACACS+
The Device Admin license (PID: L-ISE-TACACS-ND=) activates TACACS+ services on a Policy Service Node (PSN). Each PSN that uses TACACS+ requires its own Device Admin license. TACACS+ device administration does not count toward endpoint usage and imposes no limit on the number of network devices you can manage. An essential license is not needed to manage Network Access Devices (NADs) such as routers and switches.
Accounting Endpoint License
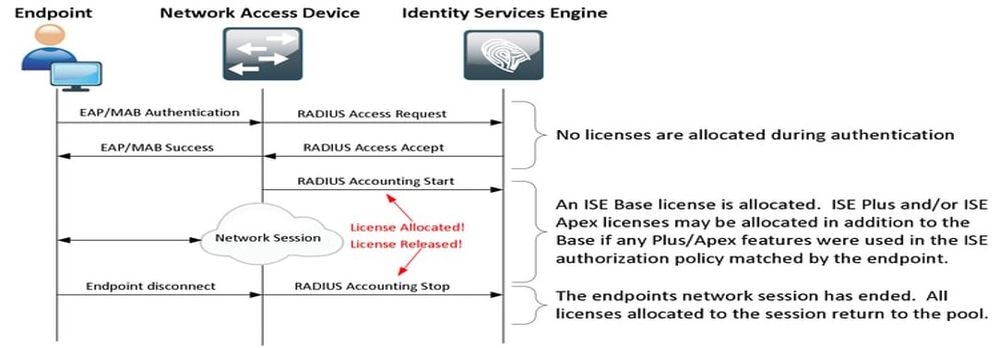

Note: The diagram uses traditional license terminologies, but these also apply to the new tier licenses referenced throughout the documentation.
The number of active endpoints can differ from the licenses used because each endpoint can have multiple sessions. License consumption is based on the number of active sessions, not just the number of endpoints. For example, a system with 10 active endpoints with multiple sessions can use more licenses.
Ensure that accounting is enabled on both the wireless access points and the switch. License consumption is determined by the Start - Stop messages sent from the AAA client to the AAA server.
Cisco ISE uses specific rules in order to manage sessions in Monitoring and Troubleshooting (MnT), relying on accounting messages from Network Access Devices (NADs). Here is how Cisco ISE processes sessions based on these accounting messages:
- If Cisco ISE receives a RADIUS authentication request but no accounting message, it keeps the session active for 1 hour.
- Upon receiving an accounting message, Cisco ISE maintains the session for up to 5 days or until an accounting stop message is received.
- The license session is released immediately once an accounting stop message is received.
- An interim update extends the 5 days.
ISE Licenses
Evaluation
Evaluation Licenses are activated by default when you install or upgrade to Cisco ISE Release 3.x and later versions. The Evaluation License is active for 90 days, and you have access to all the Cisco ISE features during this time. Cisco ISE is considered to be in Evaluation Mode when the Evaluation License is in use. The top-right corner of the Cisco ISE administration portal displays a message with the number of days that are left in the Evaluation Mode.

Tier
Tier Licenses replace the Base, Apex, and Plus licenses used in releases earlier than release 3.x. Tier Licenses include three licenses — Essentials, Advantage, and Premier. If you currently have Base, Apex, or Plus licenses, use Cisco License Central in order to convert them into the new license types.
Device Admin
A Device Administration license allows you to use TACACS services on a Policy Service node. In a high-availability standalone deployment, a Device Administration license permits you to use TACACS services on a single Policy Service node in the high-availability pair. On Cisco ISE, it is defined as Device Admin and on the Smart license portal, it is defined as Maximum number of nodes entitled to TACACS+ transactions.
Virtual Appliance Licenses
Cisco ISE 3.x onwards comes with a new form of VM license which is the VM Common license. If you are using traditional VM licenses then they must be converted to VM common licenses.
For information on license types and conversion, refer to the links:
Key Smart Licensing Changes on New ISE Versions
-
Smart Licensing Connection Method Change:
Cisco ISE 3.4 removed support for the Transport Gateway connection method used in Smart Licensing. If you were using Transport Gateway for smart licensing, you must update the connection method before upgrading to 3.4. If not updated, the system automatically switches to Direct HTTPS during upgrade, but you can change it anytime after the upgrade. -
Licensing Visibility Improvements in 3.5:
Cisco ISE 3.5 enhances license tracking for better visibility and accuracy. The license tiers and features remain the same, but license usage is now aligned with peak active endpoints. Enforcement is not yet active in 3.5; instead, non-disruptive consumption alerts notify if usage exceeds licensed limits
License Registration Types
For the introduction of Cisco ISE 3.1, you have three options available in order to enable Smart Licensing.
Smart Software Licensing Reservation (Direct-Https, HTTP-Proxy, Cisco License Central On-Prem)
Smart Software Licensing Reservation is easily used and efficiently with a single token registration. The licenses that you purchase are maintained in a centralized database called Cisco License Central. Log in to the Cisco License Central portal in order to easily track the endpoint licenses that are available to you and consumption statistics. In this mode, Cisco ISE is required to connect with Cisco License Central, either directly (Direct HTTPS) or via Proxy in order to exchange the consumption and Compliance information. The new option Cisco License Central On-Prem allows air-gapped ISE in order to utilize the features of Cisco License Central in the form of a local Server hosted as an On-Prem (Satellite) server.
Specific License Reservation (Available in ISE 3.1 and Later)
Specific License Reservation (SLR) allows customers in highly secure networks in order to use Smart Licensing (and Smart licenses) without communicating the license information. SLR allows reservation of specific licenses, including add-on licenses. SLR does not require Cisco ISE in order to connect to Cisco License Central and allows Cisco ISE to consume the licenses present in the Smart Account till they reach expiry.
Configure
Connection Methods (Direct HTTPS/HTTPS-Proxy) for Integrating Cisco License Central with ISE
Step 1. Browse to Administration > System > Licensing:

Step 2. Choose Smart Software Licensing Reservation in License Type and paste the Registration Token in the Registration Details. Choose the Applicable Tier as required. The process differs slightly between Direct HTTPS and HTTPS Proxy.
Direct HTTPS
Step 3. For Direct HTTPS, choose the Connection Method as Direct HTTPS and click Register:

HTTPS Proxy
Step 4. In order to ensure that HTTPS Proxy is preconfigured, navigate to Administration > System > Settings.
Add proxy details > Host, user ID, and Password:

Step 5. Back on the Cisco ISE Licensing page, choose Connection Method as HTTPS Proxy and ensure that the configured Proxy is seen under the HTTPS Proxy section. Click Register:

Finally, Cisco ISE is now registered to Cisco License Central and an entry for this ISE node can be found in the Product Instances in the Virtual Account (from where the token was generated).
Configuring Cisco License Central On-Prem Server
This configuration requires an Cisco License Central On-Prem (Satellite) Server to be deployed in the environment. Once deployed and connected, the Satellite server acts as a local Licensing Server allowing Cisco ISE to perform the Licensing transactions without reaching out to Cisco License Central over the Internet. Satellite servers can in turn sync with Cisco License Central, either in online or offline mode (using .yml files). More details about the Satellite server are available in Cisco License Central.
These steps assume that the Satellite Server is configured and a Virtual Account on Cisco License Central containing Cisco ISE Licenses is added to the Satellite Server. Steps to perform the same can be traced in Cisco License Central.
Step 1. Log in to the Satellite Server and choose the Smart Licensing Option:

Step 2. From the inventory, generate a token and copy the token value. Back on Cisco ISE, choose Smart Software Licensing Reservation and as Connection Method as Cisco License Central On-Prem server:

Step 3. The field Cisco License Central On-Prem Server Host is taken from the hostname configured on the On-Prem Server. The same can be confirmed from the On-Prem Server Admin Workspace > Security > Certificates > Host Common Name:

Step 4. Once the hostname is confirmed, add it to Cisco ISE under the Cisco License Central On-Prem server Host and click Register. After successful registration, Cisco ISE appears in the list of Product Instances added to the Virtual Account on the Satellite Server.
Integration Methods for ISE and Cisco License Central
SLR
Step 1. Browse to Administration > System > Licensingas shown in the image:

Step 2. For the License Type, choose SLR and then click Generate Code. Copy the reservation code generated as this is required by Cisco License Central in order to generate an Authorization Code:

Step 3. In Cisco License Central, choose the Virtual Account which contains Cisco ISE Licenses (Essential, Advantage, Premier, VM, TACACS+). Under the Licenses section, choose:
 L
L
License Reservation.
Step 4. Enter the Authorized Code copied from Cisco ISE and click Next in order to choose the Reserve a specific license option. Depending upon the available licenses, specify the counts to be reserved for Cisco ISE and click Next. Note that Tier Licenses and VM Licenses allow substitution that is Upper-Level licenses can be used in order to fulfill requests for lower level licenses. Check the Tier Model Cisco ISE 3.x Licensing Model .

Step 5. Review and download the generated Authorization code using the Download as File option. Return to Cisco ISE and click Upload SLR License Key in order to upload the file. The expiry date of the licenses on Cisco ISE reflects the original expiry date of licenses on the Smart Account.
Returning Reservation for SLR
Step 1. Click Return Reservation and copy the Reservation code provided and keep it safe.
Step 2. Browse to Product Instances for the Virtual Account to which Cisco ISE is added and search for ISE using its serial number. Click Actions > Remove, enter the code copied in Step 1. and click Return Product Reservation. This returns the reserved licenses to the Virtual Account.
Troubleshoot
General Guidelines
- For Cisco ISE 3.0 p7, 3.1 p5, and 3.2 or later check the reachability for this link: https://smartreceiver.cisco.com/.
- For lower ISE versions<= Ise 3.0, check the reachability for these links: tools.cisco.com, tools1.cisco.com, and tools2.cisco.com.
- These links are important because they play a vital role in communication with Cisco License Central to and fro, if you block these IPs then the Cisco ISE is unable to report license usage to Cisco License Central, and this lack of reporting results in the loss of administrative access to Cisco ISE and restrictions in Cisco ISE features.
ISE Logging Attributes to be Set to Debug Level
- License (ise-psc.log)
- admin-license (ise-psc.log)
Registration and Renewal Errors
In order to troubleshoot registration errors, start by verifying that there are no communication issues with the Smart Licensing Cloud (https://tools.cisco.com/ or https://smartreceiver.cisco.com/). Several factors can disrupt the connection between Cisco ISE and the Smart Licensing Cloud, including:
- Firewalls or other devices blocking traffic.
- DNS problems. If Cisco ISE cannot resolve the corresponding FQDN for https://tools.cisco.com/ or https://smartreceiver.cisco.com/, it is unable to send the registration API call.
- Issues with the Smart Licensing Portal.
API Requests to Investigate ISE Licensing Status
Use HTTPS API calls directly from the browser in order to know the number of licenses being consumed on Cisco ISE:
- https://<MnTNodeIP>/admin/API/mnt/Session/ActiveCount
- https://<MnTNodeIP>/admin/API/mnt/Session/License/LicenseCountsFromSessionDB
- https://<MnTNodeIP>/admin/API/mnt/License/Base
- https://<MnTNodeIP>/admin/API/mnt/License/Intermediate
- https://<MnTNodeIP>/admin/API/mnt/License/Premium
- https://<MnTNodeIP>/admin/API/mnt/Session/ActiveList
In Cisco ISE 3.1 or later, you can use OpenAPI. You must navigate to Administration > Settings > API Settings. API calls are used to get more data about the Licensing state.


Tip: Ensure the ERS and Open API services are enabled in Cisco ISE. You can verify this by navigating to Administration > Settings > API Settings > API Service Settings. You must activate these services before accessing the API calls through the URL if these services are not enabled.

Related Information
- Creating an SLR using Cisco License Central for Cisco ISE
- Basics of Cisco ISE licensing
- Troubleshoot ISE Licensing Issues
- Cisco ISE Smart Licensing
- Cisco Technical Support & Downloads
Revision History
| Revision | Publish Date | Comments |
|---|---|---|
4.0 |
01-Jun-2026
|
Formatting,Replace references to "Cisco Smart Software Manager (SSM)" with "Cisco License Central." |
3.0 |
23-Apr-2026
|
Formatting, langauge, links. |
1.0 |
03-Oct-2024
|
Initial Release |
 Feedback
Contact Cisco
- Open a Support Case

- (Requires a Cisco Service Contract)