Configure Duo Two Factor Authentication for ISE Management Access
Available Languages
Introduction
This document describes the steps required to configure external two-factor authentication for Identity Services Engine (ISE) management access.
Prerequisites
Requirements
Cisco recommends that you have knowledge of these topics:
- RADIUS Protocol
- Configuring ISE RADIUS Token server and identities
Components Used
The information in this document is based on these software and hardware versions:
- Duo Cloud Service
- Active Directory (AD)
- Identity Services Engine (ISE)
- Duo Authentication Proxy Server
The information in this document was created from the devices in a specific lab environment. All of the devices used in this document started with a cleared (default) configuration. If your network is live, ensure that you understand the potential impact of any command.
Network Diagram
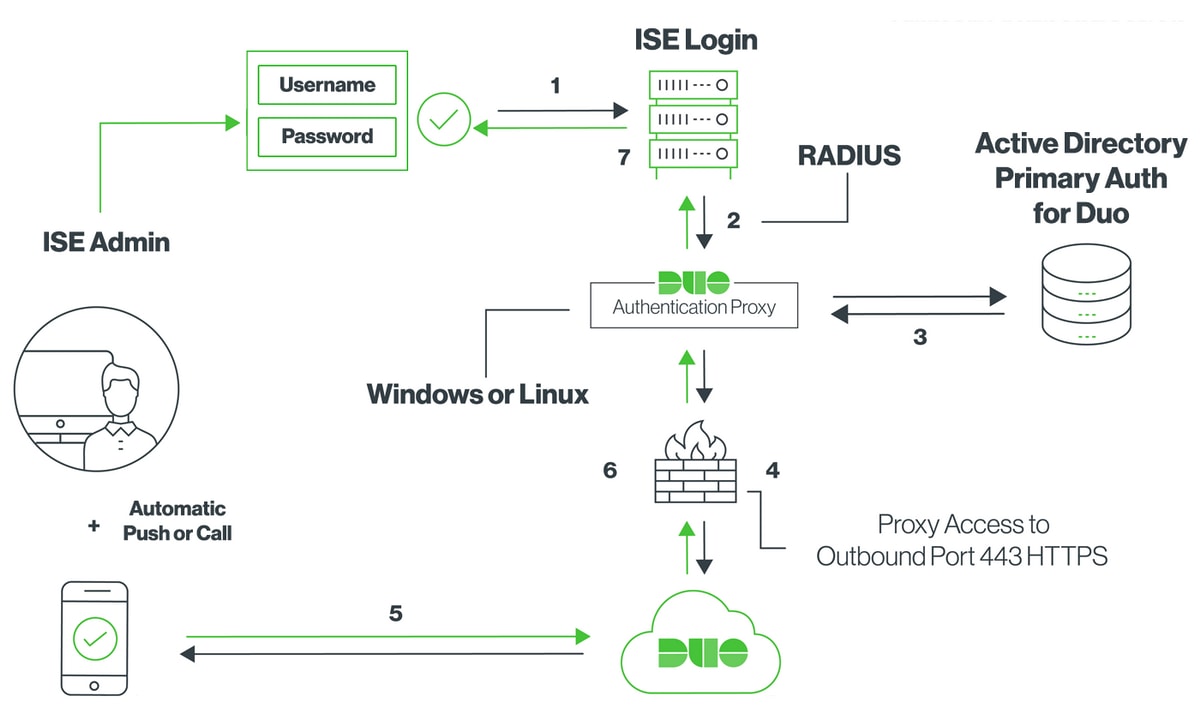
Configuration
Duo Configuration
- Download and install the Duo Authentication Proxy Server on a Windows or Linux machine - Duo Authentication Proxy
2. Configure the authproxy.cfg file. Open this file in a text editor such as Notepad++ or WordPad.
3. Create a "Cisco ISE RADIUS" application in the Duo Admin Panel.
4. Edit the authproxy.cfg file and add this configuration:
        ikey= xxxxxxxxxxxxxxxxxxxxxxxxxx
        skey= xxxxxxxxxxxxxxxxxxxxxxxxxxxxxxxxxxxxxxxx
        api_host=api-xxxxxxxx.duosecurity.com
        radius_ip_1=10.127.196.189                    Sample IP address of the ISE server
        radius_secret_1=******
        failmode=secure
        client=ad_client
        port=1812
5. Configure the ad_client with your Active Directory details. Duo Auth Proxy uses the information in the next example to authenticate against AD for the primary authentication:
        [ad_client]
        host=10.127.196.230                           Sample IP address of the Active Directory
        service_account_username=< AD-username >
        service_account_password=< AD-password >
        search_dn=CN=Users,DC=gce,DC=iselab,DC=local
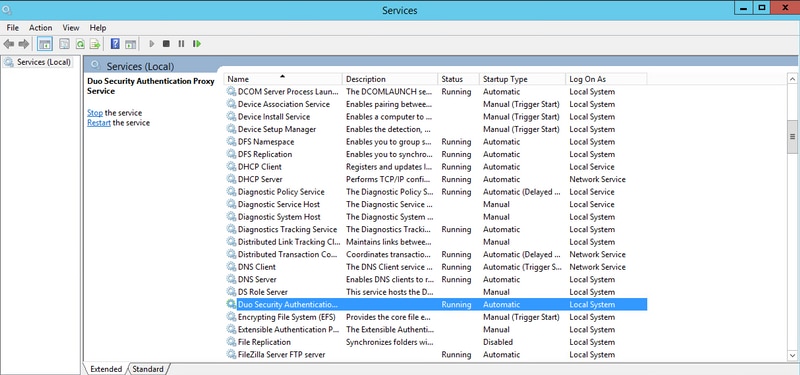
6. Restart the Duo Security Authentication Proxy Service. Save the file and Restart the Duo Service on the Windows machine. Open the Windows Services console (services.msc), locate the Duo Security Authentication Proxy Service in the list of services, and click Restart as shown in the image:
7. Create a username and activate Duo Mobile on the end device.
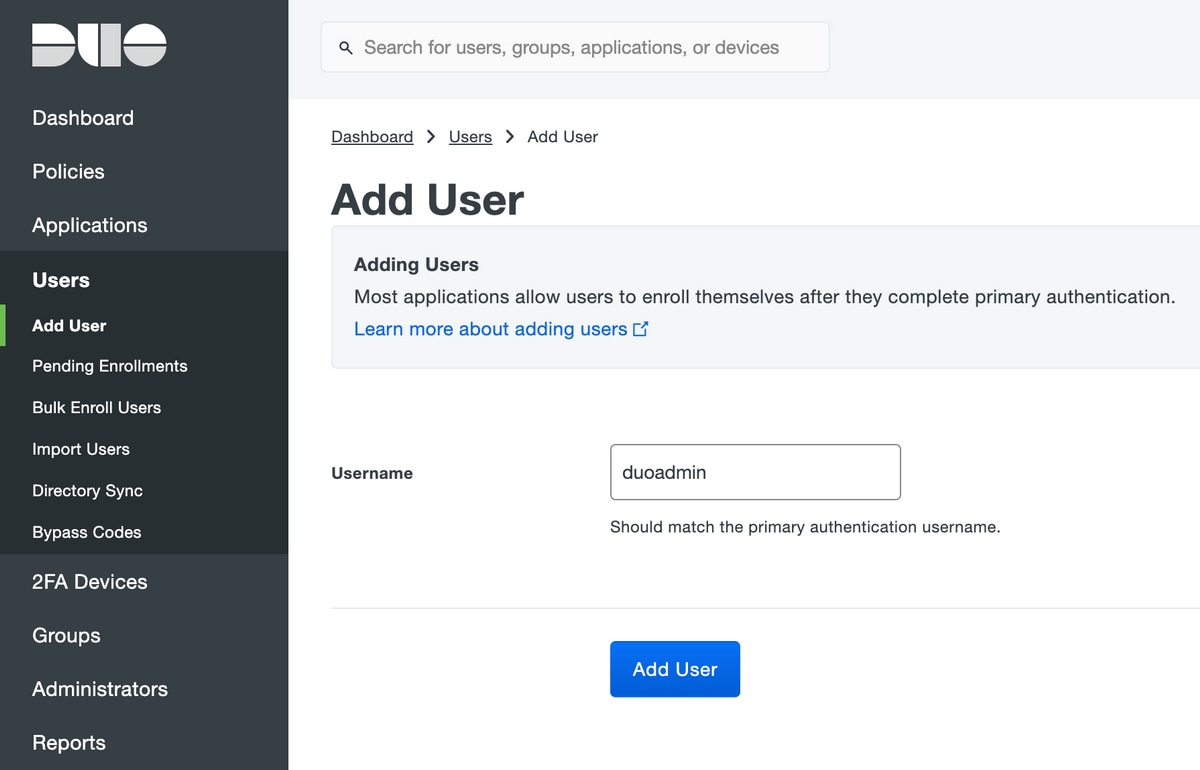
8. Add a user on the Duo Admin Panel. Navigate to Users > Add Users, as shown in the image:
9. Ensure the end user has the Duo app installed on their phone.


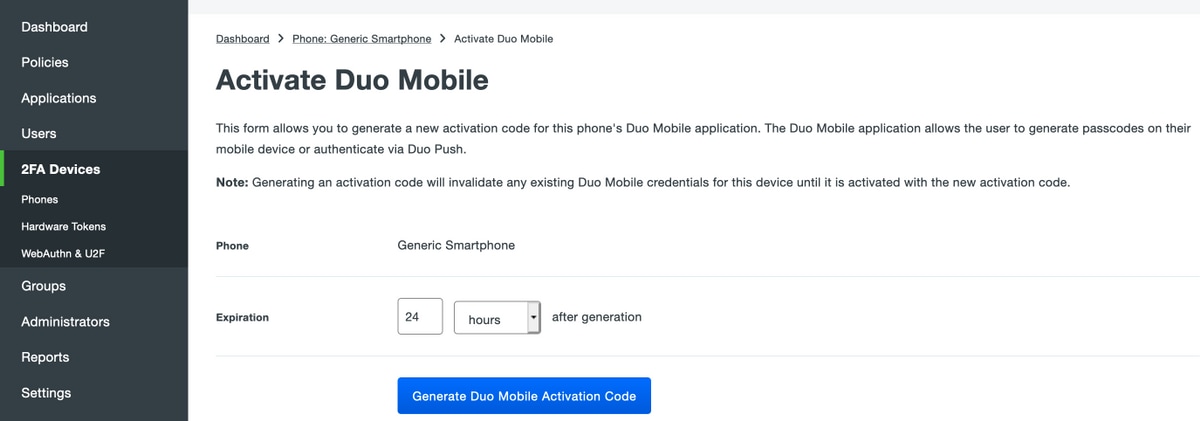
10. Select Activate Duo Mobile,as shown in the image:

11. Select Generate Duo Mobile Activation Code,as shown in the image:
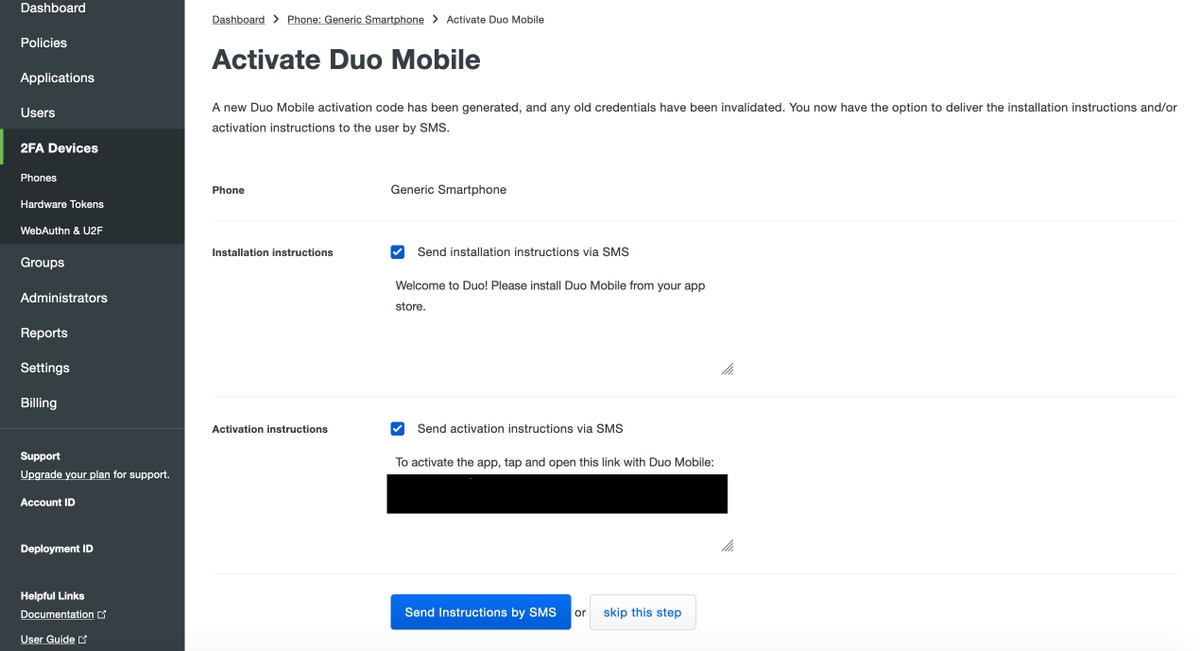
12. Select Send Instructions by SMS, as shown in the image:
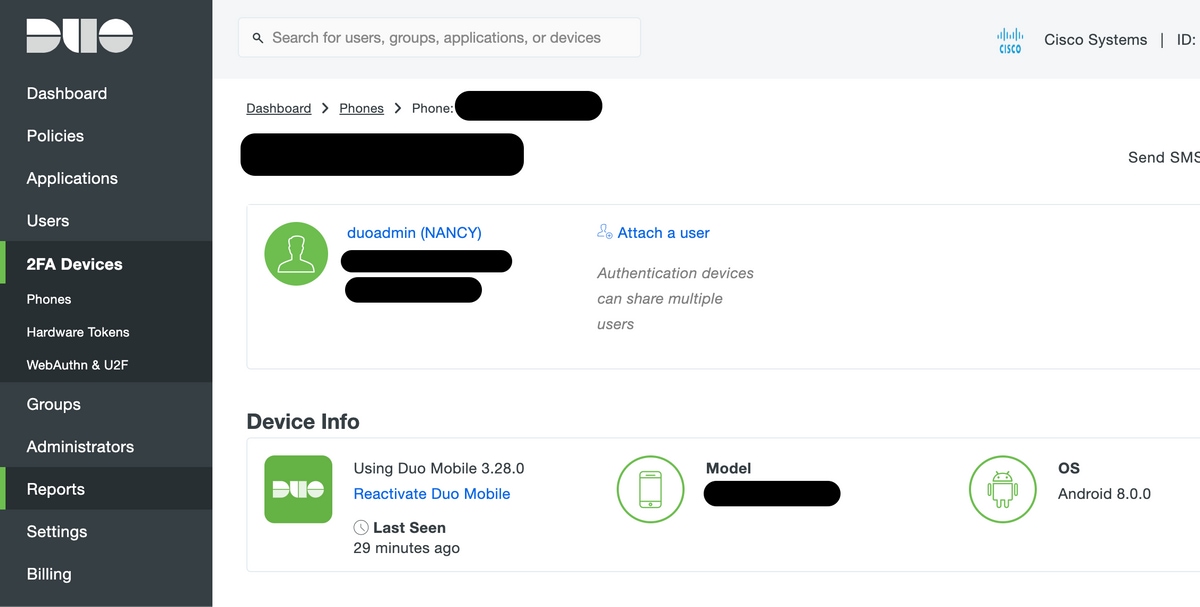
13. Click the link in SMS, and the Duo app is linked to the user account in the Device Info section:
ISE Configuration
Integrate ISE with the Duo Auth Proxy
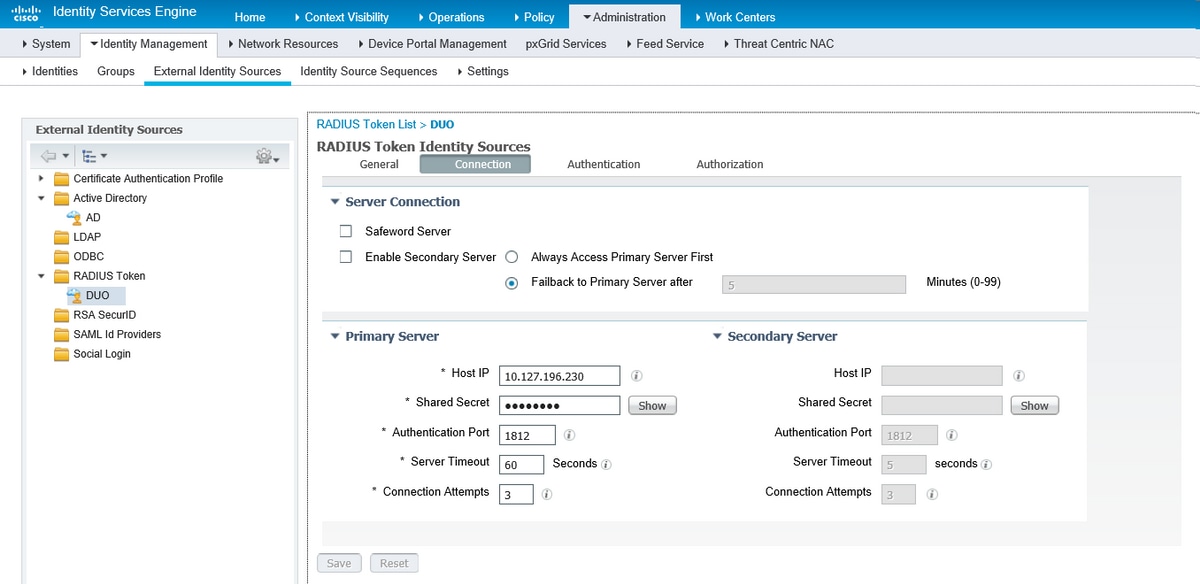
1. Navigate to Administration > Identity Management > External Identity Sources > RADIUS Token. Click Add to add a new RADIUS Token Server. Define the server name in the general tab, IP address and shared key in connection tab, as shown in the image:
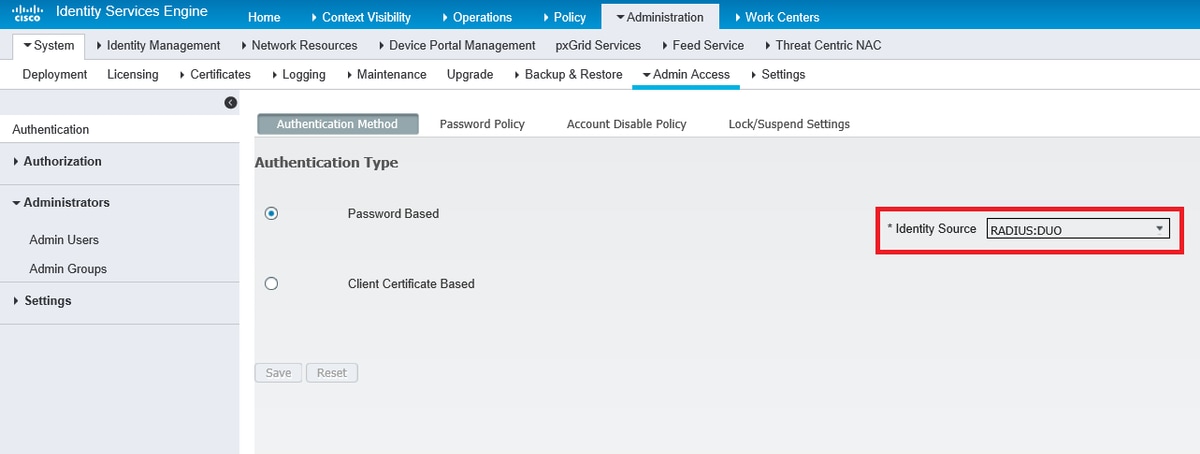
2. Navigate to Administration > System > Admin Access > Authentication > Authentication Method and Select the previously configured RADIUS token server as the Identity Source:
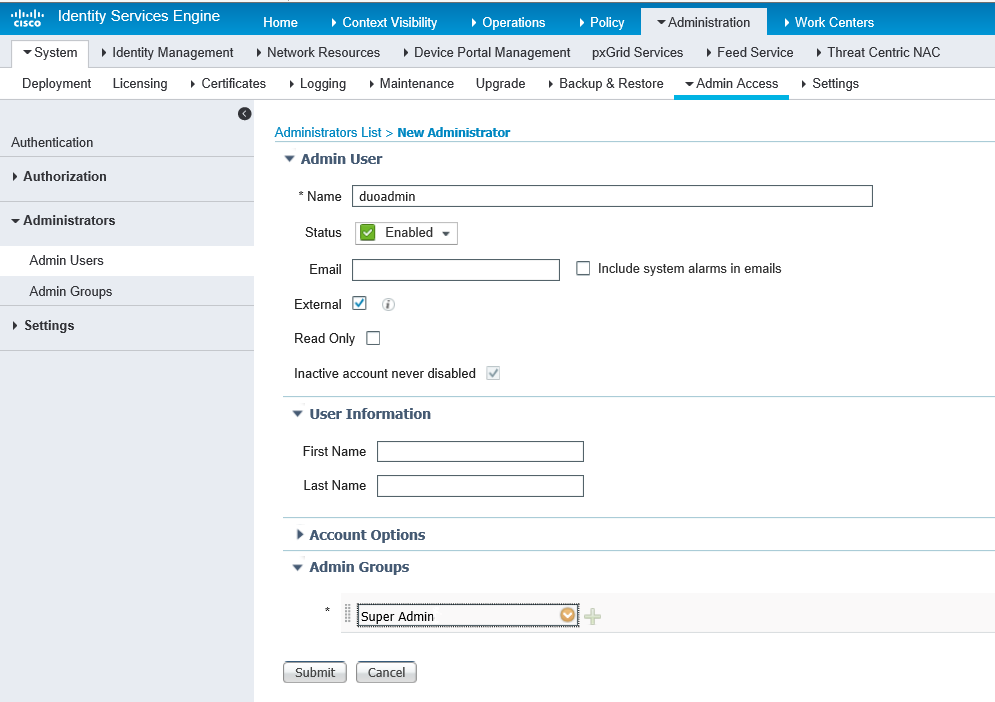
3. Navigate to Administration > System > Admin Access > Administrators > Admin Users and Create an admin user as external and provide super admin privilege:
Verify
Use this section to confirm your configuration works properly.
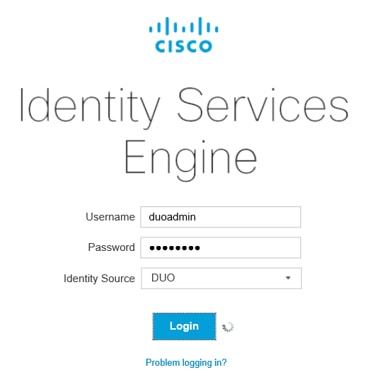
1. Open the ISE GUI, select the RADIUS Token Server as the Identity Source and log in with the admin user.
Troubleshoot
This section provides information to troubleshoot your configuration.
To troubleshoot issues related to the Duo Proxy Connectivity with Cloud or Active Directory, enable debug on the Duo Auth Proxy by adding "debug=true" under the main section of authproxy.cfg.
- The logs are located: C:\Program Files (x86)\Duo Security Authentication Proxy\log
- Open the file authproxy.log in a text editor such as Notepad++ or WordPad.
Log snippets of Duo Auth Proxy receiving request from ISE and sending it to Duo Cloud:
2019-08-19T04:59:27-0700 [DuoForwardServer (UDP)] Sending request from 10.127.196.189 to radius_server_auto
2019-08-19T04:59:27-0700 [DuoForwardServer (UDP)] Received new request id 2 from ('10.127.196.189', 62001)
2019-08-19T04:59:27-0700 [DuoForwardServer (UDP)] (('10.127.196.189', 62001), duoadmin, 2): login attempt for username u'duoadmin'
2019-08-19T04:59:27-0700 [DuoForwardServer (UDP)] Sending AD authentication request for 'duoadmin' to '10.127.196.230'
2019-08-19T04:59:27-0700 [duoauthproxy.modules.ad_client._ADAuthClientFactory#info] Starting factory
Log snippets of Duo Auth Proxy unable to reach Duo Cloud:
2019-08-19T04:59:27-0700 [duoauthproxy.modules.ad_client._ADAuthClientFactory#info] Stopping factory
2019-08-19T04:59:37-0700 [-] Duo preauth call failed
Traceback (most recent call last):
File "twisted\internet\defer.pyc", line 654, in _runCallbacks
File "twisted\internet\defer.pyc", line 1475, in gotResult
File "twisted\internet\defer.pyc", line 1416, in _inlineCallbacks
File "twisted\python\failure.pyc", line 512, in throwExceptionIntoGenerator

File "duoauthproxy\lib\radius\duo_server.pyc", line 111, in preauth
File "twisted\internet\defer.pyc", line 1416, in _inlineCallbacks
File "twisted\python\failure.pyc", line 512, in throwExceptionIntoGenerator
File "duoauthproxy\lib\duo_async.pyc", line 246, in preauth
File "twisted\internet\defer.pyc", line 1416, in _inlineCallbacks
File "twisted\python\failure.pyc", line 512, in throwExceptionIntoGenerator
File "duoauthproxy\lib\duo_async.pyc", line 202, in call
File "twisted\internet\defer.pyc", line 654, in _runCallbacks
File "duoauthproxy\lib\duo_async.pyc", line 186, in err_func
duoauthproxy.lib.duo_async.DuoAPIFailOpenError: API Request Failed: DNSLookupError('api-xxxxxxxx.duosecurity.com',)

2019-08-19T04:59:37-0700 [-] (('10.127.196.189', 62001), duoadmin, 3): Failmode Secure - Denied Duo login on preauth failure
2019-08-19T04:59:37-0700 [-] (('10.127.196.189', 62001), duoadmin, 3): Returning response code 3: AccessReject
2019-08-19T04:59:37-0700 [-] (('10.127.196.189', 62001), duoadmin, 3): Sending response
Related Information
Revision History
| Revision | Publish Date | Comments |
|---|---|---|
2.0 |
06-Aug-2026
|
Added TOC, updated Introduction, spelling, grammar, inserted horizontal lines to separate sections/readability, fixed CCW errors, edited alt text. |
1.0 |
04-Sep-2019
|
Initial Release |

 Feedback
Contact Cisco
- Open a Support Case

- (Requires a Cisco Service Contract)