Configure License Central on Prem and Register Licenses with ISE
Available Languages
Contents
Introduction
This document describes the integration of Cisco License Central On-Prem with Cisco Identity Service Engine (ISE) and Cisco Smart Account, ensuring a seamless setup.
Prerequisites
Requirements
- ISE 3.X
- Cisco License Central Version 8 Release 202304 +
Components Used
- Identity Service Engine 3.2 patch 2
- Cisco License Central On Prem 8.20234
- Windows Active Directory 2016 (DNS and Certificate Authority services)
- VMWare ESXi version 7
The information in this document was created from the devices in a specific lab environment. All of the devices used in this document started with a cleared (default) configuration. If your network is live, ensure that you understand the potential impact of any command.
Configure
Network Diagram
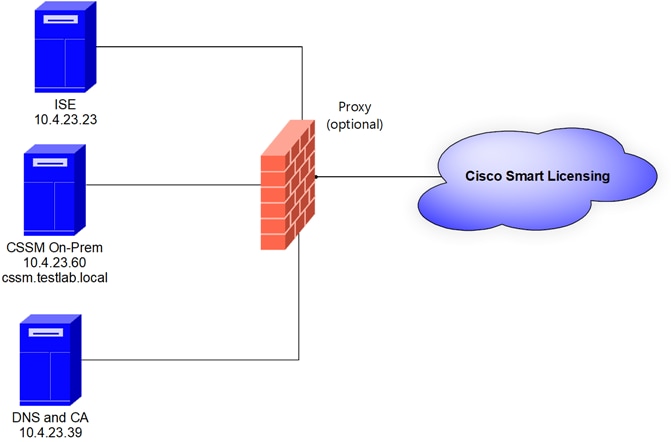 General topology
Install Cisco License Central On-Prem on VMWARE ESXi
- Download the Cisco IOS®. You can use the next link: https://software.cisco.com/download/home/286285506/type/286326948/release/8-202304
2. Upload the ISO in VMWARE ESXi.
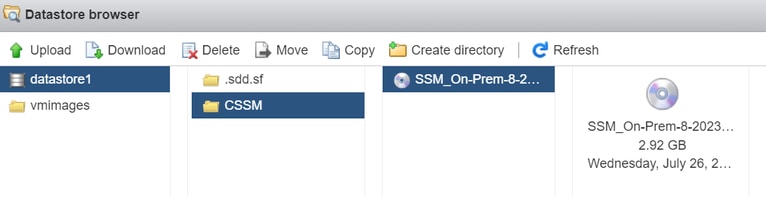
Navigate to Storage > Datastore Browser.
 Data browser section
3. Click Create Directory to create a new folder (optional).
 Creation of directory
In this example, the Cisco License Central folder was created:
 Creation of folders
4. Click Upload and then choose your ISO file.
 Uploading ISO
Now the ISO file is in the Cisco License Central folder:
 The ISO upload is completed
5. Create the Virtual Machine. navigate to Virtual Machine > Create / Register VM.
 Creating a new VM step 01
6. Choose Create a new virtual machine and click next.
 Creating a new VM step 02
7. Then configure the next parameters:
- Name: Enter the name of your virtual machine.
- Compatibility: Select either ESXi 6.0 or later or ESXi 6.5 or later.
- Guest OS family: Linux.
- Guest OS version: Choose either CentOS 7 (64 bit) or Other 2.6x Linux (64 bit)
Click Next.
 VM name and IOS
8. Select your Storage and click Next.
 Storage list
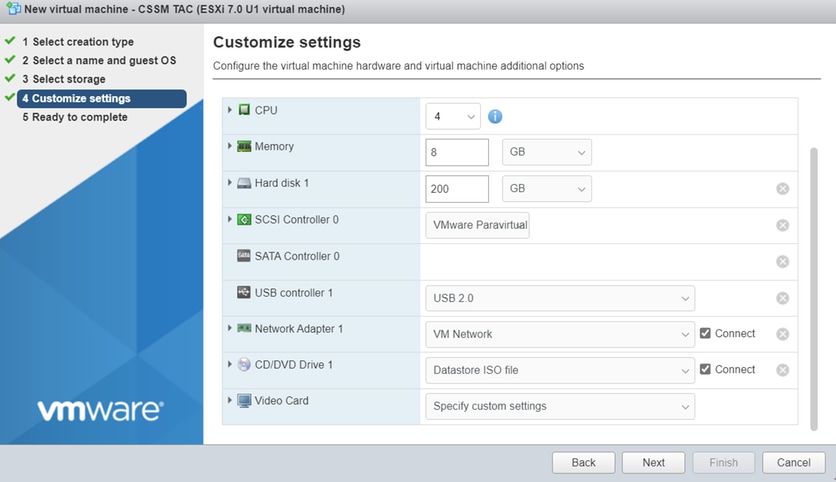
9. Configure the next parameters:
- CPU: 4 as minimum. The actual vCPU setting depends on your scale requirement

Note: The amount of cores per socket needs to be set to 1 regardless of the number of virtual sockets selected. For example, a 4 vCPU configuration needs to be configured as 4 sockets and 1 core per socket.
 Configuration of Cores
- Memory: 8 GB
- Hard Disk: 200 GB and and verify provisioning is set to Thin Provision.
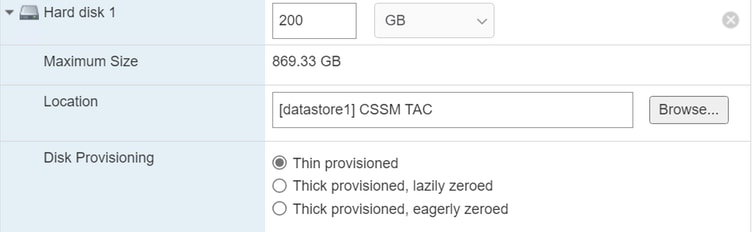 Configuration of disk
- Network Adapter: Select E1000 adapter type and select Connect at Power On.
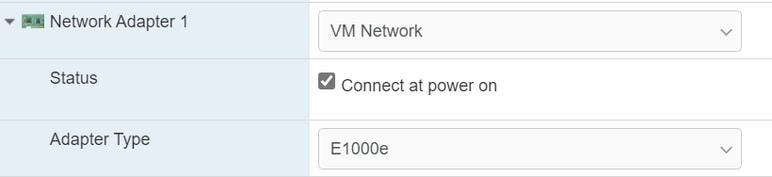 Configuration of network settings
- CD / DVD Drive: Choose Data ISO file and select the ISO file.
 ISO image
You can verify the summary of the settings once you have completed the previous steps.
 Summary VM configuration 01
Click Next.
10. Click Finish.
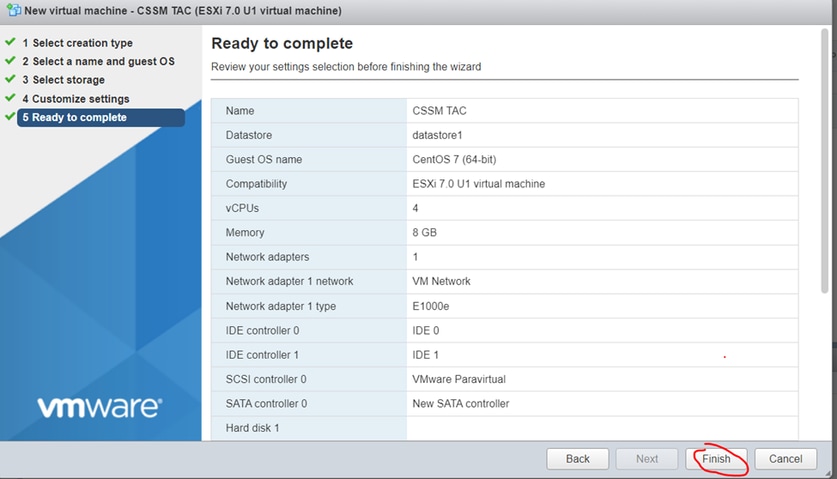 Summary VM configuration 02
Initial Configuration of Cisco License Central On-Prem
- In VMWARE ESXi, navigate to Virtual Machines and select your VM and then click Power On.
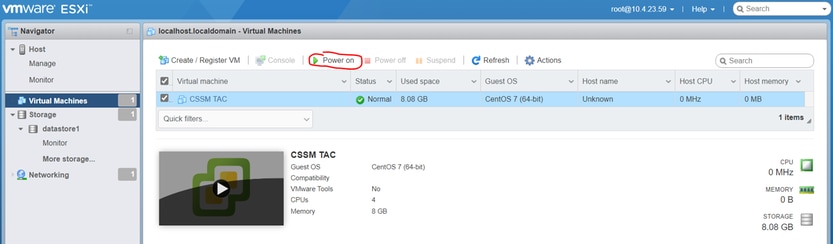 Power on option
- You have multiple options to manage the VM console. Select Console > Open browser console.
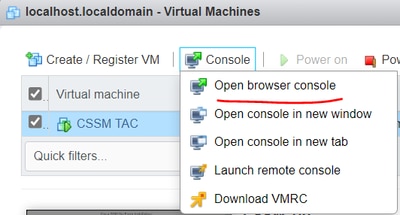 Options to manage the VM
- Configure your network settings.
Note: It’s important to configure the IP address of the DNS Server that resolves the Cisco License Central FQDN.
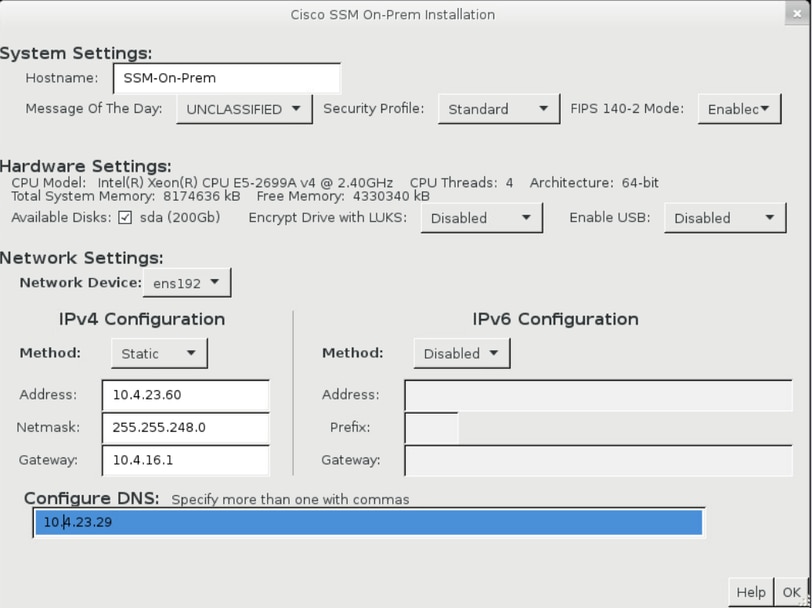 Configuration of CSSM network settings
Click Ok to configure your new CLI password.
- Then the installation process starts and is finished until you can see the access prompt.
 CSSM initial configuration completed
- Open a browser and enter https://<ip_address_Cisco License Central>.
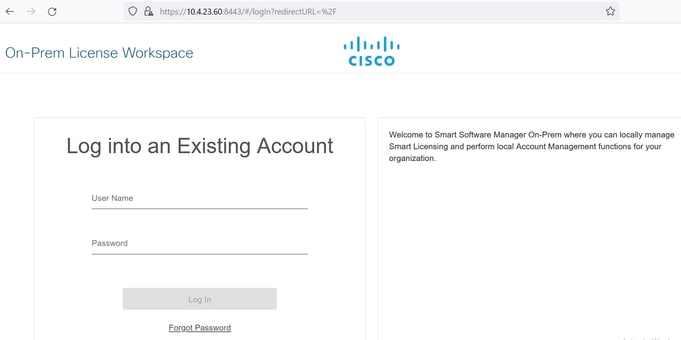 CSSM login page
Use the default credentials:
- Username: admin
- Password: CiscoAdmin!2345
- Select your language.
- Create a new GUI password.
- Configure the Host Common Name. (example: hostname.yourdomain).
In this case, the cssm.testlab.local was configured as Host Common Name.
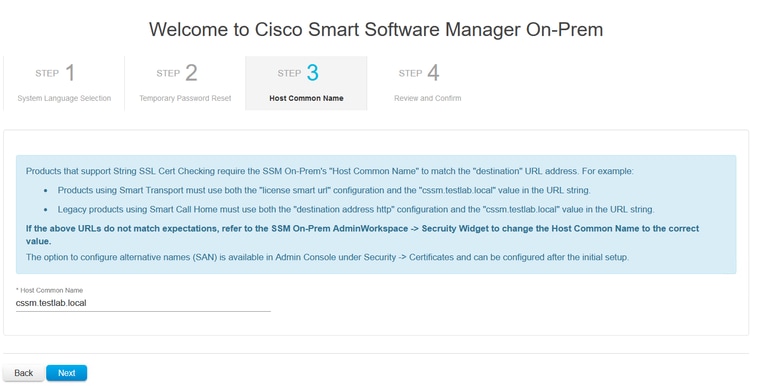 Host common name configuration
- Validate your configuration and click Apply.
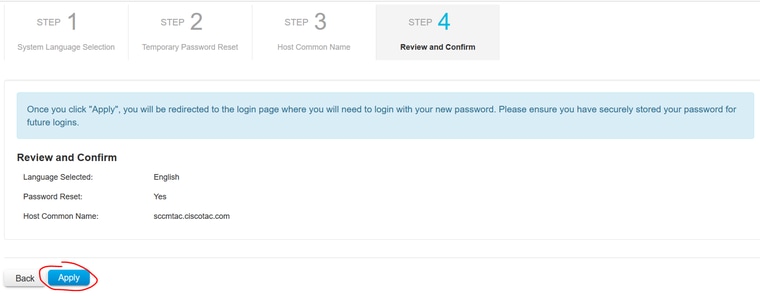 CSSM initial settings completed.
Integrate Cisco License Central On-Prem with Smart Account
You need to associate your Smart Account with your Cisco License Central On Prem Server.
- Open your Cisco Smart Account using the next link:
- Then choose Manage Licenses under the Cisco License Central section.
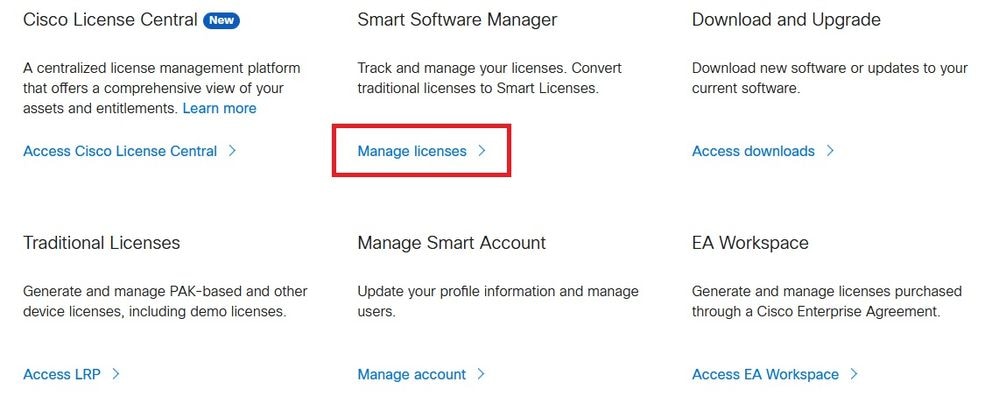 Manage licenses option Manage licenses option |
- Navigate to Inventory and copy the name of your Smart Account name and Virtual Account. In this guide, this is InternalTestDemoAccount67 and AAA MEX TEST.
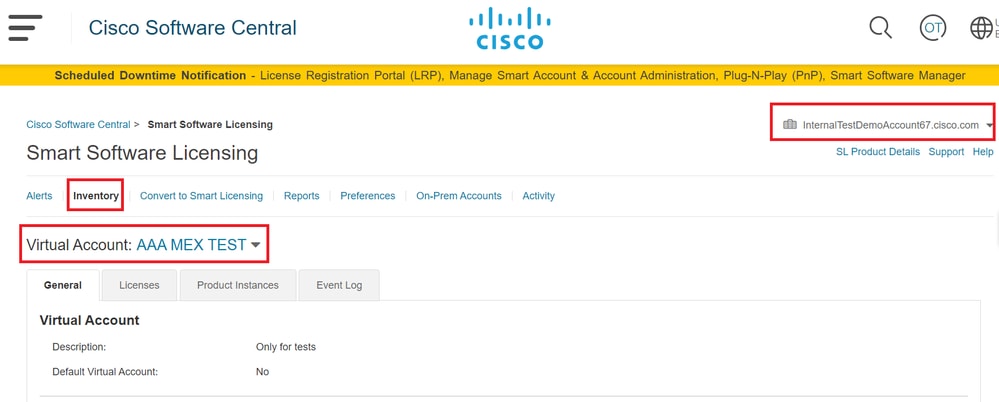 Software Cisco page
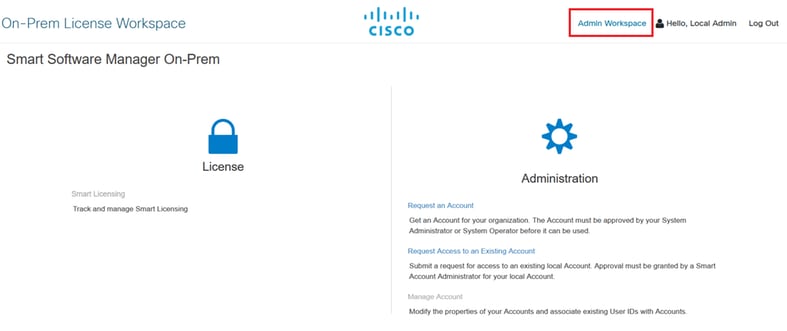
- Open the Cisco License Central GUI and select the Admin Workspace option.
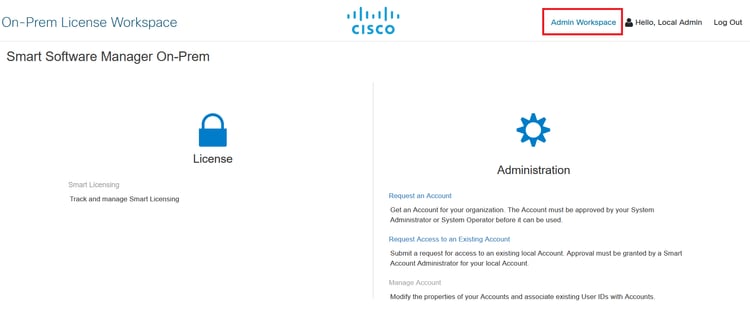 Main CSSM menu.
- Then select Accounts.
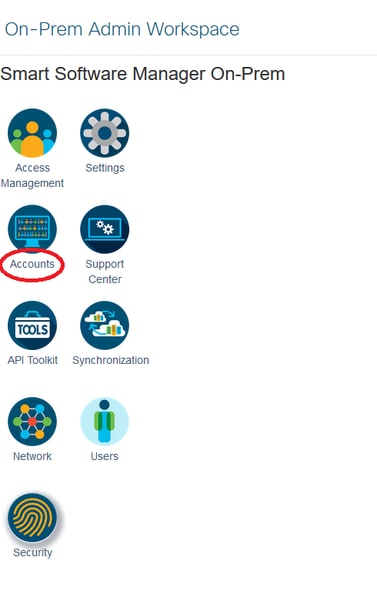 Accounts.
- Select New Account to create a new registration request.
 Creation of CSSM account.
- Enter the next information:
- Account name: This is a custom name of the new register.
- Cisco Smart Account: Paste your Smart Account name.
- Cisco Virtual Account: Paste your Virtual Account name.
- Email for notification: Type your email.
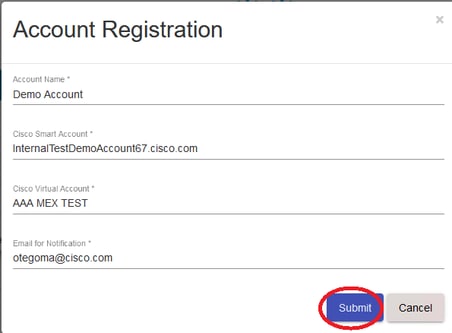 Account registration.
Click Submit.
- Then click Account Requests.
You can see the request done on the previous step in this section.
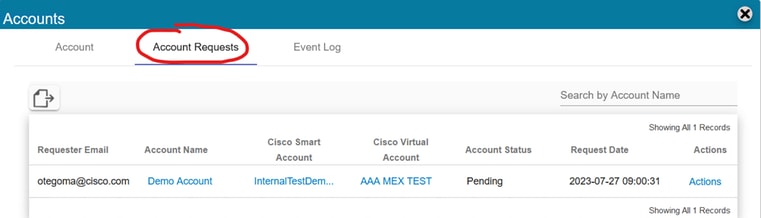 Account request.
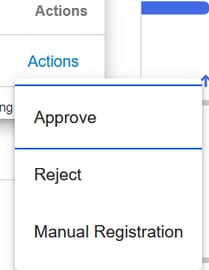
- Click actions.
 Actions option.
You have three options:
- Approve: Use this option to register the Cisco License Central On-Prem with your Smart Account through Internet.
- Reject: Drop the request.
- Manual Registration: Use this option to register the Cisco License Central On-Prem with your Smart Account without Internet.
OPTION 1: Register your Cisco License Central On-Prem through Internet Connection
- If you choose Approve, you need to enter your username and password of your Cisco Smart Account and click Submit.
 Approve option.
Then click next to accept the account registration.
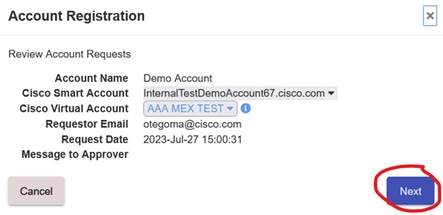 Account registration.
To confirm the status of the registration, navigate to Account and the Account status must be as active.
 Account status.
Now open your Smart Account (https://software.cisco.com/). Then select the On-Prem Accounts option to see the new register.
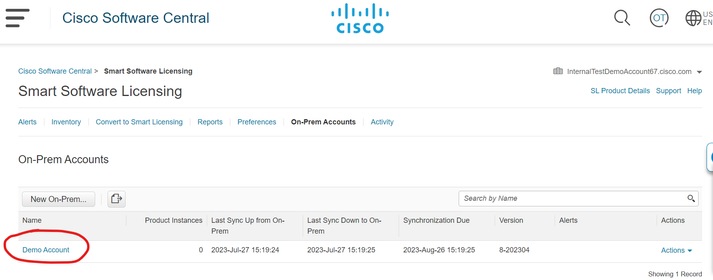 On Prem Account.
OPTION 2: Register your Cisco License Central On-Prem without an Internet Connection
If you choose Manual Registration, click Generate Registration File. This creates a Registration Request that is going to be downloaded to your computer.
 Manual registration.
Then open your Smart Account (https://software.cisco.com/) and navigate to On-Prem Accounts.
Click New On-Prem
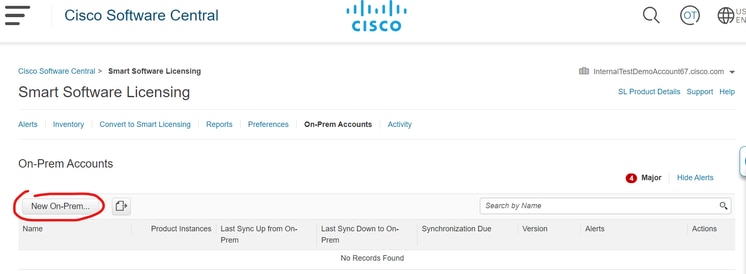 Adding new On-Prem.
Then configure the next parameters:
- On-Prem Name: This is a custom name of the new register.
- Registration File: Click Choose File and select the Registration Request.
- Virtual Account: Paste your Virtual Account name.
 Authorization file.
Click Generate Authorization File.
Then, download the Authorization File.
 Downloading authorization file.
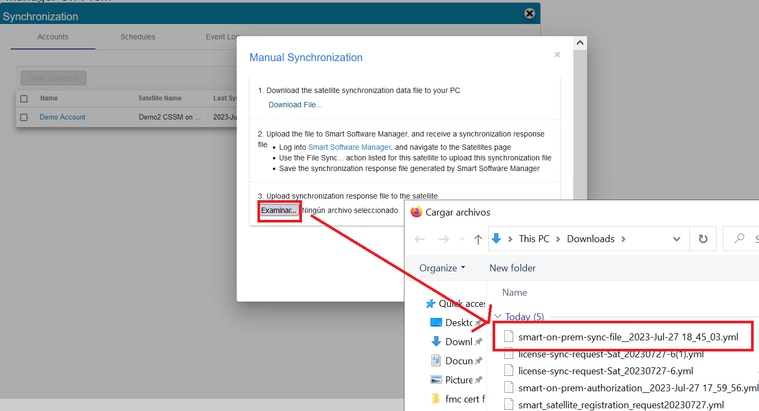
Open the Cisco License Central GUI to upload the Authorization File. Click Browse, choose the file, and then click Upload.
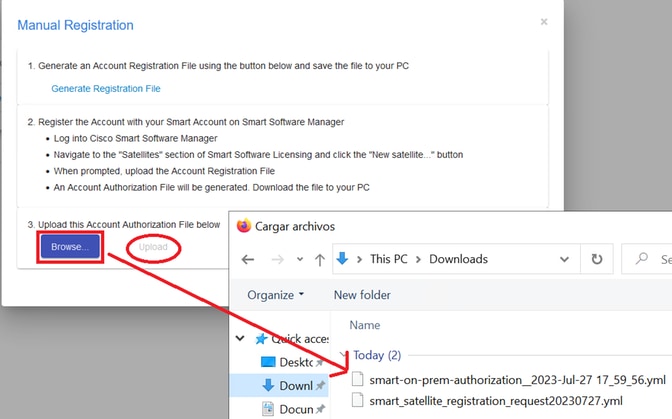 Uploading authorization file.
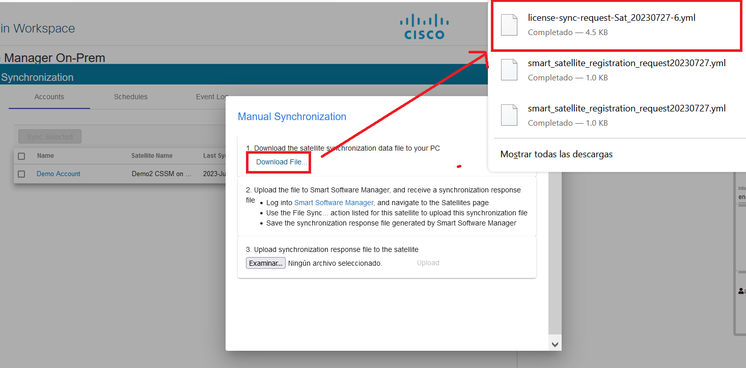
Then navigate to Synchronization and click Actions > Manual Synchronization > Full Synchronization.
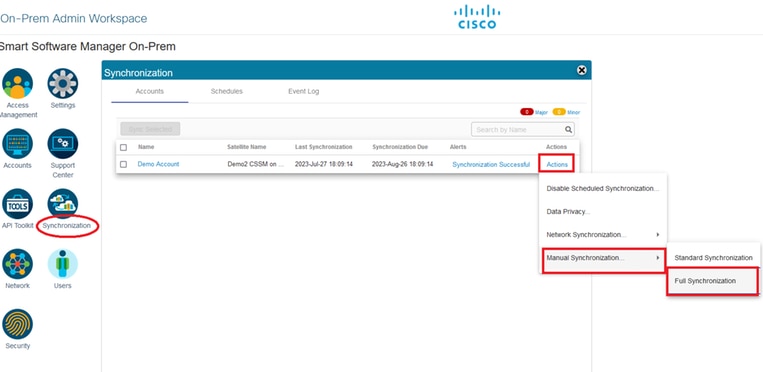 Manual Sync.
Download the Sync request file.
 Downloading file Sync.
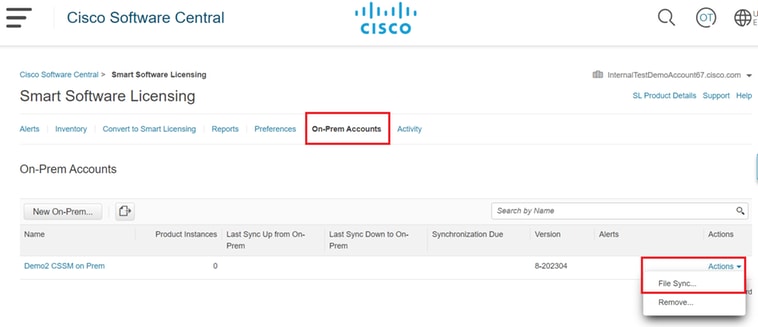
Open your Smart Account and select On-Prem Account, then look for your Cisco License Central On-Prem name in the list, and click Actions > File Sync
 Uploading file Sync.
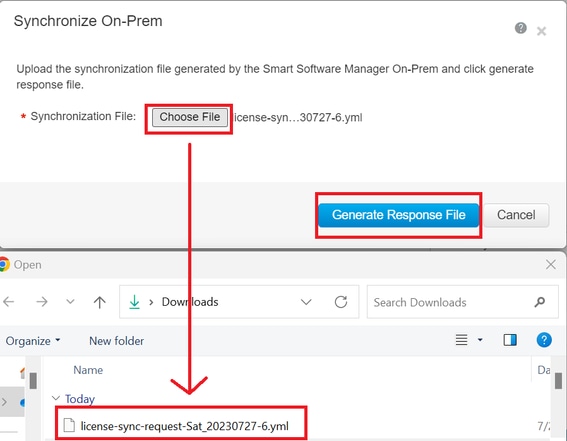
Then upload the Sync request file, and click Generate Response File.
 Generate a response file.
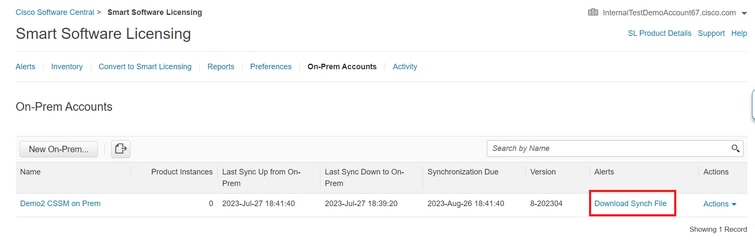
Then click Download Synch Response File
 Sync file.
And finally, upload the Synch Response File in the Cisco License Central on Premise.
 Sync completed.
Integrate Cisco License Central On-Prem with ISE.
- Open the Cisco License Central GUI and select Admin Workspace.
 Main CSSM menu.
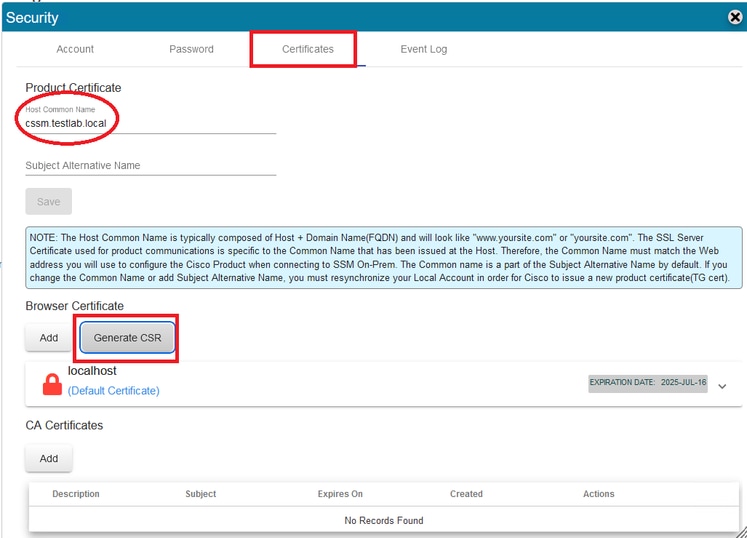
- Navigate to Security > Certificates > Generate CSR.
Note: It’s important to have the hostname + domain configured on the Host Common Name because ISE uses this parameter in order to establish a connection with the Cisco License Central. You can use an IP address instead of the hostname + domain, however the recommendation is to use the hostname + domain
Note: The next steps describe the procedure to install the GUI certificate in the Cisco License Central. If you want to protect the management connection to your GUI Cisco License Central by using a certificate signed by your personal Certification Authority (CA) you need to check the next steps. Otherwise, check directly the step 9.
 CSR option.
- Then enter your personal information. Be aware the Subject Alternative Name is created automatically by using the same value as the Common Name. The CSR is downloaded automatically after clicking Generate.
 CSR details.
- Sign the CSR:
- Upload the root CA certificate.
 Uploading Root CA.
Click Proceed.
 Proceed option.
- Enter a description and choose the root certificate and click Ok.
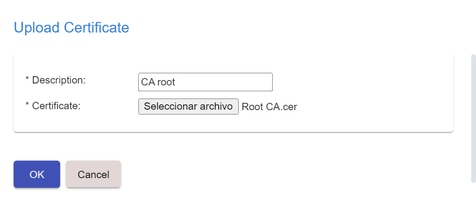 Description root CA.
- Upload the CSR signed by the CA (Cisco License Central Identity Certificate).
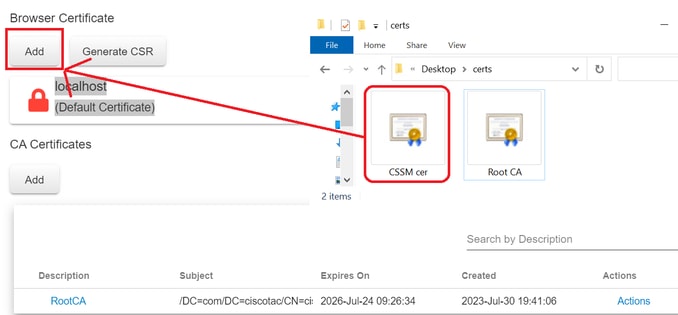 Uploading CSSM Identity Cert.
Note: NOTE: In our case, the Intermediate certificate does not exist in our CA. However, if you use an intermediate certificate in your architecture, the intermediate certificate is mandatory.
8. Then, confirm that both certificates have been installed.
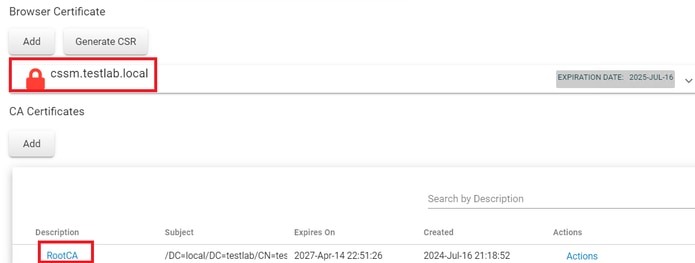 Certificates validation.
- Create a token on Cisco License Central On-Prem: Select licensing Workspace.
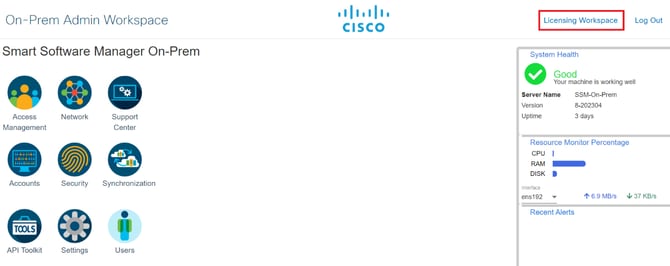 Workspace page.
- navigate to Smart Licensing.
 CSSM Smart licensing page
- Look for your Local Virtual Account, then click New Token and click Proceed.
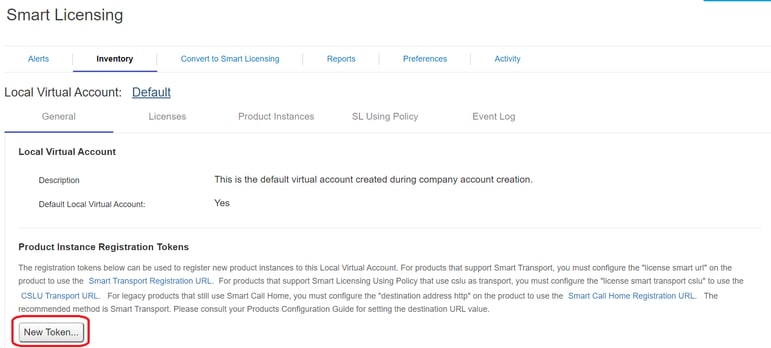 New token option.
- Select Create Token and copy it.
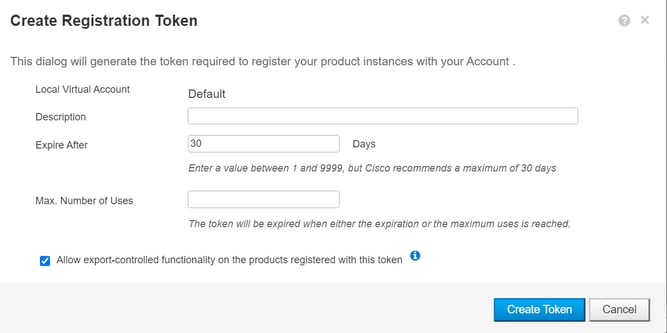 Creation of new token.
 Token details.
- Open the ISE GUI and navigate to Administration > Systems > Licensing, then click Registration details, select the Cisco License Central On-Prem server Host method, and paste the token.
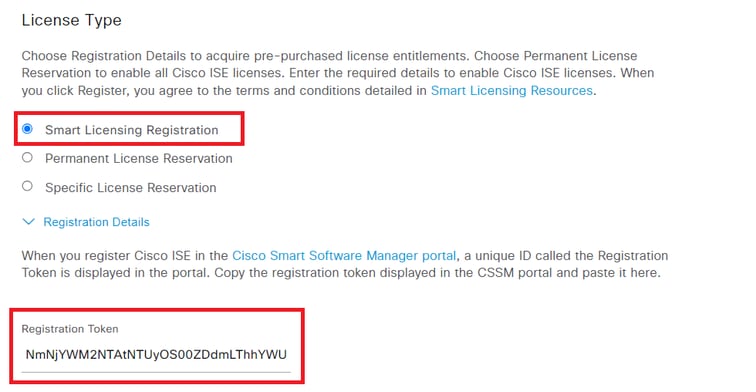 Registration of licenses.
- Enter the Cisco License Central On-Prem FQDN on Cisco License Central On-Prem server Host and click Register.
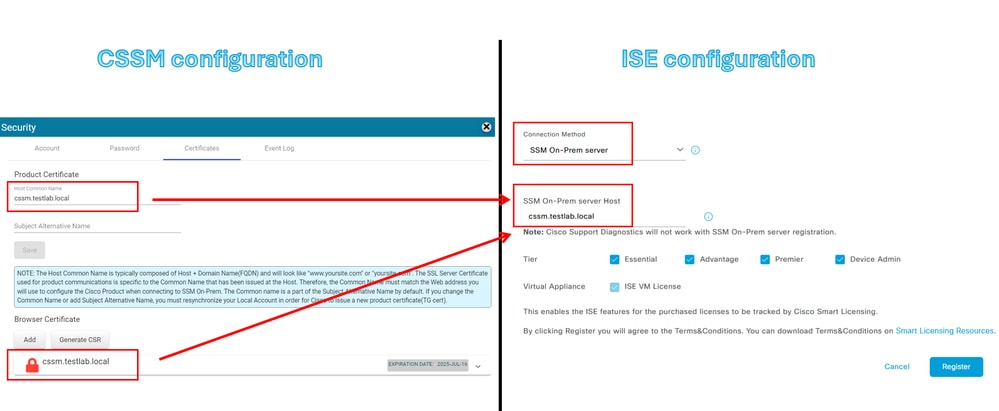 CSSM and ISE settings.
Note: It’s important to have the hostname + domain configured on the Host Common Name because ISE uses this parameter in order to establish a connection with the Cisco License Central. You can use an IP address instead of the hostname + domain, however the recommendation is to use the hostname + domain
- And finally, the registration has been completed.
 Registration completed.
Create certificates from Windows CA.
If you are the administrator of the Certificate Authority, you must do the next:
- Open a web browser and navigate to http://localhost/certsrv/
- Click Request a certificate.
 Request certificate.
- Click advanced certificate request.
 Advanced certificate request.
- Open the CSR generated previously. Then copy the information and paste it in Saved request.
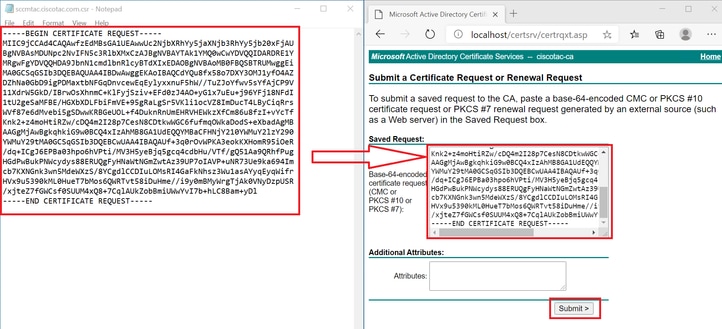 Submit certificate.
After clicking Submit the certificate is downloaded automatically.
- Now download the CA certificate root. navigate back to http://localhost/certsrv/ and select Download a CA Certificate, Certificate Chain, or CRL.
 Download root CA.
- Download the CA certificate by using the encoding method as Base64.
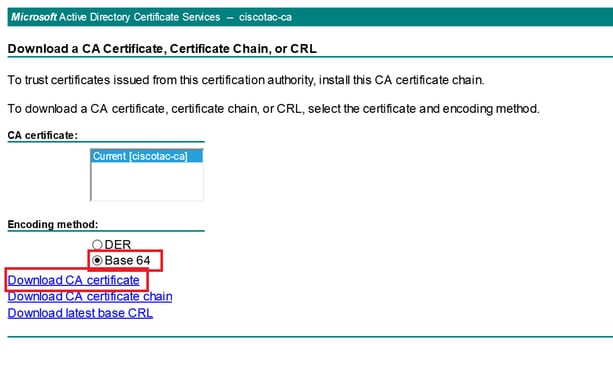 Base 64 option.
Add DNS records on Windows Server
If you are the administrator, add the ISE and Cisco License Central FQDNs.
- Open the DNS Manager: Type “DNS” on the Windows finder and open the DNS app.
 DNS option.
- Navigate to Forward Lookup Zones > And choose your domain.
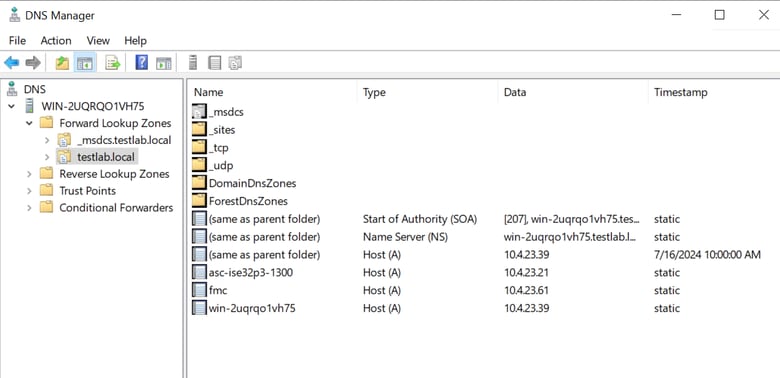 DNS manager.
- Right-click on a black space over the screen and select New Host (A or AAAA).
 Adding record.
- Configure the record DNS as the next:
- Name: It means the name of the host.
- The IP Address of the device.
Click Add Host.
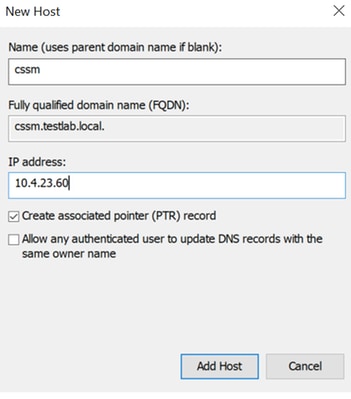 Record settings.
Troubleshoot
Host/IP Address is not reachable. (Error on ISE)
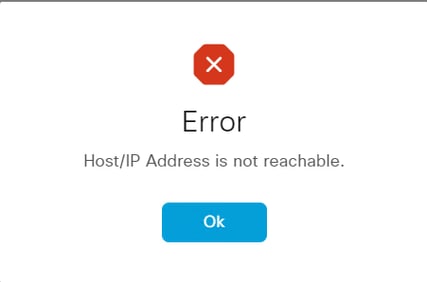 Reachable error.
Solution 1: Check and fix the DNS configuration in the ISE node.
- Open the ISE CLI and type nslookup <Cisco License Central_FQDN>.
On the next example, we can see that cssm.testlab.local wasn’t resolved from the ISE node.
 CSSM resolution failed.
The correct resolution would be:
 CSSM resolution successfully.
Action Plan:
- Check the DNS configuration topic on this document.
- Enter the show running-config command on the ISE CLI in order to check the “ip name-server”. The “ip name-server” needs to match with the IP address of the DNS Server.
Solution 2: Open the Cisco License Central GUI to confirm that the Host Common Name and Browser Certificate are the same as Cisco License Central On-Prem server Host parameter on the ISE side.
Wrong scenario:
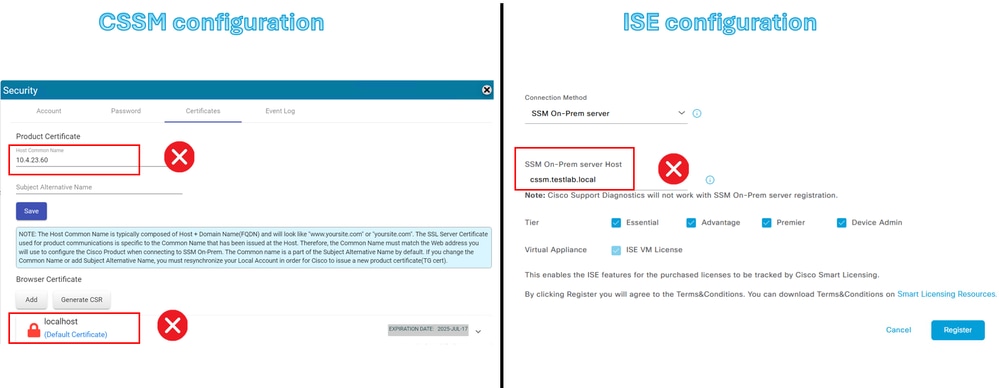 CSSM resolution and ISE setting are incorrect.
Correct scenario:
 CSSM resolution and ISE setting are correct.
Action Plan: See “ISE and Cisco License Central configuration” in this guide for more information.
SSO service: Unable to reach Cisco. (Error on Cisco License Central On-Prem)
 Account registration failed.
Solution: Check your connectivity to the Internet.
Action Plan:
- If you need a proxy to get access to the Internet, navigate to Network > Proxy and enable the Use A Proxy Server option and click Apply.
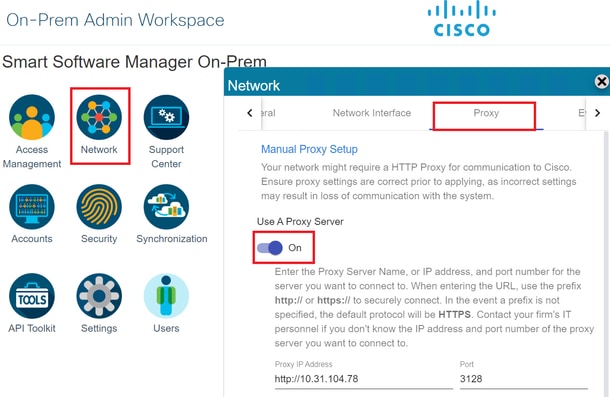 Proxy configuration.
The Common Name in the CSR is not a DNS-resolvable hostname or IP address, please try again. (Error on Cisco License Central On-Prem)
 CSR error.
Solution: Check and fix the DNS resolution on the Cisco License Central Server.
- Open the Cisco License Central CLI and type nslookup <Cisco License Central_FQDN>.
On the next example, we can see that cssm.testlab.local was not resolved from the Cisco License Central Server.
 The DNS server is not reachable.
The correct output would be the next:
 The DNS server is reachable.
Action Plan:
Check the DNS configurations on the Cisco License Central On-Prem.
- navigate to Network > General > DNS Setting.
The Primary or Alternate DNS needs to be the same as the IP address of the DNS Server.
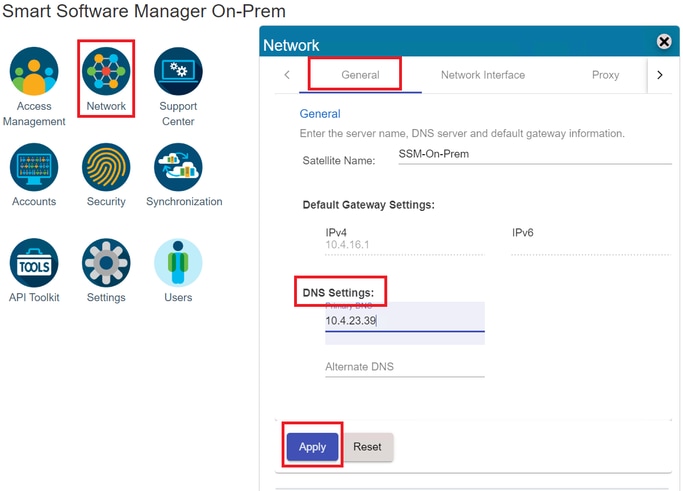 DNS settings.
Revision History
| Revision | Publish Date | Comments |
|---|---|---|
2.0 |
08-Jun-2026
|
Al text, formatting, Replace references to "Cisco Smart Software Manager (SSM)" with "Cisco License Central." |
1.0 |
25-Jul-2024
|
Initial Release |
 Feedback
Contact Cisco
- Open a Support Case

- (Requires a Cisco Service Contract)