Configure and Troubleshoot ISE 3.2 with FMC 7.2.4 Integration
Available Languages
Contents
Introduction
This document describes the process to integrate Identity Services Engine with Firewall Management Center using Platform Exchange Grid connections.
Prerequisites
Cisco recommends knowledge in these topics:
- TLS/SSL Certificates
- Platform Exchange Grid
- Identity Services Engine (ISE)
- Firewall Management Center (FMC)
Components Used
The information in this document is based on these software and hardware versions:
- Firewall Management Center Version 7.2.4
- Identity Services Engine (ISE) Version 3.2 Patch 3
The information in this document was created from the devices in a specific lab environment. All of the devices used in this document started with a cleared (default) configuration. If your network is live, ensure that you understand the potential impact of any command.
Background Information
This documentation provides a solution to integrate FMC and ISE using pxGrid Version 2. Cisco Firepower Management Center (FMC) is a centralized platform for Next Generation Firewall and Intrusions Prevention System, offering policy management, threat detection, and incident response. Cisco Identity Services Engine is a comprehensive solution that provides secure access to endpoints by providing services of authentication, authorization, and accountability (AAA) and policy enforcement.
Platform Exchange Grid (pxGrid) enables you to interchange information among multivendor, and the cross-platform network. This integration provides secure monitoring, detection of threats, and set network policies based on the information shared. PxGrid framework has two versions; one to use (depends on the ISE version) and patch; you must review.
Starting with Version ISE 3.1, all pxGrid connections from ISE are based on pxGrid Version 2.
pxGrid Version 1
The first version of this framework (pxGrid v1) is characterized on the serviceability seen through the command show application status ise as displayed in the output. When the pxGrid feature is enabled in the node, you can see the pxGrid features in a running status:
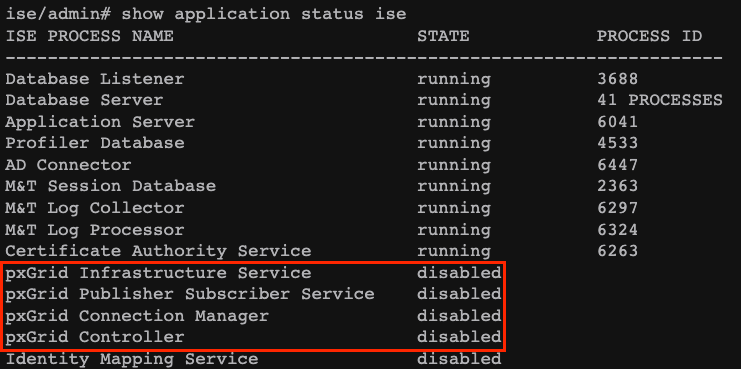 PxGrid version 1 serviceability.
In this version of the platform, there is only one pxGrid node with the pxGrid process running status while the other pxGrid nodes are in a standby status. These nodes continually monitor the pxGrid node and its associated services to ensure they are running properly. The secondary pxGrid node was promoted to primary, and the other node enabled its pxGrid services. However, that represented a downtime when the failover occurred.
The first version of pxGrid was based on communication in Extensible Messaging and Presence Protocol (XMPP), which is a set of technologies used in collaboration and voice infrastructures.
The topics shared in a pxGrid v1 connection are:
- SXP
- Identity
- Session Directory
- Trustsec MetaData
- MDM_Offline Topic
- Adaptive Network Control
- Endpoint Profile MetaData
- Endpoint Protection Capability
PxGrid Version 2
This document covers the use of pxGrid v2. This platform operates using REST operations on ISE and WebSocket protocols which brings enhancements, improved scalability, performance, and flexibility in data models. In this version, you do not see pxGrid features running like previous versions with the command show application status ise.
Refer to the validation section for ISE in this document to understand which mechanisms to review with pxGrid functionalities.
In this version, you have pxGrid nodes to configure as active pxGrid nodes. These are ready to participate in the exchange of information at any time. With v1, only one node held the serviceability of pxGrid as running.
The topics shared in a pxGrid v2 connection are:
- MDM
- TrustSec
- ANC Status
- TrustSec SXP
- Radius Failure
- System Health
- Endpoint Asset
- Session Directory
- Profiler Configuration
- TrustSec Configuration
Components of pxGrid as Platform
pxGrid Controller (ISE): Must trust each of the participants that use pxGrid.
Client: Can be a subscriber and publisher of different topics.
Publisher: Client that shares information with the controller.
Subscriber: Client that consumes the information of a topic.
This integration allows you to create content policies on the FMC based on the information that is shared by ISE and their published topics (related to the endpoint activity).
Configure
Prepare the ISE for the Integration
Step 1. Configure the ISE node to run the pxGrid persona from the menu Administration > System > Deployment.
Step 2. Select the nodes and enable the pxGrid feature.
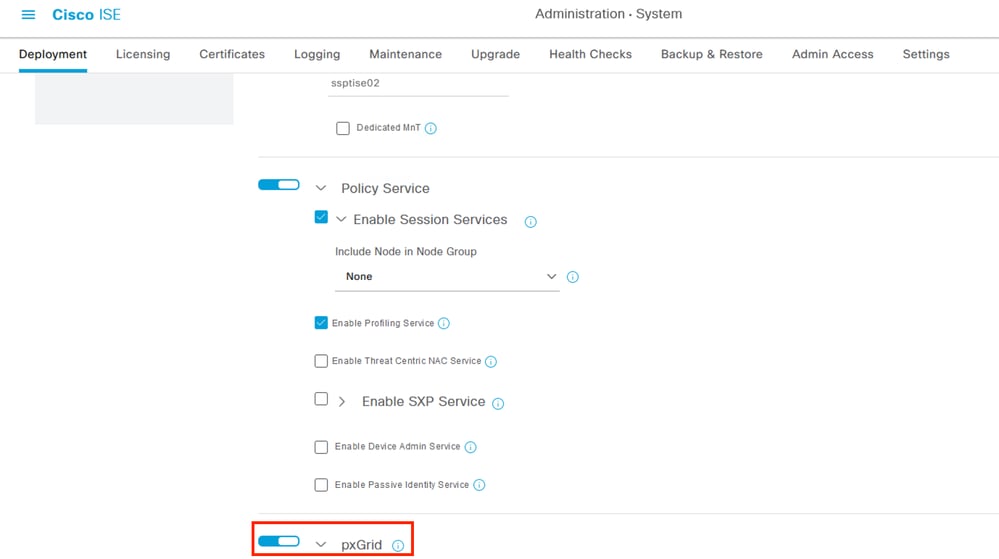 Enabling ISE pxGrid services in a node.
Step 3. After enabling the nodes with the pxGrid feature, review the status of the Websockets related to the connected internal clients.
Step 4. Navigate to Administration > pxGrid Services > Websocket - Notice clients pointing to the ISE services directly through the IP address 127.0.0.1.
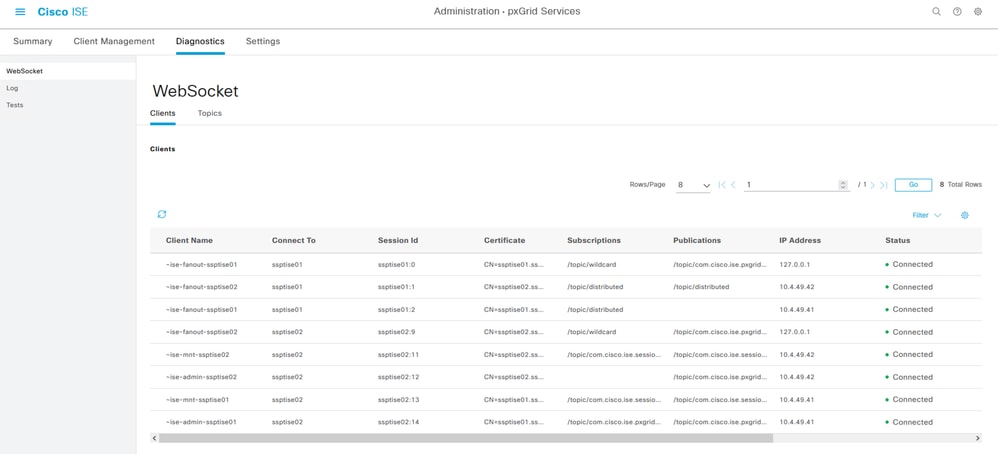 Internal WebSockets from ISE.
Step 5. Navigate through the menu, Administration > pxGrid Services > Settings and select the option to Automatically approve new certificate-base accounts, This step is optional, however, for the pxGrid connection, it is recommended to enable this checkbox. You can accept the FMC as subscriber manually after.
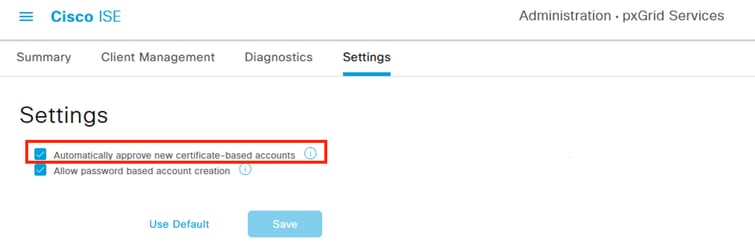 Enabling Automatic approval for pxGrid certificate based accounts.
Step 6. Review the certificates related to the pxGrid functionality of your environment in Administration > System > System Certificates, It is recommended you have homogenous pxGrid certificates in all nodes of your deployment signed by the same root Certificate Authority (CA). In this example, the internal ISE certificates are generated and the root CA corresponds to the PAN node.
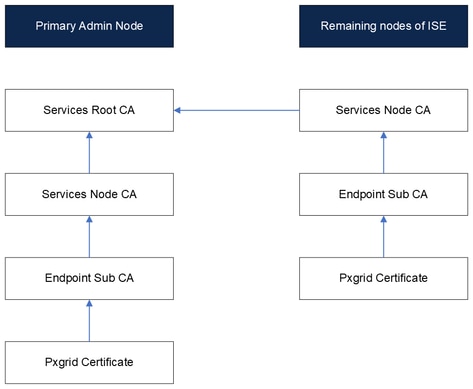 Diagram Internal Certificates on ISE.

Note: For further about the internal structure of certificates generated on ISE please refer to Understand ISE Internal Certificate Authority Services.
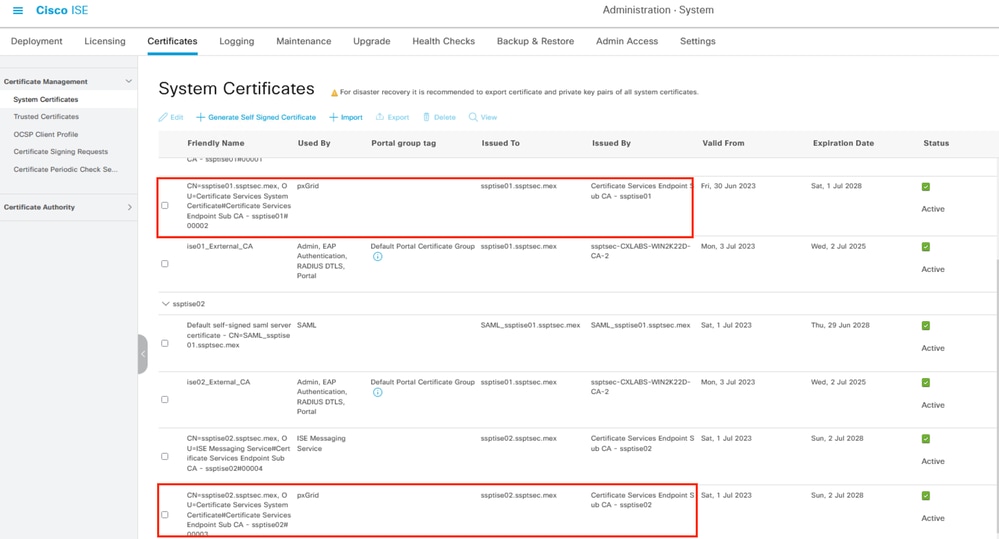 PxGrid certificates in a distributed deployment.
Step 7. Verify the status of the pxGrid certificates. From the previous menu, select the checkbox from the node pxGrid certificate, then select the option View. The output looks like the one displayed in the pxGrid certificates.
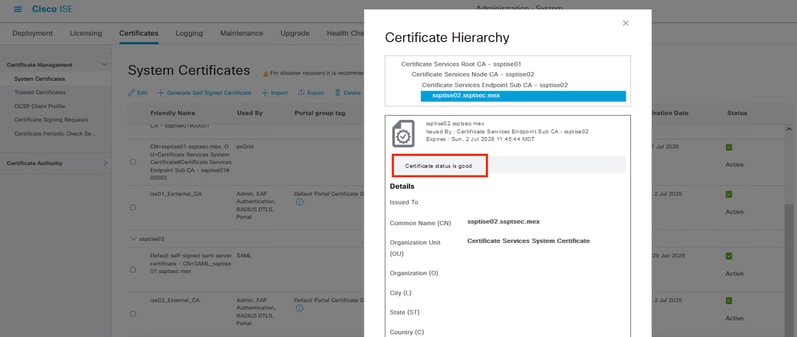 Verification of pxGrid certificate.
Prepare the FMC for the Integration
Step 1. Confirm the FMC internal time is up to date by navigating to System > Configuration > Time.
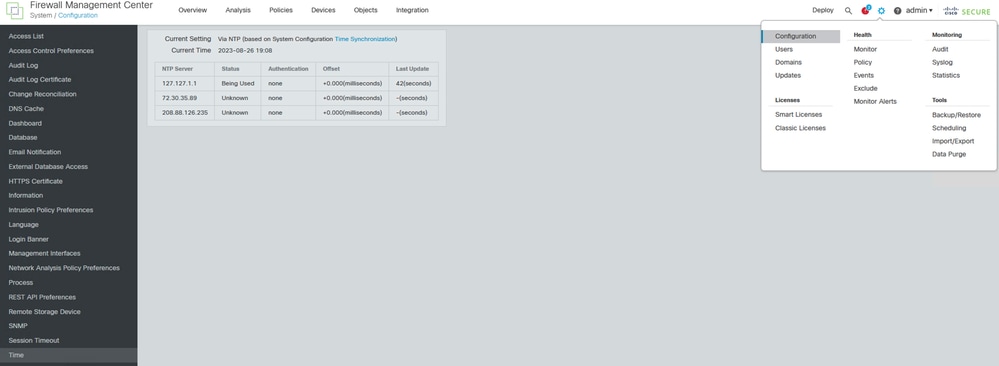 Verifying that the FMC is up to date.
If the FMC time is not updated, ensure the NTP is properly configured and in sync. NTP can be configured under System > Configuration > Time > + Add.
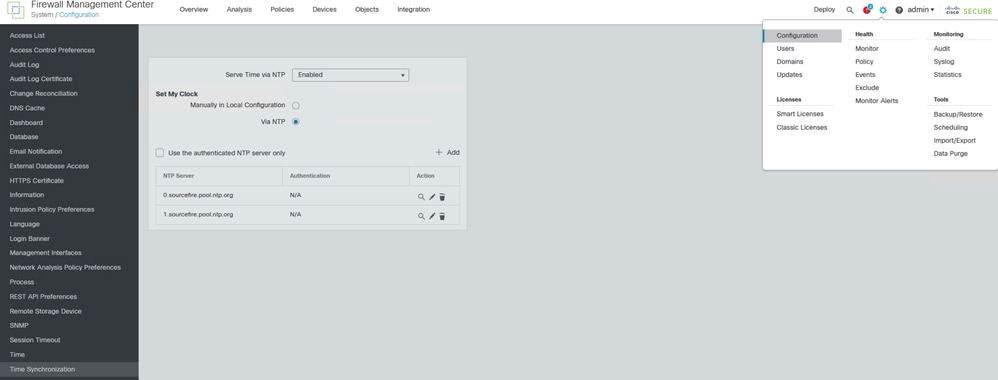 Time Synchronization on FMC.
Step 2. Navigate to System > Configuration > Management Interface > Shared Settings and verify the Primary DNS Server field contains a valid DNS server IP.
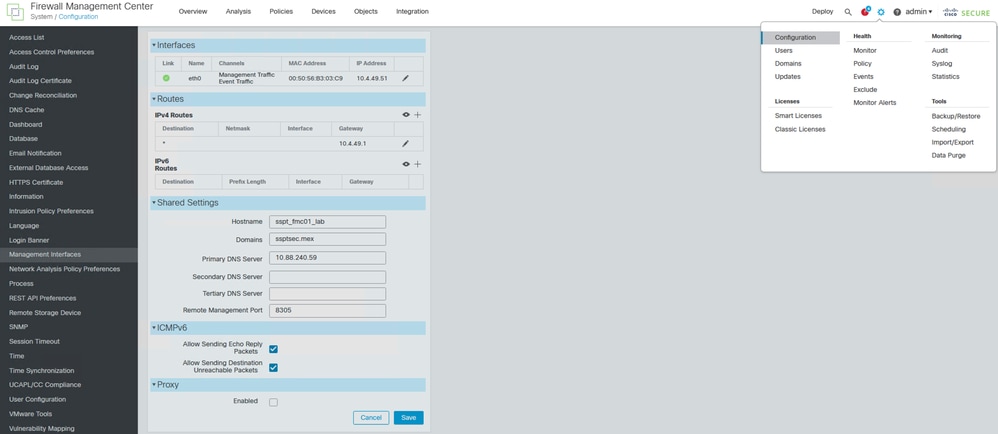 DNS configuration on FMC.
Step 3. Confirm the FMC hostname is configured. Navigate to System > Configuration > Management Interface > Shared Settings and verify the Hostname field contains the FMC hostname. Verify this step while reviewing the previous step in this section.
Setting up the pxGrid Connection between ISE and FMC
Step 1. Navigate to the menu Administration > pxGrid Services > Client Management > Certificates. In the first option, select I want to Generate a single certificate (without a certificate signing request).
Step 2. In the Common Name (CN) section, input the FQDN of the FMC where the ISE issues a certificate and provide a description.
Step 3. In the section of Subject Alternative Name (SAN), input the FQDN and IP address of the FMC to connect.
Step 4. At the bottom of the Certificate Download Format, select the drop-down menu and choose Certificate in Privacy Enhanced Electronic Mail (PEM) format. Input PKCSS PEM format (including certificate chain).
Step 5. Input and store a password in Certificate Password (this password is used later in the FMC.) Confirm the password and select Create.
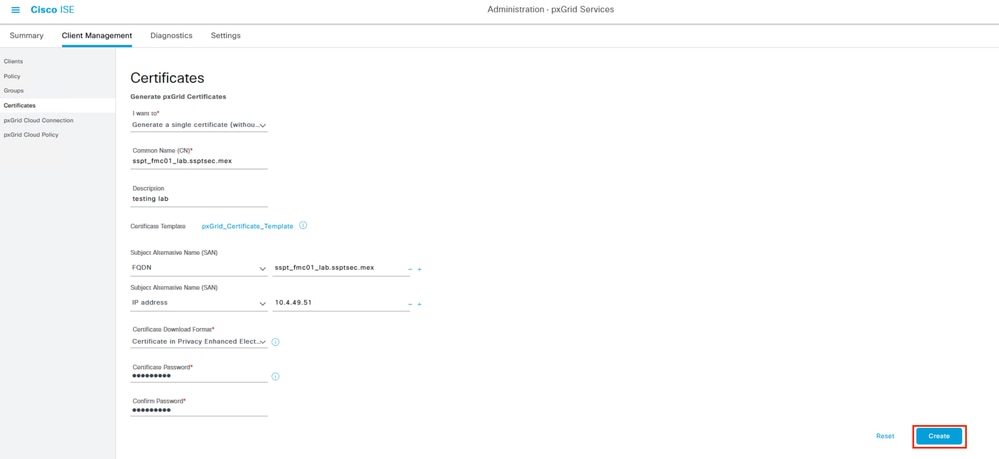 Example of pxGrid certificate generation.
Step 6. A zip file is downloaded to your computer. Decompress the file, and confirm you have these files in your environment:
 PxGrid certificates generated by ISE.
Step 7. In the FMC, Navigate to the menu Objects > Objects Management > PKI > Internal Certs. Select the option Add Internal Cert.
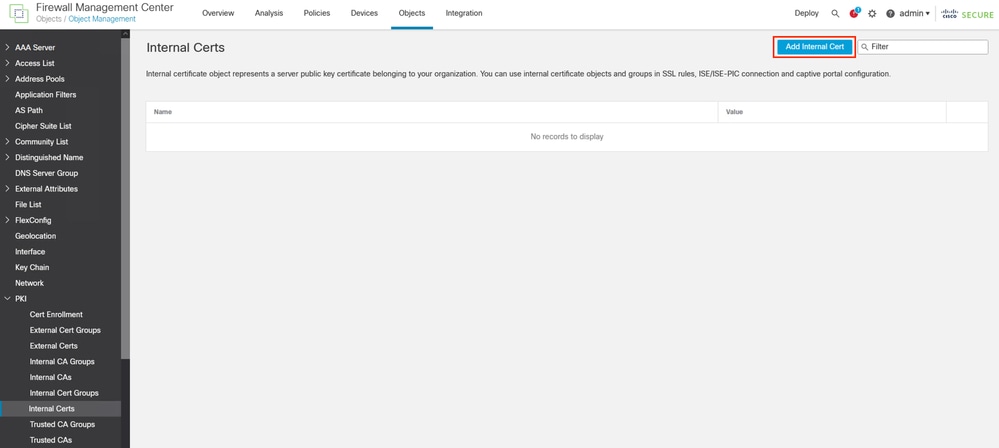 Adding the FMC certificate as internal certificate.
Step 8. Name the certificate allocated on FMC. Browse the certificate you created for the FMC from ISE in the Certificate Data section.
Step 9. Browse the file with the extension .key to fill the next field.
Step 10. Select the option Encrypted and input the password you used when you created the certificate on ISE. Save the configuration.
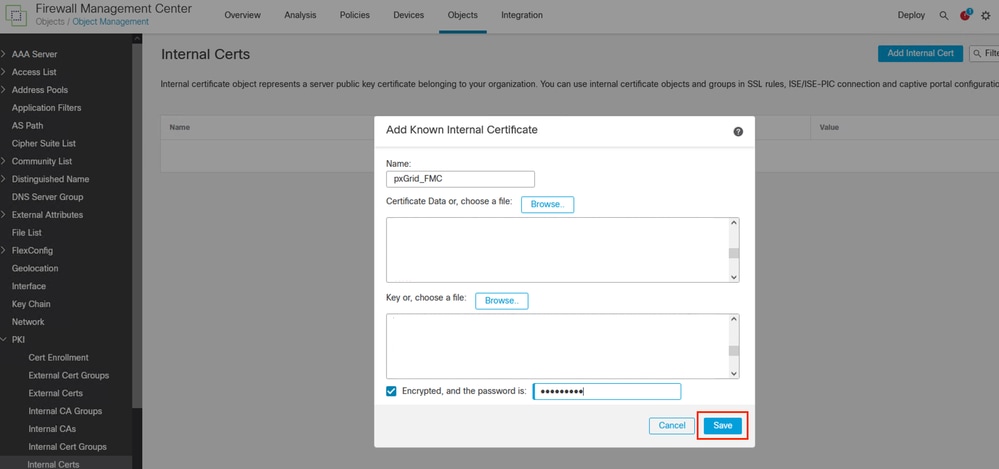 Exporting the FMC certificate that was generated by ISE.
 FMC certificate.
Step 5. Navigate to the menu Objects > Objects Management > PKI > Trusted CAs, Select Add Trusted CAs.
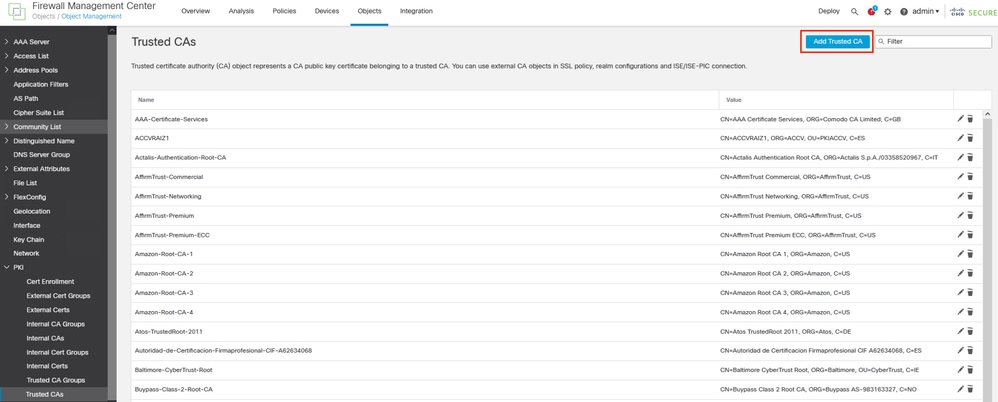 Adding the ISE rootCA as trusted certificate.
Step 11. Name the Certificate Authority.
Step 12. Browse and select the ISE rootCA that was downloaded from the ISE file. Save your configuration.
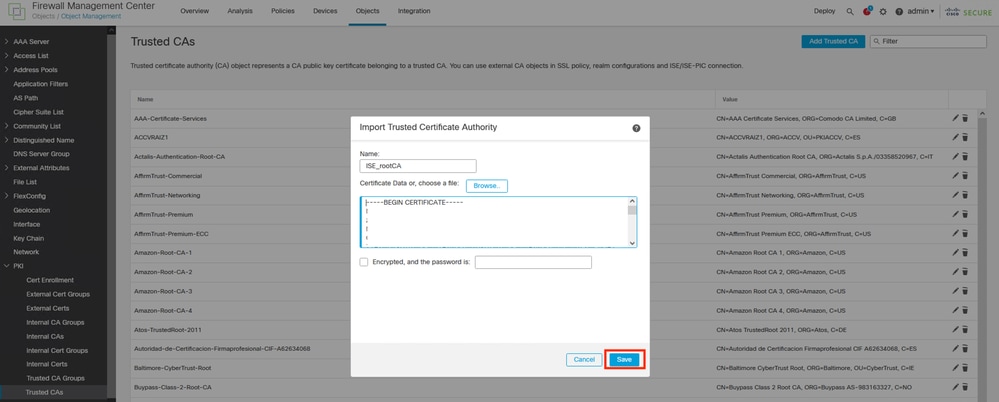 Exporting the ISE rootCA.
Step 13. Navigate to the menu Integration > Other Integrations > Identity Sources. Select the Service Type: Identity Services Engine,
Step 14. Input the IP address or the FQDN of the pxGrid node, this becomes the Primary node. Repeat the procedure for the Secondary pxGrid node.
Step 15. Select from the drop-down menu the pxGrid certificate generated by ISE for the section pxGrid Client Certificate.
Step 16. In the section MNT Server CA and pxGrid Server CA, select the ISE rootCA that you exported in the last step.
Note: The pxGrid Server CA corresponds the root Certificate Authority of the certificate that is being used by pxGrid on the pxGrid nodes.
The MNT Server CA corresponds to the Certificate Authority of the certificate that is being used by pxGrid on the MNT nodes.
Step 17. Optional: You can subscribe to the Session Directory and SXP topic from ISE. Save the configuration.
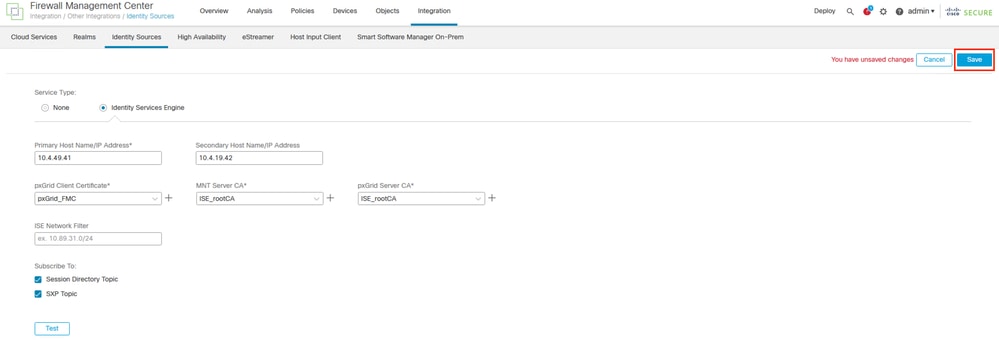 Setting up ISE as Identity Source in FMC.
Verify
Validation on FMC
Step 1. In the menu, navigate to Integration > Other Integrations > Identity Sources > Identity Services Engine. Before saving your configuration, you can test the settings for the pxGrid link.
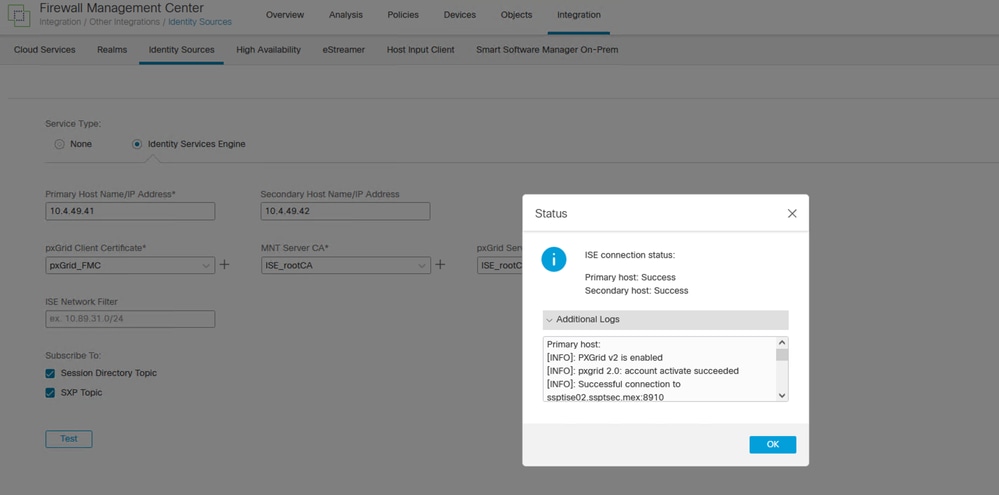 PxGrid successful communication.
Primary host:

[INFO]: PXGrid v2 is enabled
[INFO]: pxgrid 2.0: account activate succeeded
[INFO]: Successful connection to ssptise02.ssptsec.mex:8910
[INFO]: Successful connection to ssptise01.ssptsec.mex:8910
[INFO]: These ISE Services are up: SessionDirectory, SXP, EndpointProfile, SecurityGroups, AdaptiveNetworkControl
[INFO]: All requested ISE Services are online.

Secondary host:

[INFO]: PXGrid v2 is enabled
[INFO]: pxgrid 2.0: account activate succeeded
[INFO]: Successful connection to ssptise02.ssptsec.mex:8910
[INFO]: Successful connection to ssptise01.ssptsec.mex:8910
[INFO]: These ISE Services are up: SessionDirectory, SXP, EndpointProfile, SecurityGroups, AdaptiveNetworkControl
[INFO]: All requested ISE Services are online.
Validation on ISE
Step 1. When the FMC pxGrid client has been successfully integrated on ISE, you can see in the Administration > pxGrid Services > Client Management > Clients menu, clients with the name fmc are included and enabled.
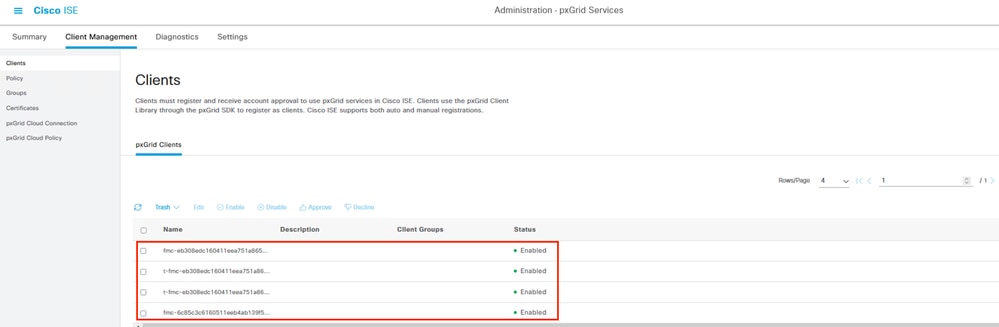 PxGrid Clients available and enable.
Note: pxGrid clients with the "t-fmc" prefix are used by the FMC test button.
Step 2. If you navigate to the menu Administration > pxGrid Services > Diagnostics > WebSocket, you see the connections towards the FMC. In this scenario, you have FMC in high-availability (HA). The primary and secondary units are displayed like this example:
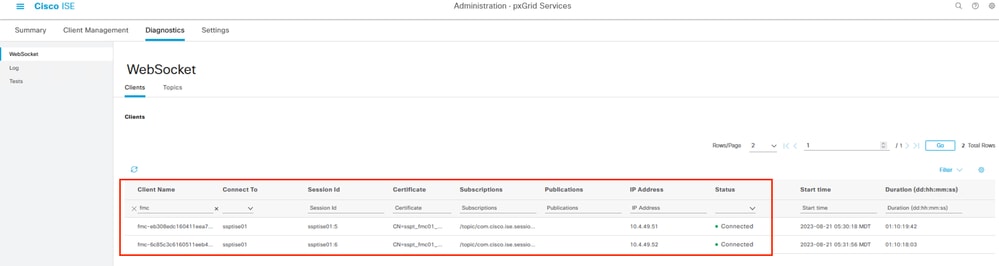 WebSockets available on ISE.
Step 3. In the next tab, under Topics, verify the FMC subscribers are added to the pxGrid topics published by ISE.For example, the topic related to the security group where you see both FMCs are subscribed and receiving information related to SGT posted by ISE.
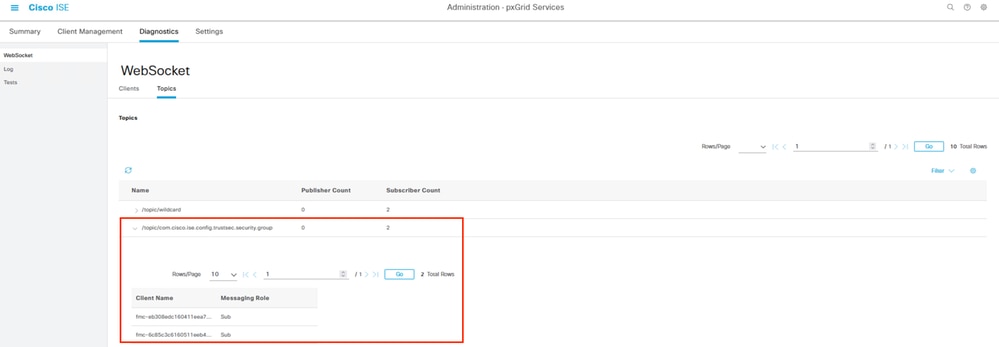 Topics per pxGrid subscriber.
Step 4. In the menu Administration > pxGrid Services > Diagnostics > Log, important events related to the pxGrid communication (for the nodes with the enabled feature) are displayed. These portray the information related to the integration.
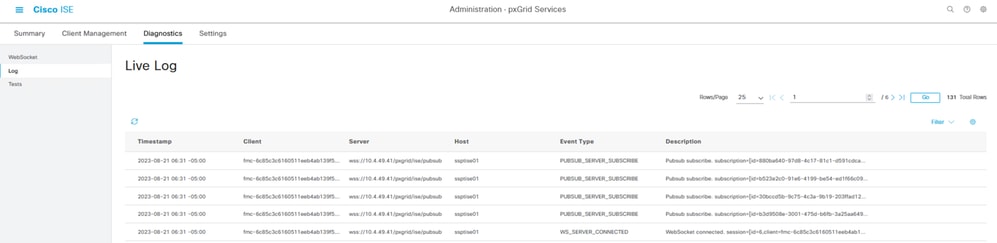 PxGrid live logs.
Troubleshoot
Troubleshooting on FMC
Confirm FMC can resolve its own hostname and ISE nodes by hostnames. For example:
> expert
admin@sspt_fmc01_lab:~$ ping sspt_fmc01_lab

PING sspt_fmc01_lab (10.4.49.51) 56(84) bytes of data.
64 bytes from sspt_fmc01_lab (10.4.49.51): icmp_seq=1 ttl=64 time=0.029 ms
64 bytes from sspt_fmc01_lab (10.4.49.51): icmp_seq=2 ttl=64 time=0.071 ms
64 bytes from sspt_fmc01_lab (10.4.49.51): icmp_seq=3 ttl=64 time=0.055 ms
^C
--- sspt_fmc01_lab ping statistics ---
3 packets transmitted, 3 received, 0% packet loss, time 27ms

admin@sspt_fmc01_lab:~$ ping ssptise01
PING ssptise01.ssptsec.mex (10.4.49.41) 56(84) bytes of data.
64 bytes from ssptise01.ssptsec.mex (10.4.49.41): icmp_seq=1 ttl=64 time=0.586 ms
64 bytes from ssptise01.ssptsec.mex (10.4.49.41): icmp_seq=2 ttl=64 time=0.646 ms
64 bytes from ssptise01.ssptsec.mex (10.4.49.41): icmp_seq=3 ttl=64 time=0.743 ms
^C
--- ssptise01.ssptsec.mex ping statistics ---
3 packets transmitted, 3 received, 0% packet loss, time 82ms
rtt min/avg/max/mdev = 0.586/0.658/0.743/0.068 ms
admin@sspt_fmc01_lab:~$
admin@sspt_fmc01_lab:~$ ping ssptise02

PING ssptise02.ssptsec.mex (10.4.49.42) 56(84) bytes of data.
64 bytes from ssptise02.ssptsec.mex (10.4.49.42): icmp_seq=1 ttl=64 time=0.588 ms
64 bytes from ssptise02.ssptsec.mex (10.4.49.42): icmp_seq=2 ttl=64 time=0.609 ms
64 bytes from ssptise02.ssptsec.mex (10.4.49.42): icmp_seq=3 ttl=64 time=0.628 ms
^C
--- ssptise02.ssptsec.mex ping statistics ---
3 packets transmitted, 3 received, 0% packet loss, time 45ms
rtt min/avg/max/mdev = 0.588/0.608/0.628/0.025 ms
Ensure the ADI process is up and running:
> expert
sudo suadmin@sspt_fmc01_lab:~$ sudo su
root@sspt_fmc01_lab:/Volume/home/admin#  pmtool status | grep adi

adi (normal) - Running 7911
Ensure the communication from FMC to ISE on port TCPP 8910 is allowed. From FMC CLI you can configure a tcpudump packet capture to confirm bidirectional communication:
> expert
sudo suadmin@sspt_fmc01_lab:~$ sudo su

root@sspt_fmc01_lab:/Volume/home/admin# tcpdump -i any tcp and port 8910
22:34:08.415370 IP sspt_fmc01_lab.46248 > ssptise01.ssptsec.mex.8910: Flags [S], seq 3033526171, win 29200, options [mss 1460,sackOK,TS val 2701166399 ecr 0,nop,wscale 7], length 0
22:34:08.415840 IP ssptise01.ssptsec.mex.8910 > sspt_fmc01_lab.46248: Flags [S.], seq 3024877968, ack 3033526172, win 28960, options [mss 1460,sackOK,TS val 2268665064 ecr 2701166399,nop,wscale 7], length 0
22:34:08.415894 IP sspt_fmc01_lab.46248 > ssptise01.ssptsec.mex.8910: Flags [.], ack 1, win 229, options [nop,nop,TS val 2701166400 ecr 2268665064], length 0
[...]
Troubleshooting on ISE
Step 1. Verify communication on port 8910 is operational. This is the port used by the pxGrid clients to communicate with pxGrid nodes and MnT nodes for the bulk download of information.
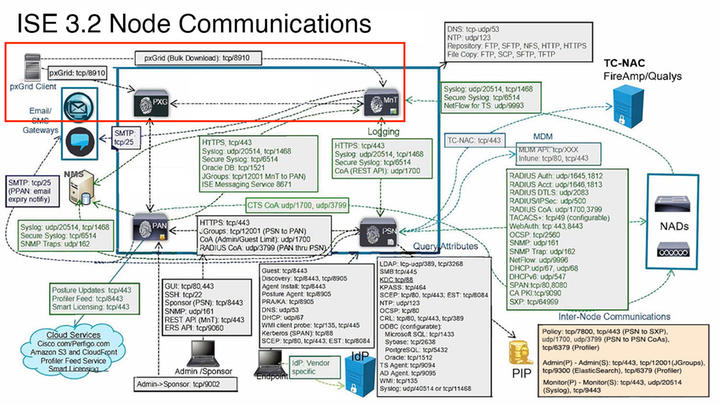 PxGrid interaction in ISE environment.
Note: The pxGrid client, (in this case) the FMC communicates to the pxGrid nodes and the secondary MNT (SMNT) node receives the bulk download of information. If a failure occurs in the SMNT, it looks for the information through the Primary MNT.
In the ISE nodes where communication with the pxGrid client is held, you can review whether the port is open or if there are sockets connected to that port.
#show ports | include 8910
tcp: (output omitted), :::8910,
Step 2. There are two tests available on ISE that diagnose the overall status of the pxGrid implementations. Those can be found in the menu Administration > pxGrid Services > Diagnostics > Test. The tests displayed in this section are performed internally on ISE.
Step 3. The Health Monitoring Test reviews the pxGrid service lookup, which evaluates if a client can access the Session Directory, service, and topics published by the pxGrid controller.
Step 4. Select the option Start Test and wait for the logs to be gathered.
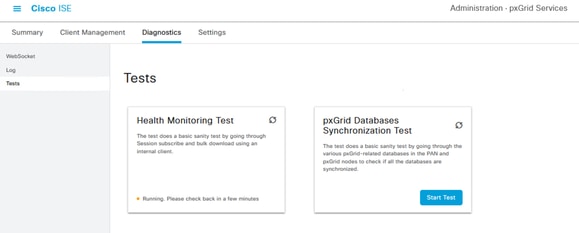 PxGrid Health Monitoring Test.
Step 5. Once the test is completed, select the option View Log. In this example, the content of the log is:
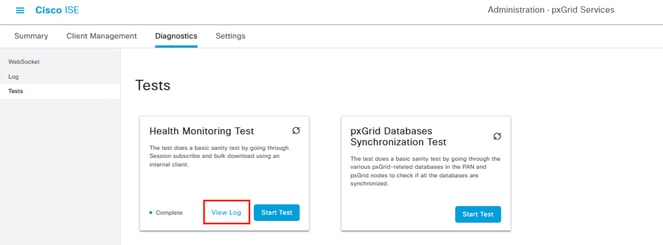 Review of Health Monitoring Test.
22-Aug-2023 17:03:13 [INFO] ************** pxGrid Session Directory Test ***************
22-Aug-2023 17:03:13 [INFO] ----------------- Starting Connection Test -----------------
22-Aug-2023 17:03:14 [INFO] pxGrid Node: ssptise01.ssptsec.mex
22-Aug-2023 17:03:14 [INFO] wsPubsubServiceName=com.cisco.ise.pubsub
22-Aug-2023 17:03:14 [INFO] sessionTopic=/topic/com.cisco.ise.session
22-Aug-2023 17:03:14 [INFO] sessionRestBaseUrl=https://ssptise01.ssptsec.mex:8910/pxgrid/mnt/sd
22-Aug-2023 17:03:14 [INFO] wsUrl=wss://ssptise02.ssptsec.mex:8910/pxgrid/ise/pubsub
22-Aug-2023 17:03:15 [INFO] ---------------- Connection Test Completed -----------------
22-Aug-2023 17:03:15 [INFO] ------------------ Starting Download Test ------------------
22-Aug-2023 17:03:15 [INFO] Downloading sessions since 2023-08-21T17:03:15.273-06:00
22-Aug-2023 17:03:15 [INFO] Response status=200
22-Aug-2023 17:03:15 [INFO] Number of sessions read: 0
22-Aug-2023 17:03:15 [INFO] ----------------- Download Test Completed ------------------
22-Aug-2023 17:03:15 [INFO] ----------------- Starting Subscribe Test ------------------
22-Aug-2023 17:03:16 [INFO] STOMP CONNECT host=ssptise02.ssptsec.mex
22-Aug-2023 17:03:16 [INFO] STOMP SUBSCRIBE topic=/topic/com.cisco.ise.session
22-Aug-2023 17:03:16 [INFO] STOMP CONNECTED version=1.2
22-Aug-2023 17:07:16 [INFO] A total of 0 notifications were received.
22-Aug-2023 17:07:16 [INFO] STOMP RECEIPT id=77
22-Aug-2023 17:07:19 [INFO] ----------------- Subscribe Test Completed -----------------
22-Aug-2023 17:07:19 [INFO] ********** pxGrid Session Directory Test Complete **********
The PxGrid Database Synchronization Test checks if the information within the databases is correct between the PAN and pxGrid nodes and whether they are synchronized.Therefore, the information sent to the pxGrid subscribers is accurate.
Step 6. Select the option Start Test and wait for the results to be evaluated.
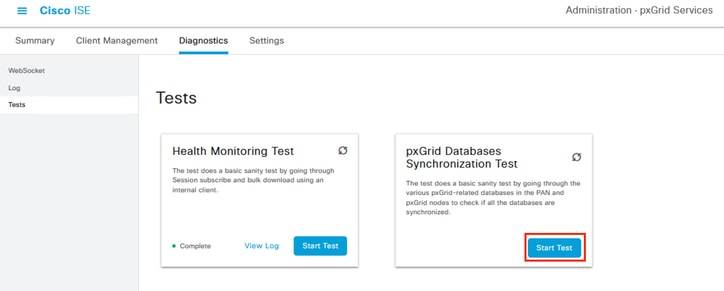 PxGrid Databases Synchronization Test.
Step 7. From the logs generated, this output was obtained.
ssptise01.ssptsec.mex : In Sync
ssptise02.ssptsec.mex : In Sync

Primary PAN : ssptise01.ssptsec.mex
pxGrid Nodes : ssptise01.ssptsec.mex ssptise02.ssptsec.mex
Step 8. Obtain a capture from the pxGrid nodes pointing towards the primary FMC node.
Step 9. Navigate to menu Operations > Troubleshoot > Diagnostic Tools > TCP Dump.
Step 10. Select the option to Add a new capture.
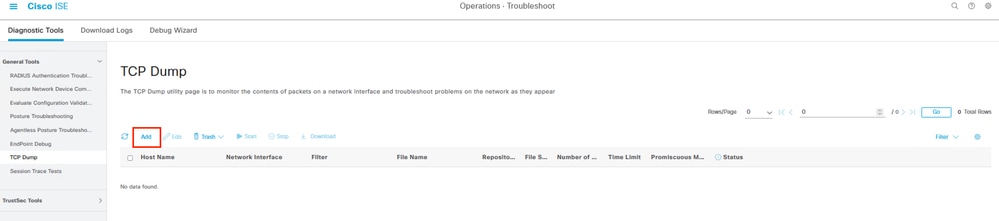 Generating a packet capture on ISE.
Step 11. Configure the parameters for the capture.
Step 12. In the HostName, select the primary pxGrid node selected in the FMC.
Step 13. Filter the traffic with this syntax ip host <FMC IP>
Step 14. Name the capture and then proceed to Save and Run.
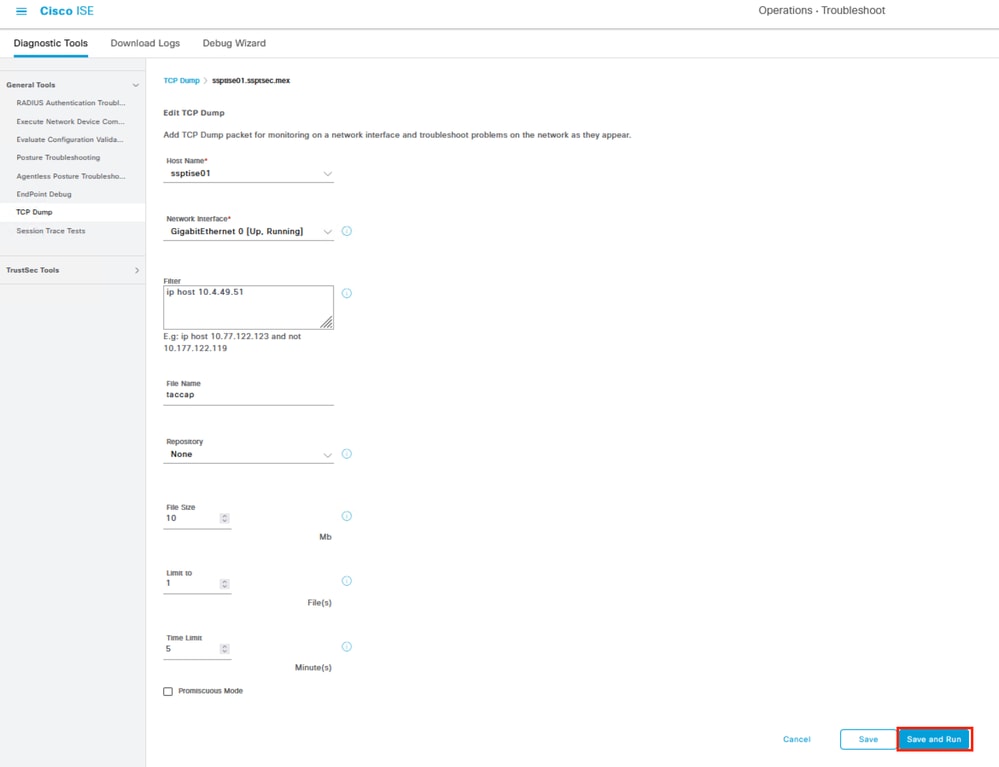 Example of packet capture configuration.
Step 15. In another window, on the FMC menu, select Integration > Other Integrations > Identity Sources. And test the connection with the ISE through the pxGrid channel. When you receive the outcome of the test, proceed to Stop the capture on ISE.
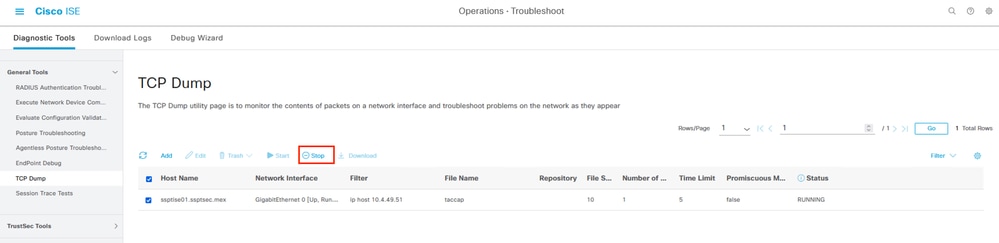 Stoping a packet capture on ISE.
Step 16. Download the capture and start the analysis. This scenario displays a capture of a working connection that can serve as reference.
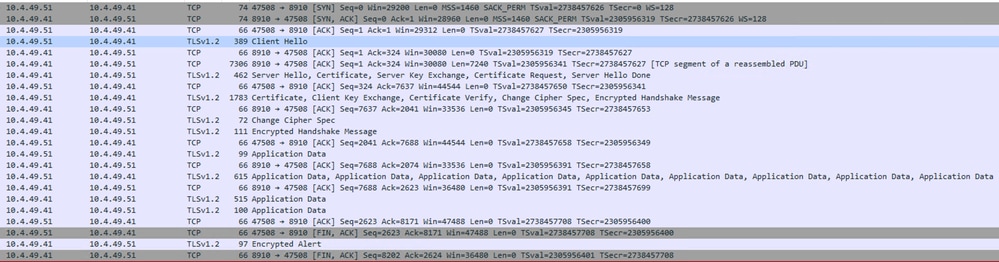 PxGrid communication between ISE and FMC.
Step 17. On ISE, you can collect debugs related to pxGrid processing. Navigate through the menu to Operations > Troubleshoot > Debug Wizard > Debug Log Configuration. Select the corresponding ISE node to analyze and then Edit.
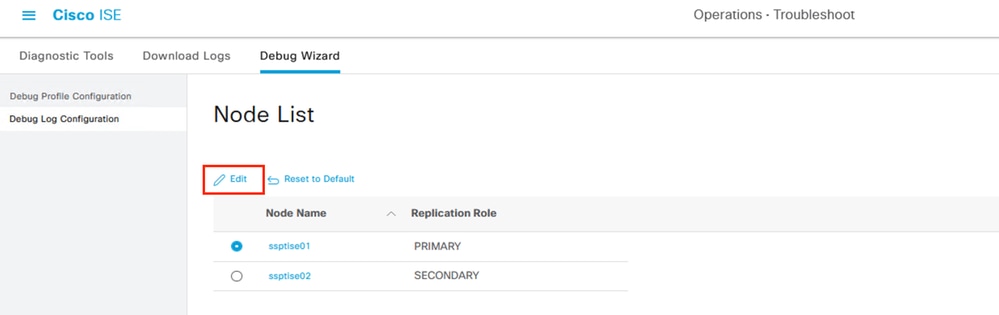 Selecting a node to debug on ISE.
Step 18. Filter the components displayed and change the Log Level to DEBUG. This debugs the pxGrid component to proceed with an analysis.Save the configuration.
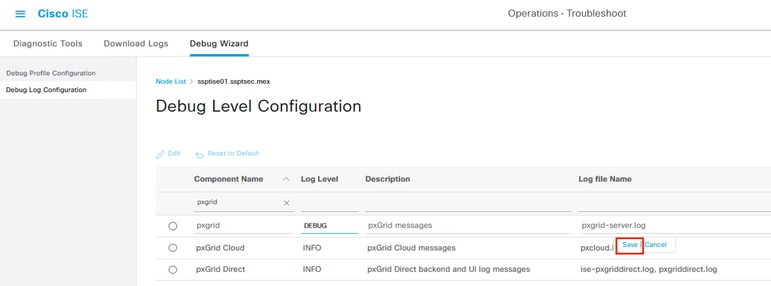 Changing the pxGrid component to debug level.
Reproduce the behavior to analyze, then proceed to analyze the logs collected on pxgrid-server.log file. Other logs you can review on the ISE node to troubleshoot are:
#show logging application | include pxgrid
ise-pxgriddirect.log
pxgrid/pxgrid-server.log
pxgrid/pxgrid-test.log
pxgrid/pxgrid_dbsync_summary.log
pxgrid/pxgrid_internal_dbsync_summary.log
pxgriddirect.log

Tip: For further log collection recommendations please review the video How to Enable Debugs on ISE 3.x Versions.
Common Problems
PxGrid Subscriber Client is not Approved on ISE
In this use case, the output related from the FMC test pxGrid button displays this behavior:
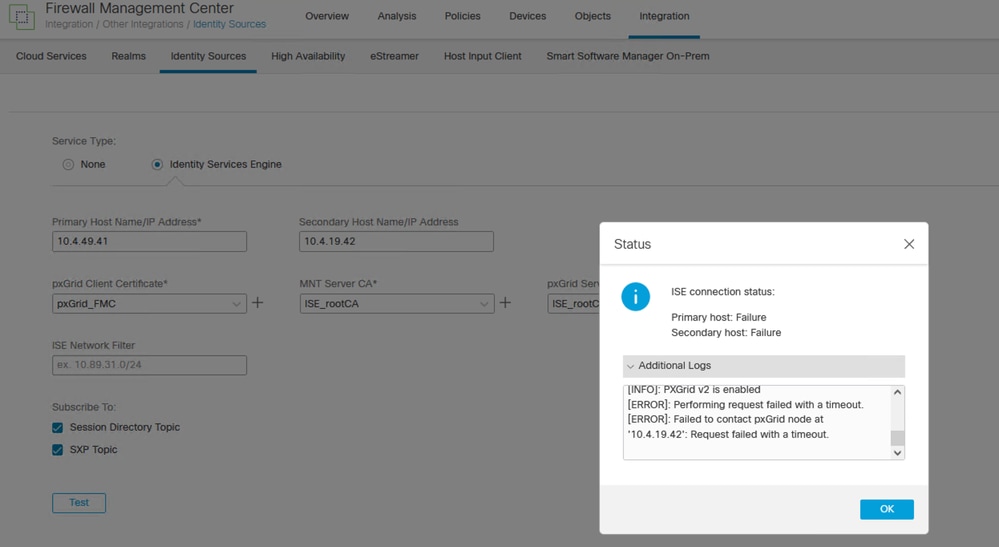 FMC pxGrid connection failed.
Primary host:

[INFO]: PXGrid v2 is enabled
[ERROR]: pxgrid 2.0: failed account activation. accountState=PENDING
[ERROR]: Failed to contact pxGrid node at '10.4.49.41': pxgrid2.0: Could not activate account

Secondary host:

[INFO]: PXGrid v2 is enabled
[ERROR]: Performing request failed with a timeout.
[ERROR]: Failed to contact pxGrid node at '10.4.19.42': Request failed with a timeout.
On ISE, notice the behavior on the menu, Administration > PxGrid Services > Client Management > Clients, which indicates the pxGrid client (FMC) is pending for approval.
Step 1. Select the button Approve and confirm the selection in the next window and attempt the integration again. This time the integration is successful.
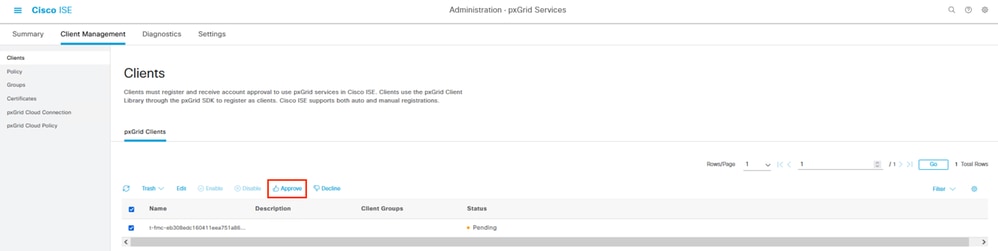 FMC client in pending status.
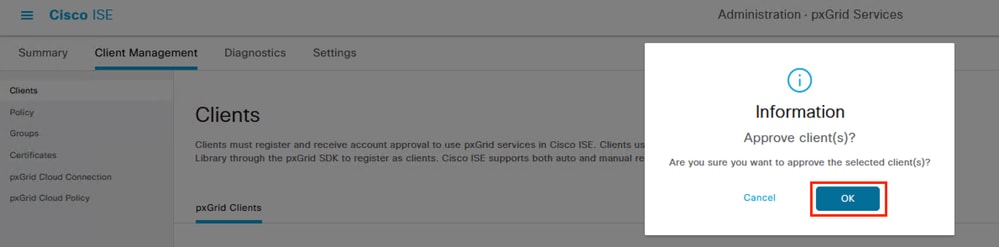 Confirmation of the approval of the pxGrid client.
If you want to enable the automatic approval of certificate based pxGrid clients, you can approve/decline the clients from the previous page as this alarm can appear.
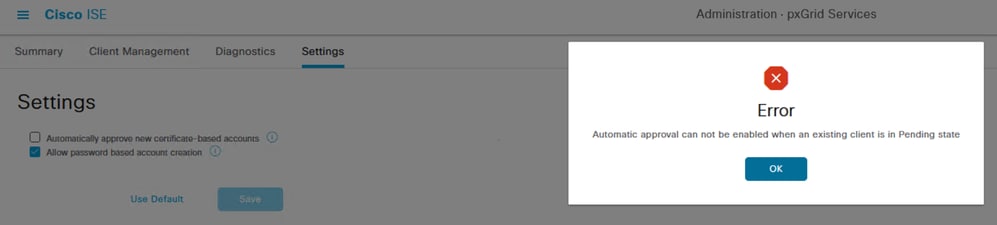 Error related to the approval of pxGrid clients.
PxGrid ISE Certificate Chain Incomplete
Step 1. In this scenario, if you navigate to menu Administration > System > Certificate, select the pxGrid certificate and select the option View. If you have a problem with the certificate, these errors can occur:
 Error related to certificate chain imcomplete.
Step 2. First check if the ISE rootCA is completed in the View option. If a certificate is missing in the hierarchy, you can issue the whole ISE deployment rootCA.
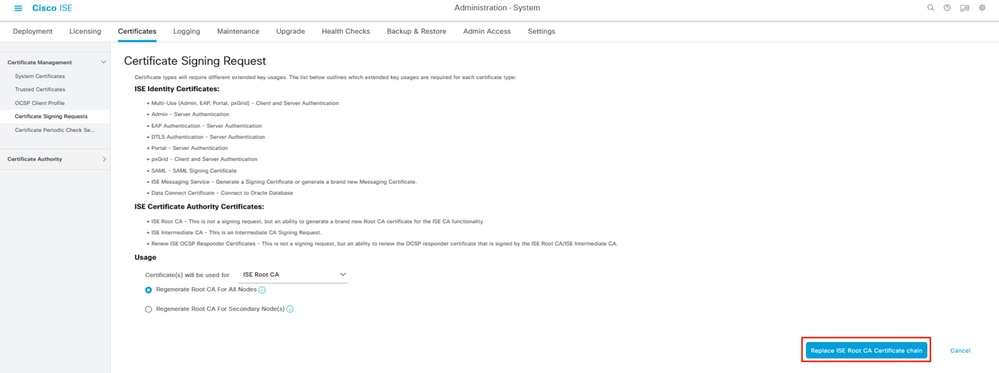
Step 3. Browse to the menu Administration > System > Certificates > Certificate Management > Certificate Signing Request (CSR) and select the same button in the next image.
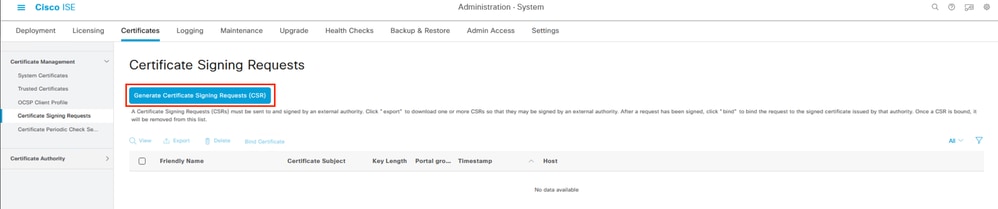 Generating a CSR on ISE.
Step 4. In this menu, select Usage ISE Root CA and regenerate the ISE Root CA for all nodes. Proceed with the button Replace ISE Root CA Certificate chain.
 Configuring the Certificate Signing Request.
Step 5. Wait for the certificates to generate in all nodes of the implementation.Upon completion, the ISE displays the next notification.
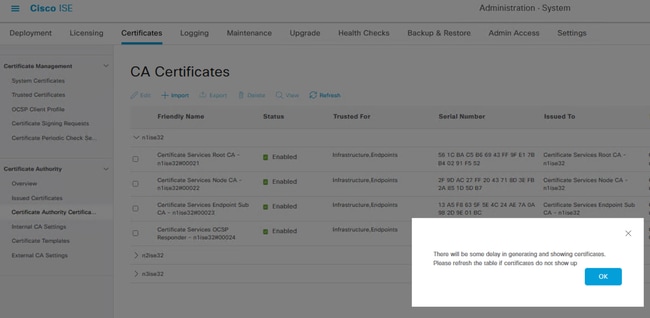 Confirmation of generation of certificates.
Step 6. Confirm if the pxGrid certificate trust chain is completed by selecting the View option in the System Certificates.
Reference
- PxGrid Cisco Developer Page
- Cisco Identity Services Engine Administrator Guide, Release 3.2 , Chapter: Cisco pxGrid
- Cisco Identity Services Engine Installation Guide, Release 3.2, Chapter: Cisco ISE Ports Reference
- Cisco Identity Services Engine CLI Reference Guide, Release 2.4
Revision History
| Revision | Publish Date | Comments |
|---|---|---|
2.0 |
16-Jul-2026
|
Updated spelling, grammar, sentence structure, adding lines to separate sections/readability, updated CCW alerts, updated alt text. |
1.0 |
29-Aug-2023
|
Initial Release |

 Feedback
Contact Cisco
- Open a Support Case

- (Requires a Cisco Service Contract)