Configure FlexVPN Headend for Secure Client (AnyConnect) IKEv2 Remote Access Using Local User Database
Available Languages
Download Options
Bias-Free Language
The documentation set for this product strives to use bias-free language. For the purposes of this documentation set, bias-free is defined as language that does not imply discrimination based on age, disability, gender, racial identity, ethnic identity, sexual orientation, socioeconomic status, and intersectionality. Exceptions may be present in the documentation due to language that is hardcoded in the user interfaces of the product software, language used based on RFP documentation, or language that is used by a referenced third-party product. Learn more about how Cisco is using Inclusive Language.
Contents
Introduction
This document describes configuring a FlexVPN headend for access via Secure Client (AnyConnect) IKEv2/EAP authentication with a local user database.
Prerequisites
Requirements
Cisco recommends that you have knowledge of these topics:
- IKEv2 protocol
Components Used
The information in this document is based on these software and hardware versions:
- Cloud Services Router version 16.9.2
- AnyConnect client version 4.6.03049 running on Windows 10
The information in this document was created from the devices in a specific lab environment. All of the devices used in this document started with a cleared (default) configuration. If your network is live, ensure that you understand the potential impact of any command.
Background Information
AnyConnect-EAP, or aggregate authentication, allows a FlexVPN Server to authenticate the AnyConnect client via the Cisco proprietary AnyConnect-EAP method.
Unlike standard-based Extensible Authentication Protocol (EAP) methods such as EAP-Generic Token Card (EAP-GTC), EAP- Message Digest 5 (EAP-MD5) and so on, the FlexVPN Server does not operate in EAP pass-through mode.
All EAP communication with the client terminates on the FlexVPN Server and the required session key used to construct the AUTH payload is computed locally by the FlexVPN Server.
The FlexVPN Server must authenticate itself to the client with certificates as required by the IKEv2 RFC.
Local user authentication is now supported on the Flex Server and remote authentication is optional.
This is ideal for small-scale deployments with fewer remote access users and environments with no access to an external authentication, authorization, and accounting (AAA) server.
However, for large scale deployments and in scenarios where per-user attributes are desired it is still recommended to use an external AAA sever for authentication and authorization.
The AnyConnect-EAP implementation permits the use of Radius for remote authentication, authorization and accounting.
Network Diagram

Configure
Authentication and Authorization of users with the Local Database
Note: In order to authenticate users against the local database on the router, EAP needs to be used. However, to use EAP, the local authentication method must be rsa-sig, so the router needs a proper identity certificate, and it cannot use a self-signed certificate.
Sample configuration that uses local user authentication, remote user and group authorization and remote accounting.
Step 1. Enable AAA, and configure authentication, authorization and accounting lists and add a username to the local database:
aaa new-model
!
aaa authentication login a-eap-authen-local local
aaa authorization network a-eap-author-grp local
!
username test password cisco123
Step 2. Configure a trustpoint intended to hold the router certificate. PKCS12 file import is used in this example. For other options, consult the Security and VPN Configuration Guide, IOS XE 17.x, Chapter: Configuring Certificate Enrollment for a PKI document.
Router(config)# crypto pki import IKEv2-TP pkcs12 bootflash:IKEv2-TP.p12 password cisco123
Step 3. Define an IP local pool to assign addresses to AnyConnect VPN clients:
ip local pool ACPOOL 192.168.10.5 192.168.10.10
Step 4. Create an IKEv2 local authorization policy:
crypto ikev2 authorization policy ikev2-auth-policy
 pool ACPOOL
 dns 10.0.1.1
Step 5 (Optional). Create desired IKEv2 proposal and policy. If not configured, smart defaults are used:
crypto ikev2 proposal IKEv2-prop1
 encryption aes-cbc-256
 integrity sha256
 group 14
!
crypto ikev2 policy IKEv2-pol
 proposal IKEv2-prop1
Step 6. Create AnyConnect profile
Note: The AnyConnect profile needs to be delivered to the client machine. Refer to the next section for more information.
Configure the client profile with the AnyConnect Profile Editor as shown in the image:
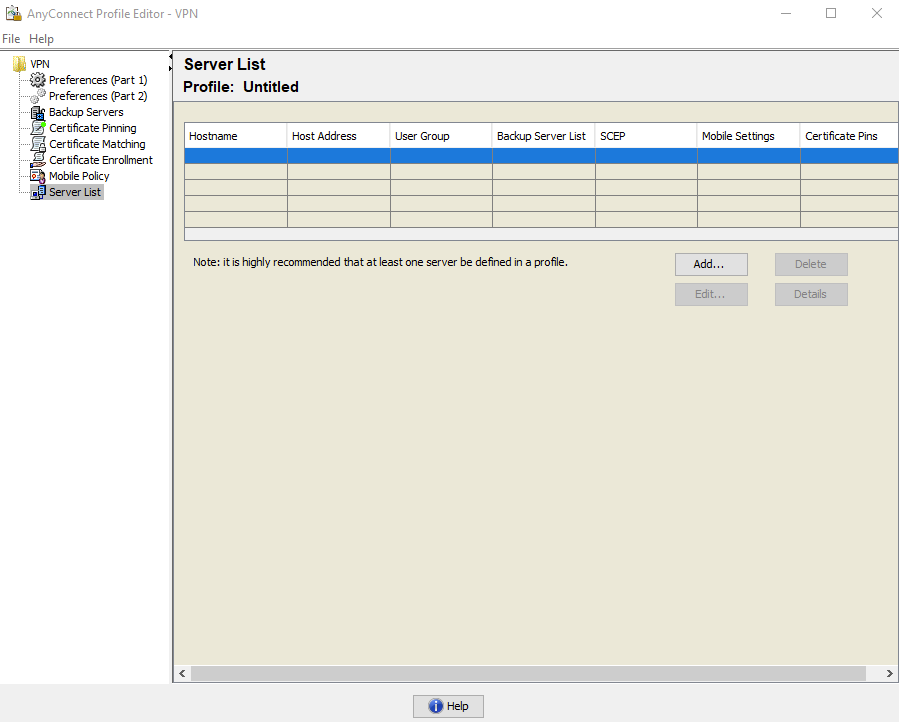
Click Add to create an entry for the VPN gateway. Make sure to select IPsec as the Primary Protocol. Uncheck the ASA gateway option.
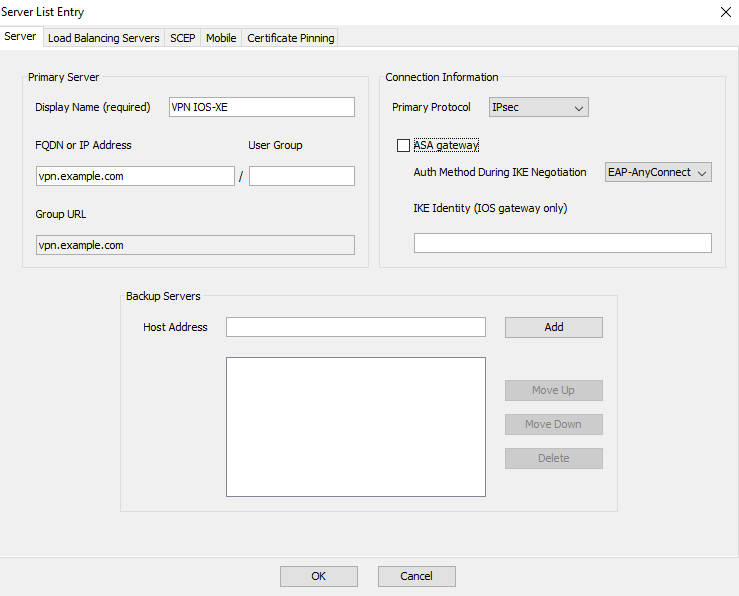
Save the profile: FIle -> Save As. The XML equivalent of the profile:
<?xml version="1.0" encoding="UTF-8"?>
<AnyConnectProfile xmlns="http://schemas.xmlsoap/encoding/" xmlns:xsi="http://www.w3.org/2001/XMLSchema-instance" xsi:schemaLocation="http://schemas.xmlsoap/encoding/ AnyConnectProfile.xsd">
    <ClientInitialization>
        <UseStartBeforeLogon UserControllable="true">false</UseStartBeforeLogon>
        <AutomaticCertSelection UserControllable="true">false</AutomaticCertSelection>
        <ShowPreConnectMessage>false</ShowPreConnectMessage>
        <CertificateStore>All</CertificateStore>
        <CertificateStoreMac>All</CertificateStoreMac>
        <CertificateStoreOverride>false</CertificateStoreOverride>
        <ProxySettings>Native</ProxySettings>
        <AllowLocalProxyConnections>true</AllowLocalProxyConnections>
        <AuthenticationTimeout>12</AuthenticationTimeout>
        <AutoConnectOnStart UserControllable="true">false</AutoConnectOnStart>
        <MinimizeOnConnect UserControllable="true">true</MinimizeOnConnect>
        <LocalLanAccess UserControllable="true">false</LocalLanAccess>
        <DisableCaptivePortalDetection UserControllable="true">false</DisableCaptivePortalDetection>
        <ClearSmartcardPin UserControllable="true">true</ClearSmartcardPin>
        <IPProtocolSupport>IPv4,IPv6</IPProtocolSupport>
        <AutoReconnect UserControllable="false">true
            <AutoReconnectBehavior UserControllable="false">ReconnectAfterResume</AutoReconnectBehavior>
        </AutoReconnect>
        <AutoUpdate UserControllable="false">true</AutoUpdate>
        <RSASecurIDIntegration UserControllable="false">Automatic</RSASecurIDIntegration>
        <WindowsLogonEnforcement>SingleLocalLogon</WindowsLogonEnforcement>
        <WindowsVPNEstablishment>LocalUsersOnly</WindowsVPNEstablishment>
        <AutomaticVPNPolicy>false</AutomaticVPNPolicy>
        <PPPExclusion UserControllable="false">Disable
            <PPPExclusionServerIP UserControllable="false"></PPPExclusionServerIP>
        </PPPExclusion>
        <EnableScripting UserControllable="false">false</EnableScripting>
        <EnableAutomaticServerSelection UserControllable="false">false
            <AutoServerSelectionImprovement>20</AutoServerSelectionImprovement>
            <AutoServerSelectionSuspendTime>4</AutoServerSelectionSuspendTime>
        </EnableAutomaticServerSelection>
        <RetainVpnOnLogoff>false
        </RetainVpnOnLogoff>
        <AllowManualHostInput>true</AllowManualHostInput>
    </ClientInitialization>
    <ServerList>
        <HostEntry>
            <HostName>VPN IOS-XE</HostName>
            <HostAddress>vpn.example.com</HostAddress>
            <PrimaryProtocol>IPsec
                <StandardAuthenticationOnly>true
                    <AuthMethodDuringIKENegotiation>EAP-AnyConnect</AuthMethodDuringIKENegotiation>
                </StandardAuthenticationOnly>
            </PrimaryProtocol>
        </HostEntry>
    </ServerList>
</AnyConnectProfile>
Note: AnyConnect uses *$AnyConnectClient$* as its default IKE identity of type key-id. However, this identity can be manually changed in the AnyConnect profile to match deployment needs.
Note: To upload the XML profile to the router, version 16.9.1 or later is required. If an older software version is used, the profile download capability needs to be disabled on the client. Refer to the section Disable the AnyConnect Downloader Capability for more information.
Upload the created XML profile to the flash memory of the router and define the profile:
crypto vpn anyconnect profile acvpn bootflash:/acvpn.xml
Note: The filename used for AnyConnect XML profile is always acvpn.xml. Even if a different file name is used, the profile sent to PC is named acvpn.xml. Therefore it is recommended to not change the name in the router configuration.
Step 7. Create an IKEv2 profile for AnyConnect-EAP method of client authentication.
crypto ikev2 profile AnyConnect-EAP
 match identity remote key-id *$AnyConnectClient$*
 authentication local rsa-sig
 authentication remote anyconnect-eap aggregate
 pki trustpoint IKEv2-TP
 aaa authentication anyconnect-eap a-eap-authen-local
 aaa authorization group anyconnect-eap list a-eap-author-grp ikev2-auth-policy
 aaa authorization user anyconnect-eap cached
 virtual-template 100
 anyconnect profile acvpn
Note: For the aaa authentication eap / anyconnect-eap command ensure the local authentication method is configured as rsa-sig before the remote authentication method is configured.
Step 8. Disable HTTP-URL based certificate lookup and HTTP server on the router:
no crypto ikev2 http-url cert
no ip http server
no ip http secure-server
Note: Refer to Next Generation Encryption Support document to confirm whether your router hardware supports the NGE algorithms (for example sha-256, aes-gcm, ecdh, ecdsa), otherwise, IPSec SA installation on the hardware fails at the last stage of tunnel establishment.
Step 9. Define the encryption and hash algorithms used to protect data
crypto ipsec transform-set TS esp-aes 256 esp-sha256-hmac
 mode tunnel
Step 10. Create an IPSec profile:
crypto ipsec profile AnyConnect-EAP
 set transform-set TS
 set ikev2-profile AnyConnect-EAP
Step 11. Configure a loopback interface with some dummy IP address. The Virtual-Access interfaces borrow the IP address from it.
interface loopback100
 ip address 10.0.0.1 255.255.255.255
Step 12. Configure a virtual-template (associate the template in the IKEv2 profile)
interface Virtual-Template100 type tunnel
 ip unnumbered Loopback100
 ip mtu 1400
 tunnel mode ipsec ipv4
 tunnel protection ipsec profile AnyConnect-EAP
Step 13 (Optional). By default, all traffic from the client is sent through the tunnel (full tunnel). You can configure a split tunnel, which allows only selected traffic to go through the tunnel.
ip access-list standard split_tunnel
 permit 10.0.0.0 0.255.255.255
!
crypto ikev2 authorization policy ikev2-auth-policy
 route set access-list split_tunnel
Step 14 (Optional). If all traffic is required to go through the tunnel, configure NAT in order to allow internet connectivity for remote clients.
ip access-list extended NAT
 permit ip 192.168.10.0 0.0.0.255 any
!
ip nat inside source list NAT interface GigabitEthernet1 overload
!
interface GigabitEthernet1
 ip nat outside
!
interface Virtual-Template 100
 ip nat inside
Example: AnyConnect Profile Download Configuration
This example shows how to configure the FlexVPN AnyConnect Profile Download feature:
Note: You do not need to modify the Local Policy file on the Anyconnect Client machine. After the Anyconnect Profile Download feature with IKEv2 is configured, the VPN Downloader module works correctly - the required XML profile gets automatically updated on the client device in case of XML profile update.
Note: You must not use the HTTPS server and SSL policy together. Before SSL Policy is enabled remove the ip http secure-server command. If both these features are enabled at the same time and the device receives an incoming SSL VPN connection, the device can crash.
no ip http secure-server
crypto ssl policy ssl-policy
  pki trustpoint IKEv2-TP sign
  ip address local 10.0.0.1 port 443
  no shutdown
crypto ssl profile ssl_prof
    match policy ssl-policy
Disable the AnyConnect Downloader Capability (Only for versions older than 16.9.1).
This step is only necessary if a version older than 16.9.1 is used. Before this version, the capability to upload the XML profile to the router was not available. The Secure Client (AnyConnect) tries to perform the download of the XML profile after successful login by default. If the profile is not available, the connection fails. As a workaround, it is possible to disable the AnyConnect profile download capability on the client itself. To do that, this file can be modified:
For Windows:
C:\ProgramData\Cisco\Cisco AnyConnect Secure Mobility Client\AnyConnectLocalPolicy.xml

For MAC OS:
/opt/cisco/anyconnect/AnyConnectLocalPolicy.xml
The BypassDownloader option is set to true, for example:
<?xml version="1.0" encoding="UTF-8"?>
<AnyConnectLocalPolicy xmlns="http://schemas.xmlsoap/encoding/" xmlns:xsi="http://www.w3.org/2001/XMLSchema-instance" xsi:schemaLocation="http://schemas.xmlsoap/encoding/ AnyConnectLocalPolicy.xsd" acversion="4.6.03049">
<BypassDownloader>true</BypassDownloader>
<EnableCRLCheck>false</EnableCRLCheck>
<ExcludeFirefoxNSSCertStore>false</ExcludeFirefoxNSSCertStore>
<ExcludeMacNativeCertStore>false</ExcludeMacNativeCertStore>
<ExcludePemFileCertStore>false</ExcludePemFileCertStore>
<ExcludeWinNativeCertStore>false</ExcludeWinNativeCertStore>
<FipsMode>false</FipsMode>
<RestrictPreferenceCaching>false</RestrictPreferenceCaching>
<RestrictTunnelProtocols>false</RestrictTunnelProtocols>
<RestrictWebLaunch>false</RestrictWebLaunch>
<StrictCertificateTrust>false</StrictCertificateTrust>
<UpdatePolicy>
<AllowComplianceModuleUpdatesFromAnyServer>true</AllowComplianceModuleUpdatesFromAnyServer>
<AllowISEProfileUpdatesFromAnyServer>true</AllowISEProfileUpdatesFromAnyServer>
<AllowServiceProfileUpdatesFromAnyServer>true</AllowServiceProfileUpdatesFromAnyServer>
<AllowSoftwareUpdatesFromAnyServer>true</AllowSoftwareUpdatesFromAnyServer>
<AllowVPNProfileUpdatesFromAnyServer>true</AllowVPNProfileUpdatesFromAnyServer></UpdatePolicy>
</AnyConnectLocalPolicy>
After the modification, the AnyConnect client needs to be restarted.
AnyConnect XML profile delivery
With the fresh installation of the AnyConnect (with no XML profiles added), the user is able to manually enter the FQDN of the VPN gateway in the address bar of AnyConnect client. This results in the SSL connection to the gateway. The AnyConnect client does not attempt to establish the VPN tunnel with IKEv2/IPsec protocols by default. This is the reason why the XML profile installation on the client PC is mandatory to establish the IKEv2/IPsec tunnel with the FlexVPN gateway.
The profile is used when it is selected from the drop-down list of AnyConnect address bar.
The name that appears on the list is specified in Display Name field in AnyConnect Profile Editor -> Server List -> Server List Entry.

The XML profile can be manually put into a directory, depending on the client operating system:
For Windows:
C:\ProgramData\Cisco\Cisco AnyConnect Secure Mobility Client\Profile

For MAC OS:
/opt/cisco/anyconnect/profile
The AnyConnect client needs to be restarted in order for the profile to become visible in the GUI. It is not sufficient to close the AnyConnect window. The process can be restarted by right-click the AnyConnect icon in the Windows tray and select Quit option:

Communication flow
IKEv2 and EAP exchange

Verify
Use this section in order to confirm that your configuration works properly.
! Check IKEv2 SA parameters
Router# show crypto ikev2 sa detailed

 IPv4 Crypto IKEv2  SA

Tunnel-id Local                 Remote                fvrf/ivrf            Status
1         192.0.2.1/4500     192.0.2.100/50899    none/none            READY
      Encr: AES-CBC, keysize: 256, PRF: SHA256, Hash: SHA256, DH Grp:14, Auth sign: RSA, Auth verify: AnyConnect-EAP
      Life/Active Time: 86400/758 sec
      CE id: 1004, Session-id: 4
      Status Description: Negotiation done
      Local spi: 413112E83D493428       Remote spi: 696FA78292A21EA5
      Local id: 192.0.2.1
      Remote id: *$AnyConnectClient$*
      Remote EAP id: test        <------ username
      Local req msg id:  0              Remote req msg id:  31
      Local next msg id: 0              Remote next msg id: 31
      Local req queued:  0              Remote req queued:  31
      Local window:      5              Remote window:      1
      DPD configured for 0 seconds, retry 0
      Fragmentation not  configured.
      Dynamic Route Update: disabled
      Extended Authentication not configured.
      NAT-T is detected  outside
      Cisco Trust Security SGT is disabled
      Assigned host addr: 192.168.10.8.  <---- Assigned IP
      Initiator of SA : No

! Check the crypto session information
Router# show crypto session detail
Crypto session current status

Code: C - IKE Configuration mode, D - Dead Peer Detection
K - Keepalives, N - NAT-traversal, T - cTCP encapsulation
X - IKE Extended Authentication, F - IKE Fragmentation
R - IKE Auto Reconnect, U - IKE Dynamic Route Update
S - SIP VPN

Interface: Virtual-Access1. <----- Virtual interface associated with the client
Profile: AnyConnect-EAP
Uptime: 00:14:54
Session status: UP-ACTIVE
Peer: 192.0.2.100 port 50899 fvrf: (none) ivrf: (none). <----- Public IP of the remote client
      Phase1_id: *$AnyConnectClient$*
      Desc: (none)
  Session ID: 8
  IKEv2 SA: local 192.0.2.1/4500 remote 192.0.2.100/50899 Active
          Capabilities:N connid:1 lifetime:23:45:06
  IPSEC FLOW: permit ip 0.0.0.0/0.0.0.0 host 192.168.10.8
        Active SAs: 2, origin: crypto map
        Inbound:  #pkts dec'ed 89 drop 0 life (KB/Sec) 4607990/2705. <------ Packets received from the client
        Outbound: #pkts enc'ed 2 drop 0 life (KB/Sec) 4607999/2705. <------ Packets sent to the client

! Check the actual configuration applied for the Virtual-Acces interface associated with client
Router# show derived-config interface virtual-access 1.
Building configuration...

Derived configuration : 258 bytes
!
interface Virtual-Access1
 ip unnumbered Loopback100
 ip mtu 1400
 ip nat inside
 tunnel source 192.0.2.1
 tunnel mode ipsec ipv4
 tunnel destination 192.0.2.100
 tunnel protection ipsec profile AnyConnect-EAP
 no tunnel protection ipsec initiate
end
Troubleshoot
This section provides information you can use to troubleshoot your configuration.
- IKEv2 debugs to collect from the headend:
debug crypto ikev2
debug crypto ikev2 packet
debug crypto ikev2 error - AAA debugs to see assignment of local and/or remote attributes:
debug aaa authorization
debug aaa authentication - Diagnostic and Reporting Tool (DART) for the AnyConnect client.
To collect the DART bundle, perform the steps described in the Cisco Secure Client (including AnyConnect) Administrator Guide, Release 5, Chapter: Chapter: Troubleshoot Cisco Secure Clientdocument.
Revision History
| Revision | Publish Date | Comments |
|---|---|---|
2.0 |
24-Apr-2023
|
Recertification |
1.0 |
08-Jul-2016
|
Initial Release |
Contributed by Cisco Engineers
- Aniket Rodrigues
- Kratika Dubey
- More Cisco TAC Engineers
 Feedback
Contact Cisco
- Open a Support Case

- (Requires a Cisco Service Contract)