Introduction
This document describes how to configure a Beta Cisco Email Security Appliance (ESA) to receive a copied mail flow from a Production ESA for testing.
Background Information
The procedure configures Beta ESA listeners, relay permissions, and Simple Mail Transfer Protocol (SMTP) routes, then configures a Production ESA message filter to send a BCC copy of messages to the Beta ESA and verifies delivery in mail_logs. Expected outcome: the Beta ESA accepts copied inbound and outbound traffic from the Production ESA for testing.
Prerequisites
Environment
- One Production Cisco Email Security Appliance (ESA) and one Beta ESA.
- Beta ESA listeners: Public listener on TCP port 25; Private listener on TCP port 26 (or port 25 only when an additional interface is available). In CES Hosted Beta, port 587 is reserved for outbound mail.
- Applies to copied inbound and outbound mail flow from the Production ESA to the Beta ESA by using a Production ESA message filter (BCC).
Requirements
Administrative access to the ESA GUI and CLI is required.
Components Used
This document is not restricted to specific software and hardware versions.
The information in this document was created from the devices in a specific lab environment. All of the devices used in this document started with a cleared (default) configuration. If your network is live, ensure that you understand the potential impact of any command.
Configure Beta Appliance
Listener Configuration for Beta ESA
The initial Listener configuration is to be completed on the Beta ESA.
- From the GUI, navigate to Network > Listeners.
- Select Add Listener....
- Enter the listener name and configure a Public Listener on TCP port 25.
- Select Submit.
- Repeat Steps 2 through 4 to add a second listener.
- Enter the listener name and configure a Private Listener on TCP port 26. This listener is used for outbound mail. You can use port 25 only when an additional interface is available and configured for the environment. In CES Hosted Beta, port 587 is reserved for outbound mail.
- Submit to save changes to the Listener.
- Commit to save all changes to the configuration.
Sender Group for Beta ESA
For relayed traffic or outbound messages, add the appropriate IP addresses for the Beta ESA so that it accepts and relays messages from the Production ESA.
- From the GUI, navigate to Mail Policies > HAT Overview.
- Select the appropriately named Relay Sender Group. (This is usually named RELAY, or RELAYLIST.)
- Select Add Sender....
- For Sender, use the IP address of the Production ESA.
- Enter any administrative comments, as needed.
- Submit to save changes to the Relay Sender Group.
- Commit to save all changes to the configuration.
Simple Mail Transfer Protocol (SMTP) Routes for Beta ESA
Configure this SMTP routes on the Beta ESA.
- From the GUI, navigate to Network > SMTP Routes.
- If current SMTP routes exist, you can need to select them and Delete them before you proceed. Ensure that you review the Beta Lab Setup Guide.
- Select Add Route....
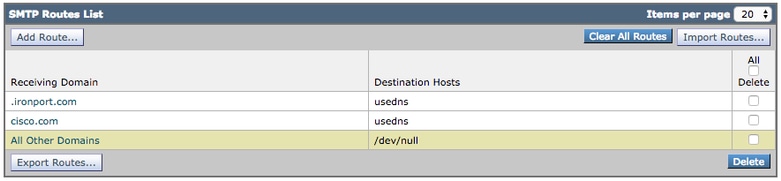
- Enter cisco.com for Receiving Domain and USEDNS for Destination.
- Select Submit.
- Repeat Steps 3 through 5 to add a second SMTP route.
- Enter ironport.com for Receiving Domain and USEDNS for Destination.
- Click Submit.
- Select All Other Domains for Receiving Domain.
- Enter /dev/null for Destination. This prevents routing mail from the Beta ESA for any domains that are not configured.
- Select Submit.
- Commit to save all changes to the configuration.
The SMTP routes on the Beta ESA appear as shown in this image.
Note: Add the appropriate routes to deliver emails to test end-users for domains as needed.
Incoming Relay for Beta ESA (Optional)
Incoming Relay allows the Beta ESA to evaluate the connecting IP address and retrieve a SenderBase Reputation Score (SBRS) beyond what is available from the Production ESA.
Most deployments require one hop.
- In the GUI, navigate to Network > Incoming Relay.
- Select the Enable checkbox.
- Select Add Relay.
- In the Name field, enter a descriptive name.
- In the IP Address field, enter the IP address of the Production ESA that delivers mail to the Beta ESA. Use a partial hostname only when multiple hosts deliver mail.
- In the Hop field, enter 1.
- Click Submit, then click Commit.
 Incoming Relay: Disabled State.
 Incoming Relay: Enabled State, colored white.
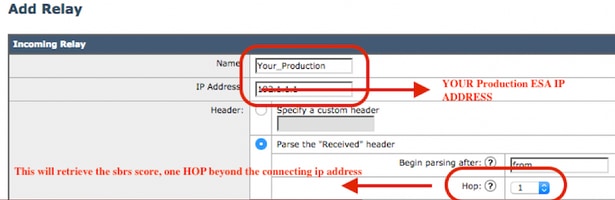 Incoming Relay: Sample Template
 Incoming Relay: Summary view after Submit.
Sample mail log entry:
Mon Apr 8 12:48:28 2019 Info: MID 2422822 IncomingRelay(PROD_hc2881-52): Header Received found, IP 10.11.1.1 being used, SBRS 3.5 country United States
Enable log headers to capture the spam verdict in mail logs (Optional)
- In the GUI, navigate to System Administration > Log Subscriptions.
- Select Global Settings at the bottom of the page.
- In the Headers section, select Add.
- Enter X-IronPort-Anti-Spam-Result.
- Select Submit.
- Click Commit.
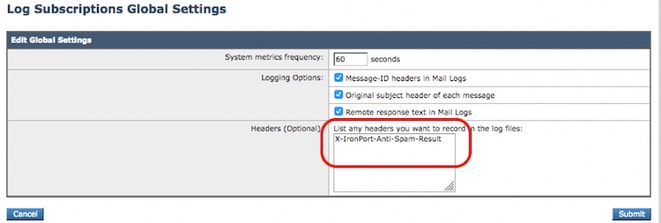 Log Spam Headers to Mail Logs
End of beta-side configuration.
Configure Production Appliance
Caution: You are about to make changes to a Production ESA. Ensure that you backup the current configuration.
- From the Web UI, navigate to System Administration > Configuration File.
- From the Current Configuration section, select one of the options to back up the current configuration as a file:
- Download file to local computer to view or save.
- Email file to: <your_email_address@domain.com>
- Click Submit.
SMTP Routes for Production ESA
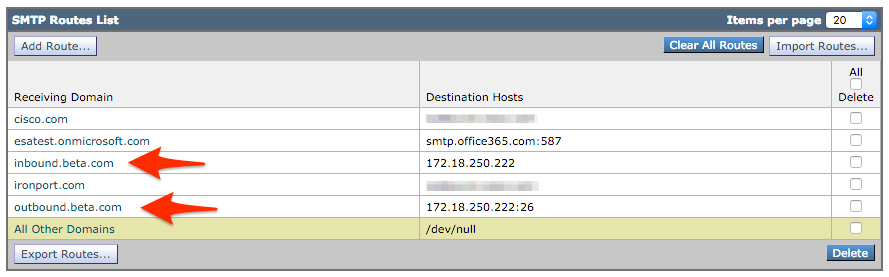
Add SMTP routes to allow BCC copies of all inbound and outbound email from the Production ESA to the Beta ESA. In this example, inbound.beta.com and outbound.beta.com are used.
- From the GUI, navigate to Network > SMTP Routes.
- Select Add Route....
- Enter inbound.beta.com for Receiving Domain.
- Enter the IP address of the Beta ESA public listener created earlier for Destination Hosts.
- Enter 25 for the port.
- Select Submit.
- Repeat Steps 2 through 5 to add the second route.
- Enter outbound.beta.com for Receiving Domain.
- Enter the IP address of the Beta ESA private listener created earlier for Destination Hosts.
- Enter 26 for the port.
- Select Submit.
- Commit to save all changes to the configuration.
The SMTP routes on the Production ESA appear as shown in this image.
Bounce Profile Creation
A combination of a Bounce Profile and a Destination Control Profile protects the production mail flow from delays or failures when messages are delivered to the Beta hosts. This configuration applies only to the beta messages.
- From the Web UI, navigate to Network > Bounce Profiles > Add Bounce Profile.
- Maximum Number of Retries: 15
- Maximum time in Queue: 130
- Initial time to wait per Message: 60
- Maximum time to wait per Message: 60
- Send Hard bounce Messages: NO
- Send Delay Warning Messages: NO
- Use Domain Key Signing for Bounce and Delay Messages: NO
- Submit to save the changes to this new Bounce Profile.
- Select Commit to save all changes to the configuration.
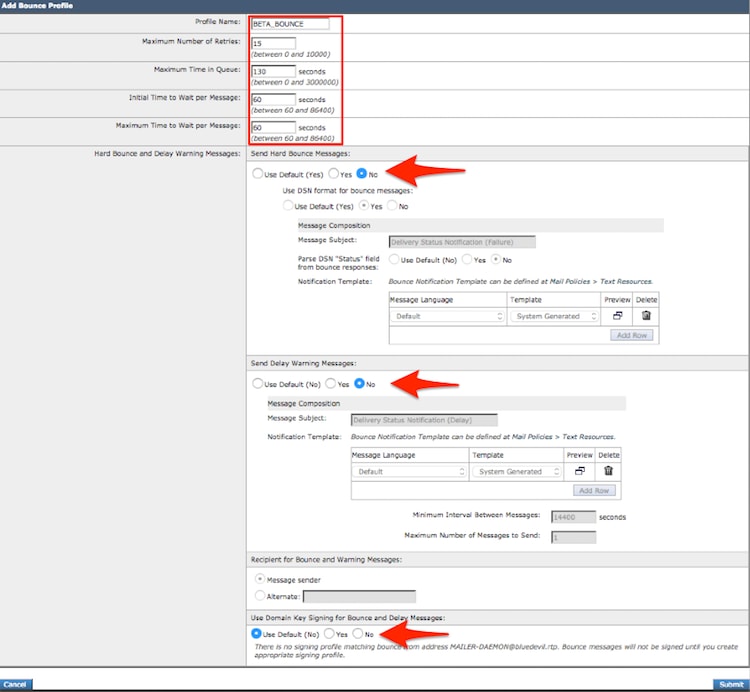 Bounce Profile Creation
Note: The numbered values are configured very aggressively to prevent Delivery Queue Backups in the event of a delivery interruption to the Beta Hosts. The values can be modified to preference. The notification settings are intentionally set to NO to prevent any user notifications from being delivered from the BCC Filters.
Destination Controls Profile Creation
- From the Web UI, navigate to Mail Policies > Destination Controls > Add Destination.
- Destination: inbound.beta.com
- Bounce Verification: > Perform address tagging: NO > or Default (NO)
- Bounce Profile: BETA_BOUNCE
- Configure the remaining values based on the administrator preference.
- Submit to save the changes to this new Destination Control Profile.
- Repeat Steps 2 through 6 and use outbound.beta.com for Destination.
- Submit to save the changes to this new Destination Control Profile.
- Commit to save all changes to the configuration.
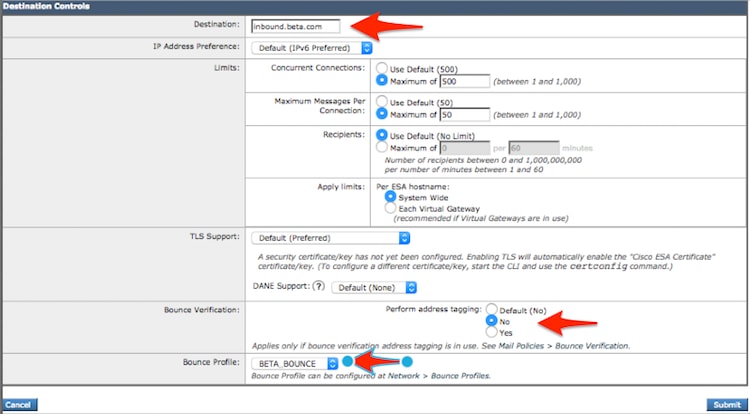 Add Destination Control Profiles.
 Summary View of New Destination Control Profiles.
Message Filter Construction for Production ESA
From the command-line interface (CLI) on the Production ESA, create a message filter that sends BCC copies of email to the appropriate listener on the Beta ESA.
- Navigate to Filters > NEW.
- Copy and paste this message filter example, and update the values as needed:
bcc-EFT: if sendergroup == "RELAY" {
 bcc ("$enveloperecipients", "$Subject", "$EnvelopeFrom", "outbound.beta.com");
 log-entry("<=====BCC COPY TO BETA ESA=====>");
 } else {
 bcc ("$enveloperecipients", "$Subject", "$EnvelopeFrom", "inbound.beta.com");
 log-entry("<=====BCC COPY TO BETA ESA=====>");
}
.
- Return until you are back to the main CLI prompt.
- Commit to save all changes to the configuration.
Note: Limit the traffic copied in the message filter based on sendergroup, recv-listener, mail-from, or other available rules and syntax. Consult the ESA User Guide for complete Message Filter Rules and Filter Rules Summary.
Verify
Use this section to confirm that the configuration works as expected.
To verify that the Beta ESA accepts email traffic from the Production ESA, run this command from the CLI on the Beta ESA:
tail mail_logs
Wed Mar 23 17:28:43 2016 Info: New SMTP ICID 2 interface Management (172.18.250.222) address 172.18.250.224 reverse dns host dhcp-172-18-250-224.cisco.com verified yes
Wed Mar 23 17:28:43 2016 Info: ICID 2 RELAY SG RELAY match 172.18.250.1/24 SBRS not enabled
Wed Mar 23 17:28:43 2016 Info: Start MID 2 ICID 2
Wed Mar 23 17:28:43 2016 Info: MID 2 ICID 2 From: <test@test.com>
Wed Mar 23 17:28:43 2016 Info: MID 2 ICID 2 RID 0 To: <example@ironport.com>
Wed Mar 23 17:28:43 2016 Info: MID 2 Message-ID '<a033ed$2@9.9.5-038.local>'
Wed Mar 23 17:28:43 2016 Info: MID 2 Subject 'TEST 2'
Wed Mar 23 17:28:43 2016 Info: MID 2 ready 320 bytes from <test@test.com>
Wed Mar 23 17:28:43 2016 Info: MID 2 matched all recipients for per-recipient policy DEFAULT in the outbound table
Wed Mar 23 17:28:43 2016 Info: MID 2 queued for delivery
Wed Mar 23 17:28:43 2016 Info: New SMTP DCID 3 interface 172.18.250.222 address 173.37.93.161 port 25
Wed Mar 23 17:28:43 2016 Info: Delivery start DCID 3 MID 2 to RID [0]
Wed Mar 23 17:28:44 2016 Info: Message done DCID 3 MID 2 to RID [0]
Wed Mar 23 17:28:44 2016 Info: MID 2 RID [0] Response '2.0.0 u2NHSipG018673 Message accepted for delivery'
Wed Mar 23 17:28:44 2016 Info: Message finished MID 2 done
Wed Mar 23 17:28:48 2016 Info: ICID 2 close
Wed Mar 23 17:28:49 2016 Info: DCID 3 close
The SMTP communication is established on 172.18.250.222 (Beta appliance). The traffic is sent from 172.18.250.224 (Production appliance).
The sender group that receives the communication is RELAY for relayed traffic from the 172.18.250.1/24 network.
The remaining entries show the processing of the TEST 2 message.
On the Production ESA, run this command to verify the processed MID:
tail mail_logs
The Production ESA shows this output:
Wed Mar 23 14:50:10 2016 Info: MID 242 was generated based on MID 241 by bcc filter 'bcc-EFT'
This output confirms a clear duplication of the message and shows that the message was BCC copied to the Beta ESA and the test end user as intended.
Troubleshoot
If verification fails, review the listener configuration, sender group entries, SMTP routes, incoming relay settings, and message filter configuration on both ESAs. Also review mail_logs on both appliances to confirm connection, relay, and delivery events.
Additional Information (Optional)
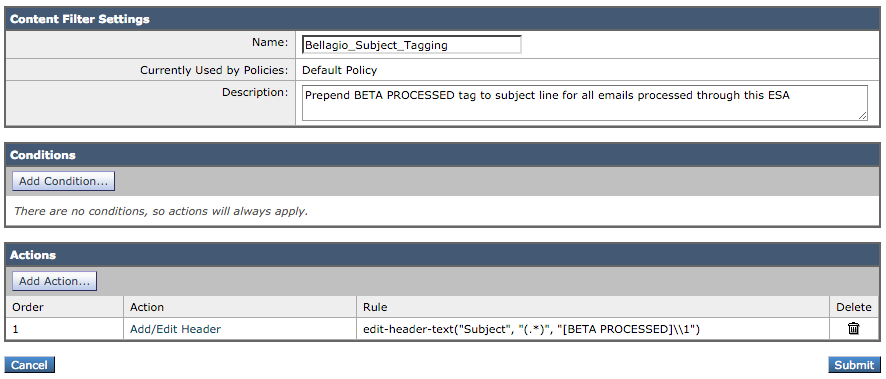
You can use a content filter to help differentiate Production and Beta email traffic for test end users.
- From the Web UI on the Beta ESA, navigate to Mail Policies > Incoming Content Filters or Mail Policies > Outgoing Content Filters.
- Create a basic content filter that performs the Add/Edit Header action.
- Select Submit.
- Navigate to Mail Policies > Incoming Mail Policies or Mail Policies > Outgoing Mail Policies.
- Enable the new content filter and add it to the policy.
- Select Submit.
- Click Commit in order to save all changes to the configuration.
After you complete this step, the content filter on the Beta ESA appears as shown in these images.
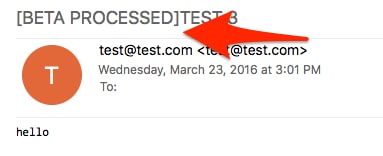
After the Beta ESA processes an email message, the Subject line appears as shown in this image.
Related Information

 Feedback