Provision an Encryption Profile and Complete RES Account Setup for ESA
Available Languages
Introduction
This document describes how to create an encryption profile and provision a Cisco Registered Envelope Service (CRES) account for a Cisco ESA.
This article also explains how to resolve the "Unable to provision profile <profile_name> for reason: Cannot find account" error, commonly encountered on Virtual and Hosted ESA models when adding an encryption profile. If you see this error, use the steps in the Virtual and Hosted ESA section.
Prerequisites
Requirements
- Ensure the IronPort Email Encryption feature key is installed on your ESA.
- Verify this from the ESA GUI at System Administration > Feature Keys or by running featurekey on the ESA CLI.
Components Used
The information in this document was created from the devices in a specific lab environment. All of the devices used in this document started with a cleared (default) configuration. If your network is live, ensure that you understand the potential impact of any command.
Account Provisioning and Encryption Profile Setup
Provision the CRES Account for Virtual and Hosted ESA
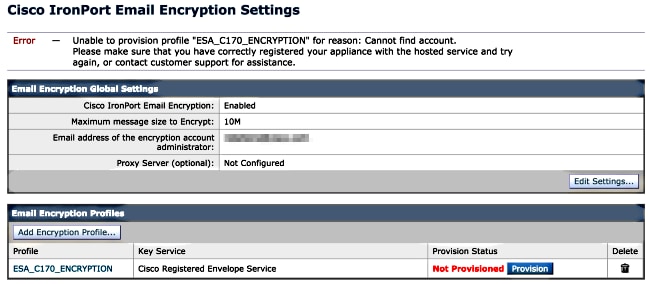
Virtual and Hosted ESA appliances can display the error "Unable to provision profile <profile_name> for reason: Cannot find account" when provisioning an encryption profile:
Cisco must complete the CRES provisioning account for you. Open a Cisco TAC case with this following:
- Name of account (specify the exact company name as it must appear).
- For Hosted accounts, end the account name with <Account Name> HOSTED.
- Email address(es) for the Account Admin (provide the admin's email address).
- The complete serial number(s) of the ESA(s) involved.
- Obtain the serial number from System Administration > Feature Keys in the GUI, or use version on the CLI.
- Domains to be mapped to the CRES account for administration.
If you have already tried to create the encryption profile on the ESA, complete these steps:
- Navigate to Security Services > Cisco IronPort Email Encryption > Email Encryption Profiles in the ESA GUI.
- Select Re-provision. The profile status updates to Provisioned when successful.
- If not successful, continue with profile creation steps for your ESA model.
Provision the CRES Account for Hardware ESA
Hardware ESAs, starting with CRES version 4.2, can auto-provision and do not require manual account creation by email.
- In the ESA GUI, navigate to Security Services > Cisco IronPort Email Encryption, enable the feature, and accept the End User License Agreement (EULA) if not already completed.
- Select Edit Settings.
- Enter the admin email address in the Email address of the encryption account administrator field and select Submit.
- Create an encryption profile using the Add Encryption Profile button.
- During profile creation, specify a meaningful profile name for reference in message or content filters.
- Select Submit.
- The new profile displays as Not Provisioned. Commit your changes before proceeding.
- After committing changes, select Provision to complete the provisioning process.
- Once provisioning is complete, a banner appears, and the profile provision button changes to Re-provision.
- The encryption profile setup is now complete. You are able to encrypt mail from your appliances through CRES.
Account Administrator Notification and Verification
Verify your configuration by checking that the admin email address receives notification of account administrator status:

After receiving this notification, log in to the CRES Admin site and verify your account. The account number appears in the Account Summary. To ensure complete visibility of all registered domains, open a Cisco TAC case with:
- Account Number
- Account Name
- Domains to be mapped for administration
This guarantees your account has full access to all domains registered through CRES.
CRES Account Number Details
The CRES account number is based on contract information tied to the appliance, generated from the Global Ultimate (GU) ID, and the Account Name is based on the Installed At Site Name. For review and entitlement checks, use the Cisco Service Contract Center (CSCC).
Troubleshooting
This section provides steps to check ESA connectivity to CRES servers.
To verify connectivity, use this command on the ESA CLI:
esa.example.com> telnet res.cisco.com 443
Trying 10.94.241.74...
Connected to 10.94.241.74.
Escape character is '^]'.
^]
telnet> quit
Connection closed.
This command checks if the ESA can reach the CRES server on port 443. Use this only for connectivity verification; do not use for other troubleshooting steps.
Related Information
- Cisco Email Security Appliance End-User Guides
- Cisco Technical Support and Documentation Resources
- Identify Cisco RES Key Server IP Addresses and Hostnames
- Set a Custom Logo in CRES
Revision History
| Revision | Publish Date | Comments |
|---|---|---|
3.0 |
19-Apr-2026
|
Updating per new process. |
1.0 |
14-Aug-2014
|
Initial Release |
 Feedback
Contact Cisco
- Open a Support Case

- (Requires a Cisco Service Contract)