Configure Duo Integration with AD and ISE for RAVPN 2FA
Available Languages
Contents
Introduction
This document describes Duo push integration with AD and Cisco ISE as 2FA for Cisco Secure Clients connected to ASA.
Prerequisites
Requirements
Cisco recommends that you have knowledge of these topics:
- Duo Applications
- Active Directory (AD)
- Identity Services Engine (ISE)
- RADIUS Configuration on ASA
- Remote Access VPN (RAVPN) Configuration on Adaptive Security Appliance (ASA)
Components Used
The information in this document is based on these software and hardware versions:
- Duo Server
- ISE Server 3.0
- ASA 9.14(3)18
- Microsoft 2016 Server
- Duo Authentication Proxy Manager
The information in this document was created from the devices in a specific lab environment. All of the devices used in this document started with a cleared (default) configuration. If your network is live, ensure that you understand the potential impact of any command.
Network Diagram and Scenario
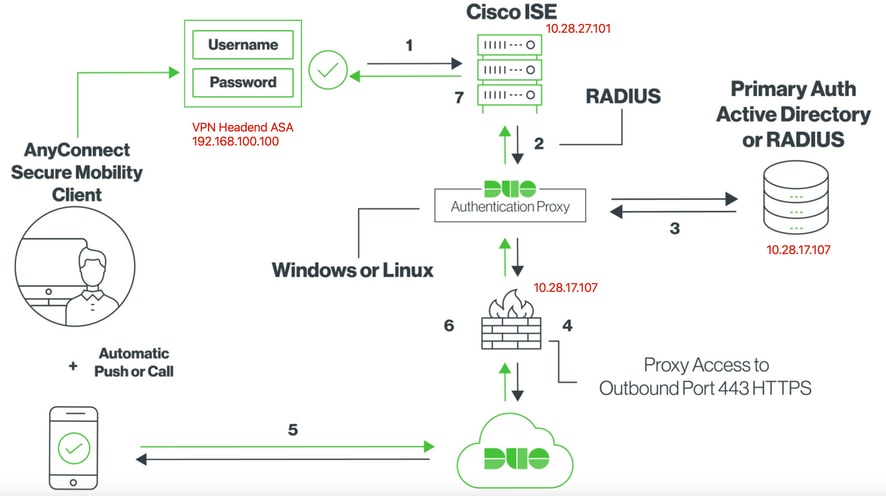
Communication Process
Duo Two-Factor RADIUS Authentication for Cisco ISE
- Primary authentication initiated to Cisco ISE.
- Cisco ASA sends authentication request to the Duo Authentication Proxy.
- Primary authentication uses Active Directory or RADIUS.
- Duo Authentication Proxy connection established to Duo Security over TCP port 443.
- Secondary authentication via Duo Security’s service.
- Duo authentication proxy receives authentication response.
- Cisco ISE access granted.
User Accounts:
- Active Directory Admin: This is used as the directory account to allow the Duo Auth Proxy to bind to the Active Directory server for primary authentication.
- Active Directory test user.
- Duo test user for secondary 2FA.
Active Directory Configurations
Windows Server is preconfigured with Active Directory Domain services.
To achieve AD configuration for authentication and user identity on Remote Access VPN users, a few values are required. All these details must be created or collected on the Microsoft Server before configuration can be completed on the ASA and Duo Auth proxy server.
The main values are:
- Domain Name: This is the domain name of the server. In this configuration guide, agarciam.cisco is the domain name.
- Server IP/Fully Qualified Domain Name (FQDN) Address: The IP address or FQDN used to reach the Microsoft server. If an FQDN is used, a DNS server must be configured within ASA and the Duo Auth proxy to resolve the FQDN. In this configuration guide, this value is agarciam.cisco, which resolves to 10.28.17.107.
- Server Port: The port used by the LDAP service. By default, LDAP and STARTTLS uses TCP port 389 for LDAP, and LDAP over SSL (LDAPS) uses TCP port 636.
- Root CA: If LDAPS or STARTTLS is used, the root CA used to sign the SSL certificate used by LDAPS is required.
- Directory Username and Password: This is the account used by the Duo Auth proxy server to bind to the LDAP server and authenticate and search for users and groups.
- Base and Group Distinguished Name (DN): The Base DN is the point of departure for Duo Auth proxy and alerts Active directory to begin searching for and authenticating users.
In this configuration guide, the root domain agarciam.cisco is used as the Base DN and Group DN is Duo-USERS.
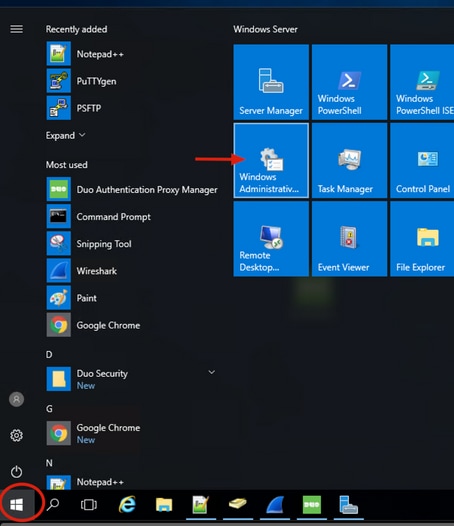
1. To add a new Duo user on Windows Server, navigate to the Windows icon at the bottom left, and click the Windows Administrative Tools:
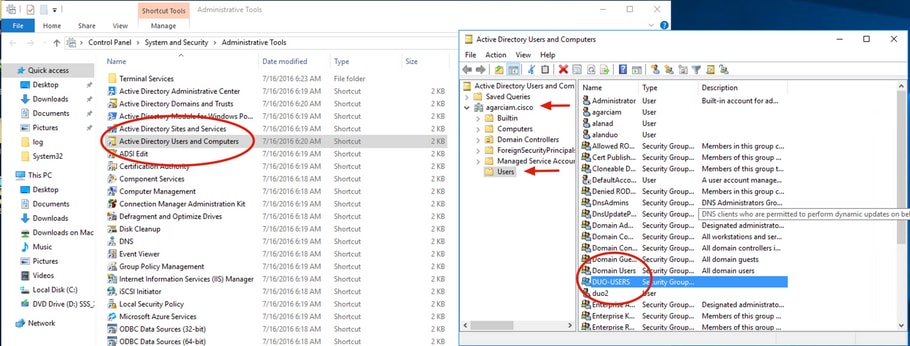
2. On the Windows Administrative Tools window, navigate to Active Directory Users and Computers.
3. On the Active Directory Users and Computers panel, expand the domain option and navigate to the Users folder.
4. In this configuration example, Duo-USERS is used as the target group for secondary authentication.
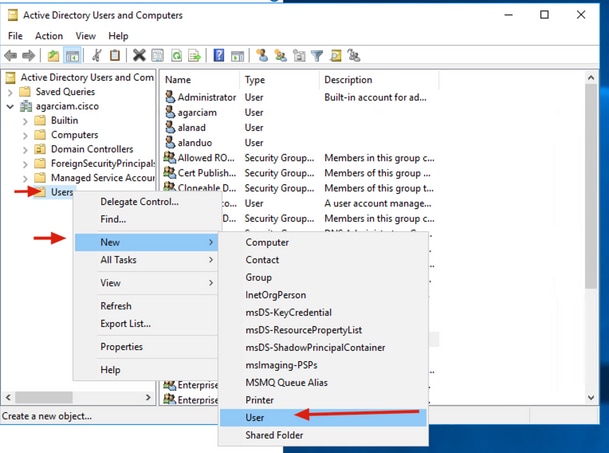
5. Right-click on the Users folder and select New > User:
6. On the New Object-User window, specify the identity attributes for the new user and click Next:
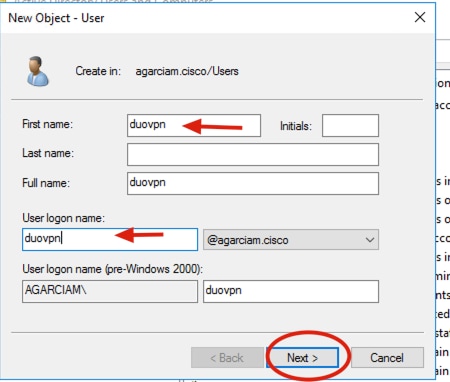
7. Confirm the password and click Next, then Finish once the user information is verified.
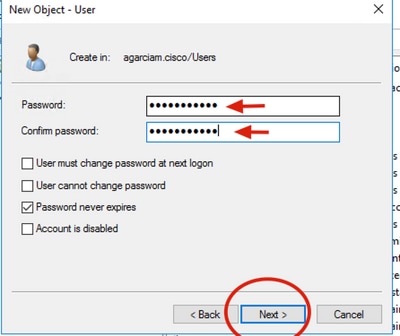
8. Assign the new user to a specific group, right-click and select Add to a group:
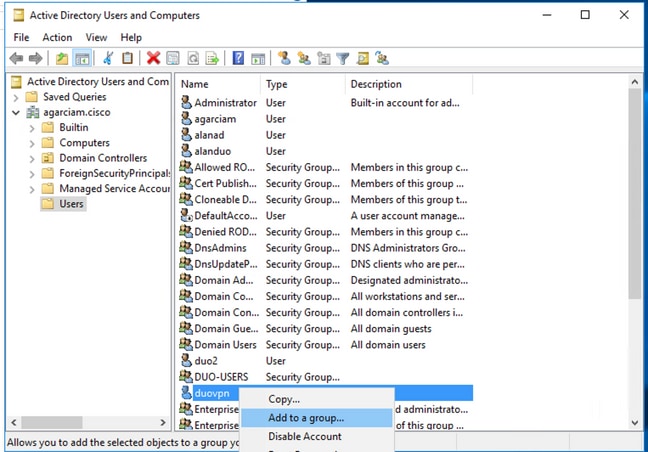
9. On the Select Groups panel, type the name of the desired group and click Check Names. Then, select the name that matches your criteria and click Ok.
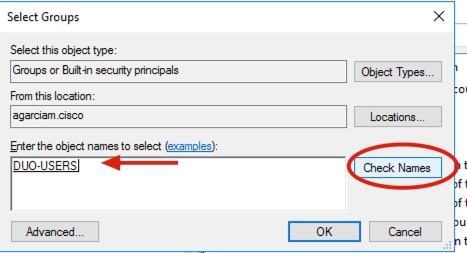
10. This is the user that is used in this document as an example.
Duo Configurations
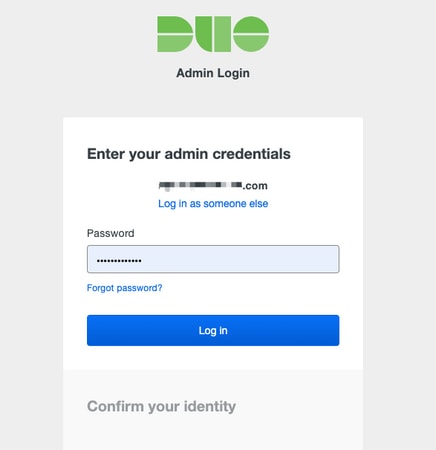
1. Log into your Duo Admin portal.
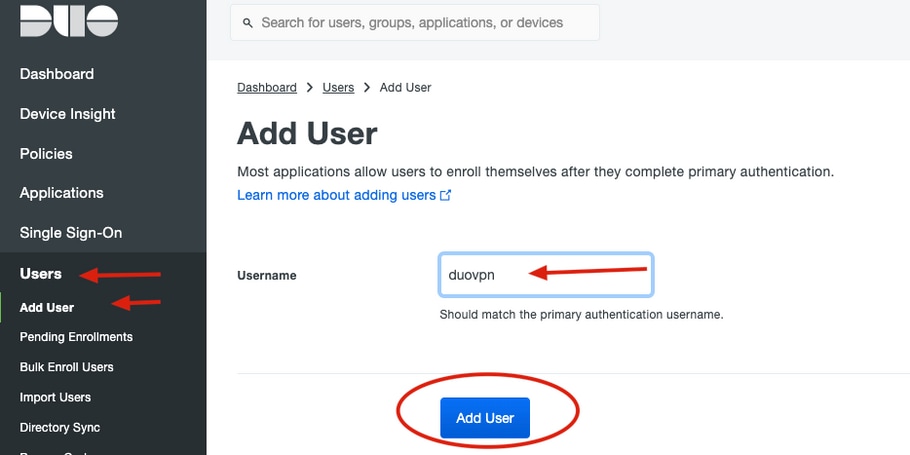
2.On the left-side panel, navigate to Users, click Add User and type the name of the user that matches the Active Domain username, then click Add User.
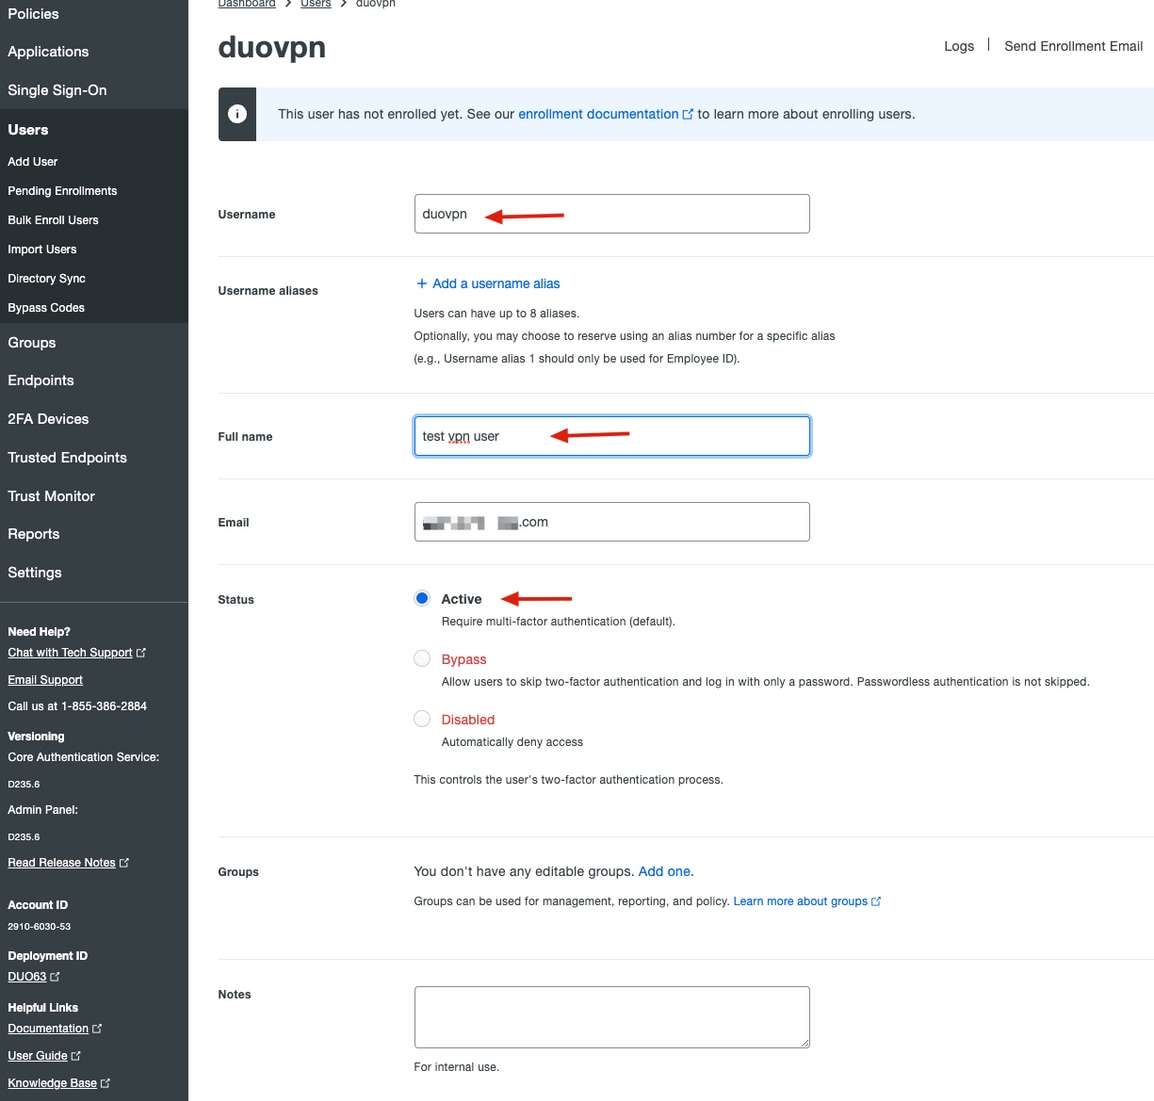
3. On the new user panel, fill in all necessary information.
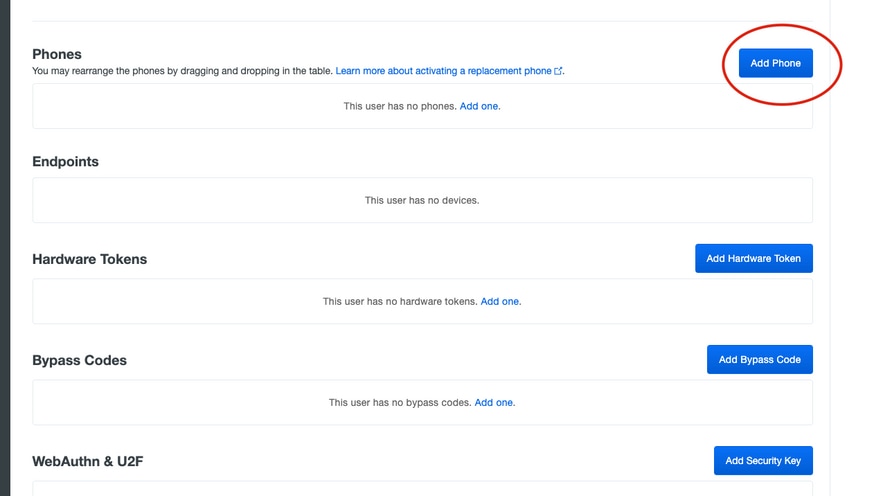
4. Under user devices, specify the secondary authentication method.
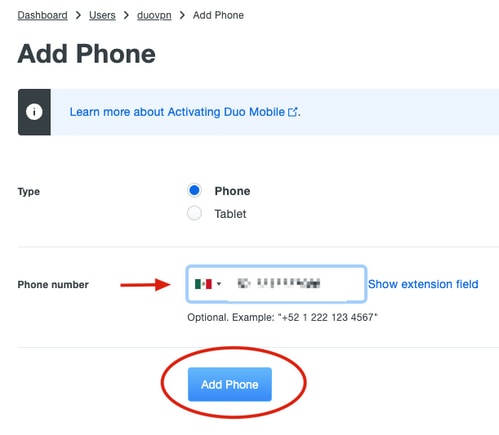
5. Click Add Phone.
6. Type in the user phone number and click Add Phone.
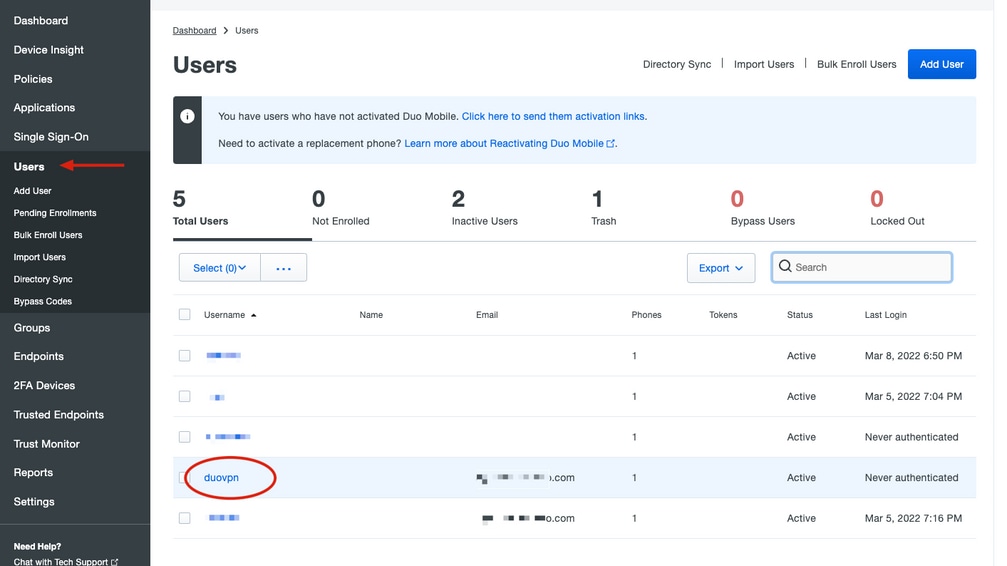
7. On the left Duo Admin panel, navigate to Users and click the new user.

Note: If you do not have access to your phone at set up, you can select the email option.
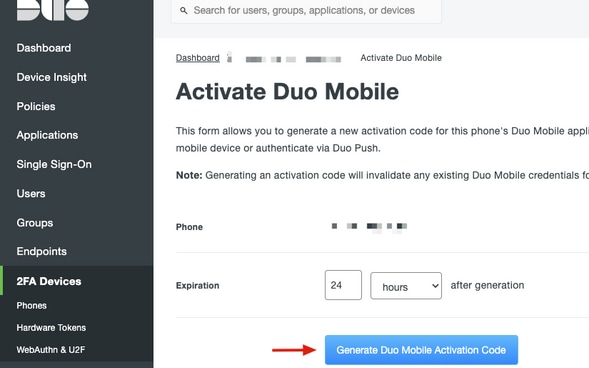
8. Navigate to the Phones section and click Activate Duo Mobile.

9. Click Generate Duo Mobile Activation Code.
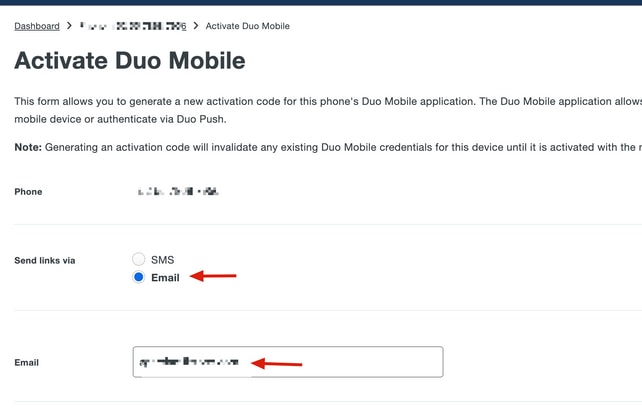
10. Select Email to receive the instructions via email, type your email address and click Send Instructions by email.
11. You receive an email with the instructions.
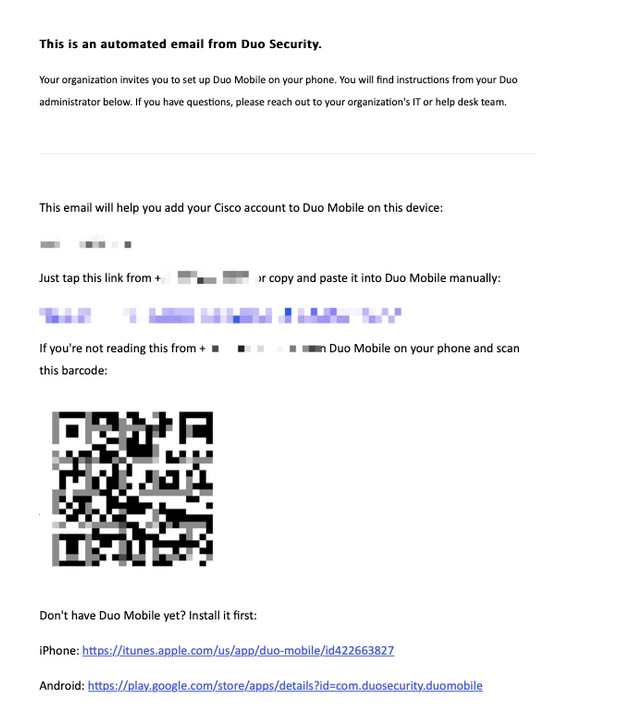
12. Open the Duo Mobile App from your mobile device and click Add, then select Use QR Code and scan the code from the email.
13. The new user is added to your Duo Mobile App.
Duo Auth Proxy Configuration
1. Download and Install Duo Auth Proxy Manager from Cisco Duo Authentication.
2. On the Duo Admin Panel, navigate to Applications and click Protect an Application.
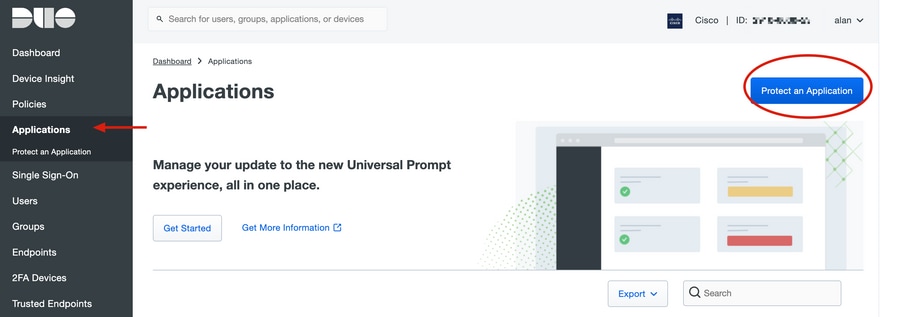
3. On the search bar, look for Cisco ISE Radius.
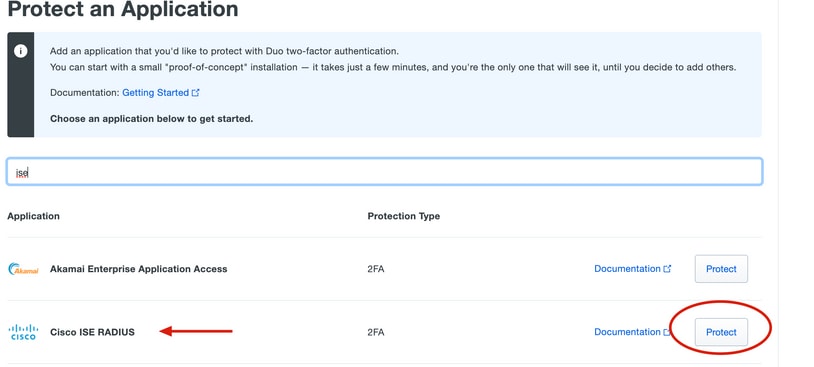
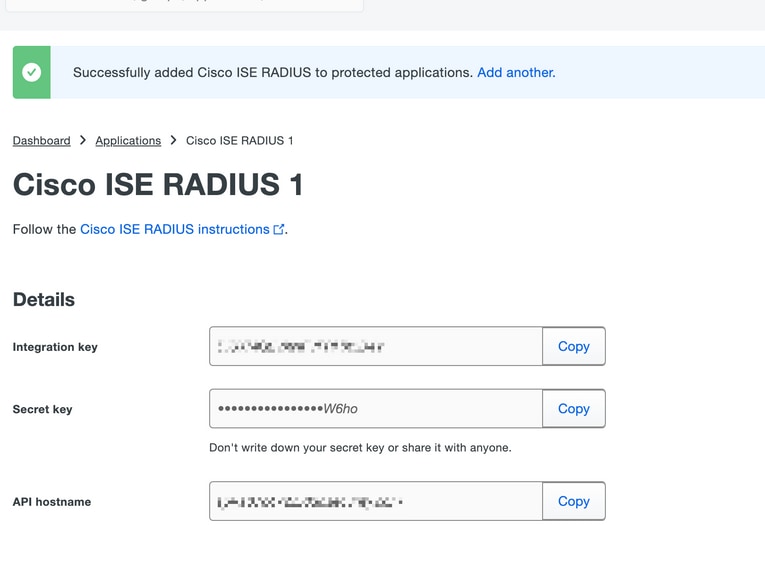
4. Copy the Integration key, Secret key, and the API Hostname. You need this information for the Duo Authentication Proxy configuration.
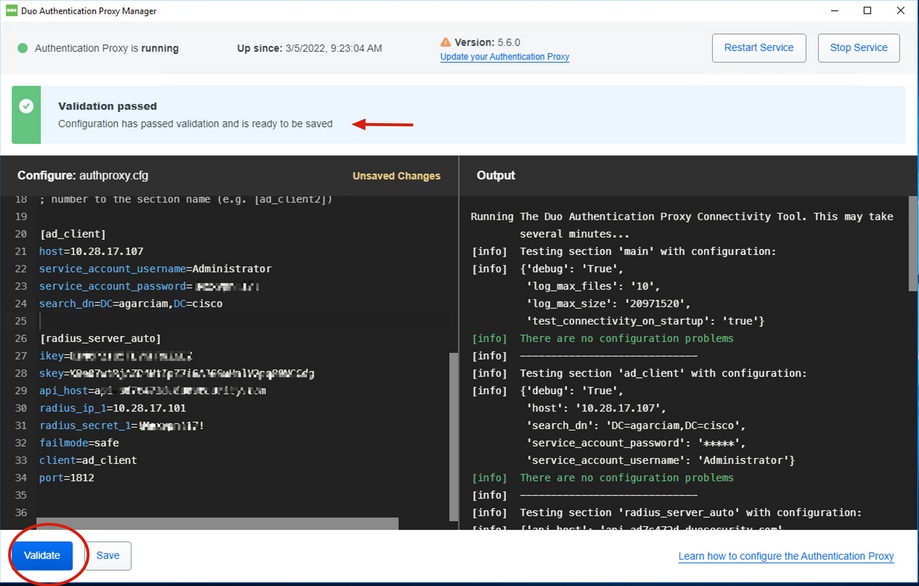
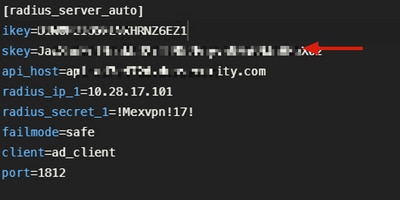
5. Run the Duo Authentication Proxy Manager application and complete the configuration for both Active Directory client and ISE Radius Server and click Validate.
Cisco ISE Configurations
1. Log into the ISE Admin portal.
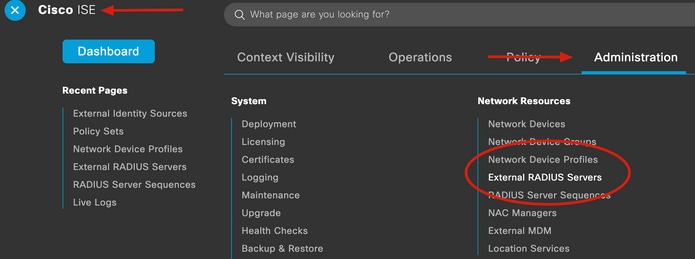
2. Expand Cisco ISE tab and Navigate to Administration, then click Network Resources, and click External RADIUS Servers.
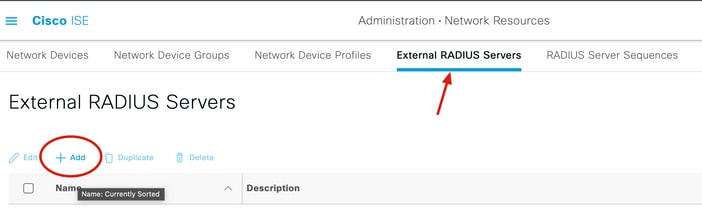
3. On the External Radius Servers tab, click Add.
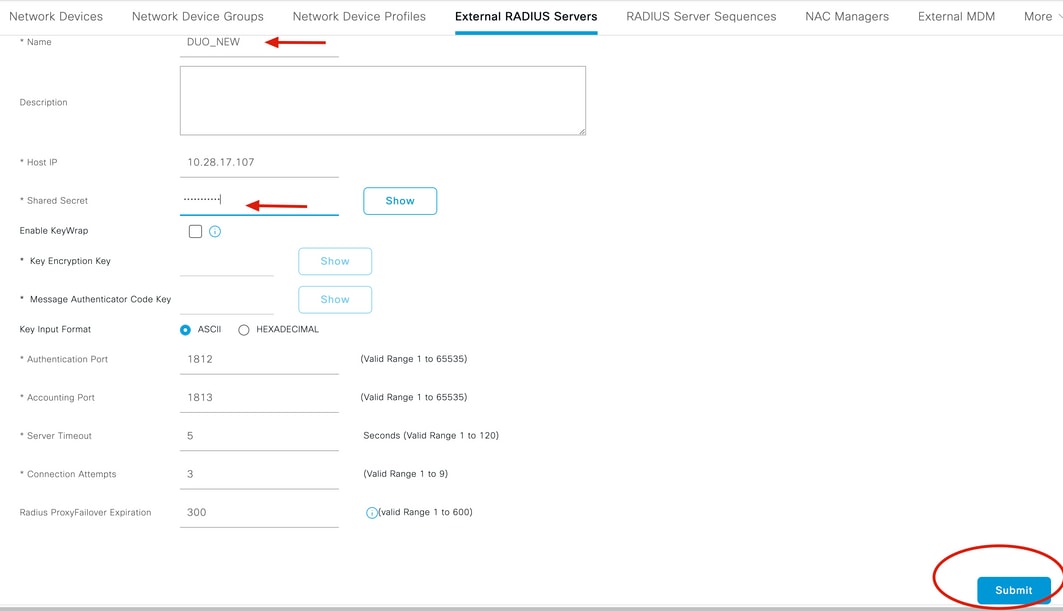
4. Fill in the blank with the RADIUS configuration used in the Duo Authentication Proxy Manager and click Submit.
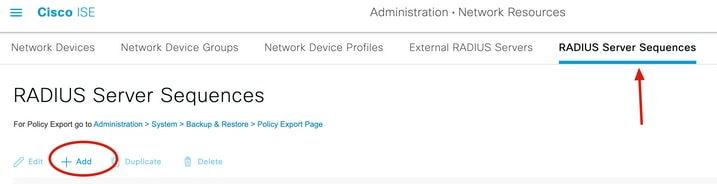
5. Navigate to RADIUS Server Sequences tab and click Add.
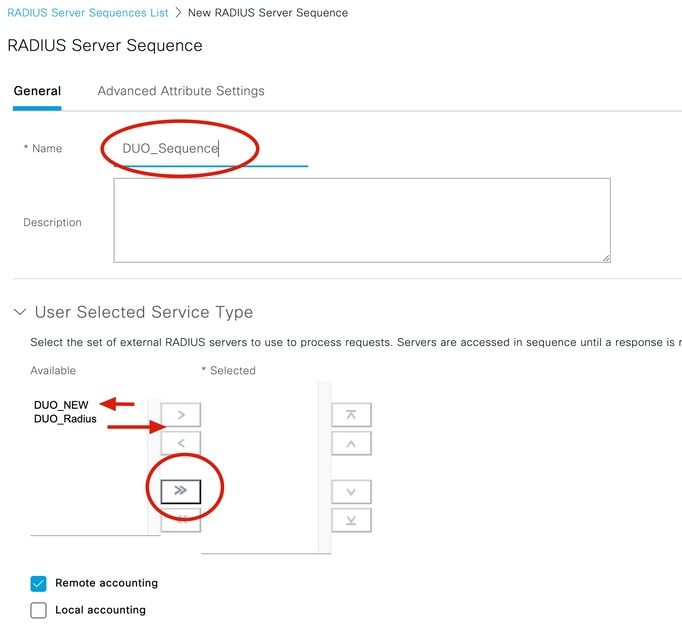
6. Specify the name of the sequence and assign the new RADIUS External server, click Submit.
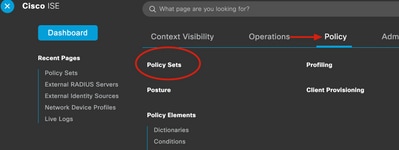
7. Navigate from the Dashboard menu to Policy, and click Policy Sets.
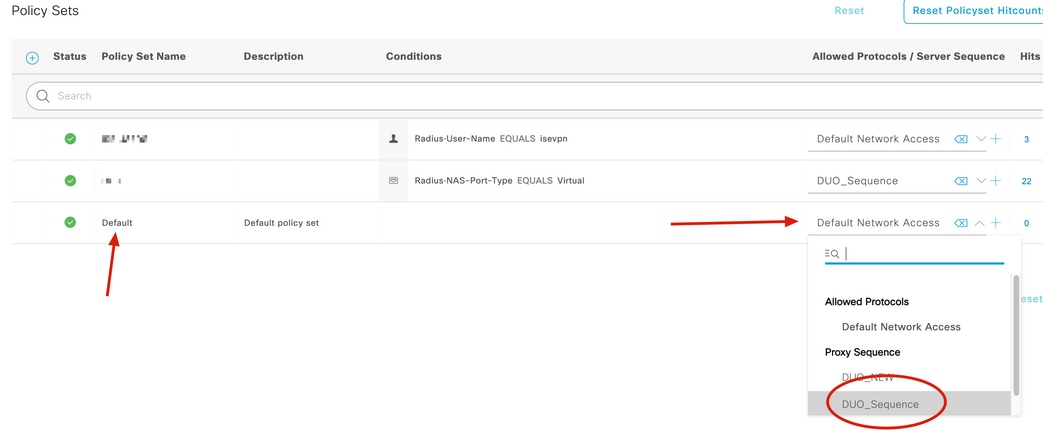
8. Assign the RADIUS Sequence to the default policy.
Cisco ASA RADIUS/ISE Configuration
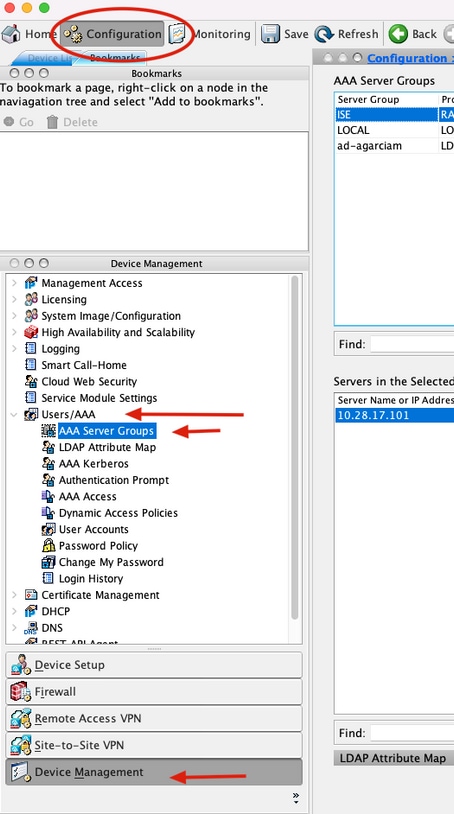
1. To configure the ISE RADIUS Server under AAA Server groups, navigate to Configuration, then click Device Management, expand the Users/AAA section, and select AAA Server Groups.
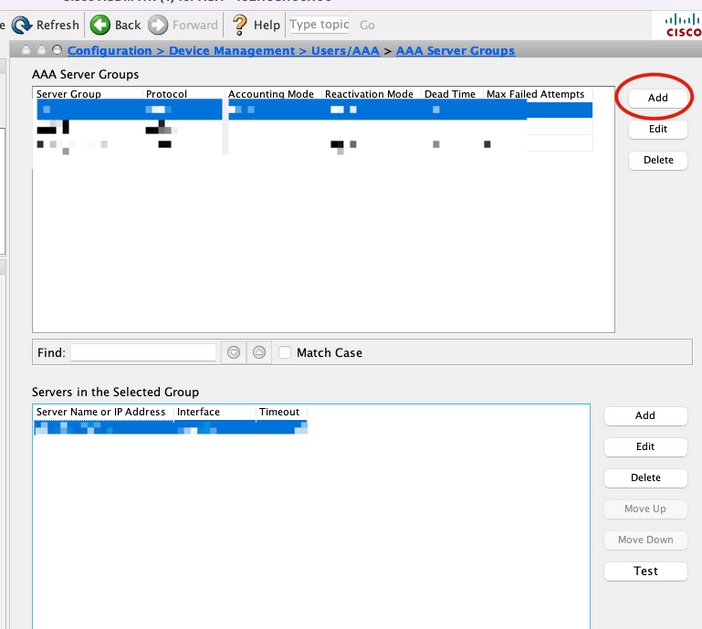
2. On the AAA Server Groups panel, click Add.
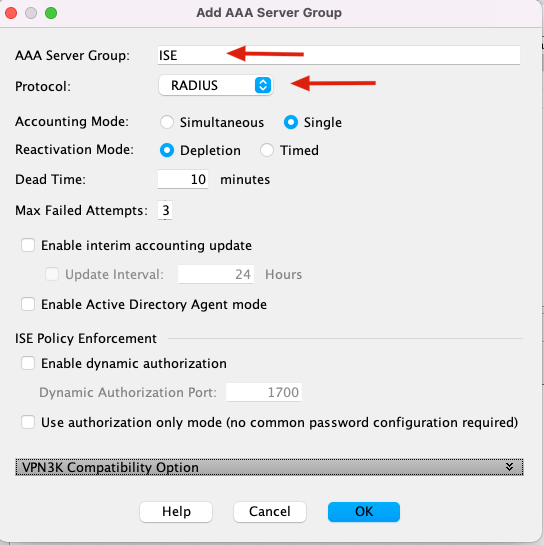
3. Select the name of the Server group and specify RADIUS as the protocol to use, then click OK.
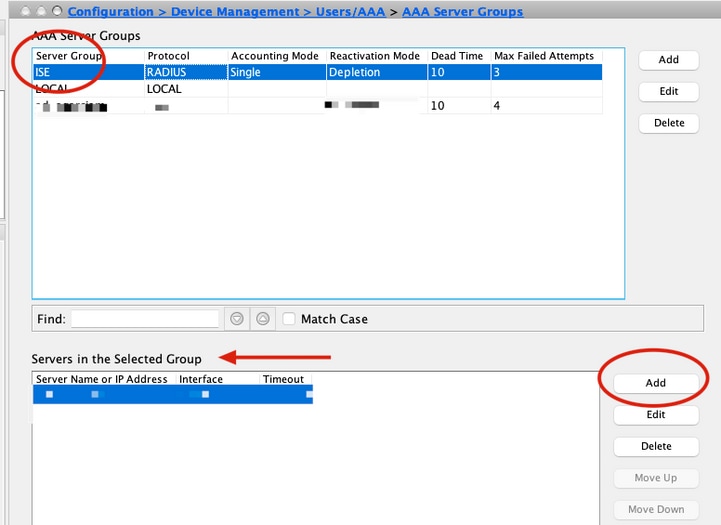
5. Select your new Server group and click Add under the Servers in the Selected Group panel:
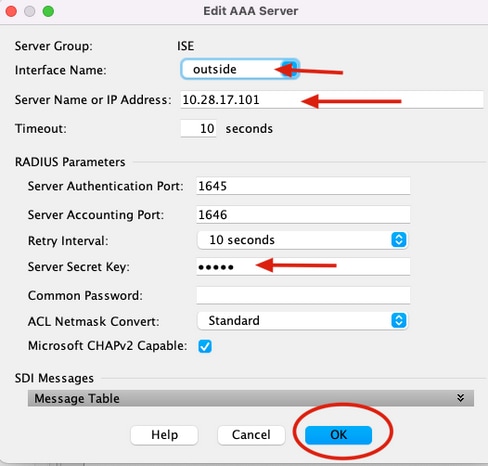
6. On the Edit AAA Server window, select the Interface Name, specify the IP Address of the ISE Server and type the RADIUS Secret Key, and click OK.
CLI Configuration
aaa-server ISE protocol radius
 dynamic-authorization
aaa-server ISE (outside) host 10.28.17.101
 key *****
Cisco ASA Remote Access VPN Configuration
ip local pool agarciam-pool 192.168.17.1-192.168.17.100 mask 255.255.255.0

group-policy DUO internal
group-policy DUO attributes
 banner value This connection is for DUO authorized users only!
 vpn-tunnel-protocol ikev2 ssl-client
 split-tunnel-policy tunnelspecified
 split-tunnel-network-list value split-agarciam
 address-pools value agarciam-pool

tunnel-group ISE-users type remote-access
tunnel-group ISE-users general-attributes
 address-pool agarciam-pool
 authentication-server-group ISE
 default-group-policy DUO
tunnel-group ISE-users webvpn-attributes
 group-alias ISE enable
 dns-group DNS-CISCO
Test
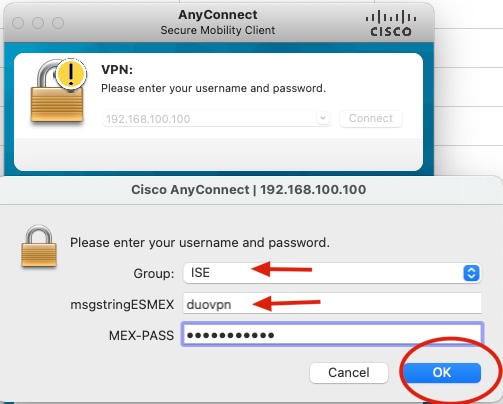
1. Open the Cisco Secure Client/AnyConnect app on your PC. Specify the hostname of the VPN ASA Headend and log in with the user created for the secondary Duo authentication, and click OK.
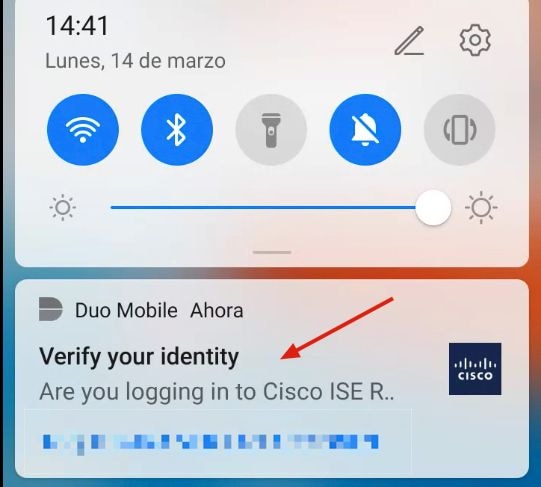
2. You receive a Duo push notification on the specified user Duo Mobile device.
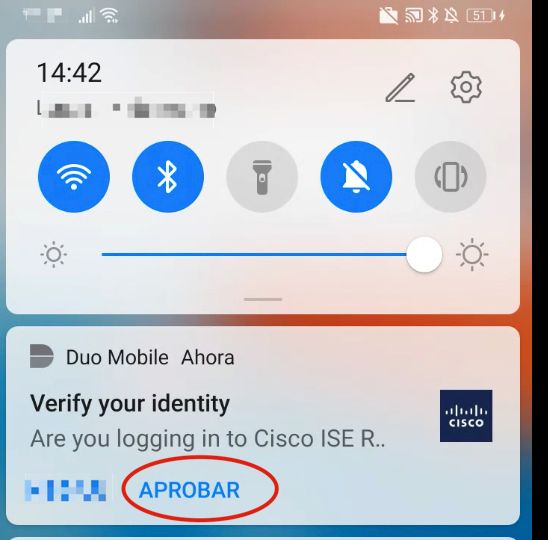
3. Open the Duo Mobile App notification and click Approve.
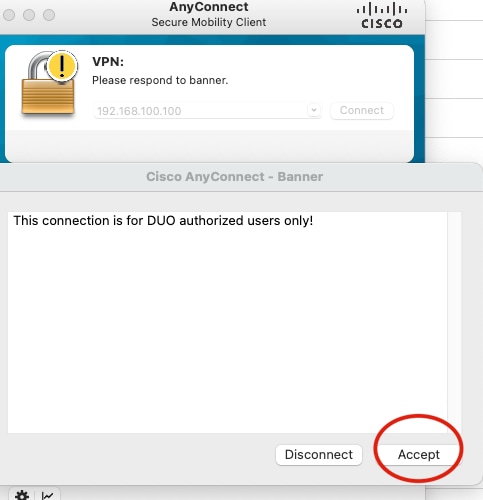
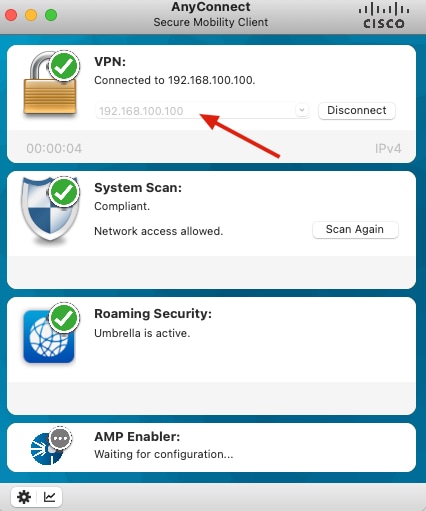
4. Accept the banner and the connection is established.
Troubleshoot
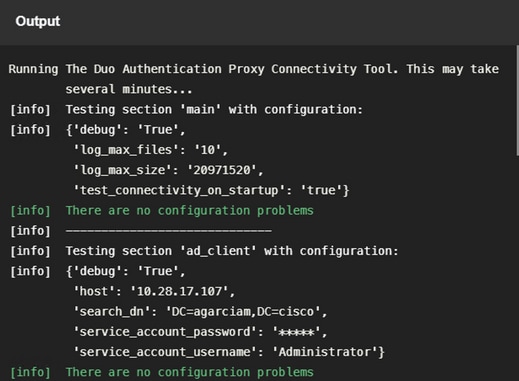
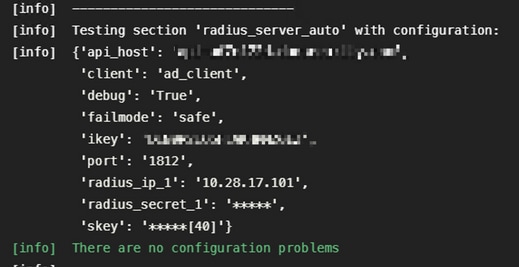
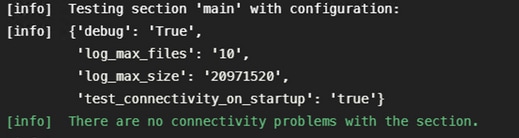
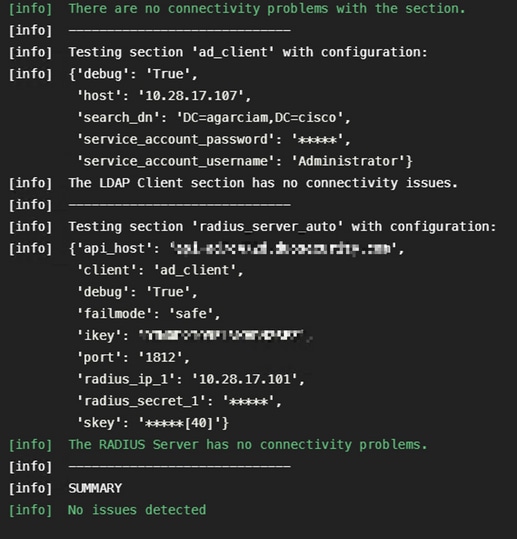
This section provides information you can use to troubleshoot your configuration. Duo Authentication Proxy comes with a debug tool that displays error and failure reasons.
Working Debugs
Common Problems
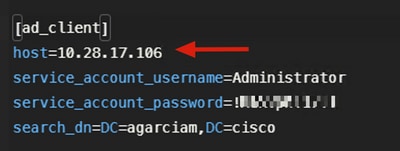
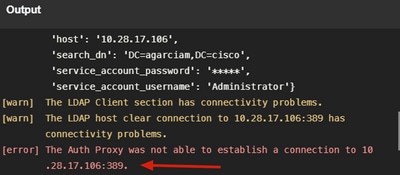
1. Connectivity Issues, Wrong IP, Unresolvable FQDN/Hostname on Active Directory Configuration
2. Wrong Password for Administrator User on Active Directory
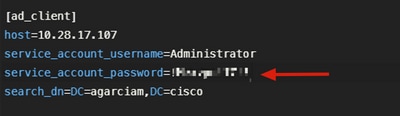
Debugs:
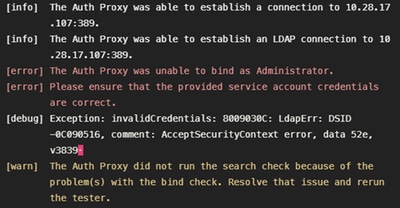
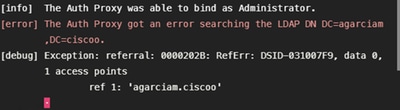
3. Wrong Base Domain
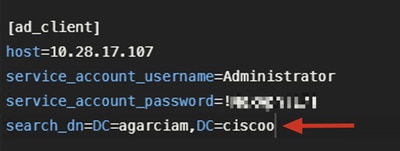
Debugs:
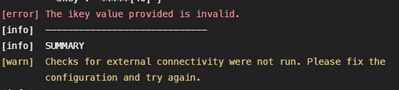
4. Wrong iKey RADIUS Value
Debugs:
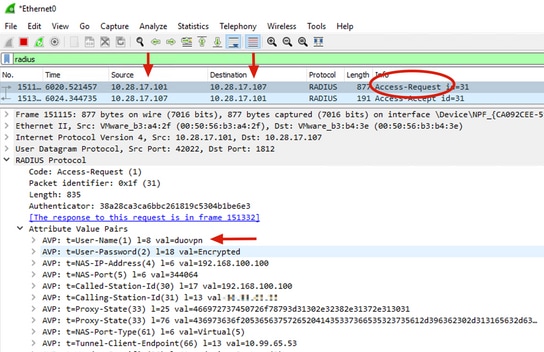
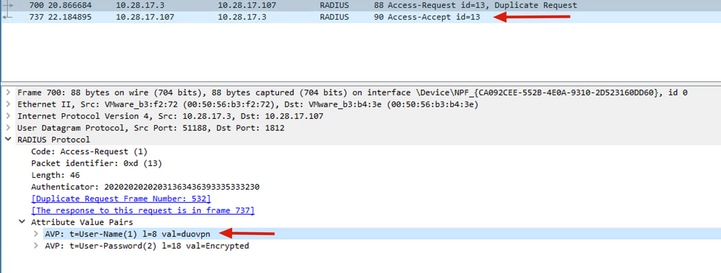
5. Verify ISE Server Sends Access-Request Packets
6. Use NTRadPing Utility to Verify Duo Authentication Proxy is Working
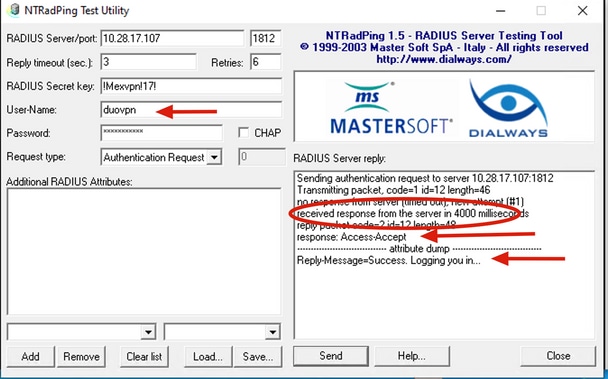
To confirm the Duo Authentication Proxy server works, Duo provides the NTRadPing tool to simulate Access-request packets and responses with Duo.
6.1 Install NTRadPing on a different PC and generate traffic.
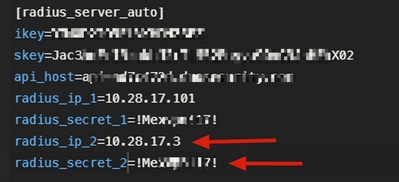
6.2 Configure with the attributes used on ISE Radius configuration.
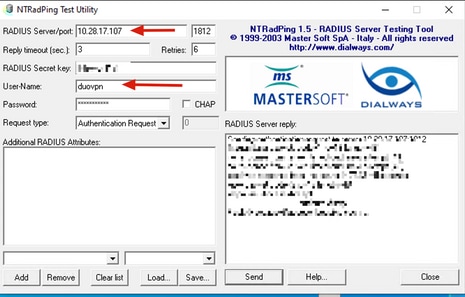
6.3 Configure the Duo Authentication Proxy Manager like the next example:
6.4. Navigate to your NTRadPing tool and click Send. You receive a Duo push notification on the assigned mobile device.
Revision History
| Revision | Publish Date | Comments |
|---|---|---|
5.0 |
19-Aug-2026
|
Updated Title, Introduction, spelling, grammar, inserted horizontal lines to separate sections for readability, alt text. |
4.0 |
10-Jul-2025
|
Updated Alt Text, Links, Acronyms, Style Requirements, Spelling, and Formatting. |
2.0 |
18-Apr-2023
|
Recertification |
1.0 |
15-Mar-2022
|
Initial Release |

 Feedback
Contact Cisco
- Open a Support Case

- (Requires a Cisco Service Contract)