Configure Domain Based Security Intelligence (DNS Policy) in FirePOWER Module With ASDM (On-Box Management)
Available Languages
Bias-Free Language
The documentation set for this product strives to use bias-free language. For the purposes of this documentation set, bias-free is defined as language that does not imply discrimination based on age, disability, gender, racial identity, ethnic identity, sexual orientation, socioeconomic status, and intersectionality. Exceptions may be present in the documentation due to language that is hardcoded in the user interfaces of the product software, language used based on RFP documentation, or language that is used by a referenced third-party product. Learn more about how Cisco is using Inclusive Language.
Contents
Introduction
This document describes how to configure Domain Based Security Intelligence (SI) on ASA with FirePOWER module with the use of Adaptive Security Device Manager (ASDM).
Prerequisites
Requirements
Cisco recommends that you have knowledge of these topics:
- Knowledge of ASA (Adaptive Security Appliance) firewall
- ASDM (Adaptive Security Device Manager)
- FirePOWER module Knowledge
Note: Security Intelligence filter requires a Protection license.
Components Used
The information in this document is based on these software versions:
- ASA FirePOWER modules (ASA 5506X/5506H-X/5506W-X, ASA 5508-X, ASA 5516-X ) with software version 6.0.0 and above
- ASA FirePOWER module (ASA 5515-X, ASA 5525-X, ASA 5545-X, ASA 5555-X) with software version 6.0.0 and above
The information in this document was created from the devices in a specific lab environment. All of the devices used in this document started with a cleared (default) configuration. If your network is live, make sure that you understand the potential impact of any command.
Background Information
Firepower system provides the ability to intercept DNS traffic requests and looks for the malicious domain name. If Firepower module finds a malicious domain, the Firepower takes appropriate action to mitigate the request as per configuration of DNS policy.
New attack methods designed to breach IP-based intelligence, misuse DNS load balance features in order to hide the actual IP address of a malicious server. While the IP addresses associated with the attack are frequently swapped in and out, the domain name is rarely changed.
Firepower provides the ability to redirect the malicious request to a sinkhole server which can be a honeypot server to detect, deflect or study attempts to know more about the attack traffic.
Overview of Domain Lists and Feeds
Domain Lists and Feeds contains the list of the malicious domain name which is further classified into the various category based upon attack type. Typically, you can categorize the feeds into two types.
Cisco TALOS provided Domain Lists and Feeds
DNS Attackers: Collection of domain names that continually scan for vulnerabilities or attempts to exploit other systems.
DNS Bogon: Collection of domain names that do not allocate but resends the traffic, also known as Fake IPs.
DNS Bots: Collection of domain names that actively participate as part of a botnet, and are controlled by a known botnet controller.
DNS CnC: Collection of domain names that are identified as the controll servers for a known Botnet.
DNS Exploit kit: Collection of domain names that attempt to exploit other systems.
DNS Malware: Collection of domain names that attempt to propagate malware or actively attacks anyone who visits them.
DNS Open_proxy: Collection of domain names that run Open Web Proxies and offer anonymous web browse services.
DNS Open_relay: Collection of domain names that offer anonymous email relay services used by spam and phish attackers.
DNS Phish: Collection of domain names that actively attempt to trick an end users to enter their confidential information like usernames and passwords.
DNS Response: Collection of domain names that are repeatedly observed engaged in suspicious or malicious behavior.
DNS Spam: Collection of domain names that are identified as the source which sends spam email messages.
DNS Suspicious: Collection of domain names that display suspicious activity and are under active investigation.
DNS Tor_exit_node: Collection of domain names that offer exit node services for the Tor Anonymizer network.
Custom Domain Lists and Feeds
Global Blacklist for DNS: Collection of the custom list of domain names which are identified as malicious by the administrator.
Global whitelist for DNS: Collection of the custom list of domain names which are identified as genuine by the administrator.
Configure DNS Security Intelligence
There are multiple steps to configure the Domain name based security intelligence.
- Configure the custom DNS Feed/List (Optional)
- Configure the Sinkhole Object (Optional)
- Configure the DNS Policy
- Configure the Access Control Policy
- Deploy the Access Control Policy
Step 1. Configure Custom DNS Feed/List (Optional).
There are two pre-defined lists which allow you to add the domains to it. You create your own Lists & Feeds for the domains which you want to block.
- Global Blacklist for DNS
- Global Whitelist for DNS
Manually add IP addresses to Global-Blacklist and Global-Whitelist
Firepower module allows you to add certain domains to Global-Blacklist when you know that they are part of some malicious activity. Domains can also be added to Global Whitelist if you want to allow the traffic to certain domains which are blocked by blacklist domains. If you add any domain to Global-Blacklist/Global-Whitelist, it takes effect immediately without the need to apply the policy.
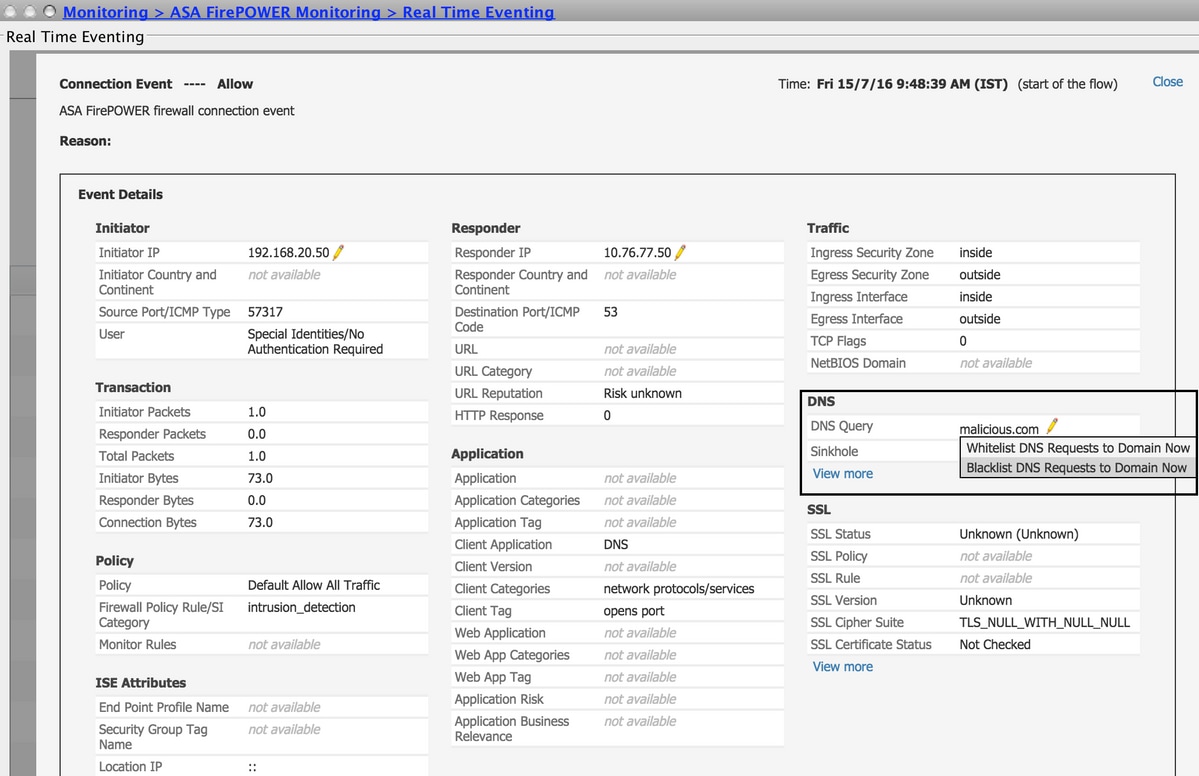
In order to add the IP address to Global-Blacklist/ Global-Whitelist, navigate to Monitoring > ASA FirePOWER Monitoring > Real Time Eventing, hover the mouse on connection events and select View Details.
You can add domains to the Global-Blacklist/Global-Whitelist. Click Edit on DNS section and select Whitelist DNS Requests to Domain Now/Blacklist DNS Requests to Domain Now to add the domain to the respective list, as shown in the image.
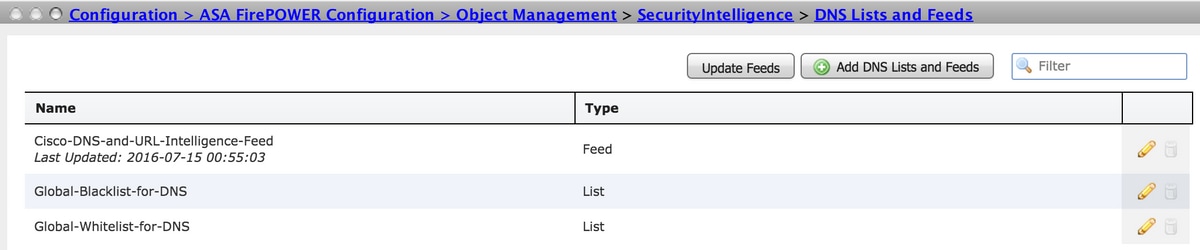
In order to verify that domains are added to the Global-Blacklist/ Global-Whitelist, navigate to Configuration > ASA FirePOWER Configuration > Object Management > SecurityIntelligence > DNS Lists and Feeds and edit Global-Blacklist for DNS / Global Whitelist for DNS. You can also use the delete button to remove any domain from the list.
Create the Custom list of blacklist domains
Firepower allows you to create custom domain list which can be used to blacklist (block) by two different methods.
- You can write domain names to a text file (one domain per line) and upload the file to FirePOWER Module.
In order to upload the file, navigate to Configuration > ASA FirePOWER Configuration > Object Management > SecurityIntelligence > DNS Lists and Feeds and then select Add DNS Lists and FeedsName: Specify the name of the Custom list.
Type: Select List from the drop-down list.
Upload List: Choose Browse to locate the text file in your system. Select Upload to upload the file.
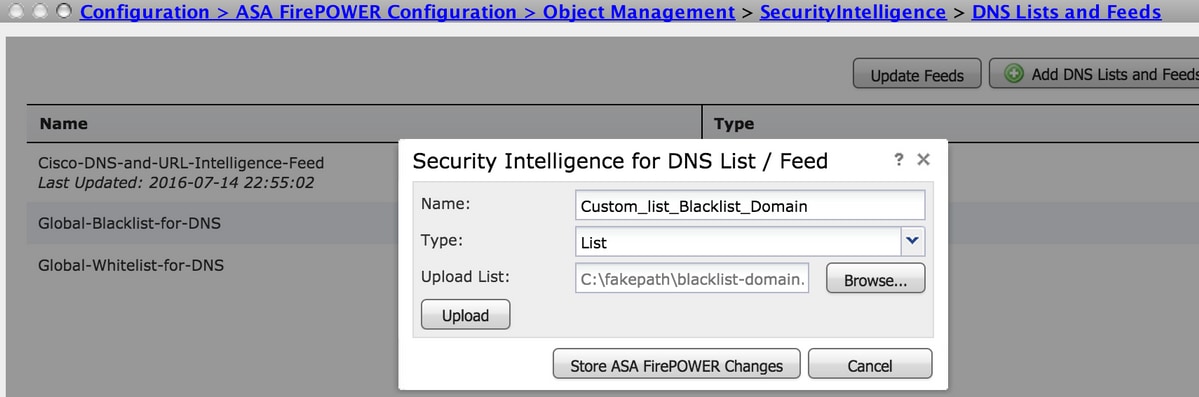
Click Store ASA FirePOWER Changes to save the changes. -
You can use any third-party domains for the custom list for which Firepower module can connect the third party server to fetch the domain list.
In order to configure this, navigate to Configuration > ASA FirePOWER Configuration > Object Management > Security Intelligence > DNS Lists and Feeds and then select Add DNS Lists and Feeds
Name: Specify the name of the Custom Feed.
Type: Select Feed from the drop-down list.
Feed URL: Specify the server URL to which the FirePOWER module can connect and download the feed.
MD5 URL: Specify the hash value to validate the Feed URL path.
Update Frequency: Specify the time interval in which the module connects to the URL Feed server.
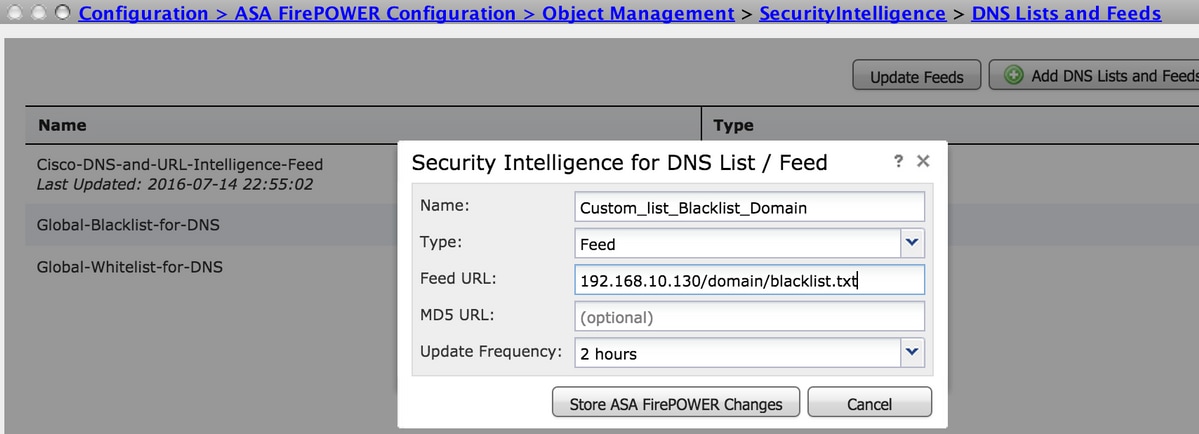
Select Store ASA FirePOWER Changes to save the changes.
Step 2. Configure A Sinkhole Object (optional).
Sinkhole IP address can be used as the response to a malicious DNS request. The client machine gets the sinkhole server IP address for malicious domain lookup and the,n the end machine tries to connect to the sinkhole server. Hence, the sinkhole can act as the Honeypot to investigate the attack traffic. The sinkhole can be configured to trigger an Indicator of Compromise (IOC).
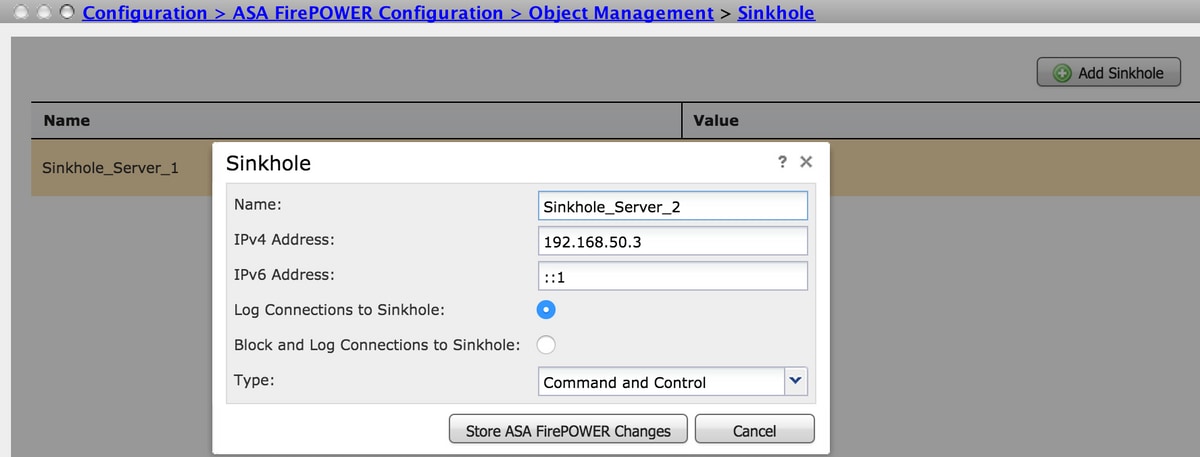
To add the sinkhole server, Configuration > ASA FirePOWER Configuration > Object Management > Sinkhole & click the Add Sinkhole option.
Name: Specify the name of sinkhole server.
IP address: Specify the IP address of sinkhole server.
Log connections to Sinkhole: Enable this option to log all the connections between the endpoint and sinkhole server.
Block and Log Connections to Sinkhole: Enable this option to block the connection and only log at the start of flow connection. If there is no physical sinkhole server, you can specify any IP address and you can see the connection events and IOC trigger.
Type: Specify the Feed from the drop-down list for which you want to select the type of IOC (Indication of Compromise) associated with sinkhole events. There are three types of sinkhole IOC that can be tagged.
- Malware
- Command and Control
- Phish
Step 3. Configure DNS Policy.
DNS Policy needs to be configured to decide the action for the DNS feed/list. Navigate to Configuration > ASA FirePOWER Configuration > Policies > DNS Policy.
The default DNS policy contains two default rules. The first rule, Global Whitelist for DNS, contains the custom list of the allowed domain (Global-Whitelist-for-DNS). This rule is at the top to match first before the system tries to match any blacklist domain. The second rule, Global Blacklist for DNS, contains the custom list of the blocked domain (Global-Blacklist-for-DNS).
You can add more rules to define the various actions for Cisco TALOS provided Domain Lists and Feeds. To add a new rule, select Add DNS Rule.
Name: Specify the rule name.
Action: Specify the action to trigger when this rule matches.
- Whitelist: This allows the DNS query.
- Monitor: This action generates the event for DNS query and traffic continue to match subsequent rules.
- Domain Not Found: This action sends DNS response as Domain Not Found (Non-existent Domain).
- Drop: This action blocks and drops the DNS query silently.
- Sinkhole: This action sends the IP address of Sinkhole server as the response to DNS request.
Specify the Zones/ Network to define the rule conditions. In the DNS tab, choose the DNS lists & Feeds and move to Selected Items option where you can apply the configured action.
You can configure the multiple DNS rules for different DNS Lists and Feeds with a different action based on your organization needs.
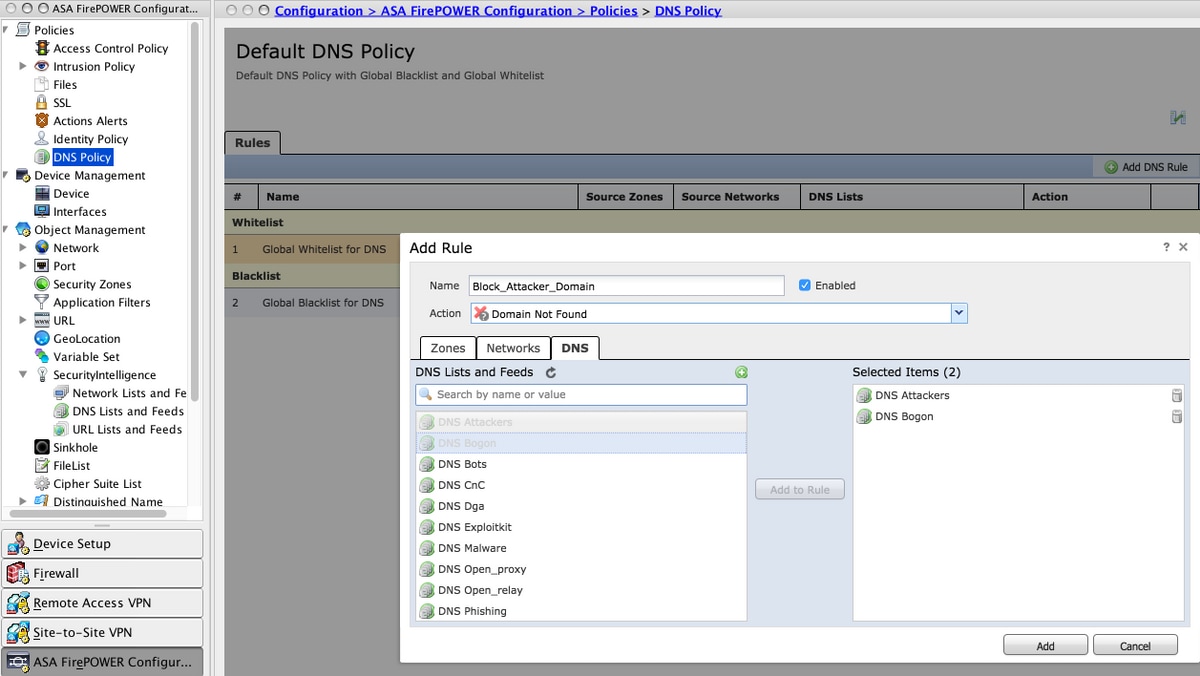
Click the Add option to add the rule.
Step 4. Configure the Access Control Policy.
In order to configure the DNS based Security Intelligence, navigate to Configuration > ASA Firepower Configuration > Policies > Access Control Policy, select Security Intelligence tab.
Ensure that DNS Policy is configured and optionally, you can enable the logs as you click on the logs icon as shown in the image.
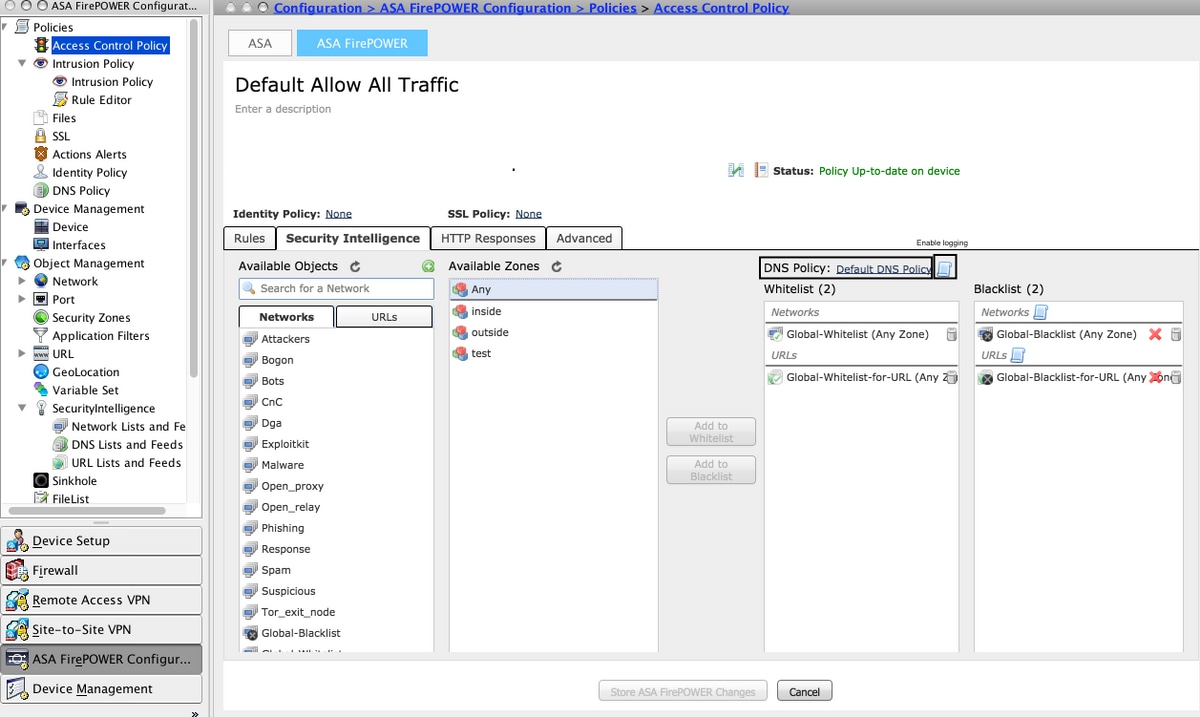
Choose option Store ASA Firepower Changes to save the AC policy changes.
Step 5. Deploy Access Control Policy.
For the changes to take effect, you must deploy the Access Control policy. Before you apply the policy, see an indication that whether the Access Control Policy is out-of-date on the device or not.
To deploy the changes to the sensor, click Deploy and choose Deploy FirePOWER Changes then select Deploy in the pop-up window to deploy the changes.
Note: In version 5.4.x, To apply the Access policy to the sensor, you need to click Apply ASA FirePOWER Changes.
Note: Navigate to Monitoring > ASA Firepower Monitoring > Task Status. Ensure the task is complete to confirm the configuration changes.
Verify
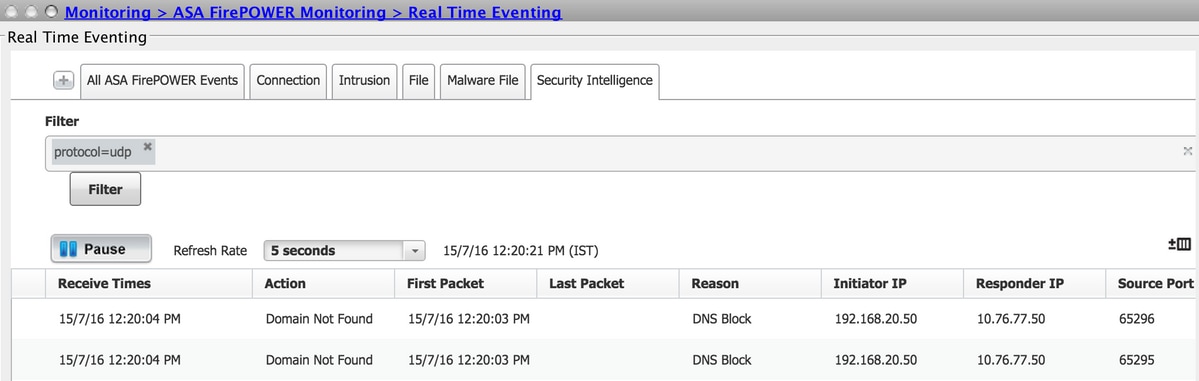
Configuration can be verified only if an event is triggered. For this, you can force a DNS query on a machine. However, be cautious of the repercussions when a known malicious server is targetted. After you generate this query, you can see the event in the Real Time Eventing section.
DNS Security Intelligence Event Monitoring
In order to see the Security Intelligence by the Firepower Module, navigate to Monitoring > ASA Firepower Monitoring > Real Time Eventing. Select the Security Intelligence tab. This shows up the events as shown in the image:
Troubleshoot
This section provides the information you can use in order to troubleshoot your configuration.
In order to ensure that Security Intelligence Feeds is up to date, navigate to Configuration > ASA FirePOWER Configuration > Object Management > Security Intelligence > DNS Lists and Feeds and check the time when the feed was last updated. You can choose Edit to set the frequency of feed update.
Ensure that Access Control Policy deployment has completed successfully.
Monitor the Security Intelligence Real Time Eventing tab to see if traffic is blocked or not.
Related Information
Contributed by Cisco Engineers
- Adwiti DashCisco TAC Engineer
- Sunil KumarCisco TAC Engineer
 Feedback
Contact Cisco
- Open a Support Case

- (Requires a Cisco Service Contract)