Configure Anyconnect VPN to FTD via IKEv2 with ISE
Available Languages
Download Options
Bias-Free Language
The documentation set for this product strives to use bias-free language. For the purposes of this documentation set, bias-free is defined as language that does not imply discrimination based on age, disability, gender, racial identity, ethnic identity, sexual orientation, socioeconomic status, and intersectionality. Exceptions may be present in the documentation due to language that is hardcoded in the user interfaces of the product software, language used based on RFP documentation, or language that is used by a referenced third-party product. Learn more about how Cisco is using Inclusive Language.
Contents
Introduction
This document describes the basic configuration of Remote Access VPN with IKEv2 and ISE authentication on FTD managed by the FMC.
Prerequisites
Requirements
Cisco recommends that you have knowledge of these topics:
- Basic VPN, TLS, and Internet Key Exchange version 2 (IKEv2)
- Basic Authentication, Authorization, and Accounting (AAA) and RADIUS
- Experience with Firepower Management Center (FMC)
Components Used
The information in this document is based on these software versions:
- Cisco Firepower Threat Defense (FTD) 7.2.0
- Cisco FMC 7.2.0
- AnyConnect 4.10.07073
- Cisco ISE 3.1
The information in this document was created from the devices in a specific lab environment. All of the devices used in this document started with a cleared (default) configuration. If your network is live, ensure that you understand the potential impact of any command.
Background Information
IKEv2 and Secure Sockets Layer (SSL) are both protocols used for establishing secure connections, particularly in the context of VPNs. IKEv2 provides strong encryption and authentication methods, offering a high level of security for VPN connections.
This document provides a configuration example for FTD version 7.2.0 and later, which allows remote access VPN in order to use Transport Layer Security (TLS) and IKEv2. As a client, Cisco AnyConnect can be used, which is supported on multiple platforms.
Configure
1. Import the SSL Certificate
Certificates are essential when AnyConnect is configured.
There are limitations to manual certificate enrollment:
1. On FTD, a Certificate Authority (CA) certificate is needed before a Certificate Signing Request (CSR) is generated.
2. If the CSR is generated externally, a different method of PKCS12 is used.
There are several methods to obtain a certificate on FTD appliance, but the safe and easy one is to create a CSR and get it signed by a CA. Here is how to do that:
1. Navigate to Objects > Object Management > PKI > Cert Enrollment, and click Add Cert Enrollment.
2. Enter the trustpoint name RAVPN-SSL-cert .
3. Under the CA Information tab, choose Enrollment Type as Manual and paste the CA certificate as shown in the image.
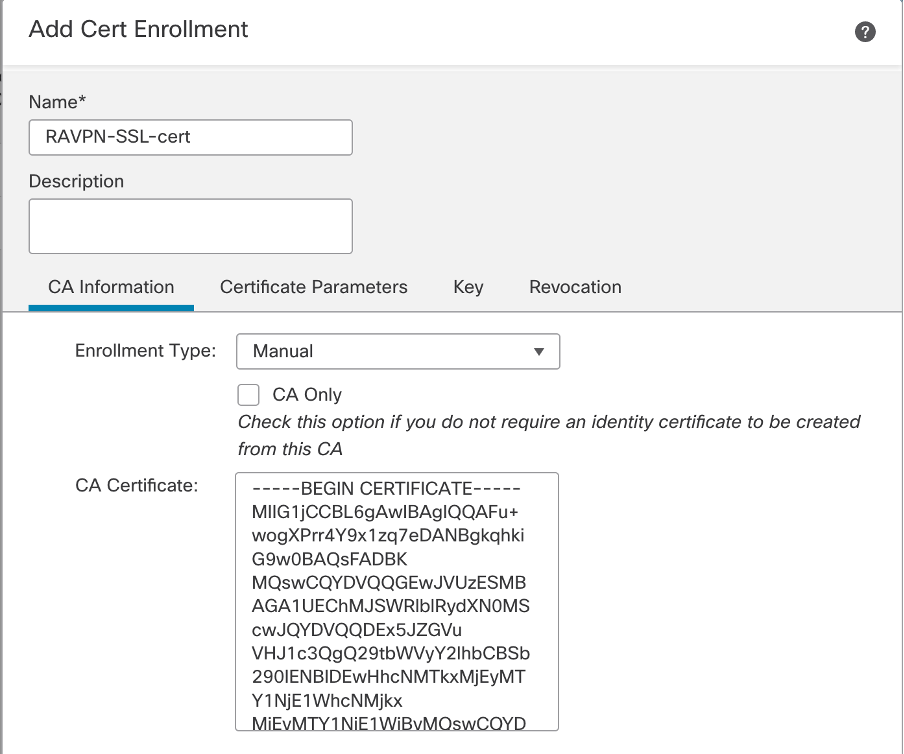 FMC - CA Certificate
4. Under Certificate Parameters, enter the subject name. For example:
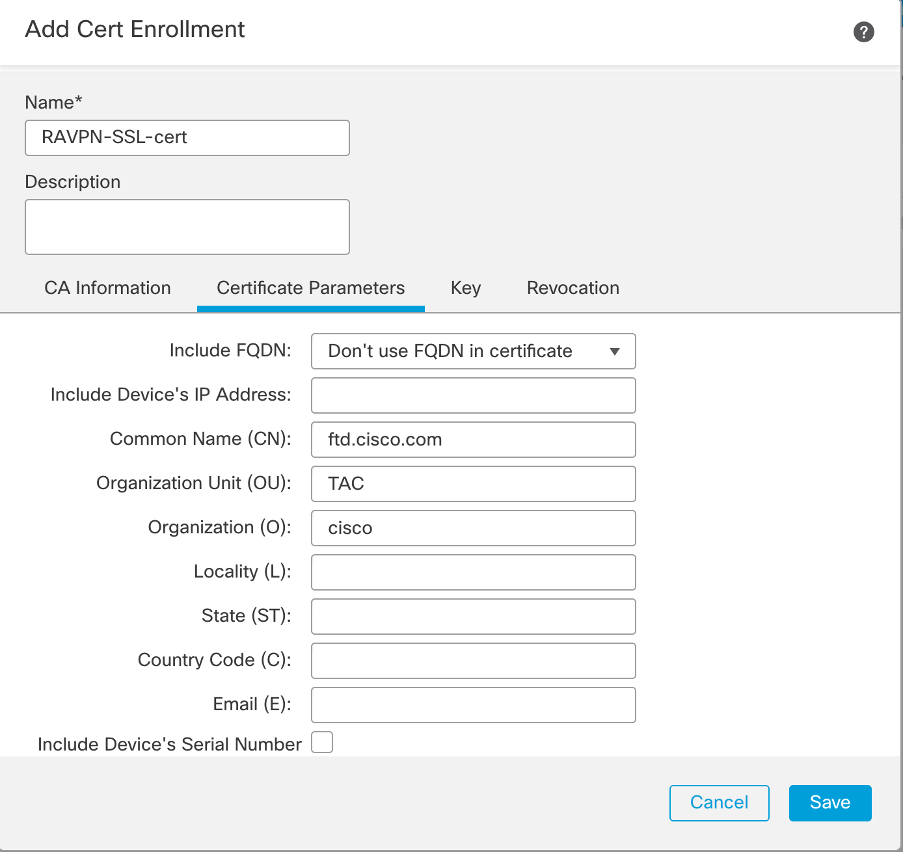 FMC - Certificate Parameters
5. Under the Key tab, choose the key type, and provide a name, and bit size. For RSA, 2048 bits is the minimum.
6. Click Save.
 FMC - Certificate Key
7. Navigate to Devices > Certificates > Add > New Certificate.
8. Choose Device. Under Cert Enrollment, choose the trustpoint created, and click Addas shown in the image.
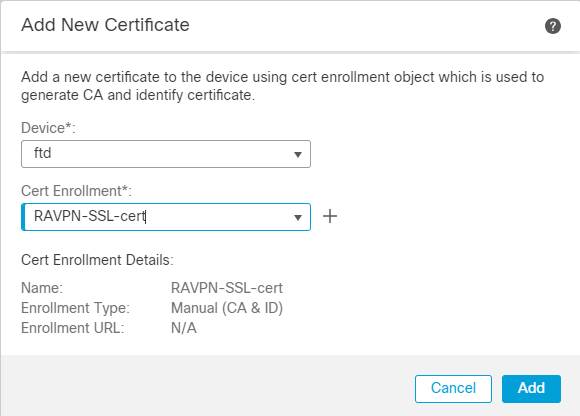 FMC - Certificate Enrollment to FTD
9. Click ID, and a prompt to generate CSR is shown, choose Yes.
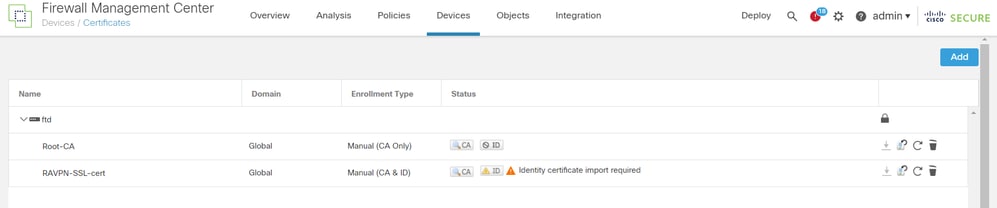 FMC - Certificate CA Enrolled
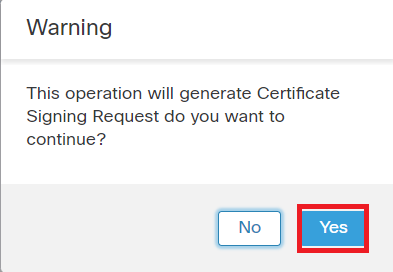 FMC - Generate CSR
10. A CSR is generated which can be shared with the CA in order to get the identity certificate.
11. After receiving the identity certificate from CA in base64 format, choose it from the disk by clicking Browse Identity Certificate and Import as shown in the image.
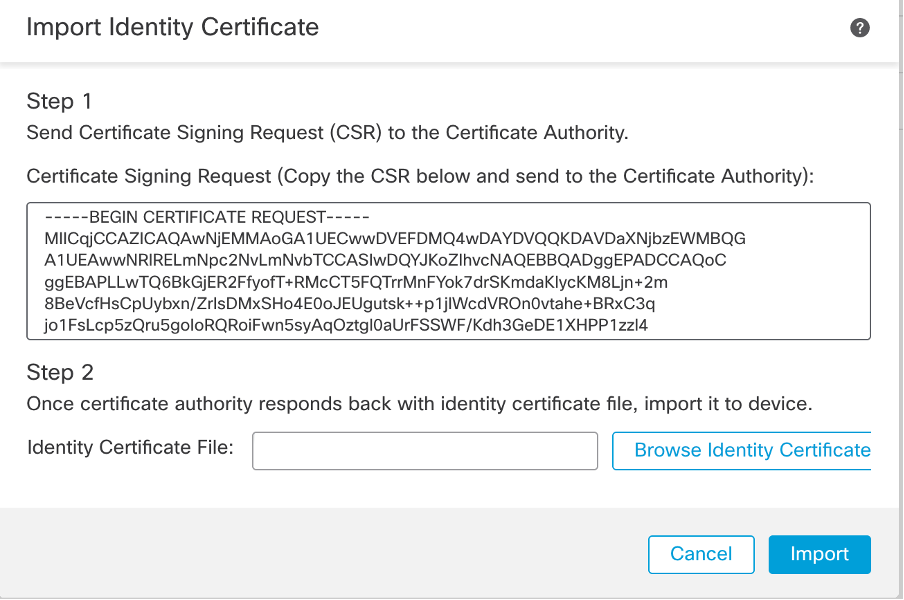 FMC - Import Identity Certificate
12. Once the import is successful, the trustpoint RAVPN-SSL-cert is seen as:
 FMC - Trustpoint Enrollment Successful
2. Configure RADIUS Server
2.1. Manage FTD on FMC
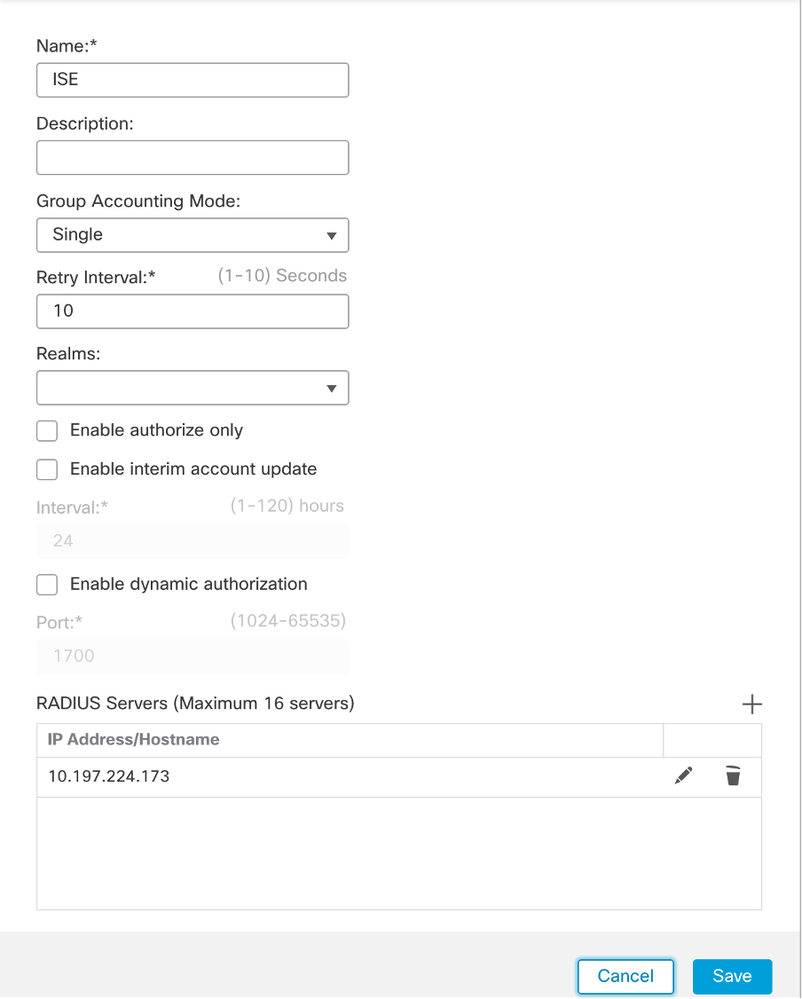
1. Navigate to Objects > Object Management > RADIUS Server Group > Add RADIUS Server Group .
2. Enter the name ISE and add RADIUS Servers by clicking +.
 FMC - Radius Server Configuration
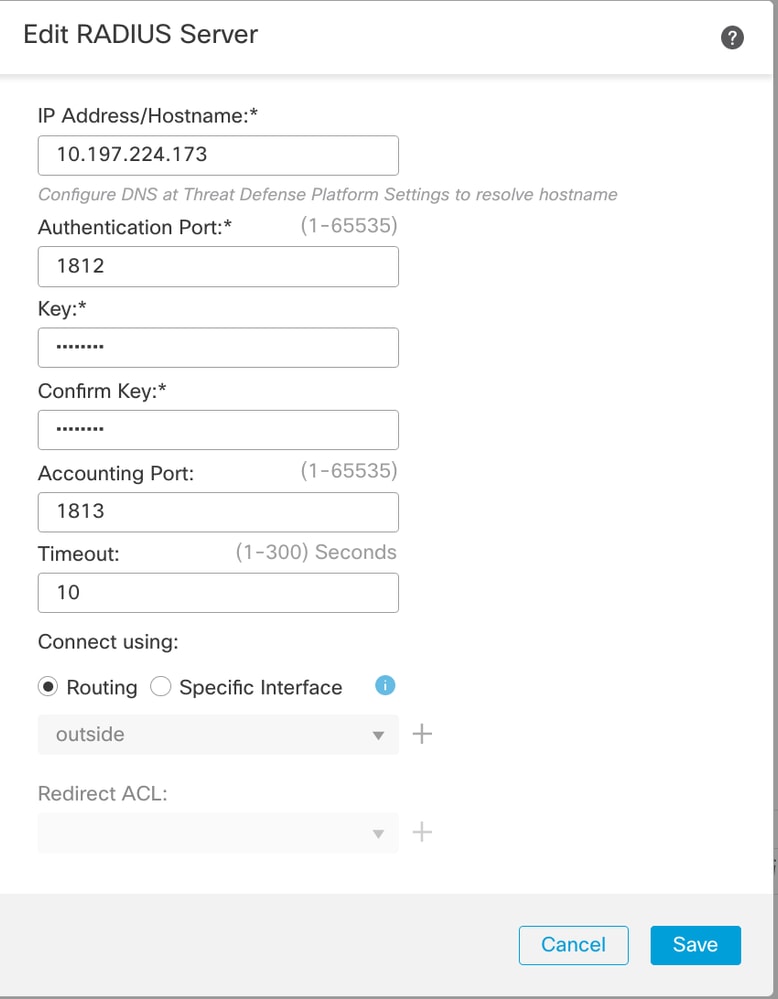
3. Mention the IP address of the ISE Radius server along with the shared secret (Key) which is the same as on the ISE server.
4. Choose either Routing or Specific Interface through which the FTD communicates with the ISE server.
5. Click Save as shown in the image.
 FMC - ISE Server
6. Once saved, the Server is added under the RADIUS Server Group as shown in the image.
 FMC - RADIUS Server Group
2.2. Manage FTD On ISE
1. Navigate to Network Devices , and click Add.
2. Enter the Name 'Cisco-Radius' of the server and IP Addressof the radius client which is the FTD communicating interface.
3. Under Radius Authentication Settings, add the Shared Secret.
4. Click Save .
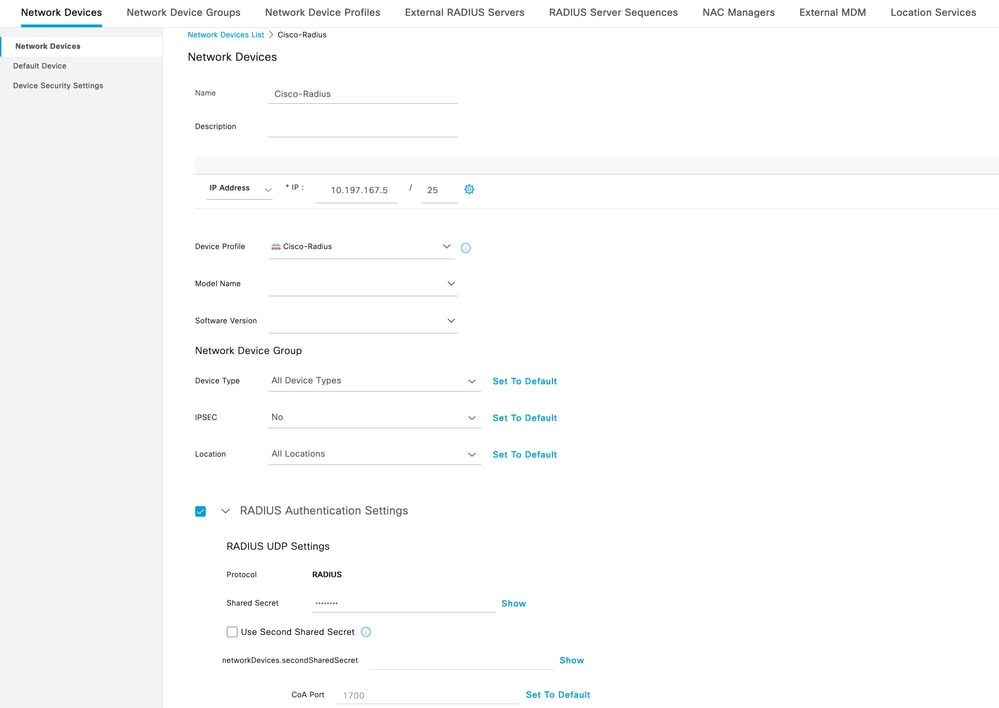 ISE - Network Devices
5. In order to create users, navigate to Network Access > Identities > Network Access Users, and click Add.
6. Create a UsernameandLogin Password as required.
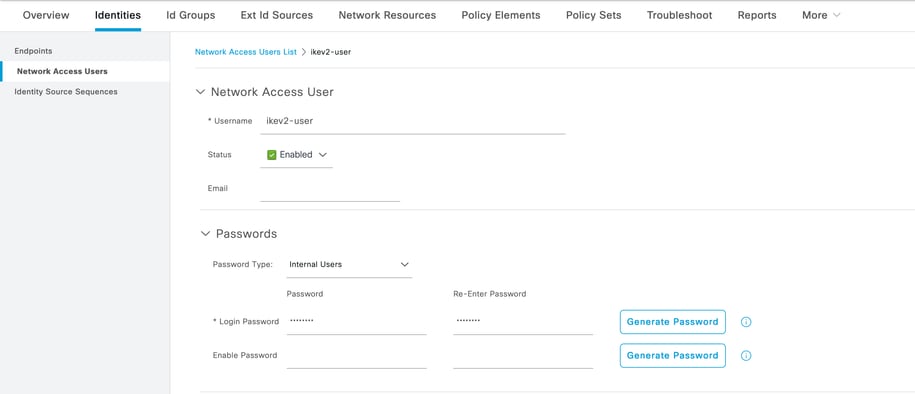 ISE - Users
7. In order to setup basic policy, navigate to Policy > Policy Sets > Default > Authentication Policy > Default, choose All_User_ID_Stores.
8. Navigate to Policy > Policy Sets > Default > Authorization Policy > Basic_Authenticated_Access, and choose PermitAccessas shown in the image.
 ISE - Authentication Policy
 ISE - Authorization Policy
3. Create an Address Pool for VPN Users on FMC
1. Navigate to Objects > Object Management > Address Pools > Add IPv4 Pools.
2. Enter the name RAVPN-Pool and Address Range, mask is optional.
3. Click Save.
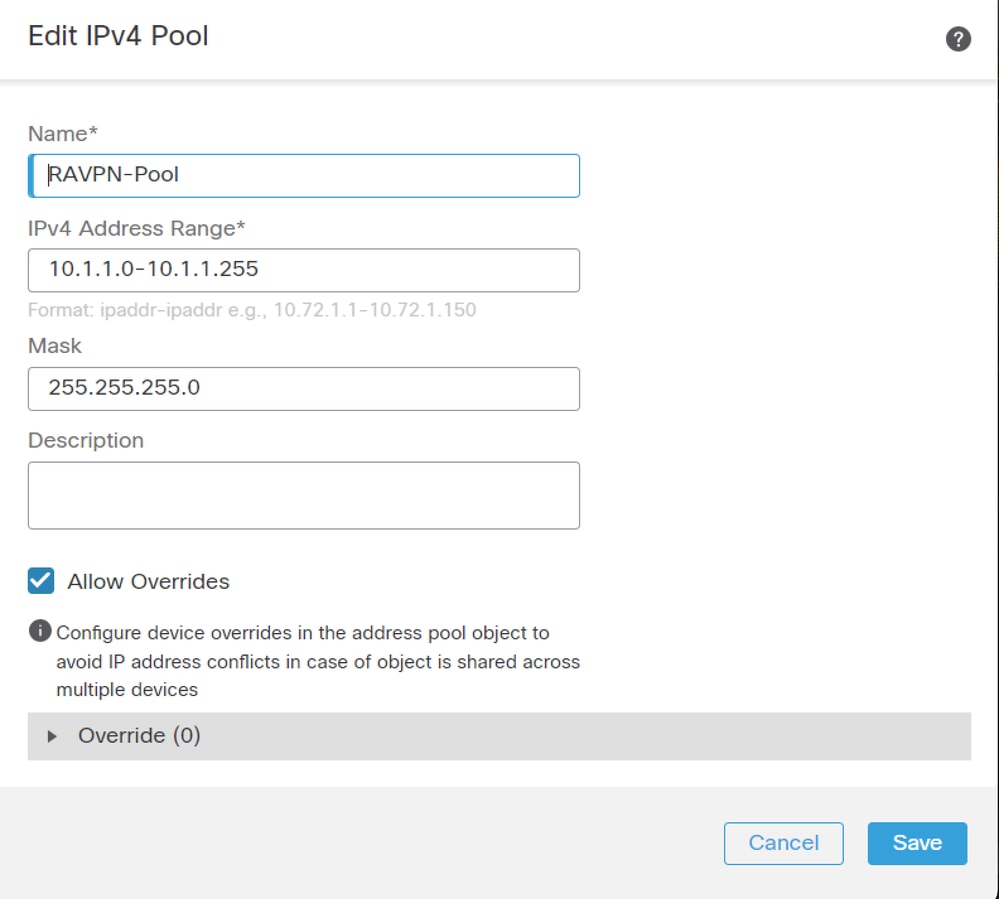 FMC - Address Pool
4. Upload AnyConnect Images
1. Navigate to Objects > Object Management > VPN > AnyConnect File > Add AnyConnect File.
2. Enter the name anyconnect-win-4.10.07073-webdeploy and click Browse in order to choose the Anyconnect file from the disk, click Save as shown in the image.
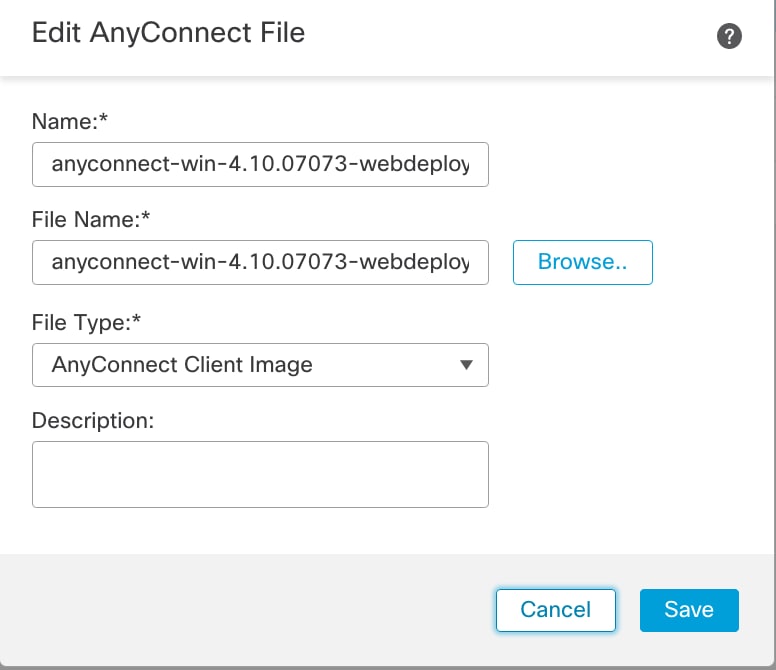 FMC - Anyconnect Client Image
5. Create XML Profile
5.1. On Profile Editor
1. Download the Profile Editor from software.cisco.com and open it.
2. Navigate to Server List > Add...
3. Enter the Display Name RAVPN-IKEV2 and FQDN along with the User Group (alias name).
4. Choose the Primary protocol as IPsec , click Ok as shown in the image.
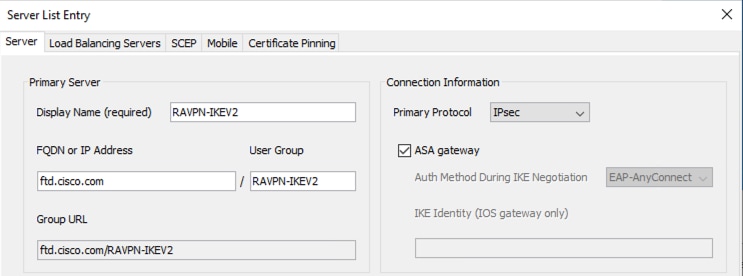 Profile Editor - Server List
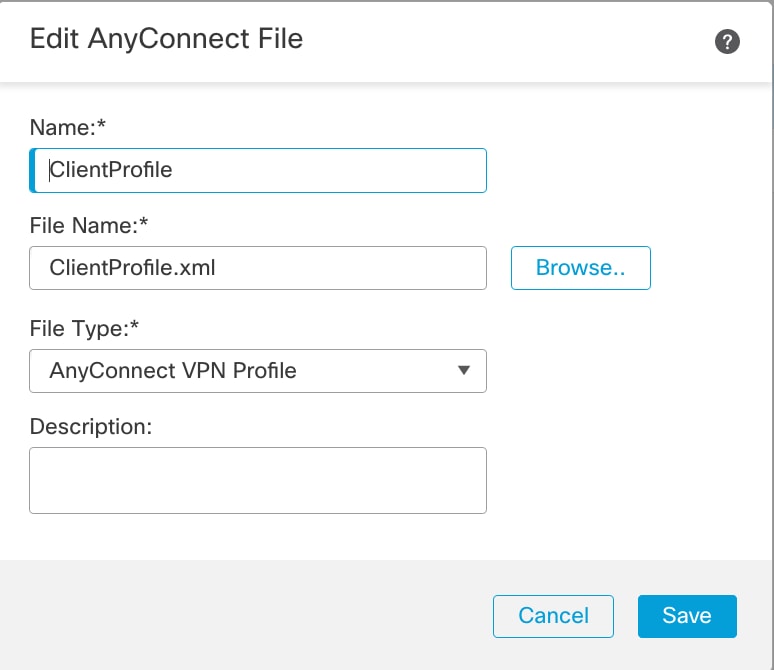
5. Server List is added. Save it as ClientProfile.xml .
 Profile Editor - ClientProfile.xml
5.2. On FMC
1. Navigate to Objects > Object Management > VPN > AnyConnect File > Add AnyConnect File.
2. Enter a Name ClientProfile and click Browse in order to choose ClientProfile.xml file from disk.
3. Click Save .
 FMC - Anyconnect VPN Profile
6. Configure Remote Access
1. Navigate to Devices > VPN > Remote Accessand click + in order to add a Connection Profile as shown in the image.
 FMC - Remote Access Connection Profile
2. Enter the connection profile name RAVPN-IKEV2 and create a group policy by clicking +in Group Policyas shown in the image.
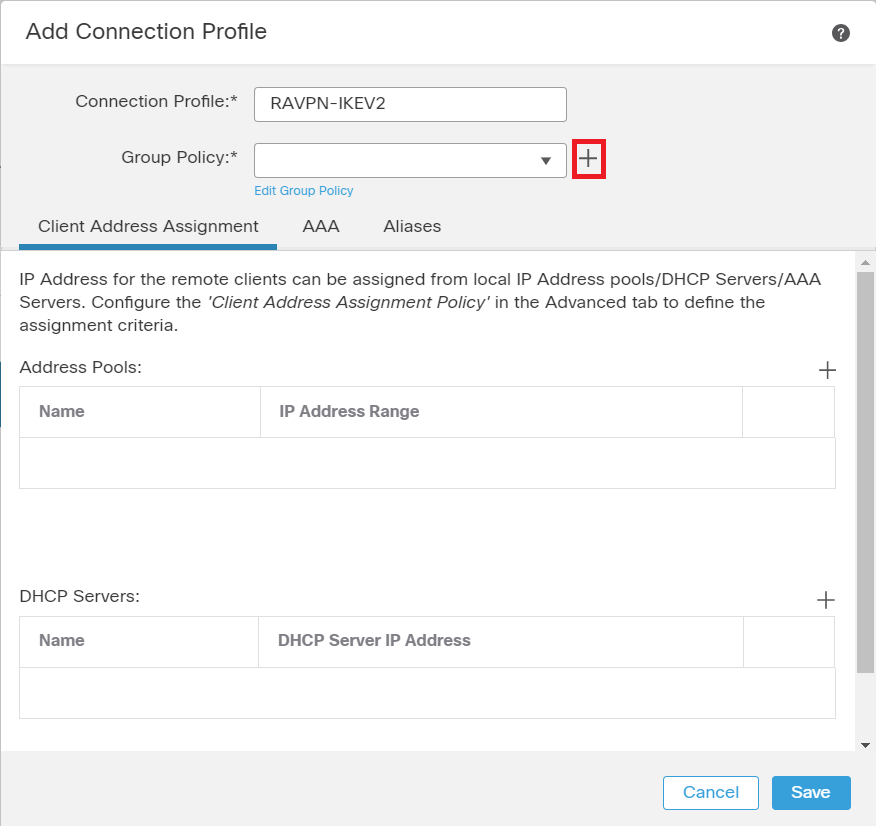 FMC - Group Policy
3. Enter the name RAVPN-group-policy , choose the VPN Protocols SSL and IPsec-IKEv2 as shown in the image.
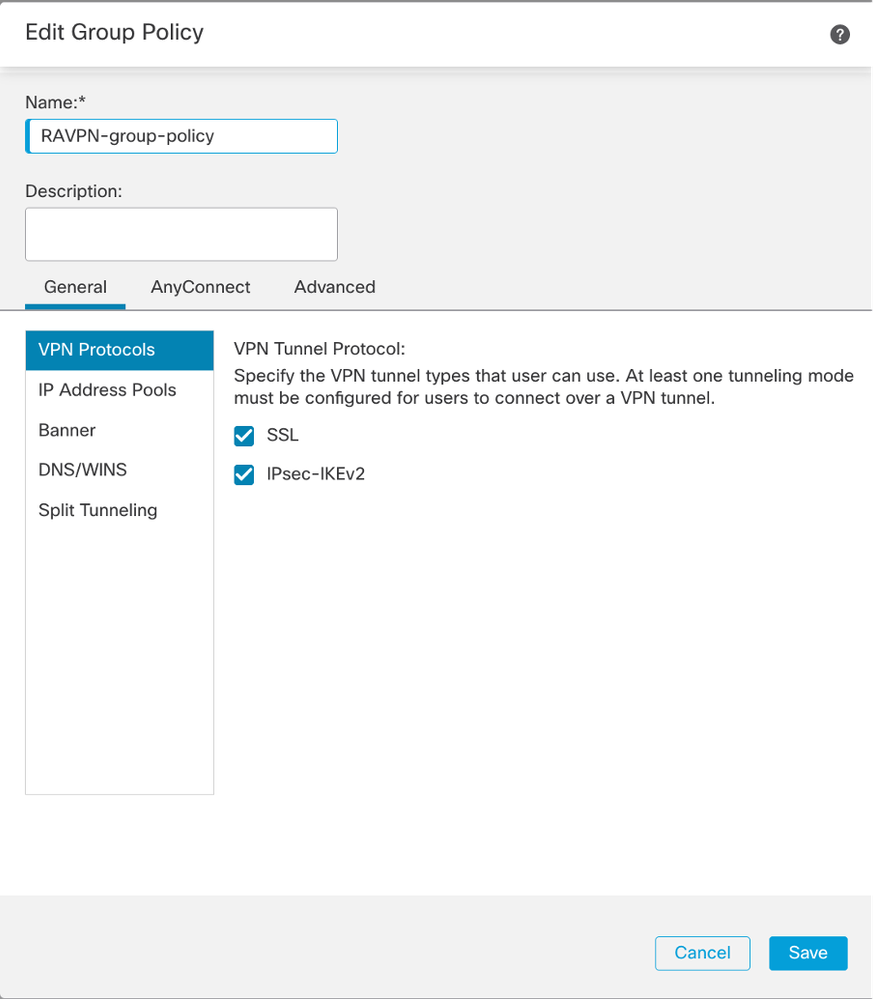 FMC - VPN Protocols
4. Under AnyConnect > Profile , choose the XML profile ClientProfile from the dropdown, and click Saveas shown in the image.
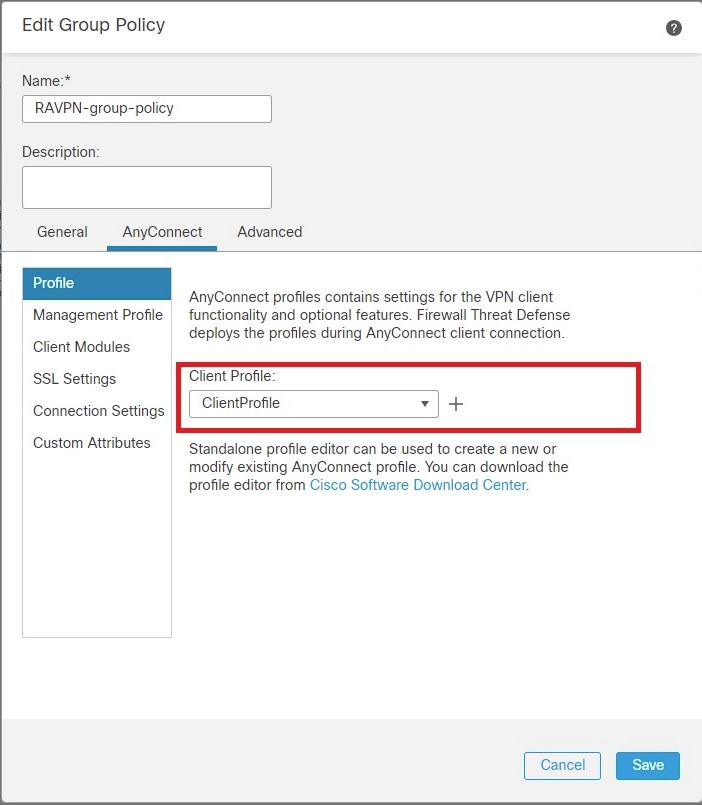 FMC - Anyconnect Profile
5. Add the Address Pool RAVPN-Pool by clicking + as shown in the image.
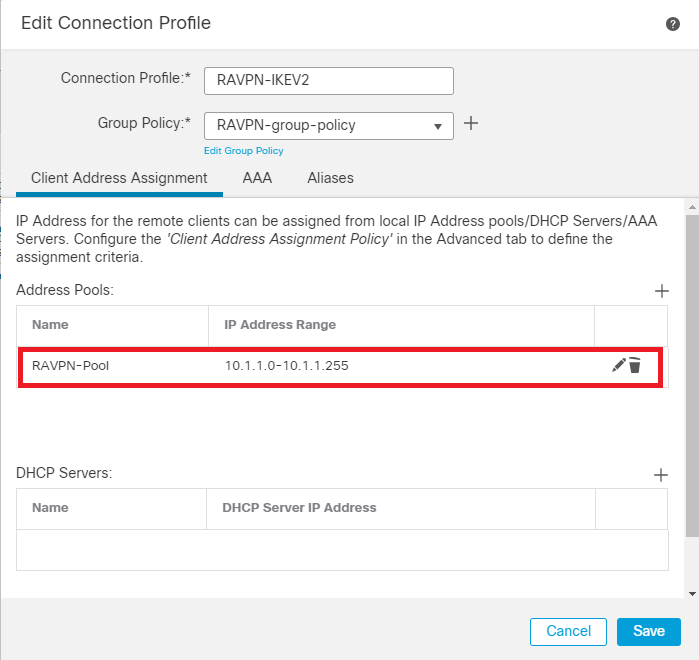 FMC - Client Address Assignment
6. Navigate to AAA > Authentication Method, and choose AAA Only.
7. Choose Authentication Server as ISE (RADIUS).
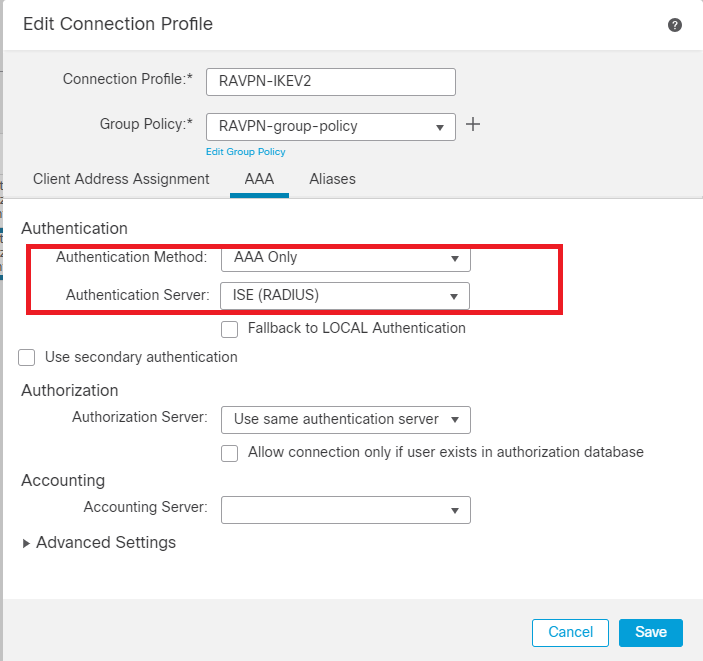 FMC - AAA Authentication
8. Navigate to Aliases , enter an Alias Name RAVPN-IKEV2 , which is used as a user group in ClientProfile.xml .
9. Click Save.
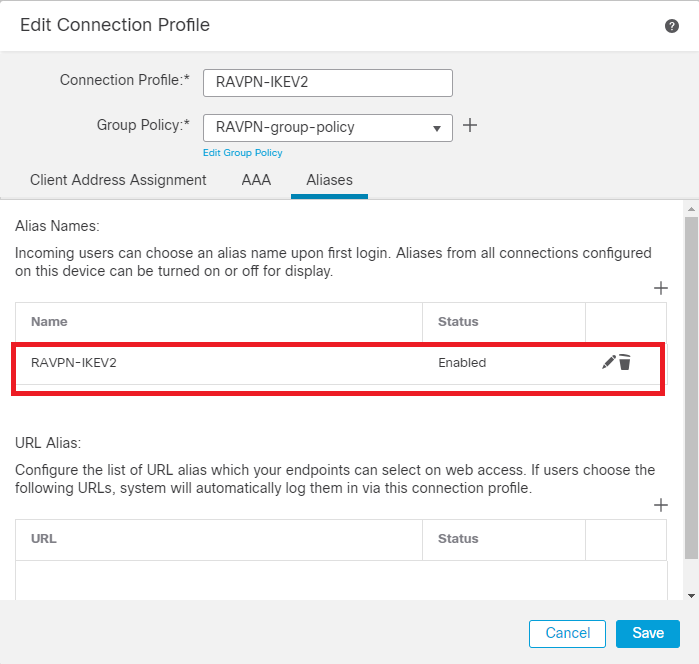 FMC - Aliases
10. Navigate to Access Interfaces, and choose the interface where RAVPN IKEv2 must be enabled.
11. Choose the identity certificate for both SSL and IKEv2.
12. Click Save.
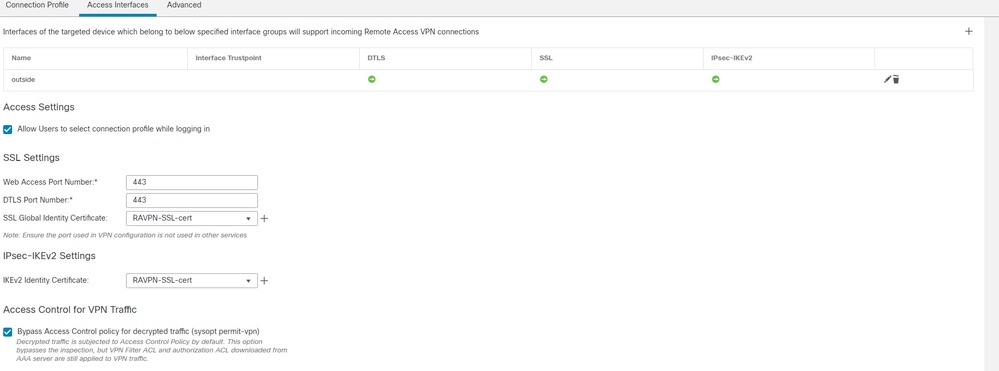 FMC - Access Interfaces
13. Navigate to Advanced .
14. Add the Anyconnect Client images by clicking +.
 FMC - Anyconnect Client Package
15. UnderIPsec, add theCrypto Maps as shown in the image.
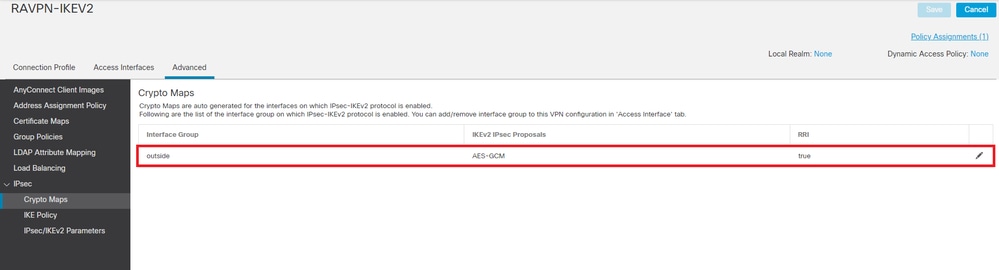 FMC - Crypto Maps
16. Under IPsec , add the IKE Policy by clicking +.
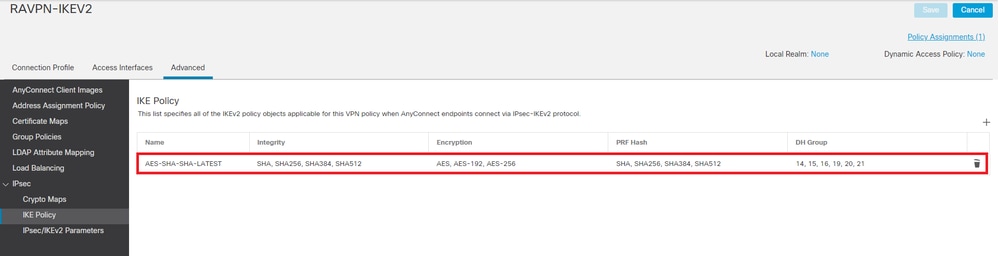 FMC - IKE Policy
17. Under IPsec , add the IPsec/IKEv2 Parameters .
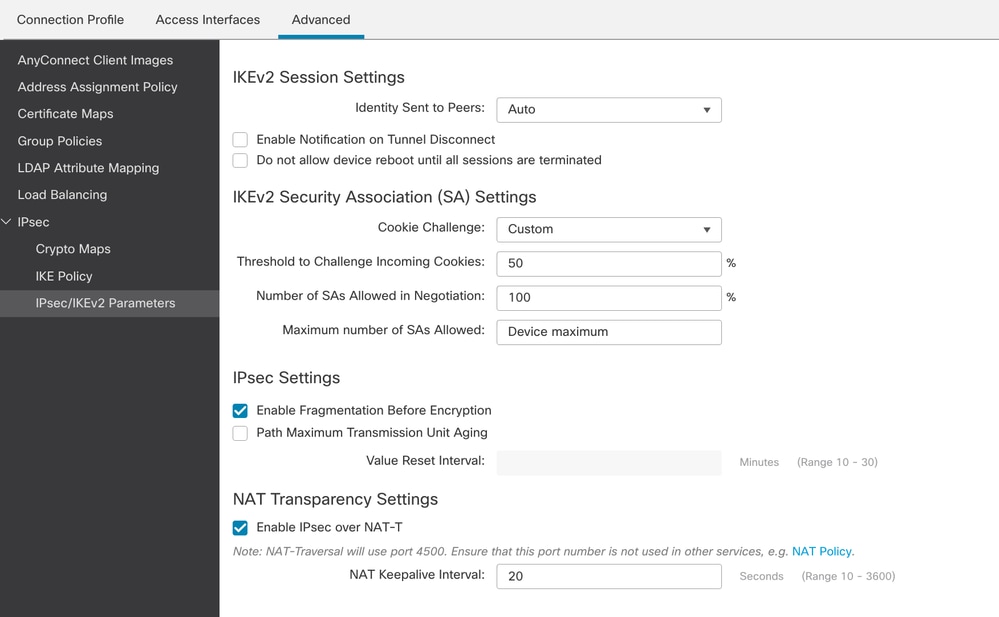 FMC - IPsec/IKEv2 Parameters
18. Under Connection Profile, new profile RAVPN-IKEV2 is created.
19. ClickSaveas shown in the image.
 FMC - Connection Profile RAVPN-IKEV2
20. Deploy the configuration.
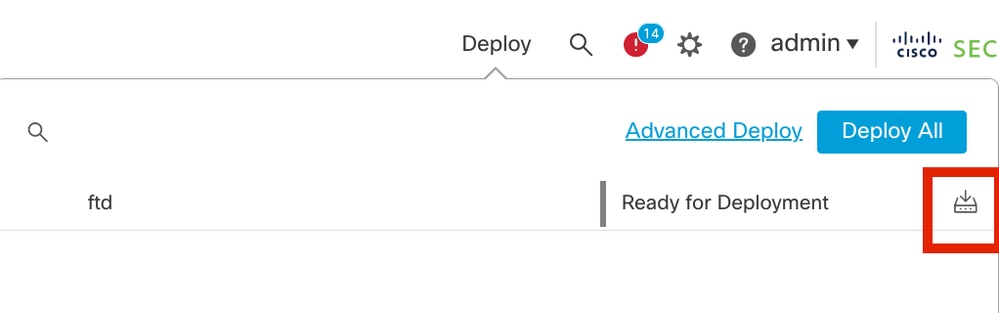 FMC - FTD Deployment
7. Anyconnect Profile Configuration
Profile on PC, saved under C:\ProgramData\Cisco\Cisco Anyconnect Secure Mobility Client\Profile .
<?xml version="1.0" encoding="UTF-8"?>
<AnyConnectProfile xmlns="http://schemas[dot]xmlsoap<dot>org/encoding/" xmlns:xsi="http://www[dot]w3<dot>org/2001/XMLSchema-instance" xsi:schemaLocation="http://schemas[dot]xmlsoap[dot]org/encoding/ AnyConnectProfile.xsd">
   <ClientInitialization>
	  <UseStartBeforeLogon UserControllable="true">false</UseStartBeforeLogon>
	  <AutomaticCertSelection UserControllable="true">false
      </AutomaticCertSelection>
	  <ShowPreConnectMessage>false</ShowPreConnectMessage>
	  <CertificateStore>All</CertificateStore>
	  <CertificateStoreOverride>false</CertificateStoreOverride>
	  <ProxySettings>Native</ProxySettings>
	  <AllowLocalProxyConnections>true</AllowLocalProxyConnections>
	  <AuthenticationTimeout>12</AuthenticationTimeout>
	  <AutoConnectOnStart UserControllable="true">false</AutoConnectOnStart>
	  <MinimizeOnConnect UserControllable="true">true</MinimizeOnConnect>
	  <LocalLanAccess UserControllable="true">false</LocalLanAccess>
	  <ClearSmartcardPin UserControllable="true">true</ClearSmartcardPin>
	  <AutoReconnect UserControllable="false">true
		 <AutoReconnectBehavior UserControllable="false">DisconnectOnSuspend
 		  </AutoReconnectBehavior>
	  </AutoReconnect>
	  <AutoUpdate UserControllable="false">true</AutoUpdate>
	  <RSASecurIDIntegration UserControllable="true">Automatic
      </RSASecurIDIntegration>
	  <WindowsLogonEnforcement>SingleLocalLogon</WindowsLogonEnforcement>
	  <WindowsVPNEstablishment>LocalUsersOnly</WindowsVPNEstablishment>
	  <AutomaticVPNPolicy>false</AutomaticVPNPolicy>
	  <PPPExclusion UserControllable="false">Disable
		 <PPPExclusionServerIP UserControllable="false"></PPPExclusionServerIP>
	  </PPPExclusion>
	  <EnableScripting UserControllable="false">false</EnableScripting>
	  <EnableAutomaticServerSelection UserControllable="false">false
		 <AutoServerSelectionImprovement>20</AutoServerSelectionImprovement>
		 <AutoServerSelectionSuspendTime>4</AutoServerSelectionSuspendTime>
	  </EnableAutomaticServerSelection>
	  <RetainVpnOnLogoff>false
	  </RetainVpnOnLogoff>
	</ClientInitialization>
	<ServerList>
		<HostEntry>
			<HostName>RAVPN-IKEV2</HostName>
			<HostAddress>ftd.cisco.com</HostAddress>
			<UserGroup>RAVPN-IKEV2</UserGroup>
		        <PrimaryProtocol>IPsec</PrimaryProtocol>
		</HostEntry>
	</ServerList>
</AnyConnectProfile>
Note: It is recommended to disable the SSL client as tunneling protocol under the group policy once the client profile is downloaded to the PC of all the users. This ensures that users can connect exclusively using the IKEv2/IPsec tunneling protocol.
Verify
You can use this section in order to confirm that your configuration works properly.
1. For the first connection, use the FQDN/IP in order to establish an SSL connection from the PC of the user through Anyconnect.
2. If the SSL protocol is disabled and the previous step cannot be performed, ensure that the client profile ClientProfile.xml is present on the PC under the path C:\ProgramData\Cisco\Cisco Anyconnect Secure Mobility Client\Profile .
3. Enter the username and password for authentication once prompted.
4. After successful authentication, the client profile is downloaded on the PC of the user.
5. Disconnect from Anyconnect.
6. Once the Profile is downloaded, use the drop-down in order to choose the hostname mentioned in the client profile RAVPN-IKEV2 in order to connect to Anyconnect using IKEv2/IPsec.
7. Click Connect.
 Anyconnect dropdown
8. Enter the username and password for authentication that was created on the ISE server.
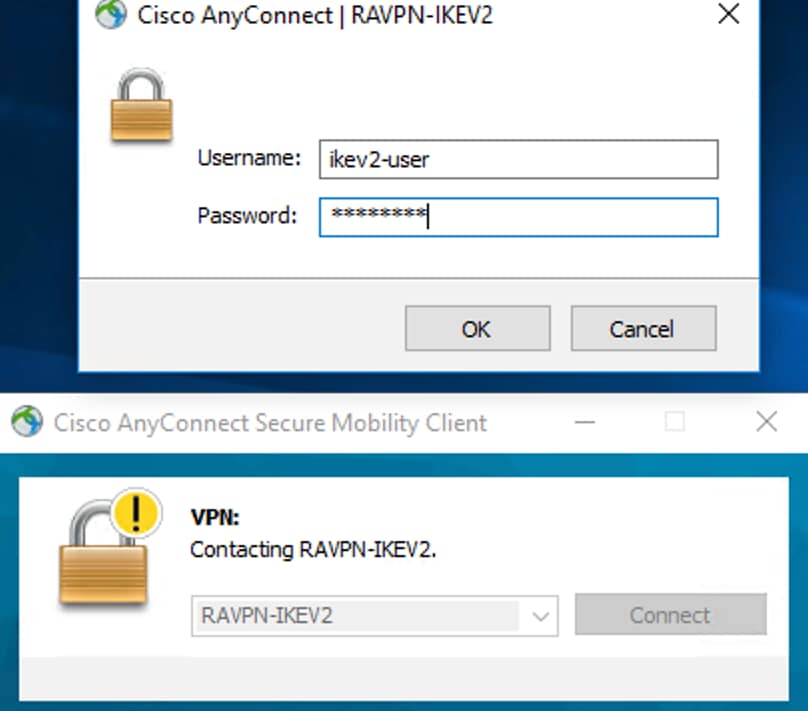 Anyconnect Connection
9. Verify the Profile and Protocol (IKEv2/IPsec) used once connected.
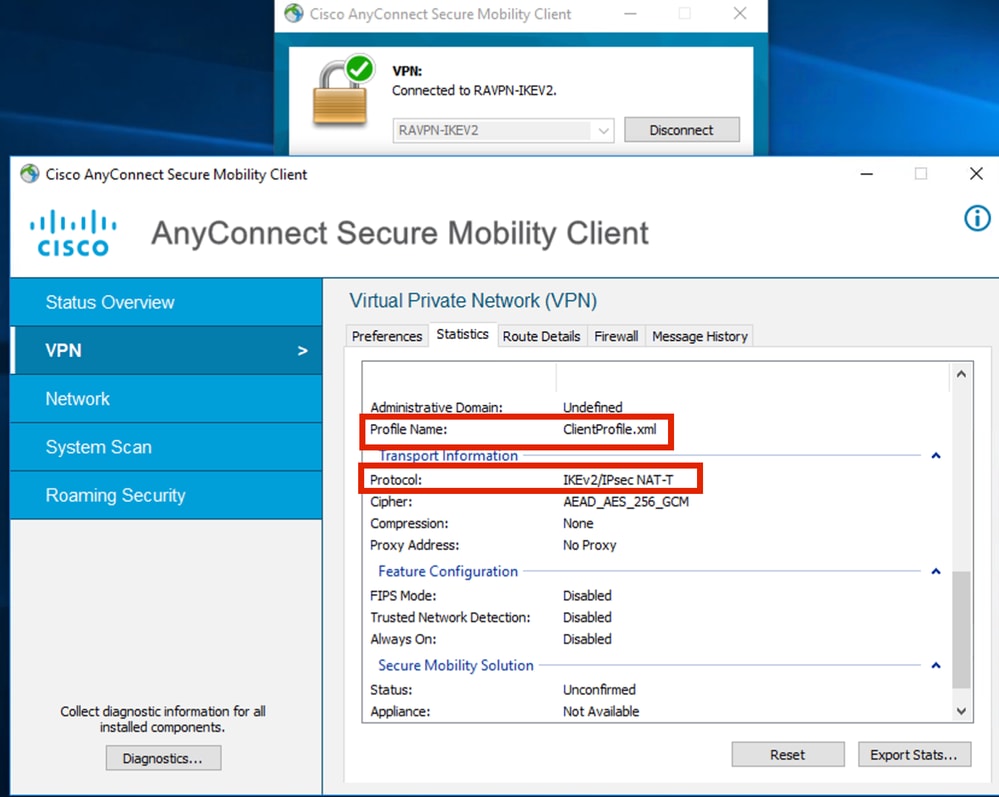 Anyconnect Connected
FTD CLI Outputs:
firepower# show vpn-sessiondb detail anyconnect

Session Type: AnyConnect

Username : ikev2-user                    Index        : 9
Assigned IP  : 10.1.1.1                  Public IP    : 10.106.55.22
Protocol     : IKEv2 IPsecOverNatT AnyConnect-Parent
License      : AnyConnect Premium
Encryption   : IKEv2: (1)AES256 IPsecOverNatT: (1)AES-GCM-256 AnyConnect-Parent: (1)none
Hashing      : IKEv2: (1)SHA512 IPsecOverNatT: (1)none AnyConnect-Parent: (1)none
Bytes Tx     : 450                         Bytes Rx     : 656
Pkts Tx      : 6                           Pkts Rx      : 8
Pkts Tx Drop : 0                           Pkts Rx Drop : 0
Group Policy : RAVPN-group-policy          Tunnel Group : RAVPN-IKEV2
Login Time   : 07:14:08 UTC Thu Jan 4 2024
Duration     : 0h:00m:08s
Inactivity   : 0h:00m:00s
VLAN Mapping : N/A                          VLAN         : none
Audt Sess ID : 0ac5e205000090006596618c
Security Grp : none                         Tunnel Zone  : 0

IKEv2 Tunnels: 1
IPsecOverNatT Tunnels: 1
AnyConnect-Parent Tunnels: 1

AnyConnect-Parent:
Tunnel ID    : 9.1
Public IP    : 10.106.55.22
Encryption.  : none.                           Hashing     : none

Auth Mode    : userPassword
Idle Time out: 30 Minutes                      Idle TO Left : 29 Minutes
Client OS    : win
Client OS Ver: 10.0.15063
Client Type  : AnyConnect
Client Ver   : 4.10.07073

IKEv2:
Tunnel ID : 9.2
UDP Src Port : 65220                            UDP Dst Port : 4500
Rem Auth Mode: userPassword
Loc Auth Mode: rsaCertificate
Encryption   : AES256                            Hashing      : SHA512
Rekey Int (T): 86400 Seconds                     Rekey Left(T): 86391 Seconds
PRF : SHA512                                     D/H Group    : 19
Filter Name  :
Client OS    : Windows Client                    Type         : AnyConnect

IPsecOverNatT:
Tunnel ID    : 9.3
Local Addr   : 0.0.0.0/0.0.0.0/0/0
Remote Addr  : 10.1.1.1/255.255.255.255/0/0
Encryption   : AES-GCM-256                       Hashing       : none
Encapsulation: Tunnel
Rekey Int (T): 28800 Seconds                     Rekey Left(T) : 28791 Seconds
Idle Time Out: 30 Minutes                        Idle TO Left  : 29 Minutes
Bytes Tx     : 450 Bytes                         Rx            : 656
Pkts Tx      : 6                                 Pkts Rx       : 8


firepower# show crypto ikev2 sa

IKEv2 SAs:

Session-id:6, Status:UP-ACTIVE, IKE count:1, CHILD count:1

Tunnel-id Local                         Remote                                           fvrf/ivrf            Status     Role
16530741  10.197.167.5/4500             10.106.55.22/65220                                                    READY      RESPONDER
Encr: AES-CBC, keysize: 256, Hash: SHA512, DH Grp:19, Auth sign: RSA, Auth verify: EAP
Life/Active Time: 86400/17 sec
Child sa: local selector 0.0.0.0/0 - 255.255.255.255/65535
remote selector 10.1.1.1/0 - 10.1.1.1/65535
ESP spi in/out: 0x6f7efd61/0xded2cbc8


firepower# show crypto ipsec sa

interface: Outside
    Crypto map tag: CSM_Outside_map_dynamic, seq num: 30000, local addr: 10.197.167.5

      Protected vrf:
      local ident (addr/mask/prot/port): (0.0.0.0/0.0.0.0/0/0)
      remote ident (addr/mask/prot/port): (10.1.1.1/255.255.255.255/0/0)
      current_peer: 10.106.55.22, username: ikev2-user
      dynamic allocated peer ip: 10.1.1.1
      dynamic allocated peer ip(ipv6): 0.0.0.0

      #pkts encaps: 6, #pkts encrypt: 6, #pkts digest: 6
      #pkts decaps: 8, #pkts decrypt: 8, #pkts verify: 8
      #pkts compressed: 0, #pkts decompressed: 0
      #pkts not compressed: 0, #pkts comp failed: 0, #pkts decomp failed: 0
      #pre-frag successes: 0, #pre-frag failures: 0, #fragments created: 0
      #PMTUs sent: 0, #PMTUs rcvd: 0, #decapsulated frgs needing reassembly: 0
      #TFC rcvd: 0, #TFC sent: 0
      #Valid ICMP Errors rcvd: 0, #Invalid ICMP Errors rcvd: 0
      #send errors: 0, #recv errors: 0

      local crypto endpt.: 10.197.167.5/4500, remote crypto endpt.: 10.106.55.22/65220
      path mtu 1468, ipsec overhead 62(44), media mtu 1500
      PMTU time remaining (sec): 0, DF policy: copy-df
      ICMP error validation: disabled, TFC packets: disabled
      current outbound spi: DED2CBC8
      current inbound spi : 6F7EFD61

  inbound esp sas:
     spi: 0x6F7EFD61 (1870593377)
     SA State: active
     transform: esp-aes-gcm-256 esp-null-hmac no compression
     in use settings ={RA, Tunnel, NAT-T-Encaps, IKEv2, }
     slot: 0, conn_id: 9, crypto-map: CSM_Outside_map_dynamic
     sa timing: remaining key lifetime (sec): 28723
     IV size: 8 bytes
     replay detection support: Y
     Anti replay bitmap:
     0x00000000 0x000001FF

  outbound esp sas:
    spi: 0xDED2CBC8 (3738356680)
    SA State: active
    transform: esp-aes-gcm-256 esp-null-hmac no compression
    in use settings ={RA, Tunnel, NAT-T-Encaps, IKEv2, }
    slot: 0, conn_id: 9, crypto-map: CSM_Outside_map_dynamic
    sa timing: remaining key lifetime (sec): 28723
    IV size: 8 bytes
    replay detection support: Y
    Anti replay bitmap:
    0x00000000 0x00000001
ISE Logs:
 ISE - Live Logs
Troubleshoot
This section provides information you can use in order to troubleshoot your configuration.
debug radius all
debug crypto ikev2 platform 255
debug crypto ikev2 protocol 255
debug crypto ipsec 255
Revision History
| Revision | Publish Date | Comments |
|---|---|---|
1.0 |
06-Feb-2024
|
Initial Release |
Contributed by Cisco Engineers
- Amrutha MCisco TAC Engineer
- Manisha PandaCisco TAC Engineer
- Xiaohua YaoCisco TAC Engineer
 Feedback
Contact Cisco
- Open a Support Case

- (Requires a Cisco Service Contract)