ASA IKEv2 RA VPN With Windows 7 or Android VPN Clients and Certificate Authentication Configuration
Available Languages
Bias-Free Language
The documentation set for this product strives to use bias-free language. For the purposes of this documentation set, bias-free is defined as language that does not imply discrimination based on age, disability, gender, racial identity, ethnic identity, sexual orientation, socioeconomic status, and intersectionality. Exceptions may be present in the documentation due to language that is hardcoded in the user interfaces of the product software, language used based on RFP documentation, or language that is used by a referenced third-party product. Learn more about how Cisco is using Inclusive Language.
Contents
Introduction
This document describes how to configure Cisco Adaptive Security Appliance (ASA) Version 9.7.1 and later in order to allow Windows 7 and Android native (Virtual Private Network) VPN clients to establish a (Remote Access) RA VPN connection with the use of Internet Key Exchange Protocol (IKEv2) and Certificates as the authentication method.
Contributed by David Rivera and Cesar Lopez Zamarripa, Cisco TAC Engineers.
Prerequisites
Requirements
Cisco recommends that you have knowledge of these topics:
- Certificate Authority (CA)
- Public Key Infrastructure (PKI)
- RA VPN with IKEv2 on ASA
- Windows 7 built-in VPN client
- Android native VPN client
Components Used
The information in this document is based on these software versions:
- CISCO1921/K9 - 15.5(3)M4a as IOS CA Server
- ASA5506X - 9.7(1) as VPN headend
- Windows 7 as client machine
- Galaxy J5 - Android 6.0.1 as mobile client
The information in this document was created from the devices in a specific lab environment. All of the devices used in this document started with a cleared (default) configuration. If your network is live, ensure that you understand the potential impact of any command.
Configure
Overview
These are the steps to configure the Windows 7 and Android native VPN clients in order to connect to an ASA headend:
Configure Certificate Authority
The CA allows to embed the required Extended Key Usage (EKU) in the certificate. For the ASA headend, certificate Server Auth EKU is required, while the client certificate needs Client Auth EKU.
A variety of CA servers can be used such as:
- Cisco IOS CA server
- OpenSSL CA server
- Microsoft CA server
- 3rd party CAs
IOS CA Server is used for this configuration example.
This section outlines the basic configuration to make a CISCO1921/K9 with version 15.5(3)M4a work as a CA Server.
Step 1. Ensure the device and version support the eku command.
IOS-CA# show run | section crypto pki
crypto pki server <CA_Server>
  issuer-name <cn=calo_root,ou=TAC,o=cisco>
  grant auto
  eku server-auth client-auth
Step 2. Enable the HTTP Server on the Router.
IOS-CA(config)#ip http server
Step 3. Generate an exportable RSA keypair.
IOS-CA(config)# crypto key generate rsa modulus 2048 label <HeadEnd> exportable
The name for the keys will be: HeadEnd
% The key modulus size is 2048 bits
% Generating 2048 bit RSA keys, keys will be exportable...
[OK] (elapsed time was 5 seconds)
Step 4. Configure a trustpoint.
IOS-CA(config)# crypto pki trustpoint <HeadEnd>
IOS-CA(ca-trustpoint)#enrollment url http://10.201.180.230:80
IOS-CA(ca-trustpoint)#subject-name <cn=HeadEnd.david.com>
IOS-CA(ca-trustpoint)#revocation-check none
IOS-CA(ca-trustpoint)#rsakeypair <HeadEnd>
Note: The IP address for the enrollment command is one of the Router configured IP addresses for a reachable interface.
Step 5. Authenticate the trustpoint (Get the CA Certificate).
IOS-CA(config)#crypto pki authenticate <HeadEnd>
Certificate has the following attributes:
       Fingerprint MD5: DA4502F4 CEFB4F08 AAA3179B 70019185
      Fingerprint SHA1: A887F6DB 0656C7E2 857749F3 EA3D7176 8920F52F
% Do you accept this certificate? [yes/no]: yes
Trustpoint CA certificate accepted.
Step 6. Enroll the trustpoint (Get the Identity certificate).
IOS-CA(config)#crypto pki enroll <HeadEnd>
%
% Start certificate enrollment ..
% Create a challenge password. You will need to verbally provide this
   password to the CA Administrator in order to revoke your certificate.
   For security reasons your password will not be saved in the configuration.
   Please make a note of it.
Password: cisco123
Re-enter password: cisco123
% The subject name in the certificate will include: cn=HeadEnd.david.com
% The subject name in the certificate will include: Connected_2_INET-B
% Include the router serial number in the subject name? [yes/no]: no
% Include an IP address in the subject name? [no]: no
Request certificate from CA? [yes/no]: yes
% Certificate request sent to Certificate Authority
% The 'show crypto pki certificate verbose HeadEnd' command will show the fingerprint.
*Jul 17 15:21:11.343: CRYPTO_PKI:  Certificate Request Fingerprint MD5: 0017C310 9F6084E8 63053228 B449794F
*Jul 17 15:21:11.343: CRYPTO_PKI:  Certificate Request Fingerprint SHA1: CFE22C7A B2855C4D B4B2412B 57FC7106 1C5E7791
*Jul 17 15:21:15.675: %PKI-6-CERTRET: Certificate received from Certificate Authority
Step 7. Verify the certificates.
IOS-CA#show crypto pki certificates verbose <HeadEnd>
Certificate
  Status: Available
  Version: 3
  Certificate Serial Number (hex): 05
  Certificate Usage: General Purpose
  Issuer:
    cn=calo_root
  Subject:
    Name: Connected_2_INET-B
    hostname=Connected_2_INET-B
    cn=HeadEnd.david.com
  Validity Date:
    start date: 16:56:14 UTC Jul 16 2017
    end   date: 16:56:14 UTC Jul 16 2018
  Subject Key Info:
    Public Key Algorithm: rsaEncryption
    RSA Public Key: (2048 bit)
  Signature Algorithm: SHA1 with RSA Encryption
  Fingerprint MD5: 0017C310 9F6084E8 63053228 B449794F
  Fingerprint SHA1: CFE22C7A B2855C4D B4B2412B 57FC7106 1C5E7791
  X509v3 extensions:
    X509v3 Key Usage: A0000000
      Digital Signature
      Key Encipherment
    X509v3 Subject Key ID: E9B3A080 779A76E7 8BE44F38 C3E4DEDF 18E75009
    X509v3 Authority Key ID: B5EEEEB9 31B9A06C CBD9893C 0E318810 5CA657E6
   Authority Info Access:
    Extended Key Usage:
        Client Auth
        Server Auth
  Associated Trustpoints: HeadEnd
  Key Label: HeadEnd

CA Certificate
  Status: Available
  Version: 3
  Certificate Serial Number (hex): 01
  Certificate Usage: Signature
  Issuer:
    cn=calo_root
  Subject:
    cn=calo_root
  Validity Date:
    start date: 13:24:35 UTC Jul 13 2017
    end   date: 13:24:35 UTC Jul 12 2020
  Subject Key Info:
    Public Key Algorithm: rsaEncryption
    RSA Public Key: (1024 bit)
  Signature Algorithm: MD5 with RSA Encryption
  Fingerprint MD5: DA4502F4 CEFB4F08 AAA3179B 70019185
  Fingerprint SHA1: A887F6DB 0656C7E2 857749F3 EA3D7176 8920F52F
  X509v3 extensions:
    X509v3 Key Usage: 86000000
      Digital Signature
      Key Cert Sign
      CRL Signature
    X509v3 Subject Key ID: B5EEEEB9 31B9A06C CBD9893C 0E318810 5CA657E6
    X509v3 Basic Constraints:
        CA: TRUE
    X509v3 Authority Key ID: B5EEEEB9 31B9A06C CBD9893C 0E318810 5CA657E6
    Authority Info Access:
  Associated Trustpoints: test HeadEnd CA_Server
Step 8. Export the HeadEnd trustpoint to terminal in PKCS12 format to get the identity certificate. The CA certificate and the private key are added in one single file.
IOS-CA(config)#crypto pki export <HeadEnd> pkcs12 terminal password <cisco123>
Exported pkcs12 follows:
MIIL3wIBAzCCC5kGCSqGSIb3DQEHAaCCC4oEgguGMIILgjCCC34GCSqGSIb3DQEH
BqCCC28wggtrAgEAMIILZAYJKoZIhvcNAQcBMBsGCiqGSIb3DQEMAQMwDQQIocGz
Fa6tZyACAQGAggs4qNTJi7l/f0IvQr8n1c/SCeaSYRLBvcY9yPgJ2K2/Nmu9+KNB
3dAoYkCrGwDdfpobJE0XqBpIE1uBOtAeF7zdFJt/Pgpie4fcqpCVIbDXG8Ansmhj
v0j6W9Z/IJHe7JrENatbi4nhTnCDP79Z65QSkzrb9DenkCGjoQsWP9zLHTiCDNzV
ajMlWFuCFb0wSW/6L73BLTjS7rwtE74gYMU5NJwtOVsJM2LdwuQ+iOnpsnp6q9fu
niUFEutPe8imOCRApe0tpPqhDp74hKziKT8JEsQ8HMO/lX1y/LIXdLISnz1nkoN3
vxD4AMGRFYACPH8PiGcVSx+vD+wmNaHp1vAOrq4pS7ZQ37ko4mFudnftdOUzaPIz
EzTrOwlRE6il/gF8vb14EfeR09vumJBsajF12hrFGugIJTZnElp5go+oHEEAo4Y+
Yhoj/MIOyhZzo3/ujhjKqtsAJXybYF9YqVkTee9u4Xjkcsg5AmbaqeUUfd7Q8CC2
bi39S1maoWbTYiNcHFs/bWKWJsgZwPzfWtmPch/8MNvXn46AJAwIwRQjHruuFE9F
bhv7SRhYSRQZPf7j1PTmJuMkKA3AzjdbmmJuLidbX3yKbTt4PxPMusbv+ojc6Nam
RCsRf7+gnNZLWs3eU1n84rryZg5Pjw3MRTu2yXDvr799gvx7NIZH5yUZyVl1T70b
eC4KbflcmpM6mJ2UVnaoP2N5u892m41BWuk9rt5isl2f/Z/ZuSbkFaxzU0456zSg
VbYsR+51XfQEH5xu88E5EUPWZ86YdUSlbD8ky6WOn0M1O4K6rNDLkgwXcxw3CaZ8
zhao+dE3qoEYWaKPgCQzPqW0BW3y7WSIELug2uSEsXQjIQcF+42CX6RA3yCmy2T8
C+osKlSSao0nzjrlpTWnPiFss9KRFgJDZhV2ItisiALNw9PqruddcmYtw44LXvdc
+OfnyRvuLS6LE/AMmGk0GaVetAXPezD+5pVZW13UMT/ZdzUjLiXjV9GzF6V8i8qN
Ua0MbDEa8T5Le4dCigaA+t1QxQOPGb+w0ZAQzWN4gZpSEk3ejRixOt14SU5ivj/O
lGXNn8Fvebk42CHohjXG9fq/IfbsVWSkxn2OZ/fhXkZztv4ic1VgprgJURjCtcBw
9Qp/ONda+9aDHiSBrKeHC/urgX6rgWXv9+hpRKIRfj3b8WE+N1sivuQEjlWxbD7h
9fpwxXb+/i7HisjzSkOWUNw4lyulfYSiOv86FPWK0H9Vjbg0G0di1rvGZ8uJHQCC
77RLFXp4jrvCgeo4oWKQbphgPAng7rT794vMwq0rYOb4D3HlHCUvU3JJmScDJQy2
zQxbG2q8Htm44COOuJEUBzx1ImayH2XvDck6VmLTGn8XH5Vq7LOlCeUcVDM8aQfy
HJSPk/VmfQ0lXwPIaxxYlr+jOpcorFkH+OH04hz07grAsGyLRoFICTEvHAzVnF0X
2A1j/z/BFAPG86ssAtInRZVeYUS72NwPEtpKmlHZnl+2iWno5iwTZgtjv7oREZKE
RE6m7O8RiPSD2RjjamCmmmnH5dK5wxF7YlIeK/+ZVrfwLecEPRl+eVw0isM/JN/a
WmkZkCcVMx/ec1P8jp8LzCx17HgVNYbg9lsiffD4xo0G/k0QLUlpliAt7LA2BeGs
yl55wtYUcOBH0/Es39yWnm2Ea//IK6BLw98PvU90vkXWwiD3ajFmcHmssDeU/tZR
4KKNuNor7Le9ycXZFM9ofKZ6AIJ9A1AYvOyhGO88voq8MMGXEe/q+DIjaVE1htYu
k0ELmYAD/XOkEvp3SqOkLQZiCzZ20iMWUTWXlXfgrfLEH0utwHTyr3J2vQk5CD37
ZAfsF6zxEvtU2t41J0e9OjWJw9WtWnnS0gzLeXWtW3H0YAIw3QodKNzbaY4eLP4y
BEdsLmWbM4eza0m9BoZOmMUSkhvFrEz5Q5X5r9vCuAi1rYDqyIjhgdme56tVV0Vg
ZauhbNX59PQQzwOdIZJVVL5tgjf0h7XCm9OBsqd12lHurCCmHy7kM5pqf0MMlhH7
oM/DhXdTU+1sEabt/9c2qs1ihJLS1Zaw2q1AaS5h00+xL8Lxwh2/1/R7Q8FferhR
QZDpix+CmtakRu7uPOMa0zsyOko3P9mf74AWDrThAwMA6G238TC6XI1vrXhvEX1l
BVplQq0Wh/p7ZorSjD5l+z7TkXmJNp7iIxAqp0yobC6vOBwQP7/QAs88q9JNSAte
ErdCXoizvs8YmZMoEap948oplYFaIP+xCnCr8l3v7znwfZwTMQPoPvqEFqUmWYgt
xkJ0qaE645ihTnLgk4eglsBLslwPR1RJU+t6kGGAUmxqhPFxb3/1xNRPVzOGn12w
S9yw+XLC6kS4PmKoxkxax4nnCx7s3e7B5e0qmYtgRTJ0GuW7Uf+T3royTOuYm0d+
ik6bmxcnO0qdcHtt2HTbI+kYpken3YrFOh9Jnm9ZKT63gQSqQWL800ZVd4dAZceg
FciNKs9r26fyy+L3rGCh+U9TLf6mNuWu8RstjjIGPHEPKZ9gnMgMJmikP2ghgOAd
XVhs6ashXx33bZ9dIuhRx6uTNMrppsXyg6SxUyeGDYhpxsPt7uRwBswOpi6iDMZn
ISSzQjrkxoNwwOfn87O5fTCLhHlTZa8HS5HMK3KE7LiZv9pa1z6KTo4z+LCQSLDy
FoRJhSaEsCYJsLDS5nYBoR8hE/eMvQDX1f+RZBrJDcftxx7FQ+8RtvHSJRcJK9N/
Ph/pL62NBlSbvCfn1AbisKrbbgCVLOSj/doufPvpMT2UDL0TY8UnQiyWMH1MF3tZ
jJy6Si2glLwA9hu/c1NsREbA0gxMTjAREb5BjAUmlc3fuv2DWpwnkwyZNyHdm9B9
TPRoByGPvSZXa8MwY/8DUEwUQEsfDJi5jlAD4I6VFFUB72ZS7wn/mVR02fPkfOMp
3yhnGgX29OaDDiDlKw1Xwj1NybOhpZ6unDo5J3stMxlbv5TYL2Tl6egZS0SjsLmn
cj5zkyUU22/93E5vfKD1CMiXx9/e4j2rRh3QCIXqaCjC9acTJ8a/k9/bp8Nz5Cir
pnaCbuQsvna92nxVUqcmLlSbVIvGqlH9qm4DurhcLh59j20tX6K8AMJ90+azaYbX
AJV/MCElhJg6wcN8QnCHMhiuK9+zpsUK2FQgfbcgaaNe3xGaXuoOIGQmlbAGtEkp
kuauRzQ8/pwszaZuPh/5rE77z8zMut3+OE5CslB9npzNi0b0itaaRl13bBBml1xn
r6SBUw7AWapZwRx6pihvptLJaqU1IzaV5SWk0zTABR7BmR84L0+/8v/bedcPSioG
ecside21F6CcWO5ywABBxDYQXM1P9qkC/2bkPkEJ0jBI5P5L1+Yqb8hTlone/InR
B8ktEd8+QW8o60h0seONXumTqBfAuNBkprOA3ssXLeEGB0IpeC5oGW+VSziyS9id
zYq8WaehpAIf3pqwn8gsi0B/wd57T0KK91+v0Ei4z+yIdu8Kh9GTiqGvgNAeakgr
ECDiXoKAwltYAn7cLKNpZaojSs2Jt+60oBA5crT04Mtgpjb9Pd/DLqWQDJTyoRVv
cJRb68aOyZvVBU0yoLbox84QKLHIsA92pplS7VFrAWP65wrhs4XOf4YSFlM89Sn4
GD/yEsGVJzwGrxgCNnOZkLIKsFbIOjp2lMps5jVKoFfpPJCie3F2FB3ecS+xRpHo
5u2KOTmH0rFQ6Vu+JYCo/qWh0ERtL/8gczP7C9ehiaZfemw2bq9xrUo+6y3H9Q+Z
LADwMlAkI+kzbng3R+fj4AYBvf8GTJdpBs8s/t7mZXHiXCtH6qxTMRWJx5Xuxs9F
I8Ii8TA9MCEwCQYFKw4DAhoFAAQUjO/On/REYODupznP9SwYnFX92BYEFESx1MSa
ho3Cv1cZYM0TzZEzlsKdAgIEAA==
---End - This line not part of the pkcs12---

CRYPTO_PKI: Exported PKCS12 file successfully.
*Jul 17 15:46:49.706: %PKI-6-PKCS12EXPORT_SUCCESS: PKCS #12 Successfully Exported.
Step 9. Create an empty trustpoint on the ASA.
ASA(config)# crypto ca trustpoint <HeadEnd>
DRIVERAP(config-ca-trustpoint)# exit
Step 10 . Import the PKCS12 file.
ASA(config)#crypto ca import <HeadEnd> pkcs12 <cisco123>
Enter the base 64 encoded pkcs12.
End with the word "quit" on a line by itself:
MIIL3wIBAzCCC5kGCSqGSIb3DQEHAaCCC4oEgguGMIILgjCCC34GCSqGSIb3DQEH
BqCCC28wggtrAgEAMIILZAYJKoZIhvcNAQcBMBsGCiqGSIb3DQEMAQMwDQQIocGz
Fa6tZyACAQGAggs4qNTJi7l/f0IvQr8n1c/SCeaSYRLBvcY9yPgJ2K2/Nmu9+KNB
3dAoYkCrGwDdfpobJE0XqBpIE1uBOtAeF7zdFJt/Pgpie4fcqpCVIbDXG8Ansmhj
v0j6W9Z/IJHe7JrENatbi4nhTnCDP79Z65QSkzrb9DenkCGjoQsWP9zLHTiCDNzV
ajMlWFuCFb0wSW/6L73BLTjS7rwtE74gYMU5NJwtOVsJM2LdwuQ+iOnpsnp6q9fu
niUFEutPe8imOCRApe0tpPqhDp74hKziKT8JEsQ8HMO/lX1y/LIXdLISnz1nkoN3
vxD4AMGRFYACPH8PiGcVSx+vD+wmNaHp1vAOrq4pS7ZQ37ko4mFudnftdOUzaPIz
EzTrOwlRE6il/gF8vb14EfeR09vumJBsajF12hrFGugIJTZnElp5go+oHEEAo4Y+
Yhoj/MIOyhZzo3/ujhjKqtsAJXybYF9YqVkTee9u4Xjkcsg5AmbaqeUUfd7Q8CC2
bi39S1maoWbTYiNcHFs/bWKWJsgZwPzfWtmPch/8MNvXn46AJAwIwRQjHruuFE9F
bhv7SRhYSRQZPf7j1PTmJuMkKA3AzjdbmmJuLidbX3yKbTt4PxPMusbv+ojc6Nam
RCsRf7+gnNZLWs3eU1n84rryZg5Pjw3MRTu2yXDvr799gvx7NIZH5yUZyVl1T70b
eC4KbflcmpM6mJ2UVnaoP2N5u892m41BWuk9rt5isl2f/Z/ZuSbkFaxzU0456zSg
VbYsR+51XfQEH5xu88E5EUPWZ86YdUSlbD8ky6WOn0M1O4K6rNDLkgwXcxw3CaZ8
zhao+dE3qoEYWaKPgCQzPqW0BW3y7WSIELug2uSEsXQjIQcF+42CX6RA3yCmy2T8
C+osKlSSao0nzjrlpTWnPiFss9KRFgJDZhV2ItisiALNw9PqruddcmYtw44LXvdc
+OfnyRvuLS6LE/AMmGk0GaVetAXPezD+5pVZW13UMT/ZdzUjLiXjV9GzF6V8i8qN
Ua0MbDEa8T5Le4dCigaA+t1QxQOPGb+w0ZAQzWN4gZpSEk3ejRixOt14SU5ivj/O
lGXNn8Fvebk42CHohjXG9fq/IfbsVWSkxn2OZ/fhXkZztv4ic1VgprgJURjCtcBw
9Qp/ONda+9aDHiSBrKeHC/urgX6rgWXv9+hpRKIRfj3b8WE+N1sivuQEjlWxbD7h
9fpwxXb+/i7HisjzSkOWUNw4lyulfYSiOv86FPWK0H9Vjbg0G0di1rvGZ8uJHQCC
77RLFXp4jrvCgeo4oWKQbphgPAng7rT794vMwq0rYOb4D3HlHCUvU3JJmScDJQy2
zQxbG2q8Htm44COOuJEUBzx1ImayH2XvDck6VmLTGn8XH5Vq7LOlCeUcVDM8aQfy
HJSPk/VmfQ0lXwPIaxxYlr+jOpcorFkH+OH04hz07grAsGyLRoFICTEvHAzVnF0X
2A1j/z/BFAPG86ssAtInRZVeYUS72NwPEtpKmlHZnl+2iWno5iwTZgtjv7oREZKE
RE6m7O8RiPSD2RjjamCmmmnH5dK5wxF7YlIeK/+ZVrfwLecEPRl+eVw0isM/JN/a
WmkZkCcVMx/ec1P8jp8LzCx17HgVNYbg9lsiffD4xo0G/k0QLUlpliAt7LA2BeGs
yl55wtYUcOBH0/Es39yWnm2Ea//IK6BLw98PvU90vkXWwiD3ajFmcHmssDeU/tZR
4KKNuNor7Le9ycXZFM9ofKZ6AIJ9A1AYvOyhGO88voq8MMGXEe/q+DIjaVE1htYu
k0ELmYAD/XOkEvp3SqOkLQZiCzZ20iMWUTWXlXfgrfLEH0utwHTyr3J2vQk5CD37
ZAfsF6zxEvtU2t41J0e9OjWJw9WtWnnS0gzLeXWtW3H0YAIw3QodKNzbaY4eLP4y
BEdsLmWbM4eza0m9BoZOmMUSkhvFrEz5Q5X5r9vCuAi1rYDqyIjhgdme56tVV0Vg
ZauhbNX59PQQzwOdIZJVVL5tgjf0h7XCm9OBsqd12lHurCCmHy7kM5pqf0MMlhH7
oM/DhXdTU+1sEabt/9c2qs1ihJLS1Zaw2q1AaS5h00+xL8Lxwh2/1/R7Q8FferhR
QZDpix+CmtakRu7uPOMa0zsyOko3P9mf74AWDrThAwMA6G238TC6XI1vrXhvEX1l
BVplQq0Wh/p7ZorSjD5l+z7TkXmJNp7iIxAqp0yobC6vOBwQP7/QAs88q9JNSAte
ErdCXoizvs8YmZMoEap948oplYFaIP+xCnCr8l3v7znwfZwTMQPoPvqEFqUmWYgt
xkJ0qaE645ihTnLgk4eglsBLslwPR1RJU+t6kGGAUmxqhPFxb3/1xNRPVzOGn12w
S9yw+XLC6kS4PmKoxkxax4nnCx7s3e7B5e0qmYtgRTJ0GuW7Uf+T3royTOuYm0d+
ik6bmxcnO0qdcHtt2HTbI+kYpken3YrFOh9Jnm9ZKT63gQSqQWL800ZVd4dAZceg
FciNKs9r26fyy+L3rGCh+U9TLf6mNuWu8RstjjIGPHEPKZ9gnMgMJmikP2ghgOAd
XVhs6ashXx33bZ9dIuhRx6uTNMrppsXyg6SxUyeGDYhpxsPt7uRwBswOpi6iDMZn
ISSzQjrkxoNwwOfn87O5fTCLhHlTZa8HS5HMK3KE7LiZv9pa1z6KTo4z+LCQSLDy
FoRJhSaEsCYJsLDS5nYBoR8hE/eMvQDX1f+RZBrJDcftxx7FQ+8RtvHSJRcJK9N/
Ph/pL62NBlSbvCfn1AbisKrbbgCVLOSj/doufPvpMT2UDL0TY8UnQiyWMH1MF3tZ
jJy6Si2glLwA9hu/c1NsREbA0gxMTjAREb5BjAUmlc3fuv2DWpwnkwyZNyHdm9B9
TPRoByGPvSZXa8MwY/8DUEwUQEsfDJi5jlAD4I6VFFUB72ZS7wn/mVR02fPkfOMp
3yhnGgX29OaDDiDlKw1Xwj1NybOhpZ6unDo5J3stMxlbv5TYL2Tl6egZS0SjsLmn
cj5zkyUU22/93E5vfKD1CMiXx9/e4j2rRh3QCIXqaCjC9acTJ8a/k9/bp8Nz5Cir
pnaCbuQsvna92nxVUqcmLlSbVIvGqlH9qm4DurhcLh59j20tX6K8AMJ90+azaYbX
AJV/MCElhJg6wcN8QnCHMhiuK9+zpsUK2FQgfbcgaaNe3xGaXuoOIGQmlbAGtEkp
kuauRzQ8/pwszaZuPh/5rE77z8zMut3+OE5CslB9npzNi0b0itaaRl13bBBml1xn
r6SBUw7AWapZwRx6pihvptLJaqU1IzaV5SWk0zTABR7BmR84L0+/8v/bedcPSioG
ecside21F6CcWO5ywABBxDYQXM1P9qkC/2bkPkEJ0jBI5P5L1+Yqb8hTlone/InR
B8ktEd8+QW8o60h0seONXumTqBfAuNBkprOA3ssXLeEGB0IpeC5oGW+VSziyS9id
zYq8WaehpAIf3pqwn8gsi0B/wd57T0KK91+v0Ei4z+yIdu8Kh9GTiqGvgNAeakgr
ECDiXoKAwltYAn7cLKNpZaojSs2Jt+60oBA5crT04Mtgpjb9Pd/DLqWQDJTyoRVv
cJRb68aOyZvVBU0yoLbox84QKLHIsA92pplS7VFrAWP65wrhs4XOf4YSFlM89Sn4
GD/yEsGVJzwGrxgCNnOZkLIKsFbIOjp2lMps5jVKoFfpPJCie3F2FB3ecS+xRpHo
5u2KOTmH0rFQ6Vu+JYCo/qWh0ERtL/8gczP7C9ehiaZfemw2bq9xrUo+6y3H9Q+Z
LADwMlAkI+kzbng3R+fj4AYBvf8GTJdpBs8s/t7mZXHiXCtH6qxTMRWJx5Xuxs9F
I8Ii8TA9MCEwCQYFKw4DAhoFAAQUjO/On/REYODupznP9SwYnFX92BYEFESx1MSa
ho3Cv1cZYM0TzZEzlsKdAgIEAA==
quit
INFO: Import PKCS12 operation completed successfully
Step 11. Verify the certificate information.
ASA(config)#show crypto ca certificates <HeadEnd>
CA Certificate
  Status: Available
  Certificate Serial Number: 01
  Certificate Usage: Signature
  Public Key Type: RSA (1024 bits)
  Signature Algorithm: MD5 with RSA Encryption
  Issuer Name:
    cn=calo_root
  Subject Name:
    cn=calo_root
  Validity Date:
    start date: 13:24:35 UTC Jul 13 2017
    end   date: 13:24:35 UTC Jul 12 2020
  Storage: config
  Associated Trustpoints: test HeadEnd
Certificate
  Status: Available
  Certificate Serial Number: 05
  Certificate Usage: General Purpose
  Public Key Type: RSA (2048 bits)
  Signature Algorithm: SHA1 with RSA Encryption
  Issuer Name:
    cn=calo_root
  Subject Name:
    hostname=Connected_2_INET-B
    cn=HeadEnd.david.com
  Validity Date:
    start date: 16:56:14 UTC Jul 16 2017
    end   date: 16:56:14 UTC Jul 16 2018
  Storage: config
  Associated Trustpoints: HeadEnd
Generate a Client Certificate
Step 1. Generate an exportable RSA keypair.
IOS-CA(config)# crypto key generate rsa modulus 2048 label <Win7_PC> exportable
The name for the keys will be: Win7_PC
% The key modulus size is 2048 bits
% Generating 2048 bit RSA keys, keys will be exportable...
[OK] (elapsed time was 5 seconds
Step 2. Configure a trustpoint.
IOS-CA(config)# crypto pki trustpoint <Win7_PC>
IOS-CA(ca-trustpoint)#enrollment url http://10.201.180.230:80
IOS-CA(ca-trustpoint)#subject-name <cn=Win7_PC.david.com>
IOS-CA(ca-trustpoint)#revocation-check none
IOS-CA(ca-trustpoint)#rsakeypair <Win7_PC>
Step 3. Authenticate the configured trustpoint (Get the CA Certificate).
IOS-CA(config)#crypto pki authenticate <Win7_PC>
Certificate has the following attributes:
       Fingerprint MD5: DA4502F4 CEFB4F08 AAA3179B 70019185
      Fingerprint SHA1: A887F6DB 0656C7E2 857749F3 EA3D7176 8920F52F
% Do you accept this certificate? [yes/no]: yes
Trustpoint CA certificate accepted.
Step 4. Enroll the authenticated trustpoint (Get the Identity Certificate).
IOS-CA(config)#crypto pki enroll <Win7_PC>
%
% Start certificate enrollment ..
% Create a challenge password. You will need to verbally provide this
   password to the CA Administrator in order to revoke your certificate.
   For security reasons your password will not be saved in the configuration.
   Please make a note of it.
Password: cisco123
Re-enter password: cisco123
% The subject name in the certificate will include: cn=Win7_PC.david.com
% The subject name in the certificate will include: Connected_2_INET-B
% Include the router serial number in the subject name? [yes/no]: no
% Include an IP address in the subject name? [no]: no
Request certificate from CA? [yes/no]: yes
% Certificate request sent to Certificate Authority
% The 'show crypto pki certificate verbose Win7_PC' command will show the fingerprint.
*Jul 17 15:21:11.343: CRYPTO_PKI:  Certificate Request Fingerprint MD5: 9153E537 11C16FAE B03F7A38 775DBB92
*Jul 17 15:21:11.343: CRYPTO_PKI:  Certificate Request Fingerprint SHA1: 3BC4AC98 91067707 BB6BBBFB ABD97796 F7FB3DD1
*Jul 17 15:21:15.675: %PKI-6-CERTRET: Certificate received from Certificate Authority
Step 5. Verify the certificates information.
IOS-CA#show crypto pki certificates verbose <Win7_PC>
Certificate
  Status: Available
  Version: 3
  Certificate Serial Number (hex): 03
  Certificate Usage: General Purpose
  Issuer:
    cn=calo_root
  Subject:
    Name: Connected_2_INET-B
    hostname=Connected_2_INET-B
    cn=Win7_PC.david.com
  Validity Date:
    start date: 13:29:51 UTC Jul 13 2017
    end   date: 13:29:51 UTC Jul 13 2018
  Subject Key Info:
    Public Key Algorithm: rsaEncryption
    RSA Public Key: (2048 bit)
  Signature Algorithm: SHA1 with RSA Encryption
  Fingerprint MD5: 9153E537 11C16FAE B03F7A38 775DBB92
  Fingerprint SHA1: 3BC4AC98 91067707 BB6BBBFB ABD97796 F7FB3DD1
  X509v3 extensions:
    X509v3 Key Usage: A0000000
      Digital Signature
      Key Encipherment
    X509v3 Subject Key ID: F37266AE 61F64BD9 3E9FA80C 77455F21 5BEB870D
    X509v3 Authority Key ID: B5EEEEB9 31B9A06C CBD9893C 0E318810 5CA657E6
    Authority Info Access:
    Extended Key Usage:
        Client Auth
        Server Auth
  Associated Trustpoints: Win7_PC
  Key Label: Win7_PC
CA Certificate
  Status: Available
  Version: 3
  Certificate Serial Number (hex): 01
  Certificate Usage: Signature
  Issuer:
    cn=calo_root
  Subject:
    cn=calo_root
  Validity Date:
    start date: 13:24:35 UTC Jul 13 2017
    end   date: 13:24:35 UTC Jul 12 2020
  Subject Key Info:
    Public Key Algorithm: rsaEncryption
    RSA Public Key: (1024 bit)
  Signature Algorithm: MD5 with RSA Encryption
  Fingerprint MD5: DA4502F4 CEFB4F08 AAA3179B 70019185
  Fingerprint SHA1: A887F6DB 0656C7E2 857749F3 EA3D7176 8920F52F
  X509v3 extensions:
    X509v3 Key Usage: 86000000
      Digital Signature
      Key Cert Sign
      CRL Signature
    X509v3 Subject Key ID: B5EEEEB9 31B9A06C CBD9893C 0E318810 5CA657E6
    X509v3 Basic Constraints:
        CA: TRUE
    X509v3 Authority Key ID: B5EEEEB9 31B9A06C CBD9893C 0E318810 5CA657E6
    Authority Info Access:
  Associated Trustpoints: test HeadEnd Win7_PC CA_Server
Install the Identity Certificate on the Windows 7 Client Machine
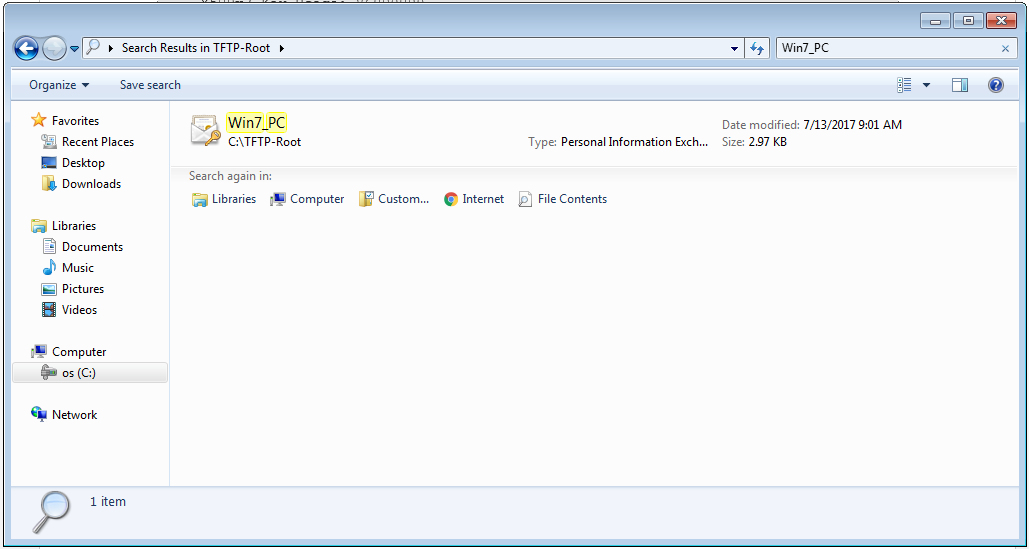
Step 1. Export the named Win7_PC trustpoint to an FTP/TFTP Server (installed on your Windows 7 machine) in PKCS12 format (.p12) to get the identity certificate, the CA certificate and the private key in one single file.
IOS-CA(config)#crypto pki export <Win7_PC> pkcs12 <tftp://10.152.206.175/ Win7_PC.p12> password <cisco123>
Address or name of remote host [10.152.206.175]?
Destination filename [Win7_PC.p12]?
!Writing pkcs12 file to tftp://10.152.206.175/Win7_PC.p12
!
CRYPTO_PKI: Exported PKCS12 file successfully.
*Jul 17 16:29:20.310: %PKI-6-PKCS12EXPORT_SUCCESS: PKCS #12 Successfully Exported.
This is how the exported file looks on a client machine.
Step 2. Press Ctrl + R and type mmc to open the Microsoft Management Console (MMC).
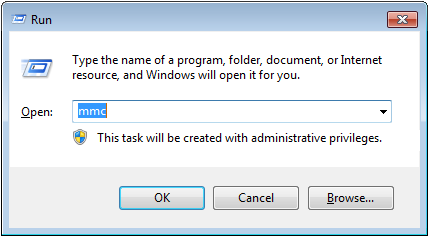
Step 3. Select OK.
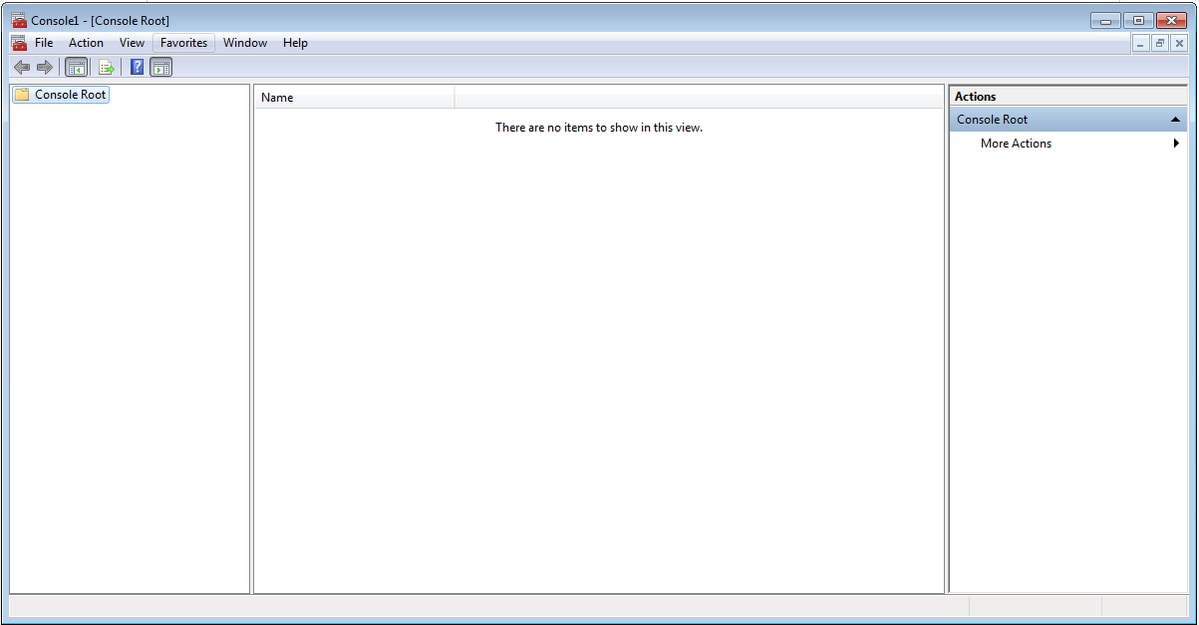
Step 4. Navigate to File>Add/Remove Snap-in.
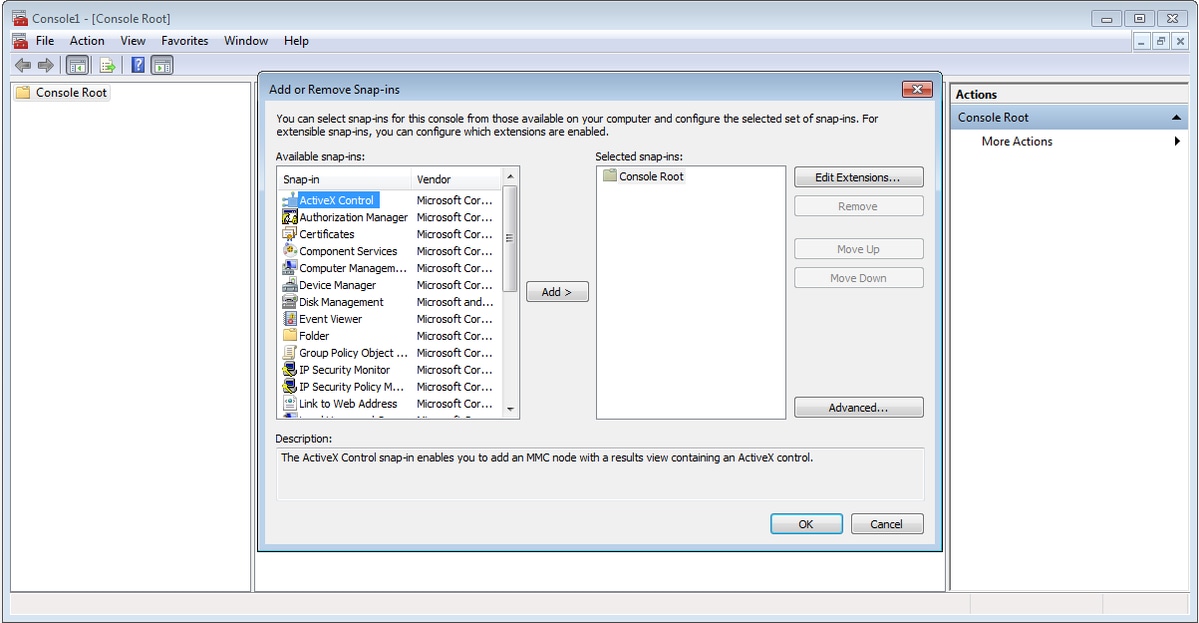
Step 5. Select Certificates > Add > Computer Account.
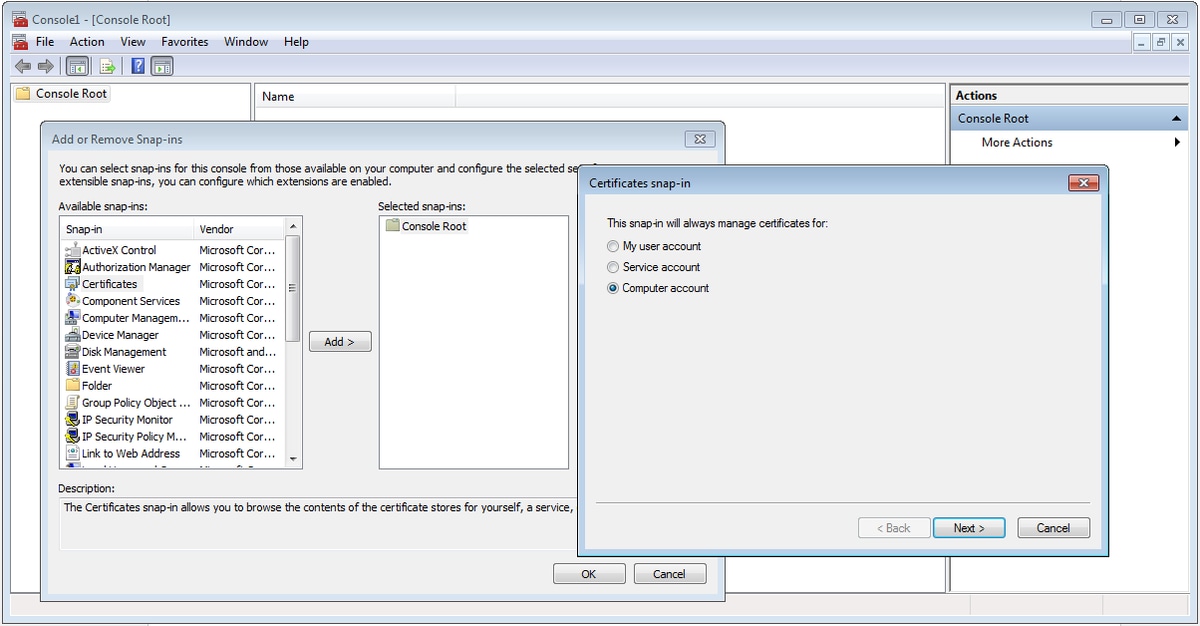
Step 6. Select Next,
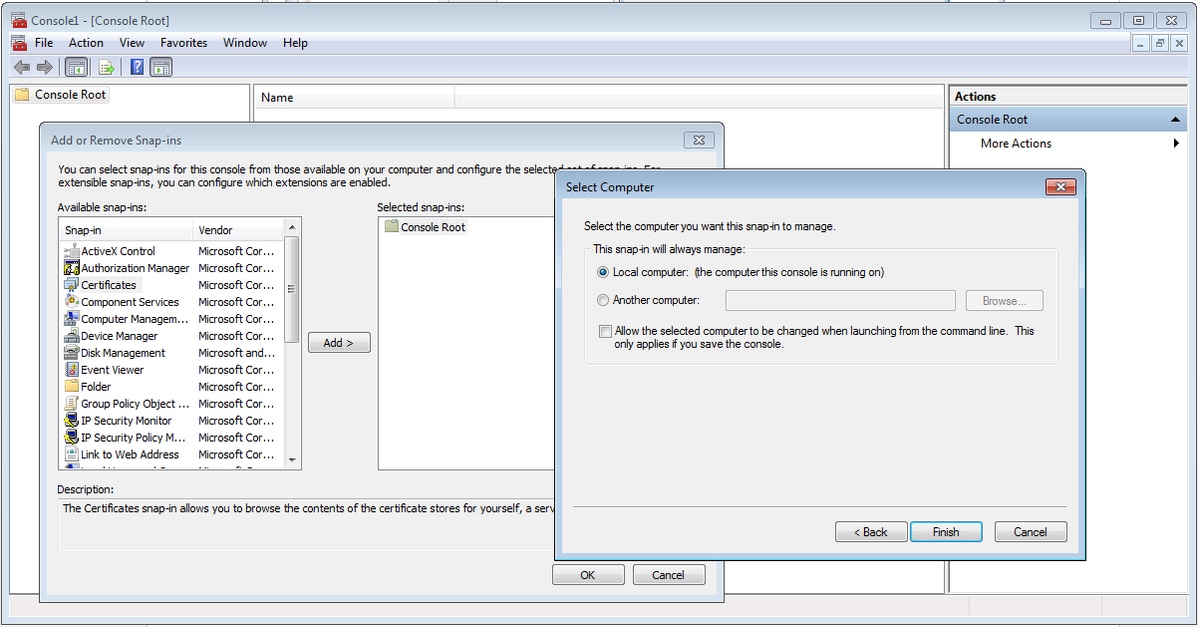
Step 7. Finish.
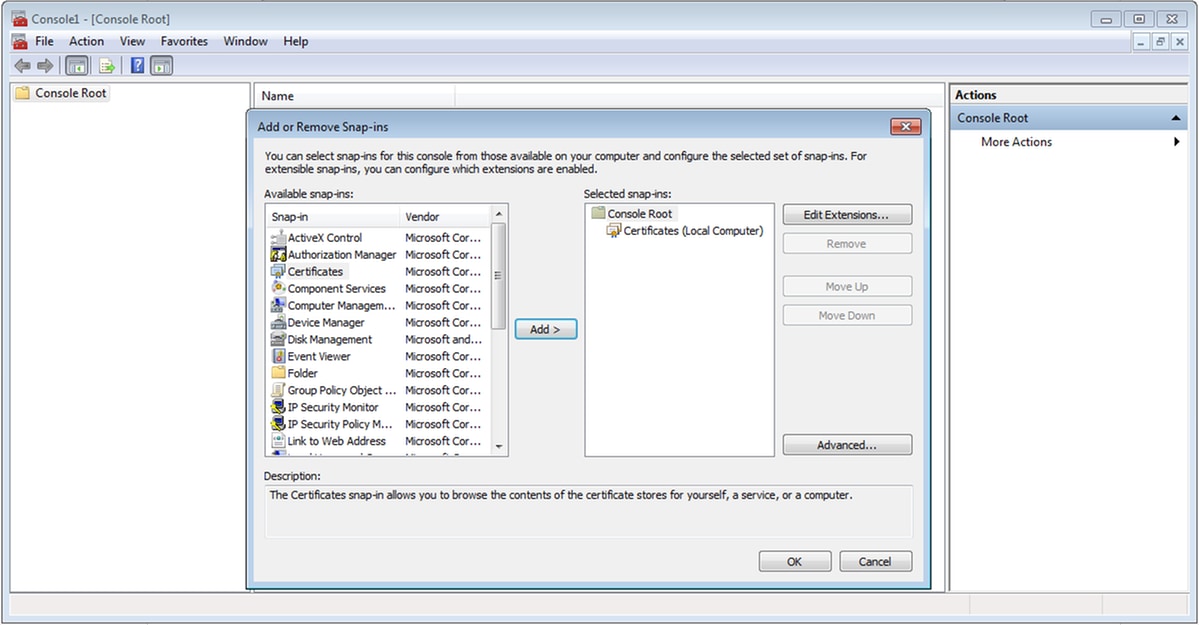
Step 8. Select OK.
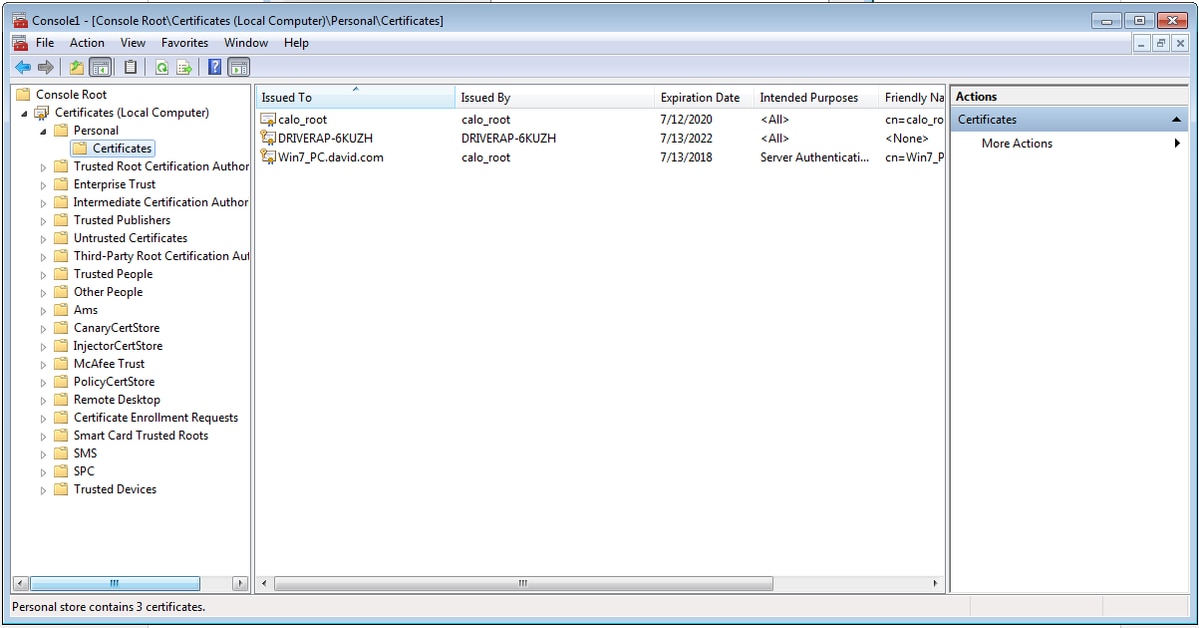
Step 9. Go to Certificates (Local Computer)>Personal>Certificates, Right-Click on the folder and navigate to All Tasks>Import:

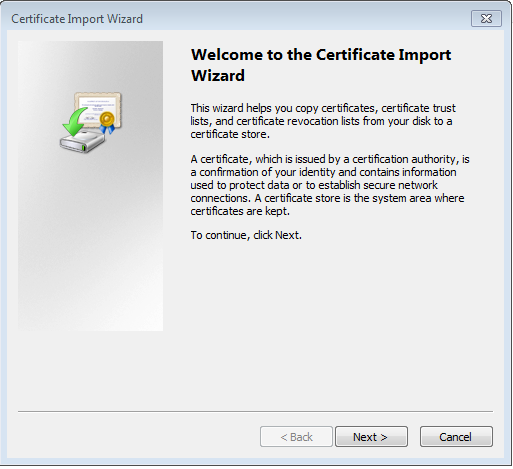
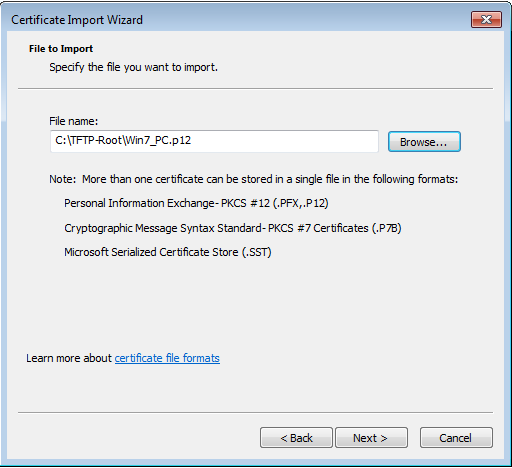
Step 10. Click Next. Indicate the path where the PKCS12 file is stored.
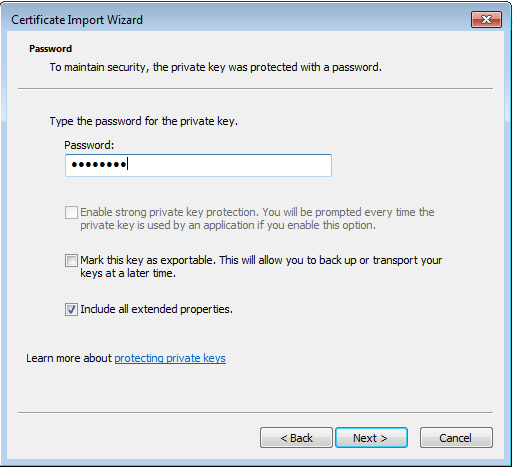
Step 11. Select Next again and type the password entered in the crypto pki export <Win7_PC> pkcs12 <tftp://10.152.206.175/ Win7_PC.p12> password <cisco123> command
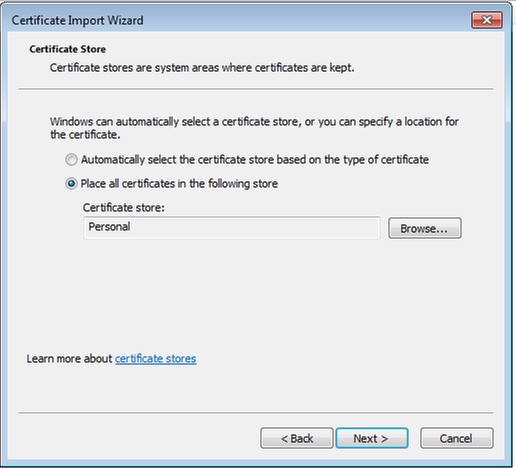
Step 12. Select Next.
Step 13. Select Next one more time.
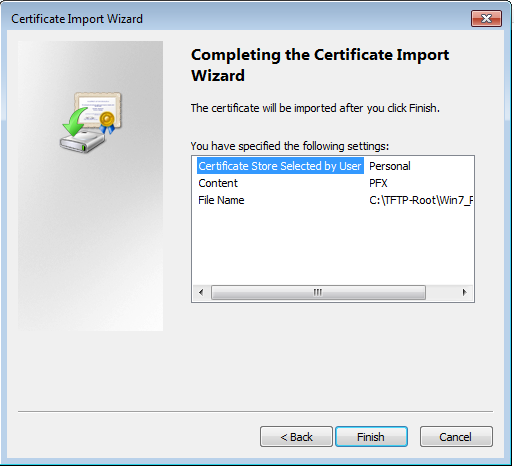
Step 14. Select Finish.
Step 15. Select OK. Now you will see the certificates installed (both the CA certificate and the Identity certificate).
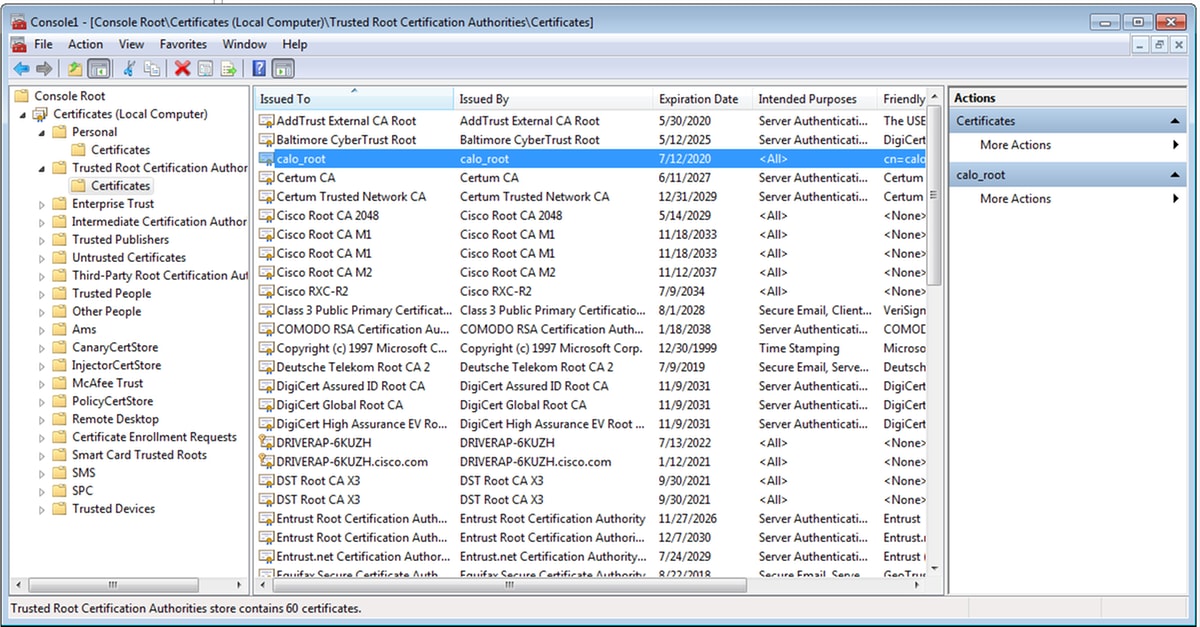
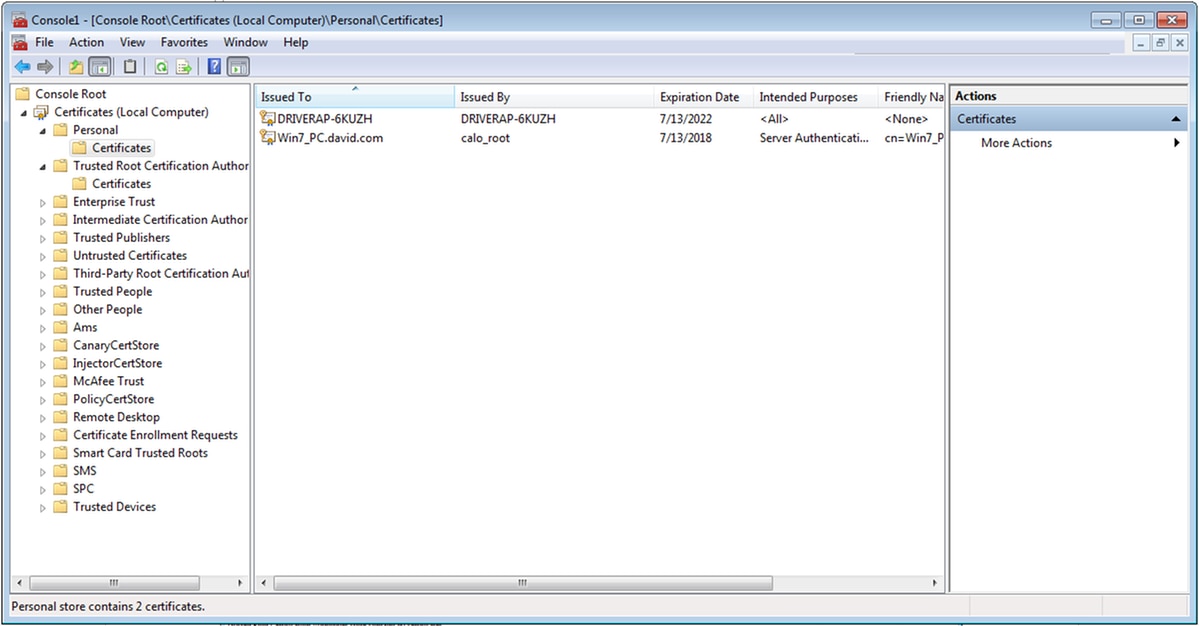
Step 16. Drag and drop the CA Certificate from Certificates (Local Computer)>Personal>Certificates to Certificates (Local Computer)>Trusted Root Certification Authority>Certificates.
How to install the Identity Certificate on your Android mobile device
Note: Android supports PKCS#12 key store files with .pfx or .p12 extension.
Note: Android only supports DER-encoded X.509 SSL certificates.
Step 1. After the client certificate export from the IOS CA Server in PKCS12 (.p12) format, send the file to the Android device via email. Once you have it there, tap on the name of the file to start the automatic installation. (Do not download the file)

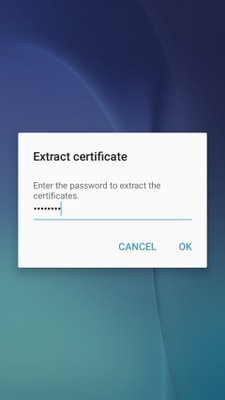
Step 2. Enter the password used to export the certificate, in this example, the password is cisco123.
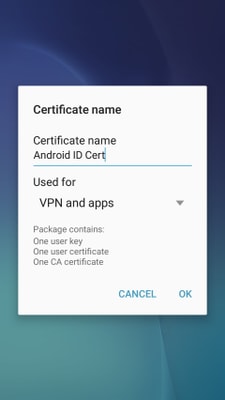
Step 3. Select OK and enter a Certificate name. It can be any word, in this example the name is Android ID Cert .
Step 4. Select OK and the message “Android ID Cert installed” appears.
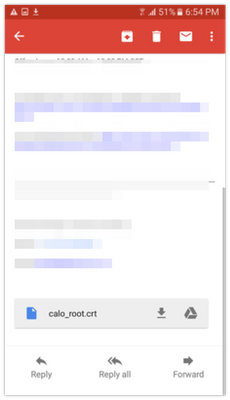
Step 5. In order to install the CA certificate, extract it from the IOS CA Server in base64 format and save it with .crt extension. Send the file to your android device via email. This time you need to download the file by taping on the arrow located next to the name of the file.

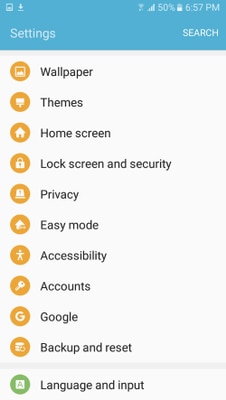
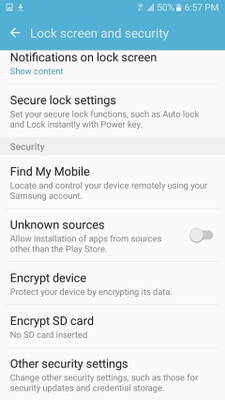
Step 6. Navigate to Settings and Lock screen and security.
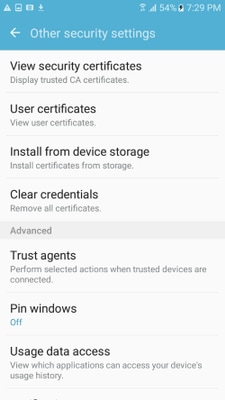
Step 7. Select Other security settings.
Step 8. Navigate to Install from device storage.
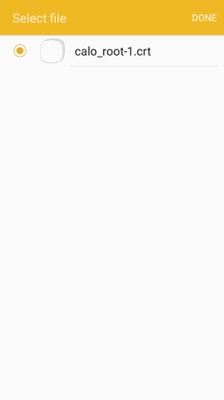
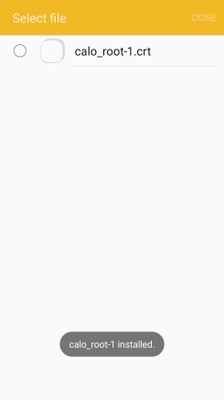
Step 9. Select the .crt file and tap on Done.
Step 10. Enter a Certificate name. It can be any word, in this example, the name is calo_root-1.
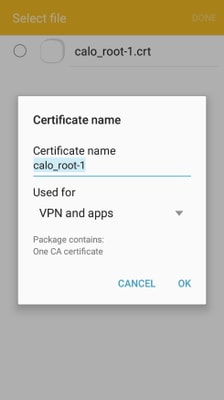
Step 10. Select OK and you will see the message “calo_root-1 installed”.
Step 11. In order to verify that the identity certificate is installed, navigate to Settings/Lock Screen and Security/Other > Security Settings/User Certificates/System tab.
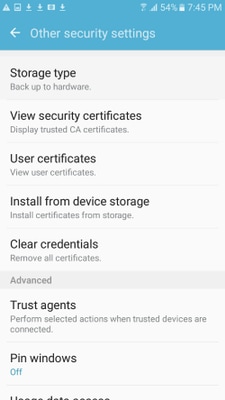

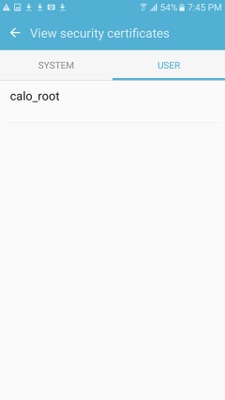
Step 12. To verify that the CA certificate is installed, navigate to Settings/Lock screen and security/Other security settings/View security certificates/User tab.

Configure ASA headend for RA VPN with IKEv2
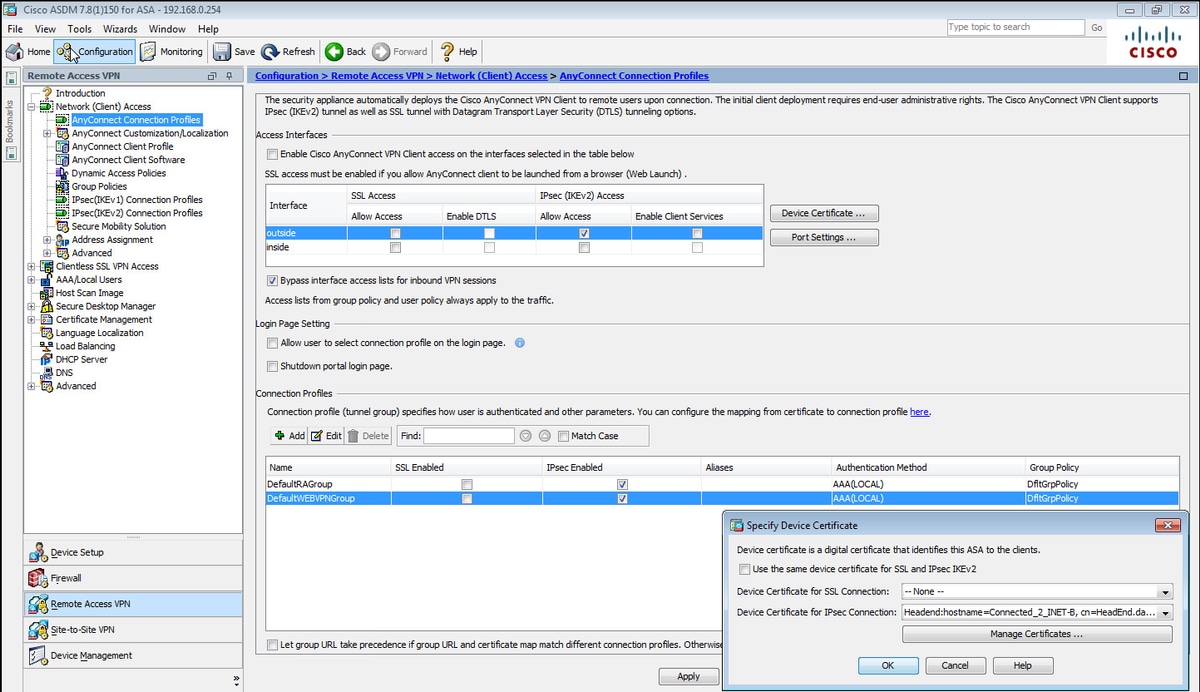
Step 1. On ASDM, navigate to Configuration>Remote Access VPN > Network (client) Access> Anyconnect Connection Profiles. Check the IPSec (IKEv2) access, Allow Access box on the interface facing the VPN clients (Enable Client Services option is not necessary).
Step 2. Select Device Certificate and remove the chekmark from Use the same device certificate for SSL and IPSec IKEv2.
Step 3. Select the Headend certificate for the IPSec connection and select -- None -- for the SSL connection.
This option puts in place the crypto ikev2, crypto ipsec, crypto dynamic-map and the crypto map configuration.
This is how the configuration looks on Command Line Interface (CLI).
crypto ikev2 policy 1
 encryption aes-256
 integrity sha
 group 5
 prf sha
 lifetime seconds 86400
crypto ikev2 enable outside

crypto ikev2 remote-access trustpoint HeadEnd
crypto ipsec ikev2 ipsec-proposal AES256
 protocol esp encryption aes-256
 protocol esp integrity sha-1 md5

crypto dynamic-map Anyconnect 65535 set ikev2 ipsec-proposal AES256
crypto map outside_map 65535 ipsec-isakmp dynamic Anyconnect
crypto map outside_map interface outside
Step 4. Navigate to Configuration > Remote Access VPN > Network (Client) Access > Group Policies to create a group policy
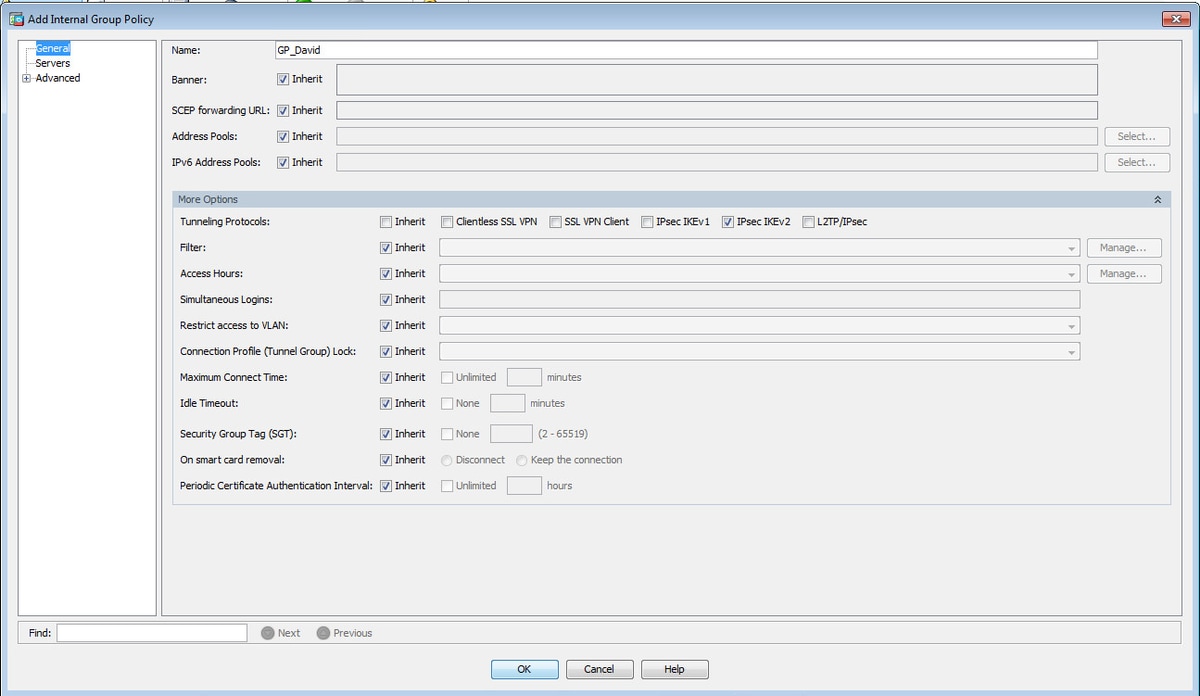
On CLI.
group-policy GP_David internal
group-policy GP_David attributes
 vpn-tunnel-protocol ikev2
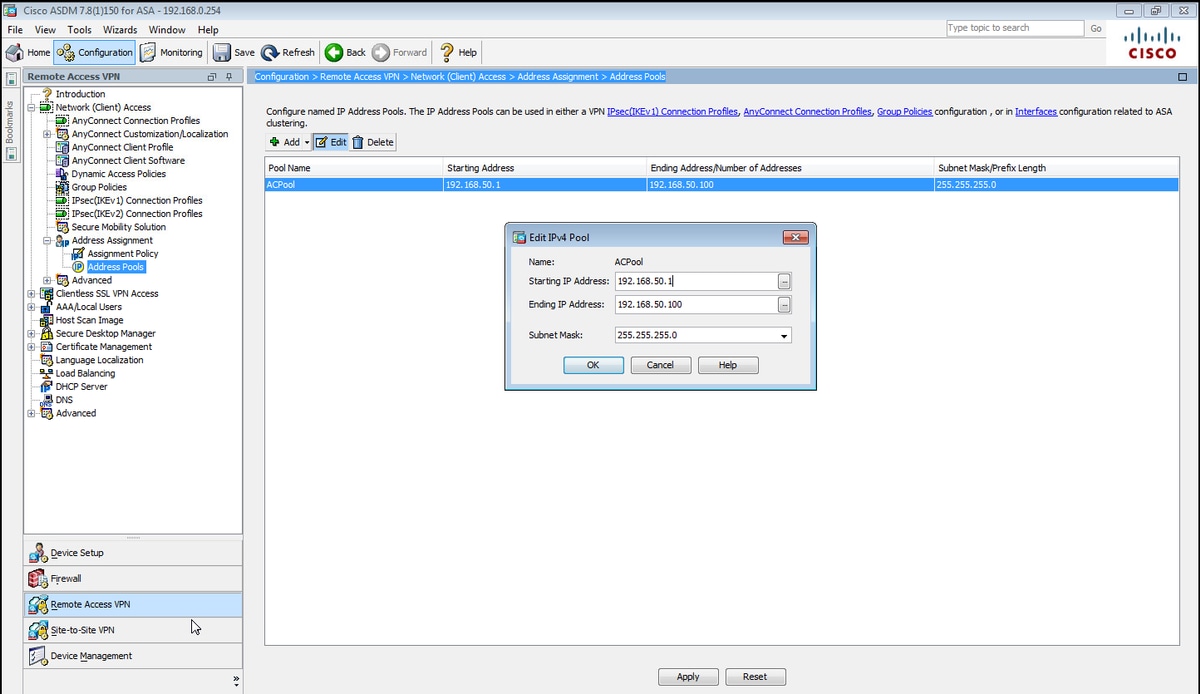
Step 5. Navigate to Configuration > Remote Access VPN > Network (Client) Access > Address Pools and select Add to create an IPv4 Pool.
On CLI.
ip local pool ACPool 192.168.50.1-192.168.50.100 mask 255.255.255.0
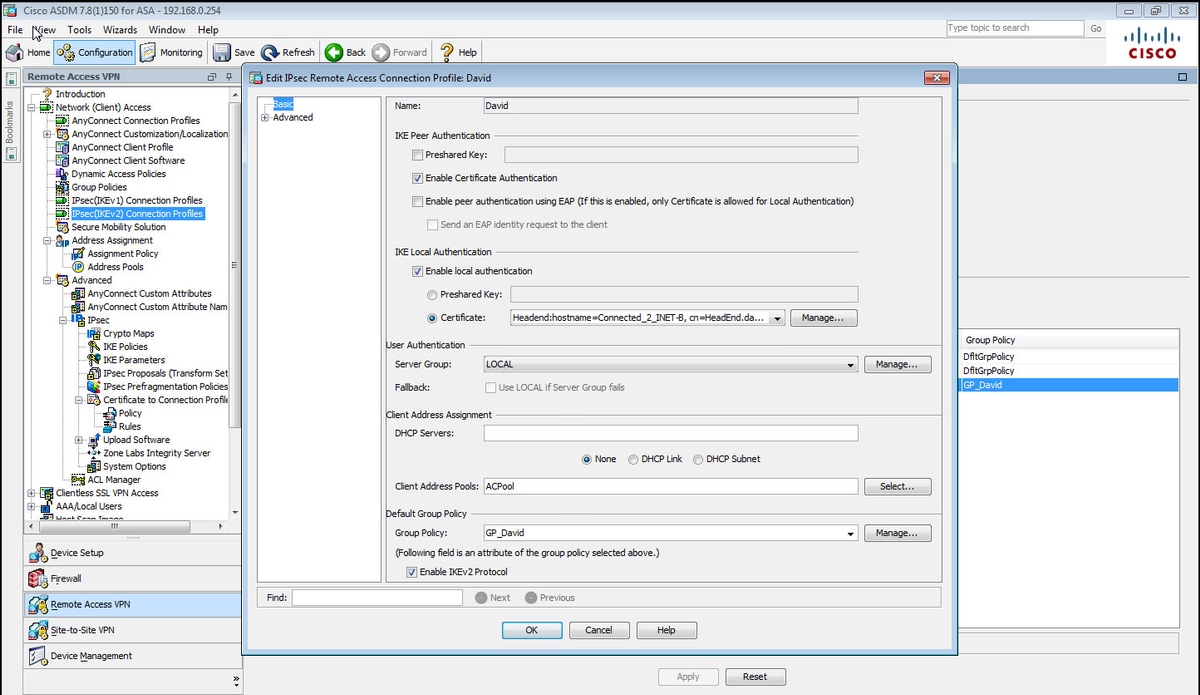
Step 6. Navigate to Configuration > Remote Access VPN > Network (Client) Access > IPSec(IKEv2) Connection Profiles and select Add to create a new tunnel group.
On CLI.
tunnel-group David type remote-access
tunnel-group David general-attributes
 address-pool ACPool
 default-group-policy GP_David
 authentication-server-group LOCAL
tunnel-group David webvpn-attributes
 authentication certificate
tunnel-group David ipsec-attributes
 ikev2 remote-authentication certificate
 ikev2 local-authentication certificate HeadEnd
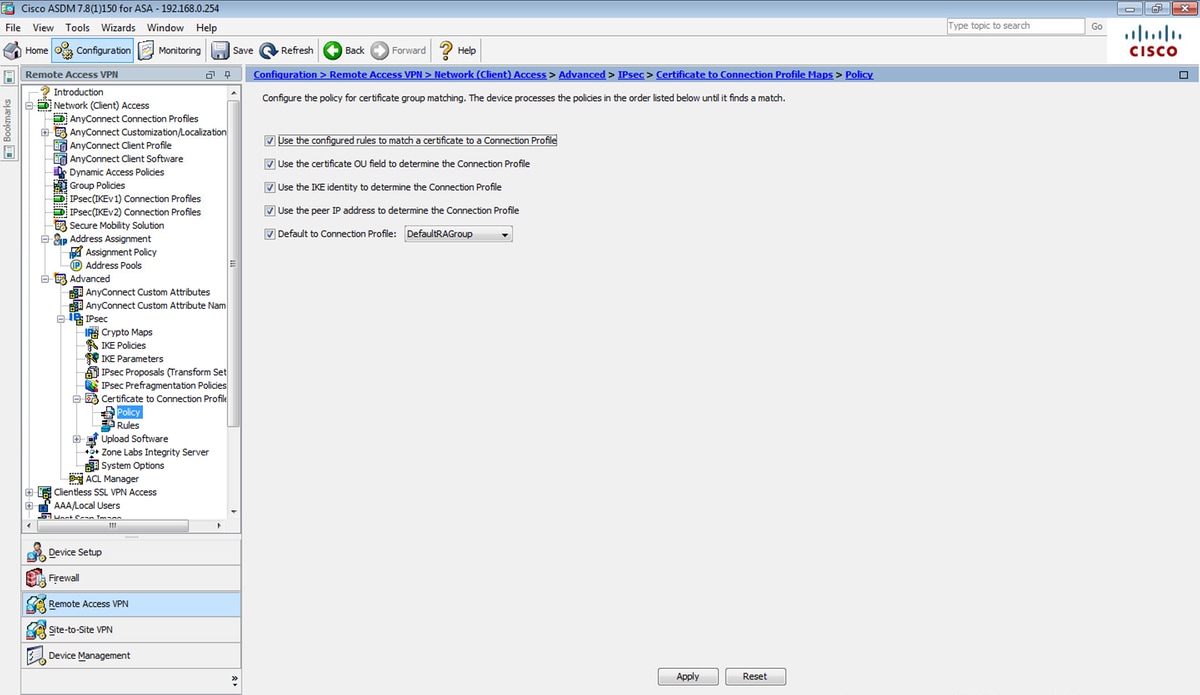
Step 7. Navigate to Configuration > Remote Access VPN > Network (Client) Access > Advanced > IPsec > Certificate to Connection Profile maps > Policy and check the Used the configured rules to math a certificate to a Connection Profile box.
On CLI.
tunnel-group-map enable rules
Step 8. Navigate to Configuration > Remote Access VPN > Network (Client) Access > Advanced > IPsec > Certificate to Connection Profile maps > Rules and create a new Certificate Map. Select Add and associate it to the tunnel-group. In this example the tunnel group is named David.
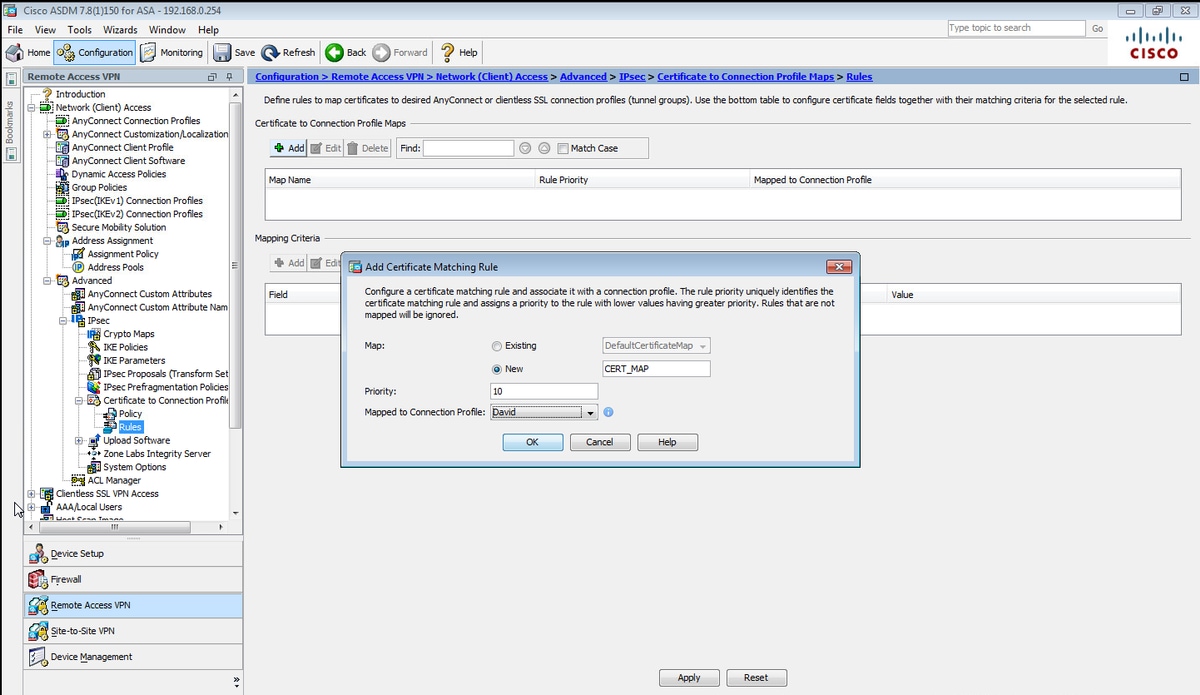
On CLI.
tunnel-group-map CERT_MAP 10 David
Step 9. Select Add at the Mapping Criteria section and enter these values.
Field: Issuer
Operator: Contains
Value: calo_root
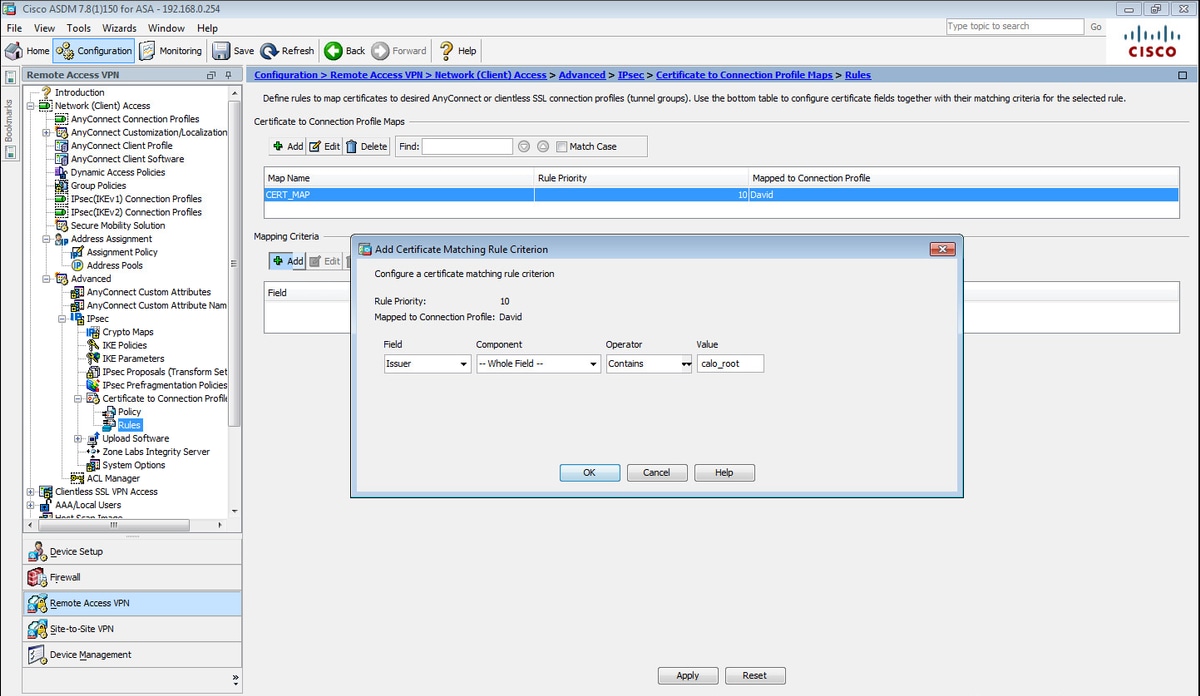
On CLI.
crypto ca certificate map CERT_MAP 10
 issuer-name co calo_root
Step 10. Create an object with the IP pool network to use in order to add a (Network Address Translation) NAT exemption rule at Configuration > Firewall > Objects > Network Objects/Groups> Add.
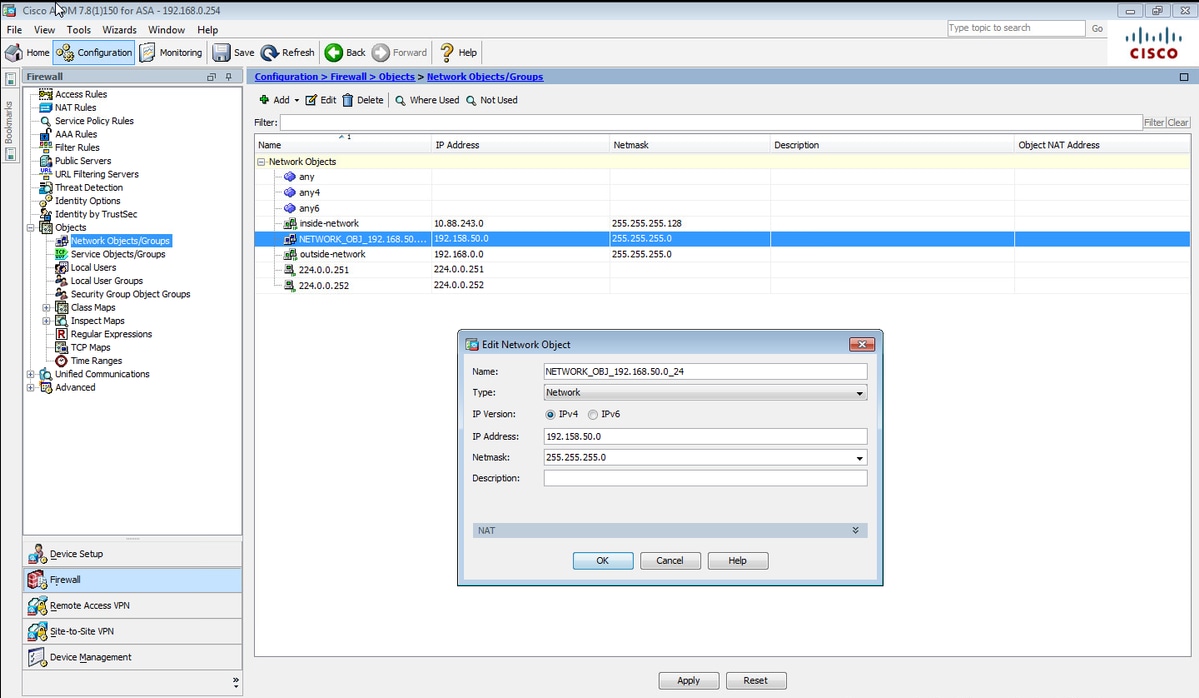
On CLI.
object network NETWORK_OBJ_192.168.50.0_24
 subnet 192.168.50.0 255.255.255.0
Step 11. Navigate to Configuration > Firewall > NAT Rules and select Add to create the NAT exemption rule for the RA VPN traffic.
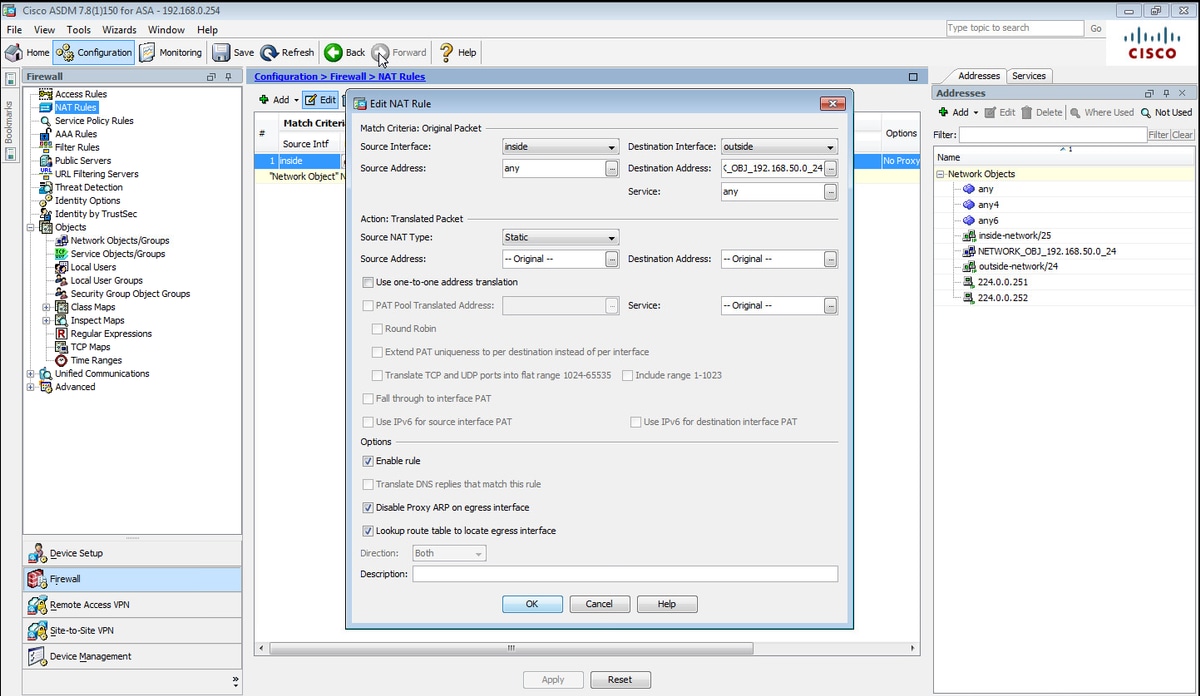
On CLI.
nat (inside,outside) source static any any destination static NETWORK_OBJ_192.168.50.0_24 NETWORK_OBJ_192.168.50.0_24 no-proxy-arp route-lookup
This is the complete ASA configuration used for this example.
interface GigabitEthernet1/1
 nameif outside
 security-level 0
 ip address 10.88.243.108 255.255.255.128

object network NETWORK_OBJ_192.168.50.0_24
 subnet 192.168.50.0 255.255.255.0
nat (inside,outside) source static any any destination static NETWORK_OBJ_192.168.50.0_24 NETWORK_OBJ_192.168.50.0_24
ip local pool ACPool 192.168.50.1-192.168.50.100 mask 255.255.255.0
crypto ikev2 policy 1
 encryption aes-256
 integrity sha
 group 5
 prf sha
 lifetime seconds 86400
crypto ikev2 enable outside

crypto ikev2 remote-access trustpoint HeadEnd

group-policy GP_David internal
group-policy GP_David attributes
 vpn-tunnel-protocol ikev2

tunnel-group David type remote-access
tunnel-group David general-attributes
 address-pool ACPool
 default-group-policy GP_David
 authentication-server-group LOCAL
tunnel-group David webvpn-attributes
 authentication certificate
tunnel-group David ipsec-attributes
 ikev2 remote-authentication certificate
 ikev2 local-authentication certificate HeadEnd

tunnel-group-map enable rules
crypto ca certificate map CERT_MAP 10
 issuer-name co calo_root
tunnel-group-map CERT_MAP 10 David

crypto ipsec ikev2 ipsec-proposal AES256
 protocol esp encryption aes-256
 protocol esp integrity sha-1 md5

crypto dynamic-map Anyconnect 65535 set ikev2 ipsec-proposal AES256
crypto map outside_map 65535 ipsec-isakmp dynamic Anyconnect
crypto map outside_map interface outside
Configure Windows 7 built-in client
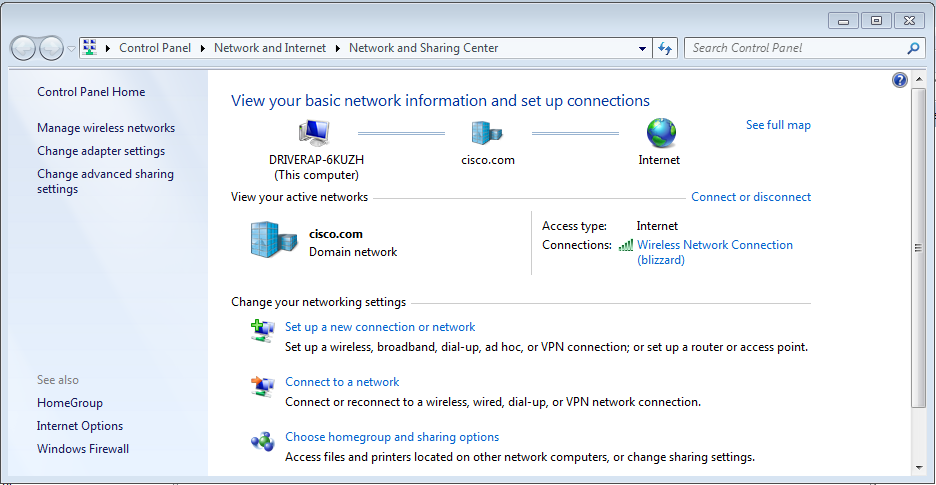
Step 1. Navigate to Control Panel > Network and Internet > Network and Sharing Center.
Step 2. Select Set up a new connection or network.
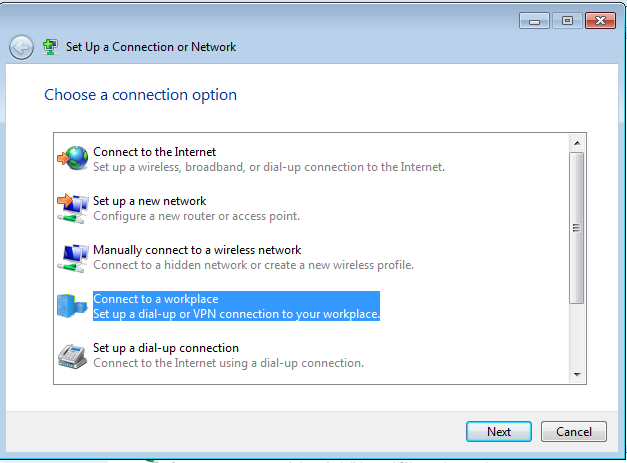
Step 3. Select Connect to a workplace and Next.
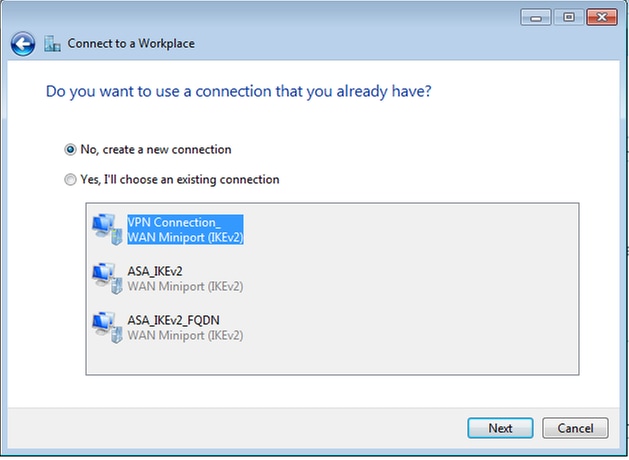
Step 4. Select No, create a new connection and Next.

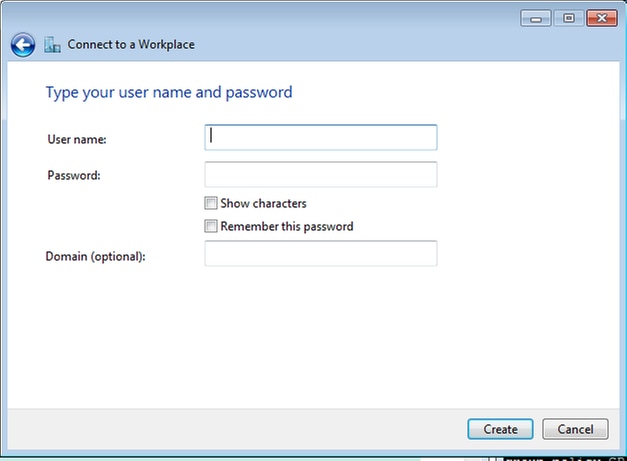
Step 5. Select Use my Internet connection (VPN) and add the HeadEnd certificate Common Name (CN) string on the Internet address field. In the Destination Name field type the name of the connection. It can be any string. Ensure to check the Don't connect now; just set it up so I can connect later box.

Step 6. Select Next.
Step 7. Select Create.
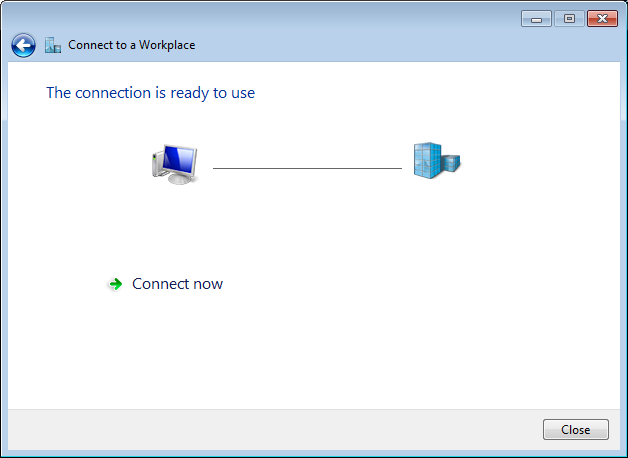
Step 8. Select Close and navigate to Control Panel > Network and Internet > Network Connections. Select the Network connection created and right-click on it. Select Properties.
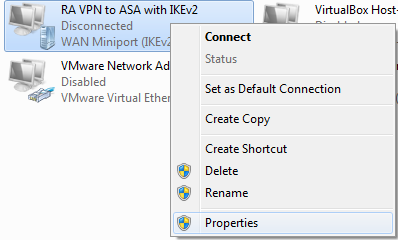
Step 9. In General tab you can verify that the appropriate hostname for the headend is correct. Your computer will resolve this name to the ASA IP address used to connect RA VPN users.

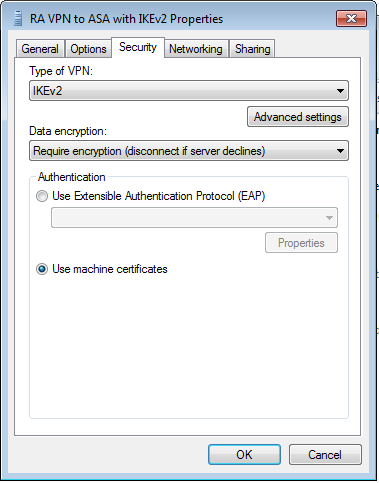
Step 10. Navigate to the Security tab and select IKEv2 as the Type of VPN. In the Authentication section select Use machine certificates.
Step 11. Select OK and navigate to C:\Windows\System32\drivers\etc. Open the hosts file using a text editor. Configure an entry to resolve the (Fully Qualified Domain Name) FQDN configured in the Network Connection to the IP address of your ASA headend (in this example, the outside interface).

Step 12. Go back to Control Panel > Network and Internet > Network Connections. Select the Network connection you created. Right-click on it and select Connect.
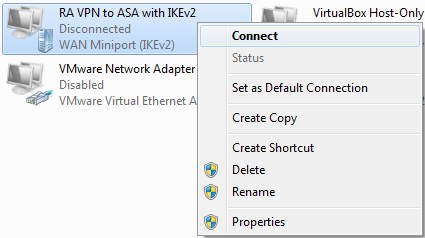
Step 13. The Network connection status transitions from Disconnected to Connecting and then to Connected. Finally, the name you specified for the Network connection is shown.

The computer is connected to the VPN headend at this point.
Configure Android native VPN client
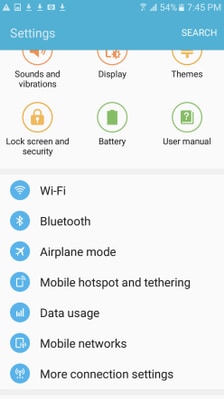
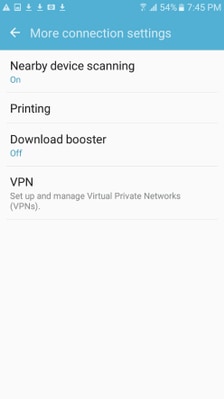
Step 1. Navigate to Settings>More connection Settings
Step 2. Select VPN
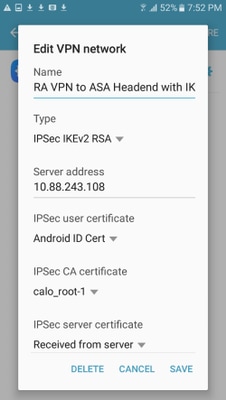
Step 3. Select Add VPN. If the connection is already created like in this example, tap on the engine icon to edit it. Specify IPSec IKEv2 RSA in the Type field. The Server address is the IKEv2 enabled ASA interface IP address. For the IPSec user certificate and IPSec CA certificate select the certificates installed by tapping on the dropdown menus. Leave the IPSec server certificate with the default option, Received from server.

Step 4. Select Save and then tap on the name of the new VPN connection.

Step 5. Select Connect.
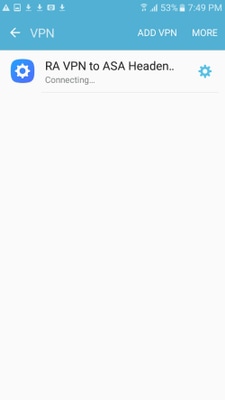

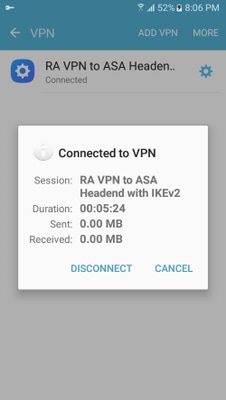
Step 6. Type the VPN connection one more time to verify the status. It is now displayed as Connected.
Verify
Verification commands on ASA Headend:
ASA#show vpn-sessiondb detail ra-ikev2-ipsec
Session Type: Generic Remote-Access IKEv2 IPsec Detailed
Username     : Win7_PC.david.com      Index        : 24
Assigned IP  : 192.168.50.1           Public IP    : 10.152.206.175
Protocol     : IKEv2 IPsec
License      : AnyConnect Premium
Encryption   : IKEv2: (1)AES256  IPsec: (1)AES256
Hashing      : IKEv2: (1)SHA1  IPsec: (1)SHA1
Bytes Tx     : 0                      Bytes Rx     : 16770
Pkts Tx      : 0                      Pkts Rx      : 241
Pkts Tx Drop : 0                      Pkts Rx Drop : 0
Group Policy : GP_David               Tunnel Group : David
Login Time   : 08:00:01 UTC Tue Jul 18 2017
Duration     : 0h:00m:21s
Inactivity   : 0h:00m:00s
VLAN Mapping : N/A                    VLAN         : none
Audt Sess ID : 0a0a0a0100018000596dc001
Security Grp : none
IKEv2 Tunnels: 1
IPsec Tunnels: 1
IKEv2:
  Tunnel ID    : 24.1
  UDP Src Port : 4500                   UDP Dst Port : 4500
  Rem Auth Mode: rsaCertificate
  Loc Auth Mode: rsaCertificate
  Encryption   : AES256                 Hashing      : SHA1
  Rekey Int (T): 86400 Seconds          Rekey Left(T): 86379 Seconds
  PRF          : SHA1                   D/H Group    : 2
  Filter Name  :
IPsec:
  Tunnel ID    : 24.2
  Local Addr   : 0.0.0.0/0.0.0.0/0/0
  Remote Addr  : 192.168.50.1/255.255.255.255/0/0
  Encryption   : AES256                 Hashing      : SHA1
  Encapsulation: Tunnel
  Rekey Int (T): 28800 Seconds          Rekey Left(T): 28778 Seconds
  Idle Time Out: 30 Minutes             Idle TO Left : 30 Minutes
  Conn Time Out: 518729 Minutes         Conn TO Left : 518728 Minutes
  Bytes Tx     : 0                      Bytes Rx     : 16947
  Pkts Tx      : 0                      Pkts Rx      : 244

ASA# show crypto ikev2 sa
IKEv2 SAs:
Session-id:24, Status:UP-ACTIVE, IKE count:1, CHILD count:1
Tunnel-id                 Local                Remote     Status         Role
2119549341    10.88.243.108/4500   10.152.206.175/4500      READY    RESPONDER      Encr: AES-CBC, keysize: 256, Hash: SHA96, DH Grp:2, Auth sign: RSA, Auth verify: RSA
      Life/Active Time: 86400/28 sec
Child sa: local selector  0.0.0.0/0 - 255.255.255.255/65535
          remote selector 192.168.50.1/0 - 192.168.50.1/65535
          ESP spi in/out: 0xbfff64d7/0x76131476

ASA# show crypto ipsec sa
interface: outside
    Crypto map tag: Anyconnect, seq num: 65535, local addr: 10.88.243.108
      local ident (addr/mask/prot/port): (0.0.0.0/0.0.0.0/0/0)
      remote ident (addr/mask/prot/port): (192.168.50.1/255.255.255.255/0/0)
      current_peer: 10.152.206.175, username: Win7_PC.david.com
      dynamic allocated peer ip: 192.168.50.1
      dynamic allocated peer ip(ipv6): 0.0.0.0

      #pkts encaps: 0, #pkts encrypt: 0, #pkts digest: 0
      #pkts decaps: 339, #pkts decrypt: 339, #pkts verify: 339
      #pkts compressed: 0, #pkts decompressed: 0
      #pkts not compressed: 0, #pkts comp failed: 0, #pkts decomp failed: 0
      #pre-frag successes: 0, #pre-frag failures: 0, #fragments created: 0
      #PMTUs sent: 0, #PMTUs rcvd: 0, #decapsulated frgs needing reassembly: 0
      #TFC rcvd: 0, #TFC sent: 0
      #Valid ICMP Errors rcvd: 0, #Invalid ICMP Errors rcvd: 0
      #send errors: 0, #recv errors: 0

      local crypto endpt.: 10.88.243.108/4500, remote crypto endpt.: 10.152.206.175/4500
      path mtu 1496, ipsec overhead 58(44), media mtu 1500
      PMTU time remaining (sec): 0, DF policy: copy-df
      ICMP error validation: disabled, TFC packets: disabled
      current outbound spi: 76131476
      current inbound spi : BFFF64D7
    inbound esp sas:
      spi: 0xBFFF64D7 (3221185751)
         transform: esp-aes-256 esp-sha-hmac no compression
         in use settings ={RA, Tunnel, IKEv2, }
         slot: 0, conn_id: 98304, crypto-map: Anyconnect
         sa timing: remaining key lifetime (sec): 28767
         IV size: 16 bytes
         replay detection support: Y
         Anti replay bitmap:
          0xFFFFFFFF 0xFFFFFFFF
    outbound esp sas:
      spi: 0x76131476 (1980961910)
         transform: esp-aes-256 esp-sha-hmac no compression
         in use settings ={RA, Tunnel, IKEv2, }
         slot: 0, conn_id: 98304, crypto-map: Anyconnect
         sa timing: remaining key lifetime (sec): 28767
         IV size: 16 bytes
         replay detection support: Y
         Anti replay bitmap:
          0x00000000 0x00000001

ASA#show vpn-sessiondb license-summary
---------------------------------------------------------------------------
VPN Licenses and Configured Limits Summary
---------------------------------------------------------------------------
                                     Status : Capacity : Installed :  Limit
                                  -----------------------------------------
AnyConnect Premium               :  ENABLED :       50 :        50 :   NONE
AnyConnect Essentials            : DISABLED :       50 :         0 :   NONE
Other VPN (Available by Default) :  ENABLED :       10 :        10 :   NONE
Shared License Server            : DISABLED
Shared License Participant       : DISABLED
AnyConnect for Mobile            :  ENABLED(Requires Premium or Essentials)
Advanced Endpoint Assessment     :  ENABLED(Requires Premium)
AnyConnect for Cisco VPN Phone   :  ENABLED
VPN-3DES-AES                     :  ENABLED
VPN-DES                          :  ENABLED
---------------------------------------------------------------------------

---------------------------------------------------------------------------
VPN Licenses Usage Summary
---------------------------------------------------------------------------
                          Local : Shared :   All  :   Peak :  Eff.  :
                         In Use : In Use : In Use : In Use :  Limit : Usage
                       ----------------------------------------------------
AnyConnect Premium     :      1 :      0 :      1 :      1 :     50 :    2%
  AnyConnect Client    :                 :      0 :      1          :    0%
    AnyConnect Mobile  :                 :      0 :      0          :    0%
  Clientless VPN       :                 :      0 :      0          :    0%
  Generic IKEv2 Client :                 :      1 :      1          :    2%
Other VPN              :                 :      0 :      0 :     10 :    0%
  Cisco VPN Client     :                 :      0 :      0          :    0%
  L2TP Clients
  Site-to-Site VPN     :                 :      0 :      0          :    0%
---------------------------------------------------------------------------

ASA# show vpn-sessiondb
---------------------------------------------------------------------------
VPN Session Summary
---------------------------------------------------------------------------
                               Active : Cumulative : Peak Concur : Inactive
                             ----------------------------------------------
AnyConnect Client            :      0 :         11 :           1 :        0
  SSL/TLS/DTLS               :      0 :          1 :           1 :        0
  IKEv2 IPsec                :      0 :         10 :           1 :        0
Generic IKEv2 Remote Access  :      1 :         14 :           1
---------------------------------------------------------------------------
Total Active and Inactive    :      1             Total Cumulative :     25
Device Total VPN Capacity    :     50
Device Load                  :     2%
---------------------------------------------------------------------------

---------------------------------------------------------------------------
Tunnels Summary
---------------------------------------------------------------------------
                               Active : Cumulative : Peak Concurrent
                             ----------------------------------------------
IKEv2                        :      1 :         25 :               1
IPsec                        :      1 :         14 :               1
IPsecOverNatT                :      0 :         11 :               1
AnyConnect-Parent            :      0 :         11 :               1
SSL-Tunnel                   :      0 :          1 :               1
DTLS-Tunnel                  :      0 :          1 :               1
---------------------------------------------------------------------------
Totals                       :      2 :         63
Troubleshoot
This section provides the information you can use in order to troubleshoot your configuration.
Note: Refer toImportant Information on Debug Commandsbefore you usedebugcommands.
Caution: On ASA, you can set various debug levels; by default, level 1 is used. If you change the debug level, the verbosity of the debugs increase. Do this with caution, especially in production environments.
- Debug crypto ikev2 protocol 15
- Debug crypto ikev2 platform 15
- Debug crypto ca 255
Contributed by Cisco Engineers
- David RiveraCisco TAC Engineer
- Cesar Lopez ZamarripaCisco TAC Engineer
 Feedback
Contact Cisco
- Open a Support Case

- (Requires a Cisco Service Contract)