Configure ASA: SSL Digital Certificate Installation and Renewal
Available Languages
Download Options
Bias-Free Language
The documentation set for this product strives to use bias-free language. For the purposes of this documentation set, bias-free is defined as language that does not imply discrimination based on age, disability, gender, racial identity, ethnic identity, sexual orientation, socioeconomic status, and intersectionality. Exceptions may be present in the documentation due to language that is hardcoded in the user interfaces of the product software, language used based on RFP documentation, or language that is used by a referenced third-party product. Learn more about how Cisco is using Inclusive Language.
Contents
Introduction
This document describes installation of third-party trusted SSL digital certificate on the ASA for Clientless SSLVPN and AnyConnect connections.
Prerequisites
Requirements
This document requires access to a trusted third-party Certificate Authority (CA) for certificate enrollment. Examples of third-party CA vendors include, but are not limited to, Baltimore, Cisco, Entrust, Geotrust, G, Microsoft, RSA, Thawte, and VeriSign.
Before you start, verify that the ASA has the correct clock time, date, and time zone. With certificate authentication, it is recommended to use a Network Time Protocol (NTP) server to synchronize the time on the ASA. The Cisco ASA Series General Operations CLI Configuration Guide, 9.1 details the steps to take in order to set up the time and date correctly on the ASA.
Components Used
This document uses an ASA 5500-X that runs software version 9.4.1 and ASDM version 7.4(1).
The information in this document was created from the devices in a specific lab environment. All of the devices used in this document started with a cleared (default) configuration. If your network is live, ensure that you understand the potential impact of any command.
Background Information
A GoDaddy Certificate is used in this example. Each step contains the Adaptive Security Device Manager (ASDM) procedure and the CLI equivalent.
Configure
The SSL protocol mandates that the SSL Server provide the client with a server certificate for the client to perform server authentication. Cisco does not recommend use of a self-signed certificate because of the possibility that a user could inadvertently configure a browser to trust a certificate from a rogue server. There is also the inconvenience to users to have to respond to a security warning when it connects to the secure gateway. It is recommended to use trusted third-party CAs to issue SSL certificates to the ASA for this purpose.
The lifecycle of a third-party certificate on the ASA essentially takes place with these steps:
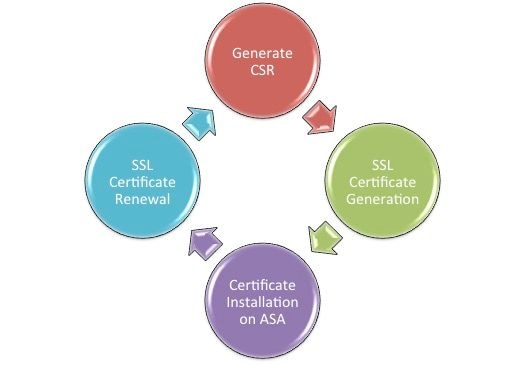
CSR Generation
CSR generation is the first step in the lifecycle of any X.509 digital certificate.
Once the private/public Rivest-Shamir-Adleman (RSA) or Elliptic Curve Digital Signature Algorithm (ECDSA) keypair is generated (Appendix A details the difference between the use of RSA or ECDSA), a Certficate Signing Request (CSR) is created.
A CSR is a PKCS10 formatted message that contains the public key and identity information of the host which sends the request. PKI Data Formats explains the different certificate formats applicable to the ASA and Cisco IOS®.
Notes:
1. Check with the CA on the required keypair size. The CA/Browser Forum has mandated that all certificates generated by their member CAs have a minimum size of 2048 bits.
2. ASA currently does not support 4096 bit keys (Cisco bug ID CSCut53512) for SSL server authentication. However, IKEv2 does support the use of 4096 bit server certificates on the ASA 5580, 5585, and 5500-X platforms alone.
3. Use the DNS Name of the ASA in the FQDN field of the CSR in order to prevent Untrusted Certificate warnings and pass Strict Certificate check.
There are three methods to generate CSR.
- Configure with ASDM.
- Configure with the ASA CLI.
- Use OpenSSL to Generate the CSR.
1. Configure with the ASDM
- Navigate to
Configuration > Remote Access VPN > Certificate Management, and chooseIdentity Certificates. - Click
Add.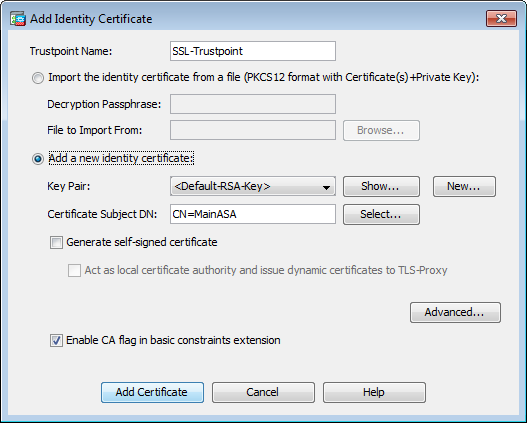
- Define a trustpoint name in the Trustpoint Name input field.
- Click the
Add a new identity certificateradio button. - For the Key Pair, click
New.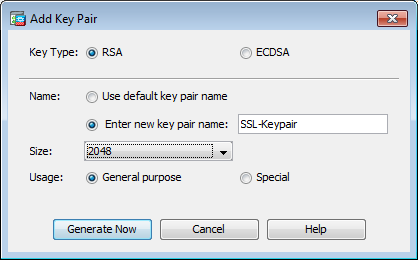
- Choose the Key Type - RSA or ECDSA. (Refer to Appendix A to understand the differences.)
- Click the
Enter new key pair nameradio button. Identify the key pair name for recognition purposes. - Choose the
Key Size. ChooseGeneral Purpose for Usagewith RSA. - Click
Generate Now. The key pair are created. - To define the Certificate Subject DN, click
Select,and configure the attributes listed in this table: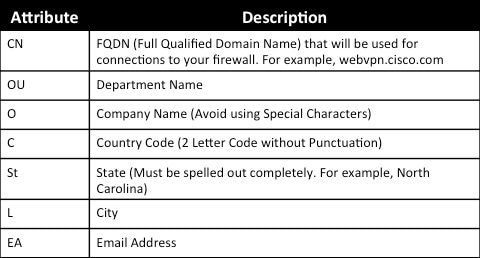
To configure these values, choose a value from the Attribute drop-down list, enter the value, and click Add.
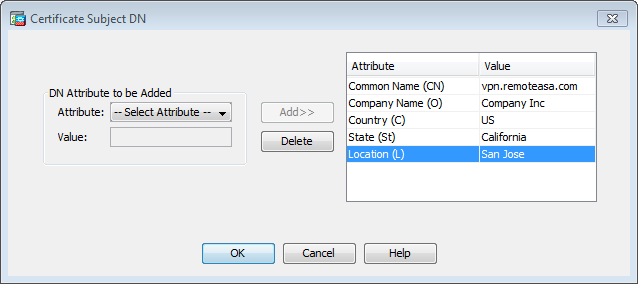
Note: Some third-party vendors require particular attributes to be included before an identity certificate is issued. If unsure of the required attributes, check with the vendor for details.
- After the appropriate values are added, click
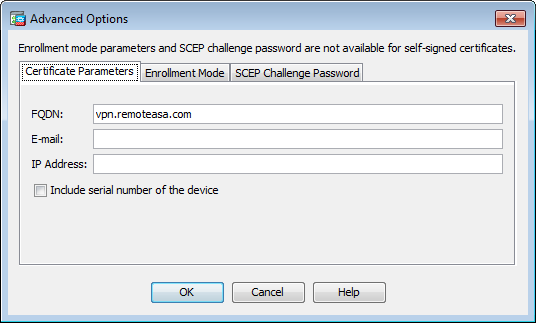
OK.The Add Identity Certificate dialog box appears with the Certificate Subject DN field populated. - Click Advanced.
- In the
FQDNfield, enter the FQDN that is used to access the device from the Internet. ClickOK. - Leave the Enable CA flag in basic constraints extension option checked. Certificates without the CA flag now cannot be installed on the ASA as CA certificates by default. The basic constraints extension identifies whether the subject of the certificate is a CA and the maximum depth of valid certification paths that include this certificate. Un-check the option to bypass this requirement.
- Click
OK,and then clickAdd Certificate.A prompt displays in order to save the CSR to a file on the local machine.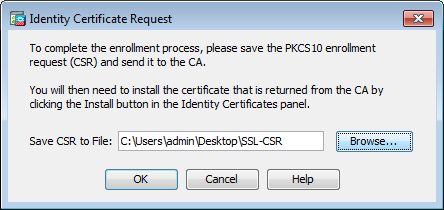
- Click
Browse,choose a location in which to save the CSR, and save the file with the .txt extension.Note: When the file is saved with a .txt extension, the PKCS#10 request can be opened and viewed with a text editor (such as Notepad).
2. Configure with the ASA CLI
In the ASDM, the trustpoint is automatically created when a CSR is generated or when the CA certificate is installed. In the CLI, the trustpoint must be created manually.
! Generates 2048 bit RSA key pair with label SSL-Keypair.

MainASA(config)# crypto key generate rsa label SSL-Keypair modulus 2048

INFO: The name for the keys are: SSL-Keypair
Keypair generation process begin. Please wait...

 ! Define trustpoint with attributes to be used on the SSL certificate

MainASA(config)# crypto ca trustpoint SSL-Trustpoint
MainASA(config-ca-trustpoint)# enrollment terminal
MainASA(config-ca-trustpoint)# fqdn (remoteasavpn.url)
MainASA(config-ca-trustpoint)# subject-name CN=(asa.remotevpn.url),O=Company Inc,C=US,
St=California,L=San Jose
MainASA(config-ca-trustpoint)# keypair SSL-Keypair
MainASA(config-ca-trustpoint)# exit

 ! Initiates certificate signing request. This is the request to be submitted via Web or
 Email to the third party vendor.

MainASA(config)# crypto ca enroll SSL-Trustpoint

WARNING: The certificate enrollment is configured with an fqdn
that differs from the system fqdn. If this certificate is
used for VPN authentication this may cause connection problems.

Would you like to continue with this enrollment? [yes/no]: yes
% Start certificate enrollment ..
% The subject name in the certificate is: subject-name CN=(remoteasavpn.url),
O=Company Inc,C=US,St=California,L=San Jose

% The fully-qualified domain name in the certificate will be: (remoteasavpn.url),

% Include the device serial number in the subject name? [yes/no]: no

Display Certificate Request to terminal? [yes/no]: yes
Certificate Request:
-----BEGIN CERTIFICATE REQUEST-----
MIIDDjCCAfYCAQAwgYkxETAPBgNVBAcTCFNhbiBKb3NlMRMwEQYDVQQIEwpDYWxp
Zm9ybmlhMQswCQYDVQQGEwJVUzEUMBIGA1UEChMLQ29tcGFueSBJbmMxGjAYBgNV
BAMTEXZwbi5yZW1vdGVhc2EuY29tMSAwHgYJKoZIhvcNAQkCFhF2cG4ucmVtb3Rl
YXNhLmNvbTCCASIwDQYJKoZIhvcNAQEBBQADggEPADCCAQoCggEBAK62Nhb9ktlK
uR3Q4TmksyuRMqJNrb9kXpvA6H200PuBfQvSF4rVnSwKOmu3c8nweEvYcdVWV6Bz
BhjXeovTVi17FlNTceaUTGikeIdXC+mw1iE7eRsynS/d4mzMWJmrvrsDNzpAW/EM
SzTca+BvqF7X2r3LU8Vsv6Oi8ylhco9Fz7bWvRWVtO3NDDbyolC9b/VgXMuBitcc
rzfUbVnm7VZDOf4jr9EXgUwXxcQidWEABlFrXrtYpFgBo9aqJmRp2YABQ1ieP4cY
3rBtgRjLcF+S9TvHG5m4v7v755meV4YqsZIXvytIOzVBihemVxaGA1oDwfkoYSFi
4CzXbFvdG6kCAwEAAaA/MD0GCSqGSIb3DQEJDjEwMC4wDgYDVR0PAQH/BAQDAgWg
MBwGA1UdEQQVMBOCEXZwbi5yZW1vdGVhc2EuY29tMA0GCSqGSIb3DQEBBQUAA4IB
AQBZuQzUXGEB0ix1yuPK0ZkRz8bPnwIqLTfxZhagmuyEhrN7N4+aQnCHj85oJane
4ztZDiCCoWTerBS4RSkKEHEspu9oohjCYuNnp5qa91SPrZNEjTWw0eRn+qKbId2J
jE6Qy4vdPCexavMLYVQxCny+gVkzPN/sFRk3EcTTVq6DxxaebpJijmiqa7gCph52
YkHXnFne1LQd41BgoLlCr9+hx74XsTHGBmI1s/9T5oAX26Ym+B2l/i/DP5BktIUA
8GvIY1/ypj9KO49fP5ap8al0qvLtYYcCcfwrCt+OojOrZ1YyJb3dFuMNRedAX37t
DuHNl2EYNpYkjVk1wI53/5w3
-----END CERTIFICATE REQUEST-----

Redisplay enrollment request? [yes/no]: no

 ! Displays the PKCS#10 enrollment request to the terminal. Copy this from the terminal
 to a text file to submit to the third party CA.
3. Use OpenSSL to Generate the CSR
OpenSSL makes use of theOpenSSL configfile to pull the attributes to be used in the CSR generation. This process results in the generation of a CSR and a Private Key.
Caution: Verify that the Private key that is generated is not shared with anyone else as it compromises the integrity of the certificate.
- Ensure that OpenSSL is installed on the system that this process is run on. For Mac OSX and GNU/Linux users, this is installed by default.
- Switch to a functional directory.
On Windows: By default, the utilities are installed in
C:\Openssl\bin.Open a command prompt in this location.On Mac OSX/Linux: Open the Terminal window in the directory needed to create the CSR.
- Create an OpenSSL config file with a text editor with the attributes given . Once done, save the file as openssl.cnf in the location mentioned in the previous step (If you use version 0.9.8h and later, the file isopenssl.cfg).
[req] default_bits = 2048 default_keyfile = privatekey.key distinguished_name = req_distinguished_name req_extensions = req_ext [req_distinguished_name] commonName = Common Name (eg, YOUR name) commonName_default = (asa.remotevpn.url) countryName = Country Name (2 letter code) countryName_default = US stateOrProvinceName = State or Province Name (full name) stateOrProvinceName_default = California localityName = Locality Name (eg, city) localityName_default = San Jose 0.organizationName = Organization Name (eg, company) 0.organizationName_default = Company Inc [req_ext] subjectAltName = @alt_names
[alt_names] DNS.1 = *.remoteasa.com - Generate the CSR and Private Key with this command:
openssl req -new -nodes -out CSR.csr -config openssl.cnf# Sample CSR Generation: openssl req -new -nodes -out CSR.csr -config openssl.cnf
Generate a 2048 bit RSA private key ...................................................................................+++ ........................................+++ writing new private key to 'privatekey.key' ----- You are about to be asked to enter information that will be incorporated into your certificate request. What you are about to enter is what is called a Distinguished Name or a DN. There are quite a few fields but you can leave some blank For some fields there will be a default value, If you enter '.', the field will be left blank. ----- Common Name (eg, YOUR name) [(asa.remotevpn.url)]: Country Name (2 letter code) [US]: State or Province Name (full name) [California]: Locality Name (eg, city) [San Jose]: Organization Name (eg, company) [Company Inc]:Submit the saved CSR to the third-party CA vendor. Once the certificate is issued, the CA provides the identity certificate and the CA certificate to be installed on the ASA.
SSL Certificate Generation on the CA
The next step is to get the CSR signed from the CA. The CA provides either a newly generated PEM encoded Identity Certificate or with a PKCS12 certificate along with the CA certificate bundle.
If the CSR is generated outside the ASA (either via OpenSSL or on the CA itself), the PEM encoded Identity Certificate with the Private Key and CA certificate are available as separate files. Appendix B provides the steps to bundle these elements together into a single PKCS12 file (.p12 or .pfx format).
In this document, the GoDaddy CA is used as an example to issue identity certificates to the ASA. This process differs in other CA vendors. Read through the CA documentation carefully before proceeding.
Example of SSL Certificate Generation on GoDaddy CA
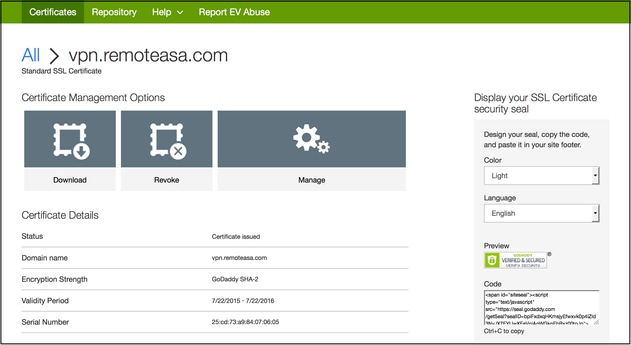
After purchase, and the initial setup phase of the SSL certificate, navigate to the GoDaddy Account and view the SSL Certificates. There must be a new certificate. ClickManage to proceed.

This then brings up a page to provide the CSR as seen in this image.
Based on the CSR entered, the CA determines the Domain Name to which the certificate is to be issued.
Verify that this matches the FQDN of the ASA.
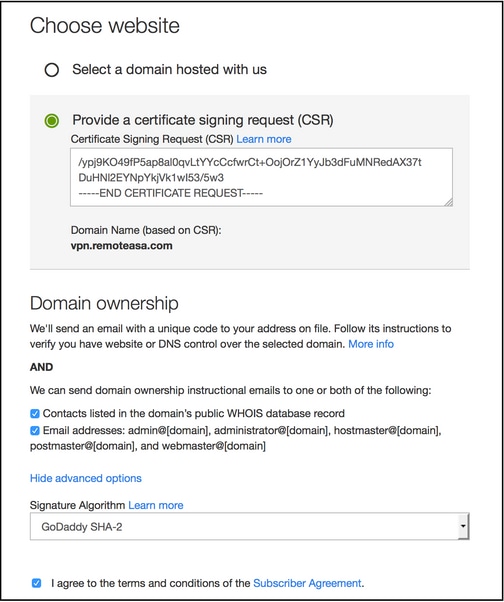
Note: GoDaddy and most other CAs use SHA-2 or SHA256 as the default Certificate Signature Algorithm. ASA supports the SHA-2 signature algorithm which starts from 8.2(5) [pre-8.3 releases] and 8.4(1) [post-8.3 releases] onwards (Cisco bug ID CSCti30937 ). Choose SHA-1 signature algorithm if a version older than 8.2(5) or 8.4(1) is used.
Once the request is submitted, GoDaddy verifies the request before it issues the certificate. After the certificate request is validated, GoDaddy issues the certificate to the account. The certificate can be then downloaded for installation on the ASA. ClickDownload on the page in order to proceed further.
ChooseOther as the Server Type and download the certificate zip bundle.
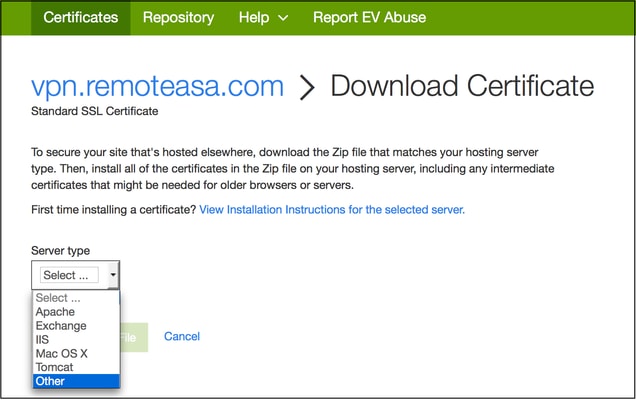
The .zip file contains the identity certificate and GoDaddy CA certificate chain bundles as two separate .crt files. Proceed to SSL certificate installation to install these certificates on the ASA.
SSL Certificate Installation on the ASA
The SSL certificate can be installed on the ASA with either ASDM or CLI in two ways:
- Import the CA and identity certificate separately in PEM formats.
- Or import the PKCS12 file (base64 encoded for CLI) wherein Identity certificate, CA certificate, and private key are bundled in the PKCS12 file.
Note: If the CA provides a CA certificate chain, only install the immediate intermediate CA certificate in the hierarchy on the trustpoint used to generate the CSR. The Root CA certificate and any other intermediate CA certificates can be installed in new trustpoints.
1.1 Installation of the Identity Certificate in PEM Format with ASDM
The installation steps given assume that the CA provides a PEM encoded (.pem, .cer, .crt) identity certificate and CA certificate bundle.
- Navigate to
Configuration > Remote Access VPN > Certificate Management,and choose CA Certificates. - The PEM encoded certificate in a text editor and copy and paste the base64 CA certificate provided by the third-party vendor into the text field.
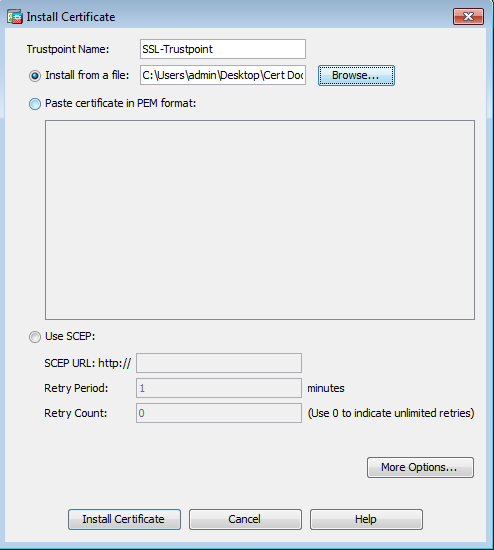
- Click Install certificate.
- Navigate to
Configuration > Remote Access VPN > Certificate Management, and choose Identity Certificates. - Select the Identity Certificate created previously. Click
Install. - Either click the option
Install from a fileradio button and choose the PEM encoded Identity certificate or, open the PEM encoded certificate in a text editor and copy and paste the base64 Identity certificate provided by the third-party vendor into the text field.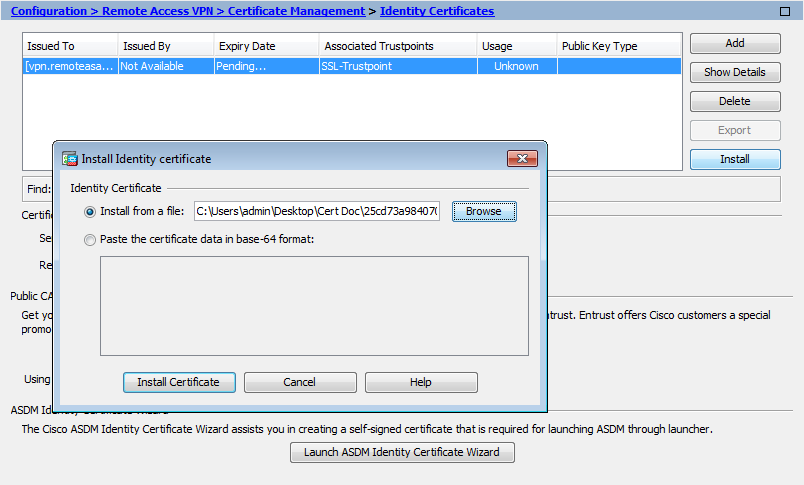
- Click
Add Certificate.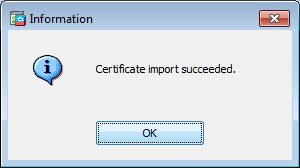
- Navigate to
Configuration > Remote Access VPN > Advanced > SSL Settings. - Under Certificates, select the interface that is used to terminate WebVPN sessions. In this example, the outside interface is used.
- Click
Edit. - In the Certificate drop-down list, choose the newly installed certificate.
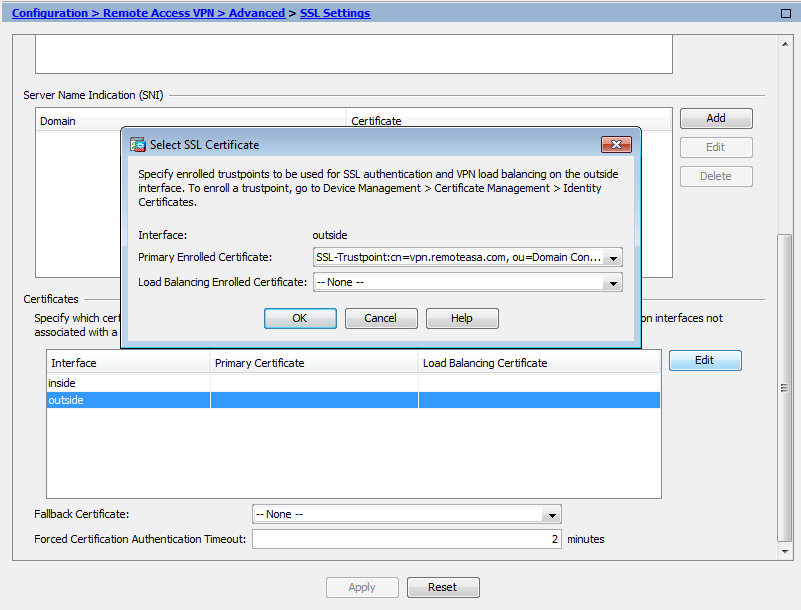
- Click
OK. - Click
Apply.The new certificate is now utilized for all WebVPN sessions that terminate on the interface specified.
1.2. Installation of a PEM Certificate with the CLI
MainASA(config)# crypto ca authenticate SSL-Trustpoint

 Enter the base 64 encoded CA certificate.
End with the word"quit"on a line by itself

-----BEGIN CERTIFICATE----- MIIEADCCAuigAwIBAgIBADANBgkqhkiG9w0BAQUFADBjMQswCQYDVQQGEwJVUzEh MB8GA1UEChMYVGhlIEdvIERhZGR5IEdyb3VwLCBJbmMuMTEwLwYDVQQLEyhHbyBE YWRkeSBDbGFzcyAyIENlcnRpZmljYXRpb24gQXV0aG9yaXR5MB4XDTA0MDYyOTE3 MDYyMFoXDTM0MDYyOTE3MDYyMFowYzELMAkGA1UEBhMCVVMxITAfBgNVBAoTGFRo ZSBHbyBEYWRkeSBHcm91cCwgSW5jLjExMC8GA1UECxMoR28gRGFkZHkgQ2xhc3Mg MiBDZXJ0aWZpY2F0aW9uIEF1dGhvcml0eTCCASAwDQYJKoZIhvcNAQEBBQADggEN ADCCAQgCggEBAN6d1+pXGEmhW+vXX0iG6r7d/+TvZxz0ZWizV3GgXne77ZtJ6XCA PVYYYwhv2vLM0D9/AlQiVBDYsoHUwHU9S3/Hd8M+eKsaA7Ugay9qK7HFiH7Eux6w wdhFJ2+qN1j3hybX2C32qRe3H3I2TqYXP2WYktsqbl2i/ojgC95/5Y0V4evLOtXi EqITLdiOr18SPaAIBQi2XKVlOARFmR6jYGB0xUGlcmIbYsUfb18aQr4CUWWoriMY avx4A6lNf4DD+qta/KFApMoZFv6yyO9ecw3ud72a9nmYvLEHZ6IVDd2gWMZEewo+ YihfukEHU1jPEX44dMX4/7VpkI+EdOqXG68CAQOjgcAwgb0wHQYDVR0OBBYEFNLE sNKR1EwRcbNhyz2h/t2oatTjMIGNBgNVHSMEgYUwgYKAFNLEsNKR1EwRcbNhyz2h /t2oatTjoWekZTBjMQswCQYDVQQGEwJVUzEhMB8GA1UEChMYVGhlIEdvIERhZGR5 IEdyb3VwLCBJbmMuMTEwLwYDVQQLEyhHbyBEYWRkeSBDbGFzcyAyIENlcnRpZmlj YXRpb24gQXV0aG9yaXR5ggEAMAwGA1UdEwQFMAMBAf8wDQYJKoZIhvcNAQEFBQAD ggEBADJL87LKPpH8EsahB4yOd6AzBhRckB4Y9wimPQoZ+YeAEW5p5JYXMP80kWNy OO7MHAGjHZQopDH2esRU1/blMVgDoszOYtuURXO1v0XJJLXVggKtI3lpjbi2Tc7P TMozI+gciKqdi0FuFskg5YmezTvacPd+mSYgFFQlq25zheabIZ0KbIIOqPjCDPoQ HmyW74cNxA9hi63ugyuV+I6ShHI56yDqg+2DzZduCLzrTia2cyvk0/ZM/iZx4mER dEr/VxqHD3VILs9RaRegAhJhldXRQLIQTO7ErBBDpqWeCtWVYpoNz4iCxTIM5Cuf ReYNnyicsbkqWletNw+vHX/bvZ8= -----END CERTIFICATE----- quit INFO: Certificate has these attributes: Fingerprint: 96c25031 bc0dc35c fba72373 1e1b4140 Do you accept this certificate? [yes/no]: yes Trustpoint 'SSL-Trustpoint' is a subordinate CA and holds a non self-signed certificate. Trustpoint CA certificate accepted. % Certificate successfully imported

!!! - Installing Next-level SubCA in the PKI hierarchy.
!!! - Create a separate trustpoint to install the next subCA certificate (if present)
in the hierarchy leading up to the Root CA (including the Root CA certificate)

MainASA(config)#crypto ca trustpoint SSL-Trustpoint-1
MainASA(config-ca-trustpoint)#enrollment terminal
MainASA(config-ca-trustpoint)#exit
MainASA(config)#
MainASA(config)# crypto ca authenticate SSL-Trustpoint-1
Enter the base 64 encoded CA certificate.
End with the word "quit" on a line by itself


-----BEGIN CERTIFICATE-----
MIIEfTCCA2WgAwIBAgIDG+cVMA0GCSqGSIb3DQEBCwUAMGMxCzAJBgNVBAYTAlVT
MSEwHwYDVQQKExhUaGUgR28gRGFkZHkgR3JvdXAsIEluYy4xMTAvBgNVBAsTKEdv
IERhZGR5IENsYXNzIDIgQ2VydGlmaWNhdGlvbiBBdXRob3JpdHkwHhcNMTQwMTAx
MDcwMDAwWhcNMzEwNTMwMDcwMDAwWjCBgzELMAkGA1UEBhMCVVMxEDAOBgNVBAgT
B0FyaXpvbmExEzARBgNVBAcTClNjb3R0c2RhbGUxGjAYBgNVBAoTEUdvRGFkZHku
Y29tLCBJbmMuMTEwLwYDVQQDEyhHbyBEYWRkeSBSb290IENlcnRpZmljYXRlIEF1
dGhvcml0eSAtIEcyMIIBIjANBgkqhkiG9w0BAQEFAAOCAQ8AMIIBCgKCAQEAv3Fi
CPH6WTT3G8kYo/eASVjpIoMTpsUgQwE7hPHmhUmfJ+r2hBtOoLTbcJjHMgGxBT4H
Tu70+k8vWTAi56sZVmvigAf88xZ1gDlRe+X5NbZ0TqmNghPktj+pA4P6or6KFWp/
3gvDthkUBcrqw6gElDtGfDIN8wBmIsiNaW02jBEYt9OyHGC0OPoCjM7T3UYH3go+
6118yHz7sCtTpJJiaVElBWEaRIGMLKlDliPfrDqBmg4pxRyp6V0etp6eMAo5zvGI
gPtLXcwy7IViQyU0AlYnAZG0O3AqP26x6JyIAX2f1PnbU21gnb8s51iruF9G/M7E
GwM8CetJMVxpRrPgRwIDAQABo4IBFzCCARMwDwYDVR0TAQH/BAUwAwEB/zAOBgNV
HQ8BAf8EBAMCAQYwHQYDVR0OBBYEFDqahQcQZyi27/a9BUFuIMGU2g/eMB8GA1Ud
IwQYMBaAFNLEsNKR1EwRcbNhyz2h/t2oatTjMDQGCCsGAQUFBwEBBCgwJjAkBggr
BgEFBQcwAYYYaHR0cDovL29jc3AuZ29kYWRkeS5jb20vMDIGA1UdHwQrMCkwJ6Al
oCOGIWh0dHA6Ly9jcmwuZ29kYWRkeS5jb20vZ2Ryb290LmNybDBGBgNVHSAEPzA9
MDsGBFUdIAAwMzAxBggrBgEFBQcCARYlaHR0cHM6Ly9jZXJ0cy5nb2RhZGR5LmNv
bS9yZXBvc2l0b3J5LzANBgkqhkiG9w0BAQsFAAOCAQEAWQtTvZKGEacke+1bMc8d
H2xwxbhuvk679r6XUOEwf7ooXGKUwuN+M/f7QnaF25UcjCJYdQkMiGVnOQoWCcWg
OJekxSOTP7QYpgEGRJHjp2kntFolfzq3Ms3dhP8qOCkzpN1nsoX+oYggHFCJyNwq
9kIDN0zmiN/VryTyscPfzLXs4Jlet0lUIDyUGAzHHFIYSaRt4bNYC8nY7NmuHDKO
KHAN4v6mF56ED71XcLNa6R+ghlO773z/aQvgSMO3kwvIClTErF0UZzdsyqUvMQg3
qm5vjLyb4lddJIGvl5echK1srDdMZvNhkREg5L4wn3qkKQmw4TRfZHcYQFHfjDCm
rw==
-----END CERTIFICATE-----
quit

INFO: Certificate has the following attributes:
Fingerprint:     81528b89 e165204a 75ad85e8 c388cd68
Do you accept this certificate? [yes/no]: yes

Trustpoint 'SSL-Trustpoint-1' is a subordinate CA and holds a non self-signed certificate.

Trustpoint CA certificate accepted.

% Certificate successfully imported
BGL-G-17-ASA5500-8(config)#

!!! - Similarly create additional trustpoints (of the name "SSL-Trustpoint-n",
where n is number thats incremented for every level in the PKI hierarchy) to
import the CA certificates leading up to the Root CA certificate.


!!! - Importing identity certificate (import it in the first trustpoint that was
created namely "SSL-Trustpoint") MainASA(config)# crypto ca import SSL-Trustpoint certificate
WARNING: The certificate enrollment is configured with an fqdn that differs from the system fqdn. If this certificate will be used for VPN authentication this may cause connection problems. Would you like to continue with this enrollment? [yes/no]: yes
% The fully-qualified domain name in the certificate will be: (asa.remotevpn.url)
Enter the base 64 encoded certificate. End with the word "quit" on a line by itself
----BEGIN CERTIFICATE-----
MIIFRjCCBC6gAwIBAgIIJc1zqYQHBgUwDQYJKoZIhvcNAQELBQAwgbQxCzAJBgNV
BAYTAlVTMRAwDgYDVQQIEwdBcml6b25hMRMwEQYDVQQHEwpTY290dHNkYWxlMRow
GAYDVQQKExFHb0RhZGR5LmNvbSwgSW5jLjEtMCsGA1UECxMkaHR0cDovL2NlcnRz
LmdvZGFkZHkuY29tL3JlcG9zaXRvcnkvMTMwMQYDVQQDEypHbyBEYWRkeSBTZWN1
cmUgQ2VydGlmaWNhdGUgQXV0aG9yaXR5IC0gRzIwHhcNMTUwNzIyMTIwNDM4WhcN
MTYwNzIyMTIwNDM4WjA/MSEwHwYDVQQLExhEb21haW4gQ29udHJvbCBWYWxpZGF0
ZWQxGjAYBgNVBAMTEXZwbi5yZW1vdGVhc2EuY29tMIIBIjANBgkqhkiG9w0BAQEF
AAOCAQ8AMIIBCgKCAQEArrY2Fv2S2Uq5HdDhOaSzK5Eyok2tv2Rem8DofbTQ+4F9
C9IXitWdLAo6a7dzyfB4S9hx1VZXoHMGGNd6i9NWLXsWU1Nx5pRMaKR4h1cL6bDW
ITt5GzKdL93ibMxYmau+uwM3OkBb8QxLNNxr4G+oXtfavctTxWy/o6LzKWFyj0XP
tta9FZW07c0MNvKiUL1v9WBcy4GK1xyvN9RtWebtVkM5/iOv0ReBTBfFxCJ1YQAG
UWteu1ikWAGj1qomZGnZgAFDWJ4/hxjesG2BGMtwX5L1O8cbmbi/u/vnmZ5Xhiqx
<snip>
CCsGAQUFBwIBFitodHRwOi8vY2VydGlmaWNhdGVzLmdvZGFkZHkuY29tL3JlcG9z
aXRvcnkvMHYGCCsGAQUFBwEBBGowaDAkBggrBgEFBQcwAYYYaHR0cDovL29jc3Au
Z29kYWRkeS5jb20vMEAGCCsGAQUFBzAChjRodHRwOi8vY2VydGlmaWNhdGVzLmdv
ZGFkZHkuY29tL3JlcG9zaXRvcnkvZ2RpZzIuY3J0MB8GA1UdIwQYMBaAFEDCvSeO
zDSDMKIz1/tss/C0LIDOMEYGA1UdEQQ/MD2CEXZwbi5yZW1vdGVhc2EuY29tghV3
d3cudnBuLnJlbW90ZWFzYS5jb22CEXZwbi5yZW1vdGVhc2EuY29tMB0GA1UdDgQW
BBT7en7YS3PH+s4z+wTRlpHr2tSzejANBgkqhkiG9w0BAQsFAAOCAQEAO9H8TLNx
2Y0rYdI6gS8n4imaSYg9Ni/9Nb6mote3J2LELG9HY9m/zUCR5yVktra9azdrNUAN
1hjBJ7kKQScLC4sZLONdqG1uTP5rbWR0yikF5wSzgyMWd03kOR+vM8q6T57vRst5
69vzBUuJc5bSu1IjyfPP19z1l+B2eBwUFbVfXLnd9bTfiG9mSmC+4V63TXFxt1Oq
xkGNys3GgYuCUy6yRP2cAUV1lc2tYtaxoCL8yo72YUDDgZ3a4PyO1EvC1FOaUtgv
6QNEOYwmbJkyumdPUwko6wGOC0WLumzv5gHnhil68HYSZ/4XIlp3B9Y8yfG5pwbn
7puhazH+xgQRdg==
-----END CERTIFICATE-----
quit
INFO: Certificate successfully imported
! Apply the newly installed SSL certificate to the interface accepting SSL connections

MainASA(config)# ssl trust-point SSL-Trustpoint outside
2.1 Installation of a PKCS12 Certificate with ASDM
In cases where the CSR is not generated on the ASA, such as in the case of a wildcard certificate or when a UC certificate is generated, an Identity certificate along with the private key are received as separate files or a single bundled PKCS12 file (.p12 or pfx format). In order to install this type of certificate, complete these steps.
- In the Identity certificate, bundle the CA certificate and private key into a single PKCS12 file. Appendix B provides the steps to do this with OpenSSL. If already bundled by the CA, proceed to the next step.
- Navigate to
Configuration > Remote Access VPN > Certificate Management,and chooseIdentity Certificates. - Click
Add. - Specify a Trustpoint name.
- Click the
Import the identity certificate from a fileradio button. - Enter the passphrase used to create the PKCS12 file. Browse and select the PKCS12 file. Enter the certificate passphrase.
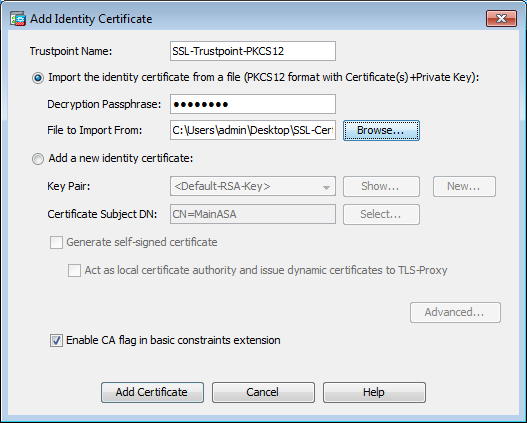
- Click Add Certificate.
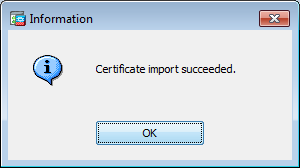
- Navigate to
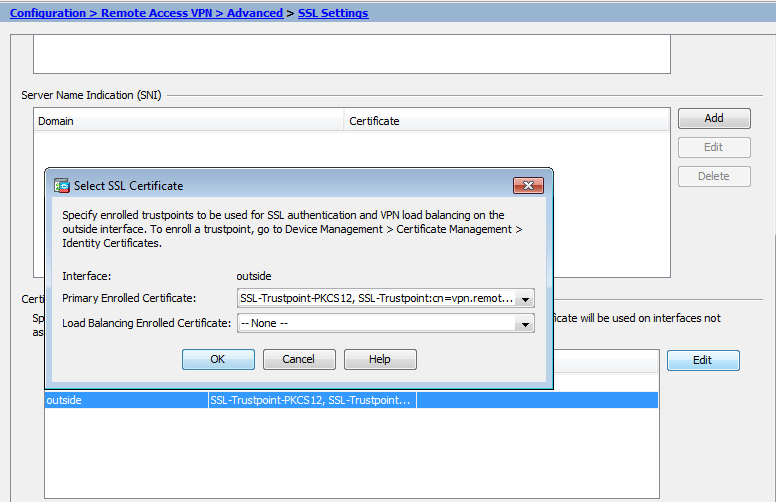
Configuration > Remote Access VPN > Advanced,and chooseSSL Settings. - Under Certificates, choose the interface that is used to terminate WebVPN sessions. In this example, the outside interface is used.
- Click
Edit. - In the Certificate drop-down list, choose the newly installed certificate.
- Click
OK. - Click
Apply.The new certificate are now utilized for all WebVPN sessions that terminate on the interface specified.
2.2 Installation of a PKCS12 Certificate with the CLI
  MainASA(config)# crypto ca trustpoint SSL-Trustpoint-PKCS12
MainASA(config-ca-trustpoint)# enrollment terminal
MainASA(config-ca-trustpoint)# exit

MainASA(config)# crypto ca import SSL-Trustpoint-PKCS12 pkcs12 cisco123

Enter the base 64 encoded pkcs12.
End with the word "quit" on a line by itself:
-----BEGIN PKCS12-----
MIISNwIBAzCCEfEGCSqGSIb3DQEHAaCCEeIEghHeMIIR2jCCEdYGCSqGSIb3DQEH
BqCCEccwghHDAgEAMIIRvAYJKoZIhvcNAQcBMBsGCiqGSIb3DQEMAQMwDQQIWO3D
hDti/uECAQGAghGQ9ospee/qtIbVZh2T8/Z+5dxRPBcStDTqyKy7q3+9ram5AZdG
Ce9n5UCckqT4WcTjs7XZtCrUrt/LkNbmGDVhwGBmYWiOS7npgaUq0eoqiJRK+Yc7
LN0nbho6I5WfL56/JiceAMlXDLr/IqqLg2QAApGdN+F5vANsHse2GsAATewBDLt7
Jy+SKfoNvvIw9QvzCiUzMjYZBANmBdMCQ13H+YQTHitT3vn2/iCDlzRSuXcqypEV
q5e3heiOO75lE8TDLWmO3PMvwIZqi8yzWesjcTt1Kd4FoJBZpB70/v9LntoIUOY7
kIQM8fHb4ga8BYfbgRmG6mkMmO1STtbSvlvTa19WTmdQdTyCa+G5PkrryRsy3Ww1
lkGFMhImmrnNADF7HmzbyslVohQZ7h09iVQY9krJogoXHjmQYxG9brf0oEwxSJDa
mGDhhESh+s/WuFSV9Z9kiTXpJNZxpTASoWBQrrwmO5v8ZwbjbVNJ7sVdbwpUl6d+
NNFGR7LTqO8hpupeeJnY9eJc2yYqeAXWXQ5kLOZo6/gBEdGtEaZBgCFK9JZ3bl3A
xqxGifanWPnLYG611NKuNjTgbjhnEEYI2uZzU0qxnlKa8zyXw+lzrKuJscDbkAPZ
wKtw8K+p4OzXVHhuANo6MDvffNRY1KQDtyK1inoPH5ksVSE5awkVam4+HTcqEUfa
16LMana+4QRgSetJhU0LtSMaQfRJGkha4JLq2t+JrCAPz2osARlTsBOjQBNq6YNj
0uB+gGk2Gl8Q5Nln6K1fz0XBFZLWEDBLsaBRO5MAnE7wWtO0+4awGYqVdmIF1lkf
XIRKAiQEr1pZ6BVPuvsCNJxaaUHzufhYI2ZAckasKBZOT8/7YK3fnAaGoBCz4cHa
o2EEQhq2aYb6YTv0+wtLEWGHzsbGZEM/u54XmsXAI7g28LGJYdfWi509KyV+Ac1V
KzHqXZMM2BbUQCNcTF5JIMiW+r62k42FdahfaQb0vJsIe/IwkAKG7y6DIQFs0hwg
ZlPXiDbNr1k4e8L4gqupMKWg853PY+oY22rLDC7bul1CKtixIYBCvbn7dAYsI4GQ
l6xXhNu3+iye0HgbUQQCfTU/mBrA0ZO+bpKjWOCfqNBuYnZ6kUEdCI7GFLH9QqtM
K7YinFLoHwTWbi3MsmqVv+Z4ttVWy7XmikoO2nMynJMP6/CNV8OMxMKdC2qm+c1j
s4QlKcAmFsQmNp/7SIP1wnvOc6JbUmC1O520U/r8ftTzn8C7WL62W79cLK4HOr7J
sNsZnOz0JOZ/xdZT+cLTCtVevKJOQMK3vMsiOuy52FkuF3HnfrmBqDkbR7yZxELG
RCEL0EDdbp8VP0+IhNlyz1q7975SscdxFSL0TvjnHGFWd14ndoqN+bLhWbdPjQWV
l3W2NCI95tmHDLGgp3P0OlS+RjdCEGGMg+9cpgBfFC1JocuTDIEcUbJBY8QRUNiS
/ubyUagdzUKt1ecfb9hMLP65ZNQ93VIw/NJKbIm7b4P/1Zp/lFP5eq7LkQPAxE4/
bQ4mHcnwrs+JGFkN19B8hJmmGoowH3p4IEvwZy7CThB3E1ejw5R4enqmrgvHqpQe
B7odN1OFLAHdo1G5BsHExluNEsEb4OQ0pmKXidDB5B001bJsr748fZ6L/LGx8Al3
<snip>
ijDqxyfQXY4zSytljSMwMtYA9hG5I79Sg7pnME1E9xq1DOoRGg8vgxlwiciKtLxp
LL0ReDY31KRYv00vW0gf+tE7lST/3TKZvh0sQ/BE0V3kHnwldejMFH+dvyAA9Y1E
c8O+tdafBFX4B/HP46E6heP6ZSt0xAfRW1/JF4ljNvUNVO9VtVfR2FTyWpzZFY8A
GG5XPIA80WF6wKEPFHIcN8scY+Vot8kXxG96hwt2Cm5NQ2OnVzxUZQbpKsjs/2jC
3HVFe3UJFBsY9UxTLcPXYBSIG+VeqkI8hWZp6clTfNDLY2ELDylQzp1mBg2FujZa
YuE0avjCJzBzZUG2umtS5mHQnwPF+XkOujEyhGMauhGxHp4nghSzrUZrBeuL9lUF
2mbpsOcgZkzxMS/rjdNXjCmPFloRBvKkZSlxHFrE/5ZopAhn4i7YtHQNrz9U4RjQ
xo9cUuaJ+LNmvzE8Yg3epAMYZ16UNGQQkVQ6ME4BcjRONzW8BYgTq4+pmT1ZNq1P
X87CXCPtYRpHF57eSo+tHDINCgfqYXD6e/7r2ngfiCeUeNDZ4aVl2XxvZDaUlBPP
Tx5fMARqx/Z8BdDyBJDVBjdsxmQau9HLkhPvdfGlZIWdTe13CzKqXA5Ppmpjt4q9
GnCpC53m76x9Su4ZDw6aUdBcgCTMvfaqJC9gzObee2Wz+aRRwzSxu6tEWVZolPEM
v0AA7po3vPeklgOnLRAwEoTTn4SdgNLWeRoxqZgkw1FC1GrotxF1so7uA+z0aMeU
lw73reonsNdZvRAcVX3Y6UNFdyt70Ixvo1H4VLzWm0K/oP62C9/eqqMwZ8zoCMPt
ENna7T+7Os66SCbMmXCHwyhO0tygNKZFFw/AATFyjqPMWPAxGuPNOrnB6uYCn0Hk
1BU7tF143RNIZaQQEH3XnaPvUuAA4C0FCoE3h+/tVjtfNKDvFmb6ZLZHYQmUYpyS
uhdFEpoDrJH1VmI2Tik/iqYWaZ+oDqXPHQXnJhw25h9ombR4qnD+FCfwFCGtPFON
o3QffZ53C95n5jPHVMyUrOxDdpwnvzCQPdj6yQm564TwLAmiz7uDlpqJZJe5QxHD
nolv+4MdGSfVtBq+ykFoVCaamqeaq6sKgvAVujLXXEs4KEmIgcPqATVRG49ElndI
LO1DEQyKhVoDGebAuVRBjzwAm/qxWxxFv3hrbCjpHCwEYms4Wgt/vKKRFsuWJNZf
efHldwlltkd5dKwSvDocPT/7mSLtLJa94c6AfgxXy9zO+FTLDQwzxga7xC2krAN1
yHxR2KHN5YeRL+KDzu+u6dYoKAz+YAgwlW6KbeavALSuH4EYqcvg8hUEhp/ySiSc
RDhuygxEovIMGfES4FP5V52lPyDhM3Dqwhn0vuYUmYnX8EXURkay44iwwI5HhqYJ
lptWyYo8Bdr4WNwt5xqszGzYR6mmGeAIin7bDunsF1uBHWYF4dyKlz1tsdRNMYqQ
+W5q+QjVdrjldWv/bMFOaqEjxeNWBRqjzcff3BxMnwvVxtgqxFvRh+DZxiJoiBG+
yx7x8np2AQ1r0METSSxbnZzfnKZKVvBVMkIC6Jsmt2WEVTQvoFJ8em+nemOWgTi/
hHSBzjE7RhAucnHuifOCXOgvR1SDDqyCQbiduc1QjXN0svA8Fqbea9WEH5khOPv3
pbtsL4gsfl2pv8diBQkVQgiZDi8Wb++7PR6ttiY65kVwrdsoNl1/qq+xWOd3tB4/
zoH9LEMgTy9Sz7myWrB9EOOZ8BIjL1M8oMigEYrTDOc3KbyW1S9dd7QAxiuOBaX1
8J8q1OydvTBzmqcjeSsFH4/1NHn5VnfOZnNpui4uhpOXBG+K2zJUJXm6dq1AHBlE
KQFsFZpNNyave0Kk8JzQnLAPd7OUU/IksyOCGQozGBH+HSzVp1RDjrrbC342rkBj
wnI+j+/1JdWBmHdJMZCfoMZFLSI9ZBqFirdii1/NRu6jh76TQor5TnNjxIyNREJC
FE5FZnMFvhM900LaiUZff8WWCOfeRDMttLXb1nuxPFl+lRk+LNlPLVptWgcxzfsr
JXrGiwjxybBB9oCOrACq8fGAtEs8WRxJyDH3Jjmn9i/Gl6J1mMCUF//LxAH2WQx8
Ld/qS5OM2iFCffDQjxAj0K6DEN5pUebBv1Em5SOHXvyq5nxgUh4/y84CWaKjw0MQ
5tbbLMlnc7ALIJ9LxZ97YiXSTyeM6oBXBFx6RpklkDv05mlBghSpVQiMcQ2ORIkh
UVVNbSHOl9S3cb5wqxaWqAKBqb4h1uLGVbYWZf2mzLZ8U5U5ioiqoMBqNZbzTXpO
EqEFuatTllQvCRbcKS3xou4MAixcYUxKwEhbZA/6hd10XSBJwe7jKBV9M6wliKab
UfoJCGTAf3sY68lqrMPrbBt0eeWf1C02Sd9Mn+V/jvnil7mxYFFUpruRq3r1LeqP
J5camfTtHwyL8N3Q/Zwp+zQeWZiLA8a/iAVu/hYLR1bpF2WCK0lOtJqkvVmrLVLz
maZZjbJeOft5cP/lRxbKlS6Gd5dFTEKDE15c6gWUX8RKZP6Q7iaE5hnGmQjm8Ljl
kXwF+ivoxOQ8a+Gg1bVTROc7tqW9e9/ewisV1mwvEB6Ny7TDS1oPUDHM84pY6dqi
1+Oio07Ked4BySwNlYy9yaJtBTZSCstfP+ApLidN7pSBvvXf1aHmeNbkPOZJ+c+t
fGpUdL6V2UTXfCsOPHTC0ezA15sOHwCuPchrDIj/eGUwMS3NfS25XgcMuvnLqGVO
RzcRzlZIg8G0oLYwOCuzoY0D/m9010O1ahePyA9tmVB7HRRbytLdaW7gYeEikoCv
7qtBqJFF17ntWJ3EpQHZUcVClbHIKqjNqRbDCY7so4AlIW7kSEUGWMIUDhprE8Ks
NpnvPH2i9JrYrTeROyUI0tL/7SATd2P0a2lxz/zUWekeqd0bmVCsAgQNbB2XkrR3
XS0B52ol+63e8KDqS2zL2TZd3daDFidHlB8QB26tfbfOAcaObJH5/dWP8ddo8UYo
Y3JqTl0malxSJhaMHmQdZIQp49utW3TcjqGllYS4HEmcqtHud0ShaUysC6239jlQ
KlFWrwXTlBC5vnq5IcOMqx5zyNbfxXz28969cWoMCyU6+kRw0TyF6kF7EEv6XWca
XLEwABx+tKRUKHJ673SyDMu96KMV3yZN+RtKbCjqCPVTP/3ZeIp7nCMUcj5sW9HI
N34yeI/0RCLyeGsOEiBLkucikC32LI9ik5HvImVTELQ0Uz3ceFqU/PkasjJUve6S
/n/1ZVUHbUk71xKR2bWZgECl7fIel7wlrbjpF3Wbk+Er0kfYcsNRHxeTDpKPSt9s
u/UsyQJiyNARG4X3iYQlsTce/06Ycyri6GcLHAu58B02nj4CxolCplABZ2N79HtN
/7Kh5L0pS9MwsDCHuUI8KFrTsET7TB1tIU99FdB19L64sl/shYAHbccvVWU50Wht
PdLoaErrX81Tof41IxbSZbI8grUC4KfG2sdPLJKu3HVTeQ8LfllbBLxfs8ZBS+Oc
v8rHlQ012kY6LsFGLehJ+/yJ/uvXORiv0ESp4EhFpFfkp+o+YcFeLUUPd+jzb62K
HfSCCbLpCKyEay80dyWkHfgylqxmb9ud0oMO50aFJyqR0NjNt6pcxBRY2A6AJR5S
IIC26YNwbh0GjF9qL2FiUqnNH/7GTqPnd2qmsB6FTIwSBT6d854qN7PRt+ZXgdtQ
OjcYt1r9qpWDZpNFK8EzizwKiAYTsiEh2pzPt6YUpksRb6CXTkIzoG+KLsv2m3b8
OHyZ9a8z81/gnxrZlls5SCTfOSU70pHWh8VAYKVHHK+MWgQr0m/2ocV32dkRBLMy
2R6P4WfHyI/+9de1x3PtIuOiv2knpxHv2fKM6sQw45F7XkmwHxjq1YRJ6vIwPTAh
MAkGBSsOAwIaBQAEFFTRETzpisHKZR+Kmen68VrTwpV7BBSQi0IesQ4n4E/bSVsd
qJSzcwh0hgICBAA=
-----END PKCS12-----
quit
INFO: Import PKCS12 operation completed successfully

!!! Link the SSL trustpoint to the appropriate interface
MainASA(config)# ssl trust-point SSL-Trustpoint-PKCS12 outside
Verify
Use these steps in order to verify successful installation of the third-party Vendor Certificate and use for SSLVPN connections.
View Installed Certificates via ASDM
- Navigate to
Configuration > Remote Access VPN > Certificate Management,and chooseIdentity Certificates. - The identity certificate issued by the third-party vendor appears.

View Installed Certificates via the CLI
 MainASA(config)# show crypto ca certificate

Certificate
  Status: Available
  Certificate Serial Number: 25cd73a984070605
  Certificate Usage: General Purpose
  Public Key Type: RSA (2048 bits)
  Signature Algorithm: SHA256 with RSA Encryption
  Issuer Name:
    cn=Go Daddy Secure Certificate Authority - G2
    ou=http://certs.godaddy.com/repository/
    o=GoDaddy.com\, Inc.
    l=Scottsdale
    st=Arizona
    c=US
  Subject Name:
    cn=(asa.remotevpn.url)
    ou=Domain Control Validated
  OCSP AIA:
    URL: http://ocsp.godaddy.com/
  CRL Distribution Points:
    [1]  http://crl.godaddy.com/gdig2s1-96.crl
  Validity Date:
    start date: 12:04:38 UTC Jul 22 2015
    end   date: 12:04:38 UTC Jul 22 2016
  Associated Trustpoints: SSL-Trustpoint

CA Certificate
  Status: Available
  Certificate Serial Number: 07
  Certificate Usage: General Purpose
  Public Key Type: RSA (2048 bits)
  Signature Algorithm: SHA256 with RSA Encryption
  Issuer Name:
    cn=Go Daddy Root Certificate Authority - G2
    o=GoDaddy.com\, Inc.
    l=Scottsdale
    st=Arizona
    c=US
  Subject Name:
    cn=Go Daddy Secure Certificate Authority - G2
    ou=http://certs.godaddy.com/repository/
    o=GoDaddy.com\, Inc.
    l=Scottsdale
    st=Arizona
    c=US
  OCSP AIA:
    URL: http://ocsp.godaddy.com/
  CRL Distribution Points:
    [1]  http://crl.godaddy.com/gdroot-g2.crl
  Validity Date:
    start date: 07:00:00 UTC May 3 2011
    end   date: 07:00:00 UTC May 3 2031
  Associated Trustpoints: SSL-Trustpoint

CA Certificate
  Status: Available
  Certificate Serial Number: 1be715
  Certificate Usage: General Purpose
  Public Key Type: RSA (2048 bits)
  Signature Algorithm: SHA256 with RSA Encryption
  Issuer Name:
    ou=Go Daddy Class 2 Certification Authority
    o=The Go Daddy Group\, Inc.
    c=US
  Subject Name:
    cn=Go Daddy Root Certificate Authority - G2
    o=GoDaddy.com\, Inc.
    l=Scottsdale
    st=Arizona
    c=US
  OCSP AIA:
    URL: http://ocsp.godaddy.com/
  CRL Distribution Points:
    [1]  http://crl.godaddy.com/gdroot.crl
  Validity Date:
    start date: 07:00:00 UTC Jan 1 2014
    end   date: 07:00:00 UTC May 30 2031
  Associated Trustpoints: SSL-Trustpoint-1

...(and the rest of the Sub CA certificates till the Root CA)
Verify Installed Certificate for WebVPN with a Web Browser
Verify that WebVPN uses the new certificate.
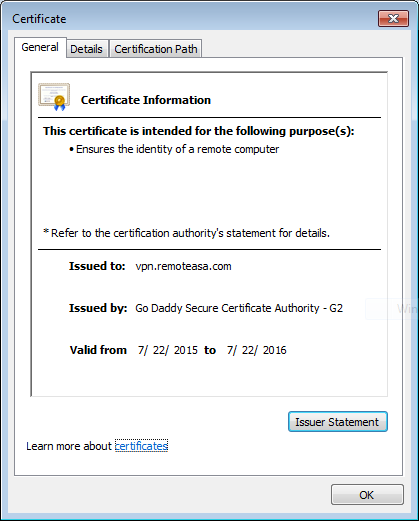
- Connect to the WebVPN interface through a web browser. Use https:// along with the FQDN used in order to request the certificate (for example, WebVPN Interface)
- Double-click the lock icon that appears in the lower-right corner of the WebVPN log in page. The installed certificate information must appear.
- Review the contents in order to verify that it matches the third-party vendor issued certificate.
Renew SSL Certificate on the ASA
- Regenerate the CSR either on the ASA, or with OpenSSL or on the CA with the same attributes as the old certificate. Complete the steps given in CSR Generation.
- Submit the CSR on the CA and generate a new Identity certificate in PEM format (.pem, .cer, .crt) along with the CA certificate. In the case of a PKCS12 certficate there is also a new Private key.
In the case of GoDaddy CA, the certificate can be rekeyed with a new CSR generated.
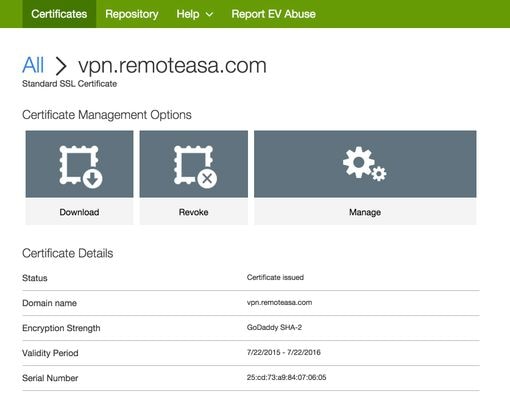
Navigate to the GoDaddy account and click Manage under SSL Certificates.

Click View Status for the required domain name.

Click Manage in order to give options to re-key the certificate.
Expand the option Re-Key certificate and add the new CSR.
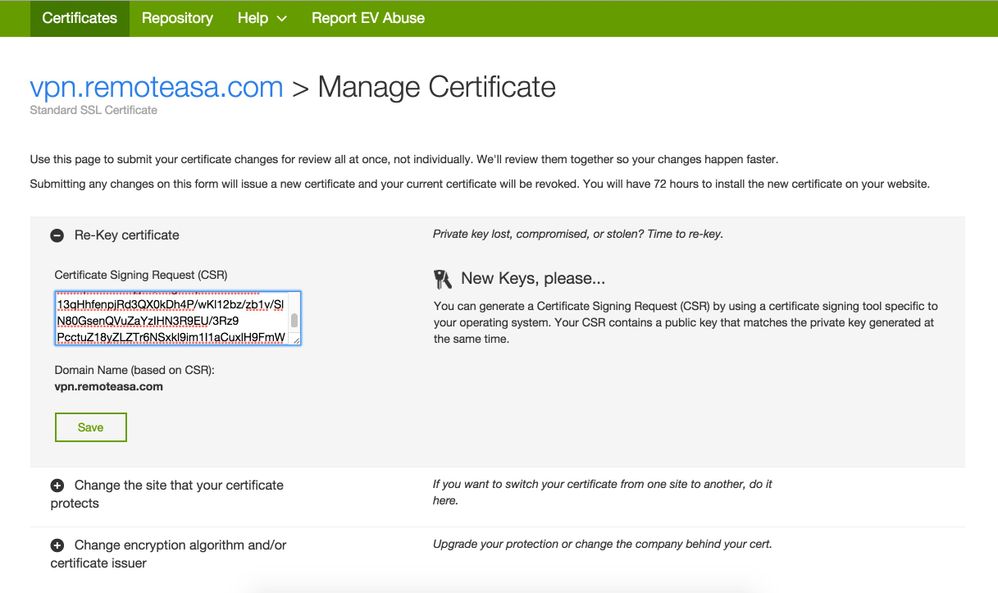
Save and proceed to the next step. GoDaddy issues a new certificate based on the CSR provided.
- Install the new certificate on a new trustpoint as shown in the SSL Certificate Installation on the ASA section.
Frequently Asked Questions
1. What is the best way to transfer identity certificates out of one ASA onto a different ASA?
Export the certificate along with the keys to a PKCS12 file.
Use this command in order to export the certificate via the CLI from the original ASA:
ASA(config)#crypto ca export <trust-point-name> pkcs12 <passphrase>
ASDM configuration:
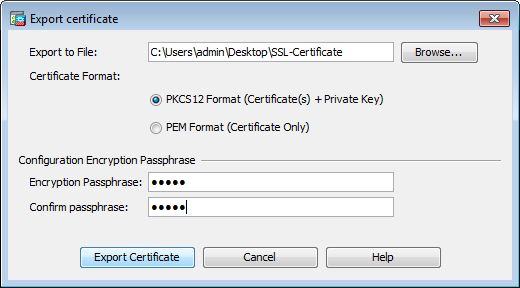
Use this command in order to import the certificate via CLI to the target ASA:
ASA(config)#crypto ca import <trust-point-name> pkcs12 <passphrase>
ASDM configuration:
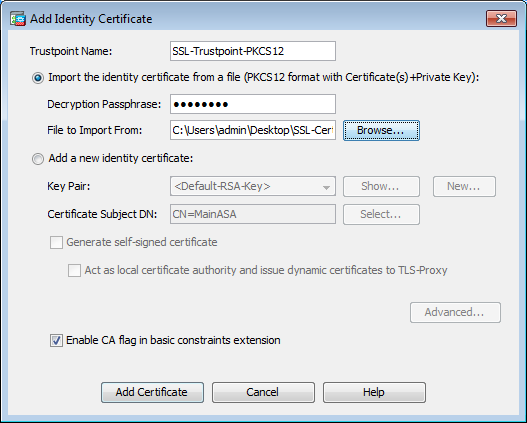
This can also also be done via the Backup/Restore feature on the ASDM with these steps:
- Log in to the ASA via ASDM and choose
Tools > Backup Configuration. - Backup All Configuration or just the Identity certificates.
- On the target ASA, open the ASDM and choose
Tools > Restore Configuration.
2. How to generate SSL certificates for use with VPN Load Balancing ASAs?
There are multiple methods that can be used to set up ASAs with SSL certificates for a VPN Load Balancing environment.
- Use a single Unified Communications/Multiple Domains Certificate (UCC) which has the load-balancing FQDN as the DN and each of the ASA FQDNs as a separate Subject Alternative Name (SAN). There are several well known CAs like GoDaddy, Entrust, Comodo and others that support such certificates. When you choose this method, it is important to remember that the ASA currently does not support the creation of a CSR with multiple SAN fields. This has been documented in the enhancement Cisco bug ID CSCso70867. In this case, there are two options to generate the CSR
- Via the CLI or ASDM. When the CSR is submitted to the CA, add in the multiple SANs on the CA portal itself.
- Use OpenSSL to generate the CSR and include the multiple SANs in the openssl.cnf file.
Once the CSR has been submitted to the CA and the certificate generated, import this PEM certificate to the ASA that generated the CSR. Once done, export and import this certificate in the PKCS12 format onto the other member ASAs.
- Use a Wildcard certificate. This is a less secure and flexible method when compared to a UC certificate. In the case that the CA does not support UC certificates, a CSR is generated either on the CA or with OpenSSL where the FQDN is on the form of *.domain.com. Once the CSR has been submitted to the CA and the certificate generated, import the PKCS12 certificate to all the ASAs in the cluster.
- Use a separate certificate for each of the member ASAs and the for the load-balancing FQDN. This is the least effective solution. The certificates for each of the individual ASAs can be created as shown in this document. The certificate for the VPN Loadbalancing FQDN is created on one ASA and exported and imported as a PKCS12 certificate onto the other ASAs.
3. Do the certificates need to copied from the Primary ASA to the Secondary ASA in an ASA failover pair?
There is no need to manually copy the certificates from the Primary to Secondary ASA as the certificates are synced between the ASAs as long as Stateful Failover is configured. If on initial setup of failover, the certificates are not seen on the Standby device, issue the command write standby in order to force a sync.
4. If ECDSA keys are used, is the SSL certificate generation process different?
The only difference in configuration is the keypair generation step, where an ECDSA keypair is generated instead of an RSA keypair. The rest of the steps remain the same.
The CLI command to generate ECDSA keys are shown here:
 MainASA(config)# cry key generate ecdsa label SSL-Keypair elliptic-curve 256
INFO: The name for the keys will be: SSL-Keypair
Keypair generation process begin. Please wait...
Troubleshoot
Troubleshoot Commands
These debug commands are to be collected on the CLI in the case of an SSL Certificate Installation failure:
debug crypto ca 255
debug crypto ca messages 255
debug crypto ca transactions 255
Common Issues
Untrusted certificate warning with a valid third-party SSL certificate on the external interface on ASA with 9.4(1) and later.
Solution:
This issue presents itself when an RSA keypair is used with the certificate. On ASA versions from 9.4(1) onwards, all the ECDSA and RSA ciphers are enabled by default and the strongest cipher (usually an ECDSA cipher) is used for negotiation. If this happens, the ASA presents a Self-Signed certificate instead of the currently configured RSA-based certificate. There is an enhancement in place to change the behavior when an RSA-based certificate is installed on an interface and is tracked by Cisco bug ID CSCuu02848
Recommended Action: Disable ECDSA ciphers with these CLI commands:
ssl cipher tlsv1.2 custom "AES256-SHA:AES128-SHA:DHE-RSA-AES256-SHA:DHE-RSA-AES128-SHA:
DES-CBC3-SHA:DES-CBC-SHA:RC4-SHA:RC4-MD5"
Or, with the ASDM, navigate toConfiguration > Remote Access VPN > Advanced,and chooseSSL Settings.Under the Encryption section, select tlsv1.2 Cipher version and edit it with the custom string AES256-SHA:AES128-SHA:DHE-RSA-AES256-SHA:DHE-RSA-AES128-SHA:DES-CBC3-SHA:DES-CBC-SHA:RC4-SHA:RC4-MD5
Appendix
Appendix A: ECDSA or RSA
The ECDSA algorithm is a part of the Elliptic curve cryptography (ECC) and uses an equation of an elliptic curve to generate a Public Key whereas the RSA algorithm uses the product of two primes plus a smaller number to generate the Public Key. This means that with ECDSA the same level of security as RSA can be achieved, but with smaller keys. This reduces computation time and increases the connection times for sites that use ECDSA certificates.
The document on Next Generation Cryptography and the ASA provides more in-depth information.
Appendix B: Use OpenSSL to Generate a PKCS12 Certificate from an Identity Certificate, CA Certificate, and Private Key
- Verify that the OpenSSL is installed on the system that this process is run on. For Mac OSX and GNU/Linux users, this is installed by default.
- Switch to a valid directory.
On Windows: By default, the utilities are installed in C:\Openssl\bin. Open a command prompt in this location.
On Mac OSX/Linux: Open the Terminal window in the directory needed to create the PKCS12 certificate.
- In the directory mentioned in the previous step, save the private key (privateKey.key), identity certificate (certificate.crt) and root CA certificate chain (CACert.crt) files.
Combine the private key, identity certificate and the root CA certificate chain into a PKCS12 file. Enter a passphrase to protect your PKCS12 certificate.
strong> openssl pkcs12 -export -out certificate.pfx -inkey privateKey.key -in certificate.crt -certfile CACert.crt
- Convert the PKCS12 certificate generated to a Base64 encoded certificate:
openssl base64 -in certificate.pfx -out certificate.p12
Next, import the certificate that was generated in the last step for use with SSL.
Appendix C: Trusted CA Certificate Security Considerations
Certificate Authentication Risks and Recommendations
Default Trustpoint Validation-Usage Behavior
When a trusted CA certificate is installed, with crypto ca trustpoint authenticate,it can be used to authenticate different types of VPN connections using certificate authentication. It is controlled with validation-usage trustpoint command. The validation-usage types are:
ipsec-client: Validates IPsec client connections.ssl-client: Validates SSL client connections.ssl-server: Validates SSL server certificates.
By default, the command allows validation for ipsec-client and ssl-client.
Default Configuration Risks
- Any CA certificate installed as trusted can be used by default to authenticate incoming client identity certificates for any tunnel group using certificate authentication.
- This default setting can be a security risk if you re not aware of it.
Recommended Action
Disable validation-usage for unintended trustpoints. If a CA certificate is not meant to authenticate VPN peers or users, disable validation-usage for that trustpoint.
Example Configuration:
trustpoint public-root-ca
	no validation-usage
Authorization Risks and Recommendations
By default, a trusted CA certificate can be used to authenticate VPN peer or user connecting to any tunnel-group. Proper authorization needs to be designed.
Recommended Action
Use certificate maps and tunnel-group maps to ensure only authorized certificates are used for specific tunnel groups. Set a default tunnel group map rule, that points to a no-access tunnel group to restrict unauthorized access.
Example Configuration
Certificate authentication is only allowed for:
- Machines with certificate issued by cn=example.com and having OU=machines in certificate subject.
- Users with certificate issued by cn=example.com and having OU=users in certificate subject.
Users with other certificates are assigned to no_access tunnel-group by default, because of tunnel-group-map default-group no_access command. The Certificate Map Rules have priority over group-url thanks to tunnel-group-map enable rules command. Knowing group-url does not help to bypass the Certificate Map Rules.
tunnel-group mgmt-tunnel type remote-access
tunnel-group mgmt-tunnel general-attributes
address-pool vpn_pool
default-group-policy mgmt-tunnel
tunnel-group mgmt-tunnel webvpn-attributes
authentication certificate
group-url https://ftd.example.com/mgmt enable
!
tunnel-group users_access type remote-access
tunnel-group usets_access general-attributes
default-group-policy user_access_gp
address-pool vpn_pool
tunnel-group users_access webvpn-attributes
authentication certificate
group-url https://ftd.example.com/users enable
!
tunnel-group no_access type remote-access
tunnel-group no_access general-attributes
default-group-policy no_access_gp
address-pool vpn_pool
tunnel-group no_access webvpn-attributes
authentication certificate
!
group-policy no_access_gp internal
group-policy no_access_gp attributes
banner value NO ACCESS GROUP POLICY
(...)
vpn-simultaneous-logins 0
!
crypto ca certificate map mgmt_tunnel 10
issuer-name attr cn eq example.com
subject-name attr ou eq machines
crypto ca certificate map users 10
issuer-name attr cn eq example.com
subject-name attr ou eq users
!
webvpn
(...)
certificate-group-map mgmt_tunnel 10 mgmt-tunnel
certificate-group-map no-access 10 users_access
!
tunnel-group-map enable rules
tunnel-group-map default-group no_access
Additional Resources
For more detailed configuration instructions, refer to the following Cisco documentation:
- Validation Usage Configuration - Cisco Secure Firewall ASA Series Command Reference, T - Z Commands
- Certificate Map Configuration - Cisco Secure Firewall ASA Series Command Reference, T - Z Commands
- Tunnel-Group Map Configuration - Cisco Secure Firewall ASA Series Command Reference, T - Z Commands
- Tunnel-Group-Map Enable Configuration - Cisco Secure Firewall ASA Series Command Reference, T - Z Commands
Related Information
Revision History
| Revision | Publish Date | Comments |
|---|---|---|
5.0 |
17-Oct-2024
|
Updated SEO, Alt Text, Machine Translation, Style Requirements, and Formatting. |
4.0 |
20-Aug-2024
|
Updated SEO links and removed unnecessary bolding. |
3.0 |
03-Aug-2023
|
-Addressed CCW Errors
-Added alt text to images |
1.0 |
18-Feb-2016
|
Initial Release |
Contributed by Cisco Engineers
- Divyansh SinghEngineering Product Manager
- Rah GovinTechnical Consulting Engineer
- RudvTechnical Consulting Engineer
Contact Cisco
- Open a Support Case

- (Requires a Cisco Service Contract)
 Feedback