How to restore events impacted by |delete command
Available Languages
Applicability
Splunk EnterpriseDescription
This article came about due to an administrator noticing bucket timestamp inconsistencies when comparing search results with apparent most recent timestamps as they appear in an indexer's Web UI under Settings > Indexes (while mousing over the latest event column for a specific index). The goal of this article is to identify events that had been removed from search using the |delete command. For the scenario encountered, the events being sought were dated far into the future, as the indexer's Web UI showed the most recent events for some indexes being future-dated, but searches on the UI did not pull up such events. However, the process outlined here could be followed to identify or restore "deleted" events for any reason.
Investigation
In Splunk, the |delete command appended to the end of a search will "soft delete" all events that appear in said search. What this means is that the events are not removed from the buckets in which they are indexed. They are simply flagged as "deleted" so they will no longer show up in searches. For guidance on using the |delete command in search, please refer to the following links:
- Splunk documentation: How do remove indexed data (i.e., delete events from search)
- Lantern article
- KB Article
- Splunk Community post(s)
When |delete is run on a search, Splunk places a deletes folder inside the rawdata folder for all affected buckets in the impacted index(es). That folder contains the details of all events that should not appear in search. Only one such folder is generated, regardless of how many times that particular bucket is impacted by use of the command.
The steps in this article will restore ALL events removed from search using the |delete command. It will not offer solutions on how to restore selected events. Best practice in that scenario is to re-delete any events that should remain deleted.
IMPORTANT NOTE: This process is not simple and involves re-indexing data (which may have a negative impact on license usage). ANY attempts to modify already-indexed data carries inherent risk of data loss and should be carried out with extreme caution and only by a Splunk Administrator well-versed in such processes. As a best practice, Splunk suggests following best practices for data management, which typically does not include a process such as this. It is provided for specific purposes and admins are very strongly advised to carry out such activities in a non-production environment.
The process below worked in a test environment, based on this non-Splunk link (which is NOT Splunk provided or endorsed documentation). It will NOT work if SmartStore is enabled.
Suggestions
- This process is not feasible in SmartStore enabled environments, as the full bucket may not be stored locally.
- Perform steps on impacted buckets which have been copied to a lower environment (make sure the affected app and/or index are deployed in that environment)
- Follow this process one bucket at a time. In a clustered environment, this means first one primary bucket, then each of its replicated copies (if your environment configures more than one), and validate the process worked successfully with each bucket.
- Steps apply equally to buckets in the hot/warm and cold paths
- If indexers are clustered, perform on ALL copies of each impacted bucket; copy to a test environment that is also clustered. Copying to a non-clustered environment is possible but out of scope for this KB.
About Buckets
Buckets are stored in folders. In this article, references to a "bucket name" mean how the bucket folder is named in the file system. For example:
- In a non-clustered indexer:
db_<lastest_event_epoch_time>_<earliest_event_epoch_time>_<bucket_number>
Example:db_1763762872_1763762872_1 - in clustered indexers:
- Original (usually Primary) copy:
db_<lastest_event_epoch_time>_<earliest_event_epoch_time>_<bucket_number>_<GUID_of_this_indexer> - Replicated copy:
rb_<lastest_event_epoch_time>_<earliest_event_epoch_time>_<bucket_number>_<GUID_original_indexer> - Examples:
db_1763762391_1763528400_0_0C4590DC-1477-4AA7-ACC6-8CA33F76D913
rb_2140488000_1793595600_2_0C4590DC-1477-4AA7-ACC6-8CA33F76D913
- Original (usually Primary) copy:
Prep Work
Test environment
- In a non-production environment: confirm the impacted index is configured and (if needed) the impacted app is installed
- If the environment is clustered, make sure search factor and replication factor match between test and production so both environments expect the same number of buckets
Production
- Run
|dbinspectsearch to identify all buckets in an index
Capture a list of all buckets for this index. run|dbinspecton the index over all time. This may take some time to complete. It will list all buckets in the index. In a clustered environment, it will also identify exactly which indexers have each copy. Use these results to verify you have identified all copies of each impacted bucket.
Example:|dbinspect index=<yourindex>
Example results:|dbinspect index=gamelog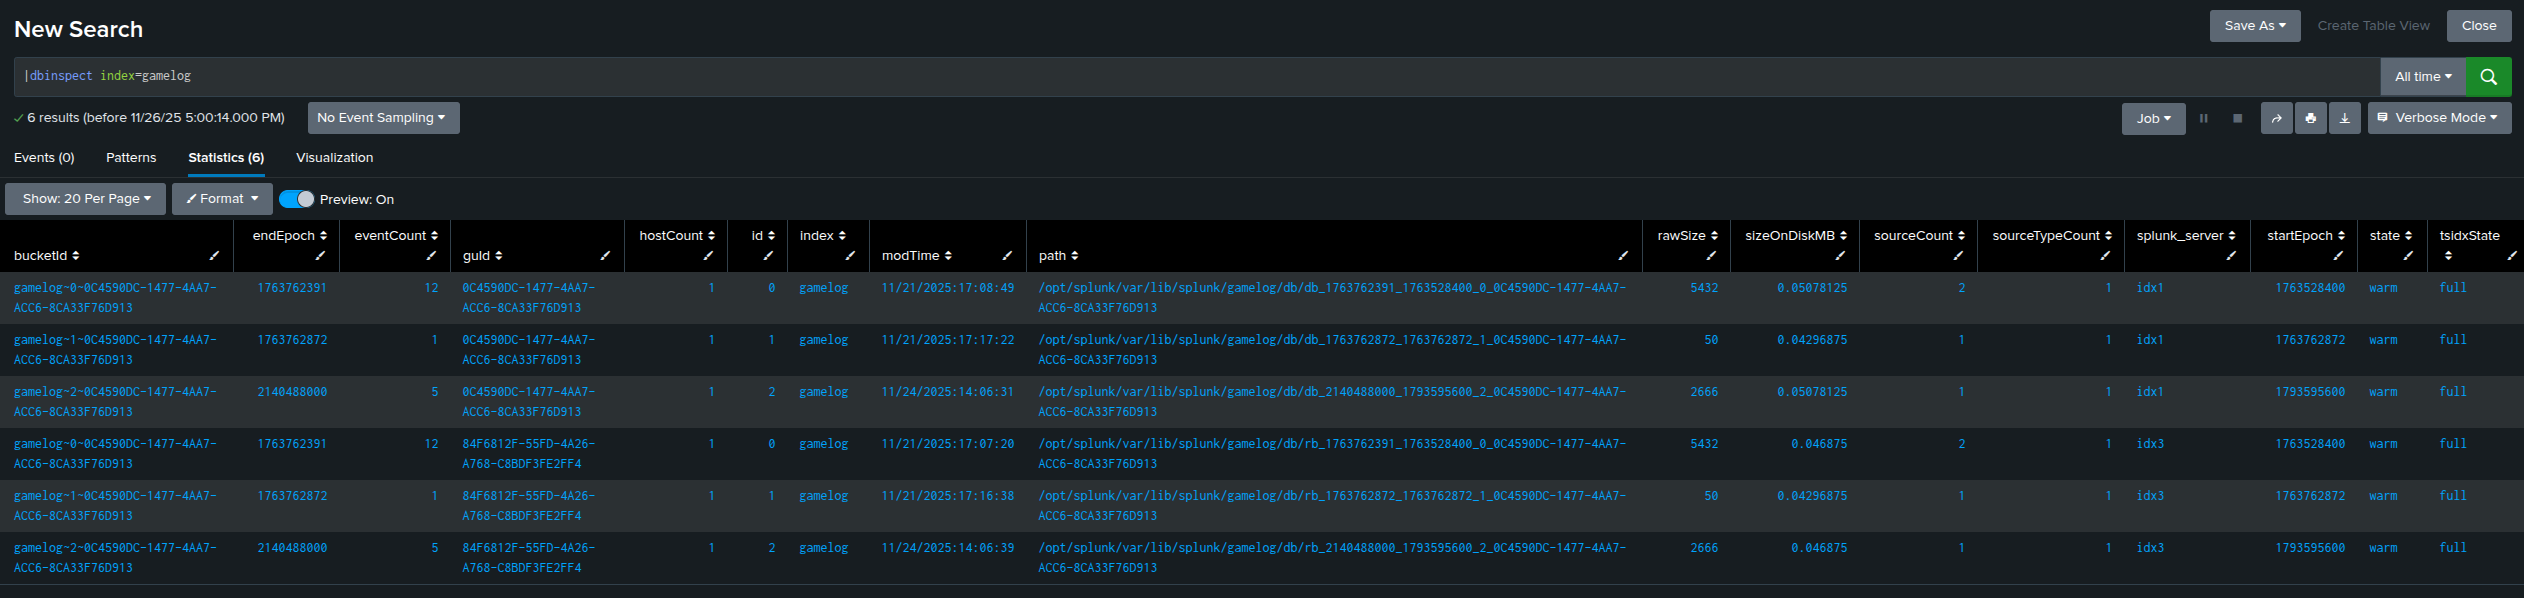
- From the command line, identify all impacted buckets
- On each indexer (if clustered), search the impacted index for all buckets which contain a
deletesfolder. Replace<path_to_index>with the absolute path to the affected index
Example result (results can include buckets in both the db and colddb directories, assuming these are on the same mount point. If they are on separate mount points, the search should be to run on each):find <path_to_index> -type d -name "deletes"[splunker@idx1 ~]$ find /opt/splunk/var/lib/splunk/gamelog -type d -name "deletes" /opt/splunk/var/lib/splunk/gamelog/db/db_2140488000_1793595600_2_0C4590DC-1477-4AA7-ACC6-8CA33F76D913/rawdata/deletes - For a clustered environment:
- Recording the results from each indexer, then
- Comparing the command line results to your dbinspect output to validate all copies of each bucket have been located
- On each indexer (if clustered), search the impacted index for all buckets which contain a
- For validation later, capture a search over all time using the latest and earliest epoch times of each impacted bucket, and export the results to CSV file(s). Note the number of events returned as well. Replace
<index>with the impacted index, and replace<latest>and<earliest>with the actual epoch timestamps in the bucket itself.index=<index> latest=<latest> earliest=<earliest>Example:
index=gamelog latest=2140488000 earliest=1793595600 - One bucket at a time, copy an impacted bucket from production to your test environment. One way option is to tar the bucket directory, then scp it to a test indexer. The below commands are run from the command line of the an indexer where you found at least one "deletes" folder for your impacted index. assume you want to store the compressed file in your user's home directory:
NOTE: In a clustered environment, do this with one bucket across all indexers which contain a copy of that bucket, beginning with the primary ("db_") copy. Each copy of this bucket must be scp'd to a different indexer in the clustered environment; alternatively, scp only the primary bucket and allow the test environment to replicate it, then run|dbinspectin test search head to identify where it placed a replicated copy.- To be safe, perform this as the user that runs Splunk
- Compress (tar) the bucket, and save the tar'd file into your user's home directory (then return to that directory yourself). Replace
<yourindex>with the name of the impacted index,<filename>with your chosen name for the tar'd file and<bucketname>with the full folder name of the bucket to be tar'd:cd /opt/splunk/var/lib/splunk/<yourindex> tar -czvf <filename>.tar.gz <bucketname> cd ~ ls -lExample:
[splunker@idx1 ~]$ cd /opt/splunk/var/lib/splunk/gamelog/db [splunker@idx1 db]$ tar -czvf ~/gamelogbucket.tar.gz db_2140488000_1793595600_2_0C4590DC-1477-4AA7-ACC6-8CA33F76D913 db_2140488000_1793595600_2_0C4590DC-1477-4AA7-ACC6-8CA33F76D913/ db_2140488000_1793595600_2_0C4590DC-1477-4AA7-ACC6-8CA33F76D913/rawdata/ db_2140488000_1793595600_2_0C4590DC-1477-4AA7-ACC6-8CA33F76D913/rawdata/journal.zst db_2140488000_1793595600_2_0C4590DC-1477-4AA7-ACC6-8CA33F76D913/rawdata/slicesv2.dat db_2140488000_1793595600_2_0C4590DC-1477-4AA7-ACC6-8CA33F76D913/rawdata/slicemin.dat db_2140488000_1793595600_2_0C4590DC-1477-4AA7-ACC6-8CA33F76D913/rawdata/deletes/ db_2140488000_1793595600_2_0C4590DC-1477-4AA7-ACC6-8CA33F76D913/rawdata/deletes/e42a246b1d6cd6ac199a1480307e67e3.csv.gz db_2140488000_1793595600_2_0C4590DC-1477-4AA7-ACC6-8CA33F76D913/rawdata/deletes/b490bdc3a156f5f8058d4bc6bb05d318.csv.gz db_2140488000_1793595600_2_0C4590DC-1477-4AA7-ACC6-8CA33F76D913/bucket_info.csv db_2140488000_1793595600_2_0C4590DC-1477-4AA7-ACC6-8CA33F76D913/Hosts.data db_2140488000_1793595600_2_0C4590DC-1477-4AA7-ACC6-8CA33F76D913/Sources.data db_2140488000_1793595600_2_0C4590DC-1477-4AA7-ACC6-8CA33F76D913/SourceTypes.data db_2140488000_1793595600_2_0C4590DC-1477-4AA7-ACC6-8CA33F76D913/Strings.data db_2140488000_1793595600_2_0C4590DC-1477-4AA7-ACC6-8CA33F76D913/.rawSize db_2140488000_1793595600_2_0C4590DC-1477-4AA7-ACC6-8CA33F76D913/optimize.result db_2140488000_1793595600_2_0C4590DC-1477-4AA7-ACC6-8CA33F76D913/bloomfilter db_2140488000_1793595600_2_0C4590DC-1477-4AA7-ACC6-8CA33F76D913/.sizeManifest4.1 db_2140488000_1793595600_2_0C4590DC-1477-4AA7-ACC6-8CA33F76D913/2140488000-1793595600-15882901470497181416.tsidx [splunker@idx1 db]$ cd ~ [splunker@idx1 db]$ ls -l total 2936304 -rw-r--r--. 1 splunker splunker 4256 Nov 26 19:12 gamelogbucket.tar.gz [splunker@idx1 db]$ - Transfer the tar'd bucket via SCP to a test indexer. Replace
<filename>with your chosen name for the tar'd file,<user>with the user you will log in to the indexer as (preferably the user that runs Splunk), and<test-indexer>with the IP or hostname of your test indexer:scp <filename> <user>@<test-indexer>:~/ -
In a clustered environment, rinse an repeat for each replicated copy of the impacted bucket. Transfer each replicated copy to a different indexer than where you sent the primary bucket copy)
You are now ready to take real action!
Resolution
Now to "undelete" those deleted events!
In the test environment
The following steps assume commands are being run from Splunk user account (the OS user that runs Splunk and owns all its files).
- If clustered, to avoid unnecessary replication tasks, place indexer cluster into maintenance mode (from Cluster Manager's command line):
$SPLUNK_HOME/bin/splunk enable maintenance-mode - Whether environment is clustered or not, stop Splunk the indexer(s) to which you uploaded this bucket:
$SPLUNK_HOME/bin/splunk stopOr, if systemd-managed (may also need to disable the service so it does not restart Splunk):
sudo systemctl stop Splunkd.service sudo systemctl disable Splunkd.service - Extract the bucket and copy to the index on your test indexer
-
Extract the impacted bucket (assumes command is run from the Splunk user's home directory to which the file was sent). Replace
<filename>with your chosen name for the tar'd file:tar -xvf <filename>.tar.gz - Confirm Splunk is stopped
$SPLUNK_HOME/bin/splunk statusOr, if systemd-managed:
sudo systemctl status Splunkd.service - Copy the bucket to the affected index and confirm folder and its contents are owned by the Splunk user
<bucketname>with the full folder name of your bucket, and<index>with the name of your index):
Example:cp -r <bucketname> /opt/splunk/var/lib/splunk/<indexname>/db/[splunker@test-idx1 ~]$ cp -r db_2140488000_1793595600_2_0C4590DC-1477-4AA7-ACC6-8CA33F76D913/ /opt/splunk/var/lib/splunk/gamelog/db/
-
- If this is a clustered environment, rinse and repeat Step 4 above until every copy of this bucket has been extracted to an indexer in your test environment.
- Check the bucket events in test environment
- Start Splunk (if clustered, on each affected indexer)
- If clustered, take the indexer cluster into maintenance mode (from Cluster Manager's command line):
$SPLUNK_HOME/bin/splunk enable maintenance-mode - Run a search to capture all events for this index in your test environment. If you wish, constrain it as you did in production to only the events in this bucket. NOTE: in very busy clustered environment, it is possible for indexers to receive events within the span for this individual bucket, so the number of results shown in your test environment may not match the number of events in production. In a non-clustered environment, the results of this search should match production. Consider exporting these results to a CSV file for validation later.
index=<index> latest=<latest> earliest=<earliest>
- Remove
deletesfolder from the impacted bucket- If clustered, place cluster back into maintenance mode (from Cluster Manager's command line):
$SPLUNK_HOME/bin/splunk enable maintenance-mode -
Whether environment is clustered or not, stop Splunk the indexer(s) to which you uploaded this bucket:
$SPLUNK_HOME/bin/splunk stopOr, if systemd-managed:
sudo systemctl stop Splunkd.service -
Either MOVE or DELETE the
deletesfolder in this index:- If you wish to move it, determine where the
deletesfolder will be saved. For this KB, created/opt/splunk/temp. (ex:mkdir /opt/splunk/temp); alternatively, choose a folder on a mount point that has space available on this indexer. - Now move or delete that deletes folder:
Move (consider the name you will give this deletes folder, if multiple buckets'deletesfolders will be moved here, hencedeletes_<bucket-name>below):mv /opt/splunk/var/lib/splunk/main/<bucket-name>/rawdata/deletes /opt/splunk/temp/deletes_<bucket-name>Delete:
rm -r /opt/splunk/var/lib/splunk/main/<bucket-name>/rawdata/deletes
- If you wish to move it, determine where the
- Run the following command to fix this bucket so the deleted events are once again recognized in search. Replace
<index>with the index and<bucket-name>with the full folder name of the impacted bucket./opt/splunk/bin/splunk fsck repair --one-bucket --bucket-path=/opt/splunk/var/lib/splunk/<index>/db/<bucket-name> - Start Splunk on this indexer
$SPLUNK_HOME/bin/splunk startOr, if systemd-managed:
sudo systemctl start Splunkd.service - If clustered,
- rinse and repeat steps 7a-e for each additional copy of this bucket (they should each be on a separate indexer)
- once completed for all copies of this bucket on your test indexers, take the cluster out of maintenance mode
$SPLUNK_HOME/bin/splunk disable maintenance-mode
- If clustered, place cluster back into maintenance mode (from Cluster Manager's command line):
- Confirmation: Run a search from Step 6c above to agani capture all events for this index in your test environment. This search should yield a greater list of events than the previous search. Consider extracting those events to a CSV and comparing before and after to identify the newly undeleted events.
index=<index> latest=<latest> earliest=<earliest>
Follow Up
- From here, you can use the results of restoring 'deleted' events to identify how your configurations (inputs.conf, props.conf or transforms.conf) should be changed so events like these will no longer be ingested.
- Alternatively, these events can be easily re-excluded from search following the same steps as above, by moving or copying the deletes folder back to the impacted bucket. For example:
mv /opt/splunk/temp/deletes_db_2140488000_1793595600_2_0C4590DC-1477-4AA7-ACC6-8CA33F76D913 /opt/splunk/var/lib/splunk/main/db/db_2140488000_1793595600_2_0C4590DC-1477-4AA7-ACC6-8CA33F76D913/rawdata/deletes
OR:cp -r ~/_db_2140488000_1793595600_2_0C4590DC-1477-4AA7-ACC6-8CA33F76D913/rawdata/deletes /opt/splunk/var/lib/splunk/main/db/db_2140488000_1793595600_2_0C4590DC-1477-4AA7-ACC6-8CA33F76D913/rawdata/ - Remember to re-enable the Splunkd service systemd managed.
- Delete buckets from your home path and deletes folders from the temporary location (if copied).
Restoring "undeleted" events to production
It is possible to restore ALL deleted events in production, but it is not feasible to restore only select deleted events. If do not want all events undeleted, consider undeleting ALL, then very carefully re-deleting only the events that should remain deleted.
To restore the undeleted events to production (sorry this KB is SO LONG -- steps are similar as previous, so providing in condensed (TL;DR) form:
- If clustered, enable Maintenance Mode in both the test and production environments
- Stop Splunk on all affected indexers, in both test and production
- In production, you should already have a tar'd copy of each original bucket with deletes folder in tact. Move to another folder, (for example, create ~/myindex-buckets-with-with-deletes-folder and move impacted bucket(s) to it)
- In the test environment, tar up the impacted bucket(s) and scp to the appropriate production indexer
- Back in production, in each affected indexer (if clustered), confirm Splunk is stopped, then
- MOVE (not copy) the impacted bucket(s) (perhaps to the folder where the tar'd version of these buckets have been placed)
- Extract the updated bucket from the test environment
- Copy the updated bucket from the test environment to the folder for that index that index (where the existing bucket no longer exists)
- Start Splunk on the impacted indexer
- If clustered, take the cluster out of maintenance mode
- Run a search against the index to confirm deleted events have been restored.
Related Links
Revision History
| Revision | Publish Date | Comments |
|---|---|---|
1.0 |
01-Oct-2026
|
Initial Release |
 Feedback
Contact Cisco
- Open a Support Case

- (Requires a Cisco Service Contract)