Upgrade Meeting Server to Release 4.0 - White Paper
Available Languages
Contents
Introduction
This document describes how to upgrade Cisco Meeting Server to release 4.0.
Background Information
Use this document together with the Cisco Meeting Server release notes, MMP Command Reference Guide, and the Secure Storage Administrator Reference Guide to understand requirements and prerequisites.
The upgrade process for Cisco Meeting Server 4.0 differs from previous versions because applying the image triggers a factory reset of the node. To ensure service continuity, all previous configurations, which includes network settings and passwords, must be preserved via a backup exported to an external location before you start the upgrade.
Additionally, Secure Storage was optional in Cisco Meeting Server versions 3.11 through 3.13, but it is enabled by default in version 4.0. As a result, you must follow different backup and restore procedures if you have never used Secure Storage or if you have already enabled it on 3.11x, 3.12x, or 3.13x.
Secure Storage encrypts private key and backup files on the server and requires those files to be encrypted before you can transfer them to external storage.
This document consolidates the required guidance into a single reference so that you can follow a common procedure for all upgrade scenarios without the need to repeat the same steps.
This document covers these topics:
- What Secure Storage is, where it applies, and what it does not do.
- The upgrade path, which includes the requirement to reach 3.13.x before 4.0 and the fact that a downgrade from 4.0 is not supported.
- A common backup and restore method for nodes where Secure Storage is enabled and for nodes where it is disabled or unavailable.
- Database cluster node disband sequencing while the database cluster is disbanded prior to an upgrade.
- The MeetingApps secret key, which is not stored in a Cisco Meeting Server backup and must be regenerated after a restore.

Note: This document uses lab screenshots captured during original upgrade guidance testing including 4.0 beta software versions. All displayed hostnames, IP addresses, and file names are strictly illustrative and do not reflect actual production credentials or sensitive passphrases. To maintain clarity and prevent redundancy, repeated steps are shown only once in the common procedure section unless the cluster view provides additional necessary context.
Secure Storage Overview
Secure Storage provides enhanced data security by encrypting sensitive files that reside on the Meeting Server and by controlling how those files are offloaded from the Call Bridge server. The capability was introduced in Cisco Meeting Server 3.11 as a configurable option with the use of the MMP command secure_storage enable on virtual machine deployments (specification-based or Meeting Server Small) and on Meeting Server Medium.
From version 4.0, Secure Storage is enabled by default. This setting is now permanent and is irreversible and the secure_storage enable MMP command has been removed.
With Secure Storage, the Meeting Server enforces this behavior:
- Private keys cannot be downloaded over SFTP until they are encrypted. Encrypt a private key with the pki encrypt MMP command followed by a passphrase of at least 14 characters. This does not change the keys currently used by Meeting Server services.
- Backup files created with the backup encrypt <name> encrypted-name command are encrypted. When Secure Storage is enabled, the backup encrypt <name> encrypted-name MMP command prompts for a passphrase of at least 14 characters. The same passphrase is required during backup restore.
- Before a backup file is downloaded, it must be in encrypted form. If a listed backup is not yet encrypted for export, use backup encrypt <name> encrypted-name. Attempts to download an unencrypted backup are denied.
- From version 3.12, Secure Storage can operate when FIPS is enabled. Private key files that were created in 3.11 with a shorter passphrase must be regenerated with the use of a passphrase of at least 14 characters.

Tip: Secure Storage restricts the transfer of unencrypted private keys and unencrypted backup files from the Meeting Server. It does not restrict the transfer of certificate files. Certificates can still be copied with SFTP; only the associated unencrypted private keys are blocked until they are encrypted with pki encrypt.

Caution: Once enabled, Secure Storage cannot be disabled with any MMP command. The operation is irreversible. Only factory_reset full resets Secure Storage to false. Take a configuration backup with backup snapshot and store it on a separate device before you enable Secure Storage. After secure_storage enable reboot immediately. If the reboot is skipped, Secure Storage can be marked enabled without being fully initialized, and commands such a factory_reset full can fail. The recovery path in that state is to revert to a previously saved snapshot (this is valid only for 3.13.x). In Meeting Server 4.0, secure_storage is enabled by default.
Supported Platforms
- Virtual machine (specification-based): Supported
- Meeting Server Small/1K: Supported
- Meeting Server Medium: Supported
- Meeting Server 2000: Not supported. Secure Storage feature is unavailable. Do not use Secure Storage commands on this platform.
Cisco Meeting Server 4.0 enables Secure Storage by default on all compatible platforms. After the upgrade, the data is automatically protected by Secure Storage even if the 3.13.x backup was taken while Secure Storage was disabled.
Implementation Notes
- Renaming the upgrade image does not change Secure Storage settings.
- Confirm the Secure Storage status on every node with the use of the command secure_storage before you take backups.
- The command reports whether Secure Storage is enabled (True) or not enabled (False). On Meeting Server 2000 the command is not applicable; while you upgrade Cisco Meeting Server 2000, follow the steps mentioned under upgrade conditions where Secure Storage is disabled or unavailable.
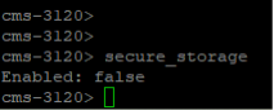 MMP output when Secure Storage is not enabled (Enabled: false).
 Figure 2: MMP output when Secure Storage is enabled (Enabled: true) on Cisco Meeting Server 3.13.
Detailed command syntax warnings and example usage can be found in the Cisco Meeting Server Administrator Quick Reference Guide for Secure Storage and the MMP Command Reference that you are currently using.
Upgrade Principles and Constraints
Required Upgrade Path
Cisco Meeting Server upgrades must follow a sequential path without skipping major releases. For example, a node on 3.11.x must advance through 3.12.x and 3.13.x before it reaches 4.0. Direct upgrades from earlier versions such as 3.9.x to 3.13.x or 3.11.x to 4.0 are not supported and typically cause unrecoverable configuration errors. For Meeting Server Medium with versions 3.11.5 or 3.13, the upgrade path would be 3.11.5 → 3.13 → 4.0.
Tip: Before you start the 4.0 upgrade, every node must be running Cisco Meeting Server 3.13.x, with a verified configuration backup exported from that 3.13.x system. All scenario procedures in this paper assume that the step-upgrade to 3.13.x is already complete.
Downgrades
Tip: A downgrade from 4.0.x to 3.13.x is not supported. If the upgrade fails or the system does not work as expected, deploy a new 3.13.x OVA (or re-image the appliance) and restore the 3.13.x backup. Keep hypervisor snapshots of the 3.13.x virtual machines for the duration of the upgrade window as an additional recovery option. VM Snapshots do not replace exported configuration backups.
Critical Backup Requirements for 4.0 Upgrades
After the 4.0 upgrade is confirmed, the node reboots into a first boot state. Do not depend on the automatic backup generated during the upgrade process, as an upgrade failure can result in loss of SFTP access and make the file inaccessible. Only backups created with the backup snapshot command and copied to external storage can be reliably used for recovery.
First Login and Password Configuration
Upon the first boot of version 4.0, the existing MMP password is removed from the database. Log in with the username admin with a blank password (no password). The system requires you to set up a new MMP password. The system prompts you to enter the password twice for verification and confirmation. Since there is no password recovery feature for Meeting Server, make sure to record your new password.
Note: If you set a new MMP password at first boot, the backup rollback command replaces it with the password that was stored in the 3.13.x backup. After you restore the backup on the server, you must log in with the password that was active at the time the backup was created.
Re-establish Network Connectivity After Upgrade
IPv4 and IPv6 addresses, masks, and gateways are lost along with the rest of the configuration. Network connectivity of the Meeting Server can be lost after the upgrade to 4.0. You must have hypervisor console, CIMC, or serial access so that you can assign addressing again from the MMP.
Note: Deployments that use DHCP reservations usually retain the same IP addresses after the reboot. However, console access must remain available until the address is verified. Do not assume SSH connectivity is restored until the IP address is confirmed.
Validate Server Health Before Creating Backups
After each step-upgrade to 3.13, ensure that the server is in healthy condition and all services are working. Do not ignore any fault conditions on the server overview page. If you encounter any errors/faults, fix those errors before a backup snapshot is created on 3.13. This ensures a healthy server backup is restored on upgraded 4.0 nodes, which keeps your deployment error free.
On Web Admin, open Status and confirm that the Fault conditions section is clear. Ignore entries that appear only under Recent errors and warnings. After an upgrade, it is common to see transient databases or Web Bridge messages there; those are not a reason to restore or to delay the backup.
If a fault condition remains for more than about ten minutes, resolve it before you take the backup. A restore of a 3.13.x backup that already contains faults onto 4.0 carries those faults forward.
For clustered systems, confirm that all call types in use are working (SIP endpoints and Web App clients) and that no fault conditions are listed on any node.
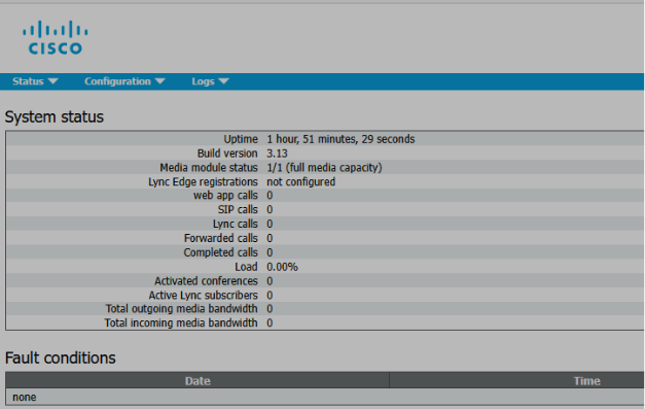 Figure 3: Web Admin Status page on 3.13.x with Fault conditions empty. Use this view before you take the backup that is restored onto 4.0.
Pre-upgrade Requirements
Before you start the upgrade to version 4.0, complete these actions. These requirements apply to all four scenarios covered later in this document.
- Upgrade to 3.13.x, then export a configuration backup. Ensure the node is running Cisco Meeting Server 3.13.x. Create a backup and transfer it, along with all custom SFTP data such as logos, branding files, audio prompts, SSO files, and any other custom data, to external storage. Use the procedures in the Common Backup and Restore Procedures section. In a clustered environment, take a backup from every node, not only the Connected Primary but from the Connected Replica.
- Record network settings. Run ipv4 a and store the output. You must re-enter this information from the console after the 4.0 reboot unless a DHCP reservation restores the IP address automatically.
- Confirm console access. Hypervisor console, CIMC, or serial access must be available before you start. SSH is expected to drop when the node reboots to 4.0.
- Download the current log bundle for archival. Save logbundle.tar.gz from each node. The bundle is not a substitute for backup snapshots.
- Read the 4.0 upgrade warning banner when displayed after the upgrade command is executed.
- Press n to abort if any prerequisite is incomplete. Press Y only when you are ready to proceed.
Common Backup and Restore Procedures
The four upgrade scenarios discussed later in this document use the same backup, export, first-boot, and restore pattern. Use this section as the single source of those steps, then follow only the scenario-specific sequencing (single node versus cluster, and whether Secure Storage is already enabled).
Data Affected After 4.0 Upgrade
This data is lost after the 4.0 upgrade until you restore a backup:
- Database content, which includes spaces, users, and call profiles.
- Certificates and private keys.
- Local customization, SSO files, and audio prompt files.
- Network configuration (IP address, mask, and gateway), except where a DHCP reservation restores the address.
- The previous MMP password, until backup rollback reapplies the password from the backup.
- Call Bridge, Web Admin, Web Bridge, and other application services return only after the restore.
Tip: Cisco Meeting Server backup does not include the MeetingApps secret key. After a restore, you must regenerate that key and apply it to every Web Bridge node. See the MeetingApps Secret Key After Restore section.
Take a Backup When Secure Storage is Disabled or Unavailable
Follow this procedure on virtual machines, Meeting Server Small, and Meeting Server Medium where secure_storage reports Enabled: False, and on Meeting Server 2000 where Secure Storage is unavailable.
1. On each node, create a file with the backup snapshot command. Do not reuse the previous file name.
2. Copy the backup file to external storage with SFTP immediately. Do not keep the only copy on the Meeting Server.
3. Store the file in a location that is still reachable if the node is rebuilt.
Example:
backup snapshot cms313SecurestorageFalse backup list
4. Confirm that the file appears in the backup list command, then transfer it to external disk with an SFTP client.
5. Repeat this process on every node in the cluster. Backup names can contain only letters, numbers, underscore, and hyphen. Do not include the .bak file extension when you create a backup file. For example, a file name such as 3.13SecurestorageFalse is rejected because of the period.
 Figure 4: Backup snapshot rejects a name that contains a period, then succeeds with an alphanumeric name. The .bak file is then ready to download.
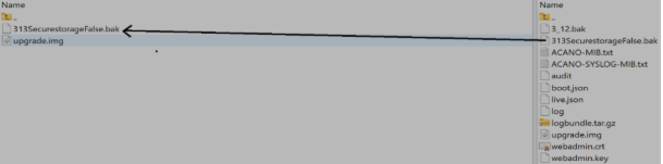 Figure 5: Copy the .bak file from the Meeting Server SFTP root to external storage. Do not leave the only copy on the server.
Take a Backup When Secure Storage is Enabled
Use this procedure when secure_storage reports Enabled: True. Unencrypted backup files cannot be downloaded.
1. Create a backup snapshot on each node. When Secure Storage is enabled, the server prompts for a passphrase of at least 14 characters. The passphrase can include letters, numbers, special characters, symbols, or spaces.
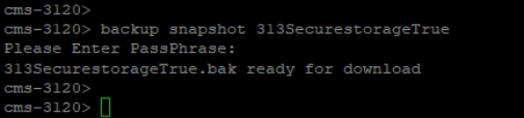 Figure 6: Backup snapshot with Secure Storage enabled prompts once for a passphrase of at least 14 characters. The MMP does not ask you to confirm it.
2. The MMP does not ask you to reenter the passphrase for confirmation. Secure your passphrase as you need the same passphrase in order to restore the file. Do not choose a trivial or example passphrase.
3. If the backup list command shows a snapshot that has not been encrypted for export, encrypt it before you download it:
 Figure 7: Backup list before encryption. The Encrypted column is no, so the file cannot be downloaded.
4. If you attempt to download an unencrypted backup, SFTP returns a permission denied error and instructs you to run the backup encrypt command first.
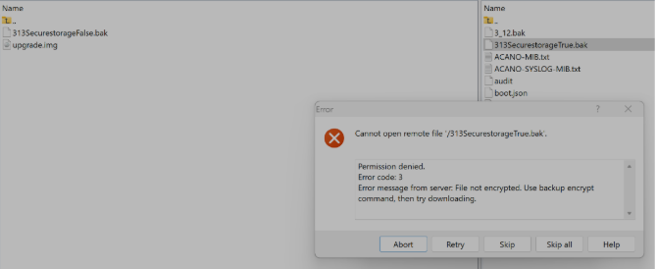 Figure 8: SFTP denies download of an unencrypted backup when Secure Storage is enabled. The server message instructs you to run backup encrypt.
5. Run the backup encrypt command in order to encrypt the backup file.
 Figure 9: Backup list after the snapshot is encrypted. Encrypted is yes and the file can be transferred with SFTP.
The backup list displays the encryption status and original file name. Ensure you transfer only the encrypted file from each node in the cluster. Maintain an organized record of each node, its corresponding file name, and the associated passphrase.
If you also need to export private keys, encrypt each key first. Certificate files are not blocked by Secure Storage and can be copied without this extra step:
pki encrypt private.key encrypted_private.key
Use a unique file name instead of overwriting the key currently in use by services. The minimum 14-character passphrase requirement applies here as well.
Restore Data After 4.0 Upgrade
1. After first-boot login and network recoveryin the First-boot and Network Restoration section, copy the corresponding 3.13.x backup onto the node with SFTP and restore it.
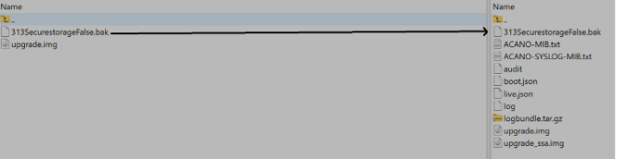 Figure 10: After first-boot network recovery, copy the 3.13.x .bak file back onto the 4.0 node with SFTP.
2. Confirm if the file is present:
backup list
 Figure 11: Backup list on 4.0 confirming the uploaded snapshot is present before rollback.
3. Restore the snapshot. In a cluster deployment, restore the former database primary first, followed by the replicas and then the connected nodes.
backup rollback name-of-the-backup-file
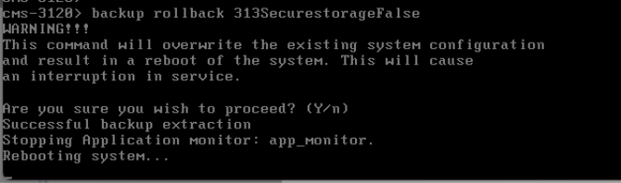 Figure 12: Backup rollback of an unencrypted snapshot. Confirm with Y; the node extracts the backup and reboots.
4. Press Y to continue. The node reboots while it extracts the backup. If the backup was taken with Secure Storage enabled, the MMP prompts for the passphrase. The reboot proceeds only after the correct passphrase is accepted.
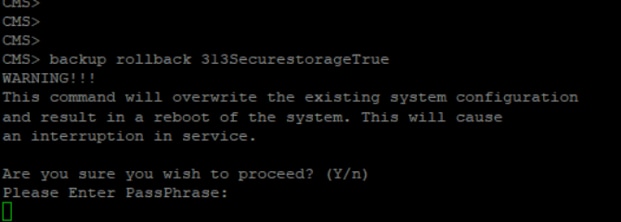 Figure 13: Backup rollback of an encrypted snapshot. After Y, the MMP prompts for the passphrase used when the backup was created.
Caution: The backup rollback overwrites the current configuration, certificates, private keys, and license file, then reboots the server. Use it only with the 3.13.x backup you exported for this upgrade.
5. When the node is back online, sign in with the MMP credentials from the backup and confirm that each required service reports as enabled and running (the MMP shows this as active: True).
Typical checks:
callbridge webbridge3 webadmin scheduler recorder streamer uploader meetingapps
6. Run only the commands for services that this node is supposed to host.
MeetingApps Secret Key After Restore
The Cisco Meeting Server backup does not store the MeetingApps secret key. After backup rollback is completed, regenerate the secret and apply it to every Web Bridge node. Skipping this step leaves file sharing unavailable even though the other services look healthy.
1. On the MeetingApps node, execute the meetingapps gensecret command.
2. Copy the generated secret to your secret store. Each execution of meetingapps gensecret invalidates the previous key, so generate the key once and reuse the same value across all Web Bridges.
3. Execute these commands on every Web Bridge node:
webbridge3 disable webbridge3 meetingapps add MeetingApps-URL secret webbridge3 enable webbridge3
The last command confirms that Web Bridge service is running and that the MeetingApps is configured correctly. MeetingApps is not supported on Meeting Server 2000, and file sharing is unavailable in clusters that include a Meeting Server 2000. In such deployments, this step is not applicable.
First-boot and Network Restoration
The 4.0 upgrade command displays a warning banner before it proceeds. Review the message carefully and abort with n if any prerequisites are incomplete. If you continue with Y, the node reboots, the SSH session disconnects, and the remaining steps must be completed from the console.
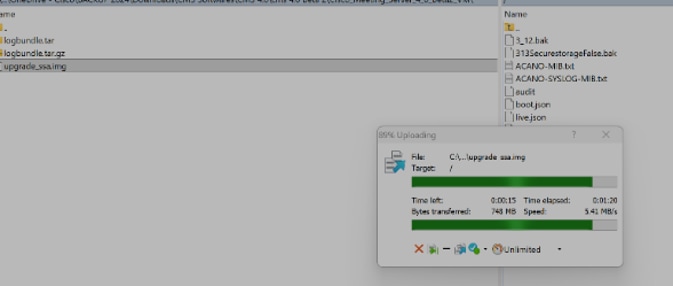 Figure 14: Upload the 4.0 upgrade image to the Meeting Server SFTP root directory. The upgrade image filename can vary depending on the package downloaded from cisco.com.
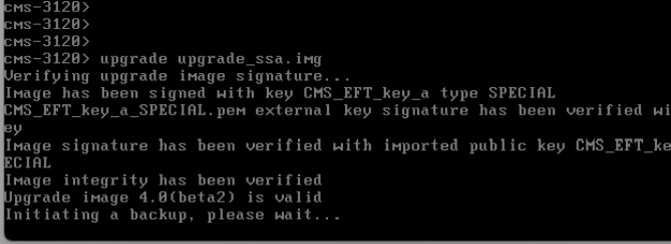 Figure 15: The upgrade command verifies the image signature and starts the process. Do not rely on the automatic backup that is created at this point.
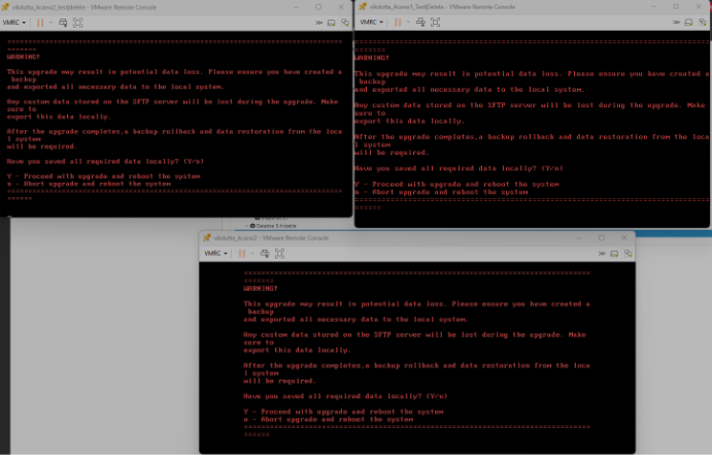 Figure 16: The red MMP warning on a three-node cluster. The same banner appears on a single node. Press n to abort if backups and custom data are not off the server. Press Y only to proceed and reboot.
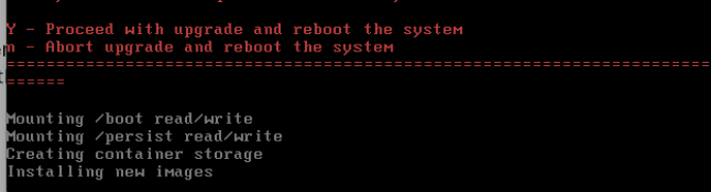 Figure 17: After Y, the node mounts storage and installs the 4.0 image. The SSH session times out; continue from the hypervisor console.
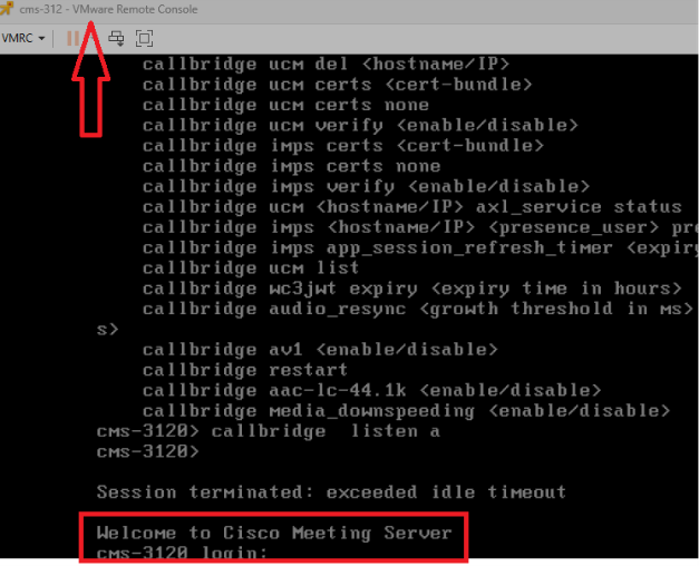 Figure 18: Use the VM or CIMC console after SSH drops. The first-boot login prompt appears when the 4.0 image is ready.
1. Log in with the first-boot MMP account (username admin and no password) then set a new MMP password when prompted. Note that backup rollback replaces this password with the password stored in the backup.
2. Re-apply network configuration from the notes you captured in the Pre-upgrade Requirements section:
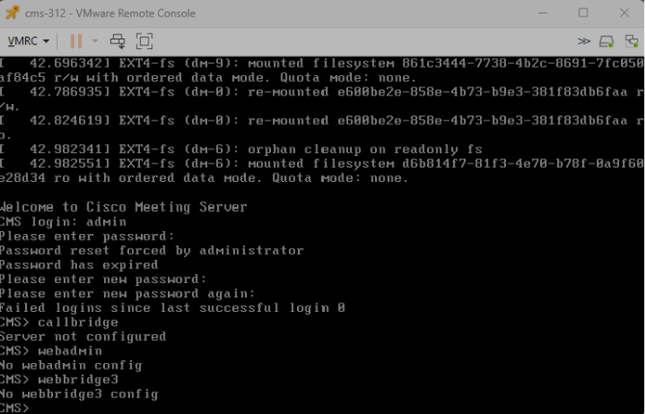 Figure 19: First-boot MMP login.
The previous password is no longer valid. After you set a new password, services such as webadmin and webbridge3 appear as not configured until the backup is restored.
3. Execute the command:
ipv4 interface add address/prefix-length gateway
For example:
ipv4 a add 192.0.2.10/24 192.0.2.1
 Figure 20: Re-applying IPv4 from the console.
A reboot is required after you assign the address. The addresses shown in the screenshot are for example purposes only.
4. Reboot after the address is assigned. Once the system is back online, continue with the SFTP upload of the backup and the restore steps mentioned in the Restore Data After 4.0 Upgrade section.
Note: If a DHCP reservation is configured, the original address can already be assigned after the reboot. Verify the address with ipv4 a before you initiate an SFTP session from your management workstation.
On Cisco Meeting Server 4.0, Secure Storage is enabled by default on platforms that support it. The MMP can no longer expose secure_storage as a toggle after the upgrade.
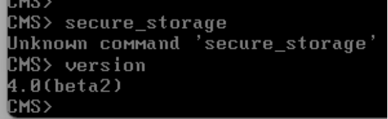 Figure 21: On this 4.0 image, secure_storage is not a recognized command because Secure Storage is enabled by default.
Confirm the release with the version command.
Upgrade Scenarios
This chapter covers different upgrade scenarios. Complete the step upgrade to 3.13.x. Identify your deployment type and choose the scenario accordingly. Follow only the procedure that matches your environment and do not combine steps from cluster and single node deployments.
First complete the supported step-upgrade to 3.13.x. Then select exactly one scenario below. Do not combine the single-node and database-cluster procedures.
- Scenario 1: Single node, Disabled or unavailable, VM, Small, Medium, and Meeting Server 2000
- Scenario 2: Single node, Enabled, VM, Small, and Medium only
- Scenario 3: Database cluster, Disabled or unavailable, VM, Small, Medium, and Meeting Server 2000
- Scenario 4: Database cluster, Enabled, VM, Small, and Medium only
Meeting Server 2000 does not support the Secure Storage enabled scenarios. For that platform, use Scenario 1 or 3 as applicable.
Scenario 1 - Single Node with Secure Storage Disabled or Unavailable
Use this procedure for a standalone server with Secure Storage disabled, or Meeting Server 2000 where Secure Storage is unavailable. The source release can be 3.11.x or later, but the node must be on 3.13.x before you upgrade to 4.0.
1. Step-upgrade to 3.13.x. Follow the supported path (for example 3.11.x → 3.12.x → 3.13.x). After each hop, confirm the version in Web Admin and that Fault conditions is clear, as described in the Validate Server Health Before Creating Backups section.
2. Confirm Secure Storage status. Run the secure_storage command and verify that Secure Storage is not enabled. Skip the command on Meeting Server 2000.
3. Create and export a 3.13.x backup file as mentioned in the Take a Backup When Secure Storage is Disabled or Unavailable section. Also export custom SFTP content and the log bundle as mentioned in the Pre-upgrade Requirements section.
4. Download the 4.0 software image from Cisco.com, extract it, and copy upgrade.img to the node over SFTP.
5. Start the upgrade with this command:
upgrade upgrade.img
6. Read the warning banner. Press Y only after all prerequisites are complete. 6. After the upgrade, configure the node as described in the First-boot and Network Restoration section, then restore the backup with the use of the Restore Data After 4.0 Upgrade section.
Scenario 2 - Single Node with Secure Storage Enabled
Use this procedure for a standalone VM, Meeting Server Small, or Meeting Server Medium where Secure Storage is enabled. It does not apply to Meeting Server 2000.
Before you transfer files from the server, note that unencrypted private keys and unencrypted backup files cannot be transferred. Certificate files are not blocked.
1. Upgrade through the supported path to 3.13.x without skipping releases. After each hop, confirm the version and that Fault conditions is clear in the Validate Server Health Before Creating Backups section.
2. Run secure_storage and confirm that the output shows Enabled: True.
3. Create and export an encrypted 3.13.x backup with the use of the Take a Backup When Secure Storage is Enabled section. Store its passphrase in your secret store. Also export custom SFTP content and the log bundle (Pre-upgrade Requirements section).
4. Copy upgrade.img to the node and run the upgrade:
upgrade upgrade.img
5. Read the warning banner and press Y to continue only when prerequisites are complete.
6. Recover the network from the console (First-boot and Network Restoration section), then restore the encrypted backup with its passphrase (Restore Data After 4.0 Upgrade section). 6. If MeetingApps is in use, apply a new MeetingApps secret (MeetingApps Secret Key After Restore section).
Secure Storage is enabled by default on Meeting Server 4.0. After a restore, continue to handle private keys and backup files as encrypted data.
Scenario 3 - Database Cluster with Secure Storage Disabled
Use this procedure for a database cluster with Secure Storage disabled, which includes a cluster that contains Meeting Server 2000. From version 3.5 onward, the database cluster must be disbanded before the software upgrade. First, step-upgrade every node to 3.13.x.
Record Cluster Details and Back Up Every Node
1. Run secure_storage on every node. Treat the command as unavailable on Meeting Server 2000 nodes.
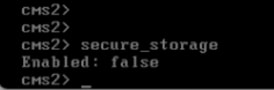 Figure 22: Before using unencrypted backups, verify Secure Storage is disabled on every cluster node. Skip the command for Meeting Server 2000 nodes, where it is unavailable.
2. Record the current database primary node as it must be restored first after the upgrade to 4.0. Confirm that replicas are In Sync and that the cluster status is healthy.
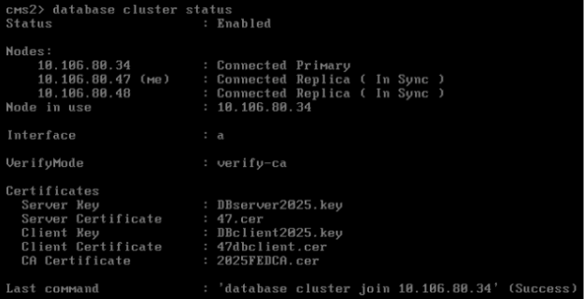 Figure 23: Record the current primary and confirm replicas are In Sync.
3. Confirm all call types in use are working and Fault conditions is clear on every node (Validate Server Health Before Creating Backups section).
4. Create a backup of every node with the use of the Take a Backup When Secure Storage is Disabled or Unavailable section. Name each file so it maps clearly to its node and transfer every backup to external storage before you disband the cluster.
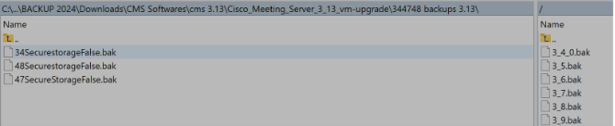 Figure 24: All three example node backups stored external storage, named so each file maps to its node.
Disband the Cluster
Remove nodes in this order. Keep the primary until last:
- Connected (non-core) Meeting Server nodes
- Replica database nodes
- Primary database node
On each node, run the removal command and press Y. Do not continue to the 4.0 upgrade until every node reports that it has left the cluster. A removal of cluster membership leaves that node’s local database in place.
database cluster remove
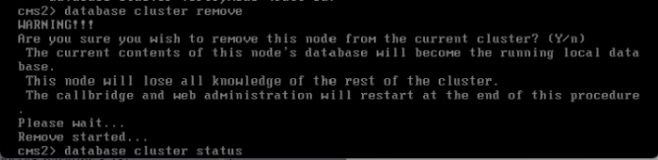 Figure 25: On a replica, confirm Y to remove cluster membership. The node’s local database remains in place.
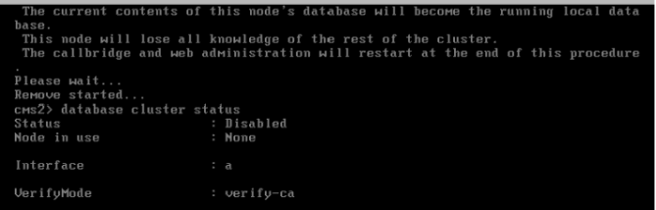 Figure 26: After removal, verify that cluster status is Disabled and Node in use is None on that node.
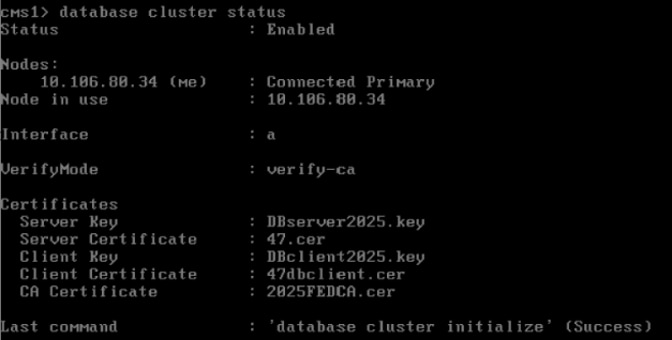 Figure 27: After removing the replicas, the former primary is the only node left in the cluster. Remove it last.
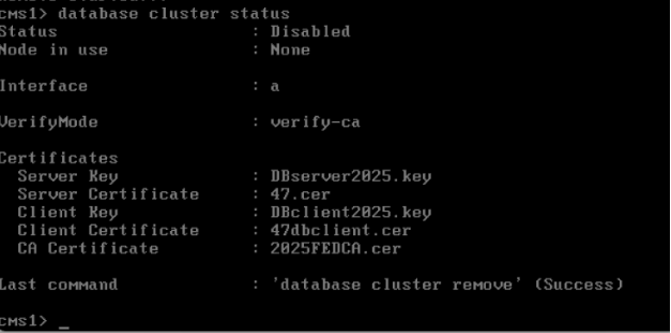 Figure 28: After removing the former primary, verify that the command reports Success and cluster status is Disabled.
Upgrade and Restore the Nodes
1. Once disbanded, the nodes are standalone and can be upgraded in parallel. On each node, copy upgrade.img over SFTP and run the upgrade command:
upgrade upgrade.img
2. Recover each node’s network addressing from the console (First-boot and Network Restoration section).
3. Copy each node’s own 3.13.x backup back to that node. Restore the former primary first, followed by the replicas, then the connected nodes. Use the Restore Data After 4.0 Upgrade section. A restore of the backups re-establishes the database-cluster membership.
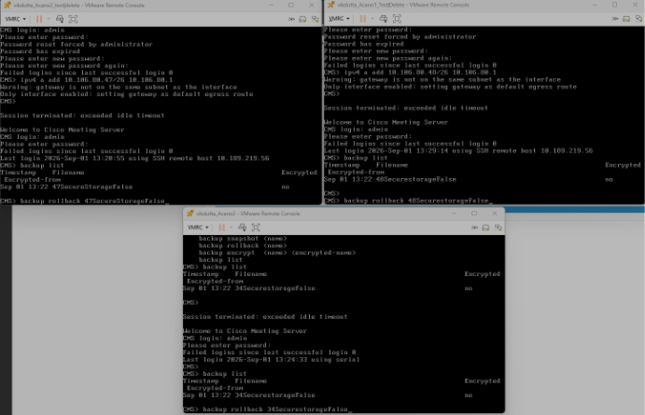 Figure 29: Restore each node’s own snapshot. Start with the former primary, then restore the replicas. Example filenames identify their node.
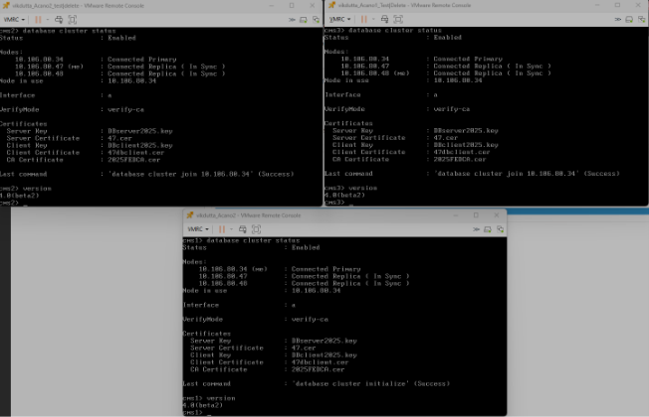 Figure 30: After restore on Meeting Server 4.0, verify the cluster is Enabled, the same primary is shown, and replicas are In Sync.
Note: If Call Bridge cluster connections do not come up after this restore, run the database cluster upgrade_schema on the former primary only, then recheck Call Bridge status.
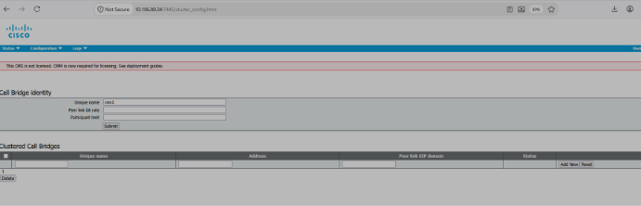 Figure 31: Before the schema upgrade, the example shows the database cluster running while Clustered Call Bridges is empty.
database cluster upgrade_schema
 Figure 32: On the former primary, confirm Y only when Call Bridge cluster connections failed after this disbanded-cluster upgrade.
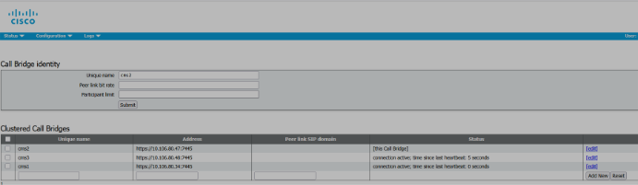 Figure 33: After the schema upgrade, verify that each Call Bridge peer shows an active connection.
4. Complete the MeetingApps secret procedure in the MeetingApps Secret Key After Restore section on every Web Bridge, then validate the deployment with the use of the Post-upgrade Validation section.
Scenario 4 - Database Cluster with Secure Storage Enabled
Use this procedure for a database cluster on VMs, Meeting Server Small, or Meeting Server Medium where Secure Storage is enabled on the nodes. It does not apply to Meeting Server 2000. First, step-upgrade every node to 3.13.x.
Record Cluster Details and Create Encrypted Backups
1. Run secure_storage on every node and confirm Enabled: True.
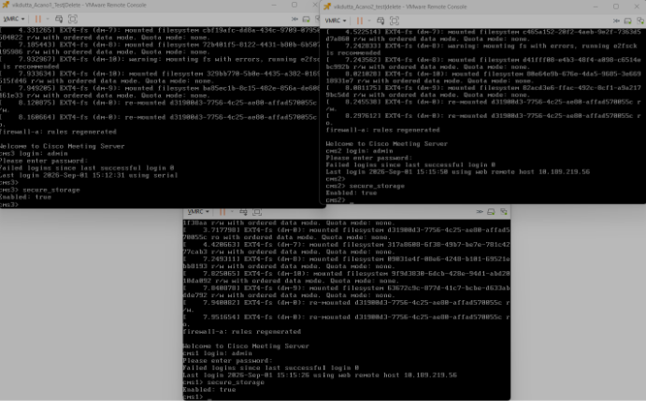 Figure 34: For the illustrated three-node cluster, confirm Secure Storage shows Enabled: True on every node before upgrading.
2. Record the current database primary and confirm that replicas are In Sync.
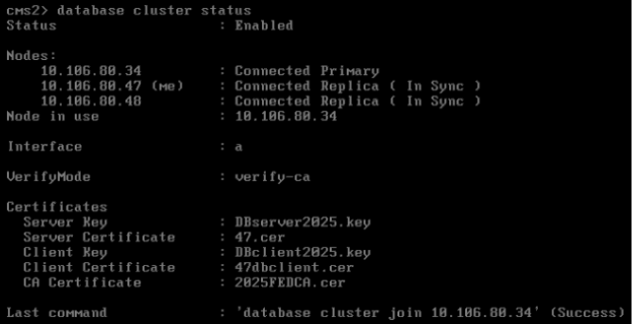 Figure 35: database cluster status before the upgrade. Record the primary and confirm replicas are In Sync.
3. Confirm all call types in use work and Fault conditions is clear on every node (Validate Server Health Before Creating Backups section).
4. Create an encrypted backup of every node with the use of the Take a Backup When Secure Storage is Enabled section. Assign and record a unique passphrase for each file or use a documented passphrase policy. Transfer only encrypted files off the servers before you disband the cluster.
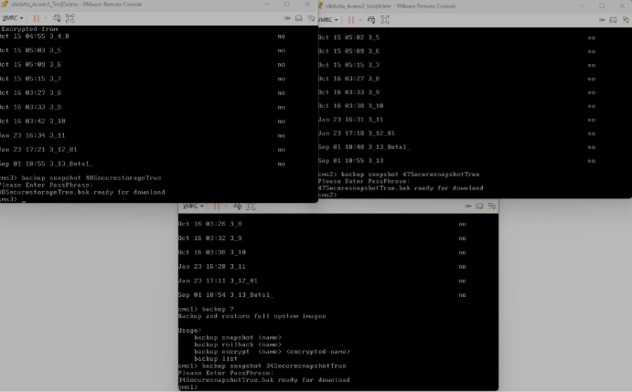 Figure 36: Encrypted backup snapshot on each node. The example shows the passphrase prompt and then each .bak file ready to download.
Disband, Upgrade, and Restore
Disband the cluster as described in Scenario 3 in this order: connected nodes, replicas, and the primary last. Use database cluster remove and confirm every node has left the cluster.
Upgrade the standalone nodes in parallel. Recover network addressing from the console (First-boot and Network Restoration section).
Upload each node’s own encrypted backup. Before a rollback, confirm the uploaded snapshot appears in the backup list as Encrypted: yes. Restore the former primary first, then the replicas and connected nodes. Use the backup rollback command below, confirm Y, and enter the backup’s passphrase when prompted. The node reboots after the passphrase is accepted. Repeat for each node.
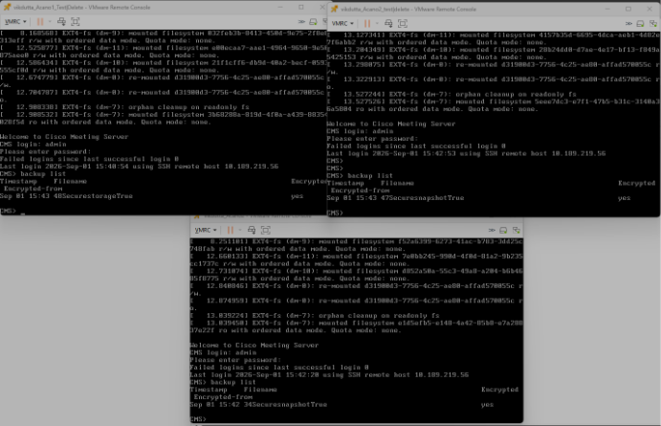 Figure 37: After the first 4.0 boot, the uploaded snapshot must appear in the backup list as Encrypted: yes and be ready for rollback.
backup rollback encrypted-filename
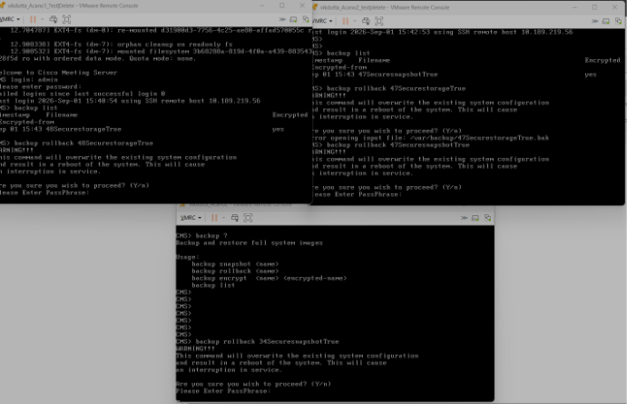 Figure 38: Confirm Y, enter the passphrase, and restore the former primary first.
Note: If Call Bridge cluster connections do not come up after this restore, run the database cluster upgrade_schema on the former primary only, then recheck Call Bridge status.
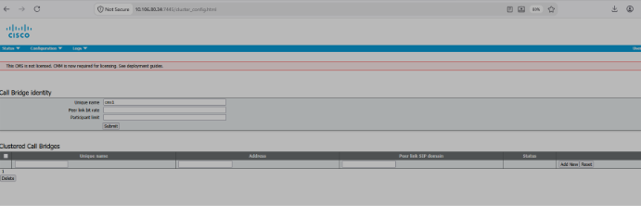 Figure 39: Before the schema upgrade, the example shows the database cluster running while Clustered Call Bridges is empty.
database cluster upgrade_schema
 Figure 40: On the former primary, confirm Y only when Call Bridge cluster connections failed after this disbanded-cluster upgrade.
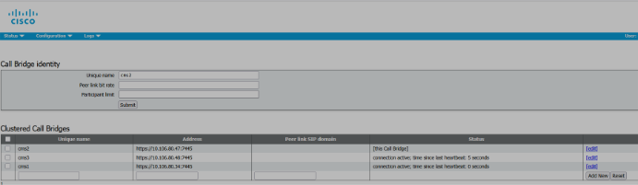 Figure 41: After the schema upgrade, verify that each Call Bridge peer shows an active connection.
Complete the MeetingApps secret procedure in the MeetingApps Secret Key After Restore section on every Web Bridge, then validate the deployment with the use of the Post-upgrade Validation section.
Post-upgrade Validation
Complete this checklist after the restore and before you return the system to production:
- Web Admin on every node shows Cisco Meeting Server 4.0.
- Required MMP services are enabled and running (active: True).
- Fault conditions are clear. Treat recent errors and warnings as informational unless a corresponding fault exists.
- If applicable, database cluster status shows the expected primary and replicas.
- Smart Licensing and Call Bridge connectivity are restored.
- SIP calls and Web App client calls supported by this deployment are completed successfully.
- Branding, audio prompts, and SSO files that are copied from the server in the Pre-upgrade Requirements section are restored if they were not already included in the backup.
- If MeetingApps is deployed, Web Bridge shows the new MeetingApps relationship and file sharing works.
- Remove short-lived snapshots only after the deployment has been accepted.
Revision History
| Revision | Publish Date | Comments |
|---|---|---|
1.0 |
13-Nov-2026
|
Initial Release |

 Feedback
Contact Cisco
- Open a Support Case

- (Requires a Cisco Service Contract)