Deployment Guide: Cisco AI PODs with
Canonical Kubernetes and Canonical MLOps Stack
White Paper
Available Languages
Bias-Free Language
The documentation set for this product strives to use bias-free language. For the purposes of this documentation set, bias-free is defined as language that does not imply discrimination based on age, disability, gender, racial identity, ethnic identity, sexual orientation, socioeconomic status, and intersectionality. Exceptions may be present in the documentation due to language that is hardcoded in the user interfaces of the product software, language used based on RFP documentation, or language that is used by a referenced third-party product. Learn more about how Cisco is using Inclusive Language.
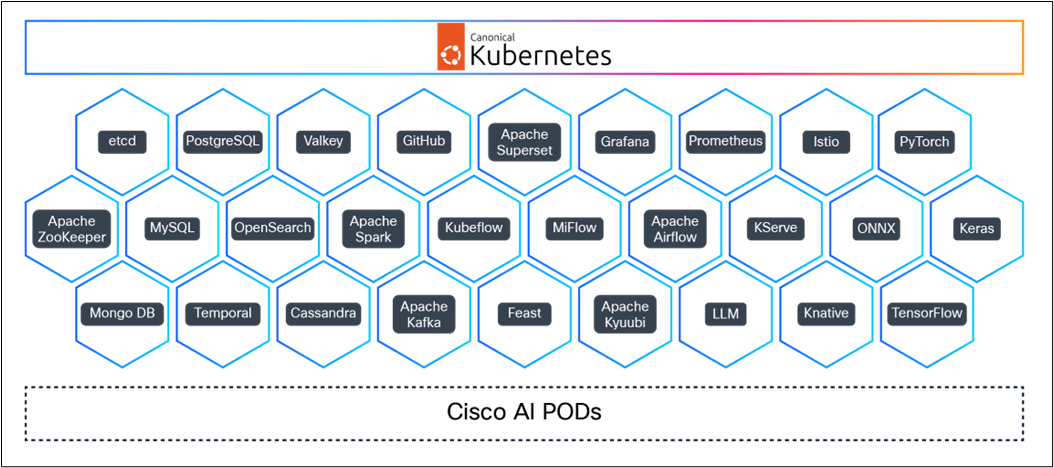
Maximize the performance of Cisco AI PODs with Canonical Kubernetes and Canonical MLOps stack
Accelerating AI/ML deployment with Canonical Kubernetes
This guide will show AI/ML solution architects, data scientists, and infrastructure engineers how to deploy Cisco AI PODs with Canonical Kubernetes and Canonical MLOps stack on Cisco AI PODs. Together, these solutions form a production-ready and scalable platform for ML workloads, delivering the cost and scale benefits of open source on a trusted enterprise platform:
● Pre-optimized resource use on Cisco AI PODs
● Streamlined Canonical MLOps lifecycle management for a quick transition from prototype to production
● Five years of support for LTS versions of Canonical Kubernetes and the Canonical MLOps stack, with the option of lengthening support to 15 years
● Security built into every layer of the stack through Cisco Secure AI Factory with NVIDIA, from infrastructure-level protection with Cisco Hypershield™ and BlueField DPUs to model-layer defense with Cisco AI Defense
● Cloud-managed operations through Cisco Intersight® and Nexus® Dashboard, enabling policy-driven GPU orchestration and zero-touch provisioning of AI infrastructure at scale
A powerful platform for MLOps, delivered by Canonical and Cisco
Canonical Kubernetes and Canonical MLOps integrate with Cisco AI PODs to deliver a turnkey environment for enterprise AI. The platform replaces fragmented tools with a unified platform that handles everything from GPU orchestration to model lifecycle management, significantly reducing the time it takes to scale AI/ML initiatives from pilot to production.
Cisco AI PODs: purpose-built infrastructure for enterprise AI
Cisco AI PODs are a pre-validated, modular AI infrastructure solution that combines Cisco UCS® servers with NVIDIA GPUs, Cisco Nexus high-performance Ethernet networking, and integrated storage into a single, rack-scale deployment unit. As a core building block of the Cisco Secure AI Factory with NVIDIA, each Cisco AI POD is engineered to compress deployment timelines from months to weeks, giving your teams a production-ready foundation for training, fine-tuning, and inference workloads without the burden of assembling and validating each component independently.
At the compute layer, Cisco UCS C880A M8 Rack Servers deliver up to 8 B300 Ultra Tensor Core GPUs interconnected through NVLink, providing the GPU-to-GPU bandwidth that large-scale model training demands. Dual Intel® Xeon® 6th Gen CPUs supply the host-side compute and memory capacity needed for data preprocessing, checkpointing, and serving workloads in parallel.
The networking fabric uses Cisco N9000 Series switches running at 400GbE/800GbE, built on Cisco® Silicon One® and NVIDIA Spectrum X. Cisco is the only networking vendor whose silicon is included in the NVIDIA Spectrum-X Ethernet platform through a shared-licensing partnership, combining Cisco’s congestion-aware per-packet load balancing with NVIDIA’s adaptive routing and out-of-order packet handling. This delivers the low-latency, lossless east/west traffic performance that distributed GPU training requires.
Security is built into Cisco AI PODs from the ground up rather than layered on after deployment. Cisco Hypershield provides AI-native, kernel-level enforcement through eBPFs, while NVIDIA BlueField-3 DPUs run the Cisco Hybrid Mesh Firewall at 400G line-rate stateful inspection without consuming CPU or GPU cycles. Cisco AI Defense adds model-layer protection: discovery of shadow AI assets, validation of model behavior, and runtime guardrails for prompt injection and data exfiltration. This security-first approach addresses the governance and compliance requirements that enterprise AI deployments face from day one.
Operationally, Cisco Intersight provides cloud-managed lifecycle management with policy-driven GPU orchestration, enabling real-time allocation of GPU resources to workloads and eliminating the manual provisioning overhead that slows down scaling. Cisco Nexus Dashboard delivers unified automation and observability across the network fabric, with topology-aware visualization and congestion analytics purpose-built for AI traffic patterns.
Canonical Kubernetes for GPU optimization:
Getting the most out of your hardware often entails a high degree of manual tweaking. Through Canonical’s partnership with Cisco, Canonical Kubernetes is optimized to deliver the full potential of the NVIDIA GPUs included in Cisco AI PODs, right out of the box. This reduces the operational overhead of GPU configuration, allowing teams to partition and scale hardware resources dynamically while maintaining strict workload isolation.
Streamlining the AI lifecycle with Canonical’s MLOps stack solutions:
Canonical’s MLOps stack builds on this robust foundation by providing the essential tools and workflows for defining, managing, and automating the entire AI workload lifecycle. Canonical’s Charmed Kubeflow, Charmed MLFlow, and Charmed Feast run seamlessly together to help ensure a smooth journey from data preparation and model training to deployment and monitoring.
Canonical’s MLOps stack simplifies complex operations by:
● Integrated tooling: seamlessly combines best practice open-source MLOps tools into a cohesive platform
● Workflow automation: Modular charmed operators encapsulate complex operational logic. This creates a repeatable framework for model building and deployment, minimizing manual overhead and accelerating time to market.
● Unified management: provides an integrated platform for managing ML experiments, artifacts, and production deployments
Enhanced networking with Cilium CNI — powered by Cisco Isovalent:
For high-performance, secure, and observable networking, this solution uses Cilium as the Container Network Interface (CNI), powered by Cisco Isovalent® Cilium, based on eBPF technology, provides:
● Superior performance: offers high-throughput and low-latency networking crucial for distributed ML workloads that rely on fast communication between nodes and GPUs
● Advanced security: implements fine-grained network policies based on application identity, securing inter-service communication within your AI workloads
● Deep observability: provides rich network telemetry and tracing, simplifying troubleshooting and performance tuning for complex Kubernetes environments
This combination of Cisco’s purpose-built AI infrastructure, Canonical’s enterprise Kubernetes and MLOps expertise, and Cilium’s networking delivers a production-grade platform for enterprises looking to move AI projects from prototype to production at scale.
Cisco acquired Isovalent in 2024, bringing the Cilium and Tetragon open-source projects under Cisco’s engineering umbrella. Cilium is already the default CNI for Canonical Kubernetes, Google Kubernetes Engine, Amazon EKS, and Microsoft Azure AKS. With the Isovalent acquisition, Cisco now offers direct engineering support and enterprise-grade SLAs for Cilium deployments, tightly integrated with the broader Cisco Secure AI Factory networking and security stack. For AI workloads running on Cisco AI PODs, this means that the same vendor providing the physical network fabric, the GPU compute, and the infrastructure security also owns and maintains the Kubernetes networking layer, eliminating the multi-vendor finger-pointing that typically plagues troubleshooting in production AI clusters.
1.1 Hardware and networking configuration
In this demo, For this demo, SSH access was given to a pre-provisioned Ubuntu 24.04 machine on CiscoAI PODs.
The Cisco AI POD used in this deployment consists of a Cisco UCS C885A M8 Rack Server equipped with 8 NVIDIA HGX H200 Tensor Core GPUs and dual AMD EPYC processors (96 cores each). The backend network fabric uses Cisco Nexus 9364E-GX2A switches running at 400 GbE, configured for RoCE (RDMA over converged Ethernet) to support the low-latency GPU-to-GPU communication required by distributed training workloads. Ubuntu 24.04 LTS was pre-installed on the server through Cisco Intersight’s OS provisioning workflow, which automates bare-metal deployment with policy-driven configuration profiles. Network configuration, including VLAN assignments, MTU settings for jumbo frames (9216 bytes), and LLDP discovery, was applied through Nexus Dashboard templates. The storage fabric was configured for NVMe over Fabrics (NVMeoF) to provide high-throughput data access to the training pipeline. All firmware versions for UCS BIOS, GPU vBIOS, and NIC firmware were validated against the Cisco Secure AI Factory with NVIDIA reference architecture compatibility matrix prior to deployment.
1.2 NVIDIA driver and CUDA installation
Install the recommended stable proprietary driver and the NVIDIA CUDA toolkit using the standard Ubuntu package manager.
sudo apt update
sudo ubuntu-drivers install --gpgpu nvidia:535-server
sudo apt install nvidia-cuda-toolkit
Next, perform a reboot to ensure that the new kernel module is loaded.
The installation can be verified by checking the driver version and running the “nvcc” compiler version check.
sudo nvidia-smi
nvcc --version

1.3 inotify setup
Canonical Kubernetes uses inotify to interact with the file system. This may lead to situations where large Canonical Kubernetes deployments (such as Charmed Kubeflow and Charmed MLflow exceed the default inotify limits. Therefore, you can increase the limits, and retain the increased limits across the infrastructure, using the following commands:
sudo sysctl fs.inotify.max_user_instances=1280
sudo sysctl fs.inotify.max_user_watches=655360
echo "fs.inotify.max_user_instances=1280" >> sudo tee -a /etc/sysctl.conf
echo "fs.inotify.max_user_watches=655360" >> sudo tee -a /etc/sysctl.conf
2. Canonical Kubernetes deployment
The deployment uses Canonical's official Kubernetes snap, customized for the Cisco AI PODs' hardware capabilities.
2.1 Core cluster deployment
You can perform the Canonical Kubernetes deployment and bootstrap using the following snap command:
sudo snap install k8s --classic
sudo k8s bootstrap
2.2 Post-deployment verification
Upon completion of the bootstrap, you should check the status of the cluster:
sudo k8s status --wait-ready
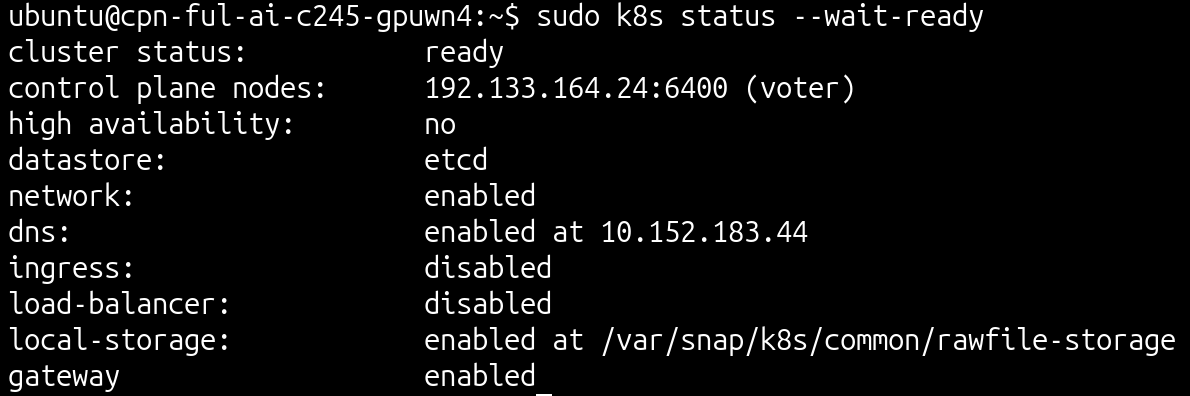
sudo k8s kubectl get nodes


3.1 NVIDIA GPU integration
Deploy the NVIDIA GPU Operator using its official Helm chart. This will automate the management and lifecycle of necessary components (such as drivers and device plug-ins) for GPU support in Kubernetes.
1. Addition of the NVIDIA GPU Operator Helm Repository: Add the official NVIDIA GPU Operator Helm Repository to the local Helm configuration:
sudo k8s helm repo add nvidia https://nvidia.github.io/gpu-operator
sudo k8s helm repo update
2. NIVIDI GPU Operator installation: Install the NVIDIA GPU Operator into the gpu-operator namespace:
sudo k8s helm install --generate-name --wait -n gpu-operator --create-namespace nvidia/gpu-operator --version=v24.9.2 --set mig.strategy=mixed
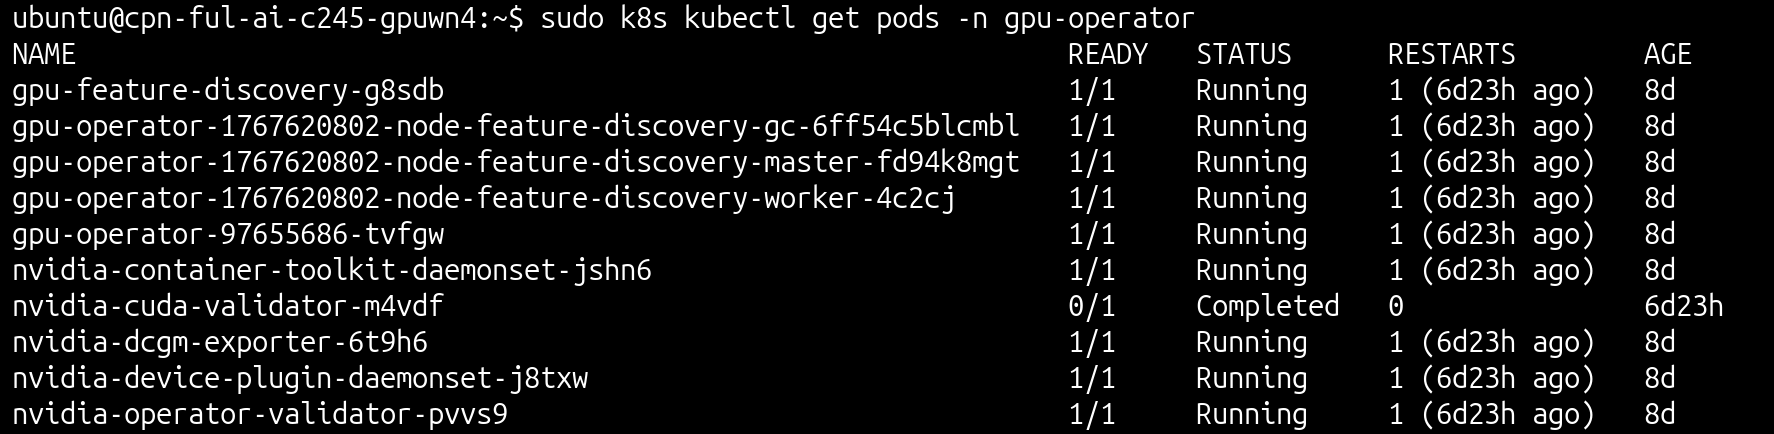
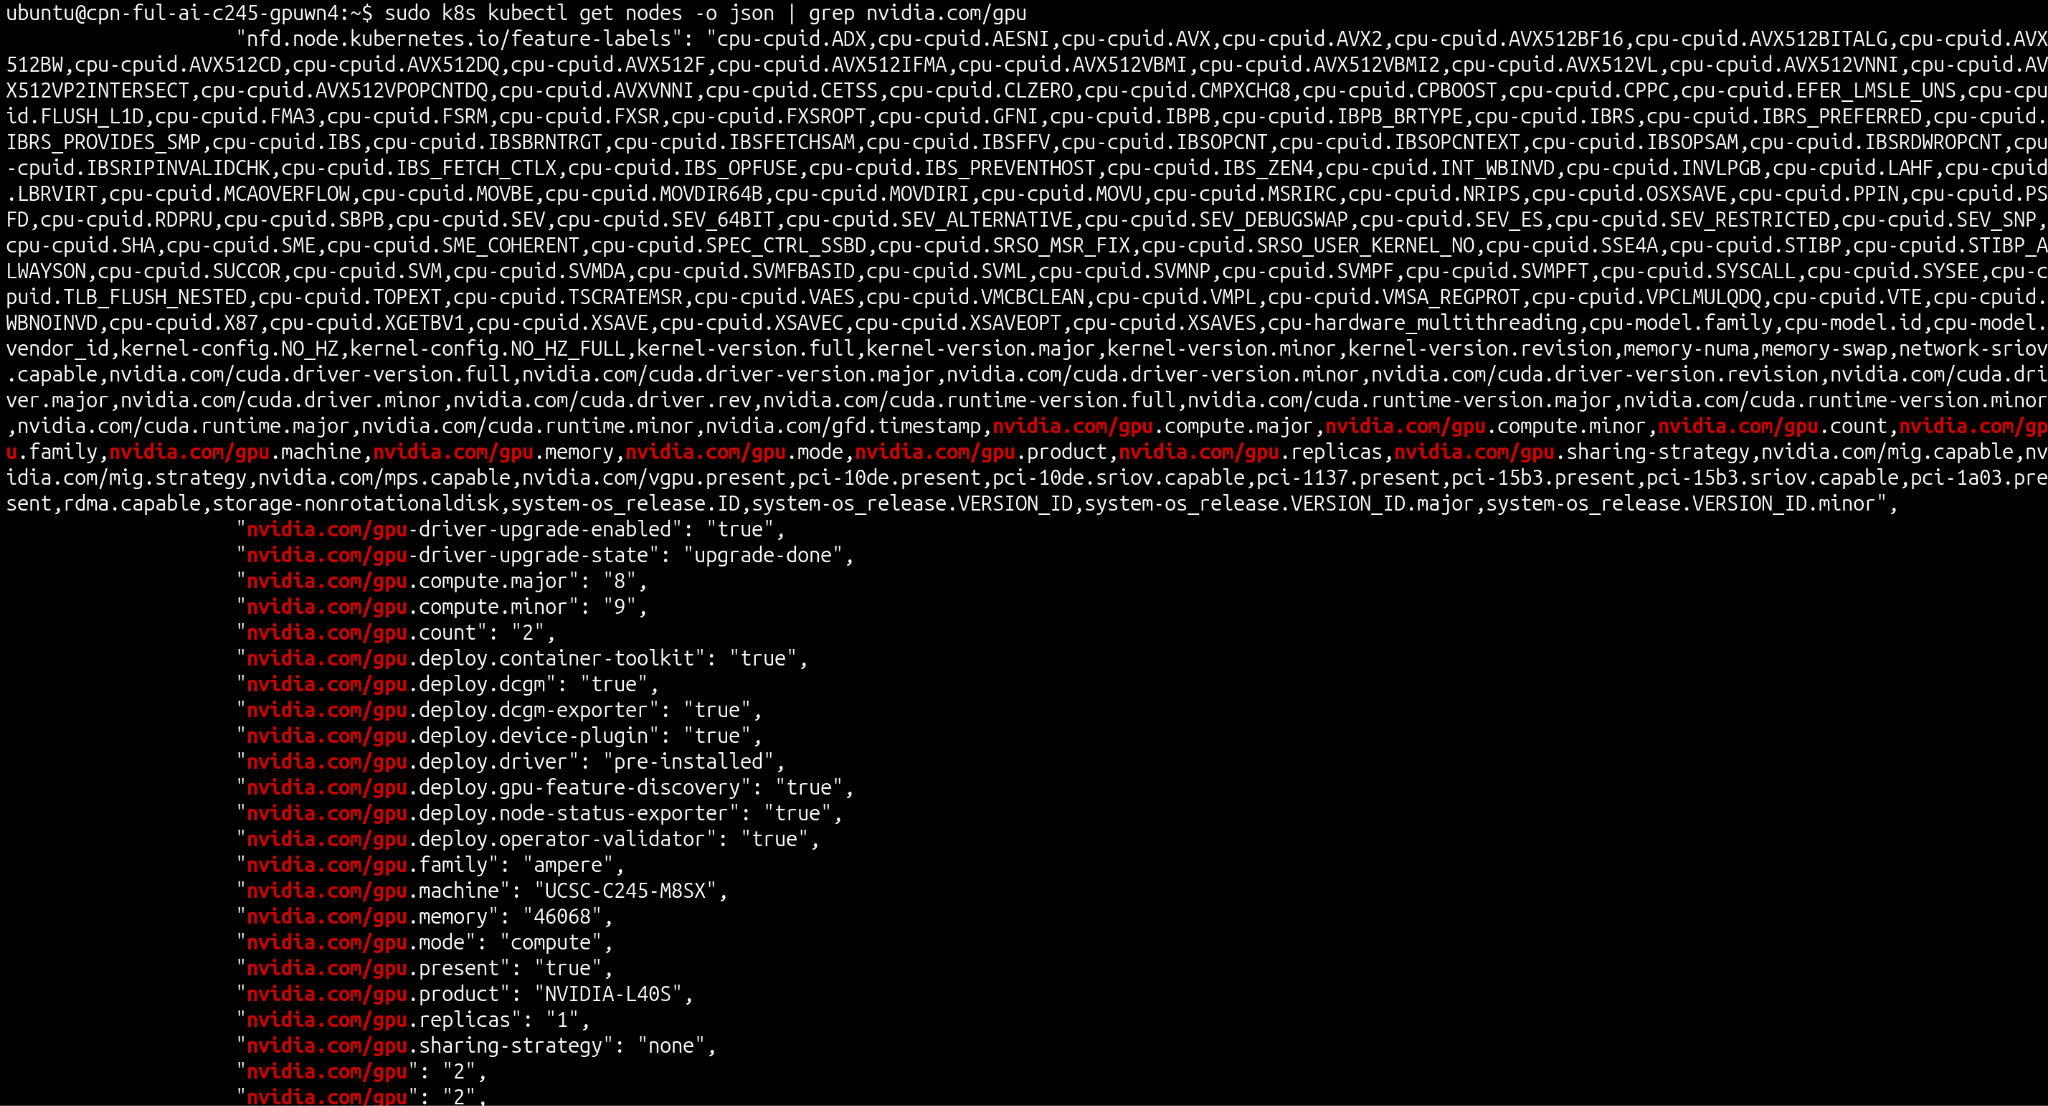
3. Verification: Monitor the cluster resources in order to confirm:
● Successful deployment of the driver and device plug-in pods
● Recognition of Kubernetes by the available NVIDIA GPUs
sudo k8s kubectl get pods -n gpu-operator
sudo k8s kubectl get nodes -o json | grep nvidia.com/gpu
3.1.1 Basic CUDA verification
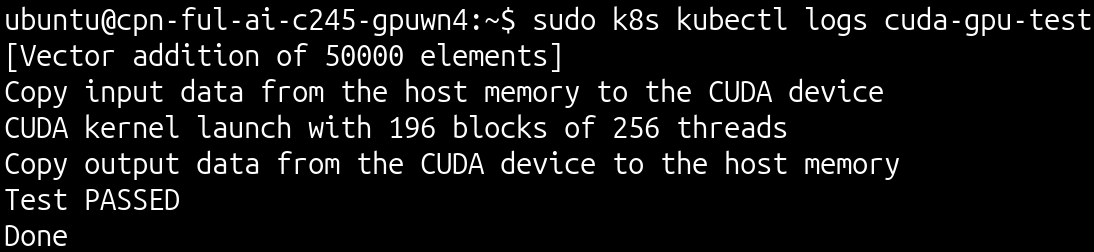
Perform the basic CUDA verification step by configuring a test pod to execute a simple CUDA operation.
As an output, you’ll see that the test pod was deployed using the nvcr.io/nvidia/k8s/cuda-sample:vectoradd-cuda10.2 image, requesting two GPU resources, which successfully ran and confirmed GPU functionality from within the containers.
apiVersion: v1
kind: Pod
metadata:
name: cuda-gpu-test
spec:
restartPolicy: OnFailure
containers:
- name: cuda-vector-add
image: "nvcr.io/nvidia/k8s/cuda-sample:vectoradd-cuda10.2"
resources:
limits:
nvidia.com/gpu: 2
3.1.2 Tensorflow benchmark
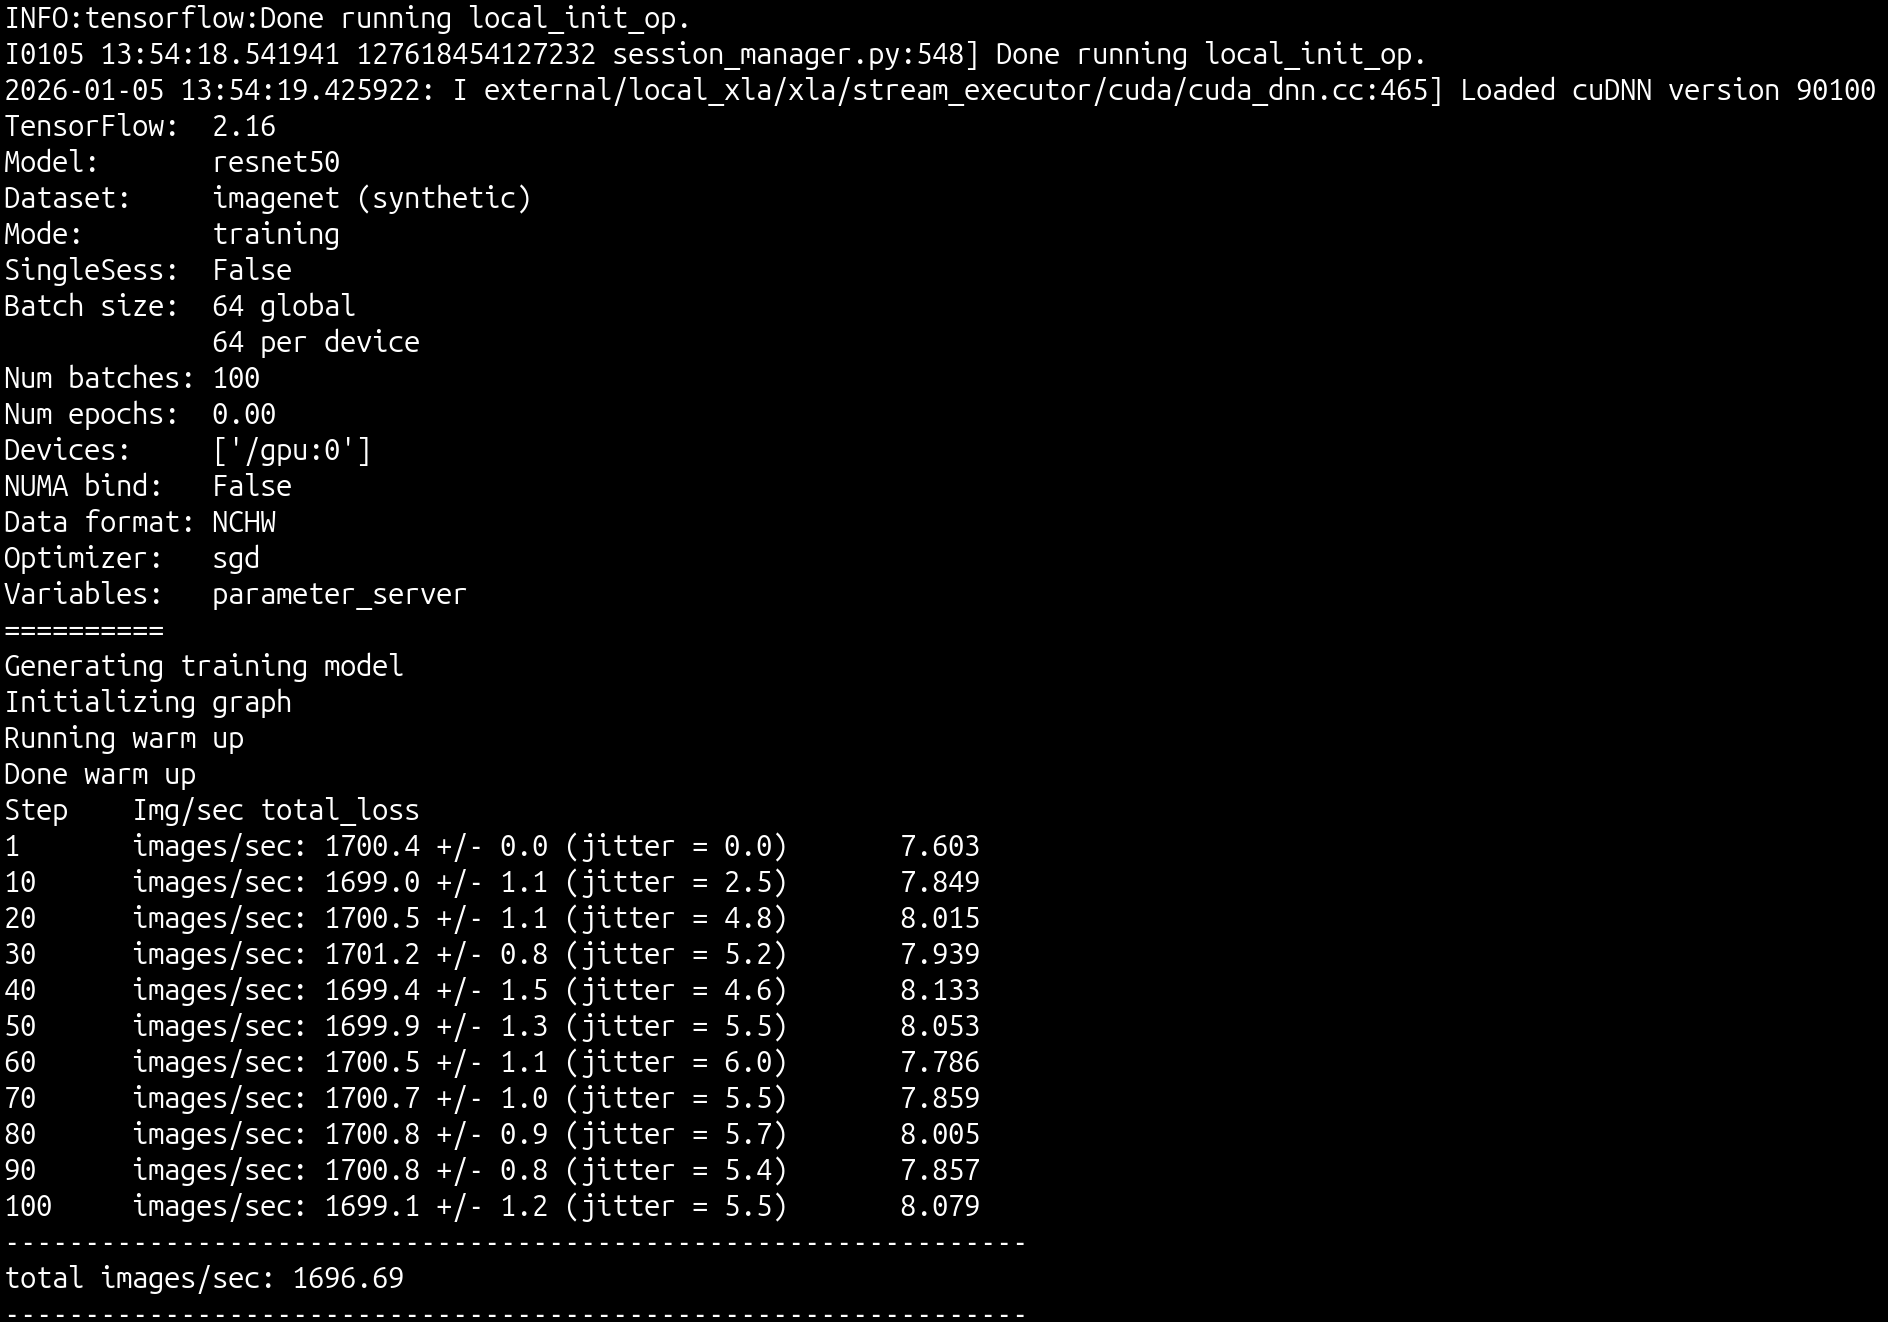
Perform the tensorflow benchmarking step by configuring a test pod to execute the tensorflow benchmarks.
As an output, you’ll see that the test pod was deployed using the nvcr.io/nvidia/tensorflow:24.06-tf2-py3 image, requesting two GPU resources, which successfully ran and confirmed GPU functionality with tensorflow from within containers.
apiVersion: v1
kind: Pod
metadata:
name: tf-gpu-bench-full
spec:
restartPolicy: Never
containers:
- name: tf-benchmarks
image: "nvcr.io/nvidia/tensorflow:24.06-tf2-py3" # Always check for latest OCI release tag: https://catalog.ngc.nvidia.com/orgs/nvidia/containers/tensorflow/tags
command: ["/bin/sh", "-c"]
args: ["cd /workspace && git clone https://github.com/tensorflow/benchmarks/ && cd /workspace/benchmarks/scripts/tf_cnn_benchmarks && python tf_cnn_benchmarks.py --num_gpus=1 --batch_size=64 --model=resnet50 --use_fp16"]
resources:
limits:
nvidia.com/gpu: 2
ubuntu@cpn-ful-ai-c245-gpuwn4:~$ cat cuda_test.yaml
apiVersion: v1
kind: Pod
metadata:
name: cuda-gpu-test
spec:
restartPolicy: OnFailure
containers:
- name: cuda-vector-add
image: "nvcr.io/nvidia/k8s/cuda-sample:vectoradd-cuda10.2"
resources:
limits:
nvidia.com/gpu: 2
sudo k8s kubectl logs tf-gpu-bench-full
3.3. Networking configuration
Cilium is the default Container Network Interface (CNI) for the Canonical Kubernetes distribution, providing integrated networking and network policy enforcement. Therefore, no additional installation or configuration steps are required.
The MetalLB plug-in should be enabled and configured to allow access to Kubeflow:
sudo k8s enable load-balancer
sudo k8s set load-balancer.cidrs=10.2.0.1-10.2.0.254
3.3.1 Cilium CNI testing
Perform the Cilium testing using the official Cilium single-node connectivity check.
This requires making adjustments to the yaml file, as coredns is used in Canonical Kubernetes instead of kube-dns.
sed -i 's/kube-dns/coredns/g' connectivity-check-single-node.yaml
sudo k8s kubectl create namespace cilium-test
sudo k8s kubectl apply -f connectivity-check-single-node.yaml
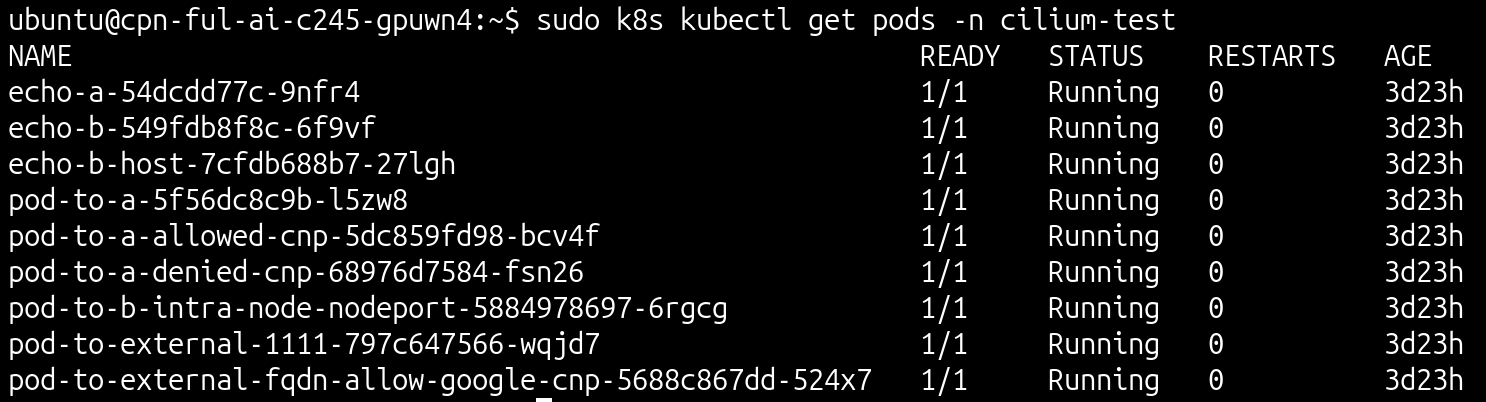
The previous command deploys the test pods and the necessary Cilium network policies:

The test is successful if all created pods are in running state:
sudo k8s kubectl get pods -n cilium-test
4.1 Introduction to Canonical’s MLOps stack
Canonical’s MLOps stack provides a robust, production-ready platform for machine learning and deep learning workloads on Kubernetes. The suite is based on two key components, both deployed and managed using Juju:
● Charmed Kubeflow: Canonical's enterprise-ready MLOps platform
● Charmed MLflow: a lightweight platform for managing the ML lifecycle, including experimentation, reproducibility, and deployment
Deploying these charmed operators through Juju brings you the power of Kubernetes while simplifying the complex operational tasks associated with running a full-featured MLOps environment.
4.2 Installation
In this guide, the installation of Canonical’s MLOps stack is performed using the Juju operator lifecycle manager. This approach automates the deployment, scaling, integration, and management of the operators.
4.2.1 Juju setup
Install Juju configured Juju connect to the existing Canonical Kubernetes cluster:
sudo snap install juju
sudo k8s config | juju add-k8s ai-pod --client
juju bootstrap ai-pod
juju add-model kubeflow
4.2.2 Charmed Kubeflow deployment
Deploy the Charmed Kubeflow bundle from the 1.10/stable channel:
juju deploy kubeflow --trust --channel=1.10/stable
Wait until the deployed Juju applications are in an active state:
juju status --watch 5s

4.2.3 Charmed MLflow deployment
Deploy Charmed MLflow separately and integrate it with Kubeflow:
juju deploy mlflow --channel=2.22/stable –trust
The integration with Kubeflow is done using the Resource dispatcher operator, which enables all Kubeflow users to access the MLflow model registry from their namespaces:
juju deploy resource-dispatcher --channel 2.0/stable --trust
#Integrate mlflow to the resource dispatcher
juju integrate mlflow-server:secrets resource-dispatcher:secrets
juju integrate mlflow-server:pod-defaults resource-dispatcher:pod-defaults
juju integrate mlflow-minio:object-storage kserve-controller:object-storage
juju integrate kserve-controller:service-accounts resource-dispatcher:service-accounts
juju integrate kserve-controller:secrets resource-dispatcher:secrets
#Integrate mlflow to the kubeflow dashboard
juju integrate mlflow-server:ingress istio-pilot:ingress
juju integrate mlflow-server:dashboard-links kubeflow-dashboard:links
Wait until the deployed Juju applications are in an active state (notice how now also mlflow-* applications are deployed):
juju status --watch 5s

4.2.4 Accessing the Kubeflow dashboard
Expose the Kubeflow dashboard using the existing MetalLB load balancer configuration. You can determine the access IP by checking the external IP of the istio ingress gateway service.
Once that is complete, set up Dex authentication to allow access to a first user:
juju config dex-auth static-username=admin
juju config dex-auth static-password=admin
sudo k8s kubectl get svc -n kubeflow | grep istio-ingressgateway
You can verify that access to the dashboard has been successful through the assigned load-balancer IP.


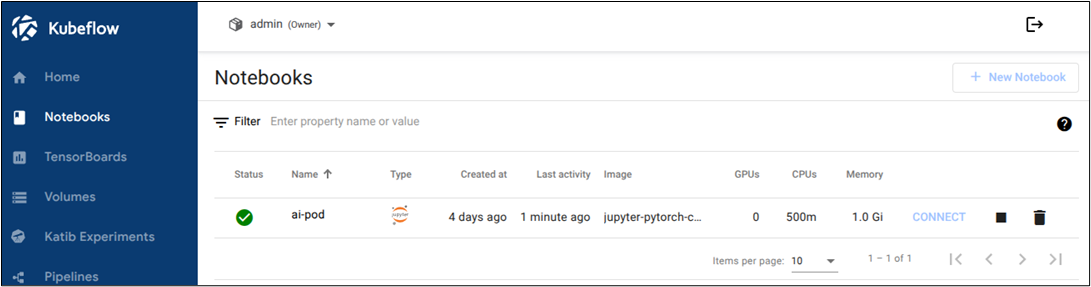
4.2.5 Jupyter notebook creation
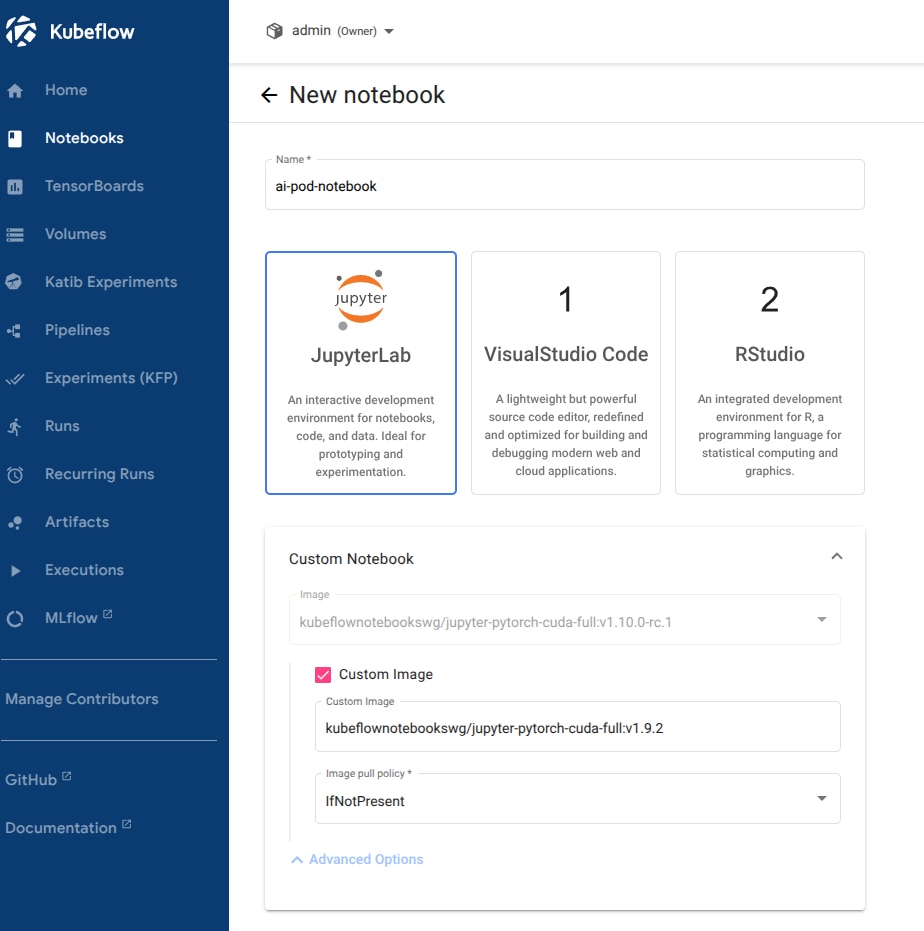
From the Notebooks tab, select New Notebook to create a new notebook.
For this showcase, we're creating a Jupyter notebook using the kubeflownotebookswg/jupyter-pytorch-cuda-full:v1.9.2 image, for compatibility with the available Cuda version on the machine (12.2).
As our notebook needs to be integrated with MLFlow, from Advanced Options, go to Configurations and allow access to Kubeflow Pipelines, MinIO, and MLflow from the dropdown menu:
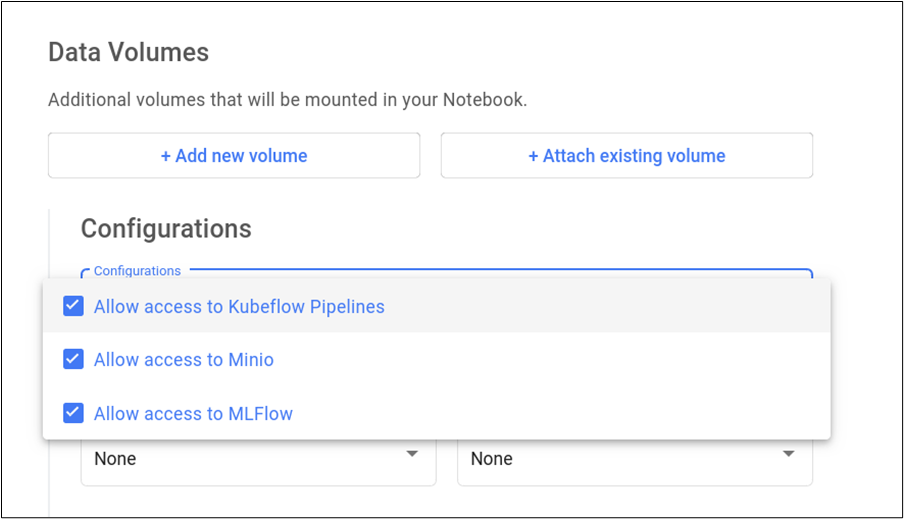
This will properly setup environment variables in the created jupyter notebook.
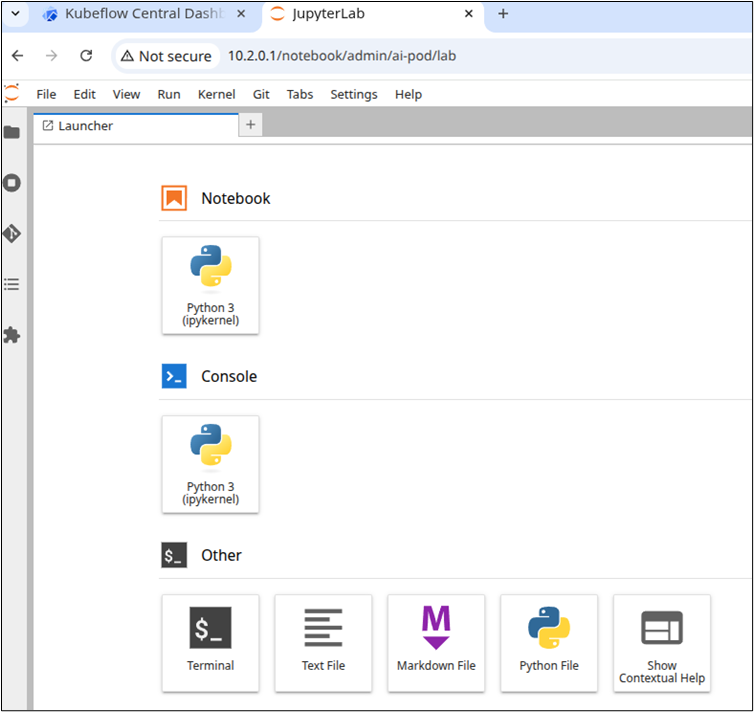
After clicking on the Launch button and waiting for the notebook status to become green, clicking on Connect will redirect to the notebook.
4.3 Test showcase: MLOps pipeline setup
4.3.1 Kubeflow + MLflow model training
In the Jupyter notebook, install the prerequisites:
pip install mlflow==2.15.1 kserve==0.13.1 tenacity
Import the necessary packages:
import kfp
import mlflow
import os
import requests
from kfp.dsl import Input, Model, component
from kfp.dsl import InputPath, OutputPath, pipeline, component
from kserve import KServeClient
from mlflow.tracking import MlflowClient
from tenacity import retry, stop_after_attempt, wait_exponential
Create a pipeline component that downloads and saves the model as .csv:
@component(
base_image="python:3.11",
packages_to_install=["requests==2.32.3", "pandas==2.2.2"]
)
def download_dataset(url: str, dataset_path: OutputPath('Dataset')) -> None:
import requests
import pandas as pd
response = requests.get(url)
response.raise_for_status()
from io import StringIO
dataset = pd.read_csv(StringIO(response.text), header=0, sep=";")
dataset.to_csv(dataset_path, index=False)
Create a pipeline component that processes the dataset:
@component(
base_image="python:3.11",
packages_to_install=["requests==2.32.3", "pandas==2.2.2"]
)
def download_dataset(url: str, dataset_path: OutputPath('Dataset')) -> None:
import requests
import pandas as pd
response = requests.get(url)
response.raise_for_status()
from io import StringIO
dataset = pd.read_csv(StringIO(response.text), header=0, sep=";")
dataset.to_csv(dataset_path, index=False)
Create a pipeline component that trains the model. This starts an MLFlow training session, which will result in the model being trained and stored on MinIO, ready to be deployed:
@component(
base_image="python:3.11",
packages_to_install=["pandas==2.2.2", "scikit-learn==1.5.1", "mlflow==2.15.1", "pyarrow==15.0.2", "boto3==1.34.162"]
)
def train_model(dataset: InputPath('Dataset'), run_name: str, model_name: str) -> str:
import os
import mlflow
import pandas as pd
from sklearn.linear_model import ElasticNet
from sklearn.model_selection import train_test_split
df = pd.read_parquet(dataset)
target_column = "quality"
train_x, test_x, train_y, test_y = train_test_split(
df.drop(columns=[target_column]),
df[target_column], test_size=0.25,
random_state=42, stratify=df[target_column]
)
mlflow.sklearn.autolog()
with mlflow.start_run(run_name=run_name) as run:
mlflow.set_tag("author", "kf-testing")
lr = ElasticNet(alpha=0.5, l1_ratio=0.5, random_state=42)
lr.fit(train_x, train_y)
mlflow.sklearn.log_model(lr, "model", registered_model_name=model_name)
model_uri = f"{run.info.artifact_uri}/model"
print(model_uri)
return model_uri
Now create a pipeline component that deploys the trained model and serves it using Kserve, reserving a GPU for the served model:
@component(
base_image="python:3.11",
packages_to_install=["kserve==0.13.1", "kubernetes==26.1.0", "tenacity==9.0.0"]
)
def deploy_model_with_kserve(model_uri: str, isvc_name: str) -> str:
from kubernetes.client import V1ObjectMeta, V1ResourceRequirements
from kserve import (
constants,
KServeClient,
V1beta1InferenceService,
V1beta1InferenceServiceSpec,
V1beta1PredictorSpec,
V1beta1SKLearnSpec,
)
from tenacity import retry, wait_exponential, stop_after_attempt
isvc = V1beta1InferenceService(
api_version=constants.KSERVE_V1BETA1,
kind=constants.KSERVE_KIND,
metadata=V1ObjectMeta(
name=isvc_name,
annotations={"sidecar.istio.io/inject": "false"},
),
spec=V1beta1InferenceServiceSpec(
predictor=V1beta1PredictorSpec(
service_account_name="kserve-controller-s3",
sklearn=V1beta1SKLearnSpec(
storage_uri=model_uri
),
resources=V1ResourceRequirements(
limits={"nvidia.com/gpu": "1"}
)
)
)
)
client = KServeClient()
client.create(isvc)
@retry(
wait=wait_exponential(multiplier=2, min=1, max=10),
stop=stop_after_attempt(30),
reraise=True,
)
def assert_isvc_created(client, isvc_name):
assert client.is_isvc_ready(isvc_name), f"Failed to create Inference Service {isvc_name}."
assert_isvc_created(client, isvc_name)
isvc_resp = client.get(isvc_name)
isvc_url = isvc_resp['status']['address']['url']
print("Inference URL:", isvc_url)
return isvc_url
The pipeline can be configured to enable GPU allocation requests for a specific task:
def add_gpu_request(task: dsl.PipelineTask) -> dsl.PipelineTask:
"""Add a request field for a GPU to the container created by the PipelineTask object."""
return task.add_node_selector_constraint(accelerator="nvidia.com/gpu").set_accelerator_limit(
limit=1
)
Now, put all components together and define the pipeline:
ISVC_NAME = "wine-regressor5"
MLFLOW_RUN_NAME = "elastic_net_models"
MLFLOW_MODEL_NAME = "wine-elasticnet"
mlflow_tracking_uri = os.getenv('MLFLOW_TRACKING_URI')
mlflow_s3_endpoint_url = os.getenv('MLFLOW_S3_ENDPOINT_URL')
aws_access_key_id = os.getenv('AWS_ACCESS_KEY_ID')
aws_secret_access_key = os.getenv('AWS_SECRET_ACCESS_KEY')
@pipeline(name='download-preprocess-train-deploy-pipeline')
def download_preprocess_train_deploy_pipeline(url: str):
download_task = download_dataset(url=url)
preprocess_task = preprocess_dataset(
dataset=download_task.outputs['dataset_path']
)
train_task = train_model(
dataset=preprocess_task.outputs['output_file'], run_name=MLFLOW_RUN_NAME, model_name=MLFLOW_MODEL_NAME
).set_env_variable(name='MLFLOW_TRACKING_URI', value=mlflow_tracking_uri)\
.set_env_variable(name='MLFLOW_S3_ENDPOINT_URL', value=mlflow_s3_endpoint_url)\
.set_env_variable(name='AWS_ACCESS_KEY_ID', value=aws_access_key_id)\
.set_env_variable(name='AWS_SECRET_ACCESS_KEY', value=aws_secret_access_key)
train_task = add_gpu_request(train_task)
deploy_task = deploy_model_with_kserve(
model_uri=train_task.output, isvc_name=ISVC_NAME
).set_env_variable(name='AWS_SECRET_ACCESS_KEY', value=aws_secret_access_key)
Now, let's run it:
client = kfp.Client()
url = 'https://raw.githubusercontent.com/canonical/kubeflow-examples/main/e2e-wine-kfp-mlflow/winequality-red.csv'
kfp.compiler.Compiler().compile(download_preprocess_train_deploy_pipeline, 'download_preprocess_train_deploy_pipeline.yaml')
run = client.create_run_from_pipeline_func(download_preprocess_train_deploy_pipeline, arguments={'url': url}, enable_caching=False)
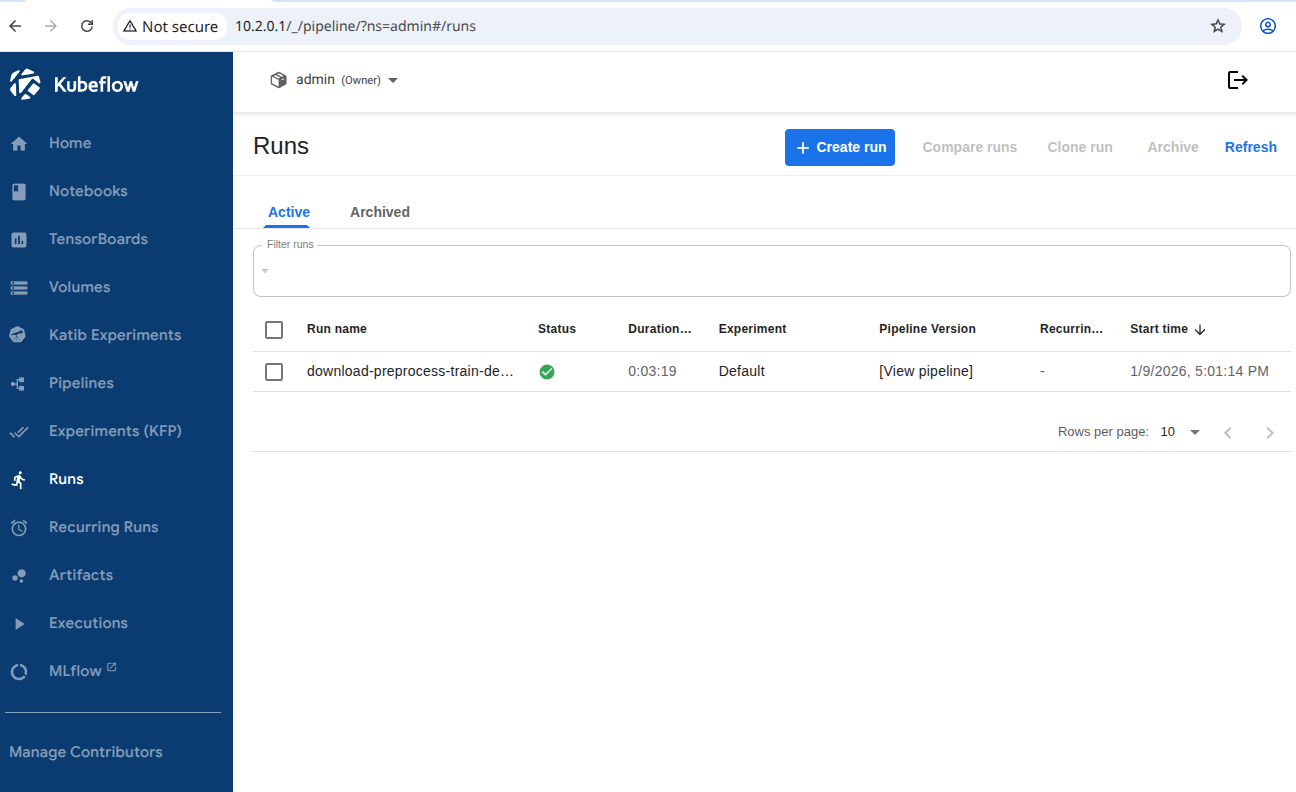
The pipeline run will now appear in the Run tab in the Kubeflow UI:
Once the pipeline is completed, the output of the last step will be the URL of the deployed model using Kserve:
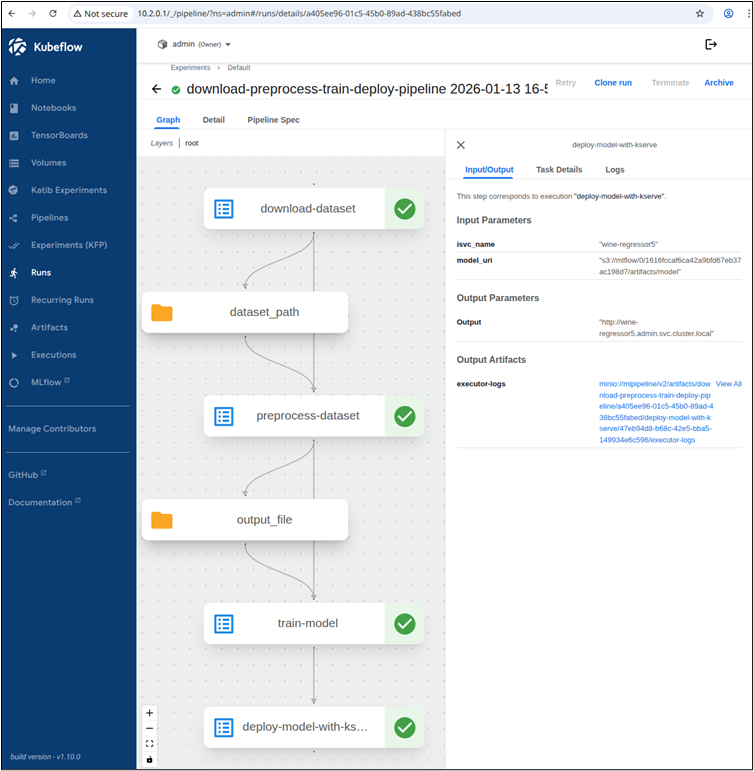
Which we can query from the Jupyter notebook:
kserve_client = KServeClient()
isvc_resp = kserve_client.get(ISVC_NAME)
inference_service_url = isvc_resp['status']['address']['url']
print("Inference URL:", inference_service_url)
input_data = {
"instances": [
[7.4, 0.7, 0.0, 1.9, 0.076, 11.0, 34.0, 0.9978, 3.51, 0.56, 9.4],
[7.8, 0.88, 0.0, 2.6, 0.098, 25.0, 67.0, 0.9968, 3.2, 0.68, 9.8]
]
}
response = requests.post(f"{inference_service_url}/v1/models/{ISVC_NAME}:predict", json=input_data)
print(response.text)

Check that the GPU has correctly been assigned to the Kserve pod:
![]()
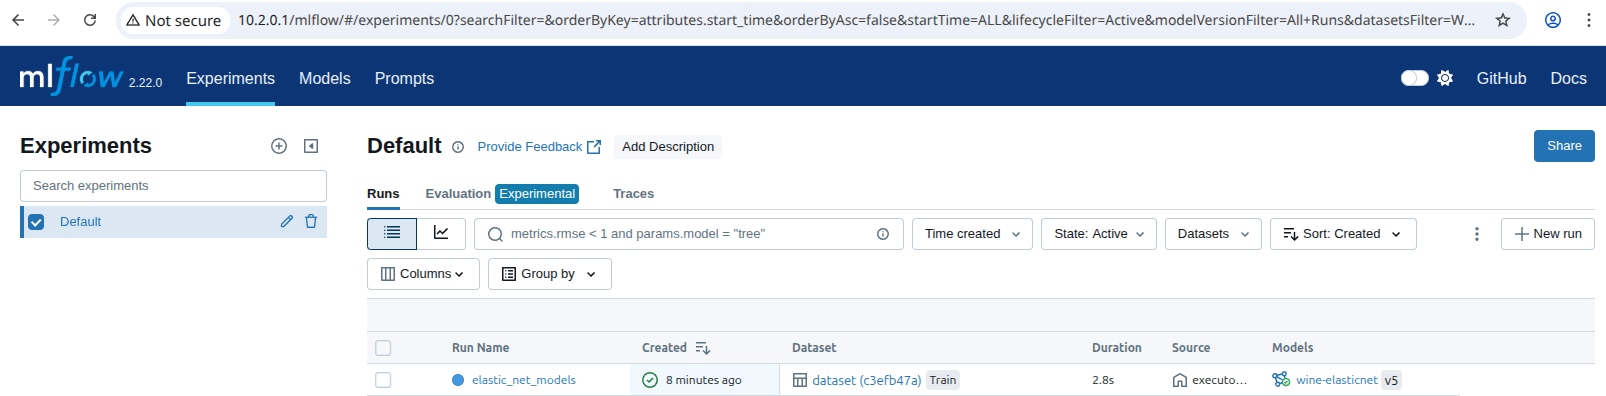
The pipeline compiled in the Jupyter notebook is shown in the UIs as a Kubeflow run and as an MLflow experiment, used for tracking parameters, metrics, artifacts, data, and environment configuration. Additionally, the ElasticNet regression model is also stored in the MLflow model registry, which enables model versioning, aliasing, tracking, and annotations.
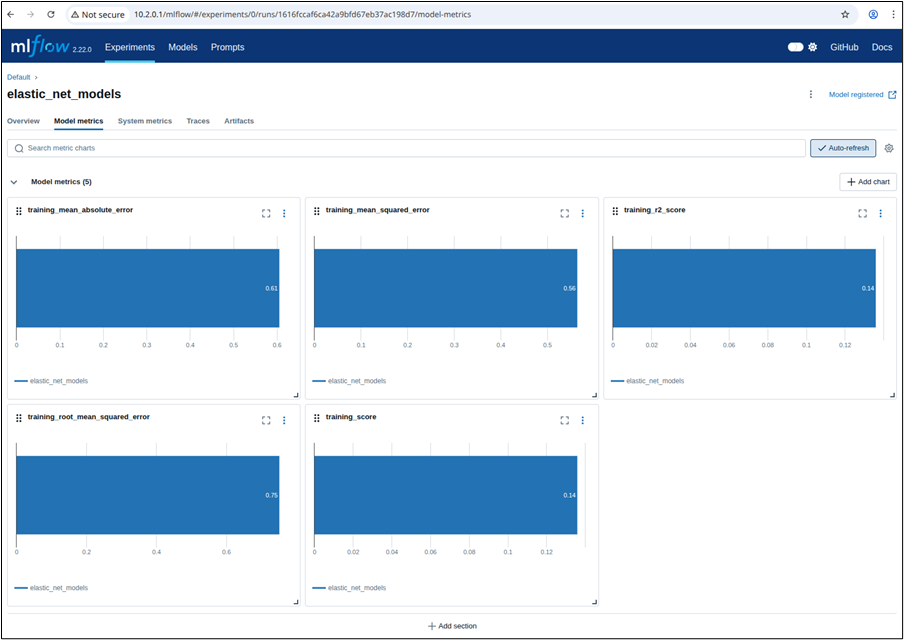
To view the MLflow tracking UI, select MLflow from the Kubeflow central dashboard sidebar. Within Experiments, information about each experiment is available, including used datasets, hyperparameters, and model metrics:
Clicking on the model, you can see information related to registered models, including descriptions, tags, and versions:


When scaling your AI/ML workloads, it’s important you have a platform that empowers you to move quickly and efficiently.
Cisco AI PODs offer a robust, pre-integrated hardware layer including networking, built on a validated reference architecture. Canonical Kubernetes and Canonical’s MLOps stack make it easy to set up your system quickly and helps to ensure your GPUs are working at their full potential.
● Cisco Secure AI Factory with NVIDIA
● Cisco UCS C885A M8 Rack Server Data Sheet
● Cisco Nexus Hyperfabric AI Infrastructure Data Sheet
● Cisco Hypershield Solution Overview
To find out more about what you can do with Canonical’s solutions, see the following further reading:
● Canonical Kubernetes documentation
● Charmed Kubeflow documentation
● Charmed MLflow documentation
Annex A: Cilium CNI testing yaml
---
metadata:
name: echo-a
labels:
name: echo-a
topology: any
component: network-check
traffic: internal
quarantine: "false"
type: autocheck
spec:
template:
metadata:
labels:
name: echo-a
spec:
hostNetwork: false
containers:
- name: echo-a-container
env:
- name: PORT
value: "8080"
ports:
- containerPort: 8080
image: quay.io/cilium/json-mock:v1.3.2@sha256:bc6c46c74efadb135bc996c2467cece6989302371ef4e3f068361460abaf39be
imagePullPolicy: IfNotPresent
terminationMessagePolicy: FallbackToLogsOnError
readinessProbe:
timeoutSeconds: 7
exec:
command:
- curl
- -sS
- --fail
- --connect-timeout
- "5"
- -o
- /dev/null
- localhost:8080
livenessProbe:
timeoutSeconds: 7
exec:
command:
- curl
- -sS
- --fail
- --connect-timeout
- "5"
- -o
- /dev/null
- localhost:8080
selector:
matchLabels:
name: echo-a
replicas: 1
apiVersion: apps/v1
kind: Deployment
---
metadata:
name: echo-b
labels:
name: echo-b
topology: any
component: services-check
traffic: internal
quarantine: "false"
type: autocheck
spec:
template:
metadata:
labels:
name: echo-b
spec:
hostNetwork: false
containers:
- name: echo-b-container
env:
- name: PORT
value: "8080"
ports:
- containerPort: 8080
hostPort: 40000
image: quay.io/cilium/json-mock:v1.3.2@sha256:bc6c46c74efadb135bc996c2467cece6989302371ef4e3f068361460abaf39be
imagePullPolicy: IfNotPresent
terminationMessagePolicy: FallbackToLogsOnError
readinessProbe:
timeoutSeconds: 7
exec:
command:
- curl
- -sS
- --fail
- --connect-timeout
- "5"
- -o
- /dev/null
- localhost:8080
livenessProbe:
timeoutSeconds: 7
exec:
command:
- curl
- -sS
- --fail
- --connect-timeout
- "5"
- -o
- /dev/null
- localhost:8080
selector:
matchLabels:
name: echo-b
replicas: 1
apiVersion: apps/v1
kind: Deployment
---
metadata:
name: echo-b-host
labels:
name: echo-b-host
topology: any
component: services-check
traffic: internal
quarantine: "false"
type: autocheck
spec:
template:
metadata:
labels:
name: echo-b-host
spec:
hostNetwork: true
containers:
- name: echo-b-host-container
env:
- name: PORT
value: "21000"
ports: []
image: quay.io/cilium/json-mock:v1.3.2@sha256:bc6c46c74efadb135bc996c2467cece6989302371ef4e3f068361460abaf39be
imagePullPolicy: IfNotPresent
terminationMessagePolicy: FallbackToLogsOnError
readinessProbe:
timeoutSeconds: 7
exec:
command:
- curl
- -sS
- --fail
- --connect-timeout
- "5"
- -o
- /dev/null
- localhost:21000
livenessProbe:
timeoutSeconds: 7
exec:
command:
- curl
- -sS
- --fail
- --connect-timeout
- "5"
- -o
- /dev/null
- localhost:21000
affinity:
podAffinity:
requiredDuringSchedulingIgnoredDuringExecution:
- labelSelector:
matchExpressions:
- key: name
operator: In
values:
- echo-b
topologyKey: kubernetes.io/hostname
selector:
matchLabels:
name: echo-b-host
replicas: 1
apiVersion: apps/v1
kind: Deployment
---
metadata:
name: pod-to-a
labels:
name: pod-to-a
topology: any
component: network-check
traffic: internal
quarantine: "false"
type: autocheck
spec:
template:
metadata:
labels:
name: pod-to-a
spec:
hostNetwork: false
containers:
- name: pod-to-a-container
ports: []
image: quay.io/cilium/alpine-curl:v1.5.0@sha256:7b286939730d8af1149ef88dba15739d8330bb83d7d9853a23e5ab4043e2d33c
imagePullPolicy: IfNotPresent
command:
- /bin/ash
- -c
- sleep 1000000000
terminationMessagePolicy: FallbackToLogsOnError
readinessProbe:
timeoutSeconds: 7
exec:
command:
- curl
- -sS
- --fail
- --connect-timeout
- "5"
- -o
- /dev/null
- echo-a:8080/public
livenessProbe:
timeoutSeconds: 7
exec:
command:
- curl
- -sS
- --fail
- --connect-timeout
- "5"
- -o
- /dev/null
- echo-a:8080/public
selector:
matchLabels:
name: pod-to-a
replicas: 1
apiVersion: apps/v1
kind: Deployment
---
metadata:
name: pod-to-external-1111
labels:
name: pod-to-external-1111
topology: any
component: network-check
traffic: external
quarantine: "false"
type: autocheck
spec:
template:
metadata:
labels:
name: pod-to-external-1111
spec:
hostNetwork: false
containers:
- name: pod-to-external-1111-container
ports: []
image: quay.io/cilium/alpine-curl:v1.5.0@sha256:7b286939730d8af1149ef88dba15739d8330bb83d7d9853a23e5ab4043e2d33c
imagePullPolicy: IfNotPresent
command:
- /bin/ash
- -c
- sleep 1000000000
terminationMessagePolicy: FallbackToLogsOnError
readinessProbe:
timeoutSeconds: 7
exec:
command:
- curl
- -sS
- --fail
- --connect-timeout
- "5"
- -o
- /dev/null
- https://1.1.1.1
livenessProbe:
timeoutSeconds: 7
exec:
command:
- curl
- -sS
- --fail
- --connect-timeout
- "5"
- -o
- /dev/null
- https://1.1.1.1
selector:
matchLabels:
name: pod-to-external-1111
replicas: 1
apiVersion: apps/v1
kind: Deployment
---
metadata:
name: pod-to-a-denied-cnp
labels:
name: pod-to-a-denied-cnp
topology: any
component: policy-check
traffic: internal
quarantine: "false"
type: autocheck
spec:
template:
metadata:
labels:
name: pod-to-a-denied-cnp
spec:
hostNetwork: false
containers:
- name: pod-to-a-denied-cnp-container
ports: []
image: quay.io/cilium/alpine-curl:v1.5.0@sha256:7b286939730d8af1149ef88dba15739d8330bb83d7d9853a23e5ab4043e2d33c
imagePullPolicy: IfNotPresent
command:
- /bin/ash
- -c
- sleep 1000000000
terminationMessagePolicy: FallbackToLogsOnError
readinessProbe:
timeoutSeconds: 7
exec:
command:
- ash
- -c
- '! curl -s --fail --connect-timeout 5 -o /dev/null echo-a:8080/private'
livenessProbe:
timeoutSeconds: 7
exec:
command:
- ash
- -c
- '! curl -s --fail --connect-timeout 5 -o /dev/null echo-a:8080/private'
selector:
matchLabels:
name: pod-to-a-denied-cnp
replicas: 1
apiVersion: apps/v1
kind: Deployment
---
metadata:
name: pod-to-a-allowed-cnp
labels:
name: pod-to-a-allowed-cnp
topology: any
component: policy-check
traffic: internal
quarantine: "false"
type: autocheck
spec:
template:
metadata:
labels:
name: pod-to-a-allowed-cnp
spec:
hostNetwork: false
containers:
- name: pod-to-a-allowed-cnp-container
ports: []
image: quay.io/cilium/alpine-curl:v1.5.0@sha256:7b286939730d8af1149ef88dba15739d8330bb83d7d9853a23e5ab4043e2d33c
imagePullPolicy: IfNotPresent
command:
- /bin/ash
- -c
- sleep 1000000000
terminationMessagePolicy: FallbackToLogsOnError
readinessProbe:
timeoutSeconds: 7
exec:
command:
- curl
- -sS
- --fail
- --connect-timeout
- "5"
- -o
- /dev/null
- echo-a:8080/public
livenessProbe:
timeoutSeconds: 7
exec:
command:
- curl
- -sS
- --fail
- --connect-timeout
- "5"
- -o
- /dev/null
- echo-a:8080/public
selector:
matchLabels:
name: pod-to-a-allowed-cnp
replicas: 1
apiVersion: apps/v1
kind: Deployment
---
metadata:
name: pod-to-external-fqdn-allow-google-cnp
labels:
name: pod-to-external-fqdn-allow-google-cnp
topology: any
component: policy-check
traffic: external
quarantine: "false"
type: autocheck
spec:
template:
metadata:
labels:
name: pod-to-external-fqdn-allow-google-cnp
spec:
hostNetwork: false
containers:
- name: pod-to-external-fqdn-allow-google-cnp-container
ports: []
image: quay.io/cilium/alpine-curl:v1.5.0@sha256:7b286939730d8af1149ef88dba15739d8330bb83d7d9853a23e5ab4043e2d33c
imagePullPolicy: IfNotPresent
command:
- /bin/ash
- -c
- sleep 1000000000
terminationMessagePolicy: FallbackToLogsOnError
readinessProbe:
timeoutSeconds: 7
exec:
command:
- curl
- -sS
- --fail
- --connect-timeout
- "5"
- -o
- /dev/null
- www.google.com
livenessProbe:
timeoutSeconds: 7
exec:
command:
- curl
- -sS
- --fail
- --connect-timeout
- "5"
- -o
- /dev/null
- www.google.com
selector:
matchLabels:
name: pod-to-external-fqdn-allow-google-cnp
replicas: 1
apiVersion: apps/v1
kind: Deployment
---
metadata:
name: pod-to-b-intra-node-nodeport
labels:
name: pod-to-b-intra-node-nodeport
topology: intra-node
component: nodeport-check
traffic: internal
quarantine: "false"
type: autocheck
spec:
template:
metadata:
labels:
name: pod-to-b-intra-node-nodeport
spec:
hostNetwork: false
containers:
- name: pod-to-b-intra-node-nodeport-container
ports: []
image: quay.io/cilium/alpine-curl:v1.5.0@sha256:7b286939730d8af1149ef88dba15739d8330bb83d7d9853a23e5ab4043e2d33c
imagePullPolicy: IfNotPresent
command:
- /bin/ash
- -c
- sleep 1000000000
terminationMessagePolicy: FallbackToLogsOnError
readinessProbe:
timeoutSeconds: 7
exec:
command:
- curl
- -sS
- --fail
- --connect-timeout
- "5"
- -o
- /dev/null
- echo-b-host-headless:31414/public
livenessProbe:
timeoutSeconds: 7
exec:
command:
- curl
- -sS
- --fail
- --connect-timeout
- "5"
- -o
- /dev/null
- echo-b-host-headless:31414/public
affinity:
podAffinity:
requiredDuringSchedulingIgnoredDuringExecution:
- labelSelector:
matchExpressions:
- key: name
operator: In
values:
- echo-b
topologyKey: kubernetes.io/hostname
selector:
matchLabels:
name: pod-to-b-intra-node-nodeport
replicas: 1
apiVersion: apps/v1
kind: Deployment
---
metadata:
name: echo-a
labels:
name: echo-a
topology: any
component: network-check
traffic: internal
quarantine: "false"
type: autocheck
spec:
ports:
- name: http
port: 8080
type: ClusterIP
selector:
name: echo-a
apiVersion: v1
kind: Service
---
metadata:
name: echo-b
labels:
name: echo-b
topology: any
component: services-check
traffic: internal
quarantine: "false"
type: autocheck
spec:
ports:
- name: http
port: 8080
nodePort: 31414
type: NodePort
selector:
name: echo-b
apiVersion: v1
kind: Service
---
metadata:
name: echo-b-headless
labels:
name: echo-b-headless
topology: any
component: services-check
traffic: internal
quarantine: "false"
type: autocheck
spec:
ports:
- name: http
port: 8080
type: ClusterIP
selector:
name: echo-b
clusterIP: None
apiVersion: v1
kind: Service
---
metadata:
name: echo-b-host-headless
labels:
name: echo-b-host-headless
topology: any
component: services-check
traffic: internal
quarantine: "false"
type: autocheck
spec:
ports: []
type: ClusterIP
selector:
name: echo-b-host
clusterIP: None
apiVersion: v1
kind: Service
---
metadata:
name: pod-to-a-denied-cnp
labels:
name: pod-to-a-denied-cnp
topology: any
component: policy-check
traffic: internal
quarantine: "false"
type: autocheck
spec:
endpointSelector:
matchLabels:
name: pod-to-a-denied-cnp
egress:
- toPorts:
- ports:
- port: "53"
protocol: ANY
toEndpoints:
- matchLabels:
k8s:io.kubernetes.pod.namespace: kube-system
k8s:k8s-app: coredns
- matchLabels:
k8s:io.kubernetes.pod.namespace: kube-system
k8s:k8s-app: node-local-dns
- toPorts:
- ports:
- port: "5353"
protocol: UDP
toEndpoints:
- matchLabels:
k8s:io.kubernetes.pod.namespace: openshift-dns
k8s:dns.operator.openshift.io/daemonset-dns: default
apiVersion: cilium.io/v2
kind: CiliumNetworkPolicy
---
metadata:
name: pod-to-a-allowed-cnp
labels:
name: pod-to-a-allowed-cnp
topology: any
component: policy-check
traffic: internal
quarantine: "false"
type: autocheck
spec:
endpointSelector:
matchLabels:
name: pod-to-a-allowed-cnp
egress:
- toPorts:
- ports:
- port: "8080"
protocol: TCP
toEndpoints:
- matchLabels:
name: echo-a
- toPorts:
- ports:
- port: "53"
protocol: ANY
toEndpoints:
- matchLabels:
k8s:io.kubernetes.pod.namespace: kube-system
k8s:k8s-app: coredns
- matchLabels:
k8s:io.kubernetes.pod.namespace: kube-system
k8s:k8s-app: node-local-dns
- toPorts:
- ports:
- port: "5353"
protocol: UDP
toEndpoints:
- matchLabels:
k8s:io.kubernetes.pod.namespace: openshift-dns
k8s:dns.operator.openshift.io/daemonset-dns: default
apiVersion: cilium.io/v2
kind: CiliumNetworkPolicy
---
metadata:
name: pod-to-external-fqdn-allow-google-cnp
labels:
name: pod-to-external-fqdn-allow-google-cnp
topology: any
component: policy-check
traffic: external
quarantine: "false"
type: autocheck
spec:
endpointSelector:
matchLabels:
name: pod-to-external-fqdn-allow-google-cnp
egress:
- toFQDNs:
- matchPattern: '*.google.com'
- toPorts:
- ports:
- port: "53"
protocol: ANY
rules:
dns:
- matchPattern: '*'
toEndpoints:
- matchLabels:
k8s:io.kubernetes.pod.namespace: kube-system
k8s:k8s-app: coredns
- matchLabels:
k8s:io.kubernetes.pod.namespace: kube-system
k8s:k8s-app: node-local-dns
- toPorts:
- ports:
- port: "5353"
protocol: UDP
rules:
dns:
- matchPattern: '*'
toEndpoints:
- matchLabels:
k8s:io.kubernetes.pod.namespace: openshift-dns
k8s:dns.operator.openshift.io/daemonset-dns: default
apiVersion: cilium.io/v2
kind: CiliumNetworkPolicy