Table Of Contents

Using the PAC

PAC Toolsets

Configuration Tools

Network Performance Analysis Toolsets

PAC Basics

Prerequisites

Launching the PAC

Launching the PAC for the First Time

Launching the PAC after First Use

Operating the PAC

Exiting the PAC

Accessing PAC Toolsets and Features

User Permissions

Logon Sessions

Logging on as a Different User

Logging Off

Maintaining the PAM List

Connecting to a Domain

Selecting a Different Domain

Using the Network Selector

Selecting a Network

Opening Toolsets


Using the PAC


This chapter orients you to the Platform Applicable Client (PAC) Toolsets and the basics of operating the PAC. Topics include:

"PAC Toolsets"—description of the PAC Toolsets

"PAC Basics" section—basics of using the PAC, which includes launching, operating, and exiting the PAC

"Accessing PAC Toolsets and Features" section

"Maintaining the PAM List" section—identifying PAMs with which the PAC will communicate

"Connecting to a Domain" section—connecting the PAC to domains on PAMs

"Using the Network Selector" section—selecting network elements to monitor from the PAC

"Opening Toolsets" section—opening PAC Toolsets using the Toolset Selector.

PAC Toolsets

The PAC integrates a suite of network configuration and performance analysis Toolsets through a common graphical user interface. Use the Toolsets to perform most network-wide WAN management tasks from a single location.


Note Partner devices may or may not have certain Cisco WAPMS features enabled in their agent software. Consequently, some interfaces on the PAC—especially those accessed through the Network Configuration and Troubleshooting Toolsets—may display differently or may not be available for partner devices. These differences, when known, are noted. For a list of how partner device features affect the interfaces and data presented in the PAC, see "ASE Models and Features."


Configuration Tools

Two tools assist you in configuring networks and ASEs:

Network Configuration—map your physical network configuration and ASE settings to the network performance database. You can access Network Configuration from the Toolset Selector (shown in Figure 2-1) and the Setup menu. See "Network Configuration."

Performance Monitoring—set alarms (i) on thresholds you specify for network performance metrics, such as the percent of channel utilization or the number of errored seconds on a given circuit; and (ii) on significant network events, such as access line signal loss. By configuring thresholds and events, you will receive early warning messages before network performance impairs business-critical network functionality. You can access Performance Monitoring from the Event Processor Tool bar (shown in Figure 2-1) and the Event Processor menu. See "Performance Monitoring."

Network Performance Analysis Toolsets

Five Toolsets assist you in analyzing network performance data. All are available from the Toolset Selector and Toolset menu.

Event Processor—displays ASE-generated and internal, PAM-generated events and alarms. All events are logged and can be saved to a text file or printed. You can prioritize, filter, and respond to events. This window is the Cisco WAPMS home window; you can gain access to all other Toolsets from here. See "Event Processor."

Troubleshooting—view WAN performance information such as throughput, channel utilization, round trip delay, burst activity, and congestion. You can view the WAN from access line, access channel, circuit, and protocol perspectives. The PAC presents this information in summary graphs, class of service views, and detailed statistical tables. See "Troubleshooting."

Traffic Capture—provides full seven-layer Open System Interconnection (OSI) protocol analysis of every access line in the network. The ASE performs protocol filtering and capturing, while the PAC performs protocol decoding and any post-filtering of the captured data. This capability is comparable to deploying a protocol analyzer at every network site. See "Traffic Capture."

Conversations—view conversations taking place between two IP devices to determine how and when network users access certain information, such as from certain Web sites or servers. See "Conversations."

Planning and Reporting—draw on historical network performance information saved in the long-term database to generate reports quickly according to report type, time period, and selected network elements. You can schedule saved reports to be regenerated periodically. This Toolset is also available from a Web Client (see the "Web Planning and Reporting Clients" section). See "Planning and Reporting."

PAC Basics

This section explains system prerequisites which must be met before you can use the PAC, presents options for launching the PAC on first and subsequent uses, and presents scenarios for ongoing use.

Prerequisites

Before you can use the PAC, your system must meet certain prerequisites related to different components of the Cisco WAPMS system. In most cases, different individuals will perform these tasks.

Install ASEs on your WAN. When ASEs are not yet installed, you can do some skeletal network configuration from the PAC, however, ASEs must be installed before you can complete the configuration and use the PAC Toolsets for analyzing your network performance. As your network expands, you can install additional ASEs at any time.

For information on updating ASEs to the current software version, see the "Updating ASE Software on the PAC" section.

Install PAC and PAM software on the clients and servers. If you are an existing customer, you must upgrade the PAM to the current version. Install or upgrade the PAC software from CD-ROM or an FTP site.

For information on installing Cisco WAPMS, see the Cisco WAN Access Performance Management System Installation and Configuration Guide, 2.0.

Define valid users for each domain. If you are a new customer, your new PAM has one default domain but no valid users. Add and configure valid users to the domain and create and set up additional domains through the PAM Administration application. If you are an existing customer, domains and users from earlier versions of Cisco WAPMS are preserved in the software upgrade process.

For information on using PAM Administration, see Chapter 3, "Configuring Access Control Using PAM Administration," in the Cisco WAN Access Performance Management System System Adminstration Guide, 2.0.

Launching the PAC

When you open the PAC for the first time, you must connect to a domain before any network information appears. On subsequent use, you are automatically connected to the last-used domain.

Launching the PAC for the First Time


Step 1 Choose Start > Programs  > Cisco Systems >WAPMS PAC .

Step 2 When the PAM List window appears, click Add, then specify the PAM you intend to connect to. (See the "Maintaining the PAM List" section.)

Step 3 In the Logon window, enter your user ID and password assigned by the system administrator.

Step 4 When the Domain Selection window appears, choose a domain, then click OK. The domains listed are those to which your user ID and password have access.

Step 5 When the Event Processor window (the Cisco WAPMS home window) appears, no network is selected and most Toolset buttons are unavailable. Toolset buttons become available when you select a network. (See Figure 2-1.)

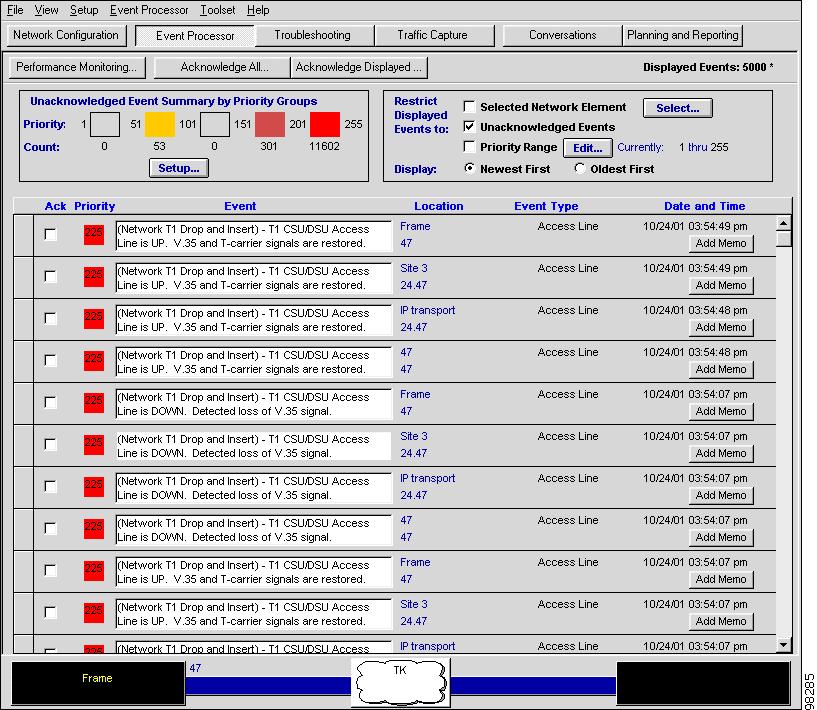
Figure 2-1 Event Processor Window—First Time PAC Launch

The Toolset options displayed in the Event Processor window vary based upon the access level and ASE link interface capability. You activate the buttons by selecting a network element from the Network Selector. The window's menus and options also vary according to the Toolset you selected from the Network Selector.

You also can click the Network Selector to choose the network elements you want to use for analysis. See the "Using the Network Selector" section for additional information.

Step 6 Proceed to the "Operating the PAC" section.


Launching the PAC after First Use


Step 1 Choose Start Programs  > Cisco Systems > WAPMS PAC.

Step 2 In the Logon window, enter your user ID and password assigned by the system administrator.

Step 3 When the Event Processor window appears, the PAC automatically connects you to your last-used domain and your last-used network element is automatically selected.

Figure 2-2 Event Processor Window—Subsequent PAC Launch

The Event Display pane displays few or no events until configured using Performance Monitoring (available from Tool bar). See the "Viewing the Event Display Pane" section

Step 4 Proceed to the "Operating the PAC" section.


Operating the PAC

After you log on to the PAC and open the Event Processor window, you encounter one of the following situations:

You are using the PAC for the first time with at least one network already configured in the current domain—in this situation, the Troubleshooting, Conversations, and Traffic Capture, and Performance Monitoring buttons are unavailable.

In the current domain you can:

open the Planning and Reporting Toolset to view or generate reports.

use the Network Selector at the bottom of the window (see the "Using the Network Selector" section) to select a network element within which you want to work. This enables the remaining Toolset buttons for which your user ID has permissions; you can open any of these applications. All network information that has been configured and collected previously is now accessible.

open Network Configuration to add more networks or network elements. See "Network Configuration."

Your current domain is empty (regardless of whether you have used the PAC before)—in this situation, the Event Processor window shows no events, the Network Selector shows no networks, and all Toolset buttons except Network Configuration are unavailable. Assuming you have access rights to the Network Configuration Toolset, the domain is empty when the PAM is a new server and it has not been loaded with data from a pre-existing domain of the same name; or the domain is empty when the domain is new, regardless of whether the PAM is new or existing.

In the current domain, you first must use the Network Configuration Toolset to enter network configuration data into the network performance database (see "Network Configuration."). Then you can:

open the Planning and Reporting Toolset to view or generate reports

select a network element within which you want to work, using the Network Selector at the bottom of the window (see the "Using the Network Selector" section). This enables any Toolset buttons for which your user ID has access rights, and for which capability exists for your ASE link interfaces. When a Toolset button is active, you can launch its associated applications.

Networks are present, but few events are displayed—when you initially view the Event Processor window, a few events are reported even though you may not have configured ASEs to report specific network events. This is because the three categories of state-change events by which ASEs report events—link layer/circuit state change events (including IP circuit state changes), physical layer state change events, and SNMP authenticate failure events—are active by default, and your ASEs may be reporting stray events caused by traffic passing over the WAN. (See "Performance Monitoring.")

In addition, other windows in other Toolsets—for example, the Troubleshooting Toolset—may also display data even though you have not yet configured any network events.

The PAC is in ongoing use—the Event Processor displays events, the last-used network is selected, and all Toolsets for which your user ID has access rights and for which capability exists for your ASE link interfaces are active.

You can change domains (see the "Connecting to a Domain" section). Or, in the current domain, you can:

select a Toolset button from the Toolset Selector to perform network performance analysis: Event Processor, Troubleshooting, Traffic Capture, Conversations, or Planning and Reporting.

return to the Network Configuration tool and Performance Monitoring function to make adjustments or additions to your network from time to time.

change network or network elements to view (see the "Using the Network Selector" section).

Exiting the PAC

Choose File  >  Exit from any Toolset window to exit the PAC. Typically, this closes the PAC application and terminates the PAC session. However, from Planning and Reporting or Conversations Toolset, exiting closes only that Toolset. You must then choose File  >  Exit again from the remaining active Toolset window to close the PAC.

Accessing PAC Toolsets and Features

The username and password required when you launch the PAC determine the domains to which you have access and the PAC capabilities to which you have rights within the current domain.

User Permissions

You can partition the PAM into one or more domains, where each domain is assigned authorized users. Through a domain you can grant users access to other, specific domains, or distinguish classes of users for the same network or group of networks. A user can have access to more than one domain, and multiple users can gain access to a single domain. The system administrator configures which networks belong in a domain, which users can access each domain, and which tasks each user can perform within a domain.

Individual users can also be granted or denied permission to:

use Network Configuration, Performance Monitoring, Traffic Capture, Conversations, and Troubleshooting Toolsets

acknowledge events and create or edit memos in the Event Processor Toolset

forward events from the Event Processor Toolset

view specific categories reports through the Planning and Reporting Toolset

create, edit, and delete Standard reports through the Planning and Reporting Toolset

create, edit, and delete Executive reports through the Planning and Reporting Toolset

schedule reports to be generated automatically through the Planning and Reporting Toolset

set domain options

update ASE software

For more information about user privileges, see Chapter 3, "Configuring Access Control Using PAM Administration," in the Cisco WAN Access Performance Management System System Adminstration Guide, 2.0.

Logon Sessions

If you have multiple user ID/password combinations with different access permissions, you can log on as a different user to change the permissions available to you. It is not, however, necessary to log off before logging on as a new user or exiting the PAC.

Logging on as a Different User


Step 1 Select Setup >  Log On.

Step 2 In the Cisco WAPMS Logon window, type a different user ID and password, then click OK.

Step 3 When prompted to confirm you want to log on as a new user, click Yes. Cisco WAPMS is reloaded, ending the previous session. You now have access to all resources appropriate to the new user ID and password in the current domain.

Step 4 To end the current session without changing user IDs or without exiting Cisco WAPMS, you can log off. This disconnects you from the PAM and the current domain.


Logging Off


Step 1 Choose Setup > Log Off.

Step 2 When prompted to confirm ending the current session, click Yes. Cisco WAPMS remains open, however most options and all Toolsets are unavailable.

Step 3 After logging off you can manage your PAM list, log on as another user, or exit the PAC. (See "Maintaining the PAM List".)


Maintaining the PAM List

Use the PAM list to connect to any PAM that may exist in your Cisco WAPMS system configuration. Adding PAMs to the list makes them available to the PAC. It is recommended you keep the PAM list current with your system configuration. For more information, see the "PAMs" section.


Note Including a PAM in the list does not grant every user of the PAC access to that PAM. Only the user's user ID and password determine the domains (if any) on that PAM to which the user can connect during a logon session.


Step 1 Select Setup  >  PAM List.

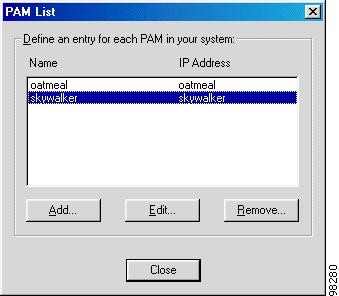
The PAM List window, shown in Figure 2-3, appears.

Figure 2-3 PAM List Window

Step 2 You have three options:

a. To add a descriptive name for the PAM and the IP address or host name of the server on which it resides, click Add. In the Add new PAM window, type the name and IP address of the PAM, then click OK.

b. To change the PAM properties, select the PAM, then click Edit. Change the name or IP address of the PAM, then click OK.

c. To erase the PAM from the list so the PAC cannot access it, click Remove. This does not affect the PAM itself—you can add it to the list again at any time. Removing the PAM you are currently connected to is the same as logging off from that PAM.

Step 3 Click Close to apply changes.


Connecting to a Domain

Connecting to a domain gives you access only to data in the selected domain on the PAM, and only to PAC Toolsets and functions granted to your user ID for that domain.

When you open Cisco WAPMS, you automatically connect to the last PAM or domain to which you were connected. You can change your domain connection at any time.

Selecting a Different Domain


Step 1 Select Setup  >  Domain Selection.

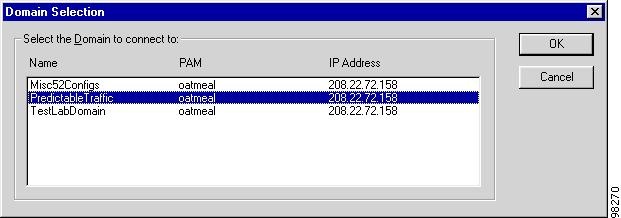
The Domain Selection window, shown in Figure 2-4, appears.

Figure 2-4 Domain Selection Window

Step 2 Select a domain, then click OK. Only the domains your user ID has access to are available (even when additional PAMs are in the PAM list).

When you connect to a domain on a PAM, all subsequent network information you configure is saved to that domain. You can then access any previously configured information in the domain and any previously collected statistical information. Other PACs that connect to the domain can access Information in the domain, barring access control limitations on specific users.


Using the Network Selector

Use the Network Selector to select the network element for which you want to perform tasks (see Figure 2-5). The Network Selector graphically displays your current network and elements (the network, sites, access lines, and circuits). The network is represented by the cloud and the circuit name is displayed below the cloud.

Figure 2-5 Network Selector—IP Circuit

The Network Selector appears at the bottom of the window in the Event Processor, Troubleshooting, and Traffic Capture Toolsets. It is not displayed in the Network Configuration, Conversations, or Planning and Reporting Toolset windows, although the Web Client Planning and Reporting Toolset allows you to select a network.

Your current selection determines which network and elements you view and act on in the current Toolset. As an exception, the Event Processor Toolset displays events for the entire domain; however, the Performance Monitoring function in the Event Processor monitors ASE events for only the selected domain.

When the current selection is a single-ended circuit (it has a near-end only) the Network Selector shows only the near-end information (site, access line, and VCs) to the left of the cloud. Figure 2-5 shows an end-to-end circuit configuration—a circuit with near-end (to the left of the cloud) and far-end (site, access line, and near and far end VCs) to the right of the cloud.

You can show or hide the Network Selector by choosing the View >  Network Selector menu option. When the Network Selector is hidden, select a network element from the Setup >Network Selection menu.

Selecting a Network


Step 1 Click anywhere on the Network Selector (or select Setup  >  Network Selection from the Menu bar). The Network Element Selection window, shown in Figure 2-6, appears.

Figure 2-6 Network Element Selection Window

Step 2 Choose the network, site, access line, and circuit to act on in the current Toolset. Your selection remains active until you change it using this window, even when you launch another Toolset.

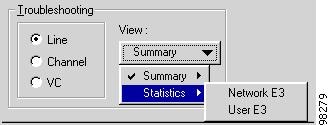
In the Troubleshooting group box, you can also select the view you want displayed the next time you open or refresh the Troubleshooting Toolset. (You can switch to another Troubleshooting view in the Troubleshooting Toolset later.)

a. Select whether to view Line, Channel, or circuit (IP Circuit for IP, PVC for Frame Relay, or VC for ATM) data.

b. Select the view type from the list in the View menu. Available view types are based on your choice in Step a. When you select Line and the ASE supports multiple interfaces, you can expand the list and select the physical interface to monitor in the Troubleshooting view.

Figure 2-7 Event Processor Window—First Time PAC Launch


Opening Toolsets

Use the Toolset Selector, shown in Figure 2-8, to quickly open a Toolset; click the appropriate Toolset button. The Toolset Selector appears at the top of the window in the Event Processor, Troubleshooting, and Traffic Capture Toolsets. It is not displayed in the Conversations or Planning and Reporting Toolset windows.

Figure 2-8 Toolset Selector


Note If no network element is selected, Toolset buttons and their equivalent menu options are unavailable. First choose a network element, then choose a Toolset.


You can show or hide the Toolset Selector by choosing View >  Toolset Selector. You can choose most Toolsets from the Toolset menu and the Network Configuration tool from the Setup menu. Some Toolsets also have Tool bars whose buttons execute Toolset-specific functions. These Tool bars are discussed in the relevant chapters.