Table Of Contents
Using the Conversations Analysis Toolset
Using the Toolset Selector or Toolset Menu
Using the Troubleshooting Menu (for ASEs with Circuit Talkers Capability)
Navigating the Conversations Window
Showing or Hiding the Conversations Tool Bar
Retrieving Conversation Pairs From the ASE
Viewing Conversations for an Individual Host
Viewing Conversations for an Individual Host
Displaying IP Addresses of Hosts
Redisplaying Resolved DNS Names
Switching the Ascending or Descending Order
Saving Conversations to Data Files
Opening a Conversations Data File
Maintaining Conversations Data Accuracy
Conversations
The Conversations Toolset helps you manage your network IP utilization and performance by displaying hosts responsible for heavy use of the network. You can also trace an IP conversation's associated Web site to determine if its use is for legitimate business purposes. Conversations is intended for use when the capture period is relatively short and you want to look at current or recent network utilization.
Topics in this chapter include:
•
"Using the Conversations Analysis Toolset"
•
•
•
Note
Using the Conversations Analysis Toolset
This section informs you about options for opening and navigating the Conversations tool.
Opening Conversations
Open Conversations from the Toolset Selector (or Toolset menu), or from a right-click pop up menu in the Troubleshooting Toolset.
When these options are unavailable, one of these conditions exists:
•
•
The current selection on the Network Selector—before opening the Conversations Toolset—establishes the perspective for the conversation pairs listed: a local host is on the near end of the ASE you are viewing, and a remote host is on the far end of the ASE. When a firewall is configured as an IP proxy, the firewall's address appears in place of the host address for the respective side.
Using the Toolset Selector or Toolset Menu
Step 1
Step 2
Note
Step 3
Using the Troubleshooting Menu (for ASEs with Circuit Talkers Capability)
Step 1
Step 2
The Conversations window is then displayed for an individual host, which typically shows the host's IP address rather than resolved name.
Step 3
Typically, you will want to display traffic conversations while Troubleshooting is displaying real-time data. When Troubleshooting is displaying history data, the top talker may no longer exist in the conversation pairs table. When this occurs, the Conversations main window appears, however, the host you selected does not appear in the window.
Navigating the Conversations Window
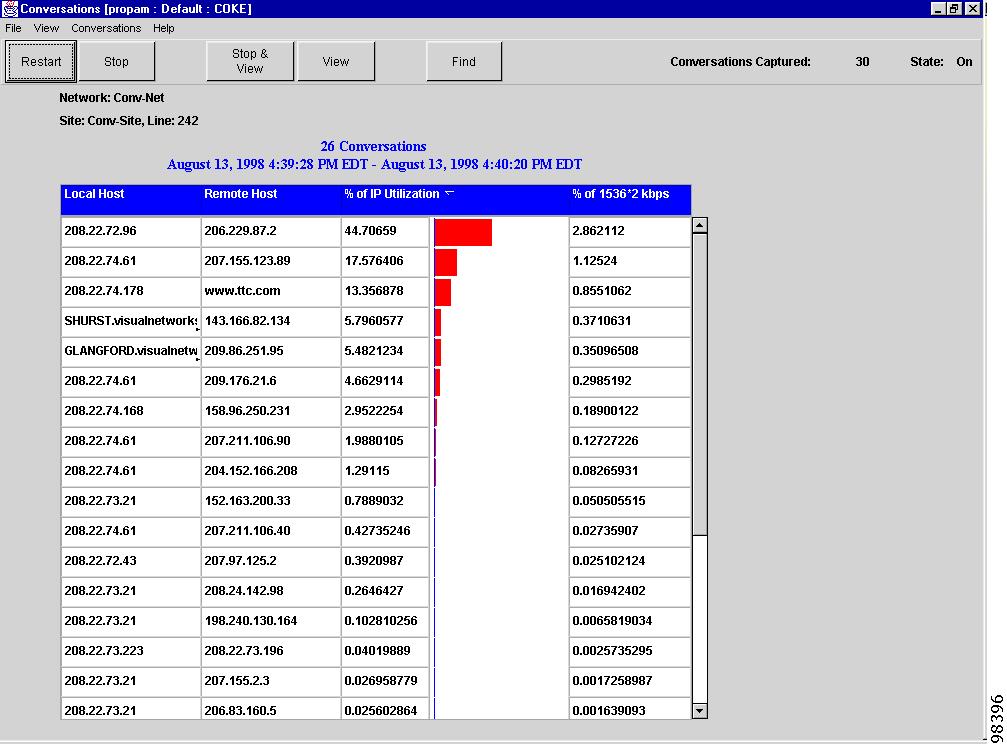
The Conversations Toolset displays IP conversations between pairs of local and remote hosts, showing the following data for each conversation pair:
•
•
•
Conversations data is available for all hosts engaged in an IP conversation during the capture period. You can drill down on an individual host to view all IP conversations the host participated in. When applicable, you can link to a host's Web site to examine its content.
Conversation pairs are displayed after you choose View, Stop and View, or File >Open menu options. The number of conversations and the time period during which the conversations were collected is displayed above the list of conversation pairs.
You can also check the conversations count displayed in the Conversations Captured field to ensure the ASE buffer is not full. See the "Maintaining Conversations Data Accuracy" section for detailed information.
You can also see whether the ASE is currently capturing conversations by checking if the State field is set to On or Off.
Figure 8-1 Conversations Main Window
Showing or Hiding the Conversations Tool Bar
From the Conversations Toolset, check or uncheck View > Conversations Toolbar.
Note
Viewing Conversation Pairs
Multi-protocol ASEs automatically capture IP conversation pairs continuously; you do not need to configure ASEs. When you initiate a request from the PAC to view conversation pairs, the Conversations Toolset takes a snapshot of the captured conversations that reside in the ASE.
You can view conversation pairs without interrupting the continuous capture, or stop the capture and then view the data. When you stop the capture, restart it after viewing the data. Otherwise, users on other PACs—or yourself at a later time—cannot see up-to-date conversation pairs.
Caution
The Conversations window shows the time period for the conversation pairs. The beginning time indicates the last time a PAC requested a Restart, or the last time the ASE was rebooted, whichever is most recent. The ending time is the last time the PAC requested a Stop, View, or Stop & View.
Retrieving Conversation Pairs From the ASE
Step 1
•
•
A Reading Progress window appears once you initiate a conversation capture.
Step 2
To read conversation pairs from a saved file rather than from the ASE, see the "Saving Conversations to Data Files" section.
Viewing Conversations for an Individual Host
From the main Conversations window, you can choose an individual host—either local or remote—to view all IP conversations in which the host has been engaged during the conversation capture time period.
Viewing Conversations for an Individual Host
Step 1
Figure 8-2 Conversations Window for an Individual Host
Step 2
Locating a Specific Host
From either the main Conversations window or the individual host window, you can search through the data table to determine if a specific host appears in a conversation pair.
Click Find, then enter part or all of either the resolved DNS name or the IP address of the host you are searching for.
Displaying IP Addresses of Hosts
By default, the Conversations window displays the resolved DNS names for the hosts, when they are available. You can display IP addresses instead.
Step 1
Step 2
Redisplaying Resolved DNS Names
Step 1
Step 2
Changing Sort Options
By default, Cisco WAPMS sorts conversation pairs by percentage of IP utilization in descending order in the Conversations main window. You can sort conversations by any other heading available in the data table. You also can sort in ascending order.
Sorting by Another Category
Choose Conversations > Sort by and choose a category. The window automatically refreshes. The ascending or descending order resets to the default, which is ascending for all categories except % IP Utilization.
Switching the Ascending or Descending Order
Choose the same sort criteria under Conversations > Sort by currently in use. The window automatically refreshes with the new order.
In the Conversations window for an individual host, the sort order remains as it was set from the main window.
Saving Conversations to Data Files
You can save conversations data as files in either COV (binary) or Comma Separated Variable (CSV) format. The COV format is the default because you can open COV files in the Conversations Toolset. CSV files can be opened in a spreadsheet application, such as MS Excel.
Step 1
Step 2
•
•
Step 3
Opening a Conversations Data File
Step 1
Step 2
Step 3
When the saved file was made from the Conversations window for an individual host, it appears in the Conversations main window using the main window's layout.
Viewing Host Sites
You can jump to any Web site identified in a conversation pair, either from the Conversations Toolset or the Troubleshooting Toolset.
Step 1
Step 2
Cisco WAPMS launches your Web browser and connects to the host site. An HTTP message informs you when the host address is not a valid Web site.
Maintaining Conversations Data Accuracy
It is important to stop and restart the conversations capture process after the conversations capture data is no longer useful.
Otherwise, the ASE buffer eventually becomes full, and the conversation pairs it displays become inaccurate. An ASE with a full buffer handles newly captured conversation pairs as follows:
•
•
•
Based on the amount of ASE memory, an ASE can capture between 1024 and 10,000 conversation pairs. (See Table 8-1). Knowing the amount of ASE memory, you can use the total number of conversations captured, as indicated on the Conversations Tool bar (see Figure 8-1), to determine when the ASE is approaching a full buffer.
To determine the amount of memory in a given ASE, use the ID command from the ASE's administrative port.
Table 8-1 ASE Capacity for Conversation Pairs
2MB
1024
4MB
2048
8MB
4096
16MB
7200
54MB
10000