Table Of Contents
Setting the SNMP Community Name
Scheduling Database Maintenance on the PAC
Daily and On-demand Maintenance
Setting Global Event Priorities
Assigning Priorities to Events
Collecting ASE Data on the PAC
Performing an ASE Inventory on the PAC
Updating ASE Software on the PAC
Domain Functions
This chapter explains the domain-wide management options available in the PAC from the Setup and File menus. Topics in this chapter include:
–
"Setting the SNMP Community Name"
–
–
Setting Domain Options
In the Domain Options window (Setup > Domain Options), you modify the ASE SNMP community name, database maintenance parameters, and the priority level of events on your network. (See Figure 10-1.)
Note
Figure 10-1 Domain Options Window
Use the ASE SNMP Community Name field to enter the SNMP community string name. Click the
Do Maintenance Now button to perform on-demand maintenance. Set event priorities by entering values in the desired Global Event Priorities fields.Setting the SNMP Community Name
The SNMP community name is configured for SNMP agents to limit access to the SNMP agent from other network devices. For the Cisco WAPMS PAC and PAM to communicate with ASEs, all components must have a matching community name. By default, the PAC, PAM, and ASEs are configured with the SNMP community name "private".
Caution
SNMP community naming rules are as follows:
•
•
•
Note
Scheduling Database Maintenance on the PAC
The database maintenance settings on the Domain Options window affect the short-term and long-term databases differently. For more information about the databases, see the "Network Performance Data in the Database" section.
Scheduling Maintenance
When scheduling or performing on-demand database maintenance, follow this sequence:
1.
2.
3.
4.
Caution
Daily and On-demand Maintenance
Daily and on-demand maintenance (Do Maintenance Now in the Domain Options window) affects both the short-term and long-term databases. The Remove deleted network elements option works with daily and on-demand maintenance, but affects only the long-term database.
Daily maintenance and on-demand maintenance both do the following:
1.
2.
3.
4.
To exercise this option, choose Remove deleted network elements from Planning and Reporting data. When you leave the option unselected, you can still run reports on obsolete network elements for historical purposes.
By default, daily maintenance automatically occurs daily at 2:00 A.M. This immediately follows the daily default ASE data collection time of 1:00 A.M. Coordinating these two tasks ensures the most current data is available for Planning and Reporting. When you change the daily maintenance time, you may need to change the ASE data collection time. (To change individual ASE data collection times, see the "ASE Data Collection Parameters" section.)
To perform on-demand maintenance, click Do Maintenance Now. Scheduled daily maintenance is not affected by on-demand maintenance.
Monthly Maintenance
Monthly maintenance trims the long-term database to the number of weeks indicated in the Keep <n> weeks option. It affects the long-term database only. (The default value for <n> is 52.)
Monthly maintenance automatically occurs on the same day every month (by default, on the first day of the month.) When you enter a value between 29 and 31, maintenance occurs on the last day of the month in months that contain fewer than the specified number of days. On the day scheduled, monthly maintenance immediately follows the time scheduled for daily maintenance.
Managing Database Space
Short-term and long-term database space allocation is set at the factory based on the anticipated number of ASEs in your network. Once Cisco WAPMS hardware and software is installed and configured, the PAM begins collecting data from ASEs and accumulating that data in the short-term and long-term databases.
In the PAM, the Status Monitor application indicates when the short-term or long-term database sizes approach the total allocated space. For more information on this, see the Cisco WAN Access Performance Management System System Administration Guide, 2.0.
The short-term database accumulates network data continually with each daily or on-demand ASE data collection. It can become too large when daily maintenance does not occur—for instance, if the PAM is down when daily maintenance is scheduled. To correct this, click Do Maintenance Now in the Domain Options window.
The long-term database accumulates network data continually with each daily or on-demand maintenance operation. It can become too large when:
•
•
•
Setting Global Event Priorities
In the Domain Options window (Setup > Domain Options), you can customize priorities assigned to state-change, SNMP Authentication, ASE Reboot, and Data Collection Poll Failure events. These priorities are applied to events reported by all ASEs in the current domain. ASEs always report ASE Reboot and Data Collection Poll Failure events.
Priorities help determine when and how an event appears in the Event Processor window. Once you assign priorities in the Domain Options window, use the Event Processor window to associate a color for each event in a priority range, and you can restrict the events displayed based on their priority range. (See the "Assigning Event Priorities to Colors" section and the "Restricting Events" section).
Assigning a priority to a state-change or SNMP Authentication event has an effect only when you have configured at least one ASE to report the event. You configure individual ASEs in Performance Monitoring (see the "Using Performance Monitoring" section). To configure multiple ASEs for performance monitoring events, you use the PAM Manager (see Chapter 4, "Managing ASEs Using PAM Manager," in the Cisco WAN Access Performance Management System System Administration Guide, 2.0).
Assigning Priorities to Events
Step 1
Step 2
The valid range is 1-255.
Figure 10-2 Global Event Priorities Window
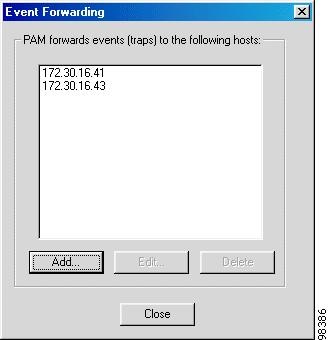
Event Forwarding
Use Event Forwarding (Setup > Event Forwarding) to forward all reported ASE events from the current domain on the PAM to designated workstations running third-party event managers, such as HP OpenView or IBM NetView. With domain-level event forwarding, events are decoded into a text string at the PAM and then forwarded from the PAM's IP address.
This domain-level option differs from ASE-level event forwarding you specify in Performance Monitoring. For more information on that feature, see the "Configuring Multiple Event Destinations" section.
Forwarding Events per Domain
Step 1
The Event Forwarding window appears, as shown in Figure 10-3.
Figure 10-3 Event Forwarding Window
Step 2
•
•
•
Step 3
Managing ASEs
Use the ASE Inventory, Update ASE Software, Collect Data Now, and Identify ASEs options in the File menu to manage groups of ASEs in a domain. These same options are also available from the PAM Manager. See Chapter 4, "Managing ASEs Using PAM Manager," in the Cisco WAN Access Performance Management System System Administration Guide, 2.0.
Collecting ASE Data on the PAC
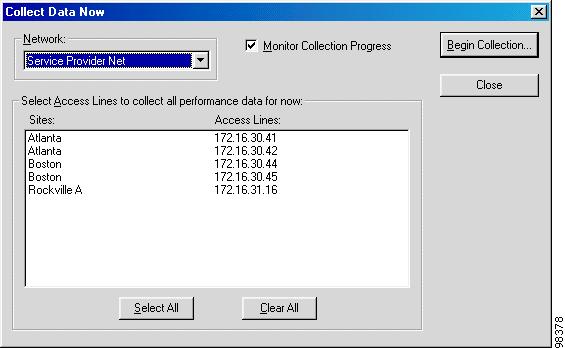
You can configure multiple ASEs to forward data on demand to the short-term network performance database. On-demand data collection does not affect scheduled data collection, which is set per ASE through Network Configuration and defaults to daily at 1:00 A.M.
Note
Step 1
The Collect Data Now window, shown in Figure 10-4, appears.
Figure 10-4 Collect Data Now Window
Step 2
To choose all displayed access lines, click Select All. To clear all access lines, click Clear All.
Step 3
Step 4
Performing an ASE Inventory on the PAC
When you perform an inventory of ASEs configured in the network database, information about the ASEs is drawn from the network database and the ASEs themselves. Use this feature to quickly check the number, location, and connectivity status of ASEs in a particular network, or to quickly access information required when contacting your vendor's technical support. (See Figure 10-5.)
You can also perform ASE inventory from the PAM. For information about this, see Chapter 4, "Managing ASEs Using PAM Manager," in the Cisco WAN Access Performance Management System System Administration Guide, 2.0.
Figure 10-5 ASE Inventory Window
Step 1
Step 2
Table 10-1 describes the information available for each ASE.
Step 3
You can update the software of any ASE in the list by right-clicking anywhere on the line of information displayed for the ASE. (See the "Updating a Single ASE" section.)
Updating ASE Software on the PAC
You can update the software version for groups of ASEs at one time from the PAC using Update ASE Software (File > Update ASE Software). This function loads the specified version of ASE software onto selected ASEs. Typically, you choose the latest version available for the overall Cisco WAPMS release. See Table 10-2 for supported updates.
When updating ASE software versions, the following rules apply:
•
Note
•
•
•
Before updating ASEs, also keep in mind the following cautions:
Caution
Caution
Once you have updated ASE software, it is strongly recommended you identify the updated ASEs using the Identify ASE function. (See the "Identifying ASEs" section.)
You can update software for an individual ASE using the Network Configuration tool. (See the "Configuring Upper Layer Analysis" section.) You can also update individual or multiple ASEs from the PAM. For information about this, see the Cisco WAN Access Performance Management System System Administration Guide, 2.0.
Updating Multiple ASEs
In the Update ASE Software window (File > Update ASE Software), you have options for updating a number of ASEs simultaneously, either automatically or by manually prompting each ASE model type or individual ASE.
Before updating multiple ASEs, see the rules and cautionary notes in the "Updating ASE Software on the PAC" section.
Figure 10-6 Update ASE Software Window
Step 1
The Update ASE Software window appears (Figure 10-6). When this option is unavailable, your user ID does not have permission to update ASE software. Contact your PAM administrator.
Step 2
Step 3
•
•
•
The particular ASEs affected by your choice here are determined later (in Step 5).
Step 4
Step 5
Step 6
A message appears.
Caution
Step 7
•
•
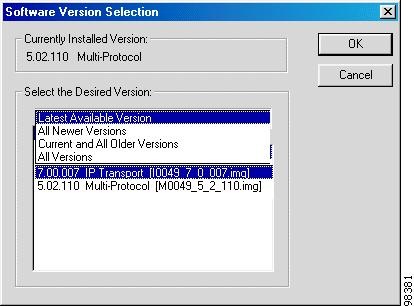
Figure 10-7 Software Version Selection Window
Step 8
•
Note
•
•
•
Step 9
Step 10
You are notified of the update status. To exit the window without updating the selected ASEs, click Cancel.
Step 11
When you are updating ASEs to a software version that requires PAM-based licenses, the Update ASE Software - PAM-based License Required window, shown in Figure 10-8, displays these ASEs.
Figure 10-8 Update ASE Software - PAM-based License Required Window
Caution
Step 12
A confirmation message appears.
Step 13
A new Update ASE Software Status window displays the status of each updated ASE. When the update is complete, click Close.
Step 14
See the "Identifying ASEs" section.
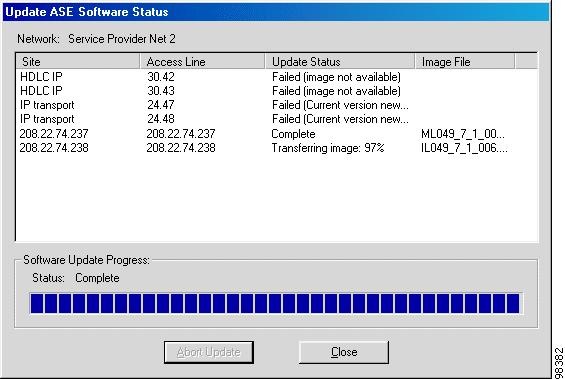
Viewing ASE Update Status
The Update ASE Software Status window appears during the ASE update process, showing the progress of the update. ASEs are listed as the update is attempted. The window shows the site, access line, update status, and ASE software image file for successful updates. (See Figure 10-9.) See Table 10-3 for a description of update status conditions.
Figure 10-9 Update ASE Software Status Window
Updating a Single ASE
Before updating an ASE, see the rules and cautionary notes in the "Updating ASE Software on the PAC" section.
Step 1
Step 2
Step 3
Step 4
When this option is unavailable, your user ID does not have permission to update ASE software (contact your PAM administrator) or when the ASE is a partner device, it does not support software updating from Cisco WAPMS.
Step 5
Step 6
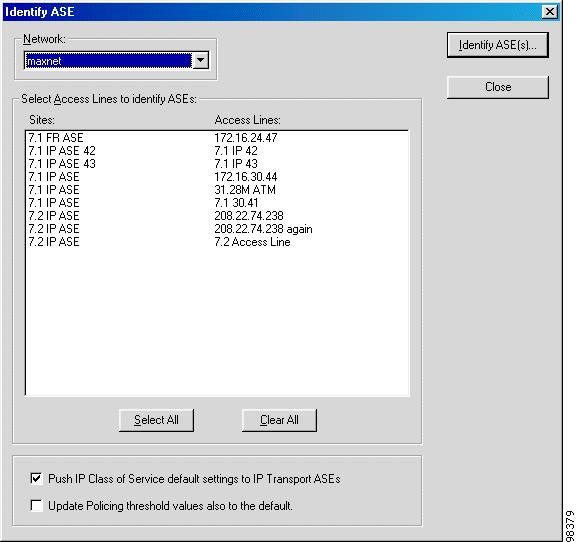
Identifying ASEs
Once you have updated ASE software, the ASE's settings may be inconsistent with the database. For example, when an individual ASE is configured on more than one access line (such as in different networks), updating the ASE software on one access line through Network Configuration causes the ASE configuration to become inconsistent with the other access lines.
The Identify ASE window also has options for IP Transport ASEs. You can send uniform default class of service (CoS) settings as specified in PAM Administration to all IP Transport ASEs in the domain. You can also choose Update Policing threshold values also to the default, only when you want uniform policing threshold values for all IP Transport ASEs.
To synchronize these settings, identify any new and updated ASEs to the PAC using the Identify ASE tool (File > Identify ASEs).
Note
Step 1
Step 2
The Identify ASE window, shown in Figure 10-10, appears.
Figure 10-10 Identify ASE Window
Step 3
Step 4
Use the Select All or Clear All buttons to quickly choose all ASEs or to clear your selection.
Step 5
Choose Update Policing threshold values also to the default, only when you want uniform policing threshold values for all IP Transport ASEs.
Step 6
A status window indicates the progress of the update. Click Close when completed.
Step 7