The Cisco CMX Detect and Locate Service

Overview of the Detect and Locate Service

The Cisco Connected Mobile Experiences (Cisco CMX) DETECT & LOCATE service enables you to view and track devices in your deployment.

Using the DETECT & LOCATE service, you can either view all the access points (APs) deployed in all the buildings of a campus or view the APs deployed on the individual floors of each building. You can also locate Wi-Fi tags, Wi-Fi interferers, and Bluetooth low energy (BLE) Tags.

Viewing or Tracking Devices

Procedure


Step 1

Log in to Cisco Connected Mobile Experiences (Cisco CMX).

Step 2

Click DETECT & LOCATE.

Step 3

Using the left pane of the Activity Map window, navigate to the desired building and floor.

The Activity Map window displays a list of icons to the right.
Figure 1. Activity Map Window
Step 4

Choose any combination of the following icons to customize your view of the devices:

  • Clients—Click the Clients icon to show or hide all the client devices (connected and detected) that are being tracked by your Cisco CMX. Client devices are displayed either as red dots (probing clients) or green dots (connected clients). Clicking on connected clients show the AP that the client is associated with (blue lines) and the APs that are participating in the location calculation (red lines), and while clicking on a probing of unassociated client displays the APs that are being used to detect the clients (red lines).

    Note 

    The maximum number of clients (connected and detected) that can be displayed at a given time is 2000. If this limit is exceeded, only connected clients are displayed, again up to a maximum of 2000 (see the figure below). However, if the number of total connected clients also exceeds 2000, no clients are displayed. In such a scenario, we recommend that you use the Analytics service to view the client information.

  • Heatmap—Click the Heatmap icon to show or hide areas with varying concentrations of client devices. Areas with a high concentration of client devices are marked bright red, as shown in this figure.

  • Zones—Click the Zones icon to show or hide the zones on a specific floor.

  • Access Points—Click the Access Points icon to show or hide all the APs that have been deployed on a specific floor. APs are displayed as circular objects, with a number in the center. This number indicates the number of clients connected to that specific AP. Inactive access points (red circle with a hyphen) are also detected.

    Cisco CMX shares Access Points grouping information to Cisco WLC every time when a NMSP connection is established. To get a list of APs connected to the Cisco WLC, Cisco CMX performs a SNMP get action on the Cisco WLC. Based on the list of APs recived from the Cisco WLC and the APs on the map, identify the subset of APs and prepare a grouping request to send to the controller. You can store the AP grouping information on the datastore.

    Note 
    • In Cisco CMX Release 10.2.1, when you select an access point icon from a floor map displayed on the Activity Map window, the Access Point information area includes Angles information.

    • Clicking an AP shows the clients connected to it (blue lines), the probing clients that are detected by the AP (red lines), and additional information such as height, orientation, and X,Y location of the AP.

    • If you have a Cisco Hyperlocation module that is attached to the back of your Cisco Aironet 3700 and 3600 Series APs, you can track the location of customers, visitors, or assets to about one meter in an ideal environment. Currently, the Hyperlocation solution works for the associated clients only.

  • Interferers—Click the Interferers icon to show or hide all the RF interferers that have been detected by the wireless network, and their zone of impact.

    Note 
    In Cisco CMX release 10.4, the BLE Beacons management page is no longer available on the Cisco CMX user interface. Beacon notifications are no longer provided. BLE beacons detected by Cisco CleanAir are displayed on Cisco CMX as interferers. BLE-related information is no longer available on the apidocs file.
  • Rogue APs—Click the Rogue APs icon to show or hide the rogue access points. Rogue access points are those access points that are not part of the Cisco CMX infrastructure access points and not managed by Cisco CMX. They are classified as Unclassified, Malicious, Friendly, and Custom and indicated by different colors on the Activity Map.

  • Rogue Clients—Click the Rogue Clients icon to show or hide rogue clients. Rogue clients are clients connected to rogue access points.

    Note 

    To track rogue access points and clients, enable the tracking parameters Rogue Access Points and Rogue Clients in the Network Location Service window under the System tab. For more information, see Setting Device Tracking Parameters.

  • BLE Tags—Click the BLE Tags icon to show or hide BLE-transmitting devices that have been detected by the wireless network.

    Note 

    A beacon is detected as an interferer. A common problem faced in the context of beacons is tracking not being enabled. In such a scenario, you can modify the tracking configurations using the System service. For more information, see the Viewing or Tracking Devices.

    Click Beacons to view the beacon attributes related to the selected beacon profile.

    • If the beacon is chirping with iBeacon profile, Cisco CMX displays the properties such as UUID, Major and Minor number.

    • If the beacon is chirping with Eddystone-UID profile, Cisco CMX displays the properties such as Namespace and Instance-Id.

    • If the beacon is chirping with Eddystone-URL profile, Cisco CMX displays the HTTP resource URL being broadcasted by that beacon.

  • Tags—Click the Tags icon to show or hide Wi-Fi tags. The vendor specific information related to the tags are displayed in raw format.

  • Filters—Click the Filters icon to filter the display of devices based on parameters such as Connection Status, Manufacturer, and Service Set Identifier (SSID).

  • Inclusion & Exclusion Regions—Click the Inclusion & Exclusion Regions icon to view the inclusion and exclusion regions on a floor. The inclusion and exclusion regions are created in Cisco Prime Infrastructure. In Cisco CMX, you can view these regions, but you cannot modify them. The inclusion regions are shown in green, and the exclusion regions are shown in gray.

  • Thick Walls—Click the Thick Walls icon to view any thick walls that have been created on prime infrastructure and included on the floor. Thick wall improves location by modeling areas of high RF signal attenuation with more accuracy.

  • GPS Markers—Click the GPS Markers to view any GPS markers that are placed on the floor. When at least three GPS markers are placed on a floor, the system can use these to provide GPS co-ordinates, in additional to X, and Y co-ordinates in client location API requests.


Viewing Device Details

Procedure


Step 1

Log in to Cisco Connected Mobile Experiences (Cisco CMX).

Step 2

Click DETECT & LOCATE .

Step 3

Using the left pane of the Activity Map window, navigate to the desired building and floor.

The Activity Map window displays a list of icons to the right.

Step 4

Click the corresponding icon to show the desired devices, for example, client devices, APs, beacons, and so on.

Step 5

Click the corresponding device on the map.

A pane displaying details of the device, such as MAC address, IP address, status, and so on is displayed.


Customizing Client Refresh Rates

The DETECT & LOCATE service enables you to configure the refresh rate for clients’ position on a floor map. The refresh interval can be used to configure how frequently a client’s positions will be polled to determine their positions. The default refresh rate is five seconds. The refresh rate gets automatically reset when you navigate to another tab or log in again. The client refresh rates are temporary and is not stored in the CMX.

Procedure


Step 1

Log in to Cisco Connected Mobile Experiences (Cisco CMX) either as an admin user or a user with Location role.

Step 2

Click DETECT & LOCATE .

Step 3

Using the left pane of the Activity Map window, navigate to the desired building and floor.

The Activity Map window displays a list of icons to the right.

Step 4

Click the Gear icon to configure the client refresh rate.

A pane indicating the client refresh intervals is displayed.
Step 5

Use the + or - icon to increase or decrease the client refresh rates. The refresh rates are in seconds. The range is one to 30 seconds.

Step 6

Click OK .

The client, represented by dots on the map, will be refreshed with the new configured rate.


Customizing Device Views Using Filters

Procedure


Step 1

Log in to Cisco Connected Mobile Experiences (Cisco CMX) either as an admin user or a user with Location role.

Step 2

Click DETECT & LOCATE .

Step 3

Using the left pane of the Activity Map window, navigate to the desired building and floor.

The Activity Map window displays a list of icons to the right.

Step 4

Click the corresponding icon to show the desired devices, for example, client devices, APs, beacons, and so on. The more icons you click, the more filtering options are enabled.


Adding and Deleting Filters

Procedure


Step 1

Log in to Cisco Connected Mobile Experiences (Cisco CMX).

Step 2

Click DETECT & LOCATE .

Step 3

Using the left pane of the Activity Map window, navigate to the desired building and floor.

The Activity Map window displays a list of icons to the right.

Step 4

Click the corresponding icon to show the desired devices, for example, client devices, APs, beacons, and so on. The more icons you click, the more filtering options are enabled.

Step 5

Click the Filter icon.

Step 6

In the Filters dialog box that is displayed, you can add or remove client filters based on the following parameters:

  • Connection Status —Unassociated or Connected

  • Device Manufacturer Type —Name of the device manufacturer, for example, Apple, Samsung, and so on

  • SSID —Device’s SSID


Searching for a Device

Procedure


Step 1

Log in to Cisco Connected Mobile Experiences (Cisco CMX).

Step 2

Click DETECT & LOCATE .

Step 3

Using the left pane of the Activity Map window, navigate to the desired building and floor.

Step 4

In the Search field of the Activity Map window, enter any of the following parameters to search for or filter a desired device:

  • MAC Address—Enter the corresponding client’s MAC address in lowercase, colon delimited, for example, 00:a0:22:bc:e2:00.

  • Device IP Address—Enter the client’s IPv4 or IPv6 address in dotted format, for example, 10.22.12.212.

  • SSID—Enter the client’s SSID in free-form text.

  • Device Manufacturer—Enter specific manufacturer names, for example, Apple, Samsung, and so on in free-form text.

  • Username—Enter the client's username in free-form text.

Note 

When performing a device search based on MAC address, if a device is not located on the specific floor that you are on, a dialog box is displayed that shows the floor in which the specific device is currently on. In addition, you can search based on MAC address for a specific date.


Client Playback

The Client Playback feature enables you to locate and track the movement of clients in a venue. You can track the activity of one client at a time.

Procedure


Step 1

Log in to Cisco Connected Mobile Experiences (Cisco CMX).

Step 2

Click DETECT & LOCATE .

Step 3

Using the left pane of the Activity Map window, navigate to the desired building and floor.

Step 4

Search the client you want to track using the its MAC ID.

For more information about how to search client devices, see Searching for a Device.

Step 5

Click the Client Movement History Playback icon.

The Client Playback (see the image below) pane is displayed .

Step 6

Click the Play icon to start client playback.

You can also change the date in order to view the playback on a specific date, by clicking the Calendar icon. You can increase the speed of the playback by clicking the 2x button.

Enabling Hyperlocation and FastLocate in Cisco CMX

The Cisco Hyperlocation solution is a suite of technologies that enables advanced location capabilities through a mix of software and hardware innovations. Cisco CMX Release 10.2.1 supports the Angle of Arrival (AoA) technology available on Cisco Aironet 3600 and 3700 access points with a Hyperlocation module and a Hyperlocation antenna. Cisco CMX uses advanced location algorithms to extract phase differences to accurately locate associated wireless clients up to one meter accuracy in an optimal deployment.

The Cisco Hyperlocation module with advanced security also integrates Bluetooth Low Energy (BLE) beacons with the module. Customers can take advantage of BLE beacon deployment powered over Ethernet and centrally managed from the convenience of a data center. This eliminates the need for local IT engineers to perform an inspection walk of BLE beacon health, using an app on their Smart devices. Cisco Hyperlocation brings virtual BLE beacon technology so that a single Hyperlocation module appears as five different BLE beacons to consumer applications.

Cisco CMX FastLocate technology enables quick location refresh for connected Wi-Fi clients. RSSI from data packets and probe frames, when available, are used for calculating a location. This technology is available with both centrally switched WLANs and FlexConnect (locally switched WLANs). Cisco Aironet 700, 1700, 2600, 2700, 3600, and 3700 APs support Cisco CMX FastLocate when used with Cisco WLC Release 8.1.123.0 or later.

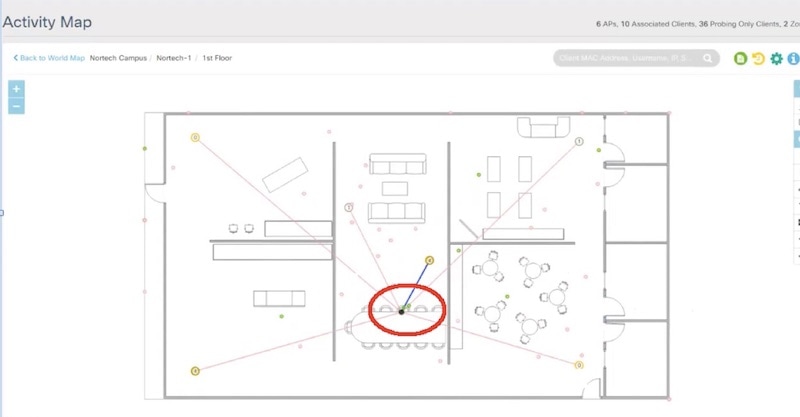
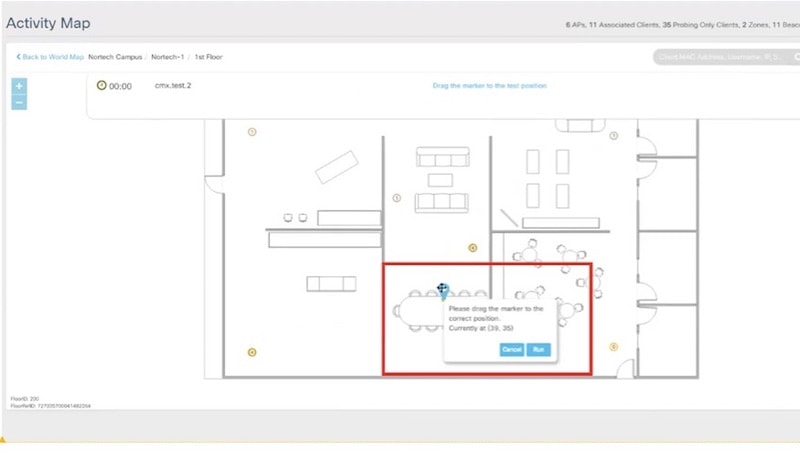
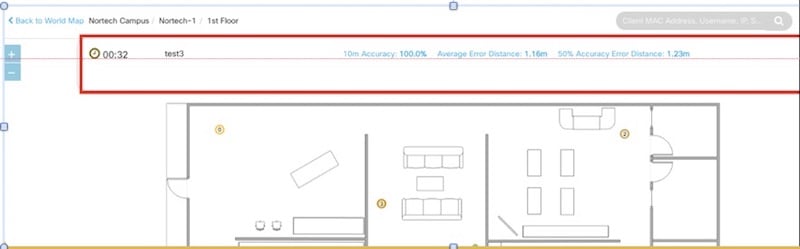
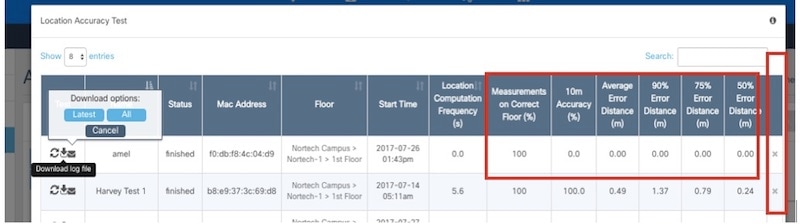
Accuracy results for the Cisco FastLocate feature are reflected in the Cisco CMX Accuracy Tool under the 50% and 75% Error Distance columns. Accuracy is considered good if the distance displayed under those columns is 10 meters or less, meaning the client will be detected less than 10 meters from its actual position. For information about configuring Cisco FastLocate, see “FastLocate for Cisco Wave 2 Access Points” section in the Cisco Wireless Controller Configuration Guide, Release 8.6 at:

https://www.cisco.com/c/en/us/td/docs/wireless/controller/8-6/config-guide/b_cg86/location_services.html#ID2048


Note

  • The above result is only valid for smart devices.

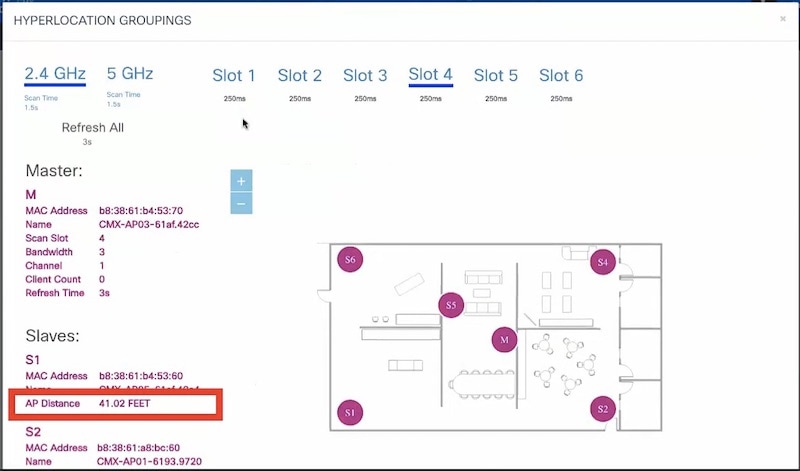
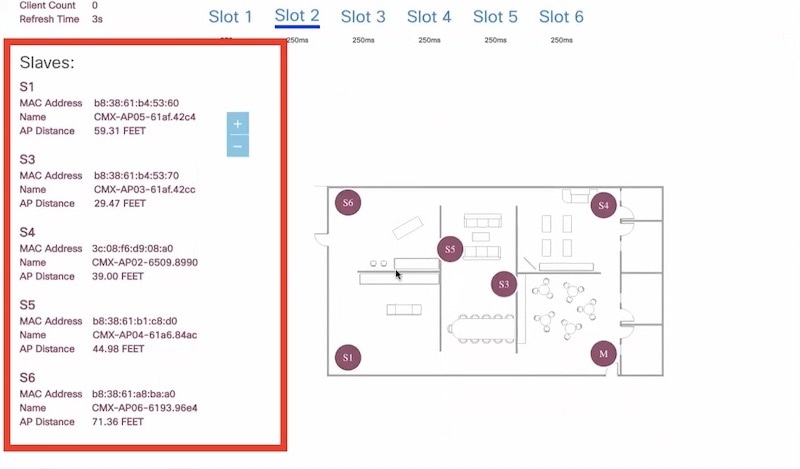
  • We recommend that you have all the APs in the same group on a particular floor. If you cannot have APs in the same group, then plan to include nearby APs in the same group. All AP groups available on the same floor must be synchronized to the same NTP server.

  • Ensure that you disable the global Hyperlocation option and enable Hyperlocation option speific for AP group. We recommend that you do not set the XOR radio to monitor mode manually. When you enable Hyperlocation in the AP group, the XOR radio settings are taken care by default.


The following are the recommended AP modes:

  • Enhanced Local Mode—APs scan opportunistically on-current channel and off-channel with up to ~15 percent performance impact to data-serving radios.

  • Monitor Mode—APs scan on 2.4 and 5 GHz bands.

  • Modular Mode—Cisco 3600 and 3700 APs with Hyperlocation Module or Wireless Security Module (WSM) scan on 2.4 and 5 GHz bands with no impact to data-serving radios.


Note

  • The FastLocate and Hyperlocation features are supported in Cisco CMX 10.2.1 and later.

  • In Cisco CMX Release 10.4, FastLocate feature is supported on Cisco Aironet 2800/3800 access points running Cisco Release 8.6 or later.

  • In Cisco CMX Release 10.3.1, the Hyperlocation feature supports 10,000 tracked devices—1000 Cisco access points (APs) with up to 10 connected clients per AP—on Cisco 3365 Mobility Services Engine (MSE) and Cisco high-end MSE Virtual Appliances (v MSE) running Cisco CMX Release 10.3.1 and later.

  • The Hyperlocation and FastLocate features are supported in Cisco WLC 8.1.123.0 and later.

  • Currently, a Hyperlocation-enabled Cisco WLC can support only one Hyperlocation-enabled Cisco CMX.

  • The Hyperlocation feature is not supported on a virtual Cisco WLC.
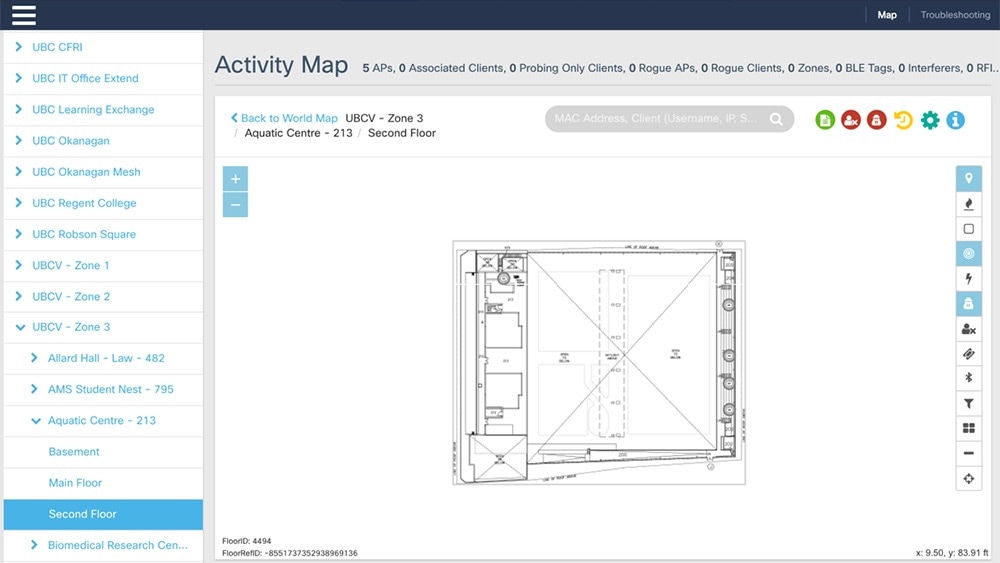

Procedure


Step 1

Log in to Cisco Connected Mobile Experiences (Cisco CMX).

Step 2

Choose SYSTEM > Dashboard .

Step 3

Click the Gear icon at the top-right corner of the window.

The SETTINGS window is displayed.
Step 4

Click the Location Setup tab.

Step 5

In the Location Calculation Parameters window, check the Enable Hyperlocation / FastLocate/ BLE Management check box.

Step 6

Add Cisco WLC to Cisco CMX.

Note 

If hyperlocation is enabled and one controller is in active status, and no data is received for almost 15 minutes an alert is generated with the following description "Hyperlocation is enabled on CMX, however no AOA data is received". The alert service type is Hyperlocation and alert type is Service_Status.

As a work around, maintain a one to one mapping between controller and Cisco CMX. Only one controller can serve one Cisco CMX box with hyperlocation enabled. If two hyperlocation enabled Cisco CMX boxes are using the same controller, disable hyperlocation service in one of the Cisco CMX box.


Hyperlocation Mixed Mode Support

Cisco CMX Release 10.4 now supports a mixed deployment of Cisco Hyperlocation access points (AP) and non-Hyperlocation AP on the same floor map. If the client is associted to a regular access point but has a hyperlocation enabled access point near by, AoA computation is performed to provide an an acceptable accuracy. All Cisco Hyperlocation APs must be within a contiguous area. Increased accuracy on the floor is only within the convex hull of the Hyperlocation contiguous are

Hyperlocation groups are formed consisting both hyperlocation and regular access points. The floor mode is decided when generating the hyperlocation group. There following are the three supported modes:

  • RSSI mode-All access points on the floor are regular APs.

  • Mixed mode: Few APs on the floor are Halo APs.


    Note

    Use the cmxctl config hyperlocation mixmode Floor ID command to enable hyperlocation mixed mode.

    We recommend that you use this command in a deployment senario where there are both Hyperlocation enabled APs and non Hyperlocation APs on the same floor map. The improved location accuracy that comes from the use of Hyperlocation AP will occur within the convex hull of the Hyperlocation APs. Outside of this convex standard location accuracy results will occur. At the edges of the convex hull there may also be lower accuracy then when clients are at least 10M inside of the convex hull. This command does not support the interspersion of Hyperlocation AP with non Hyperlocation AP. If this is type of deployment is used, then there will be no improvement in location over standard probe RSSI based location.

    An example of an supported deployment is as follows:


  • Halo mode: All APs on the floor are Halo APs.

Running Hyperlocation Diagnostics

Hyperlocation Diagnostics is a tool that can find common issues in a Hyperlocation deployment.

Hyperlocation Diagnostics executes a set of tests to verify any common issues with Hyperlocation. These tests are executed against an existing Hyperlocation setup on a floor. The floor should have clients associated to Hyperlocation access points to validate complete functionality.

Procedure


Step 1

Log in to Cisco Connected Mobile Experiences (Cisco CMX) either as an admin user or a user with Location role.

Step 2

Choose DETECT & LOCATE > Troubleshooting.

The Hyperlocation Diagnostics window is displayed. As this is a floor-level test, select a building and floor. Note that only floors with hyperlocation access points are populated here.

Step 3

(Optional) Add the details and credentials of a controller and an access point for a more detailed report.

Step 4

Click Run Diagnostics and wait for a few minutes.

  1. Click the Troubleshooting guide for a detailed description of each test.

Step 5

Observe a sample test result. The Test Type indicates which deployment component is being tested, and it can be CMX, WLC, or AP.

Step 6

If a test has failed, click Fix Issue for instructions on how to resolve the issue.

Step 7

Expand a passed test result to see further details of the test.

Step 8

If the Check AoA messages increasing for access points test has failed, expand the test.

This may happen if there aren’t clients to communicate with the access point, and hence the message count does not increase.

  1. Expand the test for a further look, and ensure that there is a significant difference for the first and second reading for access points that are connected to clients.


If you haven’t provided the optional controller and access point details, the corresponding tests will not be executed, and the result is marked INDETERMINATE for your reference.

Configure Hyperlocation Groupings

The Hyperlocation deployment calculates location in the following manner. During the time period of a slot, the respective master emits bar packets. Bar responses are sent by client devices in the vicinity. The slaves access point listen to these response packets. The master and slaves then use the collected information to calculate the location of a client, as a collective activity. This process is repeated, with the master and slaves of the next slot. If a floor is too large, there maybe more than one masters. The master and slaves form groups, and a floor may have more than one such group.
Procedure

Step 1

Open the CMX Dashboard, Detect and Locate>Troubleshooting. As this is a floor-level test, select a building and floor. Note that only floors with hyperlocation access points are populated here.

Step 2

Click View Hyperlocation Groupings to configure a different master for a slot.

Note 
You can observe that each slot has an allocated time which is listed below the slot. There are also two frequency bands, 2.4 and 5 GHz, each with scan times. Scan time is the total time allocated to scan every slot of a band at least once. Since there are two such bands, 2.4 and 5 GHz, the total Refresh time is the sum of these two, and is the time taken to scan all slots of all bands.
Step 3

Click a frequency band, and select a slot. You can observe the master access point for the site marked by M, and the slaves marked by S. You can also change the master to a more appropriate one in this page.

Step 4

Observe details of the master access point of a slot, like bandwidth, channel and client count.

Step 5

Observe the distance of a slave AP from the respective master.

Step 6

Observe that each slot has an allocated time which is listed below the slot. There are also two frequency bands, 2.4 and 5 GHz, each with scan times. Scan time is the total time allocated to scan every slot of a band at least once. Since there are two such bands, 2.4 and 5 GHz, the total Refresh time is the sum of these two, and is the time taken to scan all slots of all bands.


Controlling the Probing Client Expiry Time

Probing clients count is usually more visible on CMX than compared to Wireless LAN Controller (WLC). WLC tracks the clients until the client no longer probes for more than five minutes, whereas CMX maintains the probing client for 10 minutes.

Connected Clients do not have this behavior because, WLC notifies CMX when the clients are disconnected from the network. You can perform additional configuration changes on CMX, if you want to minimize the probing client count on CMX.


Caution

We do not recommend to set the value less than five minutes because some clients may not sent probe and in that case CMX will lose such clients. This configuration change could also increase the Analytics service processing time.


Procedure


Step 1

Log in to Cisco Connected Mobile Experiences (Cisco CMX).

Step 2

Click DETECT & LOCATE.

Step 3

Choose SYSTEM > Settings > Filtering.

Step 4

Specify the RSSI Cutoff value as -75.

Note 

Setting the RSSI cutoff to -75 affects the probing clients only. This allows Cisco CMX to filter out weak probing clients in the initial stage.

Step 5

Navigate to /opt/cmx/etc/ and open the node.conf file.

Step 6

To set the expiry time, at the end of the Location Services section, add user_options=-Dredis_ttl=5.

Note 

Cisco CMX maintains the default age out for clients as 10 minutes and when the client leaves the network, CMX usually takes 10 to 15 minutes to clean up the stale client details. If you set the age out to five minutes, Cisco CMX will perform the clean up in five to 10 minutes. Together, the RSSI cutoff and age-out settings, help Cisco CMX to narrow down the probing client count with respect to the WLC count.

Step 7

To restart the CMX agent, run the command cmxctl agent restart .

Step 8

To restart the Location Services, run the command cmxctl location restart .


Measuring Client Location Accuracy Using the Location Accuracy Test

From Cisco CMX 10.2, you can perform a location accuracy test for a single device with multiple location points. You can use the Location Accuracy Test tool to validate the placement and number of access points to ensure that the CMX deployment is giving the best location accuracy experience. The Location Accuracy tool provides an administrator the ability to quantify the location accuracy for a specific location by using a Wi-FI device to measure the difference between the actual and calculated location of a device

To run a location accuracy test, perform the following task:

Procedure


Step 1

Log in to Cisco Connected Mobile Experiences (Cisco CMX).

Step 2

Click DETECT & LOCATE .

Step 3

Using the left pane of the Activity Map window, navigate to the desired building and floor.

Step 4

Use the search option on the Activity Map window to search for a device, for example, Client, RFID Tag, or BLE Tag. In this task, we will choose a client.

Step 5

Click the corresponding connected client, indicated by a green dot.

The Client dialog box is displayed.

Step 6

Click the LOCATION ACCURACY TEST icon to start the location accuracy test.

Step 7

In the Enter a test name text box, type a name for the location accuracy test, and then press the Enter .

A dialog box, asking you to place the marker at the client device's actual position on the map, is displayed.

Step 8

Drag the marker to the correct position.

Step 9

Click Run .

Observe the increasing samples. This indicates the number of times the client is detected at the pin-pointed location. You can run the test for any required amount of time. The elapsed time of the test is displayed.
Step 10

Refresh your client frequently so that it exchanges information with the access points around it.

Step 11

Click Pause when you finish testing of the current location.

You can move your device to another location and continue testing (repeat Step 8 through Step 10). Wait for 30 seconds before resuming the test at a new spot, to eliminate any movement related discrepancies in the test result. Try to collect at least twenty samples at each spot, running the test at a spot for around five minutes.
Step 12

After you complete testing all the location points, click Finished? View Result to fetch the test results.

A dialog box, showing 10 m accuracy and Average Error Distance is displayed.

Step 13

Click View accuracy test report icon on the top-right corner of the window to view the list of accuracy tests that you performed. This report enables you to restart a test, download the latest log or all logs, or email the test results.

The Location Accuracy Test window is displayed with the test details such as test name, status, MAC address, floor, start time, location computation frequency, measurements on correct floor (in percentage), accuracy and error distance. Click Export All to export the test results as CSV files.

Note 

Even when the test is in progress, you can click View accuracy test report to monitor all the tests. You can pause a running test by clicking Pause. You can continue a paused test by clicking Relaunch. To finish the test and get the results, click the Report icon.

To remove a report from the test report table, click Delete.

The Location Accuracy Test window is displayed. You can view all the previous test results in this window, not restricted to the selected floor, but includes all test runs. You also can download the log files, email the test results, and delete the tests.
Step 14

Analyze the test results.


What to do next

You can also perform the Location Accuracy Test using the Cisco CMX mobile application. The Cisco CMX mobile application complements the Cisco CMX product by providing a set of monitoring and testing tools for CMX deployments. The application enables users to monitor the status of CMX, monitor the number of devices being tracked, receive alerts, test the location accuracy of the deployment, and test the latency of location updates. For more information, see https://blogs.cisco.com/wireless/introducing-the-cisco-cmx-mobile-app-for-deployment-administrators.

Analyzing Location Accuracy Results

Observe the test results in the figure below.

The test results displayed indicate that for 100% of the time, Cisco CMX locates the client within this many meters from where the client is actually located.

It also indicates that for 50% of the time, Cisco CMX locates the client within this many meters from where the client is actually located. A good location accuracy test result for an RSSI deployment is 10 meters, and 4 to 5 meters for FastLocate.

Observe the complete location-accuracy test below:

Ensure that Measurements on Correct Floor should be at 100%. This is an indicator of whether the client has been detected by the access points on the same floor, and not on a different floor. You can delete the test and the corresponding log files using the cross buttons here.

Understanding Client Diagnostics

Client diagnostics is a way to understand whether the tested client is sending messages to Cisco CMX for location-accuracy calculations.You can view Client Diagnostics during the location accuracy test.

Below is a sample test report.

It is best to ensure that all the tests here are in Passed status.

You can also email a summary of the messages to your Technical Support department for troubleshooting. Given below are some of the outputs of individual tests.

Figure 2. Sample Output: Check Client History
Figure 3. Sample Output: Check Heatmaps are generated
Figure 4. Sample Output: Reasons for location failure

Analyzing Location Accuracy Log Files

This task analyzes the Location Accuracy log files stored in /opt/cmx/srv/location/accuracy.

Procedure


Step 1

Telnet into the CMX box and navigate to the /opt/cmx/srv/location/accuracy directory where location accuracy results are stored by default.

Step 2

Navigate to the folder named after your test.

Step 3

Navigate into the logs folder, where the log files are stored.

Step 4

Use the grep command to find entries with COMPUTE in this log file.

cat <filename>.log.temp | grep COMPUTE

The following is a sample output that is displayed. You can see new entries added to the log file, while the location-accuracy test is performed. Activate your device to see the addition of fresh entries.


Location Accuracy for Hyperlocation Deployments

You can also run Location accuracy tests to test the efficiency of your hyperlocation deployment. Run the test from the Map Tab of Detect and Locate. Here are some points that will help improve the test results.

  • As samples are collected every 3-5 seconds, set the refresh rate of the dashboard to five minutes before running the test.

  • A good location accuracy result for a hyperlocation deployment has an Average Error Distance of around one meter.

  • Convex hull is the perimeter formed by drawing lines connecting 3 or more APs in a AP group. Ensure that a test client is within the convex hull of an AP group.

  • Do not choose a client that is in a spot between AP groups, our outside the convex hull of AP groups.

  • You can use the Location Accuracy test to calculate latency in a Hyperlocation deployment. This is especially useful if you would like to know when clients visit your store in order to send personnel to greet them. You can find the latency by moving a test client, and observing how many seconds it takes for your Cisco CMX location accuracy dashboard to update itself with the new client location. Usually, it takes around 2-3 seconds to update its location. Ideally, latency should not be more than 5 seconds for a hyperlocation deployment.